二、线性结构
2.1 数组Array
常见api:
push()unshift()shift()pop()concat()reverse()sort()join()indexOf()splice(index,num)splice(index,num,val)
2.2 栈Stack
2.2.1 认识栈结构
- 栈也是一种非常常见的数据结构,并且在程序中的应用非常广泛
- 数组
- 我们知道数组是一种线性结构,并且可以在数组的任意位置插入和删除数据
- 但是有时候,我们为了实现某些功能,必须对这种任意性加以限制
- 而栈和队列就是比较常见的受限的线性结构
- 栈(stack),它是一种受限的线性表,后进先出(LIFO:last in first out)
- 其限制是仅允许在表的一端进行插入和删除运算。这一端被称为栈顶,另一端称为栈底。
- LIFO表示就是后进入的元素,第一个弹出栈空间。
- 向一个栈插入新元素又称作进栈、入栈或压栈,它是把新元素放到栈顶元素的上面,使之成为新的栈顶元素。
- 从一个栈删除元素又称作出栈或退栈,它是把栈顶元素删除掉,使其相邻的元素成为新的栈顶元素。
- 生活中类似栈的
- 收到的邮件
- 自助餐的餐盘
- 程序中的栈结构
- 函数调用栈
- A( B( C( D() ) ) ):即A函数中调用B,B调用C,C调用D
- 函数调用栈
在A执行的过程中,A会被压入栈;随后B执行时,B被压入栈;C、D执行时也依次被压入栈 .
所以当前栈的顺序为:A(栈底)->B->C->D(栈顶).
当函数D执行完后,会弹出栈被释放,弹出栈的顺序为:D->C->B->A .
- 递归
为什么没有停止条件的递归会导致栈溢出?
比如函数A为递归函数,不断的调用自己(因为函数还没有执行完,不会函数弹出栈),不停的把相同的的函数A压入栈,最后造成栈溢出(Stack Overfloat)
- 练习,有6个元素6,5,4,3,2,1按顺序进栈,问下列哪个不是合法的出栈顺序?
- A:5 4 3 6 1 2
- B:4 5 3 2 1 6
- C:3 4 6 5 2 1
- D:2 3 4 1 5 6
正确答案:C
A:6 5进栈,5出栈,4进栈出栈,3进栈出栈,6出栈,2 1进栈,1 2出栈
B:6 5 4 进栈,4 5出栈,3进栈出栈,2进栈出栈,1进栈出栈,6出栈
D:6 5 4 3 2进栈,2 3 4出栈,1进栈出栈,5 6出栈
2.2.2 栈结构封装
基于数组实现
//封装栈类
function Stack(){
  //栈中的属性
  this.items = []
  //栈的相关操作
  //1.将元素压入栈
  //this.push = function(){
  //}
  Stack.prototype.push = (element) => {
    this.items.push(element)
  }
  //2.从栈中取出元素
  Stack.prototype.pop = () => {
    return this.items.pop()
  }
  //3.查看栈顶元素
  Stack.prototype.peek = () => {
    return this.items[this.items.length - 1]
  }
  //4.判断栈是否为空
  Stack.prototype.isEmpty = () => {
    return this.items.length == 0
  }
  //5.获取栈中元素的个数
  Stack.prototype.Size = () => {
    return this.items.length
  }
  //6.toString方法
  Stack.prototype.toString = () => {
    return this.items.join('')
  }
}
//栈的使用
let s = new Stack()
s.push(4)
s.puhs(18)
s.push(6)
s.push(17)
s.pop()
s.peek()
s.Size()
s.isEmpty()
s.toString()
基于链表实现
2.2.3 栈常见的操作
push(element):添加一个元素到栈顶位置pop():移除栈顶的元素,同时返回被移除的元素peek():返回栈顶的元素,不对栈做任何修改isEmpty():若为空,则返回true;否则,返回falsesize():返回栈里的元素个数toString():将栈的内容以字符形式返回
2.2.4 栈结构的简单封装
利用栈结构的特点封装十进制转二进制的函数
//函数:将十进制转为二进制
function dec2bin(decNumber) {
  let stack = new Stack()
  while(decNumber > 0){
    stack.push(decNumber % 2)
    decNumber = Math.floor(decNumber / 2)
  }
  let binaryStr = ''
  while(!stack.isEmpty()){
    binaryStr += stack.pop()
  }
  return binaryStr
}
2.3 队列Queue
2.3.1 认识队列
- 队列(Queue),它是一种受限的线性表,先进先出 (FIFO: First In First Out )
- 受限之处在于它只允许在表的前端(front)进行删除操作
- 在表的后端(rear)进行插入操作
- 生活中类似的队列结构
- 排队买票,买饭,上厕所
- 优先排队的人,优先处理
2.3.2 队列的应用
打印队列:计算机打印多个文件时,需要排队打印
线程队列:当开启多线程时,若新开启的线程,所需要的资源不足时,就先放入线程队列,等待CPU处理
2.3.3 队列类的实现
队列类的实现和栈一样,有两种方案:
基于数组实现
//封装队列类
function Queue() {
  //属性
  this.items = []
  //方法
  //1.enqueue
  Queue.prototype.enqueue = (element) => {
    this.items.push(element)
  }
  //2.dequeue
  Queue.prototype.dequeue = () => {
    return this.items.shift()
  }
  //3.front
  Queue.prototype.front = () => {
    return this.items[0]
  }
  //4.isEmpty
  Queue.prototype.isEmpty = () => {
    return this.items.length === 0
  }
  //5.size
  Queue.prototype.size = () => {
    return this.items.length
  }
  //6.toString
  Queue.prototype.toString = () => {
    return this.items.join('')
  }
}
let queue = new Queue()
queue.enqueue(4);
queue.enqueue(18);
queue.enqueue(6);
queue.enqueue(17);
queue.dequeue();
queue.front();
queue.isEmpty();
queue.size();
queue.toString();
基于链表实现
2.3.4 队列常见的操作
enqueue(element):向队列尾部添加一个(或多个)新的项.dequeue():移除队列的第一(即排在队列最前面的)项,并返回被移除的元素.front():返回队列中的一个元素(最先被添加,也将是最先被移除的元素),队列不做任何变动(不移除元素,只返回元素信息,与Stack的peek()方法类似).isEmpty():若队列为空,返回true,否则,返回false.size():返回队列包含的元素个数.toString():将队列中的内容,转为字符串形式.
2.3.5 队列的应用
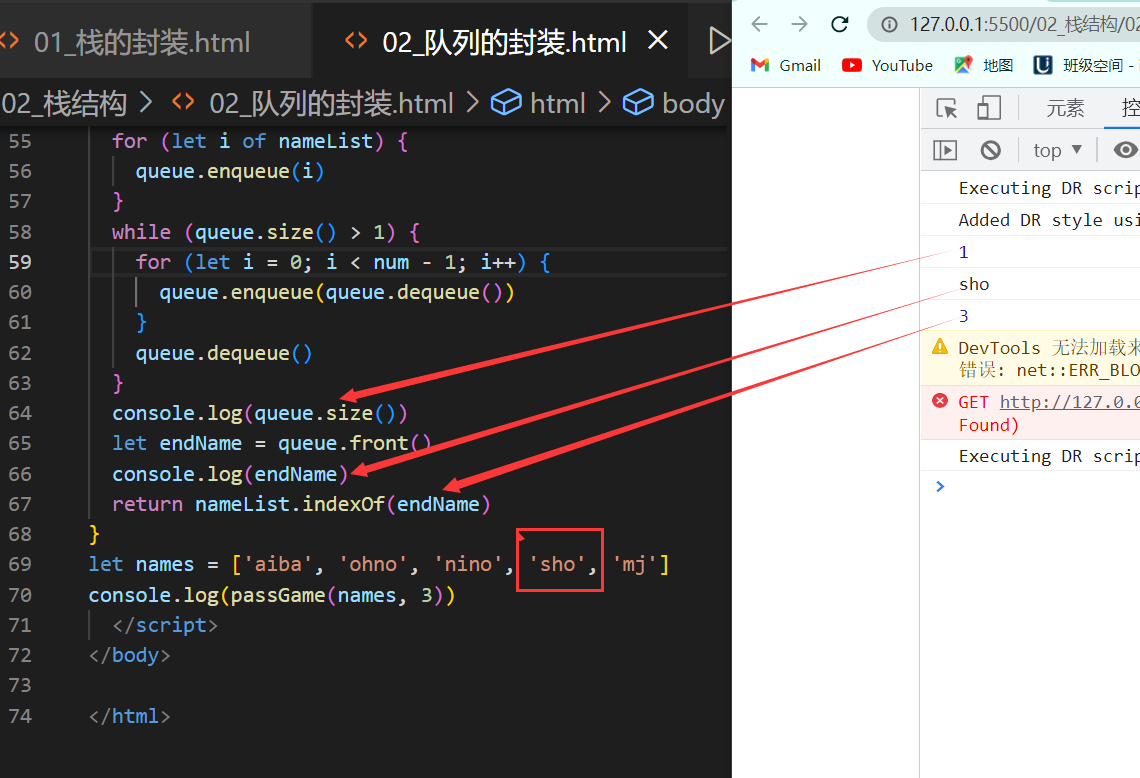
使用队列实现小游戏:击鼓传花,传入一组数据和设定的的数字num,循环遍历数组内元素,遍历到的元素为制定数字num时将该元素删除,直至数组剩下一个元素。
(从第一个人开始,按顺序数1,2,3----num,数到num的那个人淘汰,从被淘汰的下一个人再开始按顺序数1,2,3—num,以此类推,求最后剩下的那个人的名字,及在数组中的位置下标)
代码实现:
let passGame = (nameList, num) => {
  let queue = new Queue()
  for (let i of nameList) {
    queue.enqueue(i)
  }
  while (queue.size() > 1) {
    for (let i = 0; i < num-1; i++) {
      queue.enqueue(queue.dequeue())
    }
    queue.dequeue()
  }
  console.log(queue.size())
  let endName = queue.front()
  console.log(endName)
  return nameList.indexOf(endName)
}
let names = ['aiba', 'ohno', 'nino', 'sho', 'mj']
console.log(passGame(names, 3))
结果展示
2.3.6 优先队列
优先队列主要考虑的问题为:
- 每个元素不再只是一个数据,还包含数据的优先级
- 在添加数据过程中,根据优先级放入到正确位置
2.3.6.1 优先级队列的实现
代码实现:
//封装优先级队列
function PriorityQueue() {
  //内部类,在类里面再封装一个类,表示带优先级的数据
  function QueueElement(element, priority) {
    this.element = element
    this.priority = priority
  }
  //封装属性
  this.items = []
  //1.实现按照优先级插入方法
  PriorityQueue.prototype.enqueue = (element, priority) => {
    let queueElement = new QueueElement(element, priority)
    if (this.items.length === 0) {
      this.items.push(queueElement)
    } else {
      let added = false
      for (let i of this.items) {
        if (queueElement.priority < i.priority) {
          this.items.splice(i, 0, queueElement)
          added = true
          break
        }
      }
      if (!added) {
        this.items.push(queueElement)
      }
    }
  }
  //2.dequeue:删除队列前端的元素
  PriorityQueue.prototype.dequeue = () => {
    return this.items.shift()
  }
  //3.front:查看前端的元素
  PriorityQueue.prototype.front = () => {
    return this.items[0]
  }
  //4:isEmpty:查看队列元素是否为空
  PriorityQueue.prototype.isEmpty = () => {
    return this.items.legth === 0
  }
  //5.size:查看队列中元素的个数
  PriorityQueue.prototype.size = () => {
    return this.items.length
  }
  //6.toString:以字符串形式输出队列中的元素
  PriorityQueue.prototype.toString = () => {
    let resultString = ''
    for (let i of this.items) {
      resultString += i.element + '-' + i.priority + ''
    }
    return resultString
  }
}
//测试代码
let pq = new PriorityQueue()
pq.enqueue('nino', 617)
pq.enqueue('ren', 418)
pq.enqueue('money', 999)
console.log(pq)
测试结果

2.3.6.2 注意点
- 关于数组splice方法
splice(1,0,'nino'):表示在索引为1的位置,删除0个元素,插入一个"nino"元素splice(1,1,'nino'):表示在索引为1的位置,删除1个元素,插入一个"nino"元素
- 数组的push方法在数组、栈和队列中的表现形式
- 数组:在数组[0,1,2]中,执行push(3),结果为[0,1,2,3]
- 栈:stack.push()方法,执行push(0),push(1),push(2),其数组的顺序为[0,1,2],但是索引为2的元素其实是栈顶元素;所以栈的push方法是向栈顶添加元素(但在数组的视角下,为向数组尾部添加元素)
- 队列:queue.enqueue()方法,其实是由数组的push()方法实现,相当于在数组头部增加元素
2.4 单向链表Linked List
2.4.1 单向链表的优势
- 要存储多个元素,另外一个选择就是链表
- 但不同于数组,链表中的元素在内存中不必是连续的空间
- 链表的每个元素由一个存储元素本身的节点和一个指向下一个元素的引用(指针)组成
- 相对于数组,链表有一些优点:
- 内存空间不必是连续的,可以充分利用计算机的内存,实现灵活的内存动态管理
- 链表不必在创建时就确定大小,并且大小可以无限的延伸下去
- 链表在插入和删除数据时,时间复杂度可以达到O(1),相对数组效率高很多
- 相对于数组,链表有一些_缺点_:
- 链表访问任何一个位置的元素时,都需要从头开始访问(无法跳过第一个元素访问任何一个元素)
- 无法通过下标直接访问元素,需要从头一个个访问,直到找到对应的元素
2.4.2 单向链表的结构

- head属性指向链表的第一个节点
- 链表的最后一个节点指向null
- 当链表中一个节点也没有的时候,head直接指向null
2.4.3 链表中的常见操作
append(element):向链表尾部添加一个新的项insert(position,element):向链表的特定位置插入一个新的项get(position):获取对应位置的元素indexOf(element):返回元素在链表中的索引,若没有该元素则返回-1update(position,element):修改某个位置的元素removeAt(positin):从链表的特定位置移除一项remove(element):从链表中移除一项isEmpty():若链表无任何元素,则返回true,否则返回falsesize():返回链表包含的元素个数toString():由于链表使用了Node类,就需要重写继承自JS对象默认的tosString方法,让其只输出元素的值
2.4.5 封装单向链表类
- 创建单项列表类
代码实现:
function LinkedList() {
  //Node类的封装
  function Node(data){
    this.data = data
    this.next =  null
  }
  //属性
  //属性head指向链表的第一个值
  this.head = null
  this.length = 0
}
- append(element)
- 代码实现:
LinkedList.prototype.append = (data) => {
  let newNode  =new Node(data)
  //添加新节点
  //情况一:链表中没有节点时
  if(this.length === 0){
    this.head = newNode
  }
  //情况二:链表中有节点时
  else {
    //
    let current = this.head
    //只要某个节点的next不为空,就一直向后找,相当于找到最后一个节点,因为最后一个节点的next为null
    //节点的next永远指向下一个节点(data,next)
    while(current.next){
      current = current.next
    }
    //让最后一个节点的next指向新添加的节点(data,next)
    current.next = newNode
  }
  this.length += 1
}
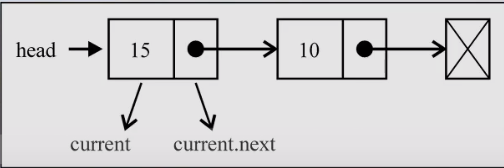
- 过程详解:
首先让current指向第一个节点:

通过while循环使current指向最后一个节点,最后通过current.next = newNode,让最后一个节点指向新节点newNode
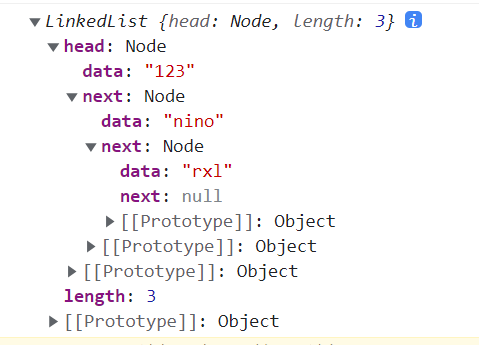
- 测试代码:
let linkedlist = new LinkedList()
linkedlist.append('123')
linkedlist.append('nino')
linkedlist.append('rxl')
console.log(linkedlist)
- 测试结果:
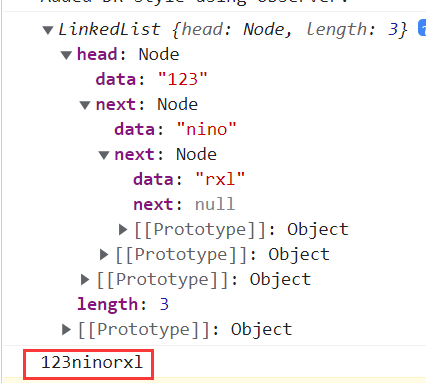
- toString()
代码实现:
LinkedList.prototype.toString = () => {
  let current = this.head
  let listStr = ''
  while(current){
    listStr += current.data + ''
    current = current.next
  }
  return listStr
}
测试结果:
- insert(position,element)
代码实现:
LinkedList.prototype.insert = (position,data) => {
//理解position的含义:
//position=0:表示新节点插入后要成为第一个节点
//position=2:表示新节点插入后要成为第三个节点
  //对position进行越界判断:要求传入的position不能是负数且不能超过linkedlist的length
  if(position < 0 || position > this.length){
    return false
  }
  let newNode = new Node(data)
  //情况1:position=0
  if(position === 0){
    //让新节点指向当前列表的第一个节点
    newNode.next = this.head
    //让head指向新节点,成为新的第一个节点
    this.head = newNode
  }
  //情况2:position>0 && position<this.length
  else {
    let index = 0
    let previous = null
    let current = this.head
    //通过while循环,使current指向当前索引为position的节点
    while(index++ < position){
      previous = current
      current = current.next
    }
    newNode.next = current
    previous.next = newNode
  }
  //
  this.length += 1
  return true
}
过程详解:
insert方法实现的过程中,根据插入节点位置的不同可分为多个情况:
- 情况1:position = 0
通过newNode.next = this.head,建立连接1
通过this.head = newNode,建立连接2
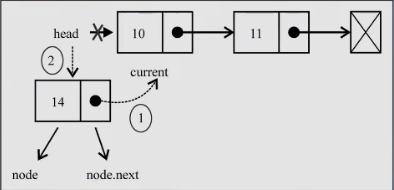
- 情况2:position = 0
首先定义两个变量previous和current分别指向需要插入位置pos=x的前一个节点和后一个节点
然后,通过newNode.next=current,改变指向1
最后,通过previous.next=newNode,改变指向2
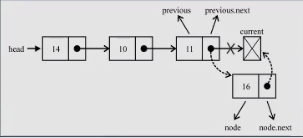
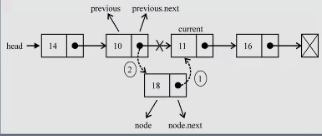
测试代码:
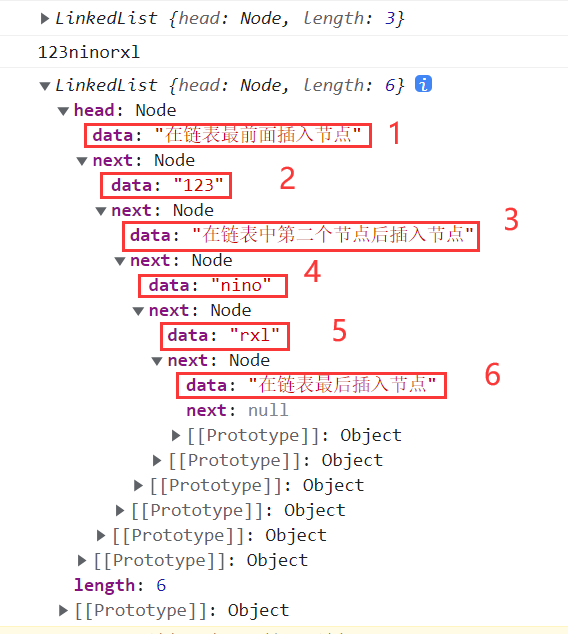
linkedlist.insert(0,"在链表最前面插入节点")
linkedlist.insert(2,"在链表中第二个节点后插入节点")
linkedlist.insert(5,"在链表最后插入节点")
console.log(linkedlist)
测试结果:
- get(position)
代码实现:
LinkedList.prototype.get = (position) => {
  //
  if(position < 0 || position > this.length){
    return null
  }
  let current = this.head
  let index = 0
  while(index++ < position){
    current = current.next
  }
    return current.data
}
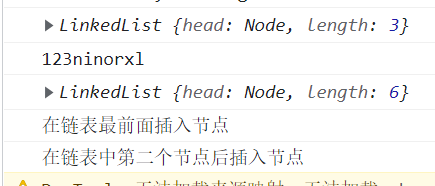
测试代码:
console.log(linkedlist.get(0))
console.log(linkedlist.get(2))
测试结果:
- indexOf(element)
代码实现:
LinkedList.prototype.indexOf = data => {
  let current = this.head
  let index = 0
  while(current){
    if(current.data === data){
      return index
    }
    current = current.next
    index += 1
  }
  return -1
}
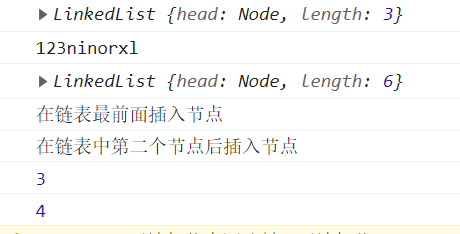
测试代码:
console.log(linkedlist.indexOf("nino"))
console.log(linkedlist.indexOf("rxl"))
测试结果:
- update(position,element)
代码实现:
LinkedList.prototype.update = (position,newData) => {
  if(position <0 || position > this.length){
    return false
  }
  let current = this.head
  let index = 0
  while(index++ < position){
    current = curretn.next
  }
  current.data = newData
  return true
}
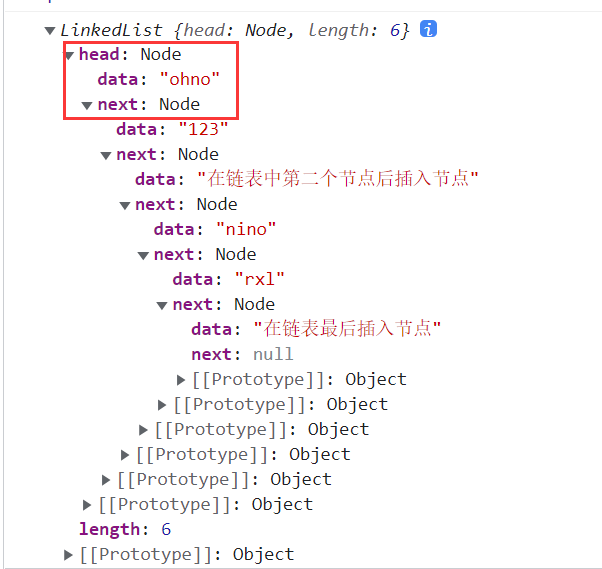
测试代码:
linkedlist.update(0,"ohno")
console.log(linkedlist)
测试结果:
- removeAt(position)
代码实现:
//7、removeAt(position)
LinkedList.prototype.removeAt = (position) => {
  if (position < 0 || position > this.length) {
    return null
  }
  let current = this.head
  if (position == 0) {
    this.head = this.head.next
  }
  else {
    let index = 0
    let previous = null
    while (index++ < position) {
      previous = current
      current = current.next
    }
    previous.next = current.next
  }
  this.length -= 1
  return current.data
}
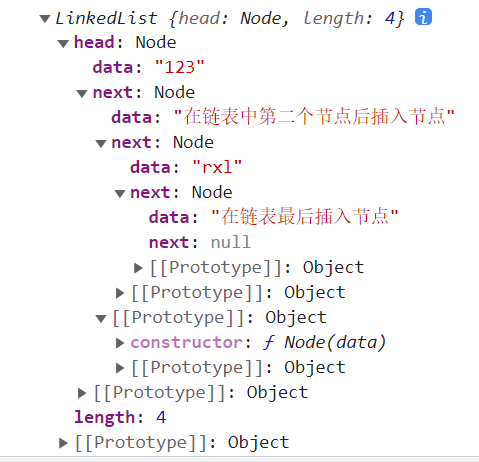
测试代码:
linkedlist.removeAt(0)
linkedlist.removeAt(2)
console.log(linkedlist)
测试结果:
- 其他方法
其他方法包括:remove()、isEmpty()、size()
代码实现:
//8、remove(element)
LinkedList.prototype.remove = (data) => {
  let position = this.indexOf(data)
  return this.removeAt(position)
}
//9、isEmpty()
LinkedList.prototype.isEmpty = () => {
  return this.length === 0
}
//10、size()
LinkedList.prototype.size = () => {
  return this.length
}
测试代码:
linkedlist.remove("123")
console.log(linkedlist)
console.log(linkedlist.isEmpty())
console.log(linkedlist.size())
测试结果:

2.4.6 完整实现
//封装链表类
function LinkedList() {
  //封装一个内部类,节点类
  function Node(data) {
    this.data = data
    this.next = null
  }
  //属性
  //属性head指向链表的第一个节点
  this.head = null
  this.length = 0
  //1、append(element)
  LinkedList.prototype.append = (data) => {
    let newNode = new Node(data)
    //添加新节点
    //情况一:链表中没有节点时
    if (this.length === 0) {
      this.head = newNode
    }
    //情况二:链表中有节点时
    else {
      //
      let current = this.head
      //只要某个节点的next不为空,就一直向后找,相当于找到最后一个节点,因为最后一个节点的next为null
      //节点的next永远指向下一个节点(data,next)
      while (current.next) {
        current = current.next
      }
      //让最后一个节点的next指向新添加的节点(data,next)
      current.next = newNode
    }
    this.length += 1
  }
  //2、toString()
  LinkedList.prototype.toString = () => {
    let current = this.head
    let listStr = ''
    while (current) {
      listStr += current.data + ''
      current = current.next
    }
    return listStr
  }
  //3、insert(position,element)
  LinkedList.prototype.insert = (position, data) => {
    //理解position的含义:
    //position=0:表示新节点插入后要成为第一个节点
    //position=2:表示新节点插入后要成为第三个节点
    //对position进行越界判断:要求传入的position不能是负数且不能超过linkedlist的length
    if (position < 0 || position > this.length) {
      return false
    }
    let newNode = new Node(data)
    //情况1:position=0
    if (position === 0) {
      //让新节点指向当前列表的第一个节点
      newNode.next = this.head
      //让head指向新节点,成为新的第一个节点
      this.head = newNode
    }
    //情况2:position>0 && position<this.length
    else {
      let index = 0
      let previous = null
      let current = this.head
      //通过while循环,使current指向当前索引为position的节点
      while (index++ < position) {
        previous = current
        current = current.next
      }
      newNode.next = current
      previous.next = newNode
    }
    //
    this.length += 1
    return true
  }
  //4、get(position)
  LinkedList.prototype.get = (position) => {
    //
    if (position < 0 || position > this.length) {
      return null
    }
    let current = this.head
    let index = 0
    while (index++ < position) {
      current = current.next
    }
    return current.data
  }
  //5、indexOf(element)
  LinkedList.prototype.indexOf = data => {
    let current = this.head
    let index = 0
    while (current) {
      if (current.data === data) {
        return index
      }
      current = current.next
      index += 1
    }
    return -1
  }
  //6、update(position,element)
  LinkedList.prototype.update = (position, newData) => {
    if (position < 0 || position > this.length) {
      return false
    }
    let current = this.head
    let index = 0
    while (index++ < position) {
      current = curretn.next
    }
    current.data = newData
    return true
  }
  //7、removeAt(position)
  LinkedList.prototype.removeAt = (position) => {
    if (position < 0 || position > this.length) {
      return null
    }
    let current = this.head
    if (position == 0) {
      this.head = this.head.next
    }
    else {
      let index = 0
      let previous = null
      while (index++ < position) {
        previous = current
        current = current.next
      }
      previous.next = current.next
    }
    this.length -= 1
    return current.data
  }
  //8、remove(element)
  LinkedList.prototype.remove = (data) => {
    let position = this.indexOf(data)
    return this.removeAt(position)
  }
  //9、isEmpty()
  LinkedList.prototype.isEmpty = () => {
    return this.length === 0
  }
  //10、size()
  LinkedList.prototype.size = () => {
    return this.length
  }
}
let linkedlist = new LinkedList()
linkedlist.append('123')
linkedlist.append('nino')
linkedlist.append('rxl')
console.log(linkedlist)
console.log(linkedlist.toString())
linkedlist.insert(0, "在链表最前面插入节点")
linkedlist.insert(2, "在链表中第二个节点后插入节点")
linkedlist.insert(5, "在链表最后插入节点")
console.log(linkedlist)
console.log(linkedlist.get(0))
console.log(linkedlist.get(2))
console.log(linkedlist.indexOf("nino"))
console.log(linkedlist.indexOf("rxl"))
linkedlist.update(0, "ohno")
console.log(linkedlist)
linkedlist.removeAt(0)
linkedlist.removeAt(2)
console.log(linkedlist)
linkedlist.remove("123")
console.log(linkedlist)
console.log(linkedlist.isEmpty())
console.log(linkedlist.size(2))
2.5 双向链表Linked List
2.5.1 双向链表简介
- 既可以从头遍历到尾,又可以从尾遍历到头。
- 也就是说链表相连的过程是双向的。
- 其实现原理是:一个节点既有向前连接的引用,也有一个向后连接的引用。
- 双向链表可以有效的解决单向链表中提到的问题。
2.5.2 双向链表的缺点
- 每次在插入或删除某个节点时,需要处理四个引用,而不是两个,也就是实现起来要困难一些
- 相对于单向链表,所占内存空间更大一些
- 但是,相对于双向链表的便利性而言,这些缺点微不足道
2.5.3 双向链表的结构

特点:
- 双向链表不仅有head指针指向第一个节点,而且有tail指针指向最后一个节点
- 每个节点有三部分组成:item储存数据,prev指向前一个节点,next指向后一个节点
- 双向链表的一个节点的prev指向null
- 双向链表的最后一个节点的next指向null
2.5.4 双向链表常见的操作
append(element):向链表尾部添加一个新的项inset(position,element):向链表的特定位置插入一个新的项get(element):获取对应位置的元素indexOf(element):返回元素在链表中的索引,若无则返回-1update(position,element):修改某个位置的元素removeAt(position):从链表的特定位置移除一项remove(element):从列表中移除一项isEmpty():如果链表中不含任何元素,返回true,否则返回falsesize():返回链表中元素个数toString():让其输出元素的值forwardString():返回正向遍历节点字符串形式backwordString():返回反向遍历的节点字符串形式
2.5.5 封装双向链表类
0.创建双向链表类
//封装双向链表类
function DoublyLinkedList(){
//封装内部类,节点类
  function Node(data){
    this.data = data
    this.prev = null
    this.next = null
  }
//属性
  this.head = null
  this.tail = null
  this.length = 0
}
- append(element)
- 代码实现:
DoublyLinkedList.prototype.append = data => {
  let newNode = new Node(data)
  if(this.length === 0){
    this.tail = newNode
    this.head = newNode
  }
  else{
    newNode.prev = this.tail
    this.tail.next = newNode
    this.tail = newNode
  }
  this.length += 1
}
- 过程详解:
添加节点时分为多个情况:
-
情况1:添加的是第一个节点:只需要让head和tail都指向新节点即可
-
情况2:链表中已经存在数据
- 首先tail中的next之前指向的是null. 现在应该指向新的节点newNode: this.tail.next = newNode
- 因为是双向链表, 新节点的next/tail目前都是null. 但是作为最后一个节点, 需要有一个指向前一个节点的引用. 所以这里我们需要newNode.prev = this.tail
- 因为目前newNod已经变成了最后的节点, 所以this.tail属性的引用应该指向最后: this.tail = newNode即可
-
测试代码:
let list = new DoublyLinkedList()
list.append('aaa')
list.append('bbb')
list.append('ccc')
console.log(list)
- 测试结果
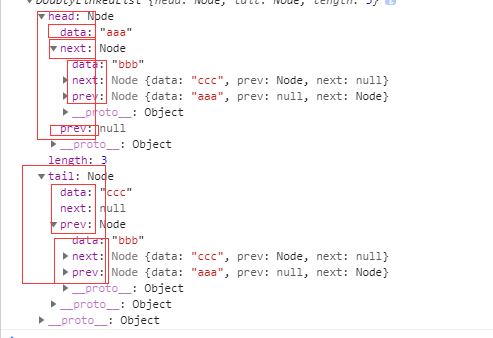
- toString()汇总
- 代码实现:
//toString
DoublyLinkedList.prototype.toString = () => {
  return this.backwardString()
}
//forwardString
DoublyLinkedList.prototype.forwardString = () => {
  let current = this.tail
  let resultString = ""
  while(current) {
    resultString += current.data + '--'
    current = current.prev
  }
  return resultString
}
//backwordString
DoublyLinkedList.prototype.backwardString = () => {
  let current = this.head
  let resultString = ""
  while(current){
    resultString += current.data + "--"
    current = current.next
  }
  return resultString
}
- 过程详解:
三种获取字符串的方法:toString()、forwardString()、backwardString()实现原理相似,仅以backWardString方法为例:
定义current变量记录当前指向的节点。首先让current指向第一个节点,然后通过 current = current.next 依次向后遍历。在while循环中以(current)作为条件遍历链表,只要current != null就一直遍历,由此可获取链表所有节点的数据。
- 测试代码:
console.log(list.toString())
console.log(list.backwardString())
console.log(list.forwardString())
- 测试结果:

3.insert(position,element)
- 代码实现:
DoublyLinkedList.prototype.insert = (pos,data) => {
  if(pos < 0 || pos > this.length ) return false
  let newNode = new Node(data)
  if(this.length === 0){
    this.head = newNode
    this.tail = newNode
  }
  else{
    if(pos == 0) {
      this.head.prev = newNode
      newNode.next = this.head
      this.head = newNode
    }
    else if(pos == this.length) {
      this.tail.next = newNode
      newNode.prev = this.tail
      this.tail = newNode
    }
    else {
      let current = this.head
      let index = 0
      while(index++ <pos) {
        previous = current
        current = current.next
      }
      newNode.next = current
      newNode.prev = current.prev
      previous.next = newNode
      current.prev = newNode
    }
  }
  this.length += 1
  return true
}
- 过程详解:
当原列表为空时:
- 情况1:插入的新节点是链表的第一个节点;只需要让head和tail都指向newNode即可。
-
当原列表不为空时:
- 情况1:当position == 0,即在链表的首部添加节点
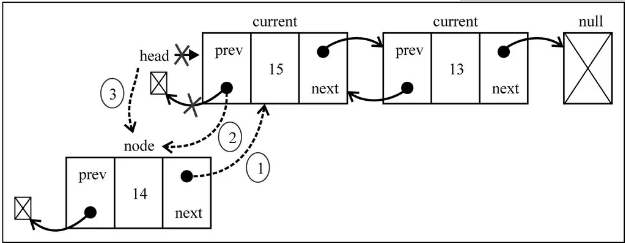
首先,通过:this.head.prev = newNode,改变指向1;
然后,通过:newNode.next = this.head,改变指向2;
最后,通过:this.head = newNode,改变指向3;
- 情况2:position == this.length,即在链表的尾部添加节点

首先,通过:this.tail.next = newNode,改变指向1;(注意这里使用this.tail指向原链表最后一个节点,而不是this.head。因为当length>1时,this.head != this.tail。)
然后,通过:newNode.prev = this.tail,改变指向2;
最后,通过:this.tail = newNode,改变指向3;
- 情况3:将元素插入到中间位置
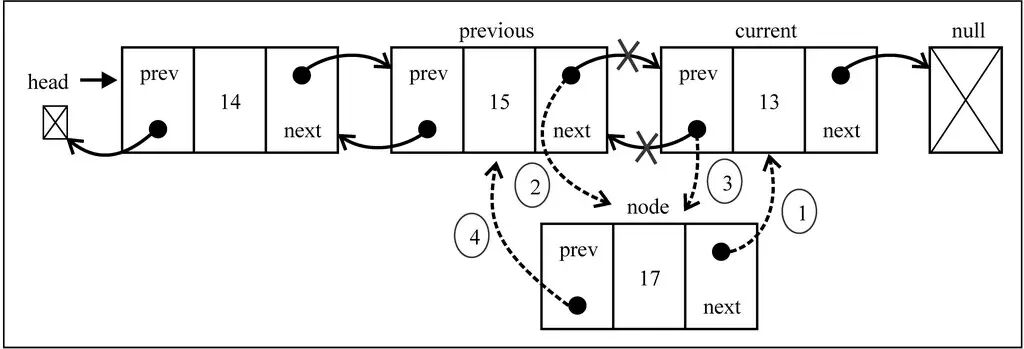
首先,需要定义变量current按照之前的思路,通过while循环找到position位置的后一个节点,循环结束后index = position
当position = 1时,current就指向了Node2。这样操作current就等同于间接地操作Node2,还可以通过current.prev间接获取Node1。得到了newNode的前一个节点和后一个节点就可以通过改变它们的prev和next变量的指向来插入newNode了。
通过:newNode.next = current,改变指向1;
通过:newNode.prev = current.prev,改变指向2;
通过:current.prev.next = newNode,改变指向3;
注意必须最后才修改current.prev的指向,不然就无法通过current.prev获取需要操作的Node1了。
通过:current.prev = current,改变指向4;
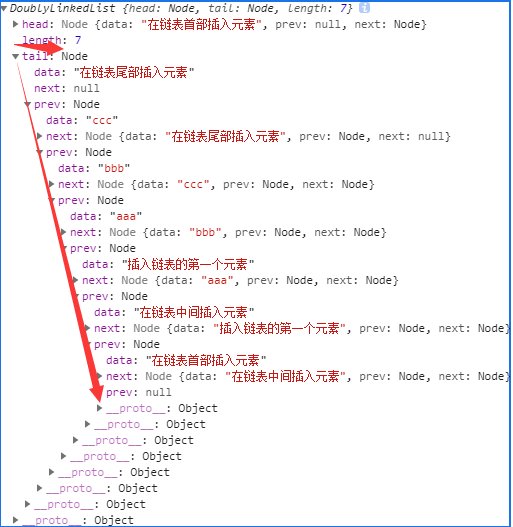
- 测试代码:
list.insert(0, '插入链表的第一个元素')
list.insert(0, '在链表首部插入元素')
list.insert(1, '在链表中间插入元素')
list.insert(6, '在链表尾部插入元素')
console.log(list);
- 测试结果:
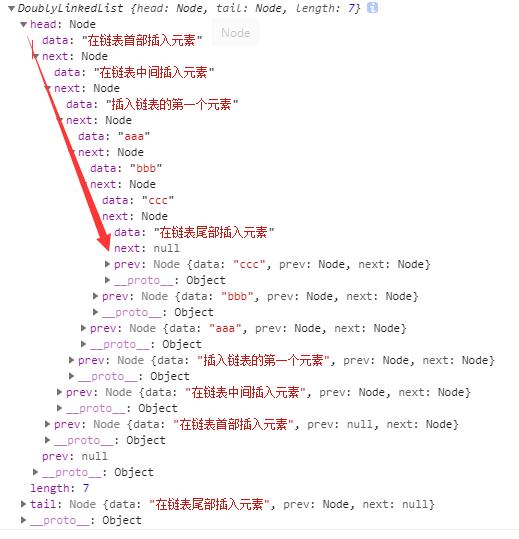
- get(position)
- 代码实现:
DoublyLinkedList.prototype.get = pos => {
  if(pos < 0 || pos > this.length) return null
  let current = null
  let index = 0
  if((this.length / 2) > pos ){
    current = this.head
    while(index++ < pos){current = current.next}
  }
  else{
    current = this.tail
    index = this.length - 1
    while(index-- > pos ){current = current.prev}
  }
  return current.data
}
- 过程详解:
定义两个变量current和index,按照之前的思路通过while循环遍历分别获取当前节点和对应的索引值index,直到找到需要获取的position位置后的一个节点,此时index = pos =x,然后return current.data即可。
如果链表的节点数量很多时,这种查找方式效率不高,改进方法为:
一定要通过this.length来获取链表的节点数否则就会报错。
当this.length / 2 > position:从头(head)开始遍历;
当this.length / 2 < position:从尾(tail)开始遍历;
- 测试代码:
console.log(list.get(0))
console.log(list.get(5))
- 测试结果:

- indexOf(element)
- 代码实现:
      DoublyLinkedList.prototype.indexOf = data => {
        //1.定义变量
        let current = this.head
        let index = 0

        //2.遍历链表,查找与data相同的节点
        while(current){
          if (current.data == data) {
            return index
          }
          current = current.next
          index += 1
        }
        return -1
      }
- 过程详解:
以(current)作为条件,通过while循环遍历链表中的所有节点(停止条件为current = null)。在遍历每个节点时将current指向的当前节点的data和传入的data进行比较即可。
- 测试代码:
console.log(list.indexOf('aaa'))
console.log(list.indexOf('ccc'))
- 测试结果:

- update(position,element)
- 代码实现:
      DoublyLinkedList.prototype.update = (position, newData) => {
        //1.越界判断
        if (position < 0 || position >= this.length) {
          return false
        }

        //2.寻找正确的节点
        let current = this.head
        let index = 0
        //this.length / 2 > position:从头开始遍历
        if (this.length / 2 > position) {
          while(index++ < position){
          current = current.next
        }
        //this.length / 2 =< position:从尾开始遍历
        }else{
          current = this.tail
          index = this.length - 1
          while (index -- > position) {
            current = current.prev
          }
        }

        //3.修改找到节点的data
        current.data = newData
        return true//表示成功修改
      }
- 过程详解:
以(index++ < position)为条件,通过while循环遍历链表中的节点(停止条件为index = position)。循环结束后,current指向需要修改的节点。
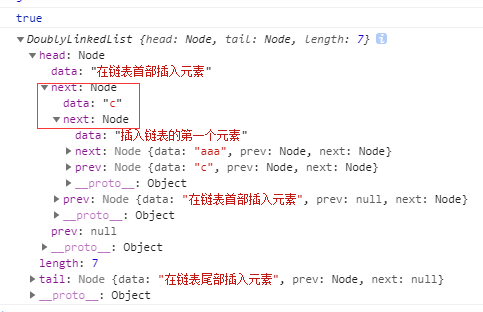
- 测试代码:
console.log(list.update(1, 'c'));
console.log(list);
- 测试结果:
- removeAt(position)
代码实现:
DoublyLinkedList.prototype.removeAt = (position) => {
  if(position < 0 || position >= this.length) return false
  let current = this.head
  if(this.length === 1){
    this.head = null
    this.tail = null
  }
  else {
    if(position === 0){
      this.head.next.prev = null
      this.head = this.head.next
    }
    else if(position === this.length - 1) {
      let current = this.tail
      this.tail.prev.next = null
      this.tail = this.tail.prev
    }
    else {
      let index = 0
      while(index++ < position){
        current = current.next
      }
      current.next.prev = current.prev
      current.prev.next = current.next
    }
  }
  this.length -= 1
  return current.data
}
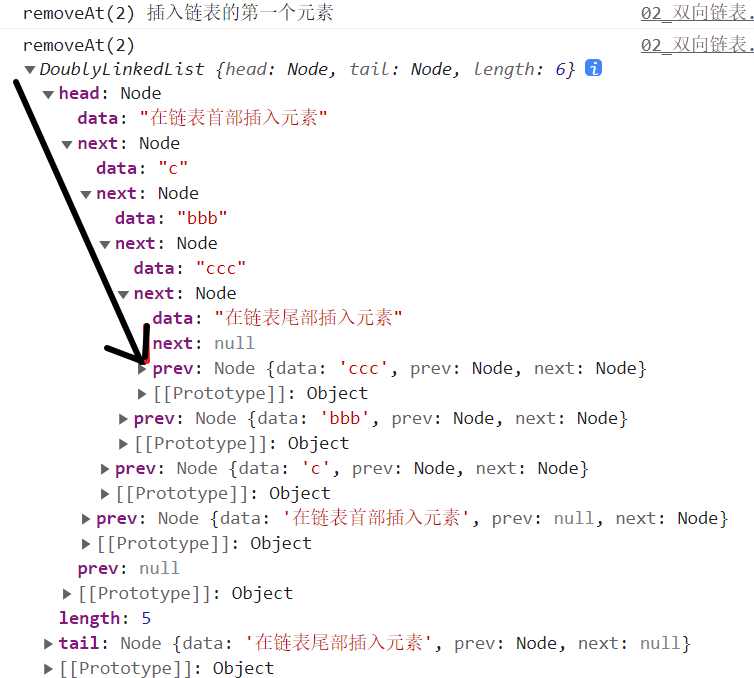
测试代码:
console.log('removeAt(2)',list.removeAt(2))
console.log('removeAt(2)',list);
测试结果:
- 其他方法
其他方法包括:**remove(element) ,isEmpty() ,size() ,getHead() ,getTail() **
代码实现:
DoublyLinkedList.prototype.remove = (data) => {
  let index = this.indexOf(data)
  return this.removeAt(index)
}
DoublyLinkedList.prototype.isEmpty = () => {
  return this.length === 0
}
DoublyLinkedList.prototype.size = () => {
  return this.length
}
DoublyLinkedList.prototype.getHead = () => {
  return this.head.data
}
DoublyLinkedList.prototype.getTail = () => {
  return this.tail.data
}
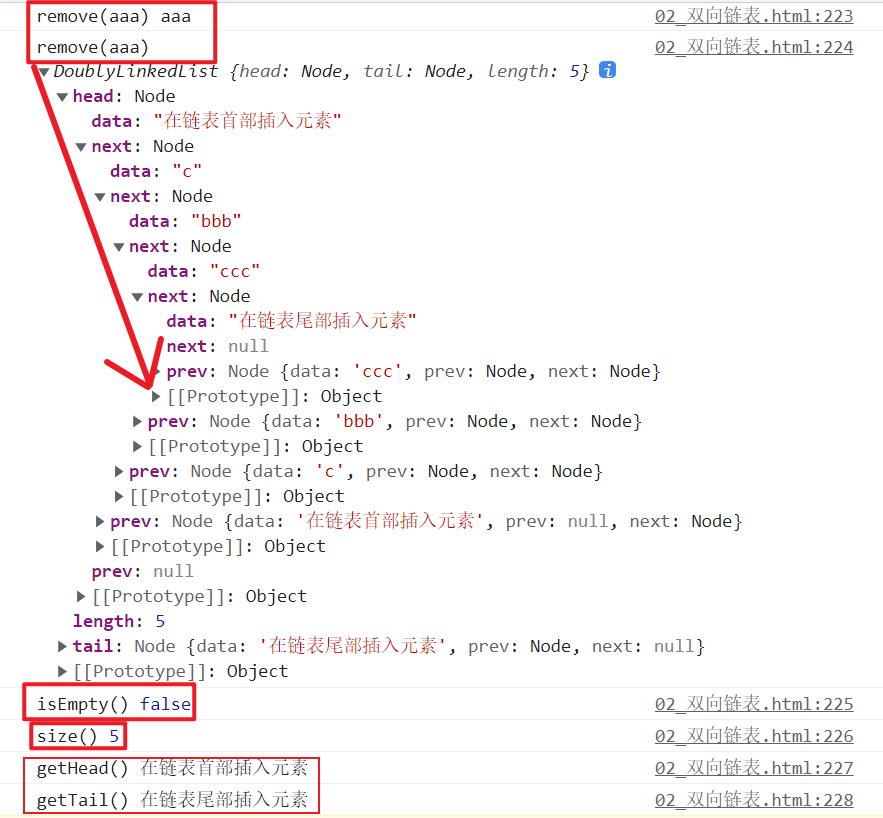
测试代码:
console.log(list.remove('aaa'))
console.log(list.isEmpty())
console.log(list.size())
console.log(list.getHead())
console.log(list.getTail())
测试结果:
2.5.6 完整实现
//封装双向链表类
function DoublyLinkedList() {
  //封装内部类,节点类
  function Node(data) {
    this.data = data
    this.prev = null
    this.next = null
  }
  //属性
  this.head = null
  this.tail = null
  this.length = 0
  DoublyLinkedList.prototype.append = data => {
    let newNode = new Node(data)
    if (this.length === 0) {
      this.tail = newNode
      this.head = newNode
    }
    else {
      newNode.prev = this.tail
      this.tail.next = newNode
      this.tail = newNode
    }
    this.length += 1
  }
  //toString
  DoublyLinkedList.prototype.toString = () => {
    return this.backwardString()
  }
  //forwardString
  DoublyLinkedList.prototype.forwardString = () => {
    let current = this.tail
    let resultString = ""
    while (current) {
      resultString += current.data + '--'
      current = current.prev
    }
    return resultString
  }
  //backwordString
  DoublyLinkedList.prototype.backwardString = () => {
    let current = this.head
    let resultString = ""
    while (current) {
      resultString += current.data + "--"
      current = current.next
    }
    return resultString
  }
  DoublyLinkedList.prototype.insert = (pos, data) => {
    if (pos < 0 || pos > this.length) return false
    let newNode = new Node(data)
    if (this.length === 0) {
      this.head = newNode
      this.tail = newNode
    }
    else {
      if (pos == 0) {
        this.head.prev = newNode
        newNode.next = this.head
        this.head = newNode
      }
      else if (pos == this.length) {
        this.tail.next = newNode
        newNode.prev = this.tail
        this.tail = newNode
      }
      else {
        let current = this.head
        let index = 0
        while (index++ < pos) {
          previous = current
          current = current.next
        }
        newNode.next = current
        newNode.prev = current.prev
        previous.next = newNode
        current.prev = newNode
      }
    }
    this.length += 1
    return true
  }
  DoublyLinkedList.prototype.get = pos => {
    if (pos < 0 || pos > this.length) return null
    let current = null
    let index = 0
    if ((this.length / 2) > pos) {
      current = this.head
      while (index++ < pos) { current = current.next }
    }
    else {
      current = this.tail
      index = this.length - 1
      while (index-- > pos) {
        current = current.prev
      }
    }
    return current.data
  }
  DoublyLinkedList.prototype.indexOf = data => {
    //1.定义变量
    let current = this.head
    let index = 0

    //2.遍历链表,查找与data相同的节点
    while (current) {
      if (current.data == data) {
        return index
      }
      current = current.next
      index += 1
    }
    return -1
  }
  DoublyLinkedList.prototype.update = (position, newData) => {
    //1.越界判断
    if (position < 0 || position >= this.length) {
      return false
    }

    //2.寻找正确的节点
    let current = this.head
    let index = 0
    //this.length / 2 > position:从头开始遍历
    if (this.length / 2 > position) {
      while (index++ < position) {
        current = current.next
      }
      //this.length / 2 =< position:从尾开始遍历
    } else {
      current = this.tail
      index = this.length - 1
      while (index-- > position) {
        current = current.prev
      }
    }

    //3.修改找到节点的data
    current.data = newData
    return true//表示成功修改
  }
  DoublyLinkedList.prototype.removeAt = (position) => {
    if (position < 0 || position >= this.length) return false
    let current = this.head
    if (this.length === 1) {
      this.head = null
      this.tail = null
    }
    else {
      if (position === 0) {
        this.head.next.prev = null
        this.head = this.head.next
      }
      else if (position === this.length - 1) {
        let current = this.tail
        this.tail.prev.next = null
        this.tail = this.tail.prev
      }
      else {
        let index = 0
        while (index++ < position) {
          current = current.next
        }
        current.next.prev = current.prev
        current.prev.next = current.next
      }
    }
    this.length -= 1
    return current.data
  }
  DoublyLinkedList.prototype.remove = (data) => {
    let index = this.indexOf(data)
    return this.removeAt(index)
  }
  DoublyLinkedList.prototype.isEmpty = () => {
    return this.length === 0
  }
  DoublyLinkedList.prototype.size = () => {
    return this.length
  }
  DoublyLinkedList.prototype.getHead = () => {
    return this.head.data
  }
  DoublyLinkedList.prototype.getTail = () => {
    return this.tail.data
  }
}
let list = new DoublyLinkedList()
list.append('aaa')
list.append('bbb')
list.append('ccc')
console.log(list)
console.log(list.toString())
console.log(list.backwardString())
console.log(list.forwardString())
list.insert(0, '插入链表的第一个元素')
list.insert(0, '在链表首部插入元素')
list.insert(1, '在链表中间插入元素')
list.insert(6, '在链表尾部插入元素')
console.log(list);
console.log(list.get(0))
console.log(list.get(5))
console.log(list.indexOf('aaa'))
console.log(list.indexOf('ccc'))
console.log(list.update(1, 'c'));
console.log(list);
console.log('removeAt(2)', list.removeAt(2))
console.log('removeAt(2)', list);
console.log('remove(aaa)', list.remove('aaa'))
console.log('remove(aaa)', list);
console.log('isEmpty()', list.isEmpty())
console.log('size()', list.size())
console.log('getHead()', list.getHead())
console.log('getTail()', list.getTail())
2.6 链表结构总结
单向链表有head和next两个属性,双向链表有head、tail、next、prev四个属性。处理好它们的指向,相当于将它们正确地连接在一起,这样就组成了一条链,这就是简单链表的实现。
在实际开发中链表使用得非常多,比如Java中的LinkList就是双向链表。
2.6.1 注意点
- 在链表中current = current.next 可以从左往右看,看成是current --> current.next,即current指向current的下一个节点。
- 删除节点的原理:只要没有引用指向该对象,无论该对象是否有引用指向其他对象,该对象都会被回收(删除)。
- 参数中凡是有position的都要进行越界判断。
2.6.2 链表的增删改查
以双向链表为例:链表的增删改查无非就是获取链表中相应的节点改变其中的prev和next两个变量的指向。
- 情况一:只需要head和tail两个变量就可以获取需要操作的变量(这里指的是能够轻松获取,当然你想通过head.next.next…或tail.prev.prev…来获取想要的节点也可以),在这种情况下链表的长度length:0 <= length <=2。
- 情况二:不能靠tail和head来获取到需要操作的变量时,可采用while循环遍历的方式,找到需要操作的节点,在这种情况下,如果我们想要在链表的position = x的位置插入新节点,那么可以通过current.next获取position的后一个节点Node(x+1),通过current.prev获取position位置的前一个节点Node(x);之后修改Node(x+1)和Node(x)中的prev和next两个变量的指向即可在pos=x 的位置插入新节点。
2.6.3 修改链表引用指向
应先修改newNode引用的指向,再修改其他引用
- 情况1:通过head和tail引用就能获取需要操作的节点时,最后更改head或tail变量的指向(因为它们分别指向链表的第一个和最后一个节点,获取其他节点时可能需要用到它们)。
- 情况2:使用current获取到需要操作的节点时,最后更改curren.next或current.prev的指向。因为current.next和current.prev表示的是Node(x+2)和Node(x)这两个节点,一旦变更它们的指向就无法获取Node(x)或Node(x+2)了,
2.6.4 遍历链表
积累两种遍历思路
- 获取指定的position = x 位置的后一个节点和索引值:循环结束后index = position = x,变量current就指向了Node(x+1),变量index的值为**Node(x+1)**的索引值x。
- 遍历链表中的所有节点:当current.next = null时停止循环,此时current指向链表的最后一个节点。


 974
974

 被折叠的 条评论
为什么被折叠?


