


2.1 基本理解和使用
2.1.1 使用React开发者工具调试

2.1.2 效果
- 函数式组件
//1.创建函数式组件
function MyComponent() {
  //此处的this为undefined,以为babel编译后开启了严格模式
  console.log(this)
  return <h2>我是用函数定义的组件(适用于简单组件的定义)</h2>
}
ReactDOM.render(<MyComponent/>,document.querySelector('#test'))
执行了ReactDOM.(…之后,发生了什么)
-
React解析组件标签,找到了MyComponent组件
-
发现组件是用函数定义的,随后调用该函数,将返回的虚拟DOM转为真实DOM,随后呈现在页面中

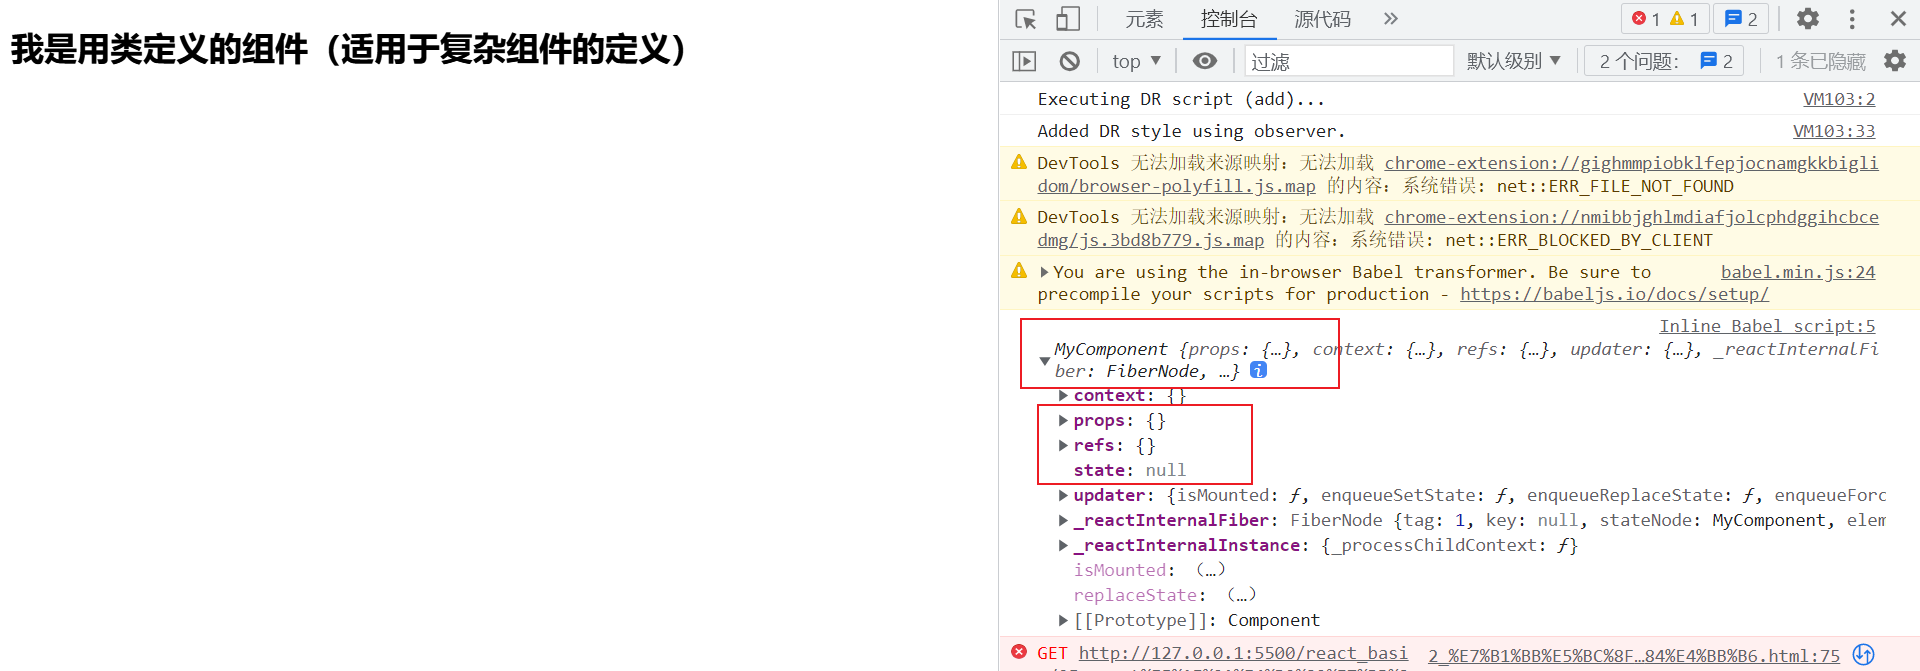
- 类式组件
class MyComponent extends React.Component {
  render(){
    console.log(this)
    return <h2>我是用类定义的组件(适用于复杂组件的定义)</h2>
  }
}
ReactDOM.render(<MyComponent/>,document.querySelector('#test'))
执行了ReactDOM.(…之后,发生了什么)
-
React解析组件标签,找到了MyComponent组件
-
发现组件是用类定义的,随后new出来该类的实例,并通过该实例调用到原型的render方法
-
将render返回的虚拟DOM转为真实DOM,随后呈现在页面中
2.1.3 注意
-
组件名必须大写
-
虚拟DOM元素只能有一个根元素
-
虚拟DOM元素必须有结束标签
2.1.4 渲染类组件标签的基本流程
-
React内部会创建组件实例对象
-
调用render()得到虚拟DOM,并解析为真实DOM
-
插入到指定的页面元素内部
2.2 组件三大核心属性1:state
2.2.1 理解
-
state是组件对象最重要的属性,值是对象(可以包含多个key-value的组合)
-
组件被称为状态机,通过更新组件的state来更新对应的页面显示(重新渲染组件)
2.2.2 注意
-
组件中render方法中的this为组件实例对象
-
组件自定义方法中this为undefined,如何解决?
-
强制绑定this,通过函数对象的bind()
-
箭头函数
-
-
状态数据,不能直接修改或更新。要用this.setState({})
2.2.3 代码
//1.创建组件
class Weather extends React.Component {
  //初始化状态
  state = { isHot: true }
  render() {
    console.log(this)
    //读取状态
    const { isHot } = this.state
    return <h1 onClick={this.changeWeather}>今天天气很{isHot ? '炎热' : '凉爽'}</h1>
  }
  //自定义方法 :赋值语句 + 自定义方法
  changeWeather = () => {
    console.log(this)
    const isHot = this.state.isHot
    this.setState({ isHot: !isHot })
  }
}
ReactDOM.render(<Weather />, document.querySelector('#test'))

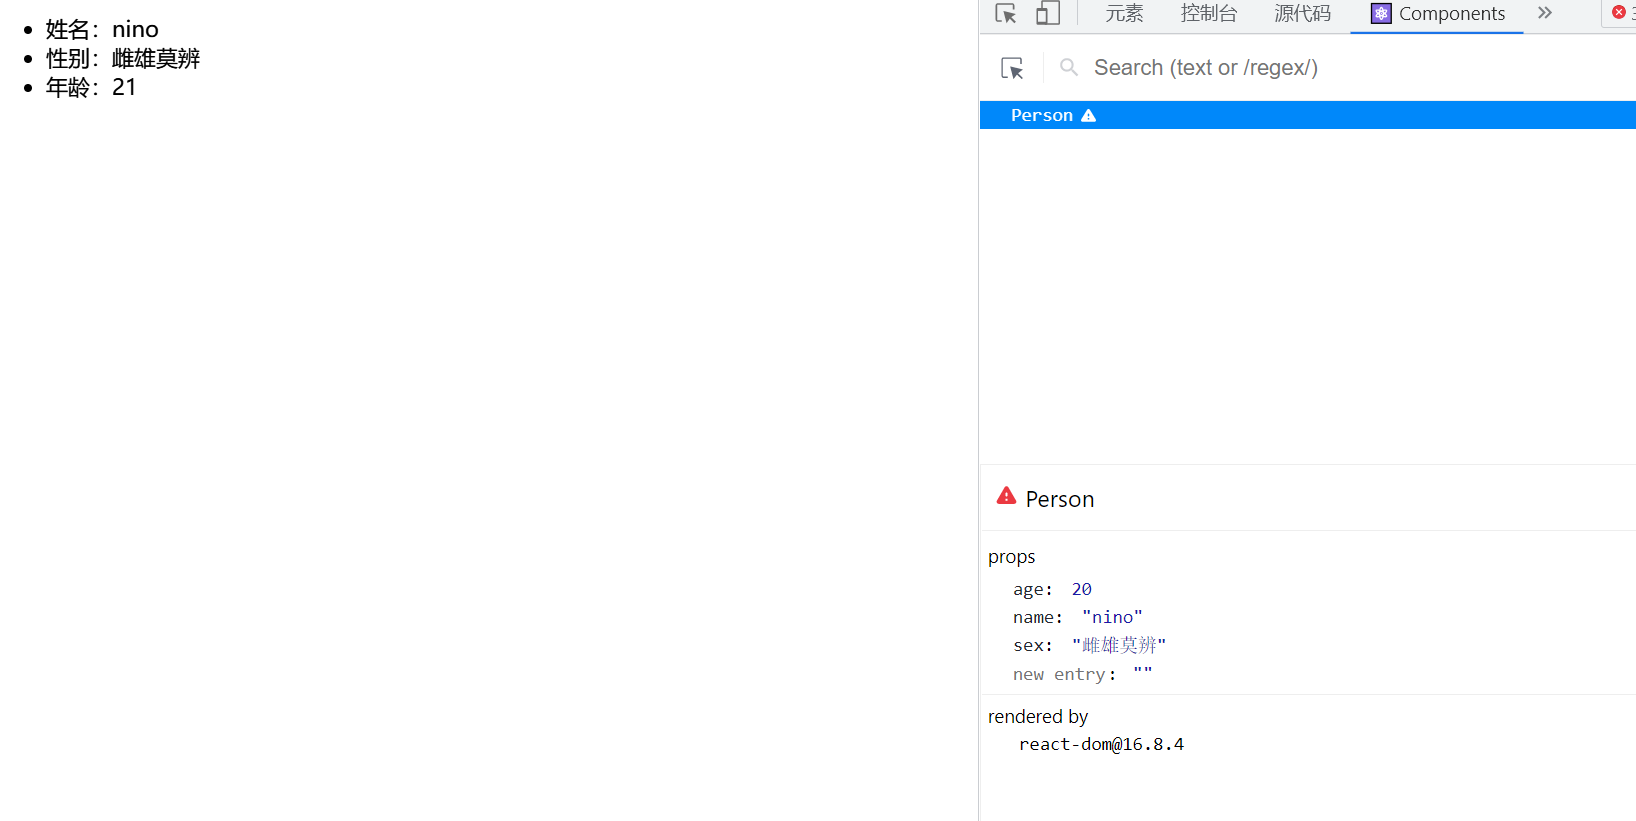
2.3 组件三大核心属性2:props
2.3.1 理解
-
每个组件对象都会有props(properties的简写)属性
-
组件标签的所有属性都保存在props中
2.3.2 作用
-
通过标签属性从组件外向组件内传递变化的数据
-
注意:组件内部不要修改props数据
2.3.3 代码
类式组件
//1.创建组件
class Person extends React.Component {
  //需要this.state,this.props,this.refs的时候才需要构造
  constructor(props){
    console.log(props)
    super(props)
    console.log(this.props)
  }
  //对标签属性进行类型,必要性的限制
  static propTypes = {
    name: PropTypes.string.isRequired,//限制name必传,且为字符串
    sex: PropTypes.string,//限制sex为字符串
    age: PropTypes.number,//限制age为数值
    speak: PropTypes.func//限制speak为函数
  }
  //指定标签默认属性
  static defaultProps = {
    sex: '雌雄莫辨',//sex默认值为'雌雄莫辨'
    age: 20//age默认值为20
  }
  render() {
    console.log(this)
    const { name, age, sex } = this.props
    return (
      <ul>
      <li>姓名:{name}</li>
<li>性别:{sex}</li>
<li>年龄:{age + 1}</li>
</ul>
)
}
}
const p = { name: 'rxl', age: 22, sex: 'female' }
ReactDOM.render(<Person name='nino' speak={speak} />, document.querySelector('#test1'))
ReactDOM.render(<Person name='tom' age={23} sex='male' />, document.querySelector('#test2'))
// ReactDOM.render(<Person name='rxl' age='22' sex='female'  />, document.querySelector('#test3'))
ReactDOM.render(<Person  {...p} />, document.querySelector('#test3'))
function speak() {
  console.log('speakspeakspeak')
}
函数式组件
function Person(props) {
  const { name, age, sex } = props
  return (
    <ul>
    <li>姓名:{name}</li>
<li>性别:{sex}</li>
<li>年龄:{age + 1}</li>
</ul>
)
}
//对标签属性进行类型,必要性的限制
Person.propTypes = {
  name: PropTypes.string.isRequired,//限制name必传,且为字符串
  sex: PropTypes.string,//限制sex为字符串
  age: PropTypes.number,//限制age为数值
  speak: PropTypes.func//限制speak为函数
}
//指定标签默认属性
Person.defaultProps = {
  sex: '雌雄莫辨',//sex默认值为'雌雄莫辨'
  age: 20//age默认值为20
}
ReactDOM.render(<Person name='nino' />, document.querySelector('#test1'))
2.3.4 效果
2.4 组件三大核心属性3:refs与事件处理
2.4.1 理解
组件内的标签可以定义 ref 属性来标识自己
2.4.2 代码
- 字符串形式的 ref
<input ref="input1"/>
const {input1} = this.refs
console.log(input1.value)
alert(input1.value)
- 回调形式的 ref
<input ref={(c)=>{this.input1 = c}}
const {input1} = this
console.log(input1.value)
alert(input1.value)
- createRef 创建 ref 容器·
/*
本身是一个函数,调用后可返回一个容器,该容器可以存储被ref所标识的节点,该容器是‘专人专用’的
 */
myRef = React.createRef()
<input ref={this.myRef}/>
alert(this.myRef.current.value)
2.4.3 事件处理
-
通过 onXxx 属性指定事件处理函数(注意大小写)
-
React 使用的是自定义(合成)事件, 而不是使用的原生 DOM 事件(为了更好的兼容性)
-
React 中的事件是通过事件委托方式处理的(委托给组件最外层的元素)(为了更高效)
-
-
通过 event.target 得到发生事件的 DOM 元素对象(不要过度使用)
showData = (e) => {
  console.log(e.target.value)
}
2.5 收集表单数据
2.5.1 理解
包含表单的组件分类
-
受控组件
-
将数据通过事件处理保存到state中
-
再从state中取出来
-
class Login extends React.Component{
  state={
    username:'',
    password:''
  }
  render(){
    return (
      <form action="http://www.renorchid.xyz" onSubmit={this.handleSubmit}>
      用户名:<input onChange={this.saveUsername} ref={c => this.username=c} type="text" name="username"/><br/>
        密码:<input onChange={this.savePassword} ref={c => this.password=c} type="password" name="password"/><br/>
          <button>登录</button>
      </form>
      )
   }
   handleSubmit = (e) =>{
     e.preventDefault()
     const {username,password} = this.state
     alert(`你输入的用户名是${username},密码是${password}`)
   }
   saveUsername = (e) =>{
     console.log('@',e.target.value)
     this.setState({username:e.target.value})
   }
   savePassword = (e) =>{
     console.log('@',e.target.value)
     this.setState({password:e.target.value})
   }
}
-
非受控组件
- 随用随取
2.6 函数柯里化
render() {
  return (
    <form action="http://www.renorchid.xyz" onSubmit={this.handleSubmit}>
    用户名:<input onChange={this.saveFormdata('username')} ref={c => this.username = c} type="text" name="username" />

      密码:<input onChange={this.saveFormdata('password')} ref={c => this.password = c} type="password" name="password" />

        <button>登录</button>
  	</form>
  )
}
saveFormdata = (dataType) => {
  return (e) => { this.setState({ [dataType]: e.target.value }) }
}
-
高阶函数:如果一个函数符合下面2个规范中的任何一个,那该函数就是高阶函数。
-
若A函数,接收的参数是一个函数,那么A就可以称之为高阶函数。
-
若A函数,调用的返回值依然是一个函数,那么A就可以称之为高阶函数。
-
常见的高阶函数有:**Promise、setTimeout、arr.map()**等等
-
-
函数的柯里化:通过函数调用继续返回函数的方式,实现多次接收参数最后统一处理的函数编码形式。
function sum(a){
  return(b)=>{
    return (c)=>{
    return a+b+c
    }
	}
}
2.7 组件的生命周期
2.7.1 理解
-
组件从创建到死亡它会经历一些特定的阶段。
-
React 组件中包含一系列钩子函数(生命周期回调函数), 会在特定的时刻
-
我们在定义组件时,会在特定的生命周期回调函数中,做特定的工作
2.7.2 生命周期流程图(旧)
.png&originHeight=670&originWidth=841&originalType=binary&ratio=1&rotation=0&showTitle=false&size=44022&status=done&style=none&taskId=u21debf1c-da18-4906-a169-229afb05dc2&title=)
生命周期的三个阶段(旧)
-
初始化阶段: 由 ReactDOM.render()触发—初次渲染
-
constructor()
-
componentWillMount()
-
render()
-
componentDidMount()
-
-
更新阶段: 由组件内部 this.setSate()或父组件重新 render 触发
-
shouldComponentUpdate()
-
componentWillUpdate()
-
render()
-
componentDidUpdate()
-
-
卸载组件: 由 ReactDOM.unmountComponentAtNode()触发
- componentWillUnmount()
/* 创建组件 */
class Life extends React.Component {
  state = { count: 0 }
  constructor(){
    super()
    console.log('count----constuctor')
  }
  render() {
    console.log('count----render')
    return (
      <div>
      <h2>当前求和为{this.state.count}</h2>
<button onClick={this.add}>点我加一</button>
<button onClick={this.death}>点我销毁</button>
<button onClick={this.forceupdate}>点我强制更新</button>
</div>
)
}
forceupdate = ()=>{
  this.forceUpdate()
}
add = ()=>{
  let {count} = this.state
  console.log(count)
  this.setState({count:count+1})
}
componentWillMount(){
  console.log('count----componentWillMount')
}
componentDidMount(){
  console.log('count----componentDidMount')
}
componentWillUnmount(){
  console.log('count----componentWillUnmount')
}
shouldComponentUpdate(){
  console.log('count----shouldComponentUpdate')
  return false
}
componentWillUpdate(){
  console.log('count----componentWillUpdate')
}
componentDidUpdate(){
  console.log('count----componentDidUpdate')
}
death() {
  ReactDOM.unmountComponentAtNode(document.querySelector('#test'))
}
}
class A extends React.Component{
  state={cpName:'军烨'}
  render(){
    return (
      <div>
      <h2>我最喜欢的cp是{this.state.cpName}</h2>
<button onClick={this.changeName}>点击切换</button>
<B cpName={this.state.cpName} />
  </div>
)
}
changeName = ()=>{
  const {cpName} = this.state
  this.setState({cpName:"周侯"})
}
}
class B extends React.Component {
  render(){
    return (
      <div>{this.props.cpName}</div>
    )
  }
  componentWillReceiveProps(){
    console.log('B--componentWillReceiveProps')
  }
  shouldComponentUpdate(){
    console.log('B----shouldComponentUpdate')
    return true
  }
  componentWillUpdate(){
    console.log('B----componentWillUpdate')
  }
  componentDidUpdate(){
    console.log('B----componentDidUpdate')
  }
}
/* 渲染虚拟DOM到页面 */
ReactDOM.render(<A />, document.querySelector('#test'))
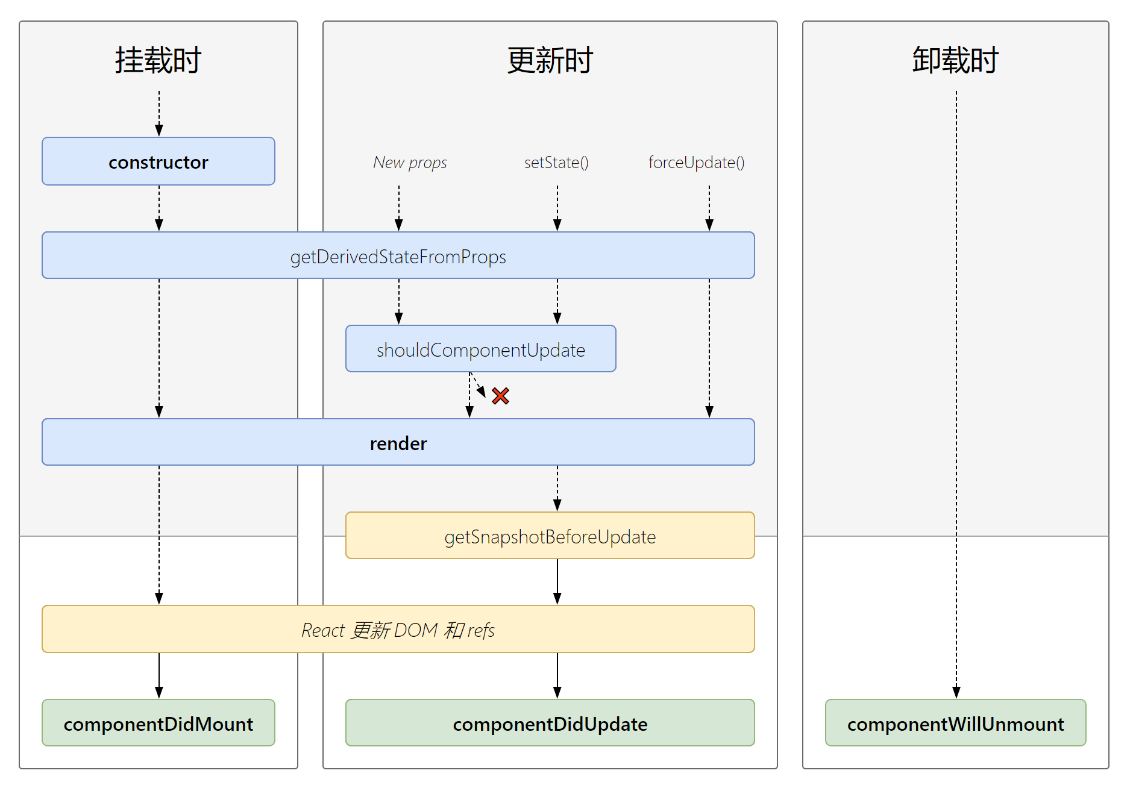
2.7.2 生命周期流程图(新)
.png&originHeight=788&originWidth=1133&originalType=binary&ratio=1&rotation=0&showTitle=false&size=66531&status=done&style=none&taskId=ue80f2d64-fc7a-47c4-b065-68d08ecf0f2&title=&width=584.4000244140625)
生命周期的三个阶段(新)
-
初始化阶段: 由 ReactDOM.render()触发—初次渲染
-
constructor()
-
getDerivedStateFromProps
-
render()
-
componentDidMount()
-
-
更新阶段: 由组件内部 this.setSate()或父组件重新 render 触发
-
getDerivedStateFromProps
-
shouldComponentUpdate()
-
render()
-
getSnapshotBeforeUpdate
-
componentDidUpdate()
-
-
卸载组件: 由 ReactDOM.unmountComponentAtNode()触发
- componentWillUnmount()
<!DOCTYPE html>
<html lang="en">

<head>
  <meta charset="UTF-8">
  <meta http-equiv="X-UA-Compatible" content="IE=edge">
  <meta name="viewport" content="width=device-width, initial-scale=1.0">
  <title>Document</title>
  <style>
    .list {
      width: 200px;
      height: 150px;
      background-color: aqua;
      overflow: auto;
    }

    .news {
      height: 30px;
    }
  </style>
</head>

<body>
  <!-- 容器 -->
  <div id="test">

  </div>
  <!-- 引入react核心库 -->
  <!-- 引入react-dom,用于支持react操作dom -->
  <script src="../17.0.1/react.development.js"></script>
  <script src="../17.0.1/react-dom.development.js"></script>
  <!-- 引入Babel,用于将jsx转为js -->
  <script src="../17.0.1/babel.min.js"></script>
  <!-- 一定要写babel -->
  <script type="text/babel">
    class NewsList extends React.Component {
      state = { newsArr: [] }
      render() {
        return (
          <div ref='list' className="list">
            {this.state.newsArr.map((n,index)=>{
              return <div className='news' key={index}>{n}</div>
            })}
          </div>
        )
      }
      componentDidMount() {
        setInterval(() => {
          const { newsArr } = this.state
          const news = '新闻' + (newsArr.length + 1)
          this.setState({ newsArr: [news, ...newsArr] })
        }, 1000);
      }
      getSnapshotBeforeUpdate(){
        /* const list = document.querySelector('.list')
        return list.scrollHeight */
        return this.refs.list.scrollHeight
      }
      componentDidUpdate(prevProps,prevState,snpaValue){
        console.log(prevProps,prevState,snpaValue)
        console.log(this.refs.list.scrollHeight)
        this.refs.list.scrollTop += this.refs.list.scrollHeight - snpaValue
      }
    }
    /* 渲染虚拟DOM到页面 */
    ReactDOM.render(<NewsList />, document.querySelector('#test'))

  </script>
</body>

</html>
2.7.3 重要的钩子
-
render:初始化渲染或更新渲染调用
-
componentDidMount:开启监听, 发送 ajax 请求
-
componentWillUnmount:做一些收尾工作, 如: 清理定时器
2.7.4 即将废弃的勾子
-
componentWillMount
-
componentWillReceiveProps
-
componentWillUpdate
现在使用会出现警告,下一个大版本需要加上 UNSAFE_前缀才能使用,以后可能会被彻底废弃,不建议使用。
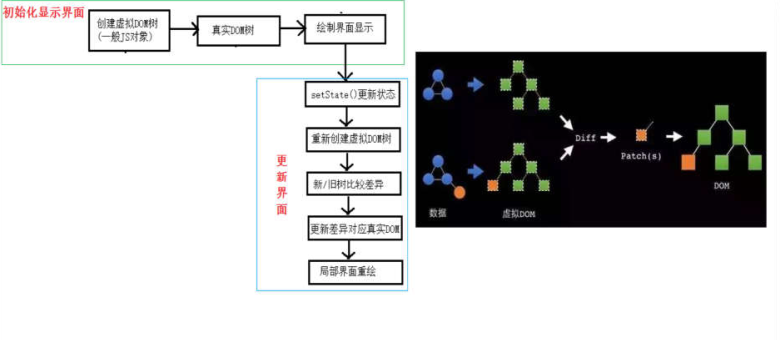
2.8 虚拟 DOM 与 DOM Diffing 算法
2.8.1 基本原理图
<!DOCTYPE html>
<html>
<head>
  <meta charset="UTF-8">
  <title>key的作用</title>
</head>
<body>
<div id="test"></div>
<!-- 引入react核心库 -->
<script type="text/javascript" src="../js/react.development.js"></script>
<!-- 引入react-dom -->
<script type="text/javascript" src="../js/react-dom.development.js"></script>
<!-- 引入babel -->
<script type="text/javascript" src="../js/babel.min.js"></script>

<script type="text/babel">
	/*
   经典面试题:
      1). react/vue中的key有什么作用?(key的内部原理是什么?)
      2). 为什么遍历列表时,key最好不要用index?

			1. 虚拟DOM中key的作用:
					1). 简单的说: key是虚拟DOM对象的标识, 在更新显示时key起着极其重要的作用。

					2). 详细的说: 当状态中的数据发生变化时,react会根据【新数据】生成【新的虚拟DOM】,
												随后React进行【新虚拟DOM】与【旧虚拟DOM】的diff比较,比较规则如下:

									a. 旧虚拟DOM中找到了与新虚拟DOM相同的key:
												(1).若虚拟DOM中内容没变, 直接使用之前的真实DOM
												(2).若虚拟DOM中内容变了, 则生成新的真实DOM,随后替换掉页面中之前的真实DOM

									b. 旧虚拟DOM中未找到与新虚拟DOM相同的key
												根据数据创建新的真实DOM,随后渲染到到页面

			2. 用index作为key可能会引发的问题:
								1. 若对数据进行:逆序添加、逆序删除等破坏顺序操作:
												会产生没有必要的真实DOM更新 ==> 界面效果没问题, 但效率低。

								2. 如果结构中还包含输入类的DOM:
												会产生错误DOM更新 ==> 界面有问题。

								3. 注意!如果不存在对数据的逆序添加、逆序删除等破坏顺序操作,
									仅用于渲染列表用于展示,使用index作为key是没有问题的。

			3. 开发中如何选择key?:
								1.最好使用每条数据的唯一标识作为key, 比如id、手机号、身份证号、学号等唯一值。
								2.如果确定只是简单的展示数据,用index也是可以的。
   */

	/*
		慢动作回放----使用index索引值作为key

			初始数据:
					{id:1,name:'小张',age:18},
					{id:2,name:'小李',age:19},
			初始的虚拟DOM:
					<li key=0>小张---18<input type="text"/></li>
					<li key=1>小李---19<input type="text"/></li>

			更新后的数据:
					{id:3,name:'小王',age:20},
					{id:1,name:'小张',age:18},
					{id:2,name:'小李',age:19},
			更新数据后的虚拟DOM:
					<li key=0>小王---20<input type="text"/></li>
					<li key=1>小张---18<input type="text"/></li>
					<li key=2>小李---19<input type="text"/></li>

	-----------------------------------------------------------------

	慢动作回放----使用id唯一标识作为key

			初始数据:
					{id:1,name:'小张',age:18},
					{id:2,name:'小李',age:19},
			初始的虚拟DOM:
					<li key=1>小张---18<input type="text"/></li>
					<li key=2>小李---19<input type="text"/></li>

			更新后的数据:
					{id:3,name:'小王',age:20},
					{id:1,name:'小张',age:18},
					{id:2,name:'小李',age:19},
			更新数据后的虚拟DOM:
					<li key=3>小王---20<input type="text"/></li>
					<li key=1>小张---18<input type="text"/></li>
					<li key=2>小李---19<input type="text"/></li>


	 */
	class Person extends React.Component{

		state = {
			persons:[
				{id:1,name:'小张',age:18},
				{id:2,name:'小李',age:19},
			]
		}

		add = ()=>{
			const {persons} = this.state
			const p = {id:persons.length+1,name:'小王',age:20}
			this.setState({persons:[p,...persons]})
		}

		render(){
			return (
				<div>
					<h2>展示人员信息</h2>
					<button onClick={this.add}>添加一个小王</button>
					<h3>使用index(索引值)作为key</h3>
					<ul>
						{
							this.state.persons.map((personObj,index)=>{
								return <li key={index}>{personObj.name}---{personObj.age}<input type="text"/></li>
							})
						}
					</ul>
					<hr/>
					<hr/>
					<h3>使用id(数据的唯一标识)作为key</h3>
					<ul>
						{
							this.state.persons.map((personObj)=>{
								return <li key={personObj.id}>{personObj.name}---{personObj.age}<input type="text"/></li>
							})
						}
					</ul>
				</div>
			)
		}
	}

	ReactDOM.render(<Person/>,document.getElementById('test'))
</script>
</body>
</html>


 608
608

 被折叠的 条评论
为什么被折叠?
被折叠的 条评论
为什么被折叠?
 到【灌水乐园】发言


