


🌟个人主页:时间会证明一切.
目录
有三个线程T1,T2,T3如何保证顺序执行?
想要让三个线程依次执行,并且严格按照T1,T2,T3的顺序的话,主要就是想办法让三个线程之间可以通信、或者可以排队。
想让多个线程之间可以通信,可以通过join方法实现,还可以通过CountDownLatch、CyclicBarrier和Semaphore来实现通信。
想要让线程之间排队的话,可以通过线程池或者CompletableFuture的方式来实现。
依次执行start方法
在代码中,分别依次调用三个线程的start方法,这种方法是最容易想到的,但是也是最不靠谱的。
代码实现如下,通过执行的话可以发现,数据结果是不固定的:
    public static void main(String[] args) {
        Thread thread1 = new Thread(new Runnable() {
            @Override
            public void run() {
                System.out.println("Thread 1 running");
            }
        });


        Thread thread2 = new Thread(new Runnable() {
            @Override
            public void run() {
                System.out.println("Thread 2 running");
            }
        });

        Thread thread3 = new Thread(new Runnable() {
            @Override
            public void run() {
                System.out.println("Thread 3 running");
            }
        });

        thread1.start();
        thread2.start();
        thread3.start();
    }
以上代码的数据结果每次执行都不固定,所以,没办法满足我们的要求。
使用join
Thread类中提供了一个join方法,他的有以下代码:
public static void main(String[] args) throws InterruptedException {
    Thread thread1 = new Thread(new Runnable() {
        @Override
        public void run() {
            try {
                Thread.sleep(10000);
            } catch (InterruptedException e) {
                e.printStackTrace();
            }
            System.out.println("Thread 1 running");
        }
    });

    thread1.start();

    System.out.println("Main 1 running");
}
输出结果会是:
Main 1 running
Thread 1 running
但是,如果我们在上面的第15行,增加一行thread1.join();那么输出结果就会有变化,如下:
Thread 1 running
Main 1 running
所以,join就是把thread1这个子线程加入到当前主线程中,也就是主线程要阻塞在这里,等子线程执行完之后再继续执行。
所以,我们可以通过join来实现多个线程的顺序执行:
    public static void main(String[] args) {
        final Thread thread1 = new Thread(new Runnable() {
            @Override
            public void run() {
                System.out.println(Thread.currentThread().getName() + " is Running.");
            }
        },"T1");


        final Thread thread2 = new Thread(new Runnable() {
            @Override
            public void run() {
                try {
                    thread1.join();
                } catch (InterruptedException e) {
                    System.out.println("join thread1 failed");
                }
                System.out.println(Thread.currentThread().getName() + " is Running.");
            }
        },"T2");

        Thread thread3 = new Thread(new Runnable() {
            @Override
            public void run() {
                try {
                    thread2.join();
                } catch (InterruptedException e) {
                    System.out.println("join thread1 failed");
                }
                System.out.println(Thread.currentThread().getName() + " is Running.");
            }
        },"T3");

        thread3.start();
        thread2.start();
        thread1.start();
    }
我们在thread2中等待thread1执行完,然后在thread3中等待thread2执行完。那么整体的执行顺序就是:
T1 is Running.
T2 is Running.
T3 is Running.
使用CountDownLatch
CountDownLatch是Java并发库中的一个同步辅助类,它允许一个或多个线程等待其他线程完成操作。我们可以借助他来让三个线程之间相互通信,以达到顺序执行的目的。
public class CountDownLatchThreadExecute {
    public static void main(String[] args) throws InterruptedException {
                // 创建CountDownLatch对象,用来做线程通信
        CountDownLatch latch = new CountDownLatch(1);
        CountDownLatch latch2 = new CountDownLatch(1);
        CountDownLatch latch3 = new CountDownLatch(1);

        // 创建并启动线程T1
        Thread t1 = new Thread(new MyThread(latch), "T1");
        t1.start();

        // 等待线程T1执行完
        latch.await();

        // 创建并启动线程T2
        Thread t2 = new Thread(new MyThread(latch2), "T2");
        t2.start();

        // 等待线程T2执行完
        latch2.await();

        // 创建并启动线程T3
        Thread t3 = new Thread(new MyThread(latch3), "T3");
        t3.start();

        // 等待线程T3执行完
        latch3.await();
    }
}

class MyThread implements Runnable {
    private CountDownLatch latch;

    public MyThread(CountDownLatch latch) {
        this.latch = latch;
    }

    @Override
    public void run() {
        try {
            // 模拟执行任务
            Thread.sleep(1000);
            System.out.println(Thread.currentThread().getName() + " is Running.");
        } catch (InterruptedException e) {
            e.printStackTrace();
        } finally {
            // 完成一个线程,计数器减1
            latch.countDown();
        }
    }
}
主要就是想办法让编排三个子线程的主线程阻塞,保证T1执行完再启动T2,T2执行完再启动T3。而这个编排的方式就是想办法知道什么时候子线程执行完,就可以通过CountDownLatch实现。
基于相同的原理, 我们还可以借助CyclicBarrier和Semaphore实现此功能:
public class CyclicBarrierThreadExecute {

    public static void main(String[] args) throws InterruptedException, BrokenBarrierException {
        // 创建CyclicBarrier对象,用来做线程通信
        CyclicBarrier barrier = new CyclicBarrier(2);

        // 创建并启动线程T1
        Thread t1 = new Thread(new MyThread(barrier), "T1");
        t1.start();

        // 等待线程T1执行完
        barrier.await();

        // 创建并启动线程T2
        Thread t2 = new Thread(new MyThread(barrier), "T2");
        t2.start();

        // 等待线程T2执行完
        barrier.await();

        // 创建并启动线程T3
        Thread t3 = new Thread(new MyThread(barrier), "T3");
        t3.start();

        // 等待线程T3执行完
        barrier.await();
    }
}

class MyThread implements Runnable {
    private CyclicBarrier barrier;

    public MyThread(CyclicBarrier barrier) {
        this.barrier = barrier;
    }

    @Override
    public void run() {
        try {
            // 模拟执行任务
            Thread.sleep(1000);
            System.out.println(Thread.currentThread().getName() + " is Running.");
        } catch (InterruptedException e) {
            e.printStackTrace();
        } finally {
            // 等待其他线程完成
            try {
                barrier.await();
            } catch (Exception e) {
                e.printStackTrace();
            }
        }
    }
}
借助Semaphore实现此功能:
public class SemaphoreThreadExecute {
    public static void main(String[] args) throws InterruptedException {
        // 创建Semaphore对象,用来做线程通信
        Semaphore semaphore = new Semaphore(1);

        // 等待线程T1执行完
        semaphore.acquire();

        // 创建并启动线程T1
        Thread t1 = new Thread(new MyThread(semaphore), "T1");
        t1.start();

        // 等待线程T2执行完
        semaphore.acquire();

        // 创建并启动线程T2
        Thread t2 = new Thread(new MyThread(semaphore), "T2");
        t2.start();

        // 等待线程T3执行完
        semaphore.acquire();

        // 创建并启动线程T3
        Thread t3 = new Thread(new MyThread(semaphore), "T3");
        t3.start();
    }
}

class MyThread implements Runnable {
    private Semaphore semaphore;

    public MyThread(Semaphore semaphore) {
        this.semaphore = semaphore;
    }

    @Override
    public void run() {
        try {
            // 模拟执行任务
            Thread.sleep(1000);
            System.out.println(Thread.currentThread().getName() + " is Running.");
        } catch (InterruptedException e) {
            e.printStackTrace();
        } finally {
            // 释放许可证,表示完成一个线程
            semaphore.release();
        }
    }
}
使用线程池
了解线程池的开发者都知道,线程池内部是使用了队列来存储任务的,所以线程的执行顺序会按照任务的提交顺序执行的,但是如果是多个线程同时执行的话,是保证不了先后顺序的,因为可能先提交的后执行了。但是我们可以定义一个只有一个线程的线程池,然后依次的将T1,T2,T3提交给他执行:
public class ThreadPoolThreadExecute {
    public static void main(String[] args) {
        // 创建线程池
        ExecutorService executor = Executors.newSingleThreadExecutor();

        // 创建并启动线程T1
        executor.submit(new MyThread("T1"));

        // 创建并启动线程T2
        executor.submit(new MyThread("T2"));

        // 创建并启动线程T3
        executor.submit(new MyThread("T3"));

        // 关闭线程池
        executor.shutdown();
    }
}

class MyThread implements Runnable {
    private String name;

    public MyThread(String name) {
        this.name = name;
    }

    @Override
    public void run() {
        try {
            // 模拟执行任务
            Thread.sleep(1000);
            System.out.println(name + " is Running.");
        } catch (InterruptedException e) {
            e.printStackTrace();
        }
    }
}
使用CompletableFuture
Java 8引入了CompletableFuture,它是一个用于异步编程的新的强大工具。CompletableFuture提供了一系列的方法,可以用来创建、组合、转换和管理异步任务,并且可以让你实现异步流水线,在多个任务之间轻松传递结果。
如以下实现方式:
public class CompletableFutureThreadExecute {
    public static void main(String[] args) {
        // 创建CompletableFuture对象
        CompletableFuture<Void> future1 = CompletableFuture.runAsync(new MyThread("T1"));

        // 等待线程T1完成
        future1.join();

        // 创建CompletableFuture对象
        CompletableFuture<Void> future2 = CompletableFuture.runAsync(new MyThread("T2"));

        // 等待线程T2完成
        future2.join();

        // 创建CompletableFuture对象
        CompletableFuture<Void> future3 = CompletableFuture.runAsync(new MyThread("T3"));

        // 等待线程T3完成
        future3.join();
    }
}

class MyThread implements Runnable {
    private String name;

    public MyThread(String name) {
        this.name = name;
    }

    @Override
    public void run() {
        try {
            // 模拟执行任务
            Thread.sleep(1000);
            System.out.println(name + " is Running.");
        } catch (InterruptedException e) {
            e.printStackTrace();
        }
    }
}
上面的代码还可以做一些优化:
public class CompletableFutureThreadExecute {
    public static void main(String[] args) throws ExecutionException, InterruptedException {
        // 创建CompletableFuture对象
        CompletableFuture<Void> future = CompletableFuture.runAsync(new MyThread("T1")).thenRun(new MyThread("T2")).thenRun(new MyThread("T3"));
        future.get();
    }
}

class MyThread implements Runnable {
    private String name;

    public MyThread(String name) {
        this.name = name;
    }

    @Override
    public void run() {
        try {
            // 模拟执行任务
            Thread.sleep(1000);
            System.out.println(name + " is Running.");
        } catch (InterruptedException e) {
            e.printStackTrace();
        }
    }
}
Spring Bean的生命周期是怎么样的?
一个Spring的Bean从出生到销毁的全过程就是他的整个生命周期,那么经历以下几个阶段: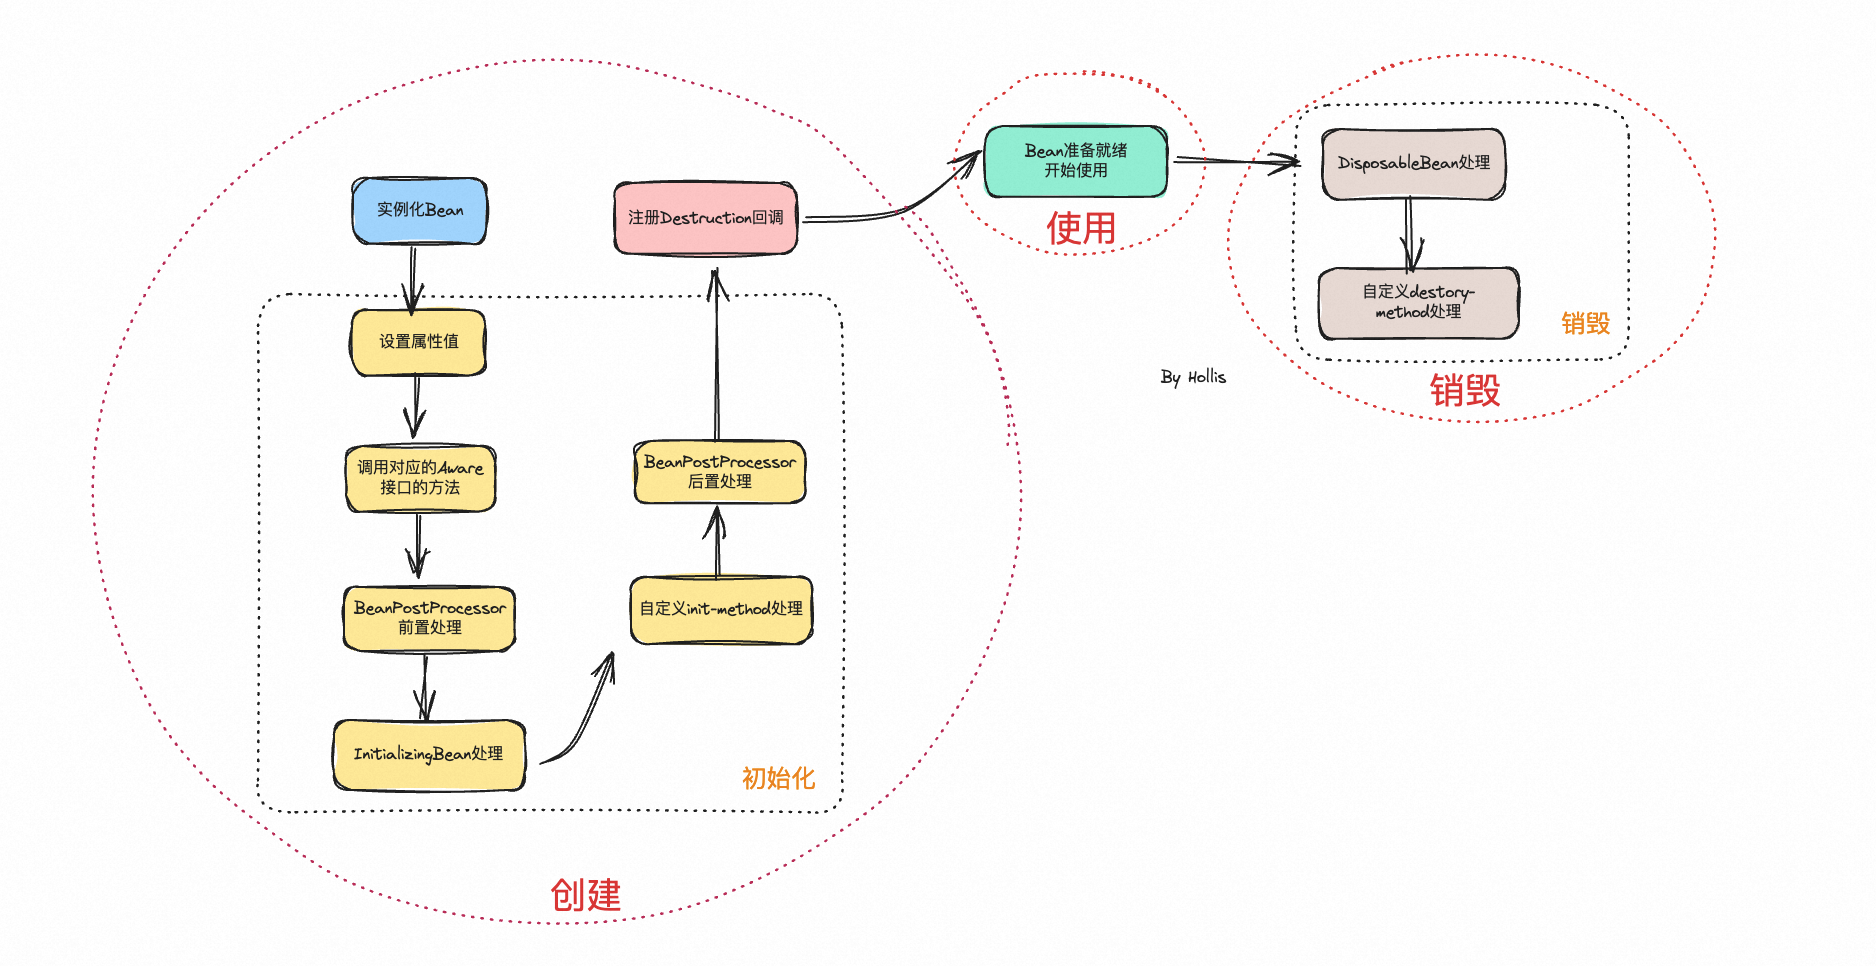
整个生命周期可以大致分为3个大的阶段,分别是:创建、使用、销毁。还可以进一步分为5个小的阶段:实例化、初始化、注册Destruction回调、Bean的正常使用以及Bean的销毁。
有人把设置属性值这一步单独拿出来了,主要是因为在源码中doCreateBean是先调了populateBean进行属性值的设置,然后再调initializeBean进行各种前置&后置处理。但是其实属性的设置其实就是初始化的一部分。要不然初始化啥呢?
有人也把注册Destruction回调放到销毁这一步了,其实是不对的,其实他不算初始化的一步,也不应该算作销毁的一个过程,他虽然和销毁有关,但是他是在创建的这个生命周期中做的。
具体到代码方面,可以参考以下这个更加详细的过程介绍,我把具体实现的代码位置列出来了。
- 实例化Bean:
- Spring容器首先创建Bean实例。
- 在AbstractAutowireCapableBeanFactory类中的createBeanInstance方法中实现
- 设置属性值:
- Spring容器注入必要的属性到Bean中。
- 在AbstractAutowireCapableBeanFactory的populateBean方法中处理
- 检查Aware:
- 如果Bean实现了BeanNameAware、BeanClassLoaderAware等这些Aware接口,Spring容器会调用它们。
- 在AbstractAutowireCapableBeanFactory的initializeBean方法中调用
- 调用BeanPostProcessor的前置处理方法:
- 在Bean初始化之前,允许自定义的BeanPostProcessor对Bean实例进行处理,如修改Bean的状态。BeanPostProcessor的postProcessBeforeInitialization方法会在此时被调用。
- 由AbstractAutowireCapableBeanFactory的applyBeanPostProcessorsBeforeInitialization方法执行。
- 调用InitializingBean的afterPropertiesSet方法:
- 提供一个机会,在所有Bean属性设置完成后进行初始化操作。如果Bean实现了InitializingBean接口,afterPropertiesSet方法会被调用。
- 在AbstractAutowireCapableBeanFactory的invokeInitMethods方法中调用。
- 调用自定义init-method方法:
- 提供一种配置方式,在XML配置中指定Bean的初始化方法。如果Bean在配置文件中定义了初始化方法,那么该方法会被调用。
- 在AbstractAutowireCapableBeanFactory的invokeInitMethods方法中调用。
- 调用BeanPostProcessor的后置处理方法:
- 在Bean初始化之后,再次允许BeanPostProcessor对Bean进行处理。BeanPostProcessor的postProcessAfterInitialization方法会在此时被调用。
- 由AbstractAutowireCapableBeanFactory的applyBeanPostProcessorsAfterInitialization方法执行
- 注册Destruction回调:
- 如果Bean实现了DisposableBean接口或在Bean定义中指定了自定义的销毁方法,Spring容器会为这些Bean注册一个销毁回调,确保在容器关闭时能够正确地清理资源。
- 在AbstractAutowireCapableBeanFactory类中的registerDisposableBeanIfNecessary方法中实现
- Bean准备就绪:
- 此时,Bean已完全初始化,可以开始处理应用程序的请求了。
- 调用DisposableBean的destroy方法:
- 当容器关闭时,如果Bean实现了DisposableBean接口,destroy方法会被调用。
- 在DisposableBeanAdapter的destroy方法中实现
- 调用自定义的destory-method
- 如果Bean在配置文件中定义了销毁方法,那么该方法会被调用。
- 在DisposableBeanAdapter的destroy方法中实现
可以看到,整个Bean的创建的过程都依赖于AbstractAutowireCapableBeanFactory这个类,而销毁主要依赖DisposableBeanAdapter这个类。
AbstractAutowireCapableBeanFactory 的入口处,doCreateBean的核心代码如下,其中包含了实例化、设置属性值、初始化Bean以及注册销毁回调的几个核心方法。
protected Object doCreateBean(final String beanName, final RootBeanDefinition mbd, final Object[] args)
			throws BeanCreationException {

		// 实例化bean
		BeanWrapper instanceWrapper = null;
		if (instanceWrapper == null) {
			instanceWrapper = createBeanInstance(beanName, mbd, args);
		}

        // ...

		Object exposedObject = bean;
		try {
            //设置属性值
			populateBean(beanName, mbd, instanceWrapper);
			if (exposedObject != null) {
                //初始化Bean
				exposedObject = initializeBean(beanName, exposedObject, mbd);
			}
		}

    	// ...

		// 注册Bean的销毁回调
		try {
			registerDisposableBeanIfNecessary(beanName, bean, mbd);
		}

		return exposedObject;
	}
而DisposableBeanAdapter的destroy方法中核心内容如下:
@Override
public void destroy() {
    if (this.invokeDisposableBean) {
            // ...
            ((DisposableBean) bean).destroy();
        }
        // ...
    }

    if (this.destroyMethod != null) {
        invokeCustomDestroyMethod(this.destroyMethod);
    }
    else if (this.destroyMethodName != null) {
        Method methodToCall = determineDestroyMethod();
        if (methodToCall != null) {
            invokeCustomDestroyMethod(methodToCall);
        }
    }
}
Autowired和Resource的关系?
相同点
对于下面的代码来说,如果是Spring容器的话,两个注解的功能基本是等价的,他们都可以将bean注入到对应的field中
@Autowired
private Bean beanA;
@Resource
private Bean beanB;
不同点
byName和byType匹配顺序不同
- Autowired在获取bean的时候,先是byType的方式,再是byName的方式。意思就是先在Spring容器中找以Bean为类型的Bean实例,如果找不到或者找到多个bean,则会通过fieldName来找。举个例子:
@Component("beanOne")
class BeanOne implements Bean {}
@Component("beanTwo")
class BeanTwo implements Bean {}
@Service
class Test {
    // 此时会报错,先byType找到两个bean:beanOne和beanTwo
    // 然后通过byName(bean)仍然没办法匹配
	@Autowired
    private Bean bean;

    // 先byType找到两个bean,然后通过byName确认最后要注入的bean
    @Autowired
    private Bean beanOne;

    // 先byType找到两个bean,然后通过byName确认最后要注入的bean
    @Autowired
    @Qualifier("beanOne")
    private Bean bean;
}
- Resource在获取bean的时候,和Autowired恰好相反,先是byName方式,然后再是byType方式。当然,我们也可以通过注解中的参数显示指定通过哪种方式。同样举个例子:
@Component("beanOne")
class BeanOne implements Bean {}
@Component("beanTwo")
class BeanTwo implements Bean {}
@Service
class Test {
    // 此时会报错,先byName,发现没有找到bean
    // 然后通过byType找到了两个Bean:beanOne和beanTwo,仍然没办法匹配
	@Resource
    private Bean bean;

    // 先byName直接找到了beanOne,然后注入
    @Resource
    private Bean beanOne;

    // 显示通过byType注入,能注入成功
    @Resource(type = BeanOne.class)
    private Bean bean;
}
作用域不同
- Autowired可以作用在构造器,字段,setter方法上
- Resource 只可以使用在field,setter方法上
支持方不同
- Autowired是Spring提供的自动注入注解,只有Spring容器会支持,如果做容器迁移,是需要修改代码的
- Resource是JDK官方提供的自动注入注解(JSR-250)。它等于说是一个标准或者约定,所有的IOC容器都会支持这个注解。假如系统容器从Spring迁移到其他IOC容器中,是不需要修改代码的。


 2111
2111

 被折叠的 条评论
为什么被折叠?
被折叠的 条评论
为什么被折叠?
 到【灌水乐园】发言


