


1.httpd常用配置
切换使用MPM(编辑/etc/httpd/conf.modules.d/00-mpm.conf文件):
以坦克.zip为例
1. 在根目录下放入坦克.zip并解压
[root@localhost ~]# cd /var/www/html/
[root@localhost html]# ls
坦克.zip

//解压坦克的包
[root@localhost html]# unzip 坦克.zip
[root@localhost html]# ls
坦克.zip  Battle_City

//删除安装包并把Battle_City移动到tanke文件下方便查找
[root@localhost html]# rm -rf 坦克.zip
[root@localhost html]# mv Battle_City tanke

//查看tanke
[root@localhost html]# cd tanke/
[root@localhost tanke]# ls
audio  css  images  index.html  js
默认情况下在浏览器上可访问192.168.253.140/tanke

2.配置访问权限允许除192.168.253.1以外的所有主机访问
[root@localhost conf]# vim httpd.conf
<Directory "/var/www/html/tanke">
     <RequireAll>
          Require not ip 192.168.253.1
          Require all granted
     </RequireAll>
</Directory>

//测试
[root@localhost conf]#httpd-t

//开启httpd服务
[root@localhost conf]# systemctl start httpd
3.在本机上访问可192.168.253.140/tanke
[root@localhost conf]# curl http://192.168.253.140/tanke/index.html
<!DOCTYPE html>
<html lang="zh" class="no-js demo-1">
		<div class="container">
			<head><h3>操作说明:玩家1:wasd上左下右,space射击;玩家2:方向键,enter射击。n下一关,p上一关。</h3></head>
			<div class="main clearfix">
				<div id="canvasDiv" >
		</div><!-- /container -->
		<div style="text-align:center;">
<p>来源:<a href="http://www.mycodes.net/" target="_blank">源码之家</a></p>
</div>
	</body>
4.拒绝虚拟机不能访问其他可以访问
[root@localhost conf]# vim httpd.conf
<Directory "/var/www/html/tanke">
     <RequireAll>
          Require not ip 192.168.253.140
          Require all granted
     </RequireAll>
</Directory>
//开启httpd服务
[root@localhost conf]# httpd -t
[root@localhost conf]# systemctl start httpd
5.只允许虚拟机IP可以访问
[root@localhost conf]# vim httpd.conf
<Directory "/var/www/html/tanke">
     <RequireAll>
          Require ip 192.168.253.140
     </RequireAll>
</Directory>
//开启httpd服务
[root@localhost conf]# httpd -t
[root@localhost conf]# systemctl start httpd
6.所有主机都能访问
[root@localhost conf]# vim httpd.conf
<Directory "/var/www/html/tanke">
     <RequireAll>
          Require all granted
     </RequireAll>
</Directory>
[root@localhost conf]# httpd -t
[root@localhost conf]# systemctl start httpd
7.拒绝所有主机访问
[root@localhost conf]# vim httpd.conf
<Directory "/var/www/html/tanke">
     <RequireAll>
          Require all denied
     </RequireAll>
</Directory>
[root@localhost conf]# httpd -t
[root@localhost conf]# systemctl start httpd
2.虚拟主机
2.1虚拟主机:一个网站就是一个虚拟主机
虚拟主机有三类:
- 相同IP不同端口
//更改此配置文件使80端口可以访问tanke
[root@localhost conf.d]# vim httpd-vhosts.conf
<VirtualHost *:80>
    DocumentRoot "/var/www/html/tanke"
    ServerName www.tanke1.com
    ServerAlias www.dummy-host.example.com
    ErrorLog "/var/log/httpd/www.tanke1.com-error_log"
    CustomLog "/var/log/httpd/www.tanke.com-access_log" common
</VirtualHost>
//测试 启动
[root@localhost conf.d]# httpd -t
Syntax OK
[root@localhost conf.d]# systemctl restart httpd

//再写一个配置文件 端口为81
Listen 81
<VirtualHost *:81>
    DocumentRoot "/var/www/html/feiji"
    ServerName www.feiji1.com
    ErrorLog "/var/log/httpd/www.feiji1.com-error_log"
    CustomLog "/var/log/httpd/www.feiji1.com-access_log" common
</VirtualHost>
用相同IP不同端口去访问浏览器- 不同IP相同端口
<VirtualHost 192.168.253.140:80>
    DocumentRoot "/var/www/html/tanke"
    ServerName www.tanke1.com
    ErrorLog "/var/log/httpd/www.tanke1.com-error_log"
    CustomLog "/var/log/httpd/www.tanke1.com-access_log" common
</VirtualHost>

<VirtualHost 192.168.253.141:80>
    DocumentRoot "/var/www/html/feiji"
    ServerName www.feiji1.com
    ErrorLog "/var/log/httpd/www.feiji1.com-error_log"
    CustomLog "/var/log/httpd/www.feiji1.com-access_log" common
</VirtualHost>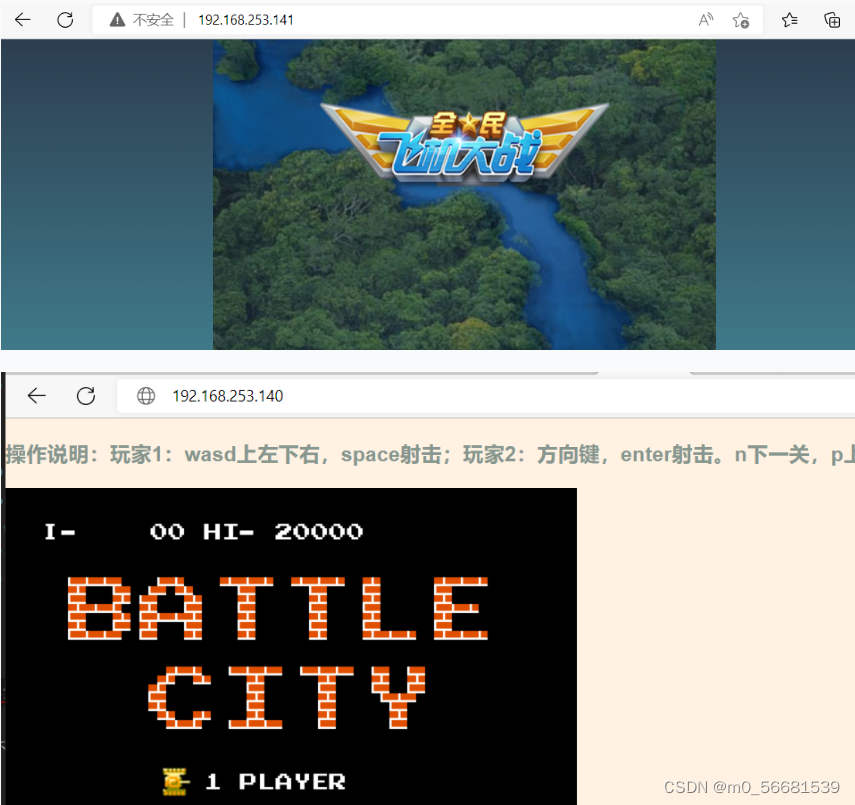
- 相同IP相同端口不同域名
<VirtualHost *:80>
    DocumentRoot "/var/www/html/tanke"
    ServerName www.tanke1.com
    ErrorLog "/var/log/httpd/www.tanke1.com-error_log"
    CustomLog "/var/log/httpd/www.tanke1.com-access_log" common
</VirtualHost>


<VirtualHost *:80>
    DocumentRoot "/var/www/html/feiji"
    ServerName www.feiji1.com
    ErrorLog "/var/log/httpd/www.feiji1.com-error_log"
    CustomLog "/var/log/httpd/www.feiji1.com-access_log" common
</VirtualHost>

//在Windows的c: \windows \system32\derviceletc \hostsr一定要把hosts文件拖到桌面进行修改,修改完再拖回去 然后再以不同的域名访问192.168.253.140网站
把hosts文件以记事本打开在里面添加上
 192.168.253.140 www.feiji.com
 192.168.253.140 www.tanke.com


 1283
1283


 被折叠的 条评论
为什么被折叠?
被折叠的 条评论
为什么被折叠?
 到【灌水乐园】发言


