


虽然东方傲月一副生人勿进的冷漠模样,但是他觉得,这就好像是一个茧,是一种伪装。就好像是受过伤之后,所结的血痂,比皮肤更坚硬

自定义启动器
1、启动器命名规范与启动器模式
官方命名空间
- 前缀:spring-boot-starter-
- 模式:spring-boot-starter-模块名
- 举例:spring-boot-starter-web、spring-boot-starter-jdbc
自定义命名空间
- 后缀:-spring-boot-starter
- 模式:模块-spring-boot-starter
- 举例:mybatis-spring-boot-starter
自定义启动器模式:启动器starter只是用来做依赖管理 需要专门写一个类似spring-boot-autoconfigure的配置模块 用的时候只需要引入启动器starter,就可以使用自动配置了
自定义starter:
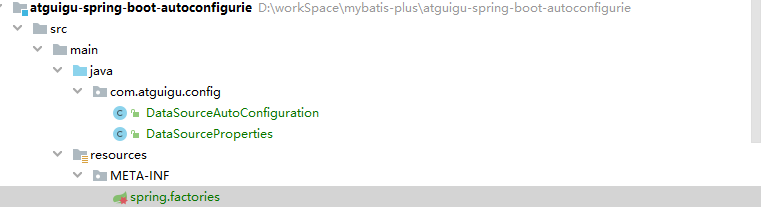
创建2个maven工程
第一个工程: atguigu-spring-boot-autoconfigurie
           基础依赖:导入springboot基础包
           自定义XXXautoconfigutiton类
           @Configuration @EnableAutoConfiguration
           在resources/META-INF/下创建spring.factories文件
           maven install 发布
第二个工程: atguigu-sping-boot-starer
           空的项目
           需要将atguigu-springboot-autoconfigurie 的依赖映入进来
           执行maven install 发布

2、自定义启动器-创建工程
自定义启动器名称:atguigu-sping-boot-starer【即创建工程atguigu-sping-boot-starer】
atguigu-sping-boot-starer引入依赖
<dependencies>
    <!-- 引入自动配置模块 -->
    <dependency>
        <groupId>com.atguigu</groupId>
        <artifactId>atguigu-spring-boot-autoconfigurie</artifactId>
        <version>1.0-SNAPSHOT</version>
    </dependency>
</dependencies>
atguigu-spring-boot-autoconfigurie中引入如下依赖
<parent>
    <groupId>org.springframework.boot</groupId>
    <artifactId>spring-boot-starter-parent</artifactId>
    <version>2.3.6.RELEASE</version>
</parent>

<properties>
    <project.build.sourceEncoding>UTF-8</project.build.sourceEncoding>
    <project.reporting.outputEncoding>UTF-8</project.reporting.outputEncoding>
    <java.version>1.8</java.version>
</properties>

<dependencies>
    <!--引入spring‐boot‐starter;所有starter的基本配置-->
    <dependency>
        <groupId>org.springframework.boot</groupId>
        <artifactId>spring-boot-starter</artifactId>
</dependency>

    <!--自动配置连接池-->
    <dependency>
        <groupId>com.alibaba</groupId>
        <artifactId>druid</artifactId>
        <version>1.1.12</version>
</dependency>

    <dependency>
            <groupId>c3p0</groupId>
            <artifactId>c3p0</artifactId>
            <version>0.9.1.2</version>
</dependency>

    <dependency>
        <groupId>org.springframework.boot</groupId>
        <artifactId>spring-boot-configuration-processor</artifactId>
        <optional>true</optional>
    </dependency>
</dependencies>
3、创建配置属性绑定类"XXXProperties"
在atguigu-spring-boot-autoconfigurie中创建属性配置类,为了读取引入“自定义连接池启动器”的工程的配置文件DataSourceProperties
@ConfigurationProperties(prefix = "spring.jdbc.datasource")
public class DataSourceProperties {
    private String driverClassName ;
    private String url;
    private String username;
    private String password;
    //省略get/set方法
}
4、创建"XXXAutoConfiguration"
也是在atguigu-spring-boot-autoconfigurie中创建,自动配置类都是以AutoConfiguration结尾来命名的。
@SpringBootConfiguration
@EnableConfigurationProperties(DataSourceProperties.class)
public class DataSourceAutoConfiguration {
    @Autowired
    private DataSourceProperties dataSourceProperties ;

    @Bean
    public DataSource createDataSource(){
        DruidDataSource dataSource = new DruidDataSource();
        dataSource.setDriverClassName(dataSourceProperties.getDriverClassName());
        dataSource.setUrl(dataSourceProperties.getUrl());
        dataSource.setUsername(dataSourceProperties.getUsername());
        dataSource.setPassword(dataSourceProperties.getPassword());
        return dataSource;
    }
}5、spring.factories注册自定义配置类
Spring Boot启动的时候会通过@EnableAutoConfiguration注解去依赖的starter包中寻找 resources/META-INF/spring.factories 文件中的所有自动配置类,并对其进行加载。
最后,根据 @Conditional注解的条件,进行自动配置并将Bean注入Spring Context 上下文当中。
在自定义启动器工程的resources/META-INF/下创建spring.factories文件,并添加如下内容:
org.springframework.boot.autoconfigure.EnableAutoConfiguration=com.atguigu.config.DataSourceAutoConfiguration
这样,项目一启动,就知道要加载哪个自动配置类
6、使用自定义启动器
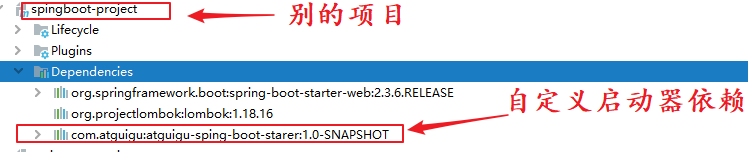
在别的项目的pom.xml中引入刚刚自定义的场景启动器(使用前先install自定义启动器项目发布)
<dependency>
    <groupId>com.atguigu</groupId>
    <artifactId>atguigu-sping-boot-starer</artifactId>
    <version>1.0-SNAPSHOT</version>
</dependency>
配置文件配置属性
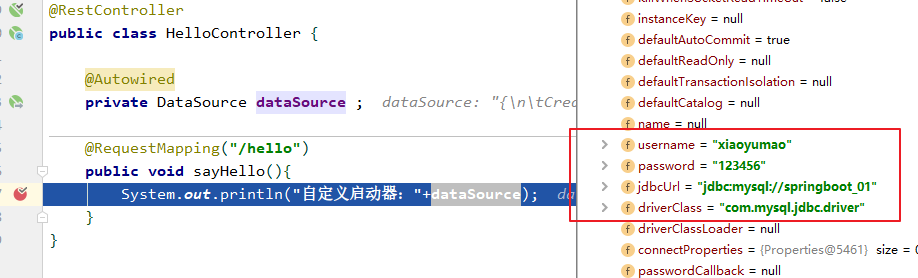
spring:
  profiles:
    active: dev
  jdbc:
    datasource:
      driverClassName: com.mysql.jdbc.driver
      url: jdbc:mysql://springboot_01
      username: xiaoyumao
      password: 123456
代码里注入后就可以直接使用了
@RestController
public class HelloController {
@Autowired
private DataSource dataSource ;
@RequestMapping("/hello")
public void sayHello(){
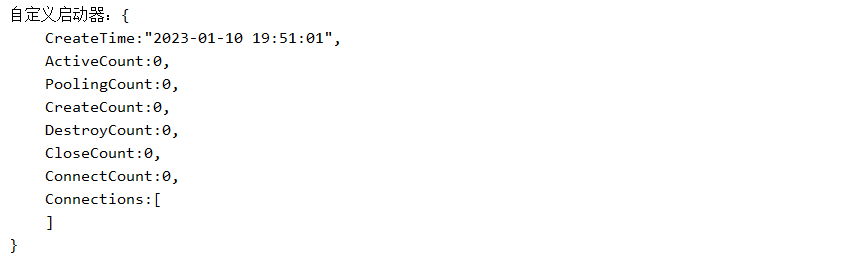
System.out.println("自定义启动器:"+dataSource);
}
}测试:在浏览器输入
http://localhost:8080/hello
控制台输出如下:
打断点
7、多种数据源-@Conditional
让我们的启动器支持多种数据源, 例如 : C3P0和Druid , 根据配置进行选择 , 就可以使用条件选择进行实现。
@ConditionalOnProperty(value = "spring.jdbc.datasource.type",havingValue = "druid")
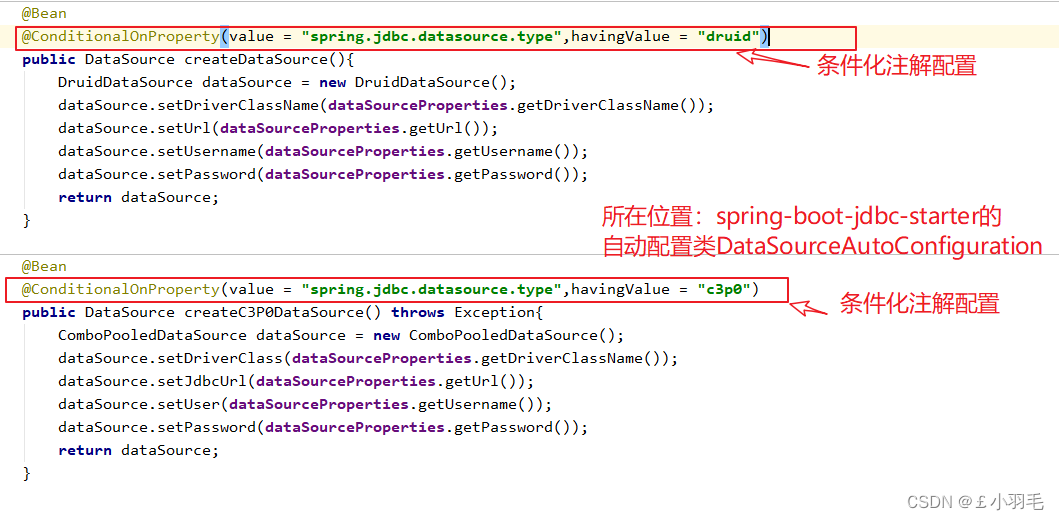
现在有俩个数据源,怎么让注入的时候只注入自己想要的那种数据源呢?
- 如果配置文件中配置了spring.jdbc.datasource.type=c3p0使用c3p0数据源
- 如果配置文件中配置了spring.jdbc.datasource.type=druid使用druid数据源
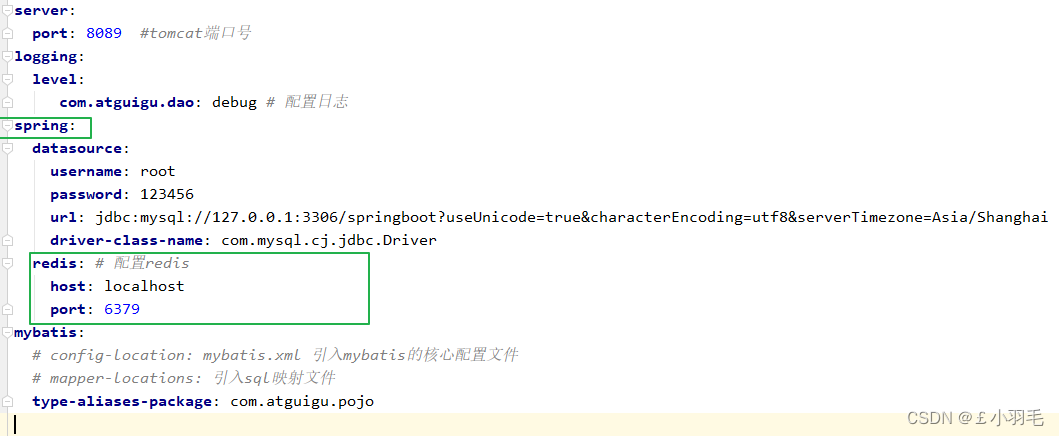
application.yml配置文件
测试,浏览器输入http://localhost:8089/hello

Spring Boot常用启动器
场景启动器
父工程pom文件管理了依赖版本: springboot和springcloud使用时我们会引入它的场景启动器
场景启动器本质是一个maven项目:它将当前场景需要使用的jar包全部引入到自己的pom文件中,范围是默认的或者compile,以后其他项目引入该项目时可以得到这个项目的所有的依赖
为什么强调版本?
因为场景启动器引入的依赖实在太多了,随便引入的启动器他们都可能有重复引入的依赖。
1、SpringBoot整合web启动器
web启动器里面包含了json启动器
        <dependency>
            <groupId>org.springframework.boot</groupId>
            <artifactId>spring-boot-starter-web</artifactId>
        </dependency>

创建UserController,里面定义一个控制器方法
@Controller
@RequestMapping(path = "/user")
public class UserController {

    @RequestMapping(path = "/findAll")
    @ResponseBody
    public List<User> findAll(){
    //返回一个User的list集合
    }
}在浏览器,输入测试springboot整合mvc
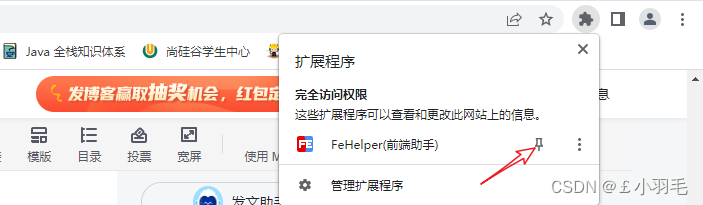
,之所以json格式的数据这么展示,是因为安装了一款插件FeHelper

安装FeHelper
怎么引入插件,添加扩展程序,
直接把老师给的文件拉到chrome的扩展程序里
固定了才能用

2、SpringBoot自定义拦截器
web开发中的拦截器可以日志记录 , 数据过滤 , 请求过滤等等很多功能,那么在SpringBoot中该如何配置呢?
回顾一下SpringMVC中配置拦截器的步骤 :
- 编写一个拦截器(实现HandlerInterceptor接口)
- 注册拦截器(mvc:interceptors)
因为SpringBoot 实现拦截器的具体步骤如下 :
1、编写一个拦截器 MyInterceptor
@Component public class MyInterceptor implements HandlerInterceptor { @Override public boolean preHandle(HttpServletRequest request, HttpServletResponse response, Object handler) throws Exception { System.out.println("MyInterceptor拦截器的preHandle方法执行...."); return true;//返回是否放行 } @Override public void postHandle(HttpServletRequest request, HttpServletResponse response, Object handler, ModelAndView modelAndView) throws Exception { System.out.println("MyInterceptor拦截器的postHandle方法执行...."); } @Override public void afterCompletion(HttpServletRequest request, HttpServletResponse response, Object handler, Exception ex) throws Exception { System.out.println("MyInterceptor拦截器的afterCompletion方法执行...."); } }2、通过WebMvcConfigurer注册拦截器
@Configuration
public class MvcConfig implements WebMvcConfigurer {

    @Autowired
    private MyInterceptor myInterceptor ;

    @Override
    public void addInterceptors(InterceptorRegistry registry) {
        registry.addInterceptor(myInterceptor).addPathPatterns("/user/findAll");
    }
}
测试:浏览器输入 http://localhost:8089/user/findAll

3、SpringBoot整合redis启动器
缓存优化
用户第一次查询数据的时候将数据存入到缓存中,之后再查间询数据直接从缓存中获取即可,不要再查间数据库
安装windows版的redis
进入 64bit目录
容我操作一手,经测试,好用


引入redis启动器:
<!--springboot整合redis启动器-->
<dependency>
    <groupId>org.springframework.boot</groupId>
    <artifactId>spring-boot-starter-data-redis</artifactId>
</dependency>
配置文件application.yml中redis相关信息
RedisTemplate 模板对象
细看RedisTemplate使用,参考连接:22-06-28 西安 redis(02) redis持久化机制、redis事务控制、主从复制机制、Jedis、Spring Data Redis_£小羽毛的博客-CSDN博客
    @Autowired
    private RedisTemplate redisTemplate ;

    @Override
    public List<User> findAll() {
        //从缓存中查询数据  规定存储用户信息使用string类型进行存储, 存储的key就是userList
        List<User> userList = (List<User>) redisTemplate.boundValueOps("userList").get();
        //如果缓存中没有数据, 查询数据库 , 将查询到的数据放入缓存
        if(userList==null){
            userList = userMapper.selectAll();
            redisTemplate.boundValueOps("userList").set(userList);
            System.out.println("从数据库中查询...");
        }else {
            System.out.println("从缓存中查询.....");
        }

        //如果缓存中有数据, 直接返回
        return userList ;
    }
清空我们测试的redis数据库,浏览器第一次访问
浏览器再第二次,第三次,之后都会从redis中查询

4、SpringBoot整合单元测试
1、引入依赖
<dependency>
    <groupId>org.springframework.boot</groupId>
    <artifactId>spring-boot-starter-test</artifactId>
    <scope>test</scope>
</dependency>
有了@RunWith(SpringRunner.class)。使用@Autowired注入的类类才能实例化到spring容器中,自动注入才能生效
@RunWith(SpringRunner.class)
@SpringBootTest
public class TestApplicationTests {
    @Autowired
    UserService userService;

    @Test
    public void contextLoads() {
        User s=userService.getName("ssss");
        System.out.println("该用户ID为:"+s.getName());

    }

}
2、类注解
@RunWith:可以更改测试运行器org.junit.runner.Runner
1.表示运行方式,@RunWith(JUnit4TestRunner)、@RunWith(SpringRunner.class)、@RunWith(PowerMockRunner.class) 三种运行方式,分别在不同的场景中使用。
2.当一个类用@RunWith注释或继承一个用@RunWith注释的类时,JUnit将调用它所引用的类来运行该类中的测试而不是开发者去在junit内部去构建它。我们在开发过程中使用这个特性。
@SpringBootTest:
1.注解制定了一个测试类运行了Spring Boot环境。提供了以下一些特性:
1.1.当没有特定的ContextConfiguration#loader()(@ContextConfiguration(loader=...))被定义那么就是SpringBootContextLoader作为默认的ContextLoader。
1.2.自动搜索到SpringBootConfiguration注解的文件。
1.3.允许自动注入Environment类读取配置文件。
1.4.提供一个webEnvironment环境,可以完整的允许一个web环境使用随机的端口或者自定义的端口。
1.5.注册了TestRestTemplate类可以去做接口调用。
2.添加这个就能取到spring中的容器的实例,如果配置了@Autowired那么就自动将对象注入。
@WebAppConfiguration:
由于是Web项目,Junit需要模拟ServletContext,因此我们需要给我们的测试类加上@WebAppConfiguration。
3、方法注解
@BeforeClass:方法只能是static void。
@AfterClass:方法只能是static void。
@Before:@Test运行之前调用的方法,可以做初始化操作
@After:执行完测试用例需要执行的清理工作
@Test:标注方法是一个单元测试用例,每个注解为@Test的方法只执行依次
执行顺序是:@BeforeClass→@Before→@Test→@After→@AfterClass
当启动测试类,测试类中有多个@Test,@BeforeClass和@AfterClass只会执行一次,每一个@Test都会执行一次@Before和@After。
5、SpringBoot整合Thymeleaf
模板引擎: 在springboot中整合它的场景启动器后,默认提供了一个视图解析器替代springmvc的,当请求被controller方法转发时 会被此视图解析器渲染跳转到指定的页面,页面中可以使用th的语法 动态获取域(request session application)中的数据到页面中展示。
引入依赖
<dependency>
    <groupId>org.springframework.boot</groupId>
    <artifactId>spring-boot-starter-thymeleaf</artifactId>
</dependency>
<dependency>
    <groupId>org.springframework.boot</groupId>
    <artifactId>spring-boot-starter-web</artifactId>
</dependency>
配置文件
Thymeleaf默认会开启页面缓存,提高页面并发能力。但会导致开发时修改页面不会立即被展现,因此关闭缓存:
# 关闭Thymeleaf的缓存
spring.thymeleaf.cache=false
默认配置
不需要做任何配置,启动器已经帮我们把Thymeleaf的视图解析器配置完成。
在spring-boot-autoconfigure依赖包中包含了Thymeleaf的默认配置:
默认前缀:
classpath:/templates/默认后缀:
.html默认编码:UTF-8

在controller层,控制视图跳转
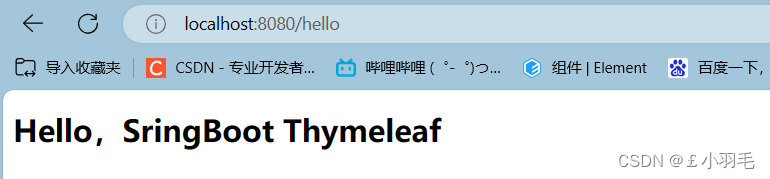
@Controller
public class HelloController {

    @GetMapping("hello")
    public String hello(Model model){
        model.addAttribute("msg","Hello,SringBoot Thymeleaf");
        return "hello";
    }
}
ModelAndView
创建hello.html页
注意,把html 的名称空间,改成:
xmlns:th="http://www.thymeleaf.org会有语法提示<!DOCTYPE html> <html lang="en" xmlns:th="http://www.thymeleaf.org"> <head> <meta charset="UTF-8"> <title>Title</title> </head> <body> <h1 th:text="${msg}"></h1> </body> </html>

访问效果,没改端口的话是8080
Spring Boot项目打包部署(应用)
1、maven-plugin插件
在pom.xml中配置SpringBoot项目的maven-plugin插件
直接使用maven自带的package打包功能,在打Jar包的时候,不会将该项目所依赖的Jar包一起打进去,在使用“java -jar”命令启动项目时会报错,项目无法正常启动。
spring-boot-maven-plugin:使用此插件在打Jar包时会引入依赖包
这样在spring boot应用打包之后,生成一个Fat.jar(jar中包含jar),包含了应用依赖的jar包和 spring boot Loader相关的类
<build>
<plugins>
<!-- 打jar包时如果不配置该插件,打出来的jar包没有清单文件 -->
<plugin>
<groupId>org.springframework.boot</groupId>
<artifactId>spring-boot-maven-plugin</artifactId>
</plugin>
</plugins>
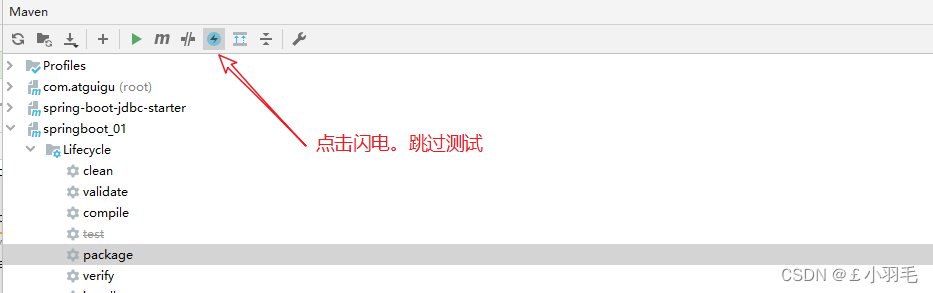
</build>2、package打包
运行maven的打包命令 : package
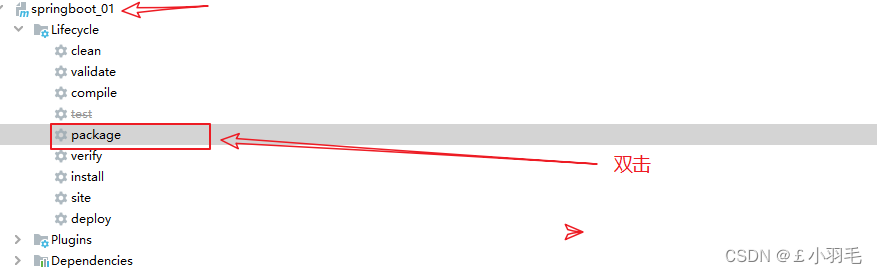
打包之前我们需要跳过测试 , 如果不跳过测试那么我们编写的测试类都会被maven自动执行, 可能会出现错误,导致打包不成功
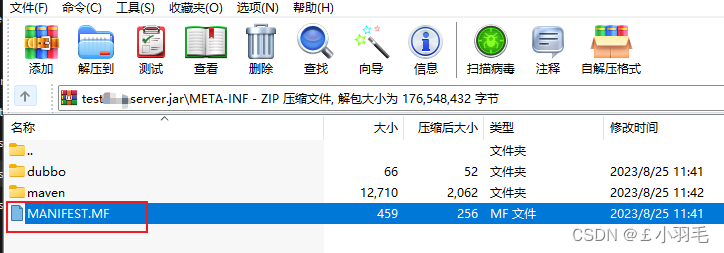
3、打包结果【target目录】
执行之后可以在控制台看到打包的日志信息, 其中有生成的包的位置。

打的jar包会放在target目录
这两个jar包有什么区别呢?
.jar.original 是普通jar包,不包含依赖
.jar 是可执行jar包,包含了pom中的所有依赖,可以直接用 java -jar xxx.jar 命令执行

- 如果是部署,就用.jar ,
- 如果是给别的项目用,就要给.jar.original这个包,把.original后缀去掉即可
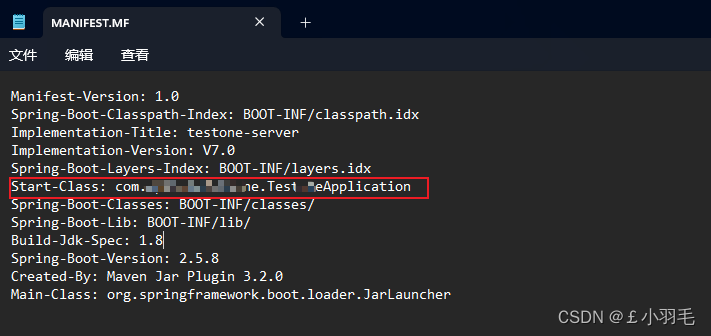
4、jar包运行
.jar 是可执行jar包,包含了pom中的所有依赖,可以直接用 java -jar xxx.jar 命令执行

java -jar命令用于运行可执行的JAR文件。它会自动查找JAR文件中的清单文件(MANIFEST.MF),
并根据清单文件MANIFEST.MF中的Main-Class属性指定的主类来启动应用程序。
项目
在cmd中更换字符编码命令
此方法更换之后只对当前窗口有效,如果想要之后的控制台都是统一当前修改的字符编码,只需要执行命令之后勾选上"丢弃旧的副本"并重启即可。
部分字符编码对应代码:
65001——UTF-8
936——简体中文
950——繁体中文
437——美国/加拿大英语
932——日文
949——韩文
866——俄文
5、常用参数
以下是一些常用的java -jar命令的参数,让我们逐一了解它们的功能和用法。
-Xmx:指定Java堆的最大内存大小。例如,-Xmx512m表示将最大堆内存设置为512MB。通过调整堆内存大小,可以优化应用程序的性能和内存使用情况。
-Xms:指定Java堆的初始内存大小。例如,-Xms256m表示将初始堆内存设置为256MB。这个参数可以帮助您在启动应用程序时控制初始内存分配的大小。
-Xss:指定线程栈的大小。例如,-Xss1m表示将线程栈大小设置为1MB。线程栈用于存储线程的局部变量和方法调用信息。通过调整线程栈的大小,可以控制应用程序的并发性能和内存使用情况。
-XX:MetaspaceSize=256m参数,您可以指定元空间的初始大小为256MB。这意味着在应用程序启动时,虚拟机会预分配256MB的内存用于存储类的元数据。
-XX:MaxMetaspaceSize=:指定元空间的最大大小。元空间用于存储类的元数据信息。例如,-XX:MaxMetaspaceSize=256m表示将元空间的最大大小设置为256MB。适当设置元空间的大小可以避免类加载和元数据溢出的问题。
-D=:设置系统属性。例如,-Djava.library.path=/path/to/libs设置java.library.path系统属性为/path/to/libs。您可以使用这个参数来配置应用程序的一些属性,例如文件路径、日志级别等。
-verbose:class:打印类加载信息。使用这个参数可以了解应用程序在运行过程中加载的类的详细信息,包括类的名称、来源等。
-verbose:gc:打印垃圾回收信息。通过使用这个参数,您可以了解应用程序的垃圾回收情况,包括垃圾回收器的使用情况、回收的对象数量等。
-Dfile.encoding=:设置默认的文件编码。例如,-Dfile.encoding=UTF-8表示使用UTF-8编码来读取和写入文件。正确设置文件编码可以确保应用程序能够正确处理不同字符集的文本数据。
以上是一些常用的java -jar命令的参数,通过灵活运用这些参数,您可以对应用程序的性能、内存使用和系统属性进行优化和配置。
6、dll引入
DLL:动态链接库(Dynamic Link Library),微软公司在Windows中实现共享函数库概念的一种实现方式
java中引入dll
System.load();
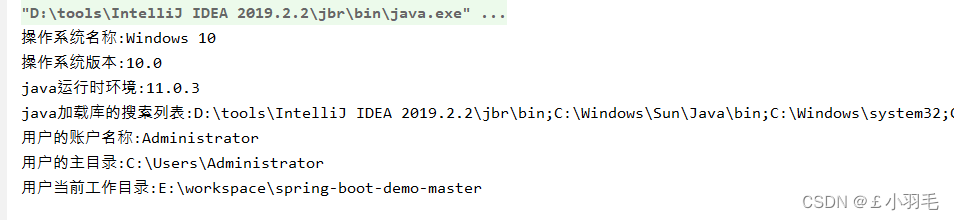
System.loadLibrary();7、java环境信息
public static void main(String[] args) {
    System.out.println("操作系统名称:" + System.getProperty("os.name"));
    System.out.println("操作系统版本:" + System.getProperty("os.version"));
    System.out.println("java运行时环境:" + System.getProperty("java.version"));
    System.out.println("java加载库的搜索列表:" + System.getProperty("java.library.path"));
    System.out.println("用户的账户名称:" + System.getProperty("user.name"));
    System.out.println("用户的主目录:" + System.getProperty("user.home"));
    System.out.println("用户当前工作目录:" + System.getProperty("user.dir"));
}
Spring Boot web 开发
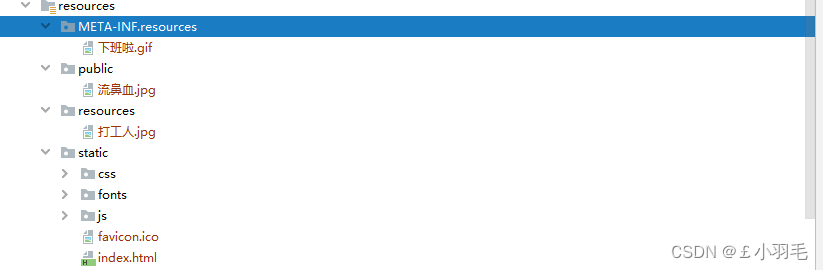
1、静态资源默认目录
使用Spring Boot做开发 , 项目中没有webapp目录 , 我们的项目是一个jar工程,那么就没有webapp,我们的静态资源该放哪里呢?
一般选择在类路径下创建static目录放静态资源
在springboot中有一个叫做ResourceProperties的类,里面就定义了静态资源的4种默认查找路径:
private static final String[] CLASSPATH_RESOURCE_LOCATIONS =
new String[]{"classpath:/META-INF/resources/", "classpath:/resources/", "classpath:/static/", "classpath:/public/"};
所以,如果要引入静态资源,就放在这4个目录之一下就可。
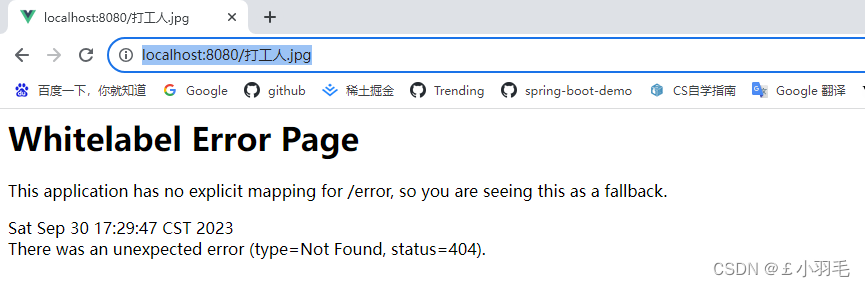
访问:项目根目录"/"+“静态资源名” 但是url中出现中文了
那么最简单:改一下图片名,就可以访问到图片资源了
2、静态资源访问前缀
springboot静态资源默认访问:无前缀
spring:
  mvc:
    static-path-pattern: /res/**
再去访问:http://localhost:8080/dagongren.jpg就会报错404了
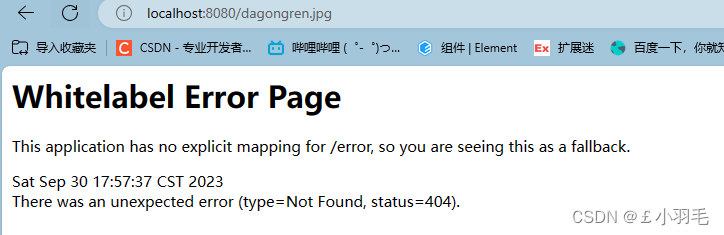
此时应该前缀去访问:http://localhost:8080/res/dagongren.jpg
3、与动态请求名冲突
有一个问题。定义一个动态请求"/dagongren.jpg",
@RestController
public class HelloController {
    @RequestMapping("/dagongren.jpg")
    public Result dagongren() {
        return Result.ok("dagongren.jpg");
    }
}
再去访问:http://localhost:8080/dagongren.jpg的结果
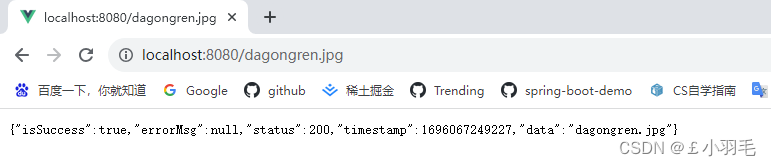
原理:请求进来,先去找controller,能处理则处理返回。不能处理的所有请求都交给静态资源处理器
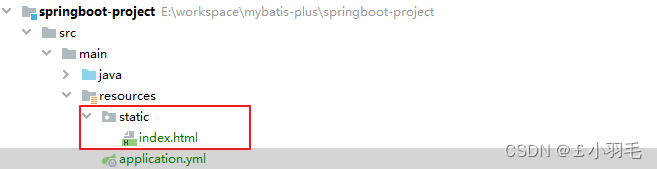
4、项目启动欢迎页
Spring Boot 项目启动后,默认会去静态资源路径(resources/static)下查找 index.html 作为首页文件。
在静态资源路径下,放一个index.html
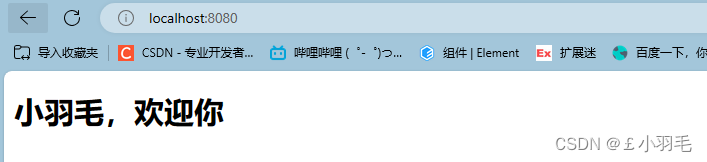
index.html 内容如下
<!DOCTYPE html> <html lang="en"> <head> <meta charset="UTF-8"> <title>Title</title> </head> <body> <h1>小羽毛,欢迎你</h1> </body> </html>项目启动后,访问项目根目录:http://localhost:8080/
如果使用非 index.html 的文件作为首页面呢?
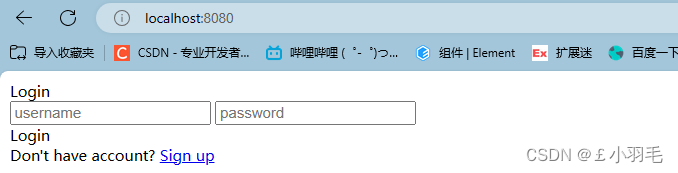
假设我们在 resources/static 目录下有个 login.html 文件
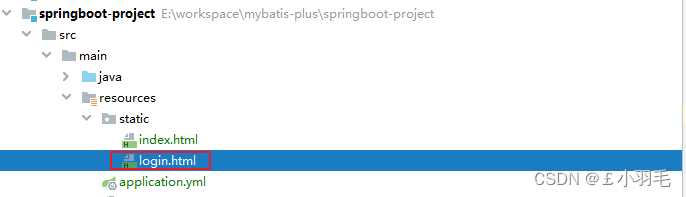
想让它作为首页
通过自定义一个 Controller 来进行转发:
@Controller
public class HelloController {

    @RequestMapping("/hello")
    @ResponseBody
    public Result sayHello() {
        return Result.ok("hello world");
    }

    @RequestMapping("/")
    public String hello() {
        //服务器内部把请求转发到登录页
        return "forward:login.html";
    }
}
项目启动后,访问项目根目录效果:http://localhost:8080/
5、静态资源拦截
1
/**
 * 配置放行静态资源文件
 *
 */
@Configuration
public class ResourcesConfiguration implements WebMvcConfigurer{

	@Override
	public void addResourceHandlers(ResourceHandlerRegistry registry) {
		registry.addResourceHandler("/static/**").addResourceLocations("classpath:/static/");
	}

	@Override
	public void addCorsMappings(CorsRegistry registry) {
		registry.addMapping("/**")
				.allowedOrigins("*")
				.allowedMethods("GET","POST","OPTIONS")
				.allowCredentials(true);
	}
}


 1387
1387


 被折叠的 条评论
为什么被折叠?
被折叠的 条评论
为什么被折叠?
 到【灌水乐园】发言


