


写在开头
这篇文章是结合Django后端实战篇搭配食用的
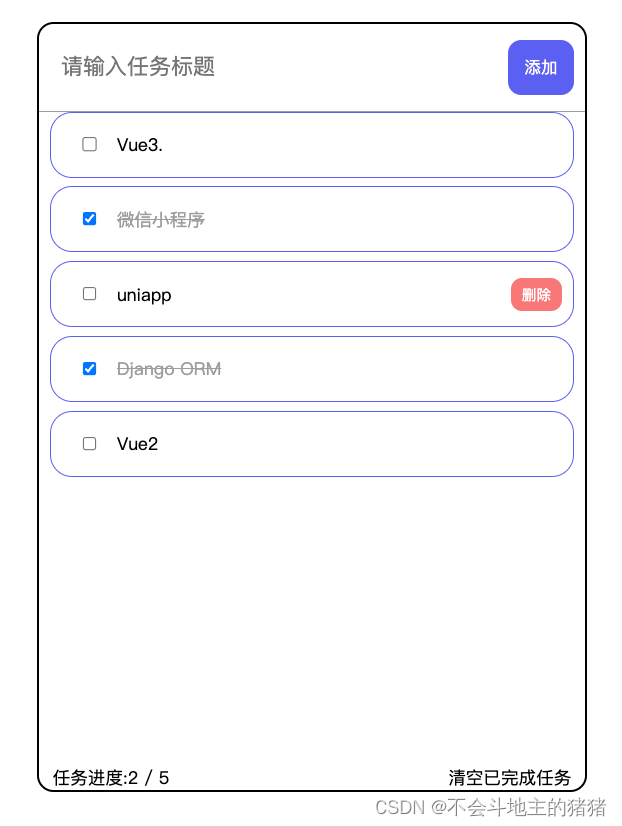
这是我们最终要实现的效果
环境搭建
本地需要有node环境

创建Vue项目brower_vue2
vue create brower_vue2
选择默认的Vue 2模版即可。
写代码前的准备
我认为思考的过程远远比codeing的过程重要
首先做前端,我们要知道页面大致长什么样,都需要设计哪些页面, 哪些可以抽离成为组件。
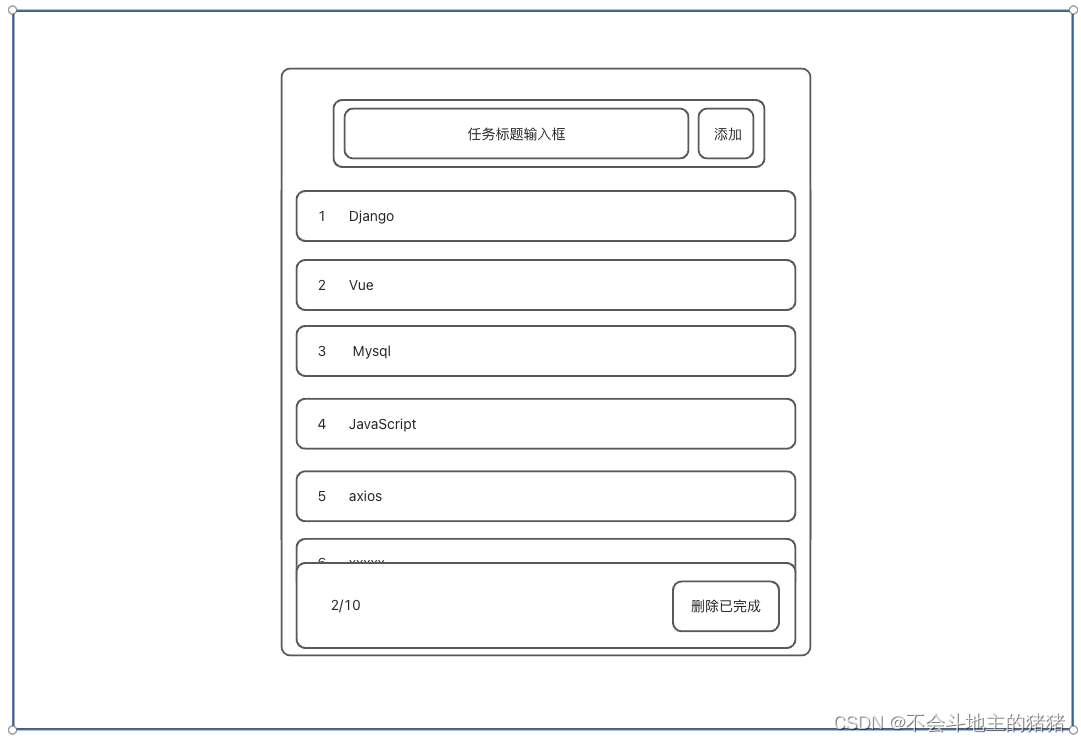
这是我绘制的草图,通过绘制草图过程,我知道可以写以下几个页面和组件
pages: todoPanel
components: todoList.vue todoItem.vue todoHeader.vue todoFooter.vue
知道了这些我们就可以进行下一步的coding了
统一配置
关闭EsLint检查
打开vue.config.js文件
const { defineConfig } = require('@vue/cli-service');
module.exports = defineConfig({
  transpileDependencies: true,
  lintOnSave: false,
});
统一目录结构

按照这个目录建立文件,并清空App.vue到最干净的状态(如下), 删除HelloWorld.vue组件
<template>
  <div class="app-container">

 </div>
</template>

<script>
export default {
  data() {
    return {

    }
  },
}
</script>

<style>

</style>
依赖包的安装
因为写样式我这里使用的是sass, 为什么要使用这个而不是css呢,它书写会有层次结构,比css的易读性更好,下面的代码中会大量的出现这样的样式代码
npm i -D sass sass-loader之后写样式就只需要表明样式文件类型即可
<style scoped lang='scss'>

</style>
组件和页面的编写
todoList
这个是todoList.vue组件,
该组件需要接收一个todoList的props数据,类型为Array
组件内部,循环遍历todoItem.vue组件
<template>
  <div class="list-container">
    <div v-for="todo,index in todoList" :key="index">
      <todoItem :todo-item="todo"/>
    </div>
 </div>
</template>

<script>
import todoItem from './todoItem.vue';
export default {
  name: "todoList",
  props: {
    todoList: {
      type: Array,
      default: () => []
    }
  },
  components: {
    todoItem
  },
  data() {
    return {

    }
  },
}
</script>

<style scoped>
.list-container {
  flex: 1;
  width: 96%;
  margin: auto;
  overflow-y: auto;
}
</style>
todoItem
todoItem组件
这个组件接收一个todo对象,看过《实战篇 TodoList (Django 后端)》文章的就会知道,我们的todo对象都包含哪些数据
let todo = {
    id: 1,
    completed: 1,
    title: "Vue2"
}
<template>
<div class="todo_item">
<input type="checkbox" :checked="todoItem.completed==1">
<div class="title" :class="{completed: todoItem.completed == 1} ">
{{ todoItem.title }}
</div>
<button class="delete" >删除</button>
</div>
</template>
<script>
export default {
name: "todoItem",
props: {
todoItem: {
type: Object,
require: true,
default: () => {}
}
},
}
</script>
<style scoped lang="scss">
.todo_item {
display: flex;
align-items: center;
width: 100%;
border: 1px solid rgb(92 96 241);
border-radius: 20px;
height: 60px;
padding: 0 10px;
margin-bottom: 8px;
input {
width: 50px;
}
div.title {
flex: 1;
white-space: nowrap;
overflow: hidden;
text-overflow: ellipsis;
&.completed {
color: #9d9d9d;
text-decoration: line-through;
}
}
button.delete {
display: none;
cursor: pointer;
border: none;
background-color: rgb(249, 119, 119);
color: white;
height: 30px;
padding: 0 10px;
border-radius: 10px;
&:hover {
background-color: rgb(249, 3, 3);
}
}
&:hover button.delete {
display: block;
}
}
</style>todoHeader
这个组件只需要将任务标题输入即可,至于之后的如何发布一个新的todo,会在下一篇文章中详细讲解
<template>
  <div class="todo-header">
    <input placeholder="请输入任务标题" v-model="title" />
    <button>添加</button>
 </div>
</template>

<script>
export default {
  name: "todoHeader",
  data() {
    return {
      title: ''
    }
  },
}
</script>

<style scoped lang="scss">
.todo-header {
  width: 100%;
  height: 80px;
  display: flex;
  align-items: center;
  border-bottom: 1px solid #9e9e9e;
  padding: 0 10px;
  input {
    height: 80%;
    width: 80%;
    outline: none;
    background-color: transparent;
    border: none;
    padding: 0 10px;
    font-size: 20px;
    color: #646363;
    flex: 1;
  }
  button {
    border: none;
    background-color: rgb(92 96 241);
    height: 50px;
    color: white;
    width: 60px;
    border-radius: 12px;
    cursor: pointer;
    font-size: 15px;

    &:hover {
      background-color: rgb(128, 132, 236);
    }
  }
}

</style>
todoFooter
这个组件只需要统计两个数据即可, 分别是当前完成任务量和任务量总数
<template>
  <div class="todo-footer">
    <div> 任务进度:<span>{{ current }}</span> / <span>{{ total }}</span> </div>
    <div class="clear_all">清空已完成任务</div>
 </div>
</template>

<script>

export default {
  props: {
    total: {
      type: Number,
      default: 0
    },
    current: {
      type: Number,
      default: 0
    },
  },
  name: "todoFooter",
}
</script>

<style scoped lang="scss">
.todo-footer {
  display: flex;
  width: 95%;
  align-items: center;
  justify-content: space-between;

  div.clear_all {
    user-select: none;
    cursor: pointer;

    &:hover {
      color: rgb(92 96 241);
    }
  }
}
</style>
todoPanel
引入上面建立好的todoHeader, todoFooter, todoList组件, 并且todoList的数据在这个组件中定义
并且使用计算属性计算出total和current两个值分别是多少
<template>
  <div class="todoPanel">
    <todo-header />
    <todoList :todo-list="todoList"/>
    <todo-footer :total="total" :current="current" />
 </div>
</template>

<script>
import todoList from '@/components/todoList'
import todoHeader from '@/components/todoHeader'
import todoFooter from '@/components/todoFooter'

export default {
  name: "todoPanel",
  components: {
    todoList, todoHeader, todoFooter
  },
  data() {
    return {
      todoList: [

      ]
    }
  },
  computed: {
    total() {
      return this.todoList.length;
    },
    current() {
      return this.todoList.filter(e => e.completed == 1).length
    }
  }
}
</script>

<style scoped>
.todoPanel {
  width: 500px;
  height: 700px;
  border: 2px solid;
  display: flex;
  flex-direction: column;
  align-items: center;
  border-radius: 15px;
}
</style>
页面呈现
做完以上步骤之后,还记得App.vue这个空空荡荡的文件吗?
这是我们项目的入口文件,所以将todoPanel再此引入并展示即可
<template>
  <div class="app-container">
    <todoPanel />
 </div>
</template>

<script>
import todoPanel from '@/views/todoPanel'
export default {
  components: {
    todoPanel
  },
  data() {
    return {

    }
  },

}
</script>

<style>
* {
  margin: 0;
  padding: 0;
  box-sizing: border-box;
}
</style>

<style scoped>
.app-container {
  height: 100vh;
  display: flex;
  align-items: center;
  justify-content: center;
}
</style>
终于做完了,此时你欣喜若狂, npm run serve运行项目一看,居然页面长这样,我的数据呢?

对啊,数据呢, 还记得我们前面说数据定义在哪里了吗? —— todoPanel中

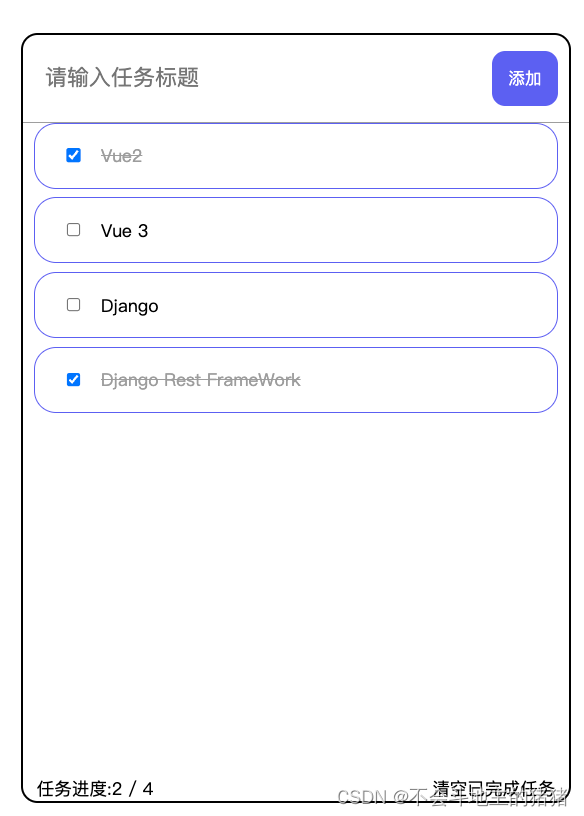
才发现我们定义的是空数据,添加几条数据试试吧
todoList: [
  {
    id: 1,
    title: "Vue2",
    completed: 1
  },
  {
    id: 2,
    title: "Vue 3",
    completed: 0
  },
  {
    id: 3,
    title: "Django",
    completed: 0
  },
  {
    id: 4,
    title: "Django Rest FrameWork",
    completed: 1
  },
] 
结尾🎉
到此为止,静态页面算是大功告成了
但是到这里为止,所有的页面交互都是行不通的
写在最后
下一篇文章: 我会详细介绍如何与我们之前写好的接口配合使用


 1601
1601


 被折叠的 条评论
为什么被折叠?
被折叠的 条评论
为什么被折叠?
 到【灌水乐园】发言


