


Puppet5 Cluster Building
Preparation
修改主机名
hostnamectl set-hostname master.cn
hostnamectl set-hostname agent1.cn
编辑主机清单
vim /etc/hosts
# 将以下配置添加到行尾。

100.64.111.121 master.cn
100.64.111.122 agent1.cn

配置完后 :wq 保存退出,并使用 ping 命令测试连通性。
关闭防火墙和 SeLinux
# 防火墙
systemctl stop firewalld

# selinux
sed -i 's/SELINUX=enforcing/SELINUX=disabled/' /etc/selinux/config
setenforce 0
配置 NTP 服务器
安装配置 ntp 服务确保主服务器和代理服务器之间的时间同步
# 使用 yum 命令在两台服务器上安装 NTP 软件包
yum -y install ntp ntpdate

# 选择 NTP 池
ntpdate 0.centos.pool.ntp.org

# 启动 NTP 服务并使其开机自启
systemctl start ntpd
systemctl enable ntpd
添加 Puppet Repository
使用以下命令将 puppet 存储库添加到系统中
rpm -Uvh https://yum.puppet.com/puppet5-release-el-7.noarch.rpmpuppet 5 包含以下组件
Package | Contents |
Puppet, Facter, Hiera, MCollective, pxp-agent root certificates, and prerequisites like Ruby and Augeas | |
puppetserver | Puppet Server; depends on puppet-agent 5 or greater |
puppetdb | |
puppetdb-termini | Plugins to let Puppet Server talk to PuppetDB |
Install:Puppet Server
1、在做如下所有操作前先添加 puppet repositories。
2、安装 puppet server package:
yum install puppetserver -y3、内存分配
默认情况下,Puppet 服务器配置为使用 2GB RAM,但是,如果你只是想在 VM 上试验 Puppet Server,可以安全地分配低至 512 MB 的内存,要更改 Puppet Server 内存分配,可以编辑 init 配置文件
对于 RHEL 或 Centos,编辑 /etc/sysconfig/puppetserver
对于 Debian 或 Ubuntu,编辑 /etc/default/puppetserver
在设置中,更新行
# Modify this if you'd like to change the memory allocation, enable JMX, etc
JAVA_ARGS="-Xms2g -Xmx2g...."
将 2g 替换成你想要分配给 Puppet Server 的内存量即可,有关 JVM 更多信息,参阅:https://docs.oracle.com/cd/E15523_01/web.1111/e13814/jvm_tuning.htm
puppetserver 对此文件进行任何更改后都需要重新启动服务。
4、启动
systemctl start puppetserver
systemctl enable puppetserver
5、配置文件
puppet server 的配置文件默认位于 /etc/puppetlabs/puppetserver/conf.d 中,详细说明可参阅:https://www.puppet.com/docs/puppetserver/5.3/configuration.html
除此之外,puppet 的可执行文件位置位于 /opt/puppetlabs/bin/ 中,且默认情况下它不在 PATH 环境变量中,可以使用命令 export PATH=/opt/puppetlabs/bin:$PATH 将其添加至 PATH 路径中,还可以通过修改 .profile 或 .bashrc 配置文件配置 PATH 位置。
Install:Puppet agent
1、安装 puppet-agent
yum install puppet-agent -y2、配置 puppet server
puppet config set server master.cn更多配置可见:https://www.puppet.com/docs/puppet/5.5/config_important_settings.html#settings-for-agents-all-nodes
3、启动 puppet 服务
/opt/puppetlabs/bin/puppet resource service puppet ensure=running enable=true4、puppet agent 现在正在 server 端上运行,它正在尝试将自己注册到 puppet master 上。每个 puppet agent 首次运行时,它会向 CA Puppet Master 提交证书签名请求(CSR),我们必须登录到 master 上检查及签署证书,签署完成后,agent 会定期从 Puppet Master 获取并应用配置目录。
在 puppet master 端
/opt/puppetlabs/bin/puppet cert list
/opt/puppetlabs/bin/puppet cert sign <NAME>
5、测试
在 puppet master 为代理签署证书文件后,在 puppet agent 上运行以下命令以验证配置。
/opt/puppetlabs/bin/puppet agent --test
Test
master 和 agent 的集群配置已经完成,接下来,做一些简单的案例。
安装软件包
为 agent 端创建清单,安装 httpd web 软件包。
# 在 master 端
cd /etc/puppetlabs/code/environments/production/manifests
vim site.pp

node 'agent2.cn'{
        package {'httpd':
                ensure => "installed",
        }
        service {'httpd':
                ensure => running,
                enable => true
        }
}

# 在 agent 端运行
/opt/puppetlabs/bin/puppet agent --test
打开 web 浏览器输入 agent 的 IP 地址,获得默认的 http 页面,如下所示

修改时区
1、安装 saz-timezone 模块
/opt/puppetlabs/bin/puppet module install saz-timezone
2、修改 site.pp 文件
# 在 master 端
cd /etc/puppetlabs/code/environments/production/manifests
vim site.pp

node default{
        class { 'timezone':
          timezone => 'UTC',
        }
}

# 在 agent 端运行
/opt/puppetlabs/bin/puppet agent --test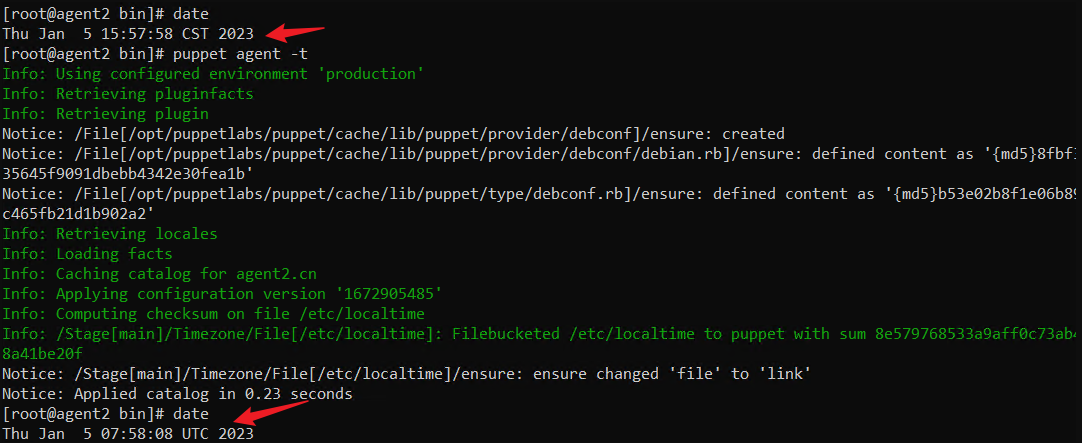


 570
570


 被折叠的 条评论
为什么被折叠?
被折叠的 条评论
为什么被折叠?
 到【灌水乐园】发言


