目录
2.2.2 实战2:爬取搜狗指定词条对应的搜索结果页面(简易网页采集器)
2.2.6 实战6:爬取国家药品监督管理总局中基于中华人民共和国化妆品生产许可证相关数据
3.4.5 xpath解析案例-爬取站长素材中免费的简历模板
1.爬虫基础简介
前戏:
1.你是否在夜深人静的时候,想看一些会让你更睡不着的图片...
2.你是否在考试或者面试前夕,想看一些具有针对性的题目和面试题...3.你是否想在杂乱的网络世界中获取你想要的数据...
什么是爬虫:
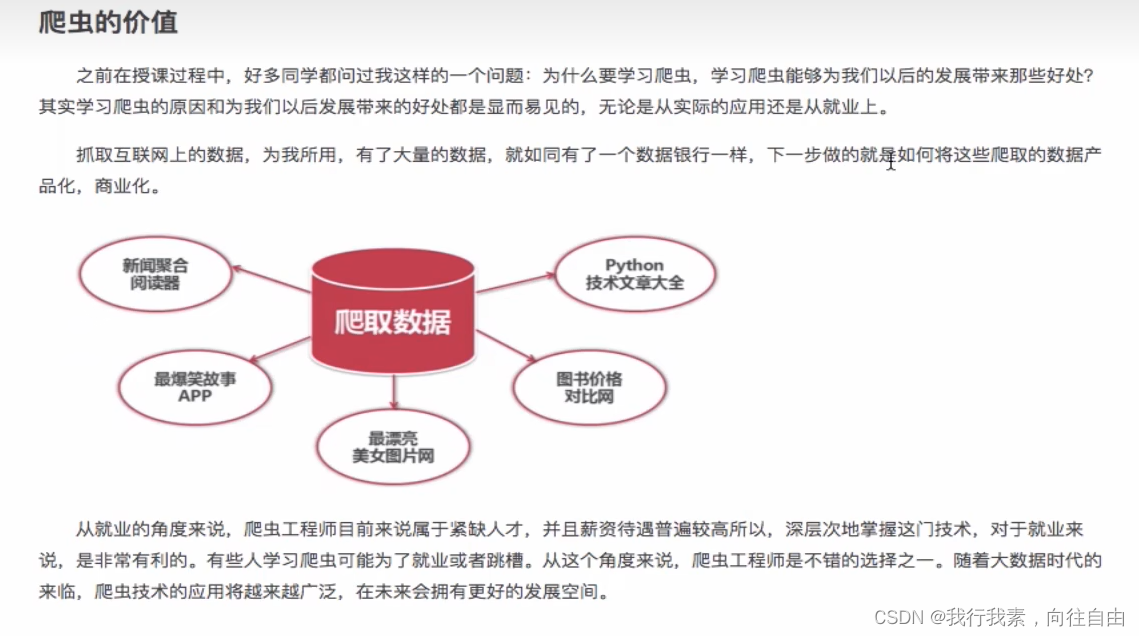
-通过编写程序,模拟浏览器上网,然后让其去互联网上抓取数据的过程。爬虫的价值:
-实际应用-就业
爬虫究竟是合法还是违法的?
-在法律中是不被禁止
-具有违法风险爬虫带来的风险可以体现在如下2方面:
-爬虫干扰了被访问网站的正常运营
-爬虫抓取了收到法律保护的特定类型的数据或信息如何在使用编写爬虫的过程中避免进入局子的厄运呢?
-时常的优化自己的程序,避免干扰被访问网站的正常运行
-在使用传播爬取到的数据时,审查抓取到的内容,如果发现了涉及到用户隐私、商业机密等敏感内容,需要及时停止爬取或传播
爬虫在使用场景中的分类:
-通用爬虫:抓取系统重要组成部分。抓取的是一整张页面数据。-聚焦爬虫:是建立在通用爬虫的基础之上。抓取的是页面中特定的局部内容。
-增量式爬虫:检测网站中数据更新的情况。只会抓取网站中最新更新出来的数据。
反爬机制:
门户网站,可以通过制定相应的策略或者技术手段,防止爬虫程序进行网站数据的爬取。
反反爬策略:
爬虫程序可以通过制定相关的策略或者技术手段,破解门户网站中具备的反爬机制,从而可以获取门户网站中的相关数据。
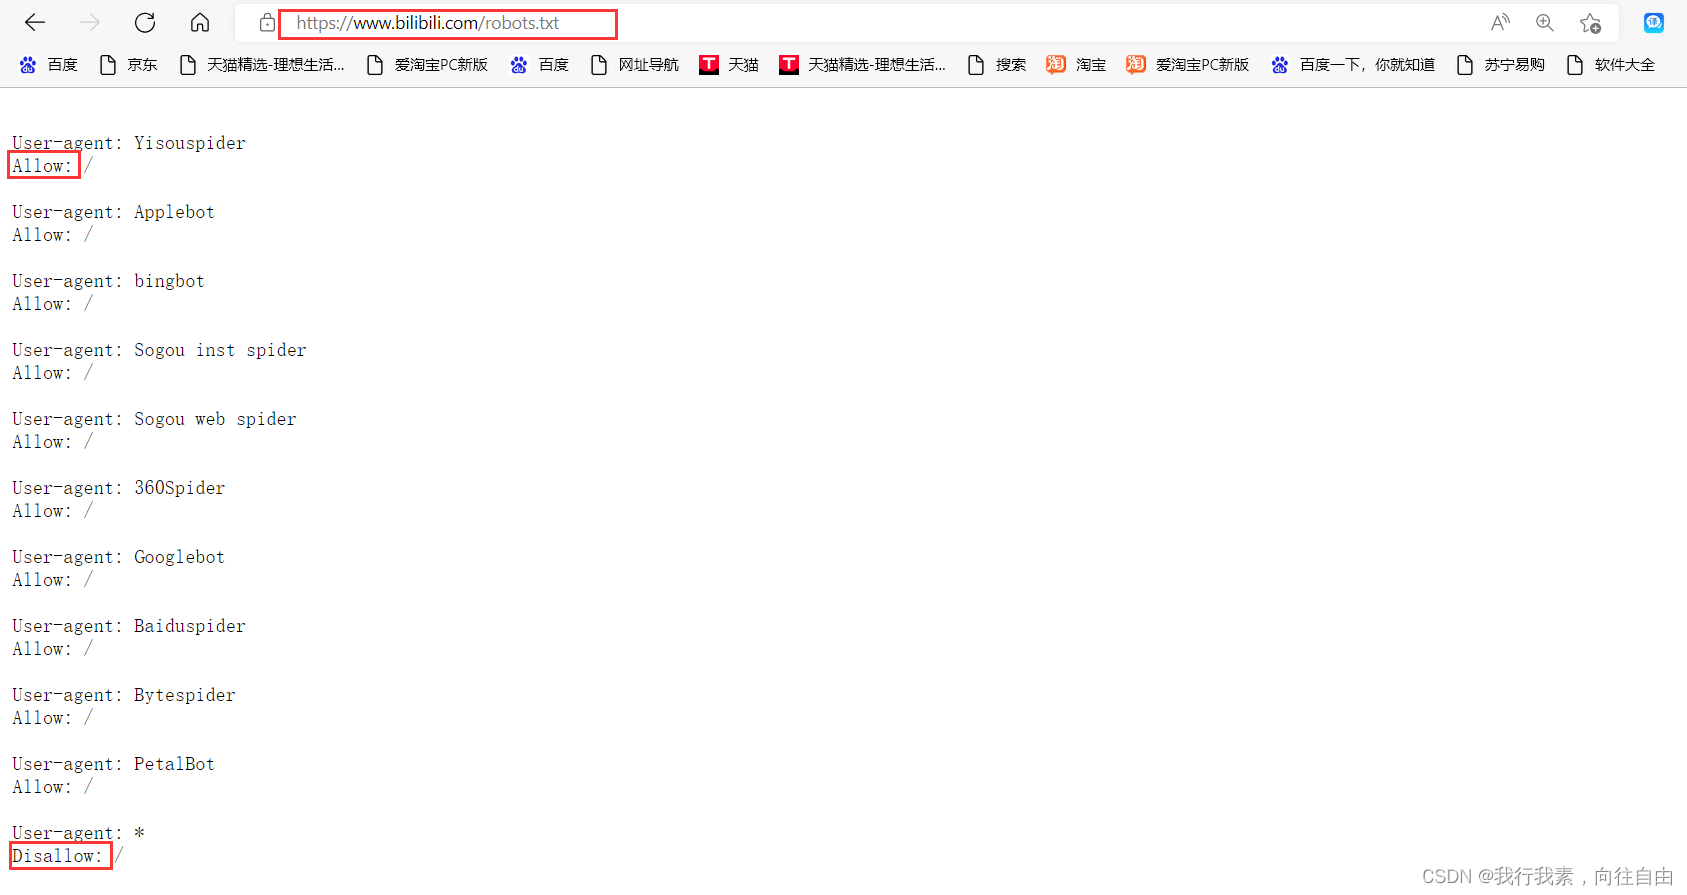
robots.txt协议:
君子协议。规定了网站中哪些数据可以被爬虫爬取,哪些数据不可以被爬取。
http协议:
-概念:就是服务器和客户端进行数据交互的一种形式。常用请求头信息。常用请求头信息:
-User-Agent:请求载体的身份标识-Connecion:请求完毕后,是断开连接还是保持连接
常用响应头信息:
-Content-Type:服务器响应回客户端的数据类型
https协议:
-安全的超文本传输协议【与http协议的区别在于是否安全,安全是指是否加密】
加密方式:
-对称秘钥加密-非对称秘钥加密
-证书秘钥加密【https所用的】
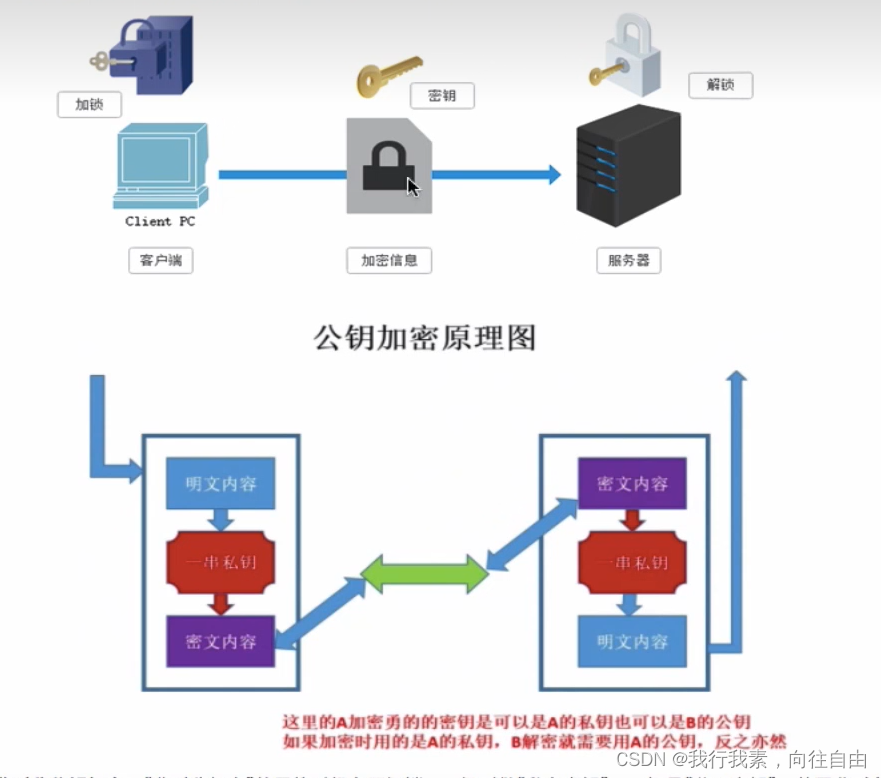
对称秘钥加密:
私有秘钥加密 Secret Key Cryptography,最大的特点是发送方和接收方都采用同样的秘钥,具有对称性,故称对称秘钥加密。发送方采用私有秘钥和指定算法进行加密 形成密文,接收方也采用同样的私有秘钥和同样的算法进行解密得到明文。由于加密和解密所用的算法是完全公开的,关键是加密和解密所用的秘钥,秘钥不同,生成的密文也就不同,用哪个秘钥加密,就需要用哪个秘钥解密,双方不能把秘钥公开,即秘钥属于双方私有。第三方无法获得秘钥,也就无法窃取信息。
使用过程:
1.发送方使用私有秘钥加密算法生成秘钥A,并复制一份借助安全通道(数字信封、PGP再次加密)发送给接收方;
2.发送方使用秘钥A将明文信息加密成密文;
3.发送方发送密文给接收方;
4.接收方接到密文利用本地秘钥A将信息解密成明文。优点:
1.算法公开;
2.应用简单;
3.加密速度快;
4.加密效率高。
在专用网络中通讯方相对固定,所以应用效果好。可以在金融局域网和各种专网的加密通讯中,大文件传输或者大报文的传输非常有效率。
缺点:
1.由于算法公开,其安全性完全依赖于对私有秘钥的保护;
2.在同一网络中所有用户使用相同的秘钥就失去了保密的意义;
3.难以进行用户身份认定,存在欺诈行为。
原理图如下:
非对称秘钥加密:
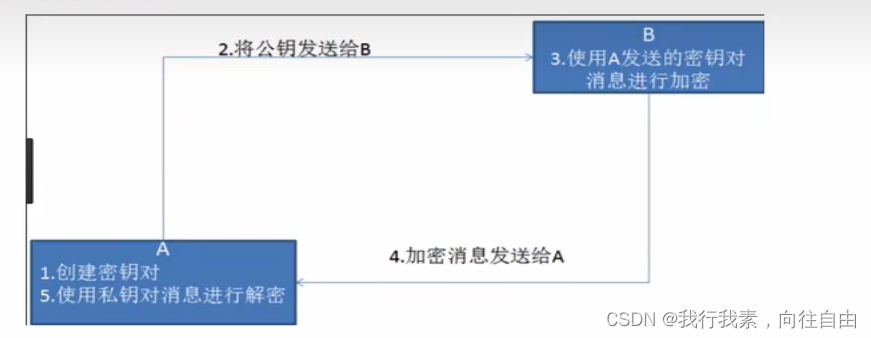
“非对称加密"使用的时候有两把锁,一把叫做“私有密钥”,一把是“公开密钥",使用非对称加密的加密方式的时候,服务器首先告诉客户端按照自己给定的公开密钥进行加密处理,客户端按照公开密钥加密以后,服务器接受到信息再通过自己的私有密钥进行解密,这样做的好处就是解密的钥匙根本就不会进行传输,因此也就避免了被挟持的风险。就算公开密钥被窃听者拿到了,它也很难进行解密,因为解密过程是对离散对数求值,这可不是轻而易举就能做到的事。
非对称秘钥加密技术缺点:
- 如何保证接收端向发送端发出公开秘钥的时候,发送端确保收到的是预先要发送的,而不会被挟持。只要是发送密钥,就有可能有被挟持的风险。
- 非对称加密的方式效率比较低,它处理起来更为复杂,通信过程中使用就有一定的效率问题而影响通信速度。
原理图如下:
证书秘钥加密:
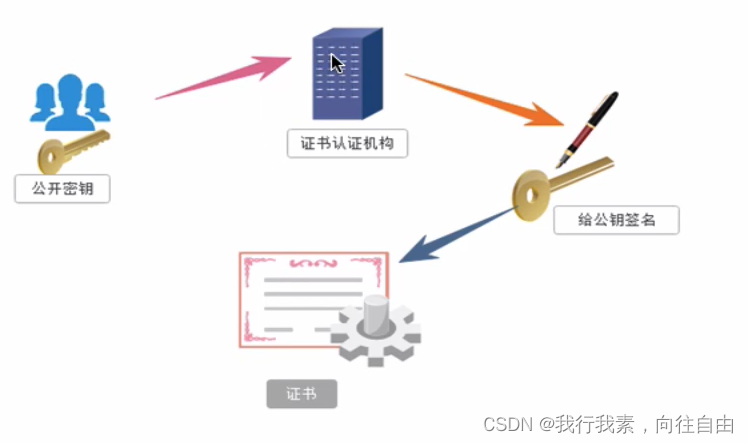
在上面我们讲了非对称加密的缺点,其中第一个就是公钥很可能存在被挟持的情况,无法保证客户端收到的公开密钥就是服务器发行的公开密钥。此时就引出了公开密钥证书机制。数字证书认证机构是客户端与服务器都可信赖的第三方机构。
证书的具体传播过程:
- 服务器的开发者携带公开密钥,向数字证书认证机构提出公开密钥的申请,数字证书认证机构在认清申请者的身份,审核通过以后,会对开发者申请的公开密钥做数字签名,然后分配这个已签名的公开密钥,并将密钥放在证书里面,绑定在一起;
- 服务器将这份数字证书发送给客户端,因为客户端也认可证书机构,客户端可以通过数字证书中的数字签名来验证公钥的真伪,来确保服务器传过来的公开密钥是真实的。一般情况下,证书的数字签名是很难被伪造的,这取决于认证机构的公信力。一旦确认信息无误之后,客户端就会通过公钥对报文进行加密发送,服务器接收到以后用自己的私钥进行解密。
原理图如下:
2.requests模块基础
2.1 requests模块介绍
requests模块:
python中原生的一款基于网络请求的模块。
特点:
功能非常强大,简单便捷,效率极高。
作用:
模拟浏览器发请求。
如何使用:(requests模块的编码流程)
-指定url
-发起请求
-获取响应数据-持久化存储
环境安装:
pip install requests
2.2 requests实战编码
2.2.1 实战1:爬取搜狗首页的页面数据
实战编码:
-需求:爬取搜狗首页的页面数据
#需求:爬取搜狗首页的页面数据

import requests

if __name__ == '__main__':
    #1.指定url
    url="https://www.sogou.com/"
    #2.发起请求
    response=requests.get(url=url)#get发起请求成功后,返回请求对象
    #3.获取响应数据
    page_text=response.text#返回字符串
    print(page_text)
    #4.持久化存储
    with open('./sogou.html','w',encoding='utf-8') as fp:
        fp.write(page_text)
    print('爬取数据结束!!!')
2.2.2 实战2:爬取搜狗指定词条对应的搜索结果页面(简易网页采集器)
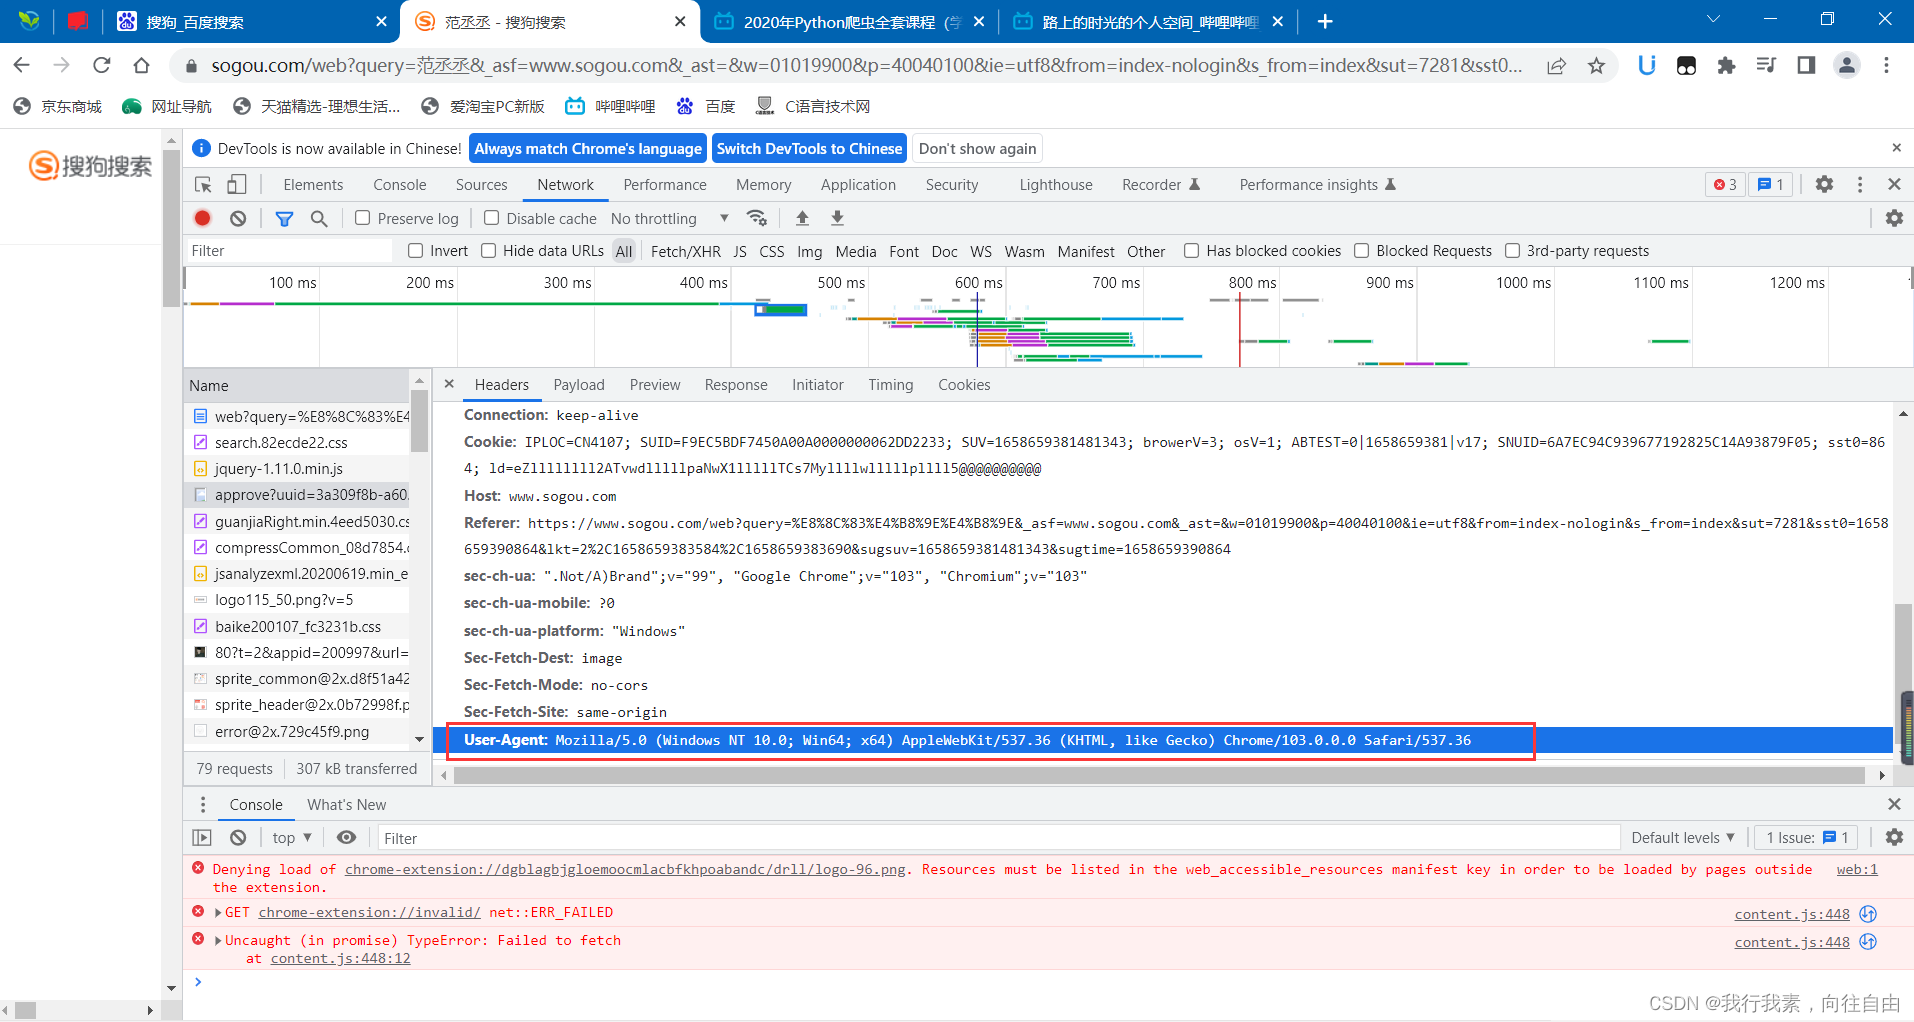
UA:User-Agent(请求载体的身份标识)
UA检测:门户网站的服务器会检测对应请求的载体身份标识,如果检测到请求的载体身份标识为某一款浏览器,说明该请求是正常的请求。但是,如果检测到的载体身份标识不是基于某一款浏览器的,则表示该请求为不正常的请求(爬虫),则服务器端就有可能拒绝该请求。UA伪装【反反爬策略】:让爬虫对应的请求载体身份标识伪装成某一款浏览器。
UA伪装:将对应的User-Agent封装到一个字典中。
需求:爬取搜狗指定词条对应的搜索结果页面(简易网页采集器)
# 需求:爬取搜狗指定词条对应的搜索结果页面(简易网页采集器)

import requests


if __name__ == '__main__':
    #UA伪装:将对应的User-Agent封装到一个字典中
    headers={
        'User-Agent':"Mozilla/5.0 (Windows NT 10.0; Win64; x64) AppleWebKit/537.36 (KHTML, like Gecko) Chrome/103.0.0.0 Safari/537.36"
    }

    #1.指定url
    url="https://www.sogou.com/web"#从网页上粘贴
    #处理url携带的参数:封装到字典中
    kw=input('enter a word:')
    param={
        'query':kw,
    }
    #2.对指定的url发起的请求对应的url是携带参数的,并且请求过程中处理了参数
    response=requests.get(url=url,params=param,headers=headers)
    #3.获取响应数据
    page_text=response.text
    #4.存储数据
    file_name=kw+'.html'
    with open(file_name,'w',encoding='utf-8') as fp:
        fp.write(page_text)
    print(file_name+'保存成功!!!')
2.2.3 实战3:破解百度翻译
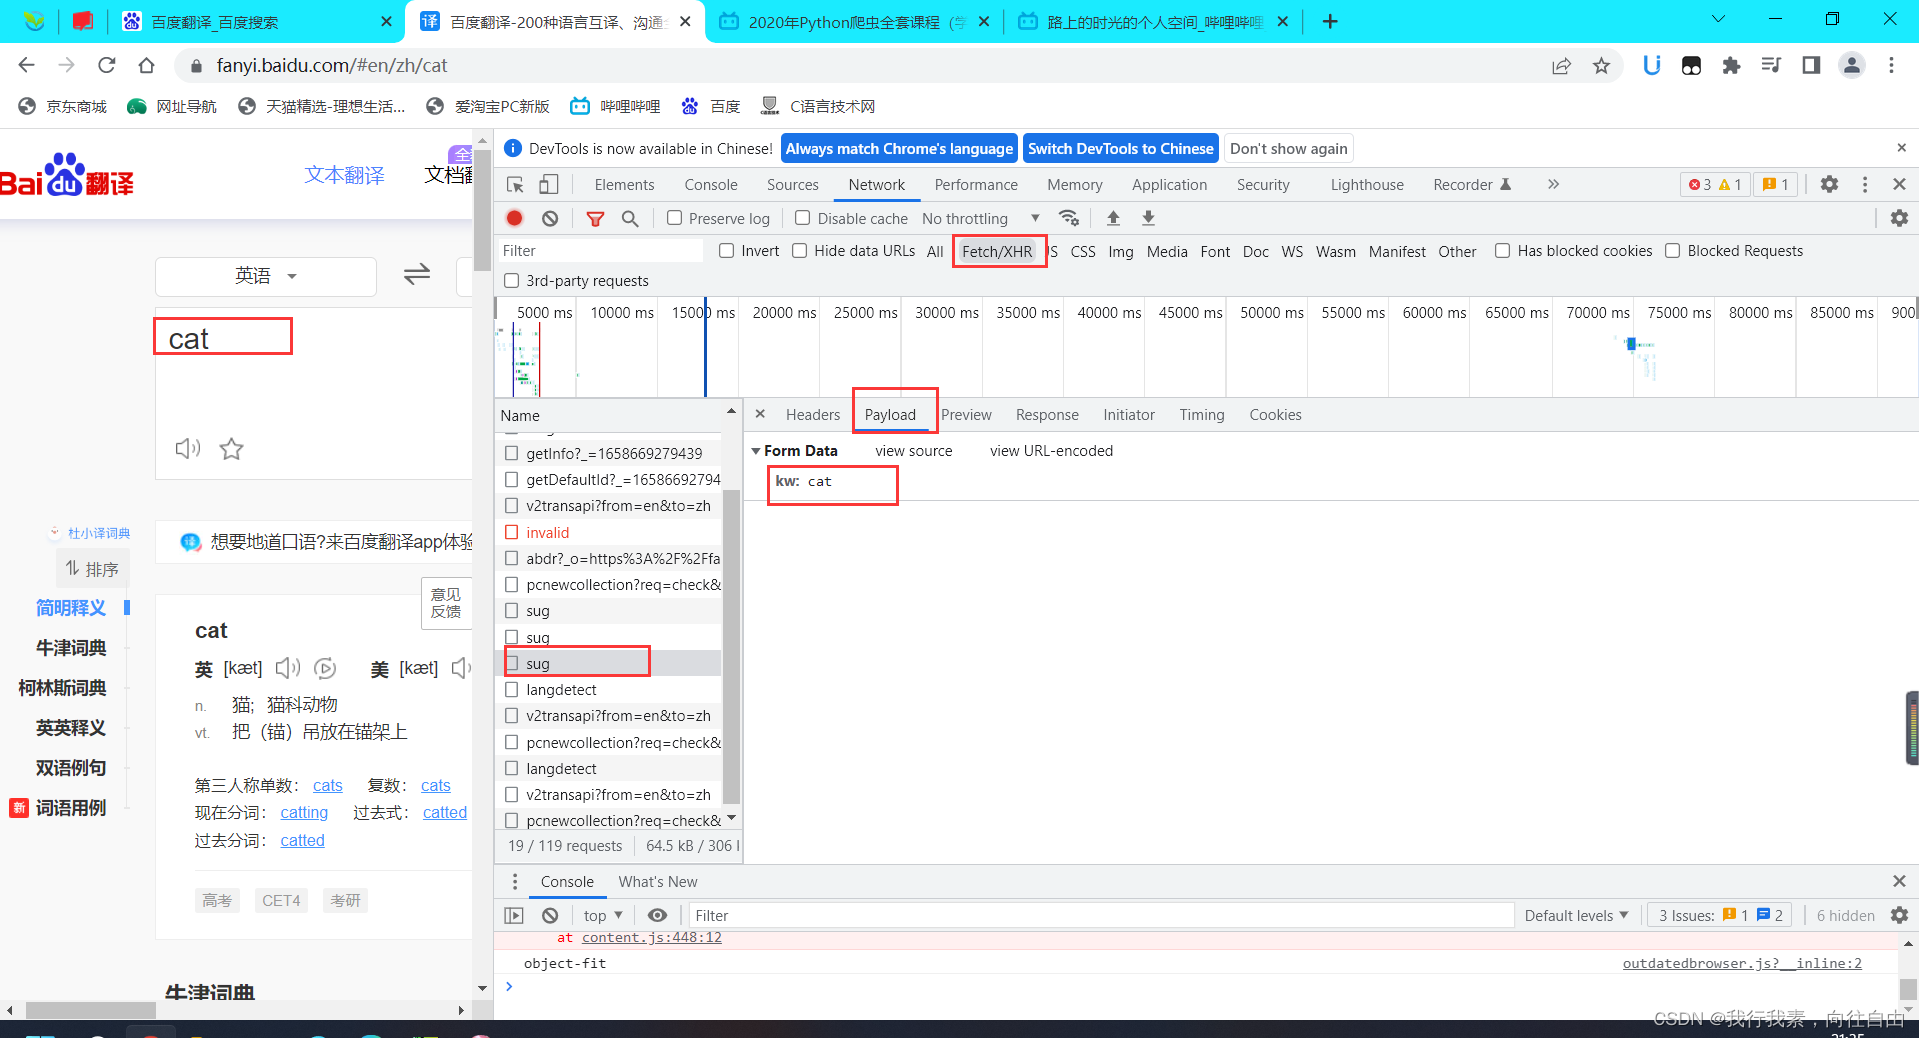
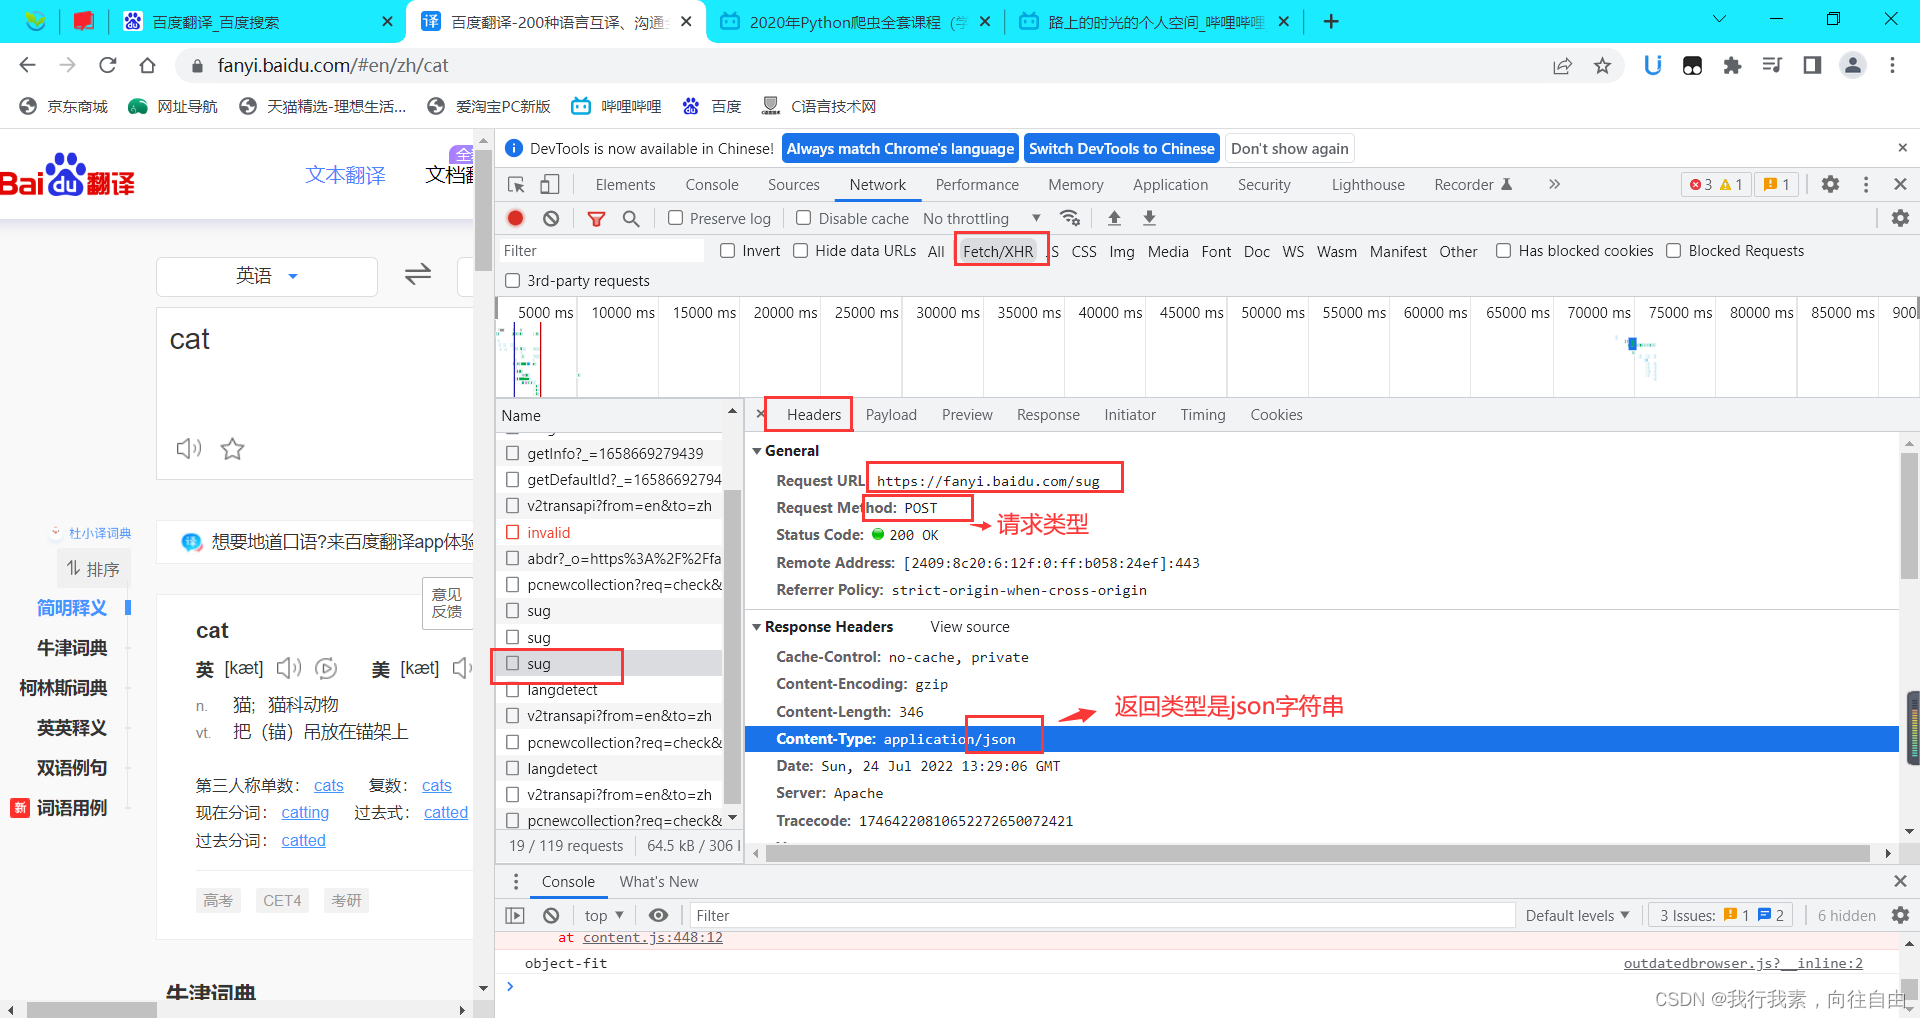
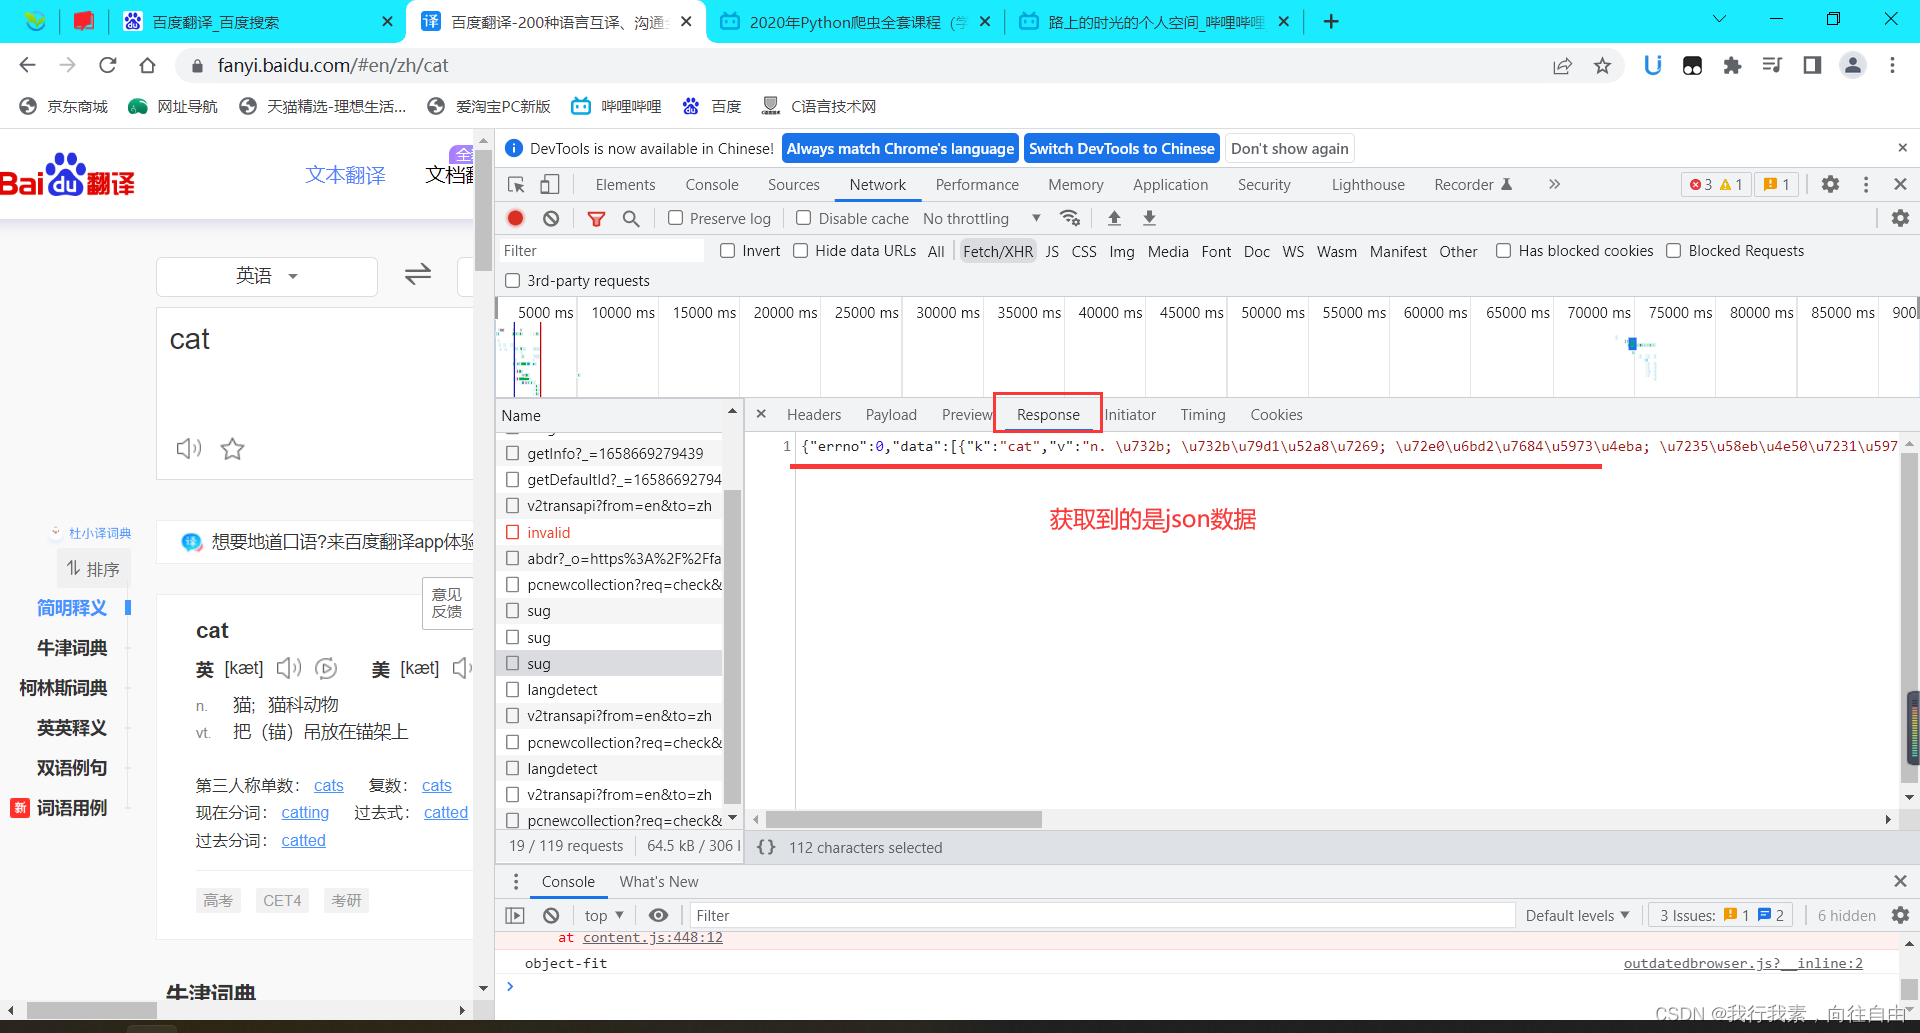
需求:破解百度翻译。 获取一个页面的局部数据。
-post请求(携带了参数) 获取到的是json数据
import requests,json

if __name__ == '__main__':
    #1.指定url
    post_url="https://fanyi.baidu.com/sug"
    #2.进行UA伪装
    headers={
        'User-Agent':"Mozilla/5.0 (Windows NT 10.0; Win64; x64) AppleWebKit/537.36 (KHTML, like Gecko) Chrome/103.0.0.0 Safari/537.36"
    }
    #3.post请求参数的处理(同get请求一致)
    word=input('enter a word:')
    data={
        'kw':word
    }
    #4.请求发送
    response=requests.post(url=post_url,data=data,headers=headers)
    #5.获取响应数据:json()方法返回的是一个对象【只有确认响应数据是json,才可以使用json()返回】
    dic_obj=response.json()
    #6.进行持久化存储
    fp=open('./'+word+'.json','w',encoding='utf-8')
    json.dump(dic_obj,fp=fp,ensure_ascii=False)#因为拿到的串是中文的,所以不是ascii

    print('数据爬取结束!!!')
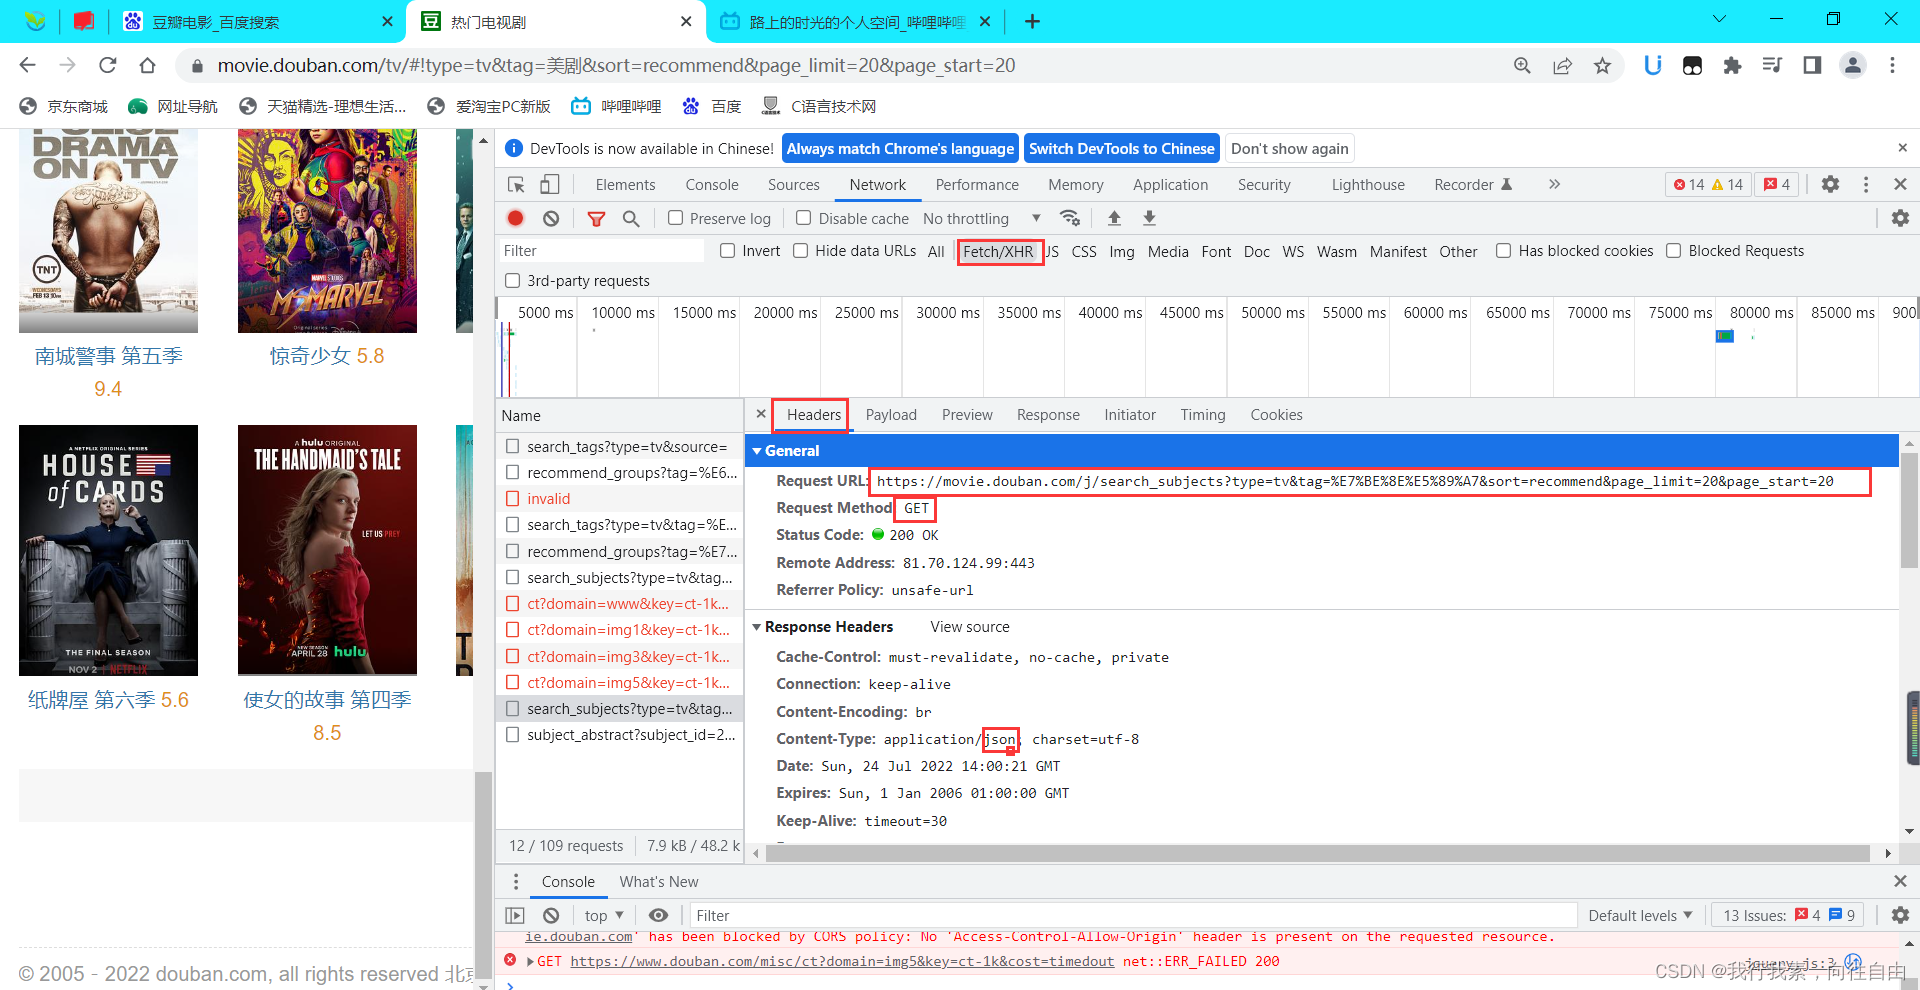
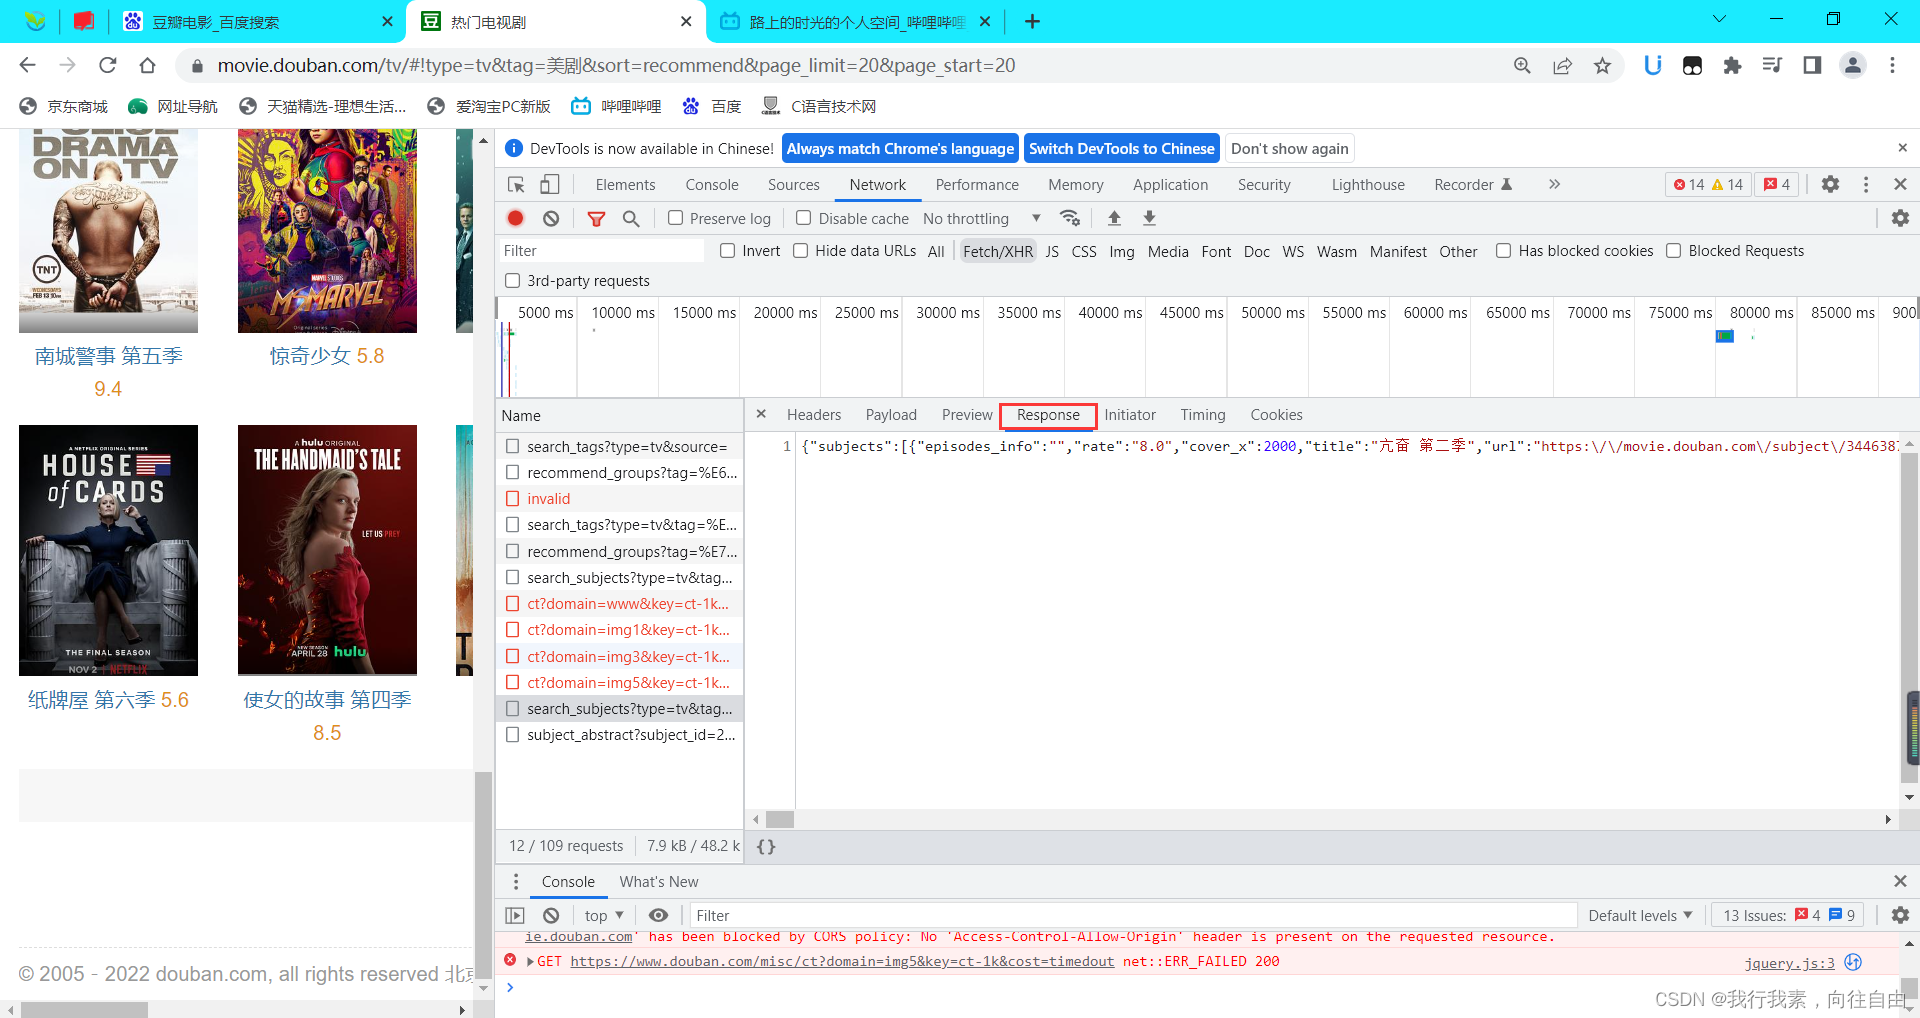
2.2.4 实战4:爬取豆瓣电影分类排行榜中的电影详情数据
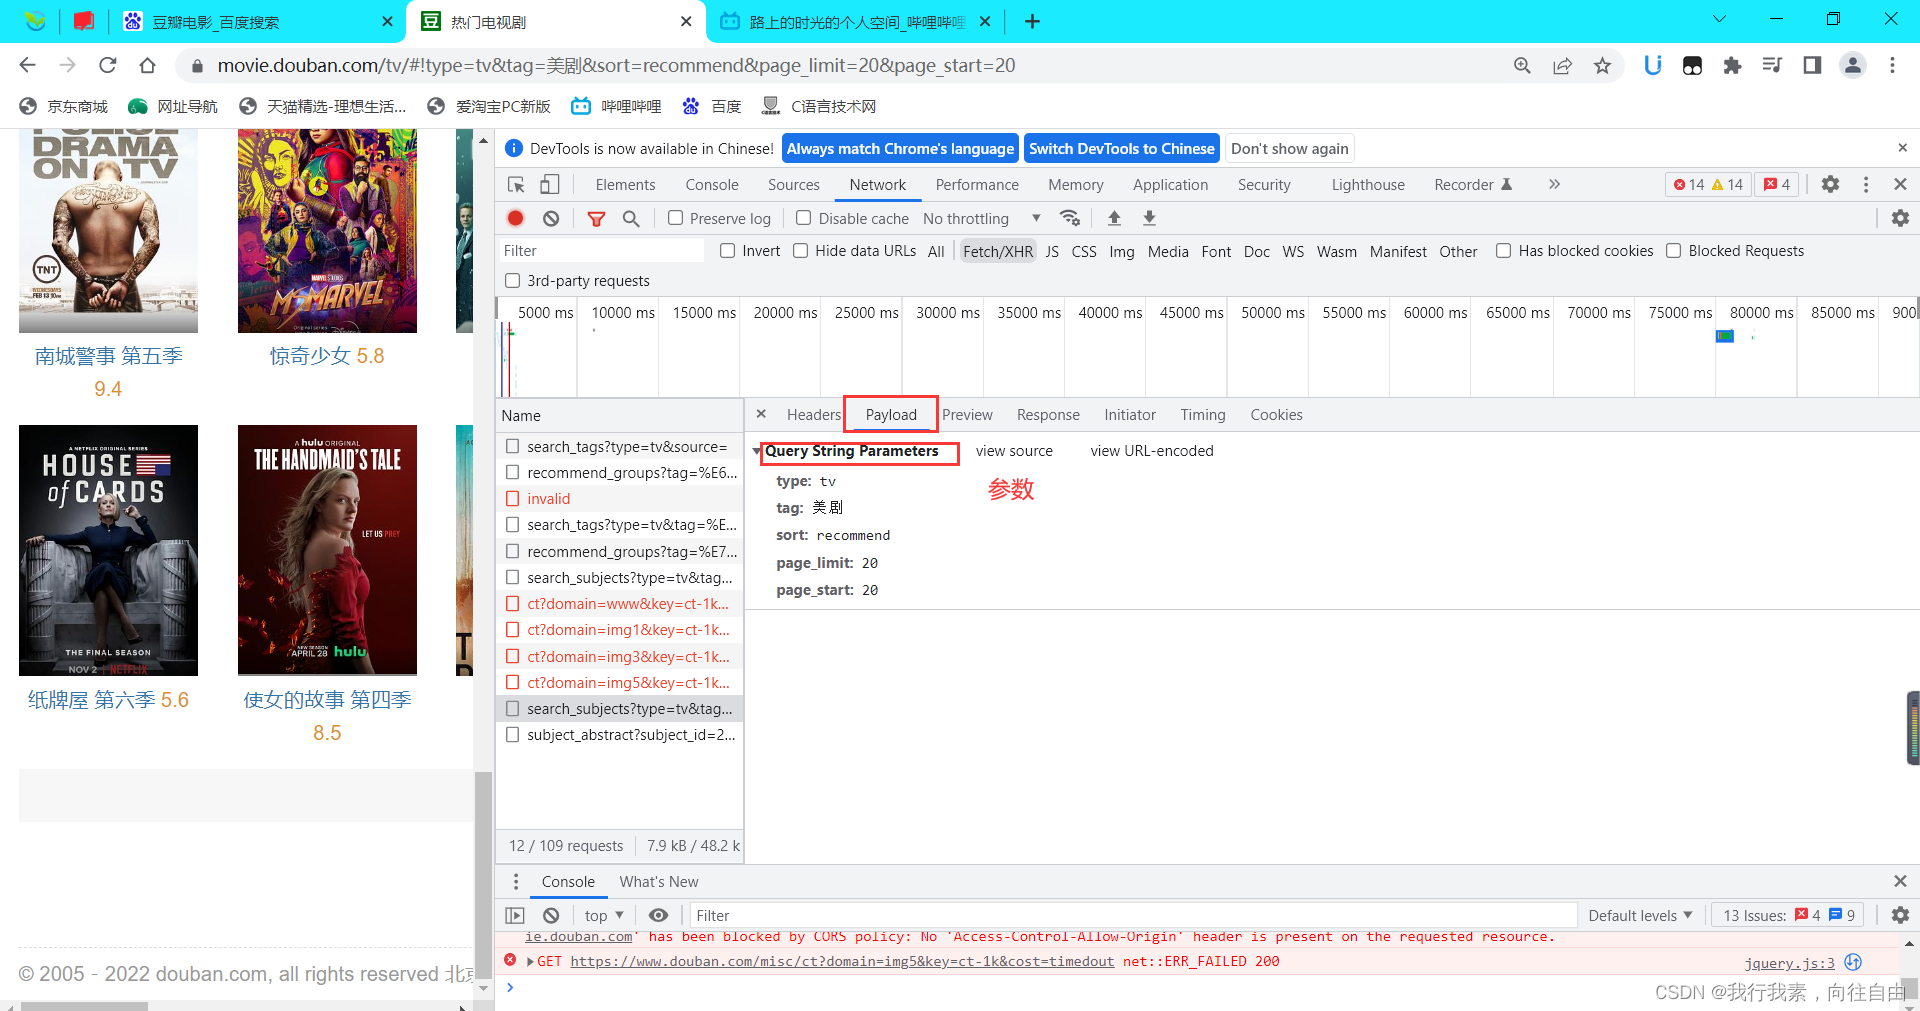
只要url里面有参数,最好用参数封装一下,将问号?后面的参数封装到字典里。
import requests,json

if __name__ == '__main__':
    #只要url里面有参数,最好用参数封装一下,将问号?后面的参数封装到字典里
    url="https://movie.douban.com/j/search_subjects"
    params={
        "type": "tv",
        "tag": "美剧",
        "sort": "recommend",
        "page_limit": "20",#一次请求取出的个数
        "page_start": "20"#从库中的第几部电影取
    }
    #UA伪装
    headers={
        'User-Agent':"Mozilla/5.0 (Windows NT 10.0; Win64; x64) AppleWebKit/537.36 (KHTML, like Gecko) Chrome/103.0.0.0 Safari/537.36"
    }
    #发请求get
    response=requests.get(url=url,params=params,headers=headers)
    list_data=response.json()
    fp=open('./豆瓣.json','w',encoding='utf-8')
    json.dump(list_data,fp=fp,ensure_ascii=False)
    print('抓取完毕!!!')
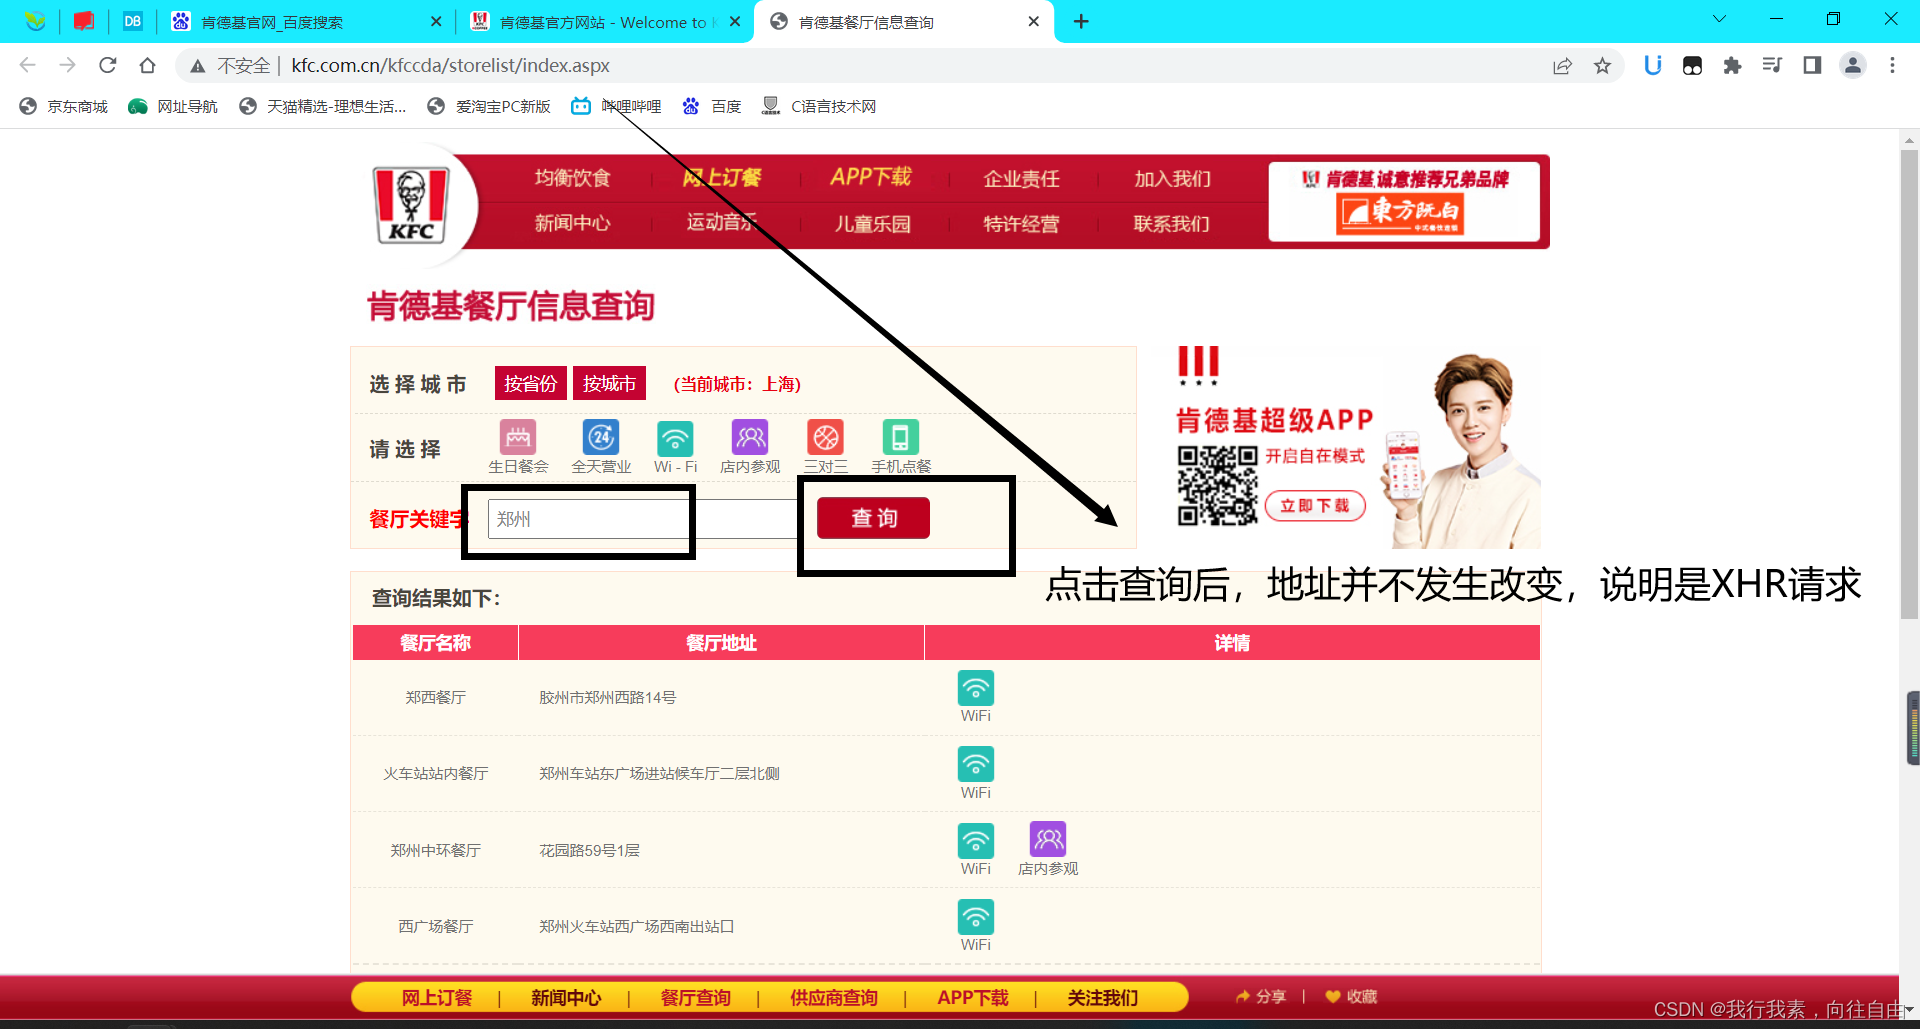
2.2.5 实战5:爬取肯德基餐厅查询中指定地点的餐厅数量
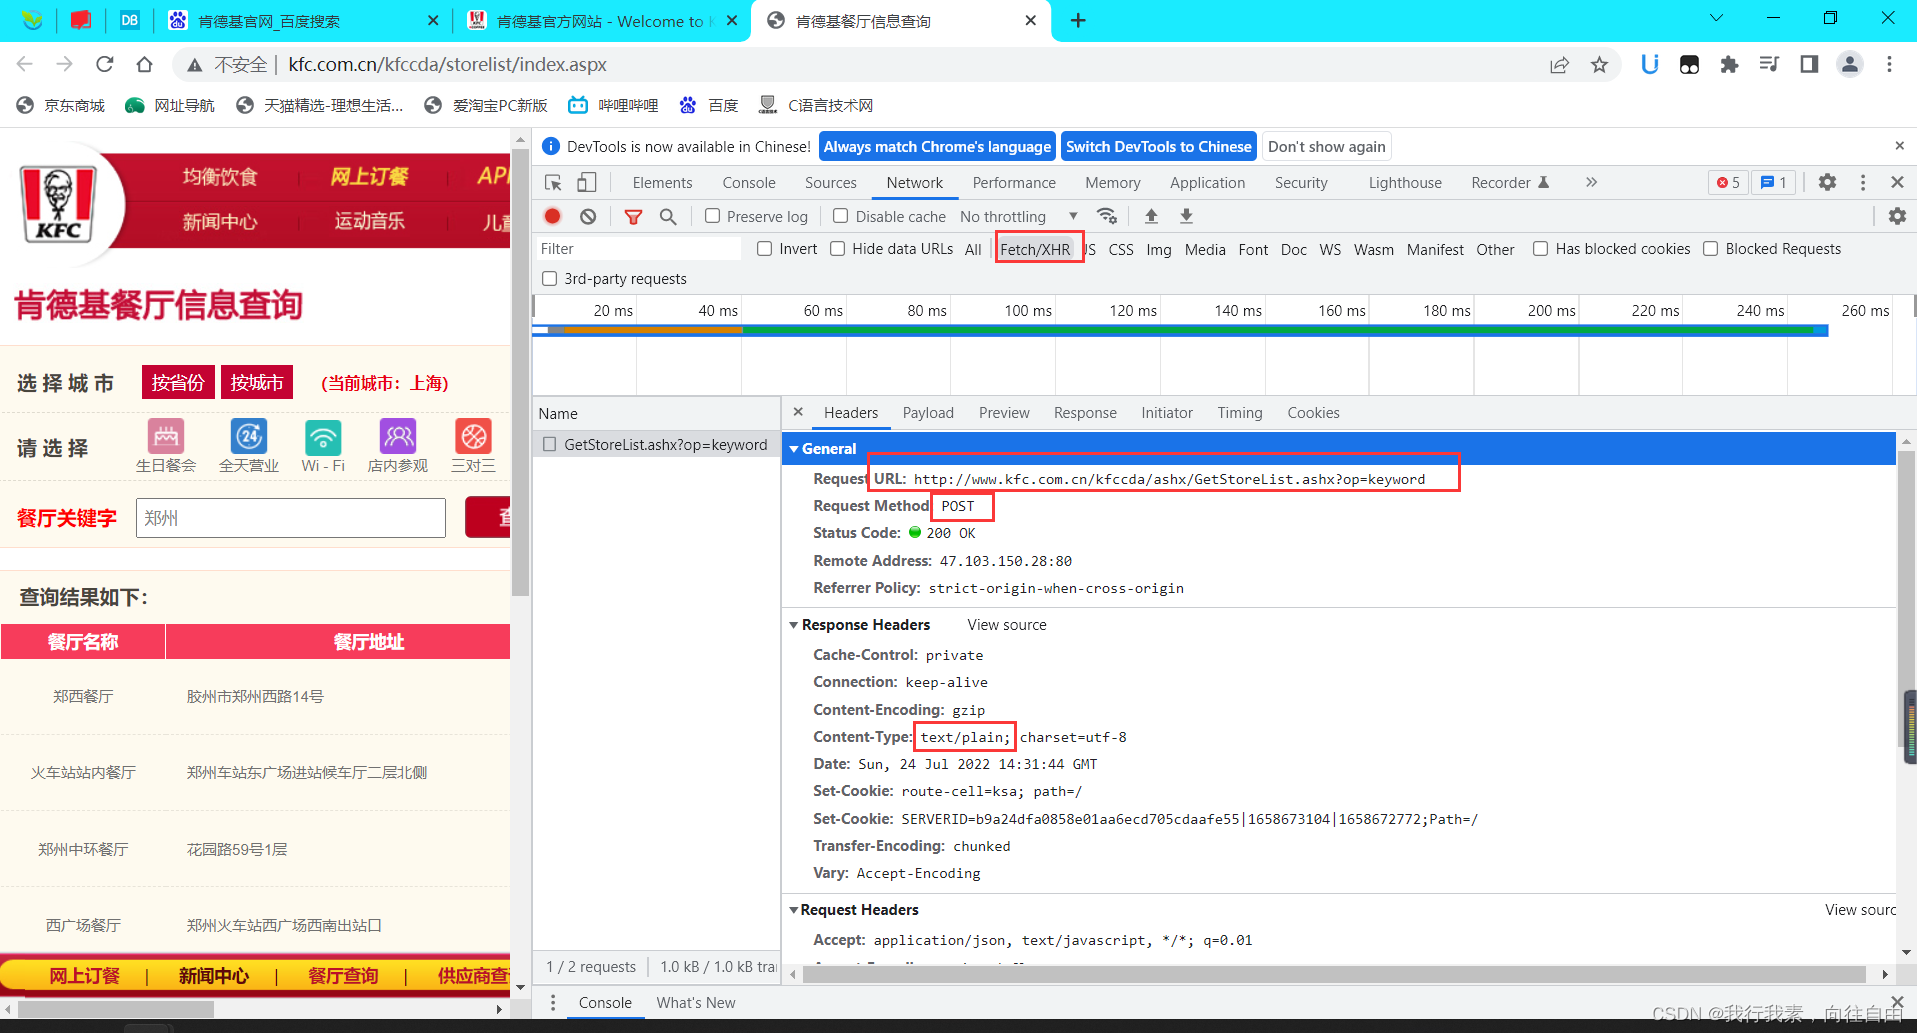
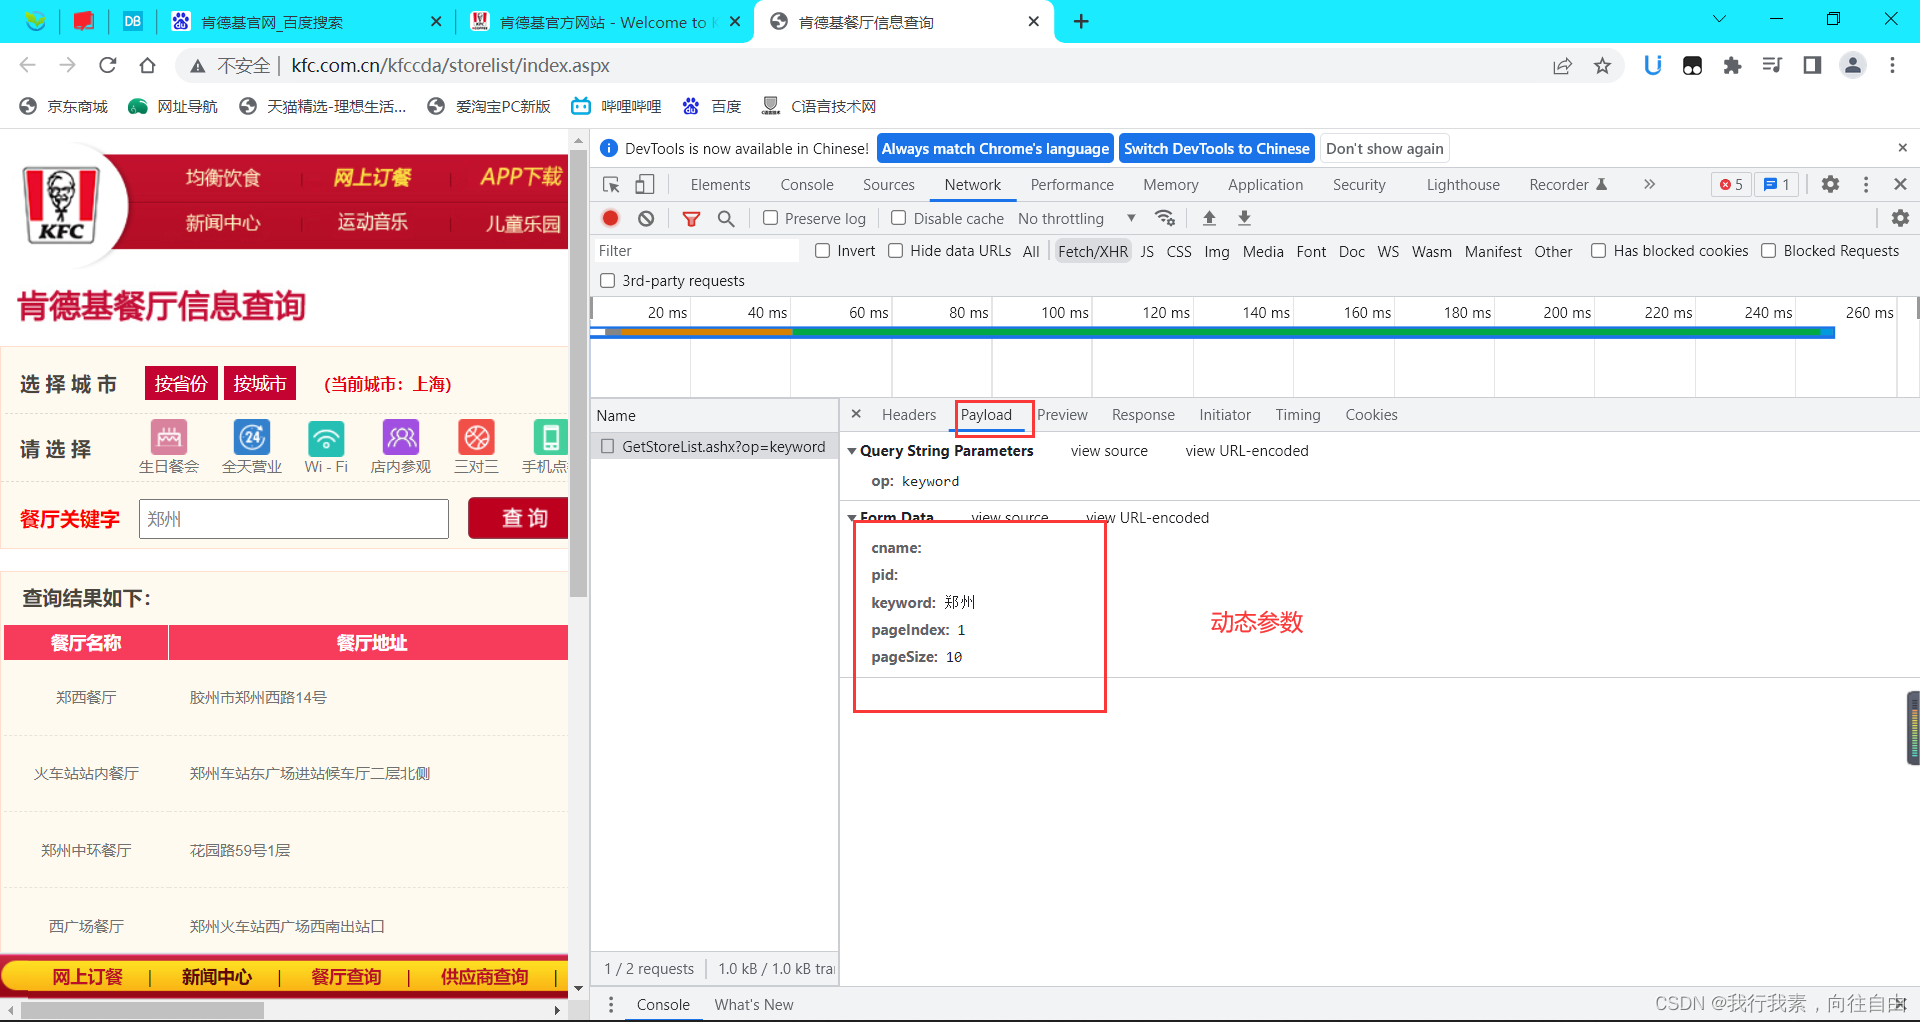
需求:爬取肯德基餐厅查询http://www.kfc.com.cn/ kfccda/index.aspx中指定地点的餐厅数量

import requests

if __name__ == '__main__':
    url="http://www.kfc.com.cn/kfccda/ashx/GetStoreList.ashx?op=keyword"
    name=input('请输入地点:')
    data={
        "cname":"" ,
        "pid":"" ,
        "keyword": name,
        "pageIndex": "1",
        "pageSize": "10"
    }
    headers = {
        'User-Agent': "Mozilla/5.0 (Windows NT 10.0; Win64; x64) AppleWebKit/537.36 (KHTML, like Gecko) Chrome/103.0.0.0 Safari/537.36"
    }
    response=requests.post(url=url,headers=headers,data=data)
    page_text=response.text
    file_name='./肯德基地点_'+name+'.html'
    fp=open(file_name,'w',encoding='utf-8')
    fp.write(page_text)
    fp.close()
    print('爬取结束!!!')
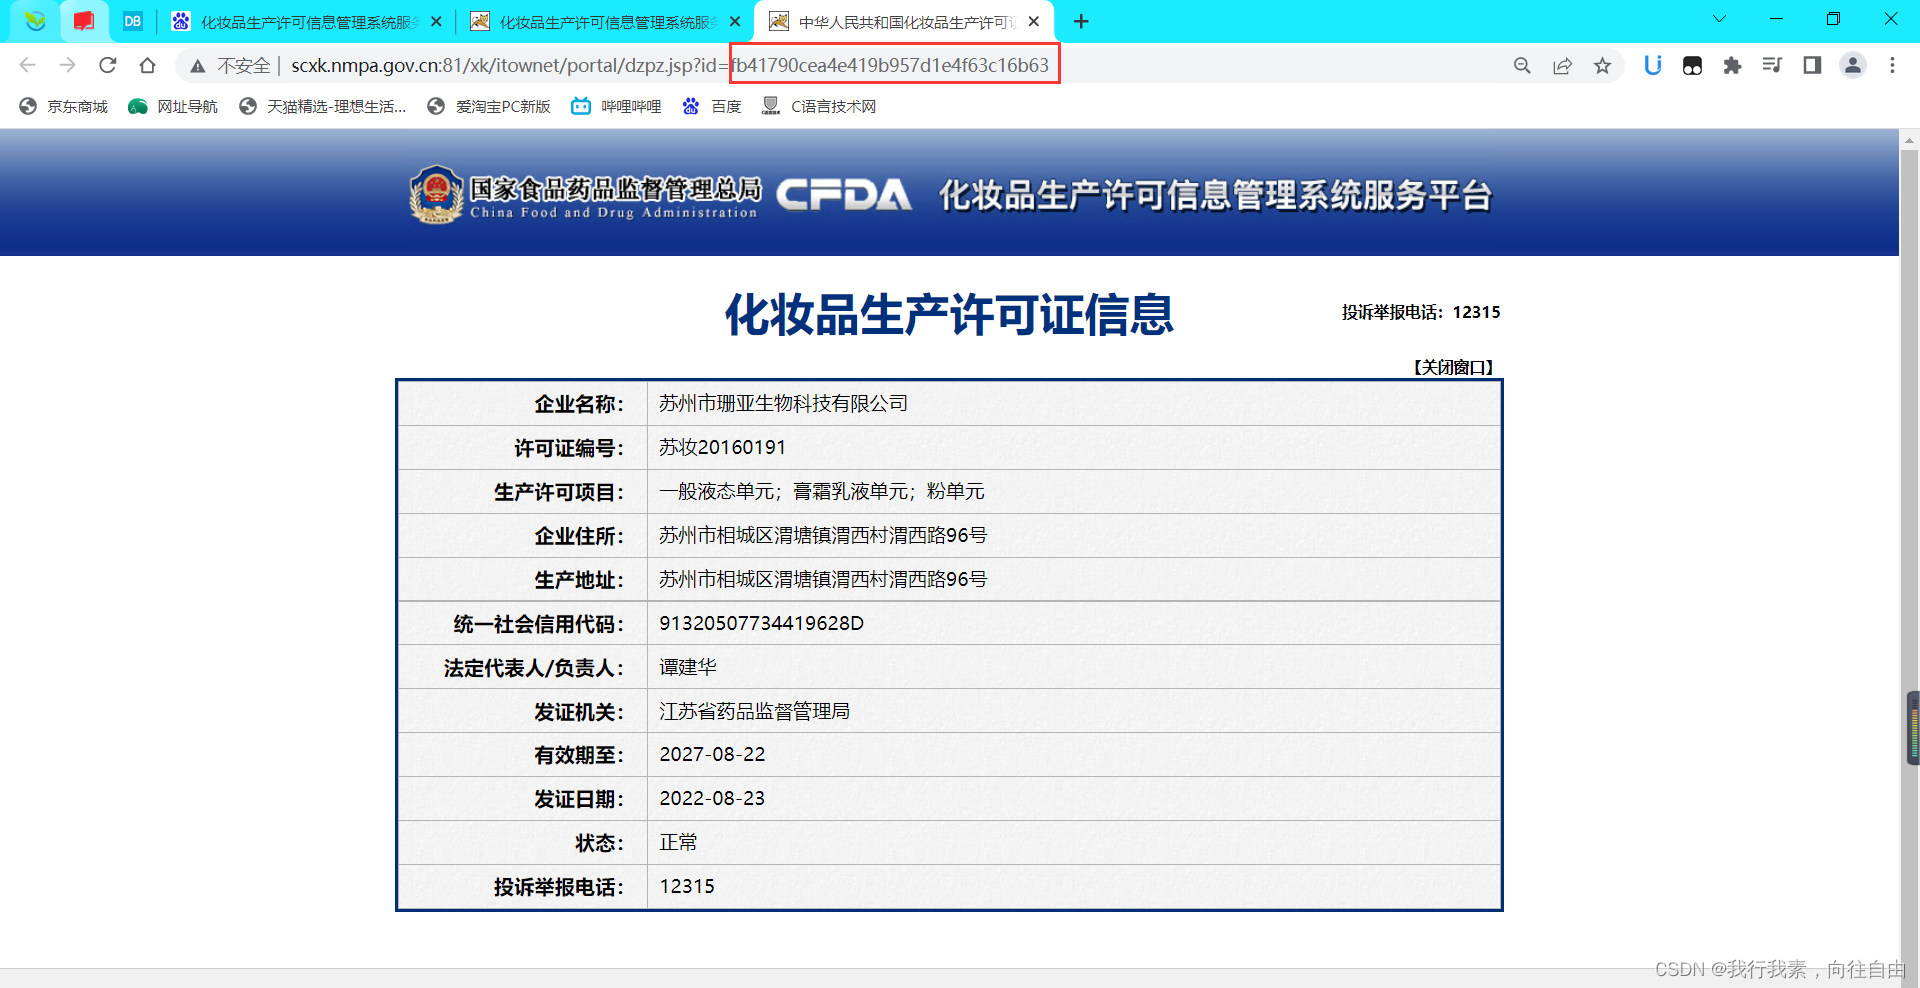
2.2.6 实战6:爬取国家药品监督管理总局中基于中华人民共和国化妆品生产许可证相关数据
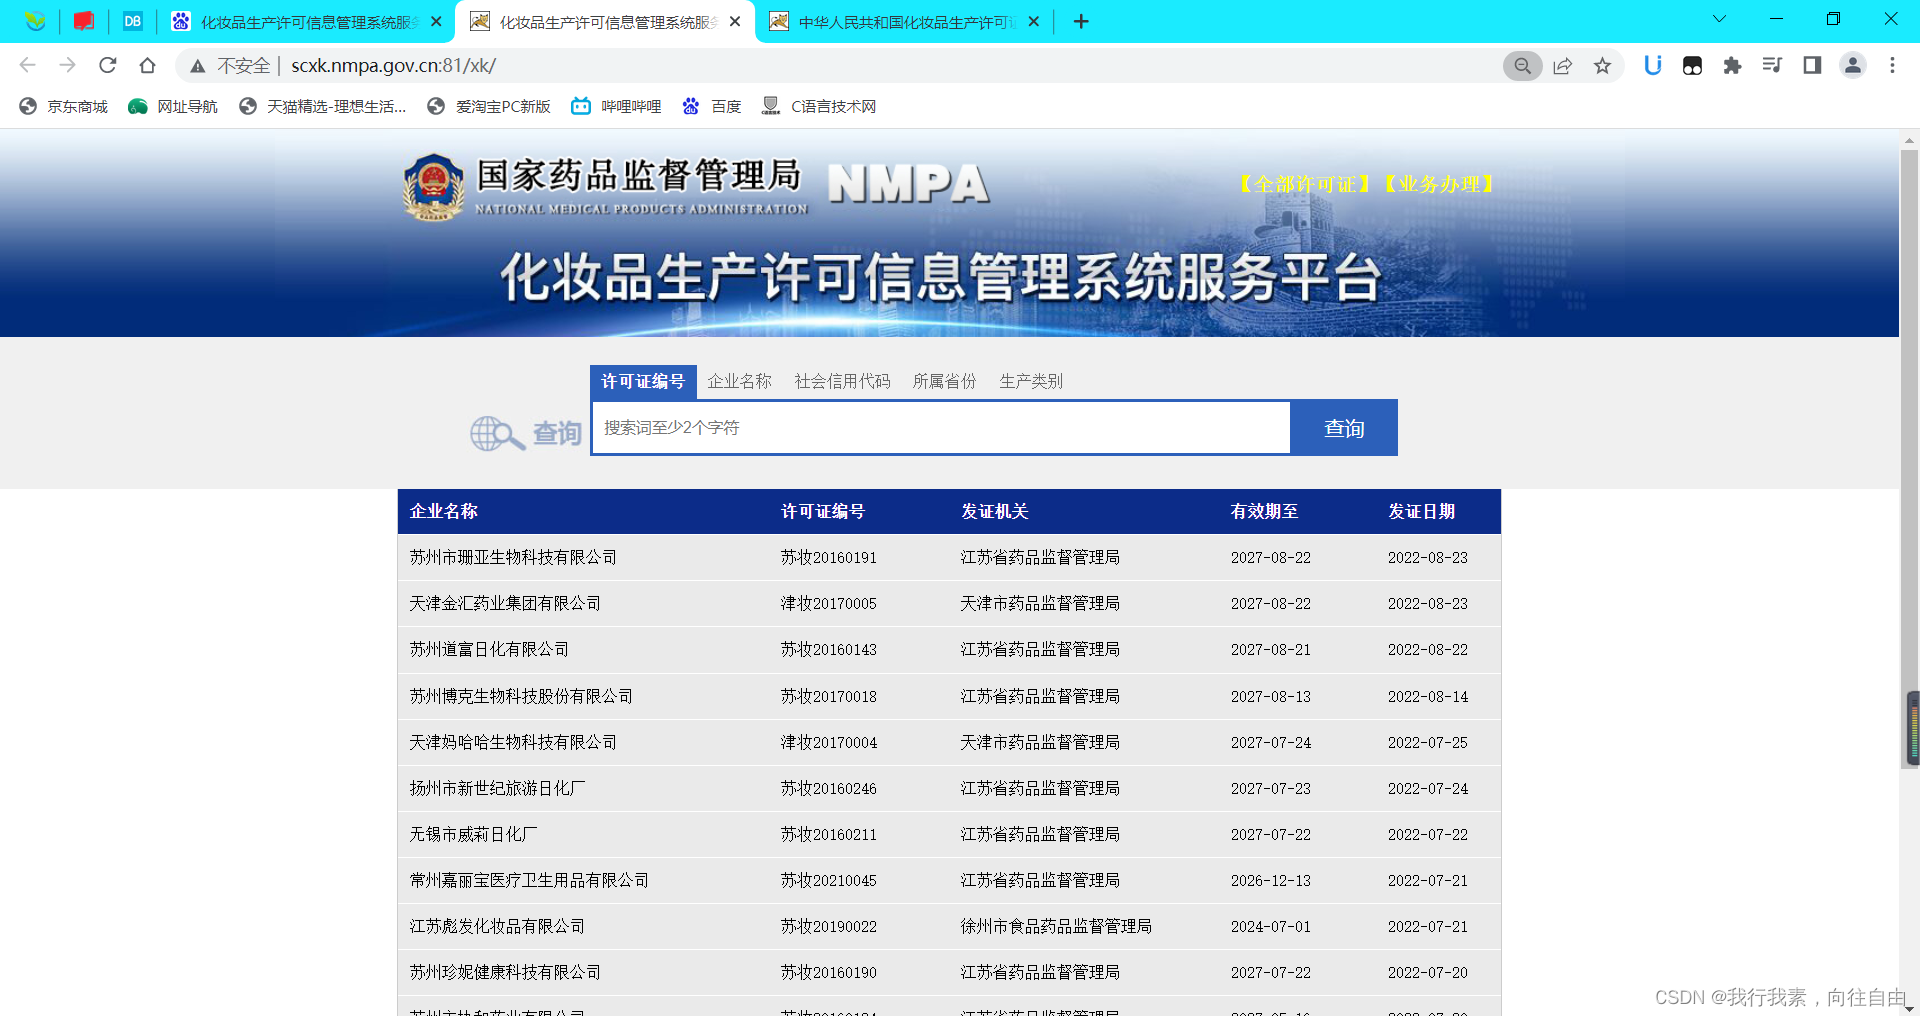
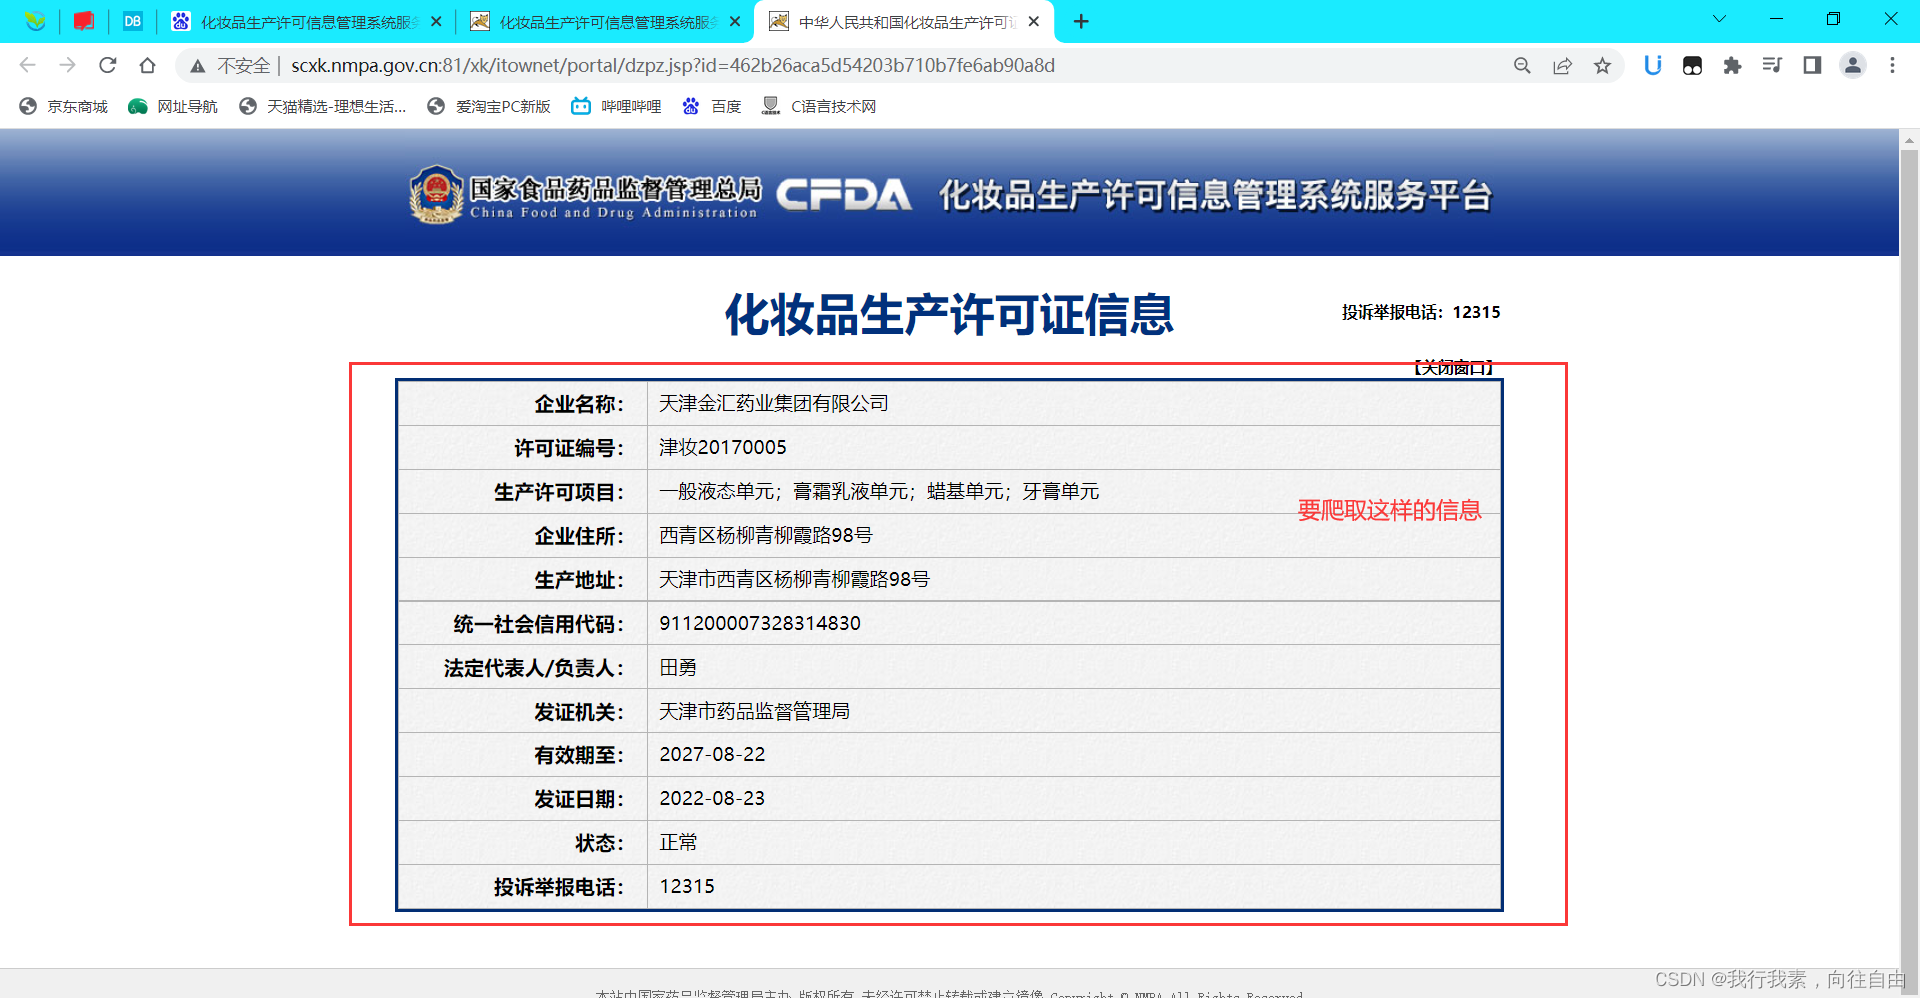
需求:爬取国家药品监督管理总局中基于中华人民共和国化妆品生产许可证相关数据
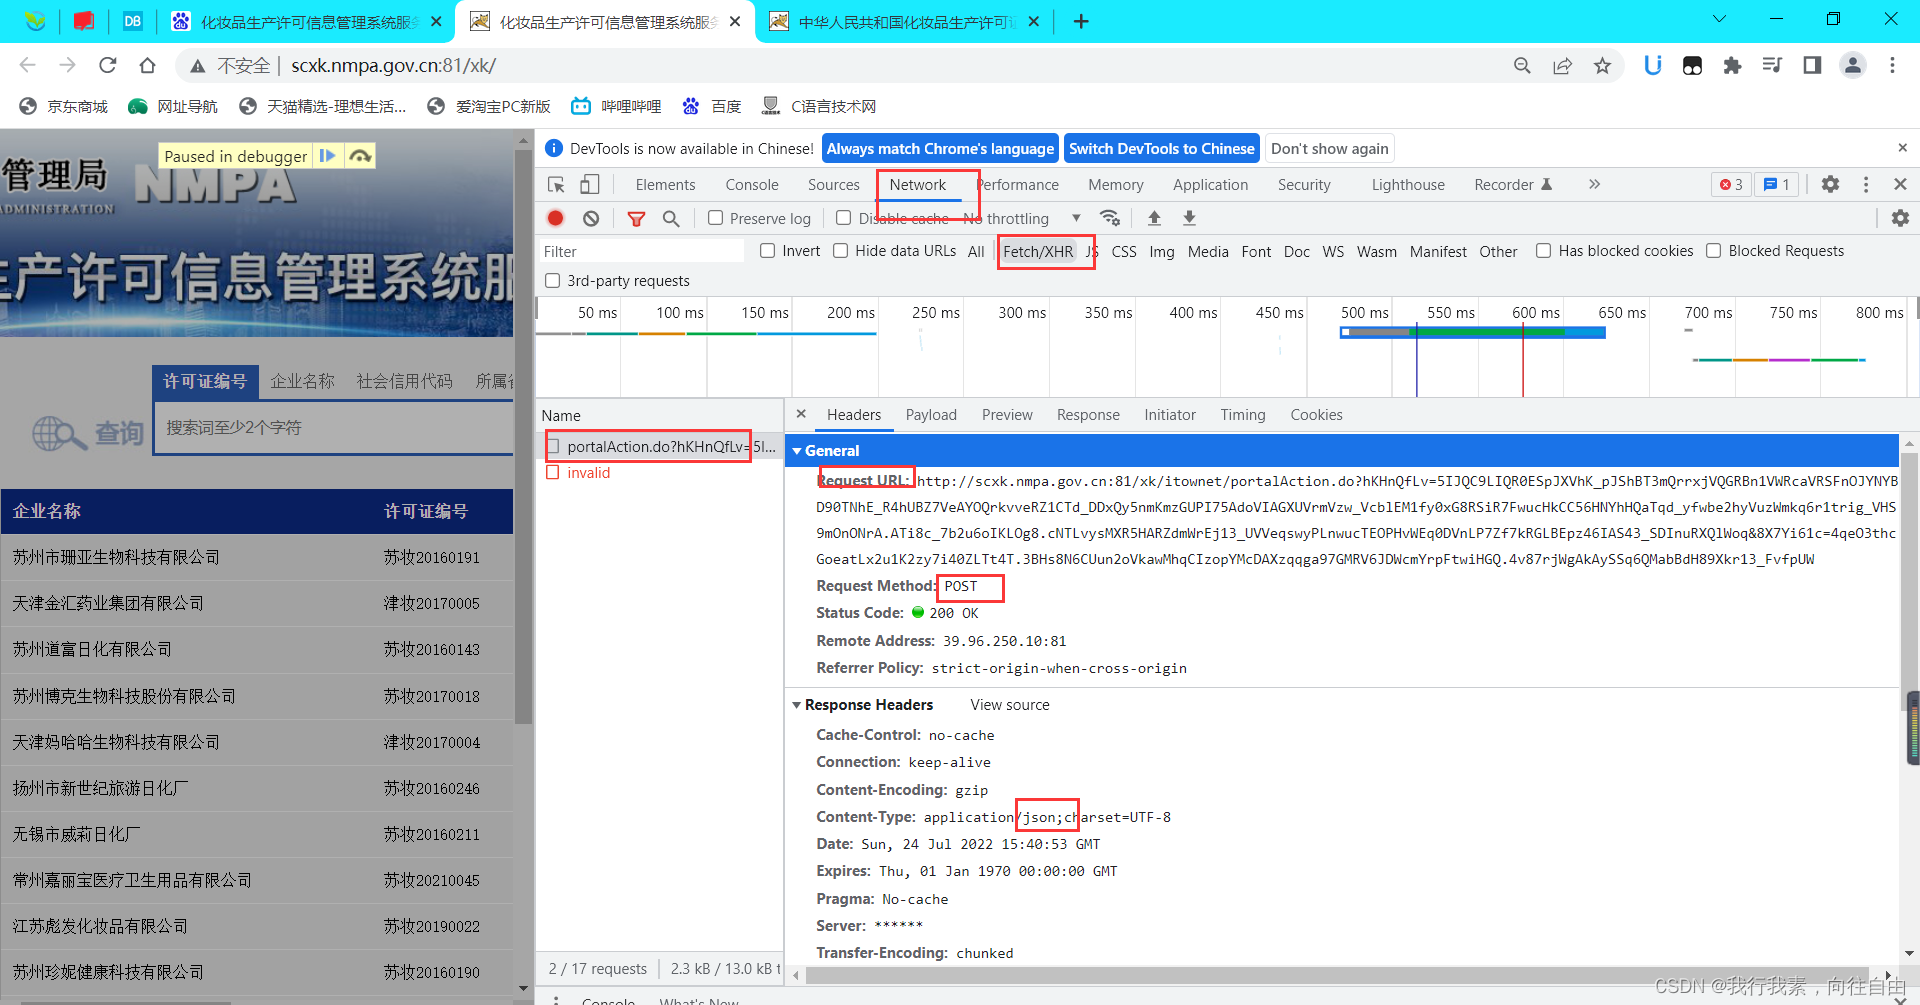
数据有可能是动态数据,这些数据通过网址是获取不到。
-动态加载数据
-首页中对应的企业信息数据是通过ajax动态请求到的。两个url:
(看差异:只有id后面的不一样,所以可以通过拼接获取url)
通过对详情页url的观察发现:
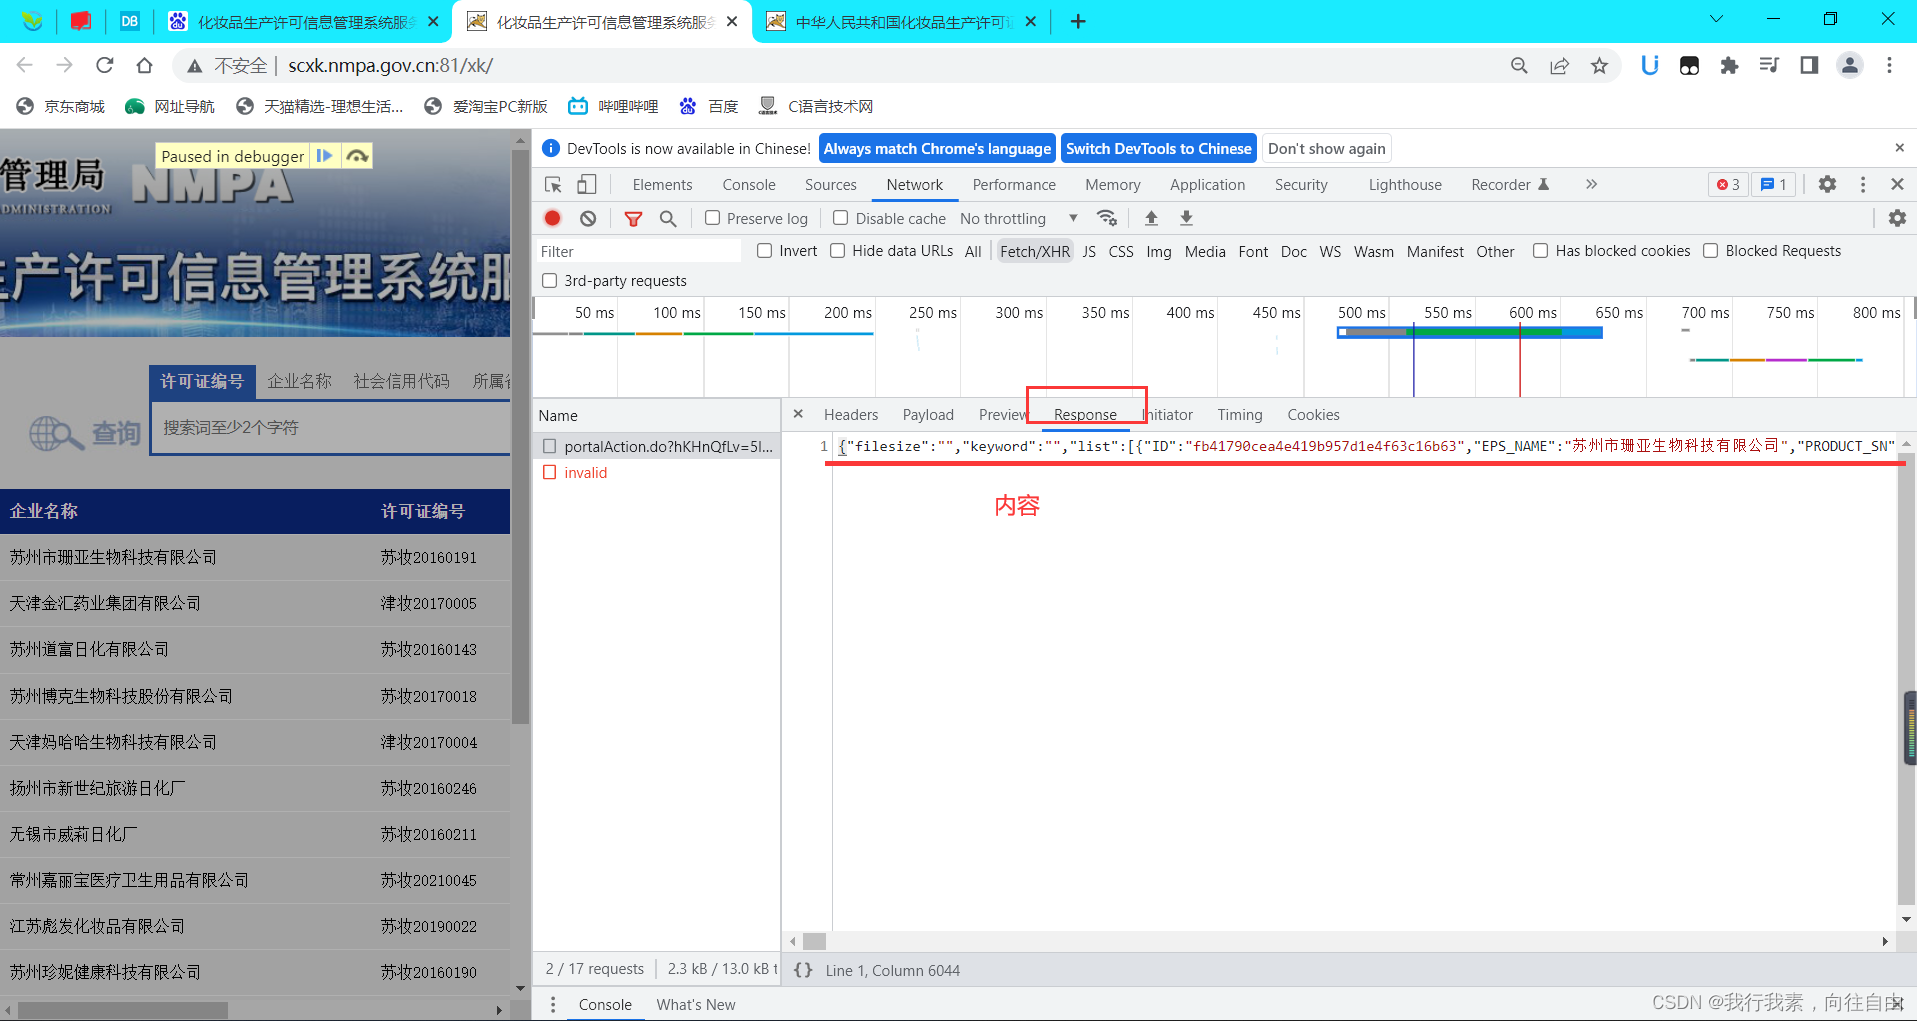
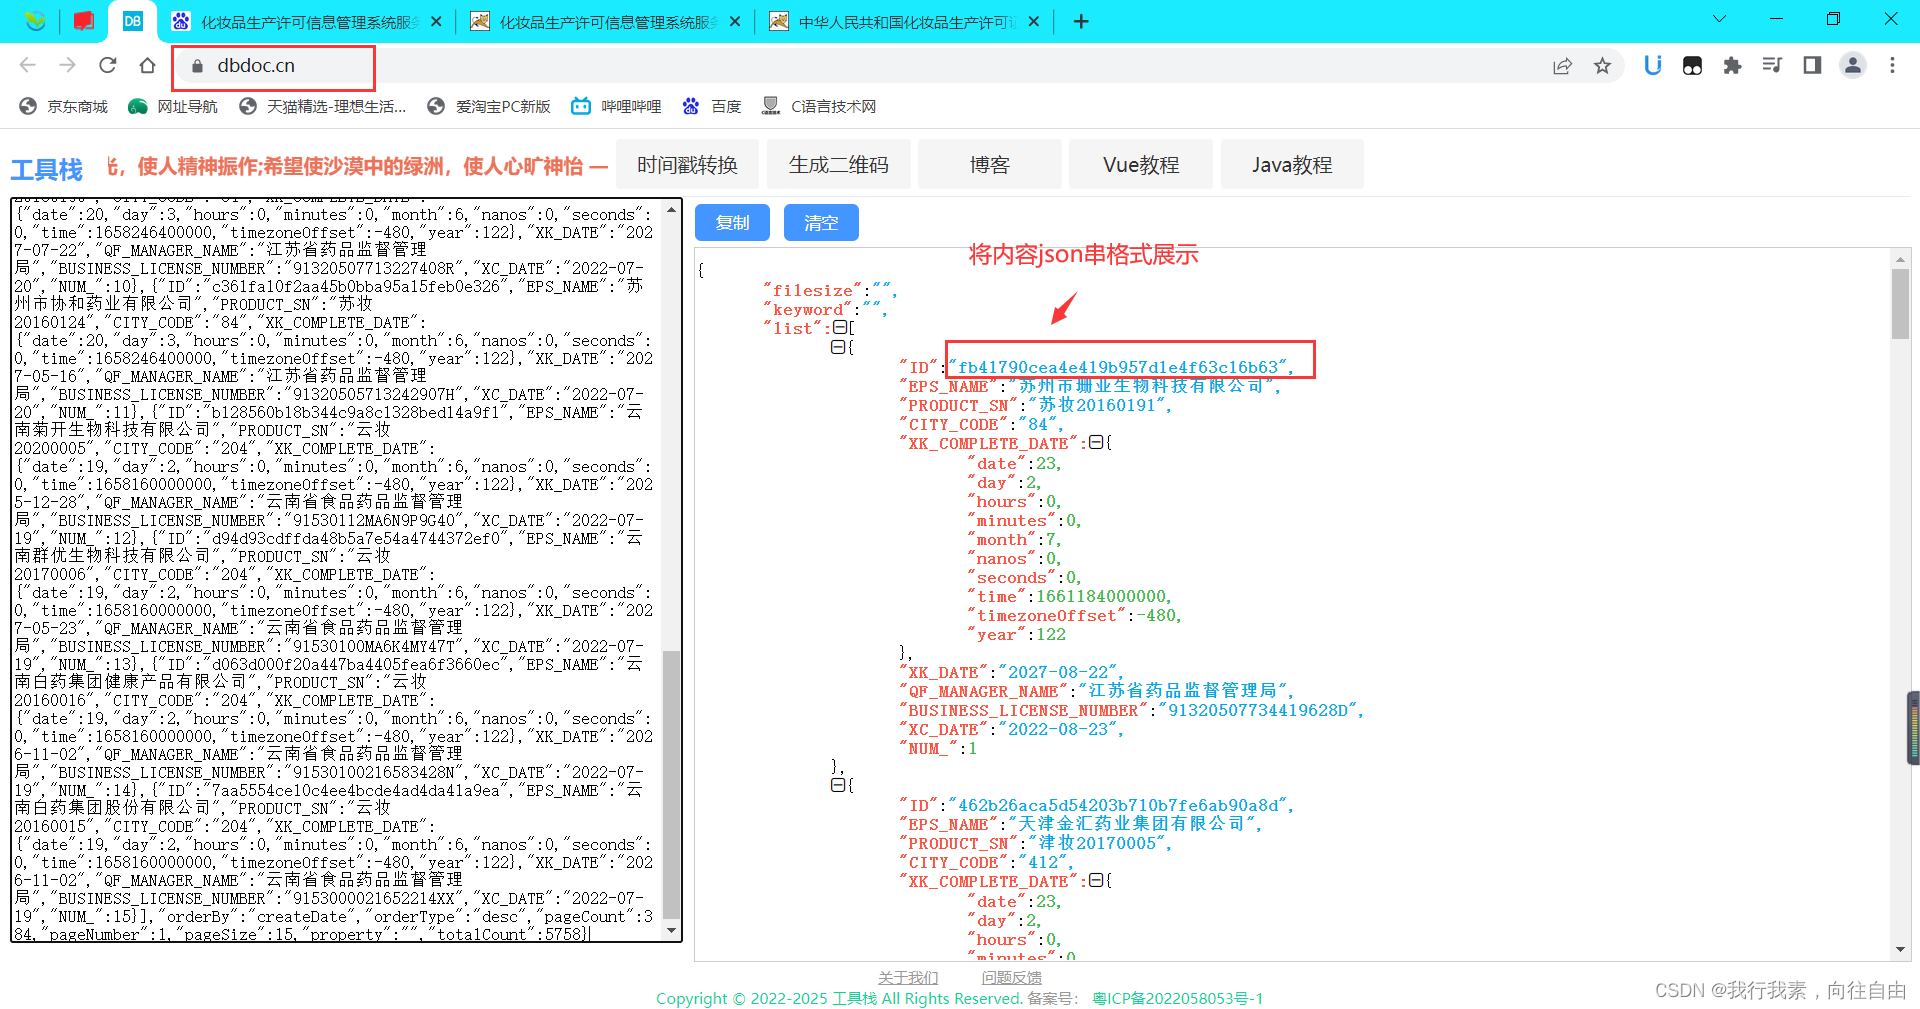
-url的域名都是一样的,只有携带的参数(id)不一样-id值可以从首页对应的ajax请求到的json串中获取
-域名和id值拼接处一个完整的企业对应的详情页的url
-详情页的企业详情数据也是动态加载出来的
http://scxk.nmpa.gov.cn:81/xk/itownet/portal/dzpz.jsp?id=fb41790cea4e419b957d1e4f63c16b63
http://scxk.nmpa.gov.cn:81/xk/itownet/portal/dzpz.jsp?id=462b26aca5d54203b710b7fe6ab90a8d
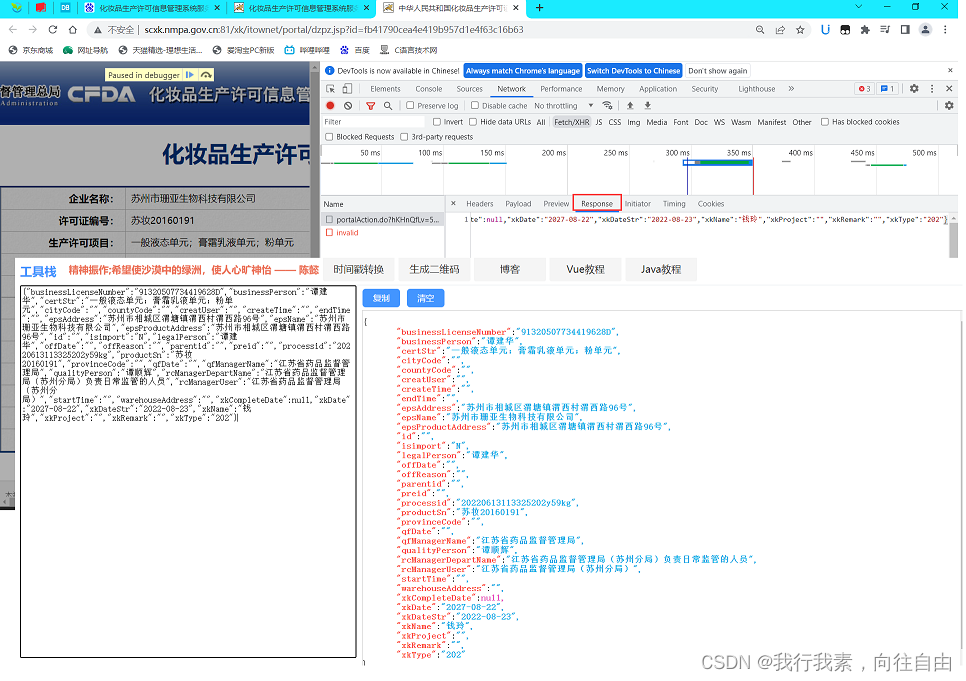
详情页的企业详情数据也是动态加载出来的:
-所有的post请求的url都是一样的,只有参数id值是不同。
-如果我们可以批量获取多家企业的id后,就可以将id和url形成一个完整的详情页对应详情数据的ajax请求的url。http://scxk.nmpa.gov.cn:81/xk/itownet/portal/dzpz.jsp?id=fb41790cea4e419b957d1e4f63c16b63
http://scxk.nmpa.gov.cn:81/xk/itownet/portal/dzpz.jsp?id=462b26aca5d54203b710b7fe6ab90a8d
如何批量获取ajax数据。
import requests,json

if __name__ == '__main__':
    #批量获取不同企业的id值
    url="http://scxk.nmpa.gov.cn:81/xk/itownet/portalAction.do?hKHnQfLv=5uQ9.uJUl4Kc0z9J3tOGq2N1C1yh_ETgCj3KikIiJ.hItGaGnAiNedALSUdOxIxomoe52gVOVehZxG_loPZkHk9bV.iYW64w1ZpctYB6I1Sj3lUQksDSpWxog0rZw.SoKR8HduuWdyJ6W_D17.n9LX8eQsdVLMAtVlbE72WXAAljs91VQSHFoZeMrNhZwAc7gsqTUHkztGPFRVIXDmsO2uHkWAmELOSrMAciMNFDKRYUH6D.SqCLo1HJ0y_E92gvRJ.QWlxJZxLbmy57RqguVavTttBPGK8.VgZOi3RiEhxq&8X7Yi61c=4W0g8_xILDErPdAKWad_7M3DbjEMGxyC0vPfbCZn8jm3ceIQ1Qr5HP6mo.xAQkBFwUlR9boMY3oK71AX.CT_JnCeV0xl.gqYU.MG6XFqC8W.qBu_P0WSZKH9.NP70GTpi"

    headers = {
        'User-Agent': "Mozilla/5.0 (Windows NT 10.0; Win64; x64) AppleWebKit/537.36 (KHTML, like Gecko) Chrome/103.0.0.0 Safari/537.36"
    }
    id_list = []  # 存储企业的id
    all_data_list = []  # 存储所有企业详情数据
    # 参数的封装
    for page in range(1,384):
        page=str(page)
        data={
            "on": "true",
            "page": page,
            "pageSize": "15",
            "productName":"",
            "conditionType": "1",
            "applyname":"",
            "applysn":""
        }

        json_ids=requests.post(url=url,headers=headers,data=data).json()#字典类型,包含id

        for dic in json_ids['list']:
            id_list.append(dic['ID'])

    #获取企业详细数据
    post_url='http://scxk.nmpa.gov.cn:81/xk/itownet/portal/dzpz.jsp?'
    for id in id_list:
        data={
            "id":id
        }
        detail_json=requests.post(url=post_url,headers=headers,data=data).json()
        all_data_list.append(detail_json)
    #持久化存储
    fp=open('./all_Data.json','w',encoding='utf-8')
    json.dump(all_data_list,fp=fp,ensure_ascii=False)
    fp.close()
    print('抓包结束!!!!')
3.数据解析
3.1 基本概念
爬虫在使用场景中的分类:
-通用爬虫:抓取系统重要组成部分。抓取的是一整张页面数据。-聚焦爬虫:是建立在通用爬虫的基础之上。抓取的是页面中特定的局部内容。
-增量式爬虫:检测网站中数据更新的情况。只会抓取网站中最新更新出来的数据。
数据解析分类:
-正则-bs4
-xpath(重要)数据解析原理概述:
-解析的局部的文本内容都会在标签之间或者标签对应的属性中进行存储-1.进行指定标签的定位
-2.标签或者标签对应的属性中存储的数据值进行提取(解析)基于聚焦爬虫的编码流程:
-指定url-发起请求
-获取响应数据-数据解析
-持久化存储
3.2 正则解析
3.2.1 正则图片数据爬取
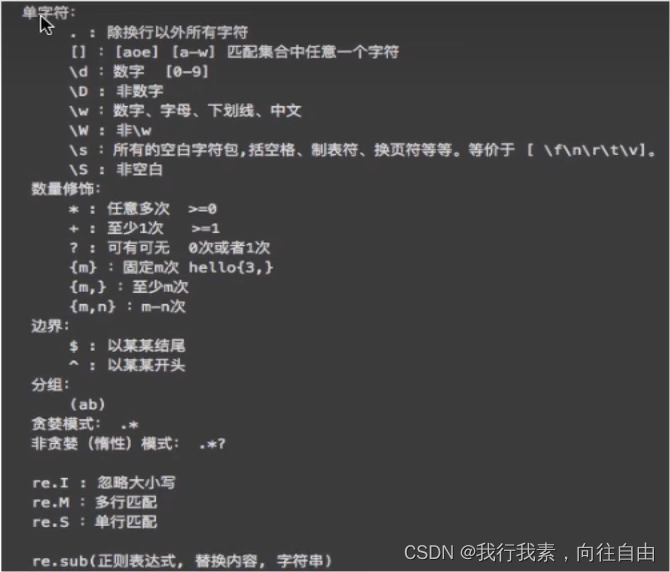
常用正则表达式回顾:
项目需求:爬取指定页面的图片,并将其保存到指定文件夹中
# 项目需求:爬取指定页面的图片,并将其保存到指定文件夹中
import requests

if __name__ == '__main__':
    #如何爬取图片数据
    url='https://c-ssl.duitang.com/uploads/item/202004/25/20200425173132_svsej.jpeg'
    #图片是二进制数据
    #text(返回字符串类型数据)    content(返回二进制类型数据)   json()(返回一个对象)
    img_data=requests.get(url=url).content#content返回的就是二进制形式的数据
    with open('./捕获图片.jpg','wb') as fp:
        fp.write(img_data)
捕获结果展示:

3.2.2 正则解析案例
爬取一个页面的所有图片
爬取http://jandan.net/ooxx中随手拍网站的所有图片。
将整个网页的<img src>=后面的链接提取出来,就可以了。
ex='<img src="(.*?)"' #最终要括号里面的内容。

#爬取一个网页的所有图片

import requests,re,os

if __name__ == '__main__':
    #创建一个文件夹,用来保存所有图片
    if not os.path.exists('./糗图获取Libs'):
        os.mkdir('./糗图获取Libs')

    url='http://jandan.net/ooxx'#将要爬取页面的网址
    headers={
        'User-Agent':"Mozilla/5.0 (Windows NT 10.0; Win64; x64) AppleWebKit/537.36 (KHTML, like Gecko) Chrome/103.0.0.0 Safari/537.36"
    }
    #使用通用爬虫对url对应的一整张页面进行爬取
    page_text=requests.get(url=url,headers=headers).text

    #使用聚焦爬虫将页面史所有的糗阁进行解析/提取
    ex='<img src="(.*?)"'#最终要括号里面的内容
    img_src_list=re.findall(ex,page_text,re.S)#re.S代表单行匹配
    for src in img_src_list:#列表中的链接内容缺少https头
        url="http:"+src
        img_data = requests.get(url=url,headers=headers).content  # content返回的就是二进制形式的数据
        #生成图片名称,链接里面的最后字符串就是图片名称
        img_name=src.split('/')[-1]
        img_path='./糗图获取Libs/'+img_name
        with open(img_path, 'wb') as fp:
            fp.write(img_data)
            print(img_name+'下载成功!!!')
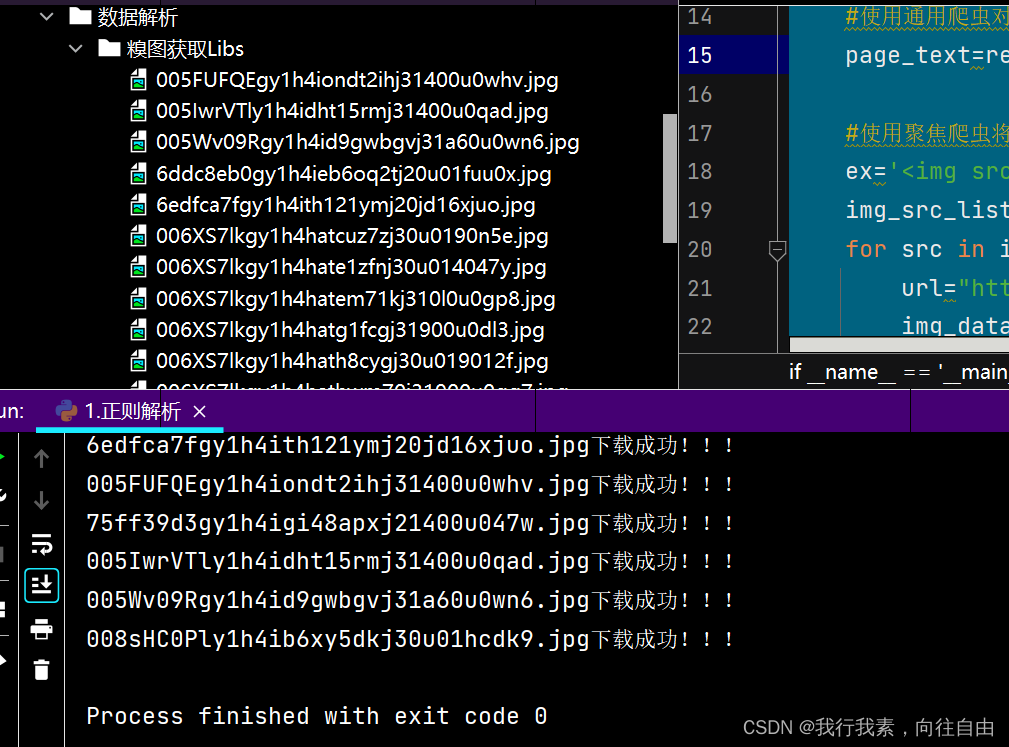
运行结果:
3.3 bs4解析
3.3.1 bs4相关知识
bs4只可以应用于python中。
bs4数据解析的原理:
-1.实例化一个BeautifulSoup对象,并且将页面源码数据加载到改对象中
-2.通过调用BeautifulSoup对象中相关的属性或者方法进行标签定位和数据提取
环境安装:
pip install bs4
pip install lxml
如何实例化一个BeautifulSoup对象呢:
-from bs4 import BeautifulSoup
-对象的实例化:
-1.将本地的html文档中的数据加载到该对象中
fp=open('./test.html','r',encoding='utf-8')
soup=BeautifulSoup(fp,'lxml')#第二个参数固定-2.将互联网上获取的页面源码加载到该对象中
page_text=response.text
soup=BeautifulSoup(page_text,'lxml')-提供的用于数据解析的方法和属性:
-soup.tagName:返回的是html中第一次出现的togName对应的标签
-soup.find():
-find(tagName):等同于soup.tagName
-属性定位:
-soup.find('div',class_/id/attr='song'
-soup.find_all(tagName):返回符合要求的所有标签(列表)
-select:
-select('某种选择器(id,calss,标签...选择器)'):返回的是一个列表
-层级选择器:
-soup.select('./tang >ul > li > a'):大于号表示是一个层级,返回的是列表
-soup.select('./tang > ul a')#ul与a之间的空格表示一个层级
-获取标签之间的文本数据:
-soup.a.text/string/get_text():这几个一样,都是获取文本内容
-text/get_text():可以获取某一个标签中所有的文本内容
-string:只可以获取该标签下面直系的文本内容
-获取标签中的属性值:
-soup.a['href‘]
#test.html文件中内容

<html lang="en">
<head>
    <meta charset="UTF-8" />
    <title>测试bs4</title>
</head>
<body>
    <div>
        <p>百里守约</p>
    </div>
    <div class="song">
        <p>李清照</p>
        <p>王安石</p>
        <p>苏轼</p>
        <p>柳宗元</p>
        <a href="http://www.song.com/" title="赵匡胤" target="_self">
            <span>this is span</span>
        宋朝是最强大的王朝,不是军队的强大,而是经济很强大,国民都很有钱</a>
        <a href="" class="du">总为浮云能蔽日,长安不见使人愁</a>
        <img src="http://www.baidu.com/meinv.jpg" alt=""/>
    </div>
    <div class="tang">
        <ul>
            <li><a href="http://ww.baidu.com" title= "ging">清明时节雨纷纷,路上行人欲断魂,借问酒家何处有,牧童遥指杏花村</a></li>
            <li><a href="http://ww.163 .com" title="gin">秦时明月汉时关,万里长征人未还,但使龙城飞将在,不教胡马度阴山</a></li>
            <li><a href="http://ww.126.com" alt= "qi">岐王宅里寻常见,崔九堂前几度闻,正是江南好风景,落花时节又逢君</a></li>
            <li><a href="http://www.sina.com" class="du">杜甫</a></li>
            <li><a href="http://www.dudu.com" class="du">杜牧</a></li>
            <li><b>杜小月</b></li>
            <li><i>度蜜月</i></li>
            <li><a href="http://www.haha.com" id="feng">凤凰台上凤凰游,凤去台空江自流,吴宫花草埋幽径,晋代衣冠成古丘</a></li>
        </ul>
    </div>
</body>
</html>
测试代码:
from bs4 import BeautifulSoup
import requests

if __name__ == '__main__':
    #想要将本地的html文档中的数据加载到该对象中
    fp=open('./test.html','r',encoding='utf-8')
    soup=BeautifulSoup(fp,'lxml')#第二个参数固定'lxml'
    # print(soup)
    # print(soup.a)#soup.tagName返回的是html中第一次出现的togName对应的标签
    # print(soup.div)#
    # print(soup.find('div'))#返回的结果也是第一次出现的,相当于soup.div
    # print(soup.find('div',class_='song'))#属性定位。注意class_
    # print(soup.find_all('a'))#找到所有的
    # print(soup.select('.tang'))
    # print(soup.select('.tang > ul > li > a')[0])#层级选择器 返回的是一个列表
    # print(soup.select('./tang > ul a')[0])#ul与a之间的空格表示一个层级
    # print(soup.select('./tang > ul a')[0].string)#text,get_text,string
    print(soup.select('./tang > ul a')[0]['href'])
3.3.2 bs4案例实战
需求:爬取三国演义小说章节标题和章节内容
http://www.shicimingju.com/book/sanguoyanyi.html
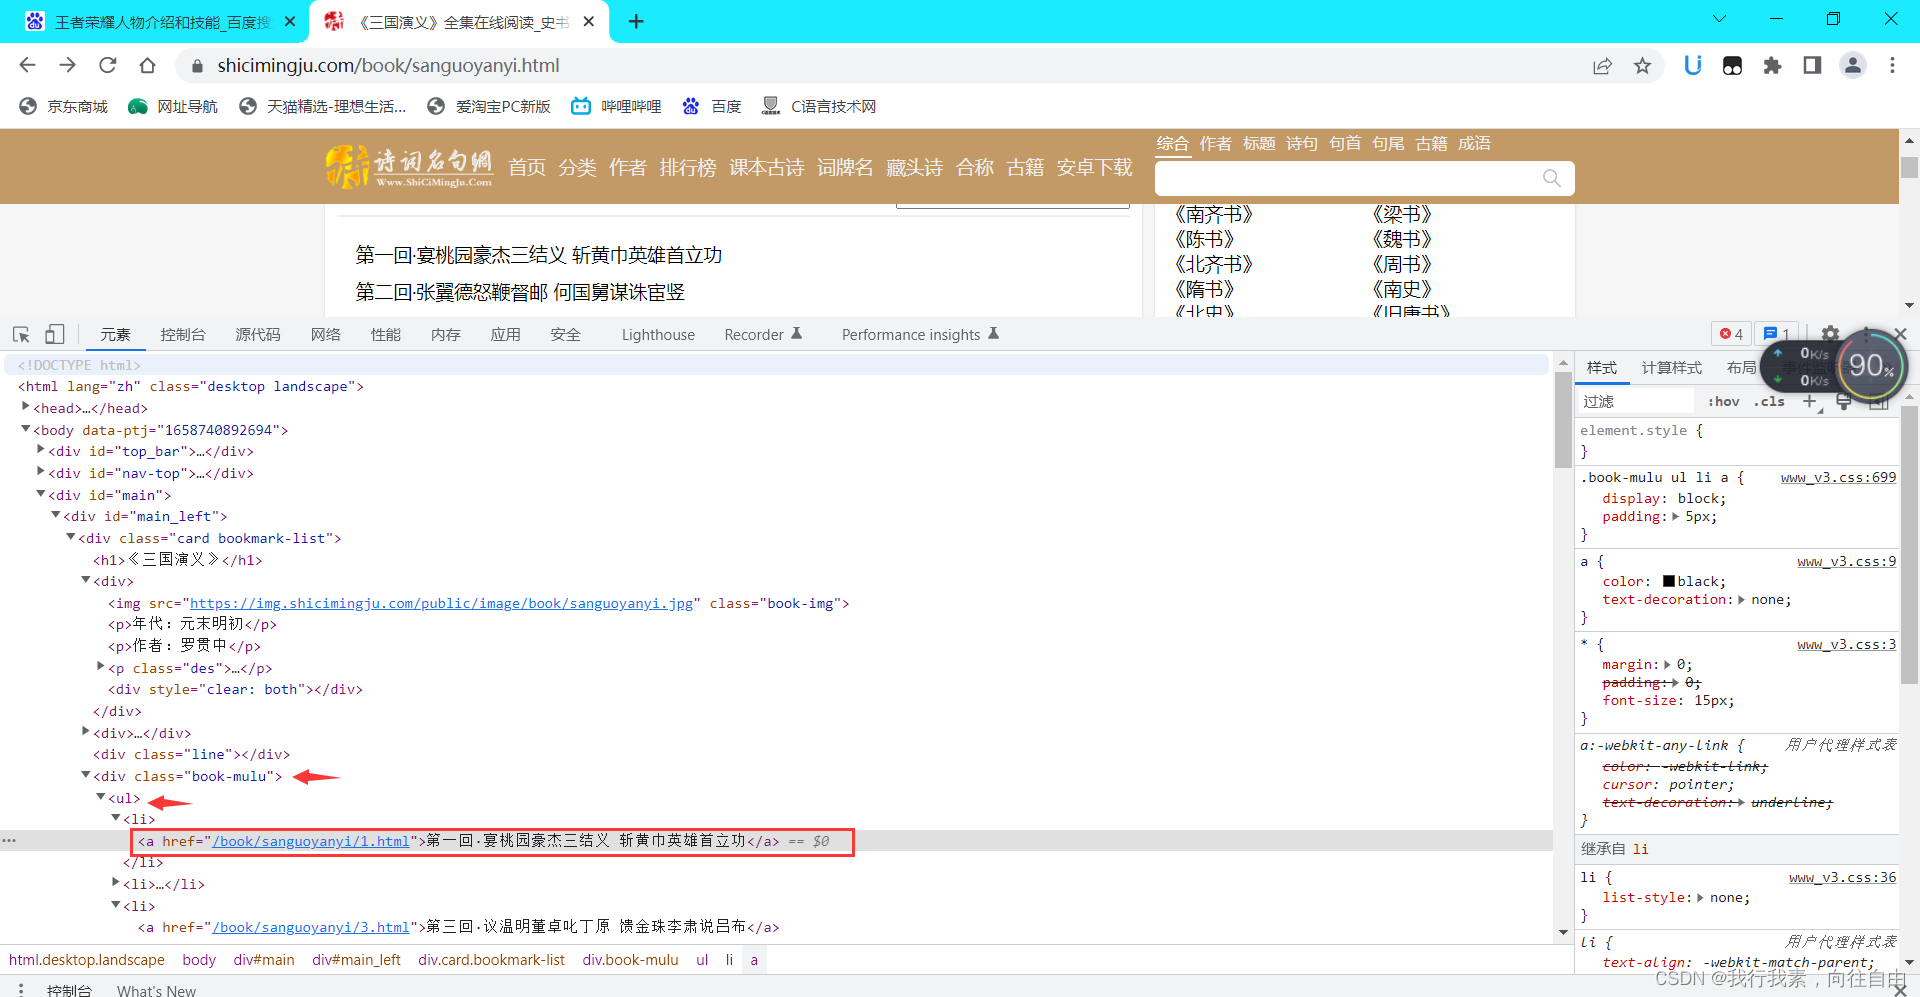
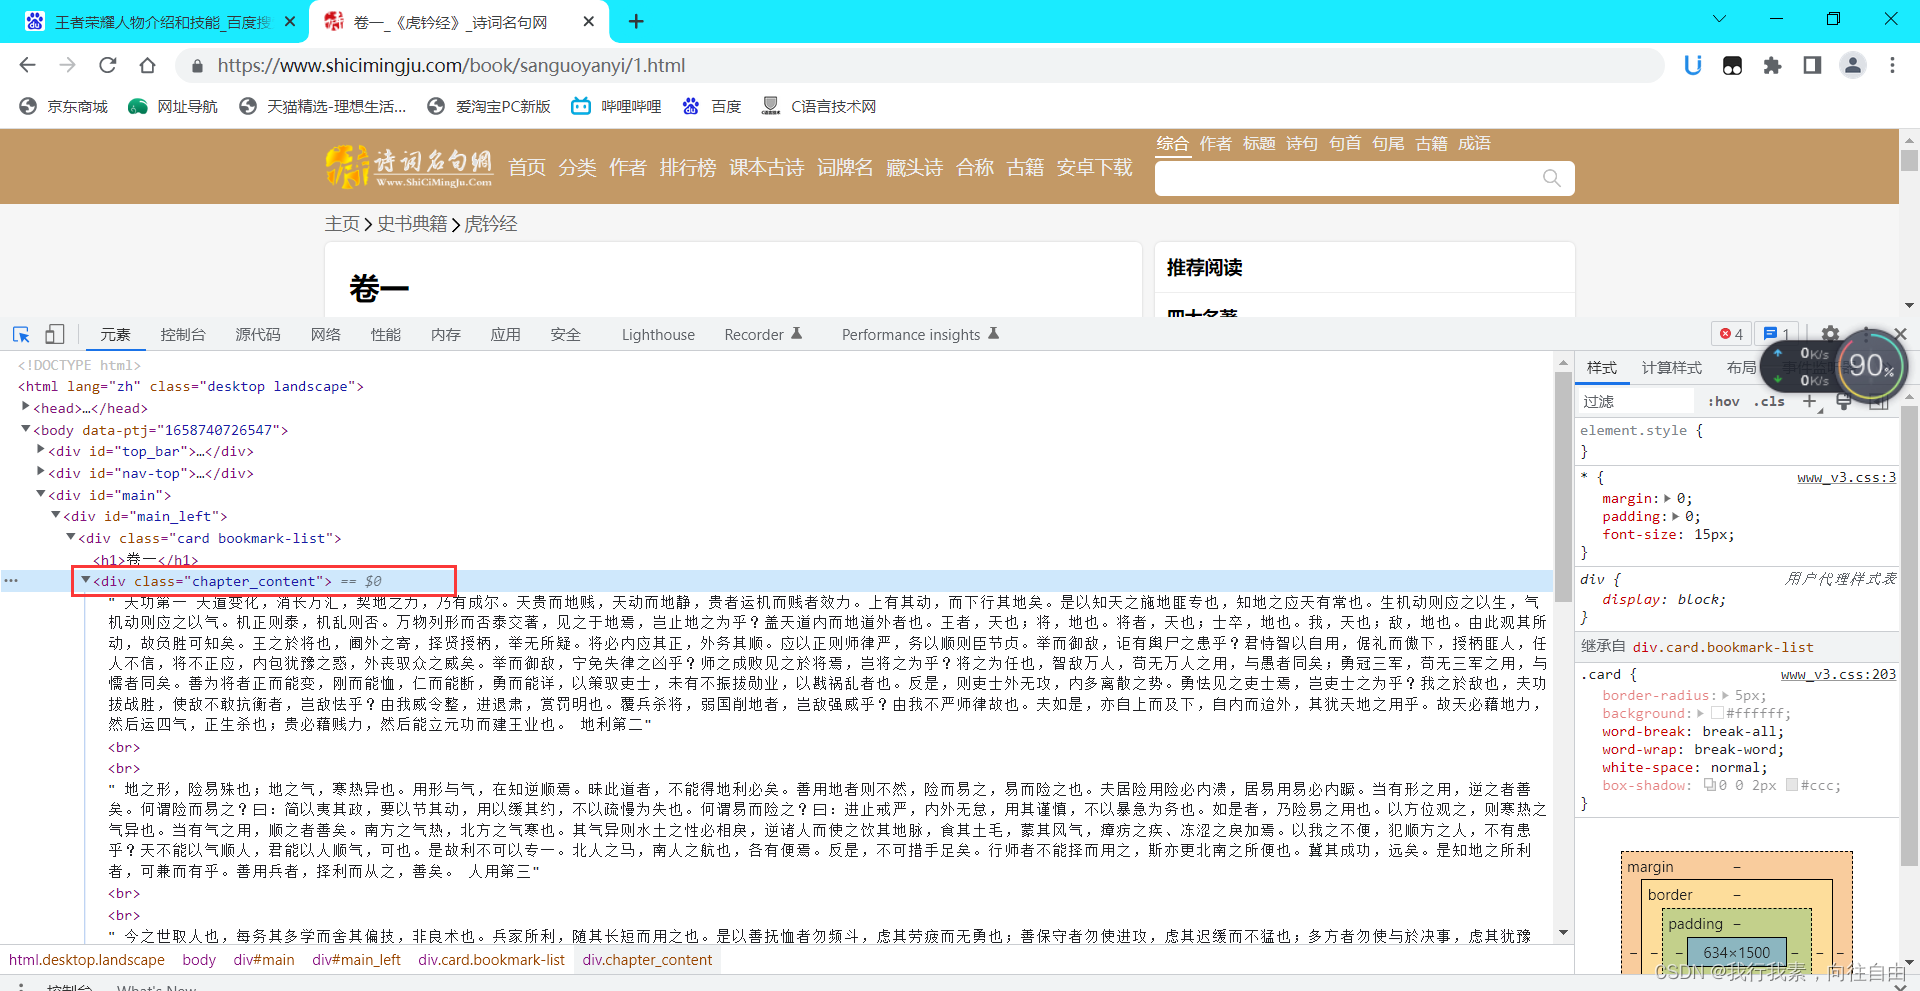
#需求:爬取三国演义小说章节标题和章节内容

import requests
from bs4 import  BeautifulSoup
if __name__ == '__main__':
    pass
    #对首页的数据进行爬取
    headers = {
        'User-Agent': "Mozilla/5.0 (Windows NT 10.0; Win64; x64) AppleWebKit/537.36 (KHTML, like Gecko) Chrome/103.0.0.0 Safari/537.36"
    }
    url = 'https://www.shicimingju.com/book/sanguoyanyi.html'
    page_text = requests.get(url =url,headers= headers).content
    #在首页中解析出所有章节的标题和详情页的url
    #实例化BeautifulSoup对象,需要将页面的网页源码加载到该对象中
    soup = BeautifulSoup(page_text,'lxml') #拿到了对象
    #解析章节标题和详情页的数据
    li_list = soup.select('.book-mulu>ul>li')
    fp = open('./三国.text', 'w', encoding='utf-8')
    for li in li_list :
        title = li.a.string
        detail_url = 'https://www.shicimingju.com'+li.a['href']
        #对详情页发起请求,并进行解析
        detail_page_text =requests.get(url=detail_url,headers=headers).content
        #解析详情页面的内容
        detail_soup = BeautifulSoup(detail_page_text,'lxml')
        div_tag = detail_soup.find('div',class_ = 'chapter_content')
        content = div_tag.text
        fp.write(title+":"+content+'\n')
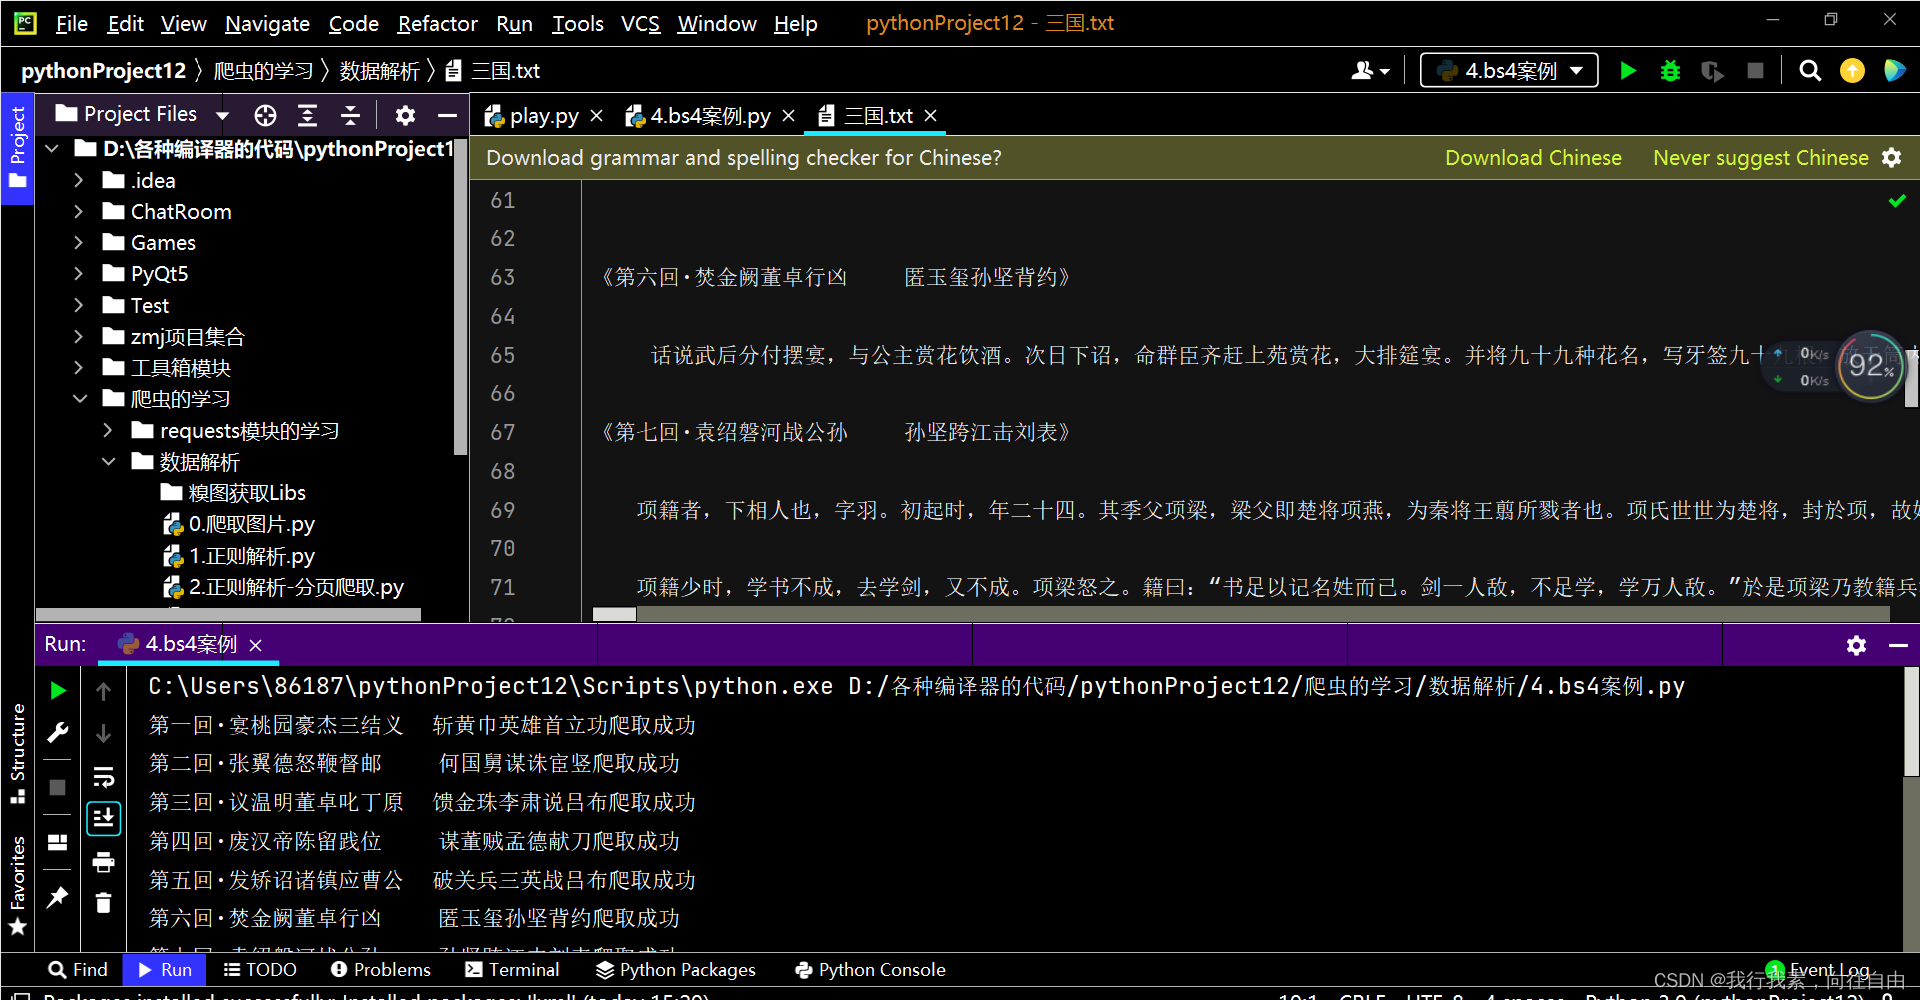
        print(title+'爬取成功')
爬取结果展示:
3.4 xpath解析(重要)
3.4.1 xpath基础知识
xpath解析:【最通用,最重要,最高效】
xpath解析原理:
-1.实例化一个etree的对象,且需要将被解析的页面源码数据加载到该对象中。
-2.调用etree对象中的xpath方法结合xpath表达式实现标签的定位和内容的捕获。
环境的安装:
pip install lxml
如何实例化一个etree对象:from lxml import etree
-1.将本地的html文档中的源码数据加载到etree对象中:
etree.parse(filePath)
-2.可以将从互联网上获取的源码数据加载到etree对象中:
etree.HTML('page_text')
-xpath('xpath表达式'):
-/:最左侧的斜杠表示从根节点开始定位,中间的斜杠表示的是一个层级
-//:中间的//表示的是多个层级,最左侧的//表示从任意位置开始定位
-属性定位://tag[@属性名称='属性值']
-索引定位://tag[@属性名称='属性值']/p[3] ==> 索引从1开始
-取文本:
-/text():获取的是标签中直系的文本内容
-//text():获取的的是标签下所有的文本内容
-取属性值:
-/@属性名字
#test.html文件中的内容


<html lang="en">
<head>
    <meta charset="UTF-8" />
    <title>测试bs4</title>
</head>
<body>
    <div>
        <p>百里守约</p>
    </div>
    <div class="song">
        <p>李清照</p>
        <p>王安石</p>
        <p>苏轼</p>
        <p>柳宗元</p>
        <a href="http://www.song.com/" title="赵匡胤" target="_self">
            <span>this is span</span>
        宋朝是最强大的王朝,不是军队的强大,而是经济很强大,国民都很有钱</a>
        <a href="" class="du">总为浮云能蔽日,长安不见使人愁</a>
        <img src="http://www.baidu.com/meinv.jpg" alt=""/>
    </div>
    <div class="tang">
        <ul>
            <li><a href="http://ww.baidu.com" title= "ging">清明时节雨纷纷,路上行人欲断魂,借问酒家何处有,牧童遥指杏花村</a></li>
            <li><a href="http://ww.163 .com" title="gin">秦时明月汉时关,万里长征人未还,但使龙城飞将在,不教胡马度阴山</a></li>
            <li><a href="http://ww.126.com" alt= "qi">岐王宅里寻常见,崔九堂前几度闻,正是江南好风景,落花时节又逢君</a></li>
            <li><a href="http://www.sina.com" class="du">杜甫</a></li>
            <li><a href="http://www.dudu.com" class="du">杜牧</a></li>
            <li><b>杜小月</b></li>
            <li><i>度蜜月</i></li>
            <li><a href="http://www.haha.com" id="feng">凤凰台上凤凰游,凤去台空江自流,吴宫花草埋幽径,晋代衣冠成古丘</a></li>
        </ul>
    </div>
</body>
</html>
测试代码:
from lxml import etree

if __name__ == '__main__':
    #实例化一个对象,且将解析的源码加载到该对象中
    tree=etree.parse('test.html')

    print(tree.xpath('/html/head/title'))#从根目录开始遍历html,html>head>title
    print(tree.xpath('/html//title'))#同上,这里的//表示的是多个层级
    print(tree.xpath('//div'))#最左侧的//表示从任意位置开始定位title
    print(tree.xpath('//div[@class="song"]'))#class属性定位
    print(tree.xpath('//div[@class="song"]/p[3]'))#索引定位,索引下标从1开始
    print(tree.xpath('//div[@class="tang"]/ul/li[5]/a/text()')[0])#杜牧
    print(tree.xpath('//li[7]/i/text()'))#返回的是列表['度蜜月'],若想拿值,可以加上[0]
    print(tree.xpath('//li[7]//text()'))  # 同上
    print(tree.xpath('//div[@class="song"]/img/@src')[0])#取属性值
运行结果:

3.4.2 xpath实战-58二手房
需求:爬取58二手房中的房源信息 https://bj.58.com/ershoufang/


from lxml import etree
import requests

if __name__ == "__main__":
    url = 'https://bj.58.com/ershoufang/'
    headers = {
        'User-Agent':'Mozilla/5.0 (Windows NT 10.0; Win64; x64) AppleWebKit/537.36 (KHTML, like Gecko) Chrome/80.0.3987.163 Safari/537.36'
    }
    # 爬取到页面源码数据
    page_text = requests.get(url=url,headers=headers).text
    # 数据解析
    tree = etree.HTML(page_text)
    # 存储li标签对象
    li_list = tree.xpath('//ul[@class="house-list-wrap"]/li')
    with open('./58.txt','w',encoding='utf-8') as fp:
        for li in li_list:
            title = li.xpath('./div[2]/h2/a/text()')
            print(title)
            fp.write(title+'\n')
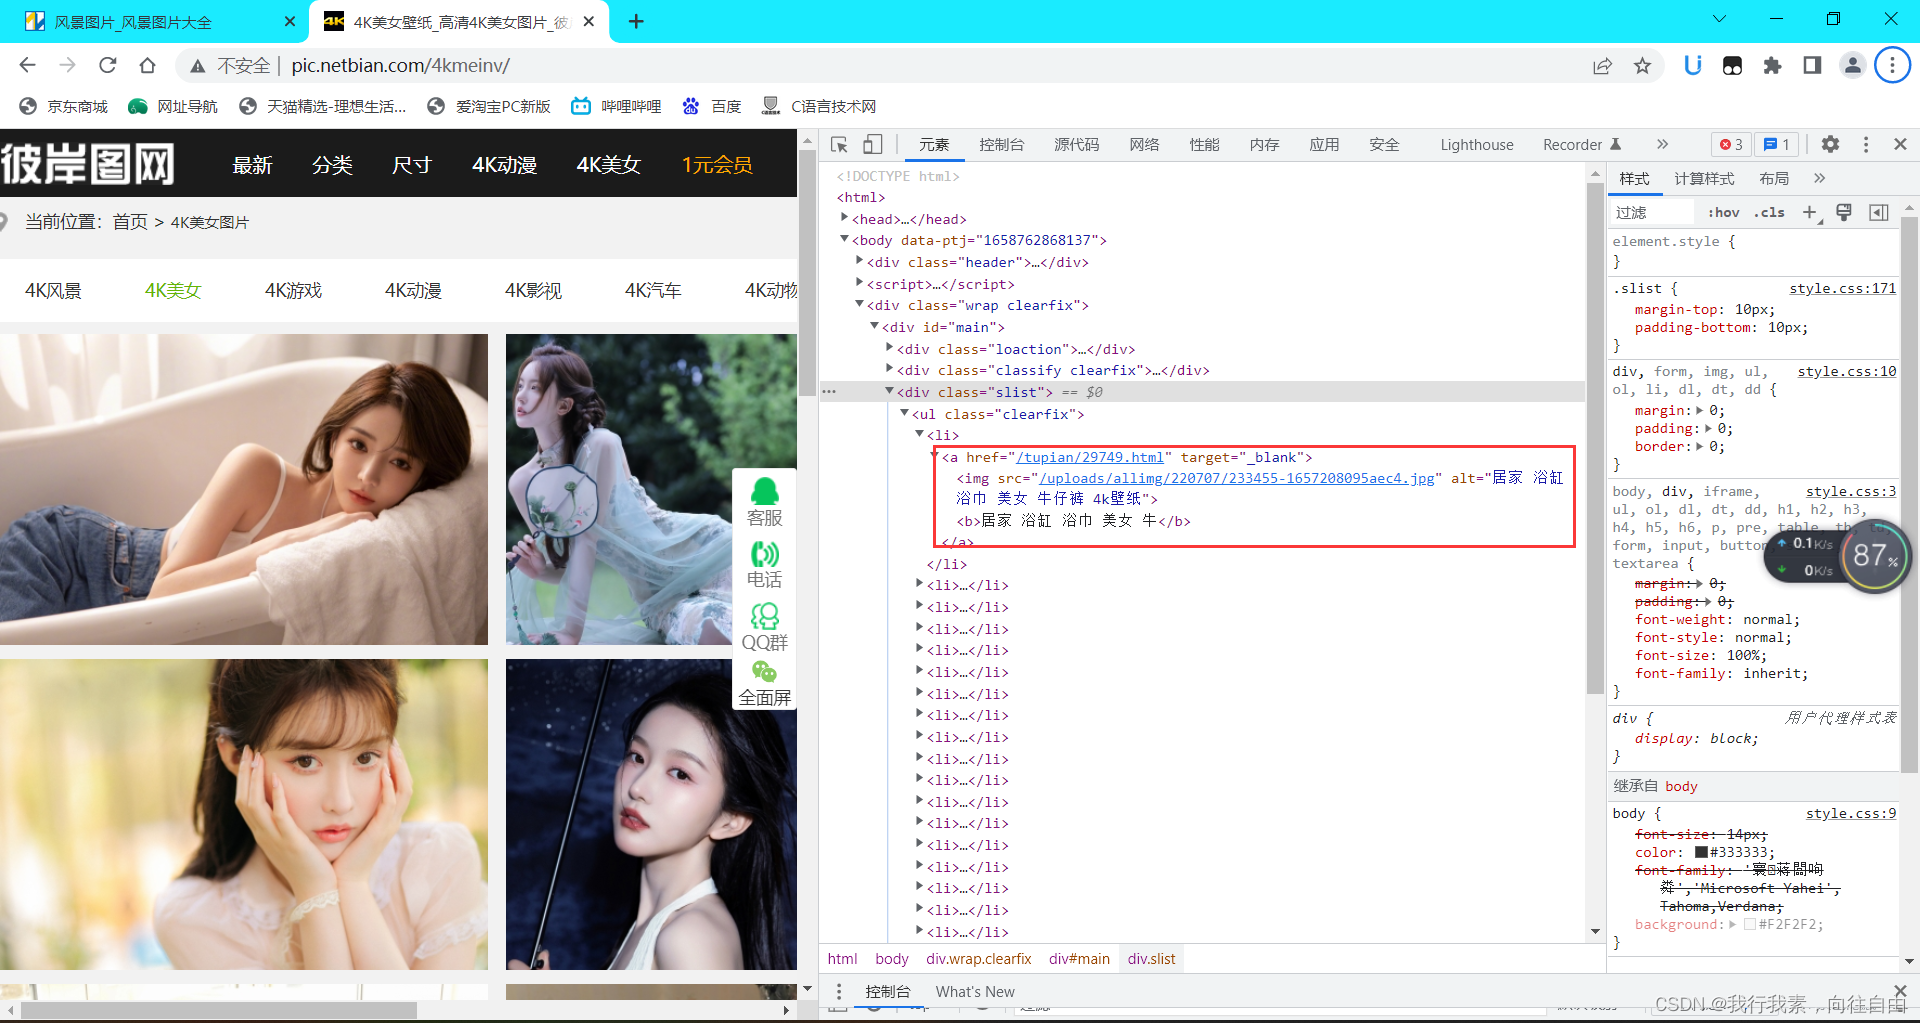
3.4.3 xpath解析案例-4k图片解析下载
import requests
from lxml import etree

if __name__ == '__main__':
    url="http://pic.netbian.com/4kmeinv/"
    headers = {
        'User-Agent': "Mozilla/5.0 (Windows NT 10.0; Win64; x64) AppleWebKit/537.36 (KHTML, like Gecko) Chrome/103.0.0.0 Safari/537.36"
    }
    response=requests.get(url=url,headers=headers)
    # response.encoding='utf-8'#可以解决乱码问题
    page_text =response.text

    # print(page_text)
    #数据解析:src的属性值 alt属性
    tree=etree.HTML(page_text)
    li_list=tree.xpath('//div[@class="slist"]/ul/li')
    # print(li_list)
    for li in li_list:
        img_src="http://pic.netbian.com"+li.xpath('./a/img/@src')[0]
        img_name=li.xpath('./a/img/@alt')[0]+'.jpg'
        #通用解决中文乱码的解决方案
        img_name=img_name.encode('iso-8859-1').decode('gbk')
        #请求图片
        img_data=requests.get(url=img_src,headers=headers).content
        with open('./糗图获取Libs/'+img_name,'wb') as fp:
            fp.write(img_data)
            print(img_name+'抓取完毕!!!')
运行效果:

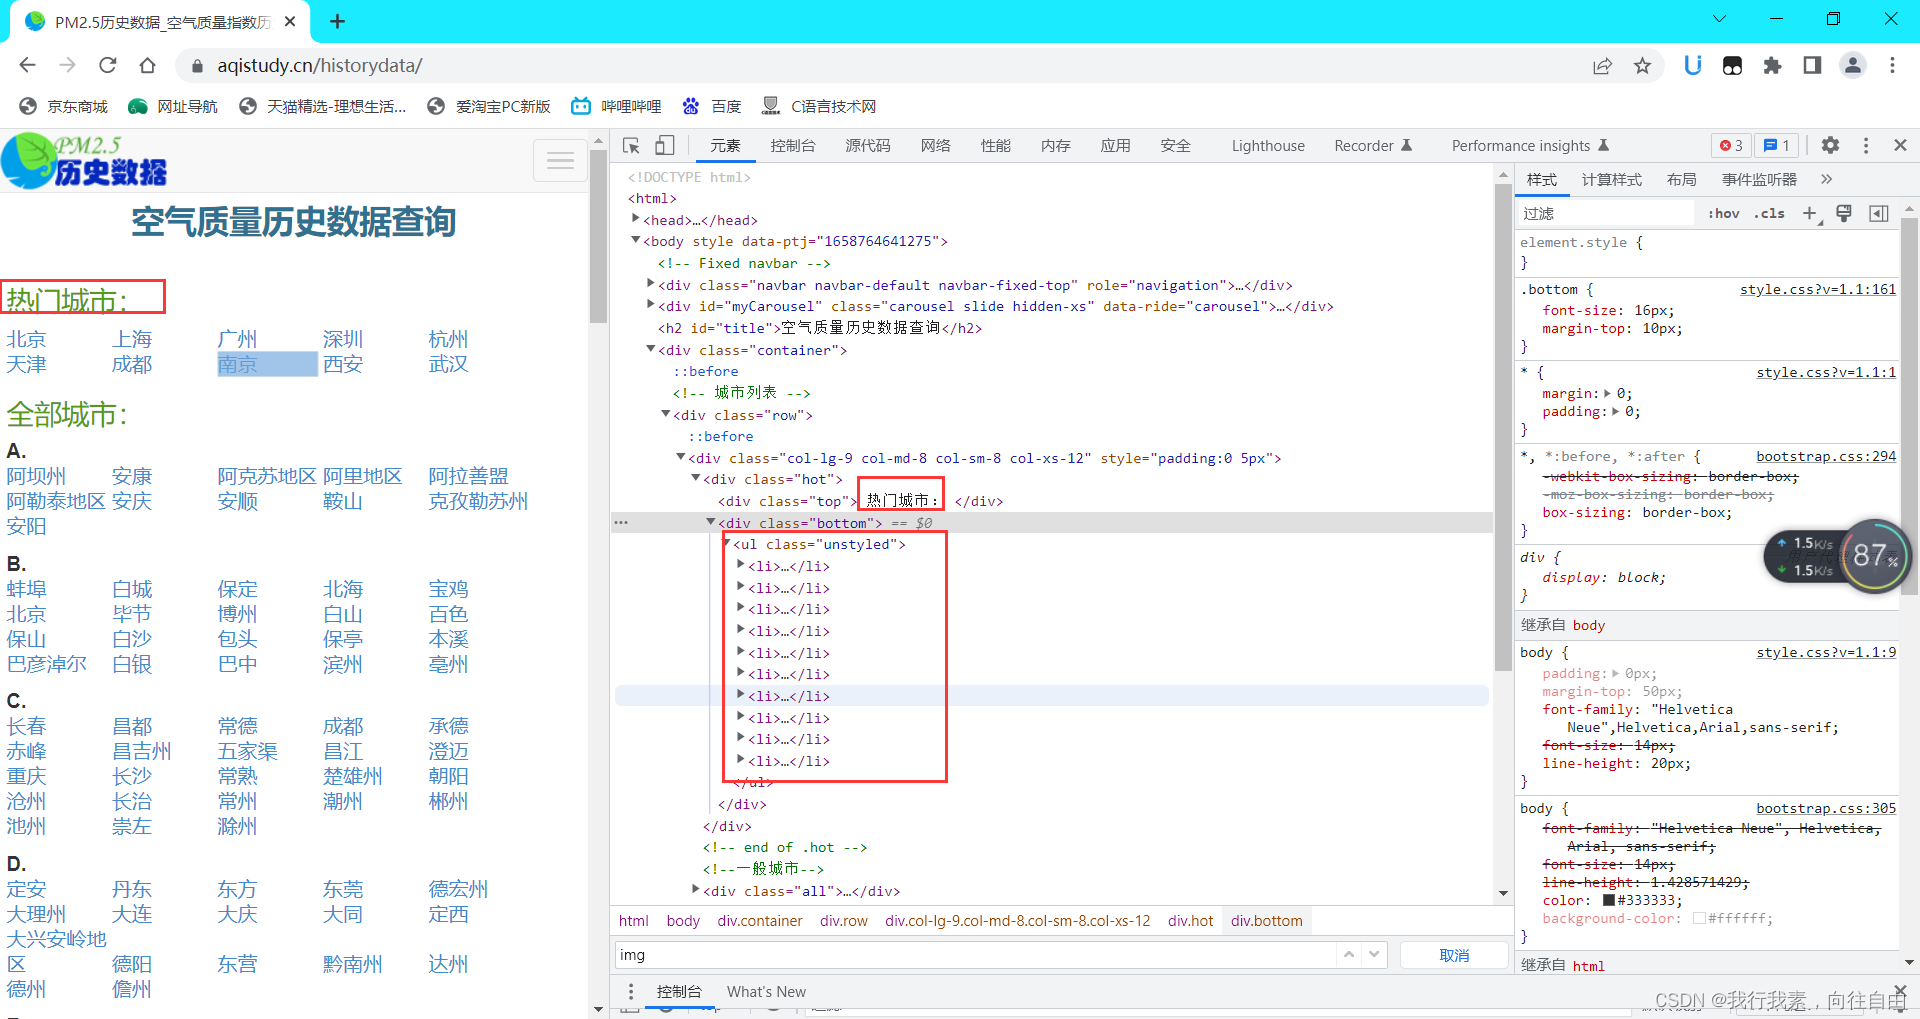
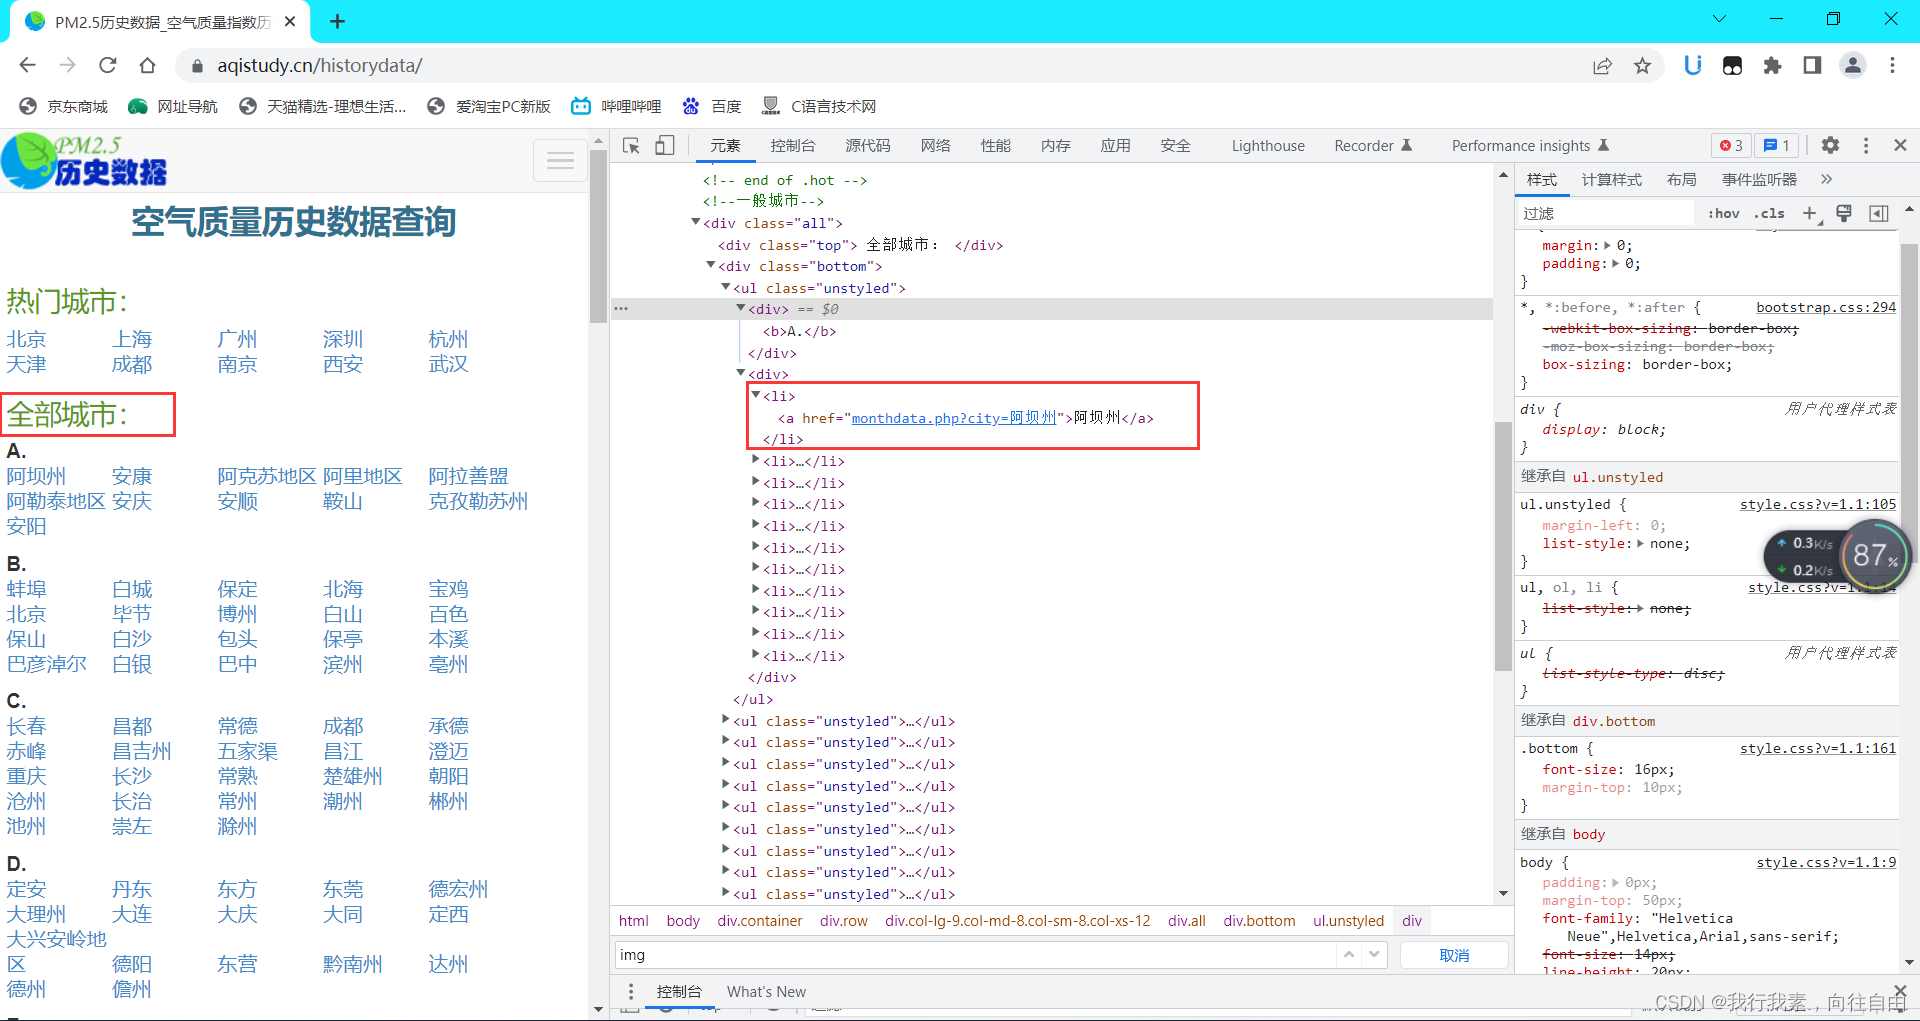
3.4.4 xpath解析案例-全国城市名称爬取
import requests
from lxml import etree

#需求:xpath解析案例-全国城市名称爬取

if __name__ == '__main__':
    headers = {
        'User-Agent': "Mozilla/5.0 (Windows NT 10.0; Win64; x64) AppleWebKit/537.36 (KHTML, like Gecko) Chrome/103.0.0.0 Safari/537.36"
    }
    url="https://www.aqistudy.cn/historydata/"
    page_text=requests.get(url=url,headers=headers).text
    tree=etree.HTML(page_text)
    host_li_list=tree.xpath('//div[@class="bottom"]/ul/li')#热门城市的标签
    all_city_names=[]
    #解析到了热门城市的名称
    for li in host_li_list:
        host_city_name=li.xpath('./a/text()')[0]#拿到热门城市的名称
        all_city_names.append(host_city_name)

    #解析全部城市的名称
    city_names_list=tree.xpath('//div[@class="all"]//ul/div[2]/li')
    for li in city_names_list:
        city_name=li.xpath('./a/text()')[0]
        all_city_names.append(city_name)

    print(all_city_names,len(all_city_names))
简洁代码:
import requests
from lxml import etree

#需求:xpath解析案例-全国城市名称爬取

if __name__ == '__main__':
    #简洁代码
    headers = {
        'User-Agent': "Mozilla/5.0 (Windows NT 10.0; Win64; x64) AppleWebKit/537.36 (KHTML, like Gecko) Chrome/103.0.0.0 Safari/537.36"
    }
    url = "https://www.aqistudy.cn/historydata/"
    page_text = requests.get(url=url, headers=headers).text
    tree = etree.HTML(page_text)
    #直接解析热门城市和全部城市
    #div[@class="bottom"]/ul/li/a   热门城市a标签的层级关系
    #div[@class="all"]/ul/div[2]/li/a   全部城市a标签的层级关系
    a_list=tree.xpath('//div[@class="bottom"]/ul/li/a | //div[@class="all"]//ul/div[2]/li/a')#按位或
    all_city_names=[]
    for a in a_list:
        city_name=a.xpath('./text()')[0]
        all_city_names.append(city_name)
    print(all_city_names)
    print(len(all_city_names))
运行结果:

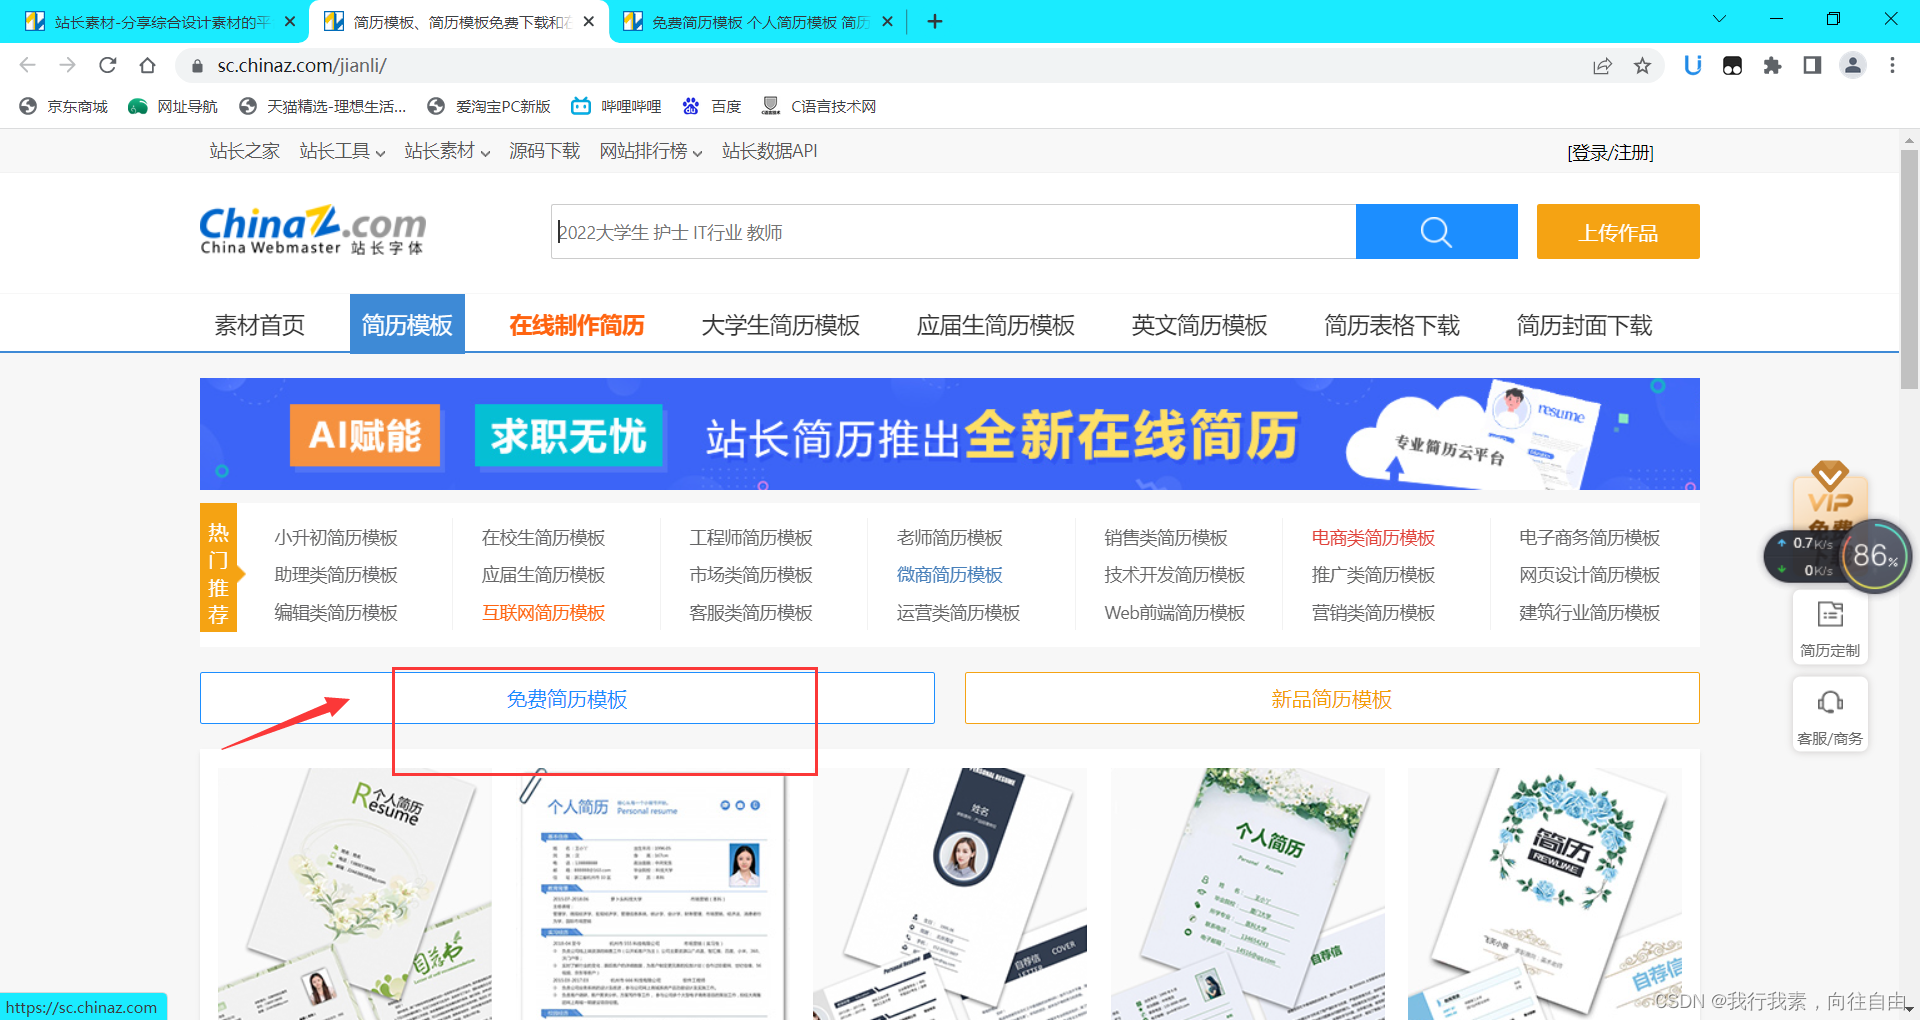
3.4.5 xpath解析案例-爬取站长素材中免费的简历模板
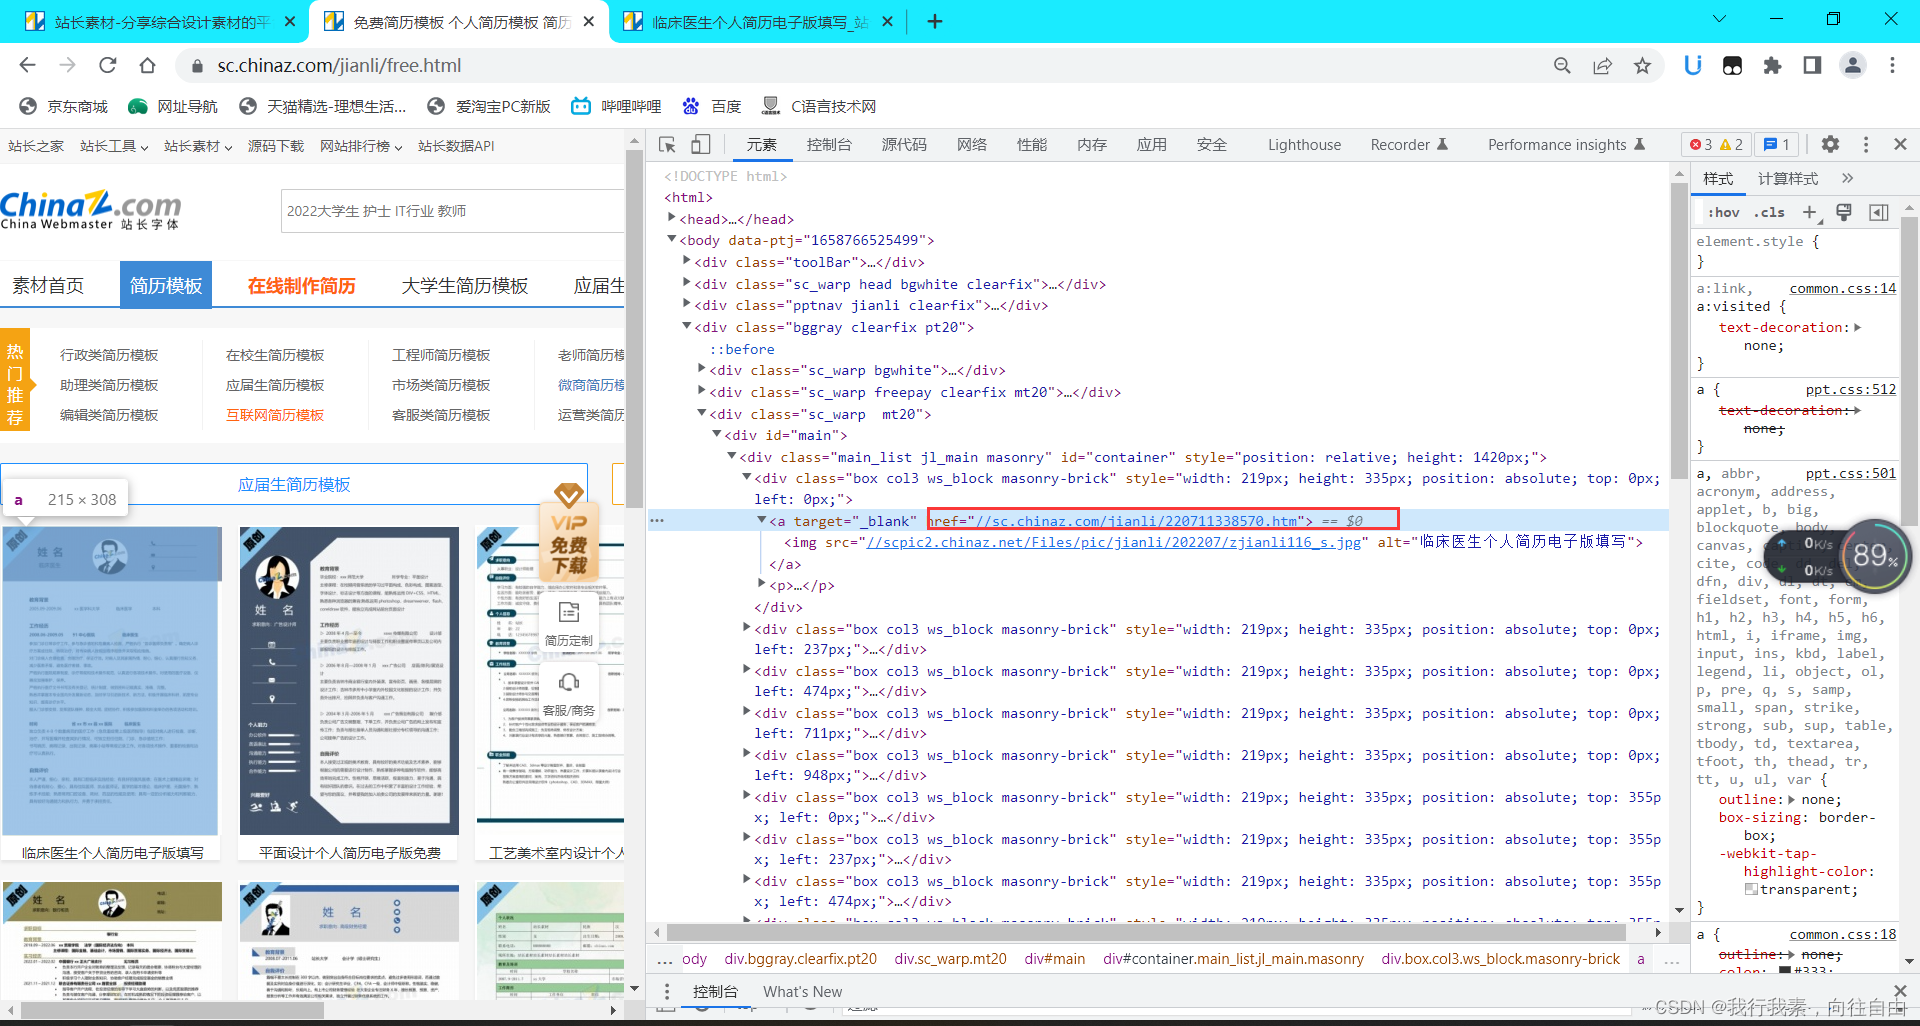
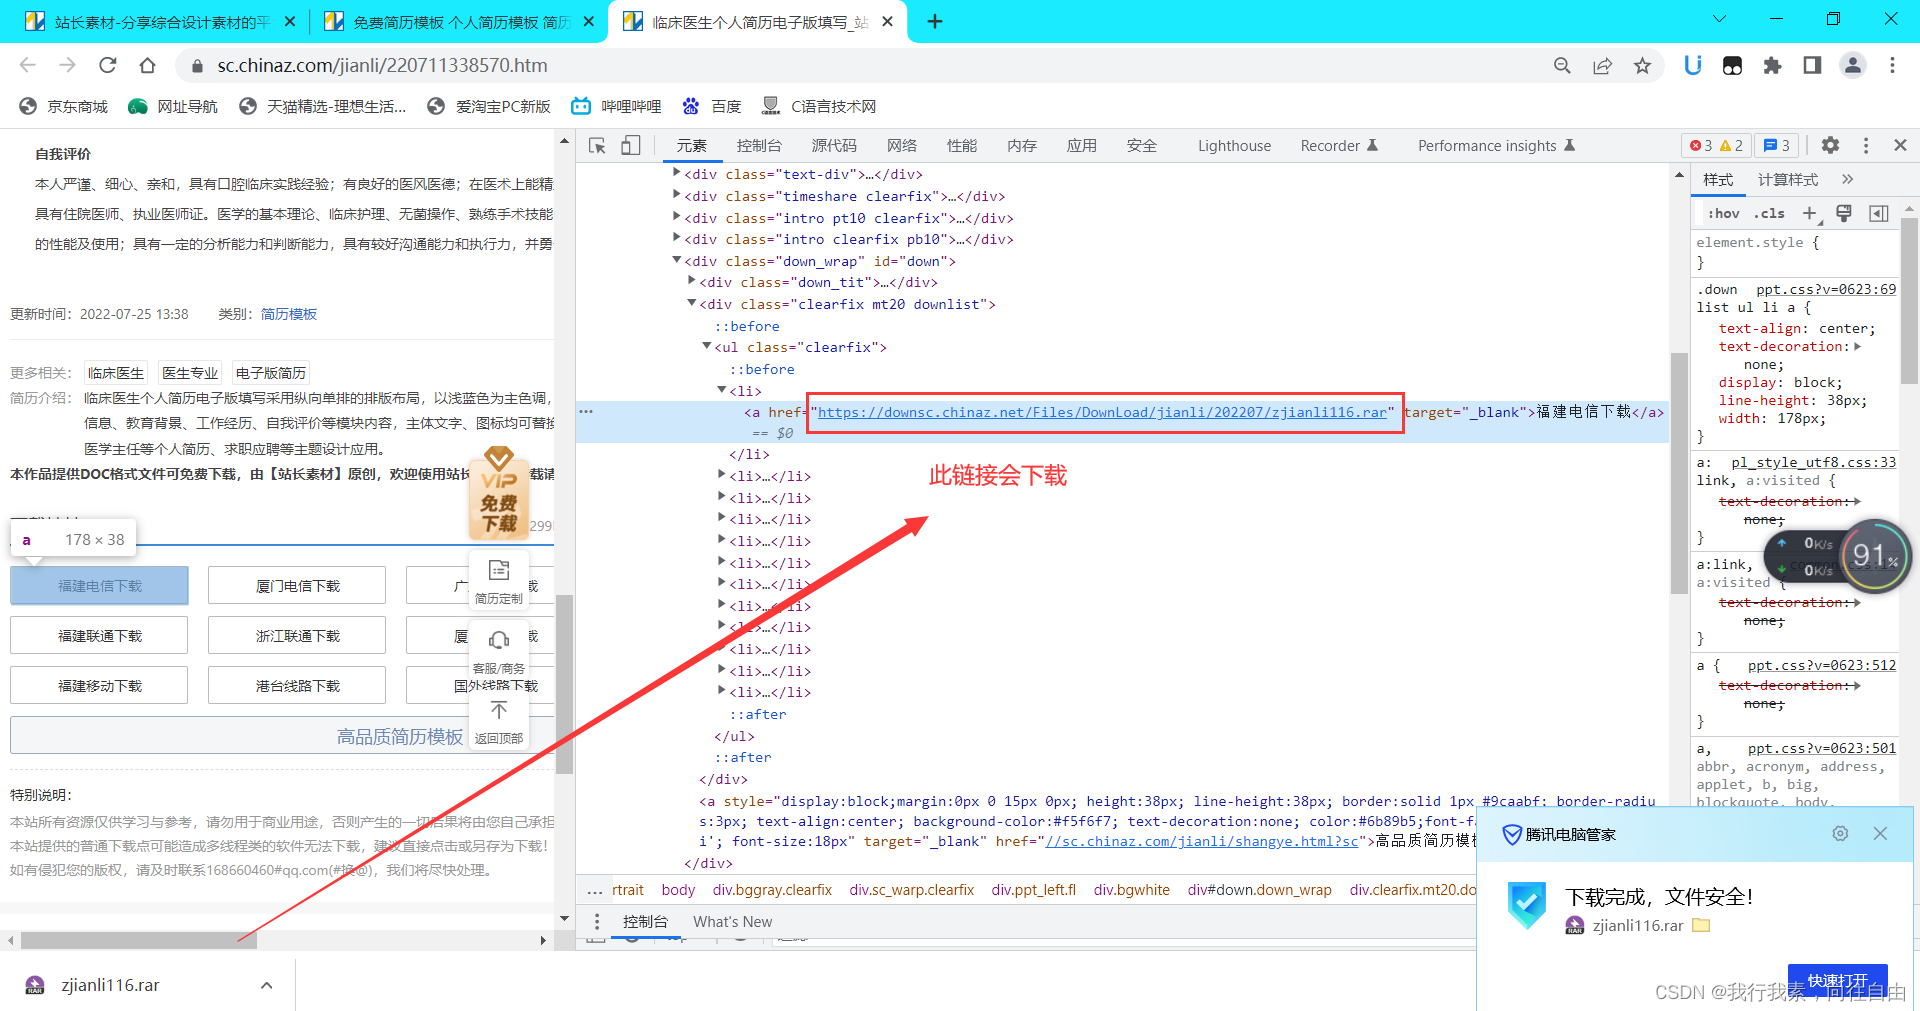
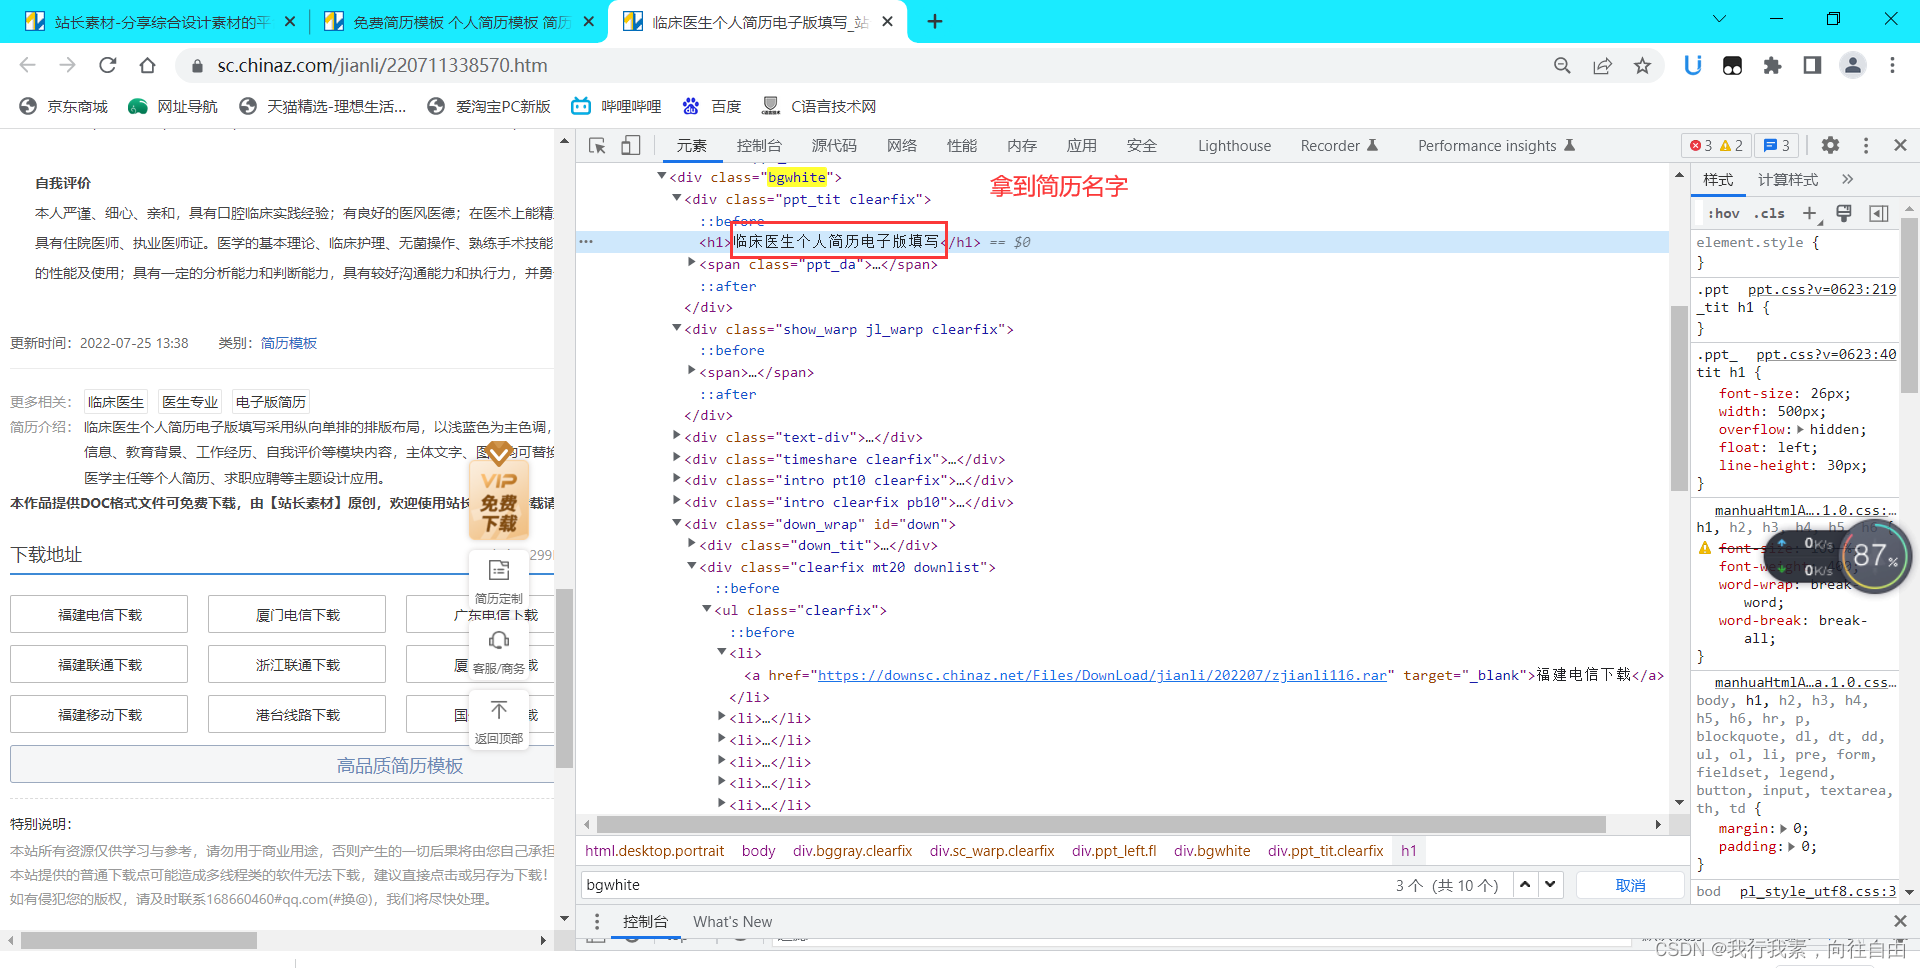
案例:爬取站长素材中免费的简历模板【详情页也需要解析 ==> 多级解析】
网址:https://sc.chinaz.com

import requests
from lxml import etree
import os
# 分页:
if __name__ == "__main__":
    if not os.path.exists('./jianli'):
        os.mkdir('./jianli')
    for pageName in range(1, 4):
        if pageName == 1:
            url = 'https://sc.chinaz.com/jianli/free.html'
            print('正在爬取网站第1页内容')
        else:
            url = format('https://sc.chinaz.com/jianli/free_%d.html' % pageName)
            print('正在爬取网站第%d页内容' % pageName)


        # 1.爬取网页信息 https://sc.chinaz.com/jianli/free.html
        headers = {
            'User-Agent': "Mozilla/5.0 (Windows NT 10.0; Win64; x64) AppleWebKit/537.36 (KHTML, like Gecko) Chrome/103.0.0.0 Safari/537.36"
        }
        # 爬取到页面源码数据
        page_text = requests.get(url=url,headers=headers).text

        # 2.数据解析
        tree = etree.HTML(page_text)
        jl_href= tree.xpath('//div[@id="container"]/div/a/@href')

        # 拿到每个简历的url
        for jl in jl_href:
            one_url = 'https:' + jl
            # print(one_url)

            # 3.拿到每个简历的下载地址
            one_page_taxt = requests.get(url=one_url,headers=headers).text
            one_tree = etree.HTML(one_page_taxt)
            one_adress = one_tree.xpath('//div[@id="down"]/div[2]/ul/li[1]/a/@href')[0]
            # print(one_adress)
            # 4.持久化存储
            # 拿到每个简历的名字
            jl_name = one_tree.xpath('//*[@class="bgwhite"]/div[1]/h1/text()')[0] + '.rar'
            jl_name = jl_name.encode('iso-8859-1').decode('utf-8')
            # print(jl_name)
            download = requests.get(url=one_adress, headers=headers).content
            adress_path = './jianli/' + jl_name
            with open(adress_path, 'wb') as fp:
                fp.write(download)
                print(jl_name, '下载成功!!!')
    print('over')
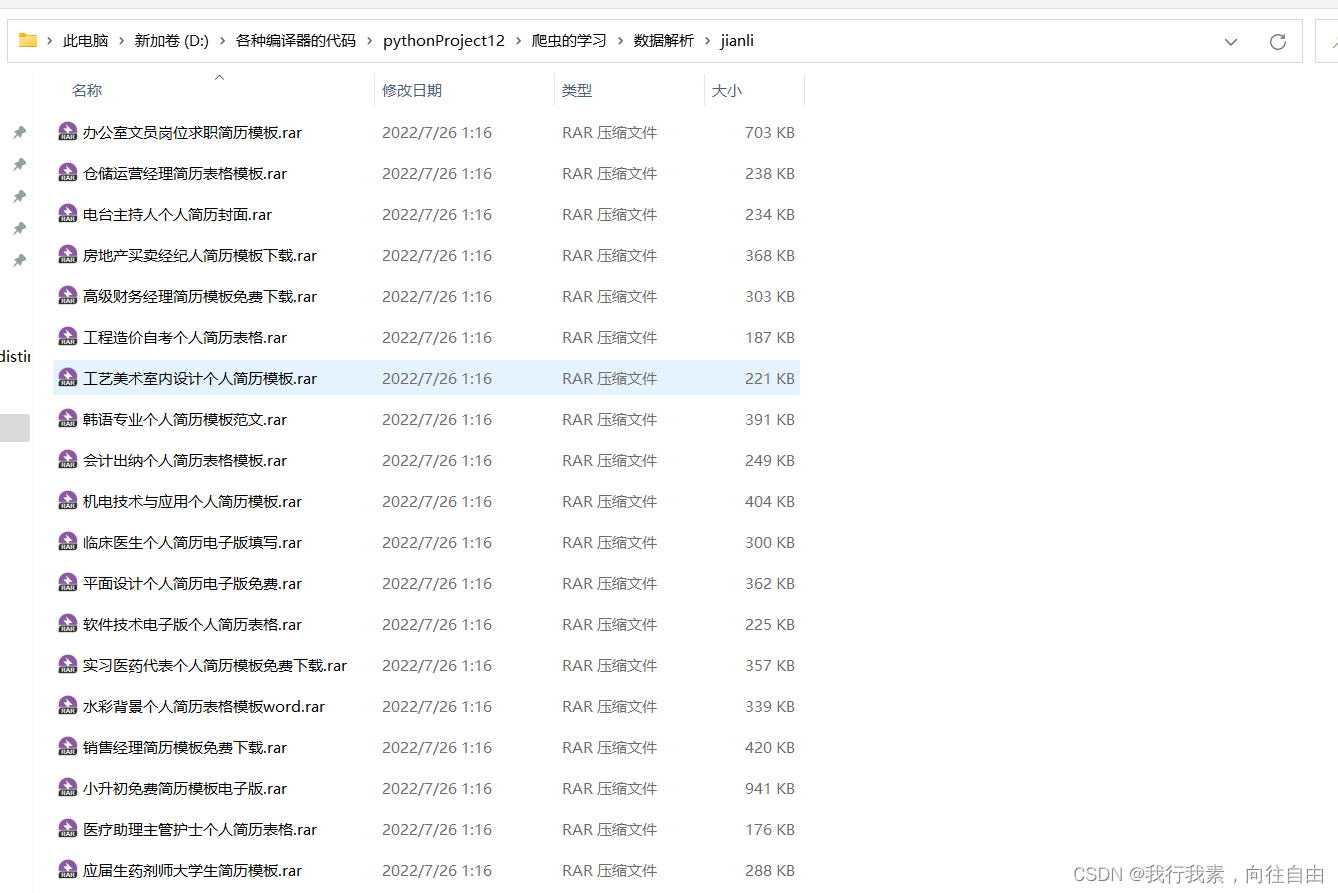
爬取结果:
4.验证码识别
4.1 云打码使用流程
验证码和爬虫之间的爱恨情仇?
反爬机制:验证码。 ==> 识别验证码图片中的数据,用于模拟登陆操作。
识别验证码的操作:
-人工肉眼识别 (不推荐)-第三方自动识别 (推荐)
-云打码 http://www.yundama.com/demo.html
云打码的使用流程:
-注册:普通用户和开发用户
-登录:
-普通用户的登录:查询该用户是否还有剩余部分
-开发者用户的登录:
-创建一个软件:我的软件->添加新软件->录入软件名称->提交(产生软件id和密钥)
-下载实例代码:开发文档->点击下载:云代码接口DLL->PythonHTTP实例下载
-下载后解压缩,如下图所示:

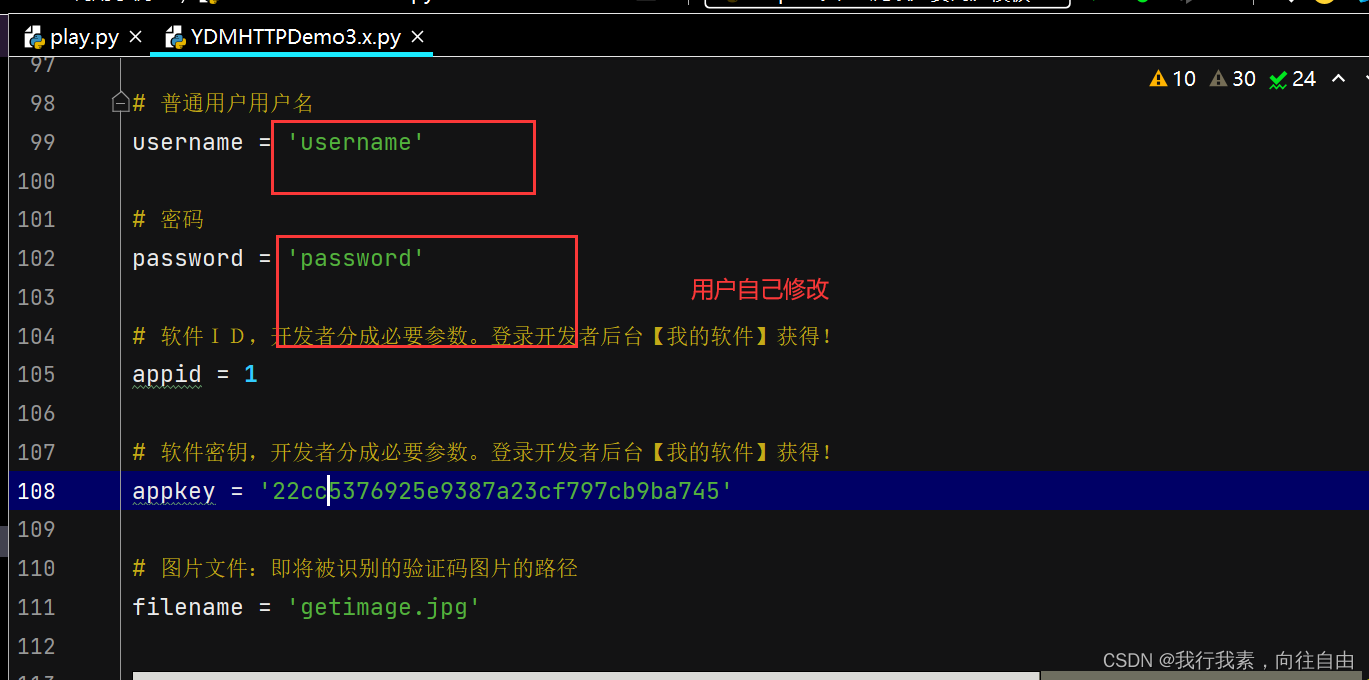
YDMHTTPDemo3.x.py文件中的内容如下:
import http.client, mimetypes, urllib, json, time, requests


######################################################################

class YDMHttp:
    apiurl = 'http://api.yundama.com/api.php'
    username = ''
    pwd= ''
    appid = ''
    appkey = ''

    def __init__(self, username, pwd, appid, appkey):
        self.username = username
        self.pwd= pwd
        self.appid = str(appid)
        self.appkey = appkey

    def request(self, fields, files=[]):
        response = self.post_url(self.apiurl, fields, files)
        response = json.loads(response)
        return response

    def balance(self):
        data = {'method': 'balance', 'username': self.username, 'pwd': self.pwd, 'appid': self.appid,
                'appkey': self.appkey}
        response = self.request(data)
        if (response):
            if (response['ret'] and response['ret'] < 0):
                return response['ret']
            else:
                return response['balance']
        else:
            return -9001

    def login(self):
        data = {'method': 'login', 'username': self.username, 'pwd': self.pwd, 'appid': self.appid,
                'appkey': self.appkey}
        response = self.request(data)
        if (response):
            if (response['ret'] and response['ret'] < 0):
                return response['ret']
            else:
                return response['uid']
        else:
            return -9001

    def upload(self, filename, codetype, timeout):
        data = {'method': 'upload', 'username': self.username, 'pwd': self.password, 'appid': self.appid,
                'appkey': self.appkey, 'codetype': str(codetype), 'timeout': str(timeout)}
        file = {'file': filename}
        response = self.request(data, file)
        if (response):
            if (response['ret'] and response['ret'] < 0):
                return response['ret']
            else:
                return response['cid']
        else:
            return -9001

    def result(self, cid):
        data = {'method': 'result', 'username': self.username, 'pwd': self.pwd, 'appid': self.appid,
                'appkey': self.appkey, 'cid': str(cid)}
        response = self.request(data)
        return response and response['text'] or ''

    def decode(self, filename, codetype, timeout):
        cid = self.upload(filename, codetype, timeout)
        if (cid > 0):
            for i in range(0, timeout):
                result = self.result(cid)
                if (result != ''):
                    return cid, result
                else:
                    time.sleep(1)
            return -3003, ''
        else:
            return cid, ''

    def report(self, cid):
        data = {'method': 'report', 'username': self.username, 'pwd': self.pwd, 'appid': self.appid,
                'appkey': self.appkey, 'cid': str(cid), 'flag': '0'}
        response = self.request(data)
        if (response):
            return response['ret']
        else:
            return -9001

    def post_url(self, url, fields, files=[]):
        for key in files:
            files[key] = open(files[key], 'rb');
        res = requests.post(url, files=files, data=fields)
        return res.text


######################################################################

# 普通用户用户名
username = 'username'

# 密码
password = 'password'

# 软件ID,开发者分成必要参数。登录开发者后台【我的软件】获得!
appid = 1

# 软件密钥,开发者分成必要参数。登录开发者后台【我的软件】获得!
appkey = '22cc5376925e9387a23cf797cb9ba745'

# 图片文件:即将被识别的验证码图片的路径
filename = 'getimage.jpg'

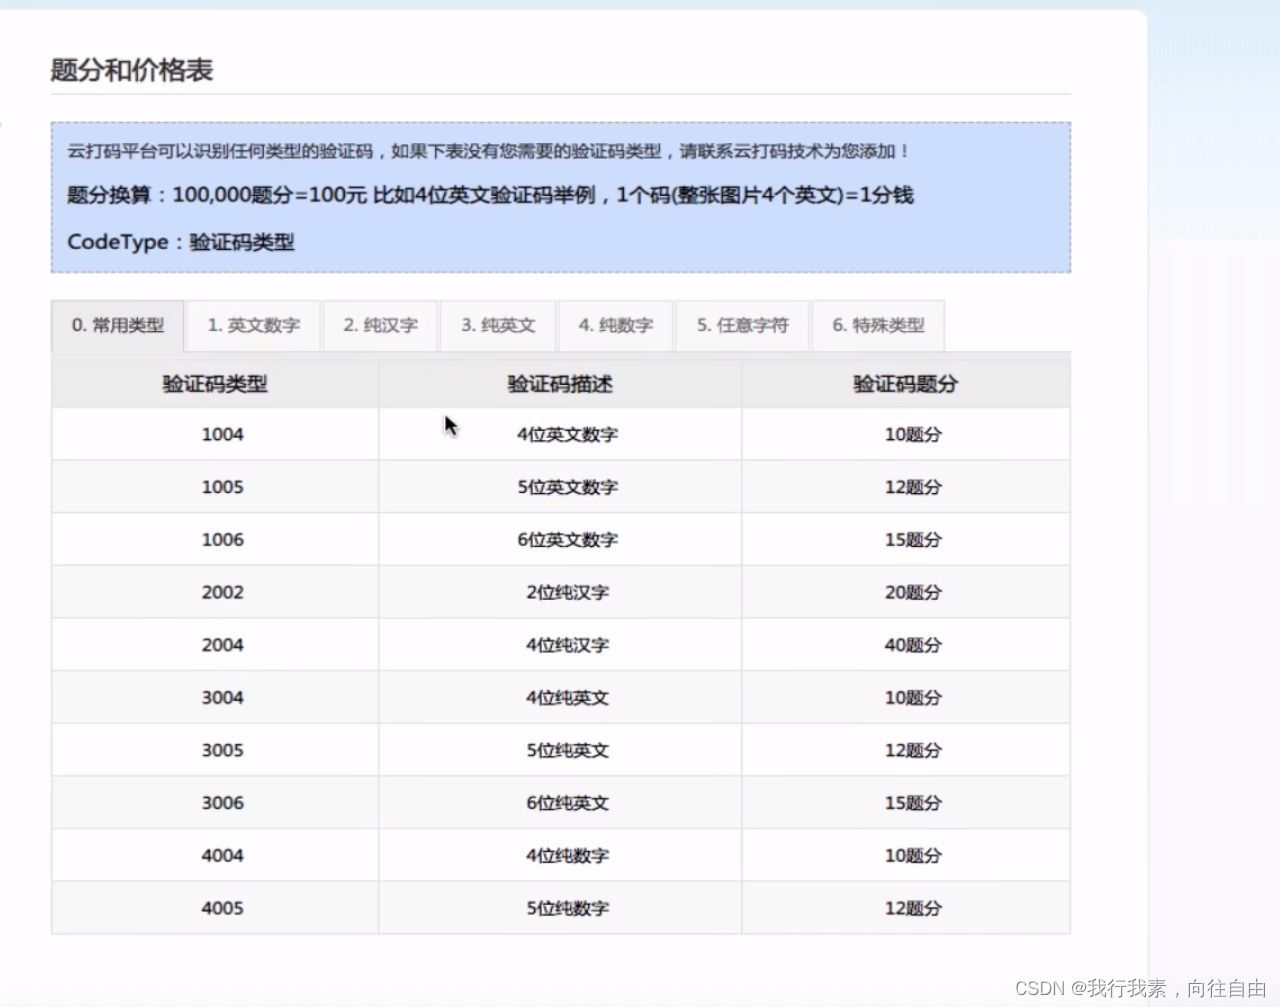
# 验证码类型,# 例:1004表示4位字母数字,不同类型收费不同。请准确填写,否则影响识别率。在此查询所有类型 http://www.yundama.com/price.html
codetype = 1004

# 超时时间,秒
timeout = 60

# 检查
if (username == 'username'):
    print('请设置好相关参数再测试')
else:
    # 初始化
    yundama = YDMHttp(username, pwd, appid, appkey)

    # 登陆云打码
    uid = yundama.login();
    print('uid: %s' % uid)

    # 查询余额
    balance = yundama.balance();
    print('balance: %s' % balance)

    # 开始识别,图片路径,验证码类型ID,超时时间(秒),识别结果
    cid, result = yundama.decode(filename, codetype, timeout);
    print('cid: %s, result: %s' % (cid, result))

######################################################################

4.2 云打码实战演练-识别古诗文网登陆页面中的验证码
实战:识别古诗文网登陆页面中的验证码
使用云打码平台识别验证码的编码流程:
-1.将验证码图片进行本地下载
-2.调用平台提供的示例代码进行图片数据识别
import requests
from lxml import etree
from CodeClass import YDMHttp
#封装识别验证码图片的函数
def getCodeText(imgPath,codeType):#图片路径,codeType:验证码类型
    # 普通用户用户名
    username = 'bobo328410948'

    # 密码
    pwd= 'bobo328410948'

    # 软件ID,开发者分成必要参数。登录开发者后台【我的软件】获得!
    appid = 6003

    # 软件密钥,开发者分成必要参数。登录开发者后台【我的软件】获得!
    appkey = '1f4b564483ae5c907a1d34f8e2f2776c'

    # 图片文件:即将被识别的验证码图片的路径
    filename = imgPath

    # 验证码类型,# 例:1004表示4位字母数字,不同类型收费不同。请准确填写,否则影响识别率。在此查询所有类型 http://www.yundama.com/price.html
    codetype = codeType

    # 超时时间,秒
    timeout = 20

    result=None
    # 检查
    if (username == 'username'):
        print('请设置好相关参数再测试')
    else:
        # 初始化
        yundama = YDMHttp(username, pwd, appid, appkey)

        # 登陆云打码
        uid = yundama.login();
        print('uid: %s' % uid)

        # 查询余额
        balance = yundama.balance();
        print('balance: %s' % balance)

        # 开始识别,图片路径,验证码类型ID,超时时间(秒),识别结果
        cid, result = yundama.decode(filename, codetype, timeout);
        print('cid: %s, result: %s' % (cid, result))
    return result
########################################################################


#1.将验证码图片下载到本地
url="https://so.gushiwen.org/user/login.aspx?from=http://so.gushiwen.org/user/collect.aspx"
headers = {
    'User-Agent': "Mozilla/5.0 (Windows NT 10.0; Win64; x64) AppleWebKit/537.36 (KHTML, like Gecko) Chrome/103.0.0.0 Safari/537.36"
}
page_text=requests.get(url=url,headers=headers).text

#解析验证码图片img中src属性值
tree=etree.HTML(page_text)
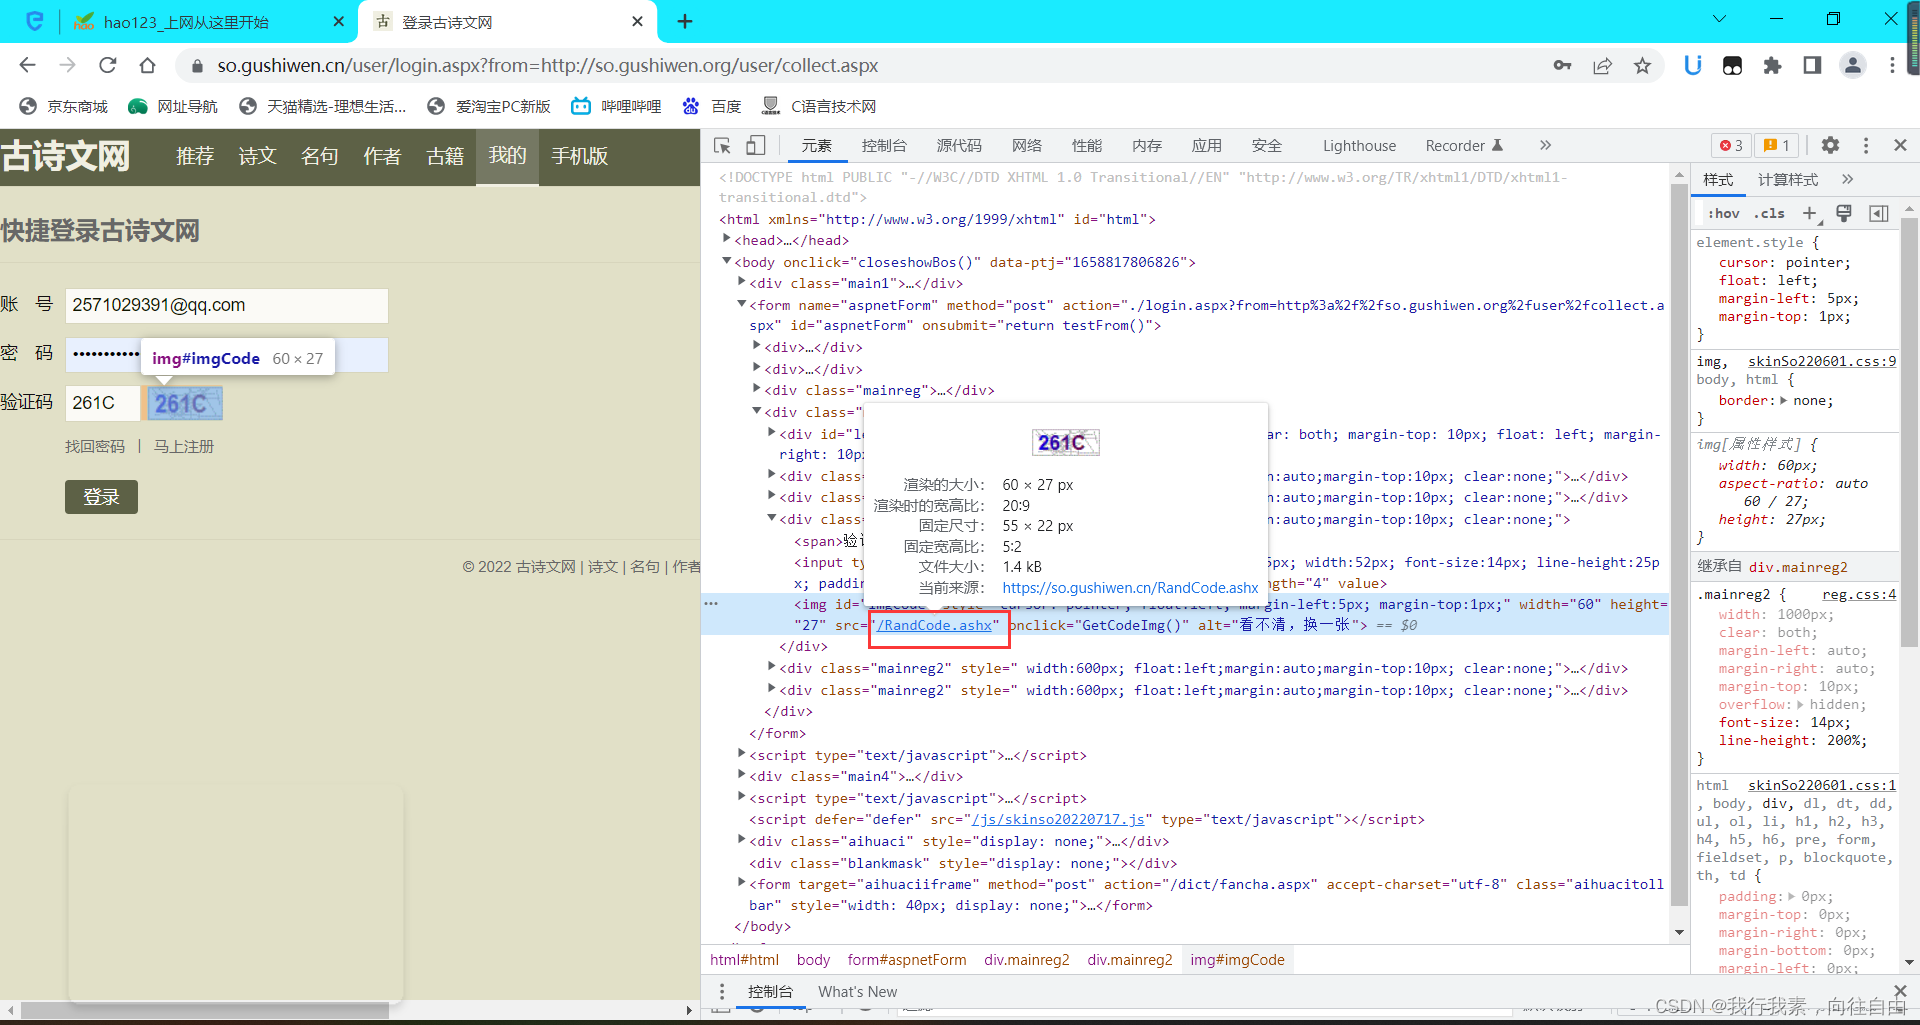
code_img_src='https://so.gushiwen.org'+tree.xpath('//*[@id="imgCode"]/@src')[0]
img_data=requests.get(url=url,headers=headers).content
#将验证码图片保存到本地
with open('./code.jpg','wb') as fp:
    fp.write(img_data)
#调用云打码平台的示例程序进行验证码图片数据识别
code_text=getCodeText('code.jpg',1004)
print('识别结果为:',code_text)

#很可能是错误的结果,所以需要多次实验
5.requests模块高级
5.1 模拟登陆古诗文网
模拟登陆:
-爬取基于某些用户的用户信息
需求:对古诗文网进行模拟登录
-点击登陆按钮后,会发送一个post请求
-post请求中会携带登陆之前录入的相关登录信息(用户名,密码,验证码.....)
-验证码:每次请求都是动态变化的
链接:登录古诗文网
import requests
from lxml import etree
from CodeClass import YDMHttp

#封装识别验证码图片的函数
def getCodeText(imgPath,codeType):#图片路径,codeType:验证码类型
    # 普通用户用户名
    username = 'bobo328410948'

    # 密码
    pwd= 'bobo328410948'

    # 软件ID,开发者分成必要参数。登录开发者后台【我的软件】获得!
    appid = 6003

    # 软件密钥,开发者分成必要参数。登录开发者后台【我的软件】获得!
    appkey = '1f4b564483ae5c907a1d34f8e2f2776c'

    # 图片文件:即将被识别的验证码图片的路径
    filename = imgPath

    # 验证码类型,# 例:1004表示4位字母数字,不同类型收费不同。请准确填写,否则影响识别率。在此查询所有类型 http://www.yundama.com/price.html
    codetype = codeType

    # 超时时间,秒
    timeout = 20

    result=None
    # 检查
    if (username == 'username'):
        print('请设置好相关参数再测试')
    else:
        # 初始化
        yundama = YDMHttp(username, pwd, appid, appkey)

        # 登陆云打码
        uid = yundama.login()
        print('uid: %s' % uid)

        # 查询余额
        balance = yundama.balance()
        print('balance: %s' % balance)

        # 开始识别,图片路径,验证码类型ID,超时时间(秒),识别结果
        cid, result = yundama.decode(filename, codetype, timeout)
        print('cid: %s, result: %s' % (cid, result))
    return result
########################################################################


#1.验证码的识别,获取验证码图片的文字数据
headers = {
    'User-Agent':'Mozilla/5.0 (Windows NT 10.0; Win64; x64) AppleWebKit/537.36 (KHTML, like Gecko) Chrome/103.0.0.0 Safari/537.36'
}
url="https://so.gushiwen.cn/user/login.aspx?from=http://so.gushiwen.org/user/collect.aspx"
page_text=requests.get(url=url,headers=headers).text
tree=etree.HTML(page_text)
code_img_src='https://so.gushiwen.cn/'+tree.xpath('//*[@id="imgCode"]/@src')[0]
# print(code_img_src)
code_img_data=requests.get(url=code_img_src,headers=headers).content
with open('./code.jpg','wb') as fp:
    fp.write(code_img_data)
#使用云打码提供的示例代码对验证码图片进行识别
result=getCodeText('./code.jpg',1004)
print(result)


#2.对post请求,进行发送(处理请求参数)
login_url="https://so.gushiwen.org/user/login.aspx?from=http%3a%2f%2fso.gushiwen.org%2fuser%2fcollect.aspx"
data = {
    "__VIEWSTATE":"u+DzAnizDr8zKG7K/Q/OHyl4Kae1i0R5uxnuMk+EONOCJb5GTyGoJgnx1n/wlOx4XePU+CN5dRcmV/ptirBjyW6SyzcQqdOMuyeIbuFfEWNcUm7K00I9RH7g5gA=",
    "__VIEWSTATEGENERATOR":"C93BE1AE",
    "from":"http://so.gushiwen.org/user/collect.aspx",
    "email":"1547360919@qq.com",
    "pwd":"512abc...",
    "code":result,
    "denglu":"登录"
}

response=requests.post(url=url,headers=headers,data=data)
print(response.status_code)

#3.对响应数据进行持久化存储
# login_page_text=requests.get(url=login_url,headers=headers,data=data).text
# with open('./古诗文网.html','w',encoding='utf-8') as fp:
#     fp.write(login_page_text)
5.2 模拟登陆人人网
def getCodeData(username, pwd, codePath, codeType):
    username = username     # 用户名(云打码普通用户用户名)
    pwd= pwd              # 普通用户对应的密码
    appid = 6003          # 软件代码,开发者分成必要参数。登录开发者后台【我的软件】获得!
    appkey = '1f4b564483ae5c907a1d34f8e2f2776c'    # 通讯密钥,开发者分成必要参数。登录开发者后台【我的软件】获得!
    filename = codePath          # 识别的图片的路径
    codetype = codeType           # 识别的类型,在帮助文档可查看对应验证码类型
    timeout = 20
    if (username == 'username'):
        print('请设置好相关参数再测试')
    else:
        # 初始化
        yundama = YDMHttp(username, password, appid, appkey)

        # 登陆云打码
        uid = yundama.login();
        # print('uid: %s' % uid)

        # 查询余额
        balance = yundama.balance();
        # print('balance: %s' % balance)

        # 开始识别,图片路径,验证码类型ID,超时时间(秒),识别结果
        cid, result = yundama.decode(filename, codetype, timeout);
        # print('cid: %s, result: %s' % (cid, result))

    return result

# 人人网的模拟登陆
import requests
import urllib
from lxml import etree
# 获取session对象
session = requests.Session()

# 下载验证码图片
headers = {
    'User-Agent':'Mozilla/5.0 (Windows NT 10.0; Win64; x64) AppleWebKit/537.36 (KHTML, like Gecko) Chrome/70.0.3538.77 Safari/537.36'
}
url = 'http://www.renren.com'
page_text = requests.get(url=url, headers=headers).text

tree = etree.HTML(page_text)
code_img_url = tree.xpath('//*[@id="verifyPic_login"]/@src')[0]
urllib.request.urlretrieve(url=code_img_url, filename='code.jpg')

# 识别验证码图片中的数据值,2004表示4位纯汉字,其他类型代码参考云打码帮助文档
code_data = getCodeData(云打码用户名', '云打码密码', './code.jpg', 2004)
# print(code_data)    # code_data为识别结果

login_url = 'http://www.renren.com/ajaxLogin/login?1=1&uniqueTimestamp=2019141727367'
data = {
    "email":"1547360919@qq.com",
    "icode":code_data,
    "origURL":"http://www.renren.com/home",
    "domain":"renren.com",
    "key_id":"1",
    "captcha_type":"web_login",
    "pwd":"38ce96b6b81595f845e55c1dd4e712ad6f1efe50fe31dbd5bf517b273d7c3b6e",
    "rkey":"07a9f1810ecf9b507634a45447a628e7",
    "f":""
}

# 如果请求成功,产生的cookie会自动保存在session对象中
session.post(url=login_url, data=data, headers=headers)

url = 'http://www.renren.com/448850039/profile'
page_text = session.get(url=url, headers=headers).text

with open('renren.html', 'w', encoding='utf8') as f:
    f.write(page_text)
5.3 模拟登录cookie
需求:爬取当前用户向相关的用户信息(个人主页中显示的用户信息)
http/https协议特性:无状态
对于本例,当前想要爬取人人网个人主页的用户数据,那整个的编码中,我们一共向人人网发起了两次请求,在我们发第二次请求,想要请求人人网个人主页源码数据的时候,其实我们是想要服务器知道我们在发第二次请求的时候,我们已经经过登录了。即我的第二次请求应该是让服务器端知道我是在登录之后才发起的第二次请求,但是服务器是不会保留用户的用户状态的。【服务器不会记录第一模拟登录成功的状态】,因此,这就导致第二次请求出现失败。没有请求到对应页面数据的原因:
发起的第二次基于个人主页页面请求的时候,服务器端并不知道该此请求是基于登陆状态下的请求。
cookie:用来让服务器端记录客户端请求的状态
-手动处理:通过抓包工具获取cookie值,将该值封装到headers。 【不建议】
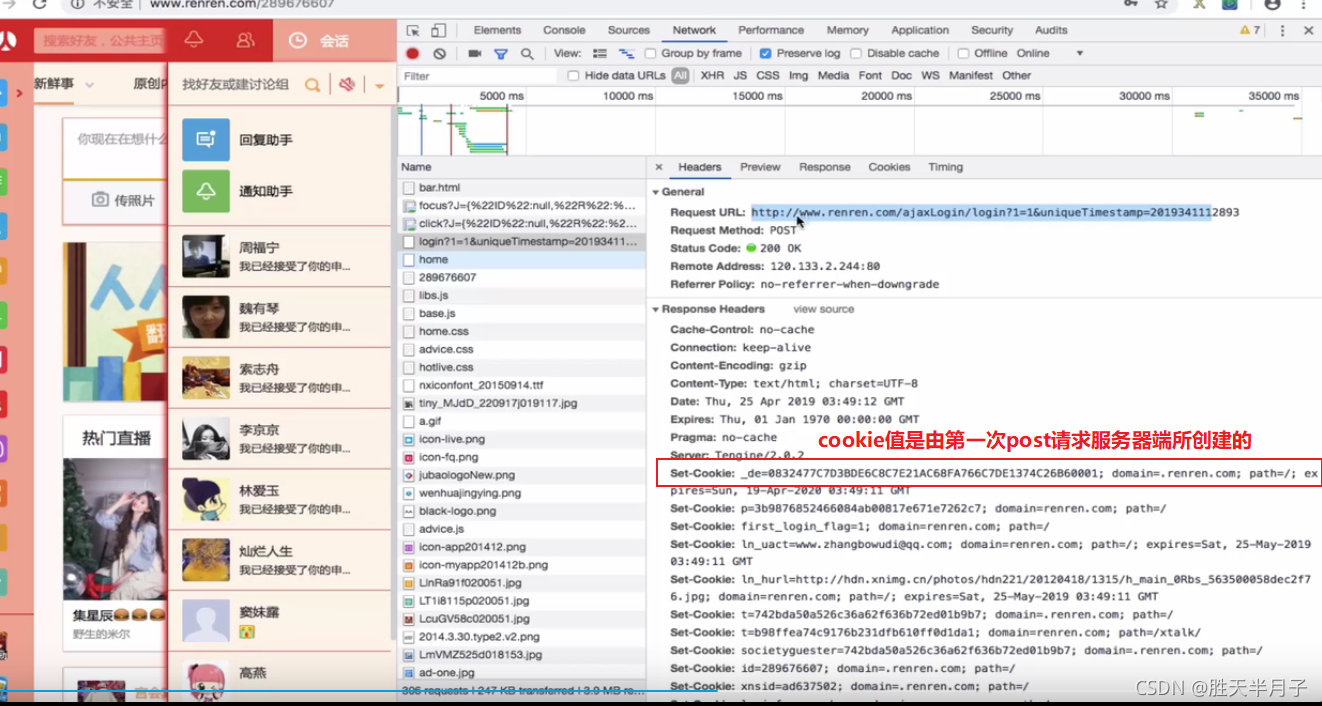
-自动处理:
-cookie值的来源是哪里?
模拟登录post请求后,由服务器端创建。
-session会话对象:
-作用:
-1.可以进行请求的发送。
-2.如果请求过程中产生了cookie,则该cookie会被自动存储/携带在该session对象中。
-步骤:
-1.创建一个session对象:session = requests.Session()-2.使用session对象进行模拟登录post请求的发送(cookie就会被自动存储在session中)
-3.session对象对个人主页对应的get请求进行发送(携带了cookie)
代码框架:
# 创建一个session对象
session = requests.Session()

# 对验证码图片进行捕获和识别
。。。
。。。
。。。

# 使用超级鹰云平台进行图片识别
。。。

# 使用session进行post请求发送
response = session.post(url = login_url,headers = headers, data = data)

# 使用携带cookie的session进行get请求的发送
detail_page_text = session.get(url = detail_url,headers=headers).text
with open('bobo.html','w',encoding = 'utf-8') as fp:
	fp.write(detail_page_text)
完整代码:
import requests
from lxml import etree
from CodeClass import YDMHttp

#封装识别验证码图片的函数
def getCodeText(imgPath,codeType):#图片路径,codeType:验证码类型
    # 普通用户用户名
    username = 'bobo328410948'

    # 密码
    password = 'bobo328410948'

    # 软件ID,开发者分成必要参数。登录开发者后台【我的软件】获得!
    appid = 6003

    # 软件密钥,开发者分成必要参数。登录开发者后台【我的软件】获得!
    appkey = '1f4b564483ae5c907a1d34f8e2f2776c'

    # 图片文件:即将被识别的验证码图片的路径
    filename = imgPath

    # 验证码类型,# 例:1004表示4位字母数字,不同类型收费不同。请准确填写,否则影响识别率。在此查询所有类型 http://www.yundama.com/price.html
    codetype = codeType

    # 超时时间,秒
    timeout = 20

    result=None
    # 检查
    if (username == 'username'):
        print('请设置好相关参数再测试')
    else:
        # 初始化
        yundama = YDMHttp(username, password, appid, appkey)

        # 登陆云打码
        uid = yundama.login()
        print('uid: %s' % uid)

        # 查询余额
        balance = yundama.balance()
        print('balance: %s' % balance)

        # 开始识别,图片路径,验证码类型ID,超时时间(秒),识别结果
        cid, result = yundama.decode(filename, codetype, timeout)
        print('cid: %s, result: %s' % (cid, result))
    return result
########################################################################

#创建一个session对象
session=requests.Session()

#1.验证码的识别,获取验证码图片的文字数据
headers = {
    'User-Agent':'Mozilla/5.0 (Windows NT 10.0; Win64; x64) AppleWebKit/537.36 (KHTML, like Gecko) Chrome/103.0.0.0 Safari/537.36'
}
url="http://www.renren.com"
page_text=requests.get(url=url,headers=headers).text
tree=etree.HTML(page_text)
code_img_src=tree.xpath('//*[@id="verifyPic_login"]/@src')[0]
# print(code_img_src)
code_img_data=requests.get(url=code_img_src,headers=headers).content
with open('./code.jpg','wb') as fp:
    fp.write(code_img_data)
#使用云打码提供的示例代码对验证码图片进行识别
result=getCodeText('./code.jpg',1004)
print(result)


#2.对post请求,进行发送(处理请求参数)
login_url="http://www.renren.com/ajaxLogin/login?1=1&uniqueTimestamp=2019141727367"
data = {
    "email":"1547360919@qq.com",
    "icode":result,
    "origURL":"http://www.renren.com/home",
    "domain":"renren.com",
    "key_id":"1",
    "captcha_type":"web_login",
    "password":"38ce96b6b81595f845e55c1dd4e712ad6f1efe50fe31dbd5bf517b273d7c3b6e",
    "rkey":"07a9f1810ecf9b507634a45447a628e7",
    "f":""
}

#使用session进行post请求的发送
response=session.post(url=url,headers=headers,data=data)
print(response.status_code)

#爬取当前用户个人主页对应的页面数据
detail_url="http://www.renren.com/289676607/profile"
# #手动Cookie处理【不建议:有的网站cookie值可能是存在有效时常的,过了该时间段,cookie可能无法使用;有的网站也是动态变换的】
# headers={
#     'Cookie':'xxxx'
# }

#使用携带cookie的session进行get请求的发送
detail_page_text=session.get(url=detail_url,headers=headers).text
with open('bobo.html','w',encoding='utf-8') as fp:
    fp.write(detail_page_text)
5.4 代理
5.4.1 代理理论知识
代理:破解封IP这种反爬机制。
什么是代理:
-代理服务器。
代理的作用:
-突破自身IP访问的限制。
-可以隐藏自身真实的IP,免受攻击。
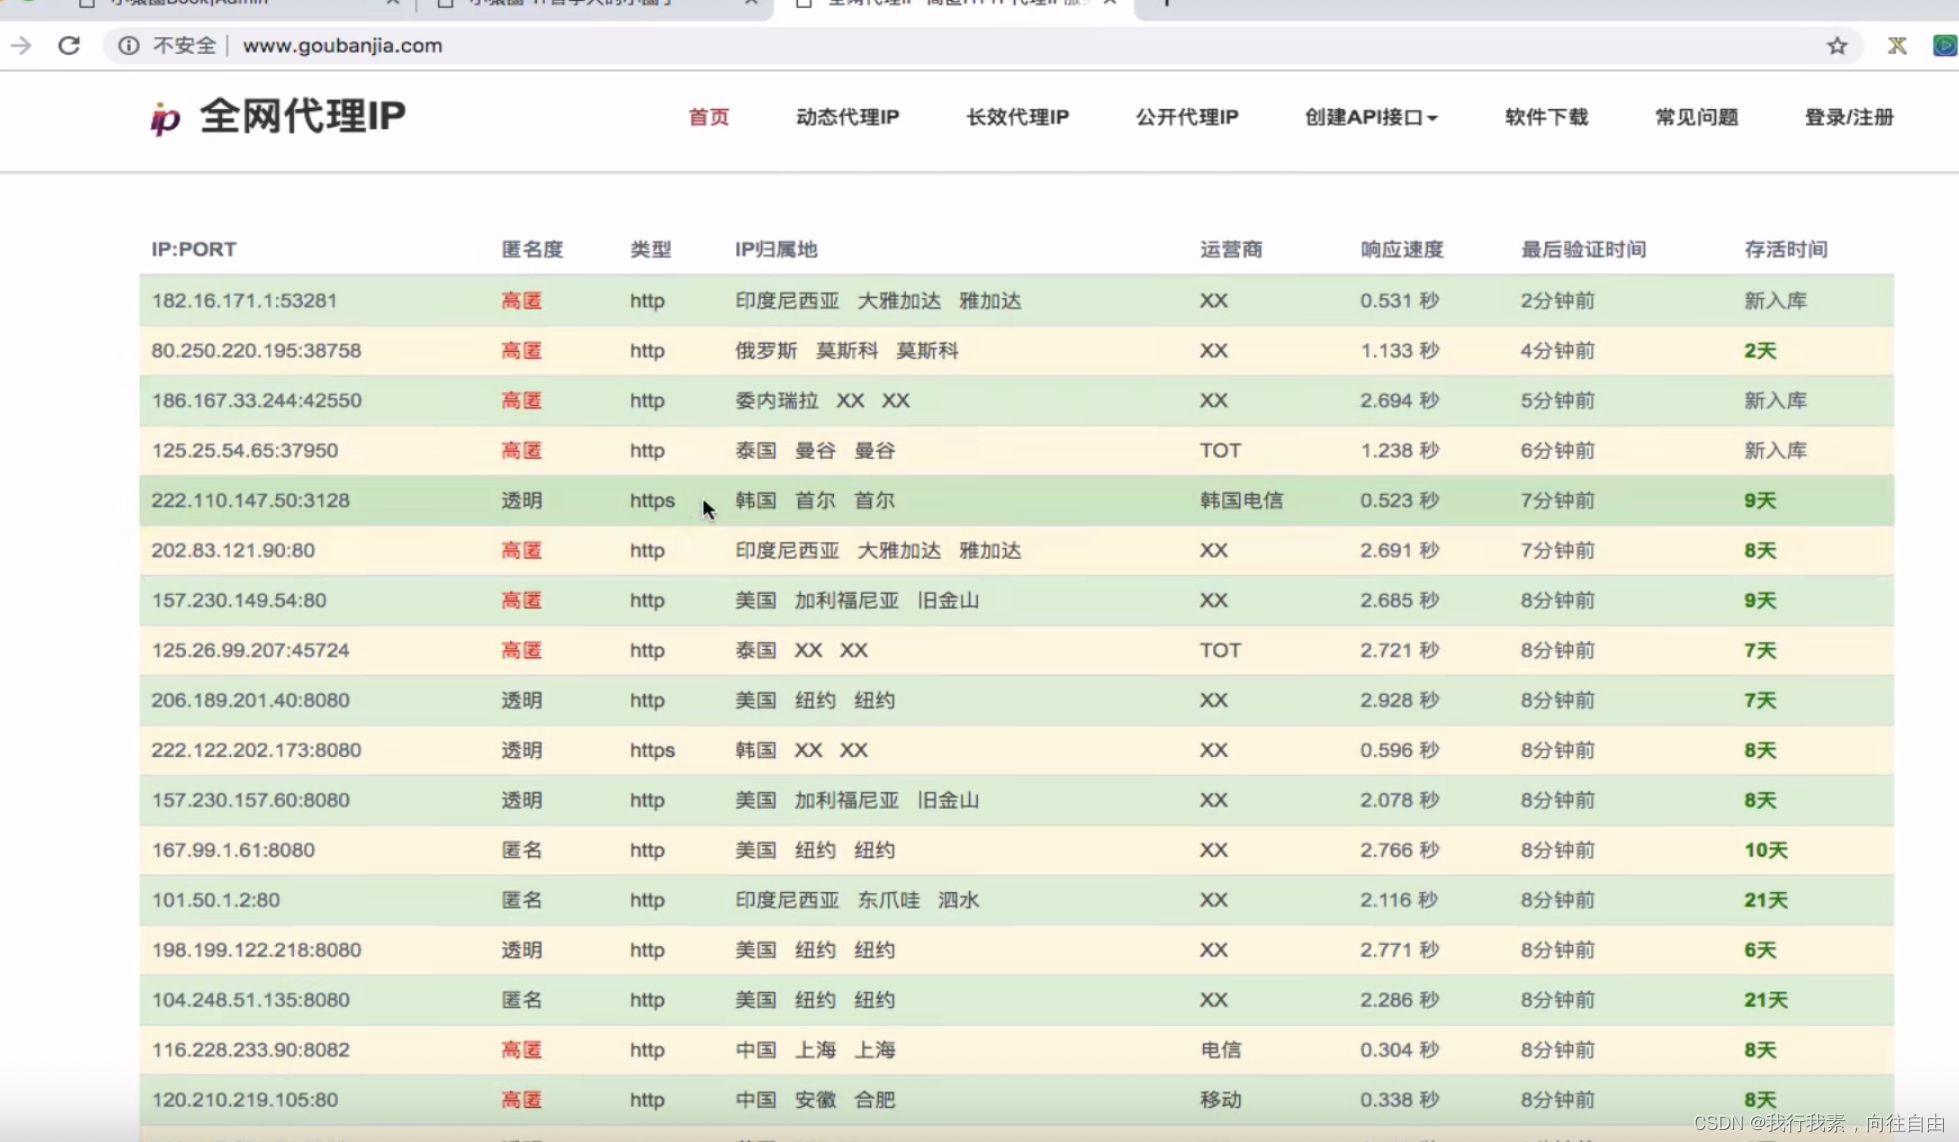
代理相关的网站:
-快代理
-西祠代理
-www.goubanjia.com
代理IP的类型:
-http:只能应用带http协议对应的url中
-https:应用带https协议对应的url中
代理IP的匿名度:
-1.透明:服务器知道该次请求使用了代理,也知道请求对应的真实ip
-2.匿名:知道使用了代理,不知道真实ip
-3.高匿:不知道使用了代理,也不知道真实ip
推荐个查询IP地址的网址:IP查询地址信息-IP归属地查询-网站IP查询 - ip.293.net
推荐几个免费代理IP网站:
-1.四叶天代理ip http://www.a-2.cn 【强烈推荐】
-2.Avoidr免费代理 http://www.avoidr.com
-3.Proxytor在线代理服务 http://www.proxytor.net
-4.SpySurfing http://www.spysurfing.com

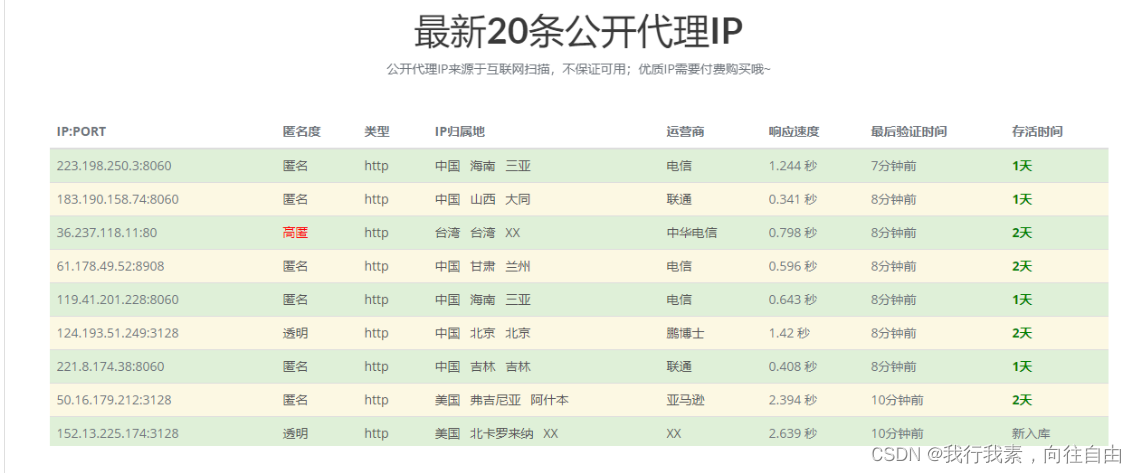
未应用代理时,如下:
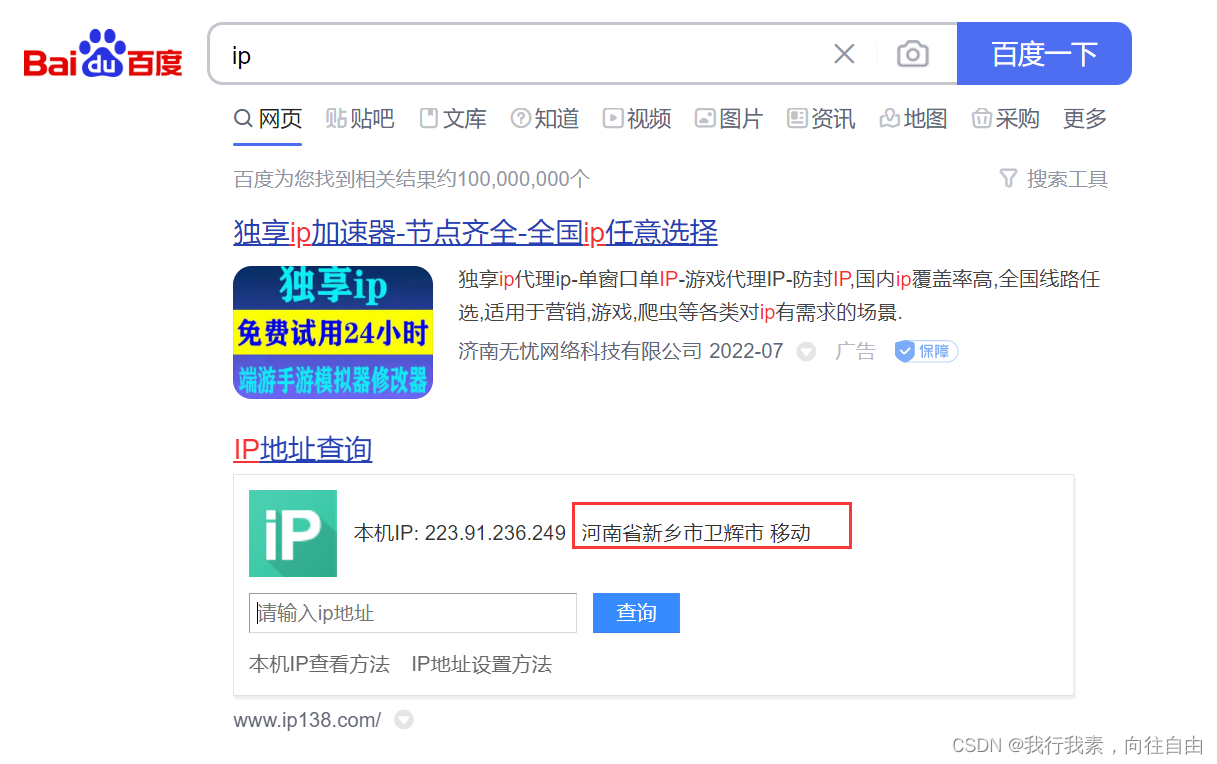
应用代理时:
#需求:
import requests
url="https://www.baidu.com/s?word=ip&tn=94819464_hao_pg"
headers={
    'User-Agent':"Mozilla/5.0 (Windows NT 10.0; Win64; x64) AppleWebKit/537.36 (KHTML, like Gecko) Chrome/103.0.0.0 Safari/537.36"
}
page_text=requests.get(url=url,headers=headers,proxies={'http':'139.196.196.74:80'}).text
with open('./ip.html','w',encoding='utf-8') as fp:
    fp.write(page_text)


#没报错,但是ip还是没有变
6.高性能异步爬虫
6.1 基础知识
高性能异步爬虫目的:在爬虫中使用异步实现高性能的数据爬取操作。
异步爬虫的方式:
-1.多线程,多进程:好处:可以为相关阻塞的操作单独开启线程或进程,阻塞操作就可以异步执行。
弊端:无法无限制的开启多线程或者多进程。
-2.线程池、进程池(适当的使用):
-好处:我们可以降低系统对进程或者线程创建和销毁的频率,从而很好地降低系统的开销。
-弊端:池中线程或进程的数量是有上限的。
-原则:线程池处理的是阻塞且较为耗时的操作。
-3.单线程 + 异步协程(推荐):
-一些概念和两个关键字:
①event_loop:事件循环,相当于一个无限循环,我们可以把一些函数注册到这个事件循环上,当满足某些条件时,函数就会被循环执行。
②coroutline:协程对象,我们可以将协程对象注册到事件循环中,它会被事件循环调用。我们可以使用async关键字来定义一个方法,这个方法在调用时不会被立即被执行,而是返回一个协程对象。
③task:任务,它是对协程对象的进一步封装,包含了任务的各个状态。
④future:代表将来执行或还没有执行的任务,实际上和task没有本质区别。
⑤async:定义一个协程。
⑥await:用来挂起阻塞方法的执行。
6.2 异步爬虫之线程池的使用
import time
#使用单线程串行方式执行

def get_page(str):
    print('正在下载:',str)
    time.sleep(2)
    print('下载成功:',str)

name_list=['xiaozi','aa','bb','cc']
start_time=time.time()
for i in range(len(name_list)):
    get_page(name_list[i])

end_time=time.time()
print('%d second!'%(end_time-start_time))
运行结果: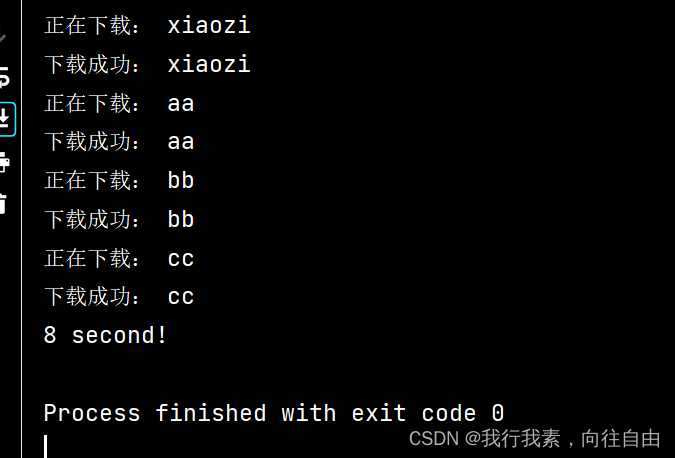
#使用线程池方式执行
import time
from multiprocessing.dummy import Pool  #导入线程池模块对应的类

start_time=time.time()
def get_page(str):
    print('正在下载:',str)
    time.sleep(2)
    print('下载成功:',str)

name_list=['xiaozi','aa','bb','cc']
#实例化一个线程池对象
pool=Pool(4)#最大4个
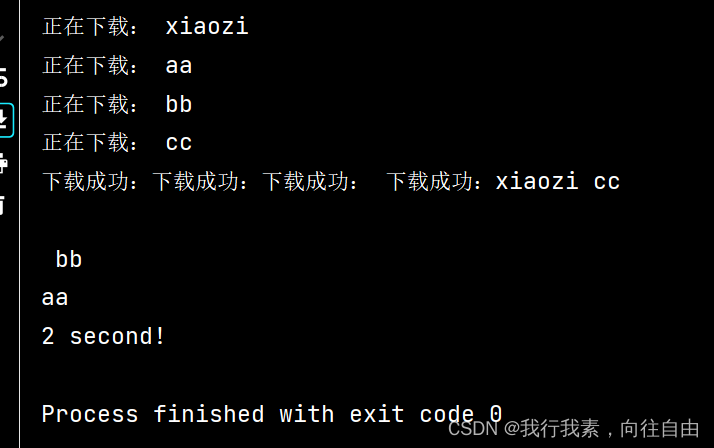
pool.map(get_page,name_list)#将列表中每一个元素交给函数get_page函数处理,map返回值就是传入函数的返回值

end_time=time.time()
print('%d second!'%(end_time-start_time))
运行效果:
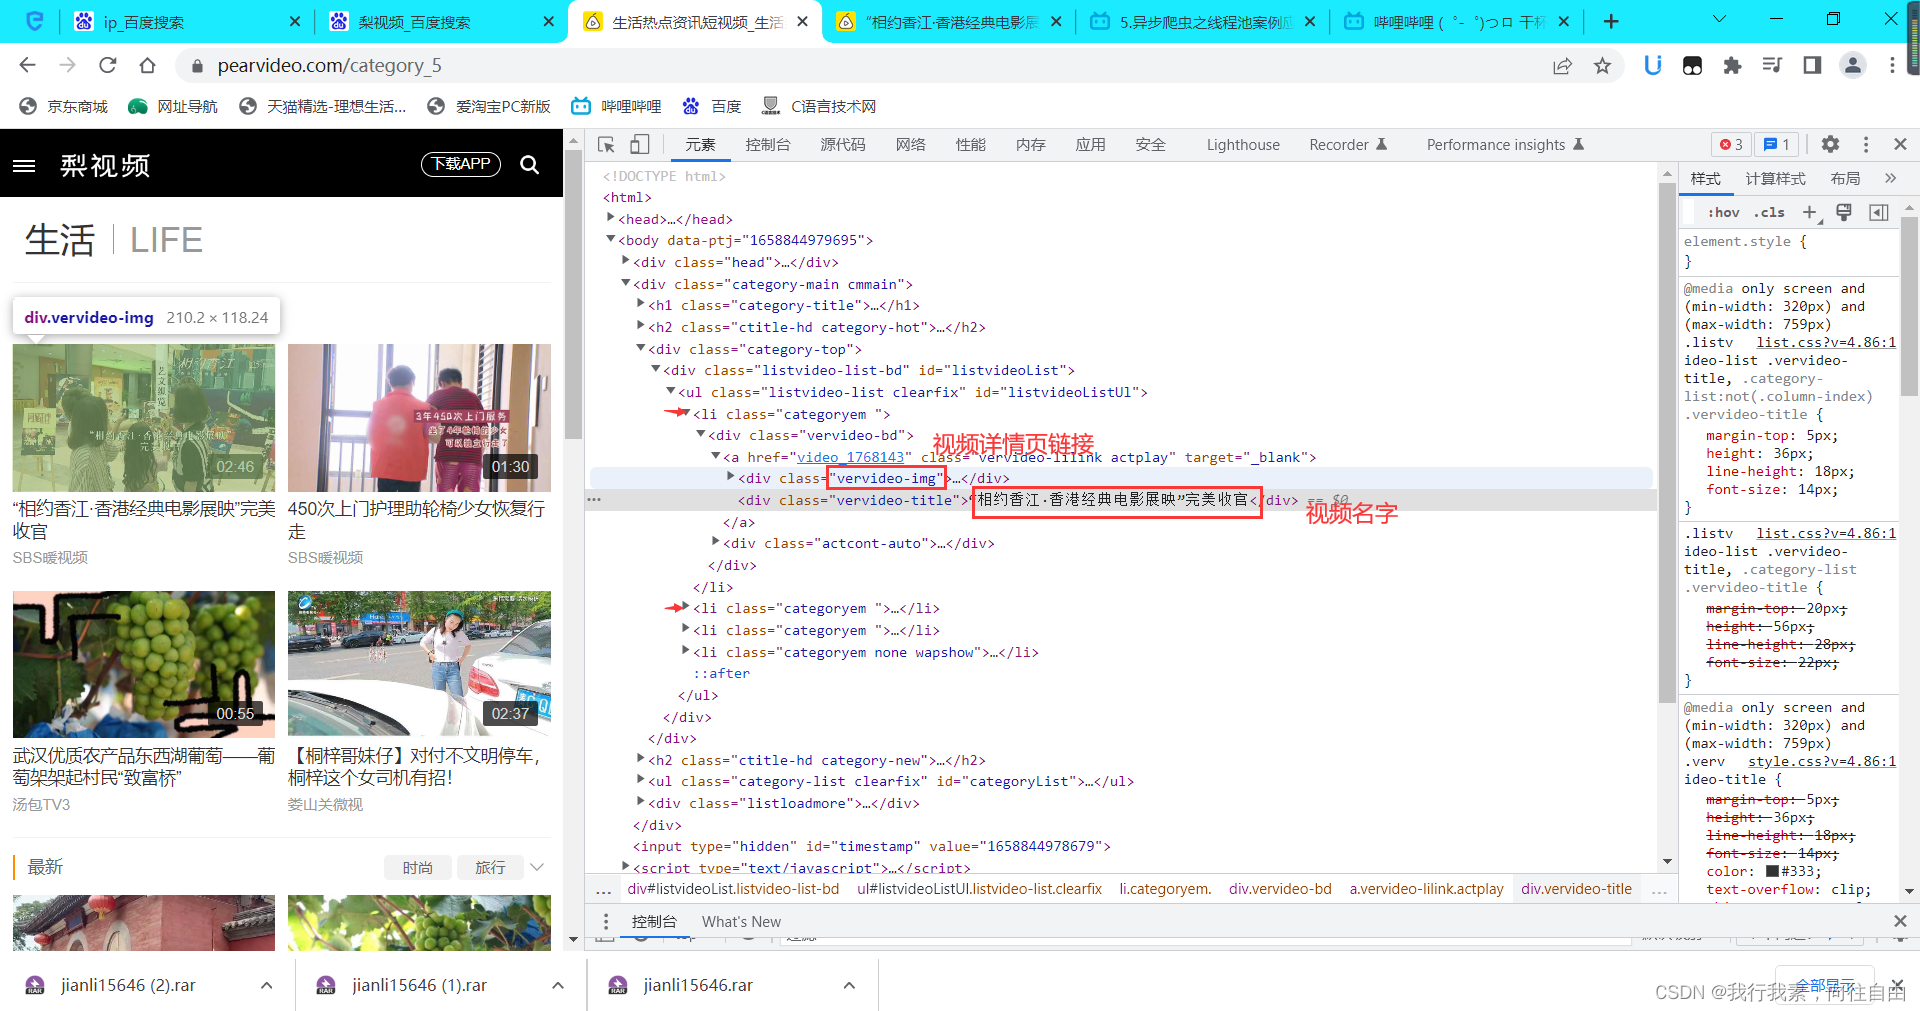
6.3 异步爬虫之线程池案例应用-爬取梨视频的视频数据
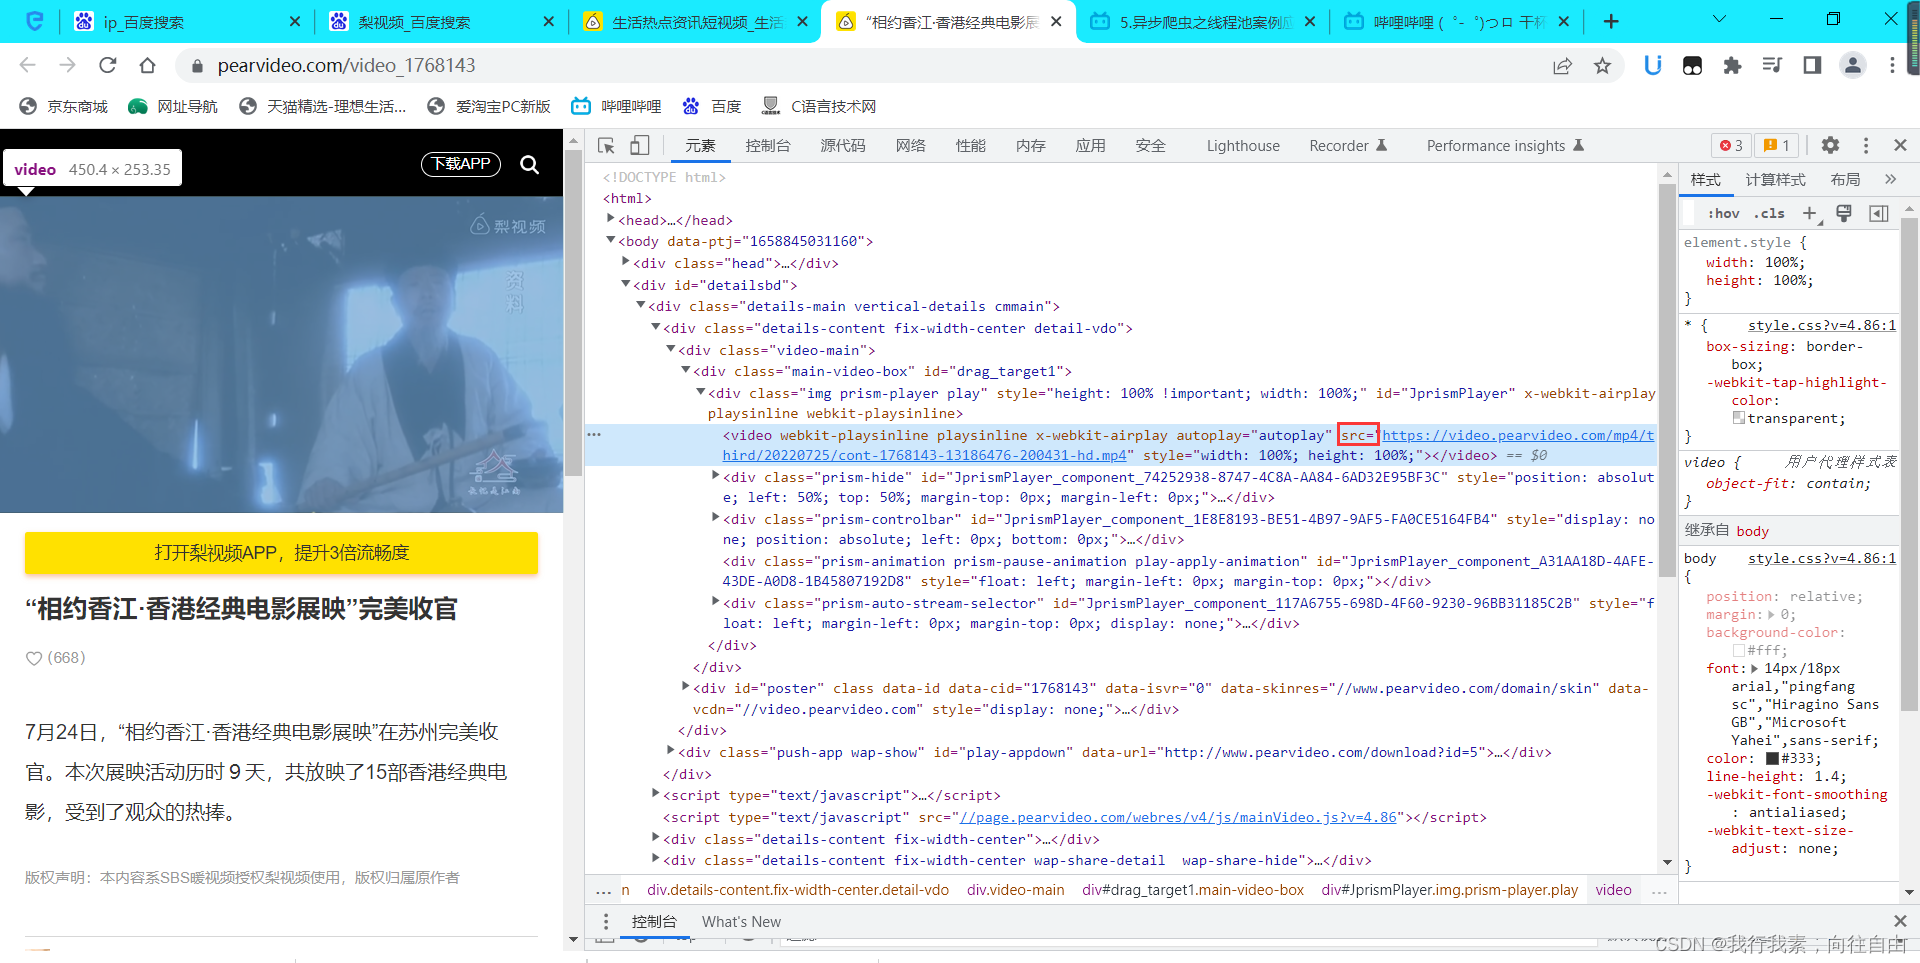
需求:爬取梨视频的视频数据。
import requests
from lxml import html
etree = html.etree
import re
from multiprocessing.dummy import Pool

# 需求:爬取视频的视频数据
headers = {
            'User-Agent': 'Mozilla/5.0 (Windows NT 10.0; WOW64) AppleWebKit/537.36 (KHTML, like Gecko) Chrome/83.0.4103.97 Safari/537.36'
    }
# 原则:线程池处理的是阻塞且较为耗时的操作


def get_video_data(dic):
    url = dic['url']
    print(dic['name'], 'downloading...')
    data = requests.get(url=url, headers=headers).content
    # 持久化存储操作
    with open(dic['name'], 'wb') as fp:
        fp.write(data)
        print(dic['name'], '下载成功')


if __name__ == "__main__":
    # 对下述url发起请求解析出视频详情页的url和视频名称
    url = 'https://www.pearvideo.com/category_5'
    page_text = requests.get(url=url, headers=headers).text

    tree = etree.HTML(page_text)
    li_list = tree.xpath('//ul[@id="listvideoListUl"]/li')
    urls = []  # 存储所有视频的名称和链接
    for li in li_list:
        detail_url = 'https://www.pearvideo.com/' + li.xpath('./div/a/@href')[0]
        name = li.xpath('./div/a/div[2]/text()')[0] + '.mp4'
        print(detail_url, name)
        # 对详情页的url发起请求
        detail_page_text = requests.get(url=detail_url, headers=headers).text
        # 从详情页中解析出视频的地址(url)

        # 用作案例的网站在教程中的那个时间段(一几年,大概是18年)
        # 没有video标签,视频的地址在js里面,所以不能用bs4和xpath
        # 但是网站已经更新(2021.08.01),我现在学的时候src的Url已经在video标签中了
        # 因此此处正则不再适用,咱用xpath修改一下

        # 教程代码:
        # ex = 'srcUrl="(.*?)",vdoUrl'
        # video_url = re.findall(ex, detail_page_text)[0]

        # 咱的代码:
        # detail_tree = etree.HTML(detail_page_text)
        # print(detail_page_text)
        # video = detail_tree.xpath('//*[@id="JprismPlayer"]/video')
        # print(video)
        # video_url = video[0]

        # 哈哈,放video标签之后不知道是人家反爬了还是咱的爬取有问题
        # 应该是弄得Ajax动态加载
        # 爬到的:
        # <div class="main-video-box" id="drag_target1">
        #     <div class="img prism-player" style="height:100% !important;" id="JprismPlayer">
        #     </div>
        # </div>

        # F12看到的:
        # <div class="main-video-box" id="drag_target1">
        #     <div class="img prism-player play" style="height: 100% !important; width: 100%;" id="JprismPlayer"
        #     x-webkit-airplay="" playsinline="" webkit-playsinline="" >
        #         < video webkit-playsinline="" playsinline="" x-webkit-airplay="" autoplay="autoplay"
        #         src="https://video.pearvideo.com/mp4/third/20210801/cont-1737209-12785353-091735-hd.mp4"
        #         style="width: 100%; height: 100%;">
        #         < / video >
        #         ...
        #     </div>
        # </div>
        # 又挖了一个坑,以后再填qwq
        video_url = ''
        dic = {
            'name': name,
            'url': video_url
        }
        urls.append(video_url)
        # 使用线程池对视频数据进行请求(较为耗时的阻塞操作)
        pool = Pool(4)
        pool.map(get_video_data, urls)

        pool.close()
        pool.join()
6.4 协程
6.4.1 基本概念
协程不是计算机提供.程序员人为创造。
协程(Coroutine),也可以被称为微线程,是一种用户态内的上下文切换技术。简而言之,其实就是通过一个线程实现代码块相互切换执行。协程意义:在一个线程中如果遇到IO等待时间,线程不会傻傻等,利用空闲的时候再去干点其他事。
例如︰
def func1():
    print(1)
    ...
    print(2)

def func2():
    print(3)
    ...
    print(4)

func1()
func2()
实现协程有这么几种方法:
-greenlet,早期模块
-yield关键字
-asyncio装饰器(py3.4以后才可以用)
-async,await关键字(py3.5以后才可以用)【推荐】
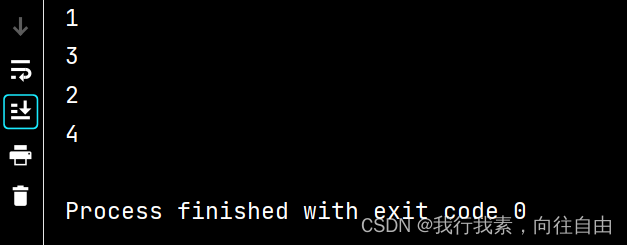
(1)greenlet实现协程:
from greenlet import greenlet
def func1():
    print(1)     #第2步:输出1
    gr2.switch() #第3步:切换到func2()函数
    print(2)     #第6步:输出2
    gr2.switch() #第7步:切换到func2()函数,从上一次执行的位置继续向后执行
def func2():
    print(3)     #第4步:输出3
    gr1.switch() #第5步:切换到func1()函数,从上一次执行的位置继续向后执行
    print(4)     #第8步:输出4

gr1=greenlet(func1)
gr2=greenlet(func2)

gr1.switch()#第1步:去执行func1函数
运行结果:
(2)yield关键字:
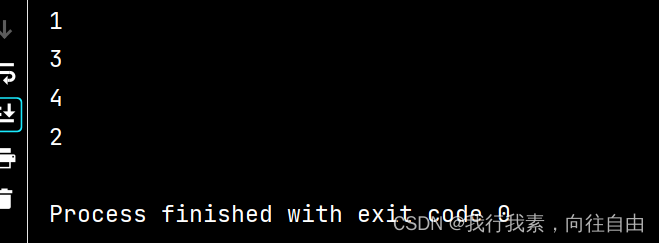
一个函数里面有yield,就是生成器函数。
def func1():
    yield 1
    yield from func2()
    yield 2
def func2():
    yield 3
    yield 4

f1=func1()
for item in f1:
    print(item)
运行结果:
(3)asyncio:
装饰器作用:给不改变原来函数的代码。给他添加新的一些功能。
注意:遇到IO阻塞自动切换
import asyncio

@asyncio.coroutine
def func1():
    print(1)
    await asyncio.sleep(2) #遇到IO耗时操作,自动化切换到tasks中的其他任务
    print(2)

@asyncio.coroutine
def func2():
    print(3)
    await asyncio.sleep(2)  # 遇到IO耗时操作,自动化切换到tasks中的其他任务
    print(4)

tasks=[
    asyncio.ensure_future(func1()),
    asyncio.ensure_future(func2())
]
loop=asyncio.get_event_loop()
loop.run_until_complete(asyncio.sleep(tasks))
(4)async & await 关键字【推荐】:
import asyncio
async def func1():
    print(1)
    await asyncio.sleep(2)#遇到IO耗时操作,自动化切换到tasks中的其他任务
    print(2)

async def func2():
    print(3)
    await asyncio.sleep(2)#遇到IO耗时操作,自动化切换到tasks中的其他任务
    print(4)
tasks=[
    asyncio.ensure_future(func1()),
    asyncio.ensure_future(func2())
]
loop=asyncio.get_event_loop()
loop.run_until_complete(asyncio.wait(tasks))
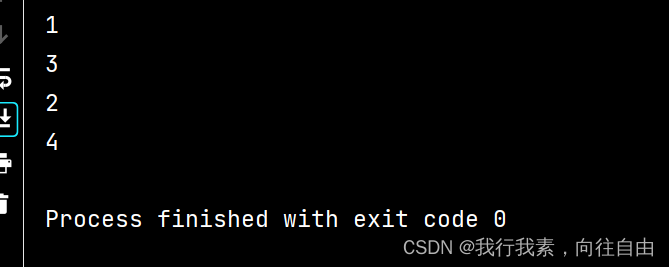
运行结果:
6.4.2 基于协程的异步编程
6.4.2.1 事件循环
事件循环:理解成为一个死循环,去检测并执行某些代码。
#伪代码:

任务列表=[任务1,任务2,任务3...]

while True:
    可执行的任务列表,已完成的任务列表=去任务列表中检查所有的任务,将'可执行'和'已完成'的任务返回

    for 就绪任务 in 已准备就绪的任务列表:
        执行已就绪的任务

    for 已完成任务 in 已完成的任务列表:
        在任务列表中移除已完成的任务

    如果人物列表中的任务都已完成,则终止循环
import asyncio
#去生成或获取一个事件循环
loop=asyncio.get_event_loop()
#将任务放到人物列表
loop.run_until_complete(asyncio.wait(tasks))6.4.2.2 快速上手
协程函数:定义函数时候async def 函数名
协程对象:执行协程函数()得到的协程对象。
async def func():
    pass

result=func()#result为协程对象,此刻函数内部代码并不会执行
如果想要运行协程函数内部代码,必须要将协程对象交给事件循环来处理,如下:
import asyncio
async def func():
    print('hahah')

result=func()

#loop=asyncio.get_event_loop()
#loop.run_until_complete(result)
asyncio.run(result)#该行代码等效上面两行,python3.7以后有效
6.4.2.3 await
await+可等待的对象(协程对象、Future、Task对象 -> IO等待)
await就是等待对应的值得到结果之后再继续向下走。
示例1:
import asyncio
async def func():
    print('hello')
    response=await asyncio.sleep(2)#有返回值
    print('over:',response)

asyncio.run(func())
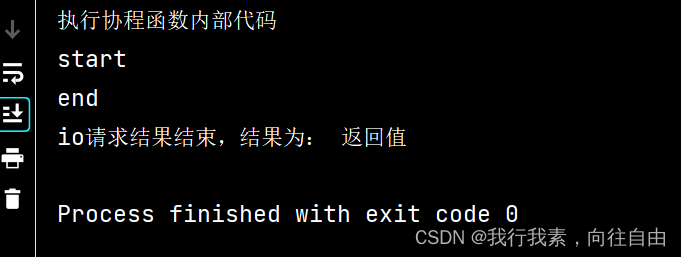
示例2:
import asyncio

async def others():
    print('start')
    await asyncio.sleep(2)
    print('end')
    return '返回值'
async def func():
    print('执行协程函数内部代码')
    response=await others()#await+协程对象
    print('io请求结果结束,结果为:',response)

asyncio.run(func())
运行结果:
示例3:
import asyncio

async def others(name):
    print('start:',name)
    await asyncio.sleep(2)
    print('end:',name)
    return name
async def func():
    print('执行协程函数内部代码')
    response1=await others('小红')#await+协程对象
    print('io请求结果结束,结果为:',response1)
    response2 = await others('小明')  # await+协程对象
    print('io请求结果结束,结果为:', response2)

asyncio.run(func())
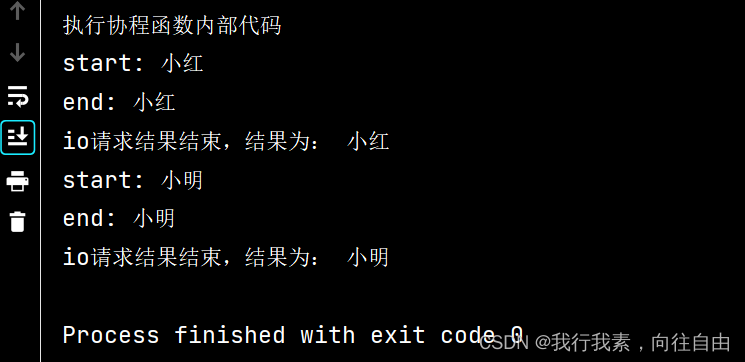
运行结果:
6.4.2.4 Task对象
在事件循环中添加多个任务。
Tasks用于并发调度协程,通过asyncio.create_task(协程对象)的方式创建Task对象,这样可以让协程加入事件循环中等待被调度执行。除了使用asyncio.create_task()函数以外,还可以用低层级的loop.create_task()或ensure_future()函数。不建议手动实例化Task对象。
注意: asyncio.create_task()函数在Python 3.7中被加入;在Python 3.7之前,可以改用低层级的asyncio.ensure_future()函数。
示例1:
import asyncio

async def func1(name):
    print(name+'执行func1开始')
    await asyncio.sleep(2)
    print(name+'执行func1结束')
    return name
async def main():
    print('main开始')
    task1=asyncio.create_task(func1('小红'))
    task2=asyncio.create_task(func1('小明'))
    print('main结束')
    ret1=await task1
    ret2=await task2
    print(ret1,ret2)
asyncio.run(main())
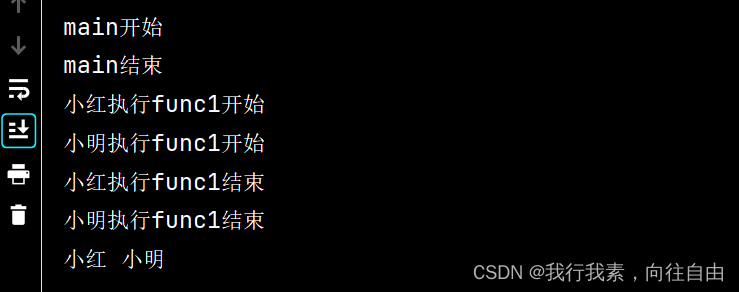
运行结果:
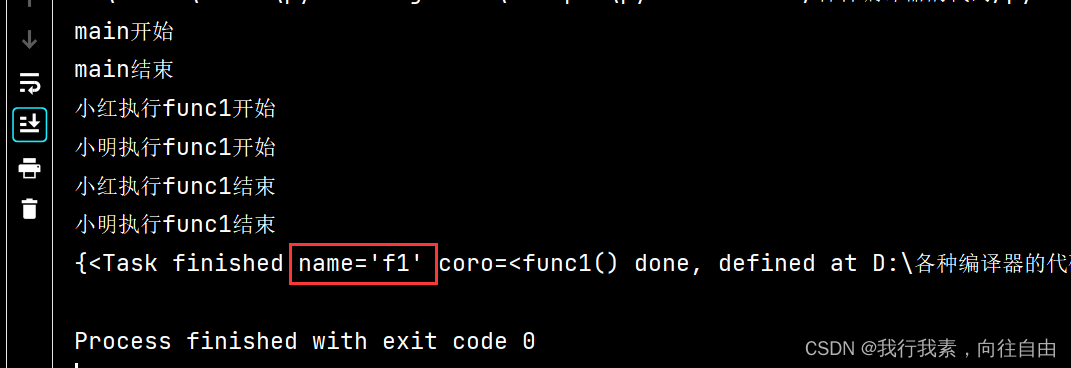
示例2:【常见写法】
import asyncio

async def func1(name):
    print(name+'执行func1开始')
    await asyncio.sleep(2)
    print(name+'执行func1结束')
    return name
async def main():
    print('main开始')

    #常见写法
    task_list=[
        asyncio.create_task(func1('小红'),name='f1'),#指定名字
        asyncio.create_task(func1('小明'),name='f2')
    ]
    print('main结束')
    # timeout=2:表示最多等2秒,默认是None,表示等到所有任务结束
    # 返回值均放在done中
    done,pending=await asyncio.wait(task_list,timeout=None)
    print(done)

asyncio.run(main())
运行结果:
示例3:
import asyncio

async def func1(name):
    print(name+'执行func1开始')
    await asyncio.sleep(2)
    print(name+'执行func1结束')
    return name
task_list=[#协程对象
    func1('小红'),
    func1('小明')
]
done,pending=asyncio.run(asyncio.wait(task_list))
print(done)
6.4.2.5 asyncio.Future对象【了解即可】
Task继承Future,Task对象内部await结果的处理基于Future对象来的。
示例1:
import asyncio
async def main():
    #获取当前事件循环
    loop=asyncio.get_running_loop()
    #创建一个任务(Future对象),这个任务什么都不干
    ful=loop.create_task()
    #等待任务最终结果(Future对象),没有结果一直等待下去
    await ful

asyncio.run(main())
示例2:
import asyncio
async def set_after(fut):
    await asyncio.sleep(2)
    fut.set_result('666')
async def main():
    #获取当前事件循环
    loop=asyncio.get_running_loop()
    #创建一个任务(Future对象),没绑定任何行为,则这个任务永远不知道什么时候结束
    fut=loop.create_future()

    #创建一个任务(Task对象),绑定了set_after函数,函数内部2秒之后,会给fut赋值
    #即手动设置future任务的最终结果,那么fut就可以结束了
    await loop.create_task(set_after(fut))

    #等待Future对象获取最终结果,否则一直等待下去
    data=await fut
    print(data)
asyncio.run(main())
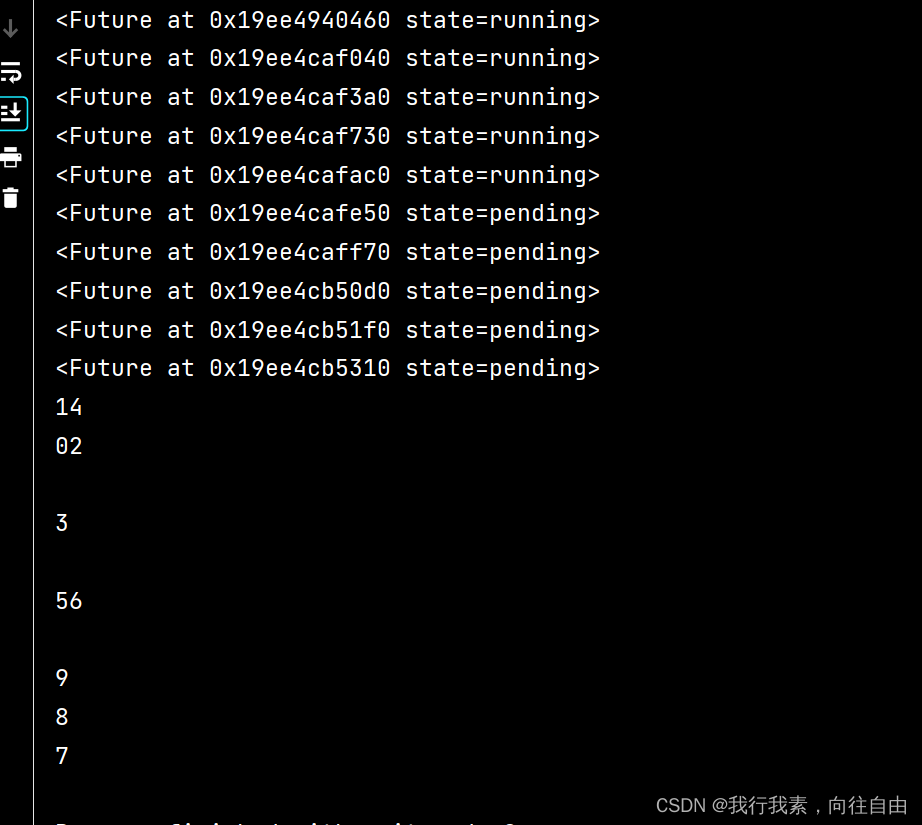
6.4.2.6 concurrent.futures.Future对象【扩充】
使用线程池、进程池实现异步操作时用到的对象。
import time
from concurrent.futures import Future
from concurrent.futures import ThreadPoolExecutor
from concurrent.futures.process import ProcessPoolExecutor

def func(value):
    time.sleep(1)
    print(value)
    return 123

#创建线程池
pool=ThreadPoolExecutor(max_workers=5)

#创建进程池
#或 pool=ProcessPoolExecutor(max_workers=5)

for i in range(10):
    fut=pool.submit(func,i)
    print(fut)
运行结果:
以后写代码可能会存在交叉时间。例如︰crm项目80%都是基于协程异步编程+MySQL.
import time,asyncio
import concurrent.futures

def func1():
    time.sleep(2)
    return "SB"
async def main():
    loop=asyncio.get_running_loop()

    #1.Run in the default loop's executor (默认ThreadPoolExecutor)
    #第1步:内部会先调用ThreadPoo1Executor的 submit方法去线程池中申请一个线程去执行func1函数,并返
    #   回一个concurrent.futures. Future对象
    #第2步︰调用asyncio.wrap_future将concurrent.futures.Future对象包装为asycio.Future对象。
    #因为concurrent.futures.Future对象不支持await语法,所以需要包装为 asycio.Future对象才能使用。
    fut=loop.run_in_executor(None,func1)
    result=await fut
    print('default thread pool',result)

    # # 2.Run in a custom thread pool:
    # with concurrent.futures.ThreadPoolExecutor() as pool:
    #     result = await loop.run_in_executor(pool,func1)
    #     print('custom thread pool', result)

    # # 3. Run in a custom process pool:
    # with concurrent.futures.ProcessPoolExecutor() as pool:
    #     result = await loop.run_in_executor(pool,func1)
    #     print('custom process poo7 ', result)


asyncio.run(main())
6.4.3 异步和非异步模块混合案例
案例:asyncio+不支持异步模块
import asyncio,requests,os

if not os.path.exists('./图片'):
    os.mkdir('./图片')

async def download_image(url):
    print('开始下载:',url)
    loop=asyncio.get_event_loop()
    future=loop.run_in_executor(None,requests.get,url)
    response=await future
    print('下载完毕:',url)
    file_name=url.split('/')[-1]
    with open('./图片/'+file_name,'wb') as fp:
        fp.write(response.content)
if __name__ == '__main__':
    url_list=[
        'https://img0.baidu.com/it/u=4035507251,3354770163&fm=253&fmt=auto&app=138&f=JPEG?w=800&h=500',
        'https://gimg2.baidu.com/image_search/src=http%3A%2F%2Fpic24.nipic.com%2F20120924%2F3809112_161818252000_2.jpg&refer=http%3A%2F%2Fpic24.nipic.com&app=2002&size=f9999,10000&q=a80&n=0&g=0n&fmt=auto?sec=1661515323&t=2730849b734a3f6e46c377b67192fa77',
        'https://gimg2.baidu.com/image_search/src=http%3A%2F%2Ftenfei02.cfp.cn%2Fcreative%2Fvcg%2Fveer%2F612%2Fveer-125357826.jpg&refer=http%3A%2F%2Ftenfei02.cfp.cn&app=2002&size=f9999,10000&q=a80&n=0&g=0n&fmt=auto?sec=1661515323&t=b7a360e37df698f959779e3a7582197d',
        'https://gimg2.baidu.com/image_search/src=http%3A%2F%2Fc-ssl.duitang.com%2Fuploads%2Fitem%2F202005%2F13%2F20200513160844_uuqfs.jpg&refer=http%3A%2F%2Fc-ssl.duitang.com&app=2002&size=f9999,10000&q=a80&n=0&g=0n&fmt=auto?sec=1661515323&t=e1f8804445dbae23dd52c3ee4f419e1d'
    ]
    tasks=[download_image(url) for url in url_list]
    loop=asyncio.get_event_loop()
    loop.run_until_complete(asyncio.wait(tasks))
6.4.4 异步迭代器【了解】
什么是异步迭代器:
实现了__aiter__()和__anext__()方法的对象。__anext__()必须返回一个awaitable对象。async for 会处理异步迭代器的__anext__()方法所返回的可等待对象,直到其引发一个StopAsyncIteration 异常。
什么是异步可迭代对象?
可在 async for语句中被使用的对象。必须通过它的__aiter__()方法返回一个asynchronous iterator。
import asyncio
from typing import Any, Coroutine


class Reader(object):
    """自定义异步迭代器(同时也是异步可迭代对象)"""
    def __init__(self):
        self.count=0

    async def readline(self):
        #await asyncio.sleep(1)
        self.count+=1
        if self.count==100:
            return self.count

    def __aiter__(self):#迭代器返回自己
        return self

    async def __anext__(self):
        val=await self.readline()
        if val==None:
            raise StopAsyncIteration#异常
        return val

#async for 必须写在协程函数内部
async def func():
    obj=Reader()
    async for val in obj:
        print(val)

asyncio.run(func())
6.4.5 异步上下文管理器
什么是异步上下文管理器:
此种对象通过定义__aenter__()和__aexit__()方法来对 async with语句中的环境进行控制。
好处:
这样执行的过程中可以被挂起,提高执行效率。
import asyncio

class AsyncContextManager:
    def __init__(self):
        self.conn="conn"

    async def do_something(self):
        return 666

    async def __aenter__(self):
        #异步链接数据库
        self.conn=await asyncio.sleep(1)
        return self

    async def __aexit__(self, exc_type, exc, tb):
        #异步关闭数据库链接
        await asyncio.sleep(1)

#async with必须在协程函数中
async def func():
    async with AsyncContextManager() as f:
        result=await f.do_something()
        print(result)

asyncio.run(func())
6.4.6 uvloop
是asyncio的事件循环的替代方案。事件循环 大于 默认asyncio的事件循环。
import uvloop
import asyncio
asyncio.set_event_loop_policy(uvloop.EventLoopPolicy())

#编写asyncio的代码,与之前写的代码一致

#内部的事件循环自动化会变成uvloop

asyncio.run(...)
6.5 协程复习
6.5.1 定义一个协程
import asyncio

#函数被async这个关键字修饰:该函数不会立马执行,返回一个协程对象
async def request(url):
    print('正在请求的url是:',url)
    print('请求成功:',url)
c=request('www.baidu.com')#c是async对象

#创建一个事件循环对象
loop=asyncio.get_event_loop()

#将协程对象注册到loop中,然后启动loop
loop.run_until_complete(c)#该函数既可以实现注册,又可以实现循环
运行结果:

6.5.2 task的使用:
#task的使用

import asyncio

#函数被async这个关键字修饰:该函数不会立马执行,返回一个协程对象
async def request(url):
    print('正在请求的url是:',url)
    print('请求成功:',url)
c=request('www.baidu.com')#c是async对象

loop=asyncio.get_event_loop()
#基于loop创建了一个task对象
task=loop.create_task(c)
print(task)#还没有被执行
loop.run_until_complete(task)
print(task)#写成状态是已经执行后的
运行结果:

6.5.3 future的使用
#future的使用


import asyncio

async def request(url):
    print('正在请求的url是:',url)
    print('请求成功:',url)
c=request('www.baidu.com')

loop=asyncio.get_event_loop()
task=asyncio.ensure_future(c)
print(task)
loop.run_until_complete(task)
print(task)
运行结果:

6.5.4 绑定回调
async def request(url):
    print('正在请求的url是:',url)
    print('请求成功:',url)
    return url
c=request('www.baidu.com')
def callback_func(task):
    print(task.result())#result()返回的是任务对象中封装的协程对象对应函数的返回值

loop=asyncio.get_event_loop()
task=asyncio.ensure_future(c)
#将回调函数绑定到任务对象中
task.add_done_callback(callback_func)
loop.run_until_complete(task)
运行结果:

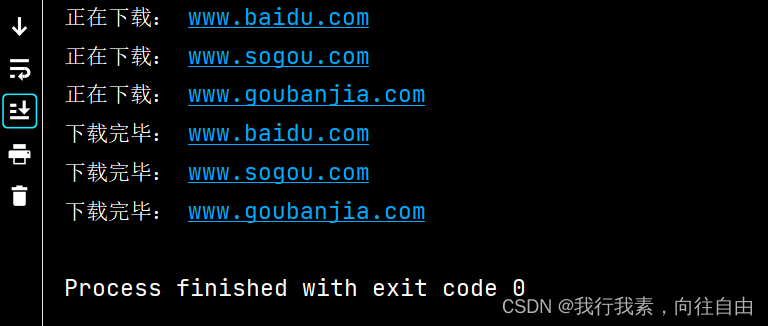
6.6 多任务异步协程
import asyncio,time

async def my_request(url):
    print('正在下载:',url)
    #在异步协程中如果出现了同步模块相关的代码,那么就无法实现异步
    # time.sleep(2)#基于同步模块的
    #当在asyncio中遇到阻塞操作必须进行手动挂起
    await asyncio.sleep(2)#基于异步模块的
    print('下载完毕:',url)

urls=[
    'www.baidu.com',
    'www.sogou.com',
    'www.goubanjia.com'
]
#任务列表:存放多个任务对象
stasks=[asyncio.ensure_future(my_request(url)) for url in urls]

loop=asyncio.get_event_loop()

#需要将任务列表封装到wait中
loop.run_until_complete(asyncio.wait(stasks))#固定写法
运行结果:
6.7 aiohttp模块
6.7.1 aiohttp模块的引出
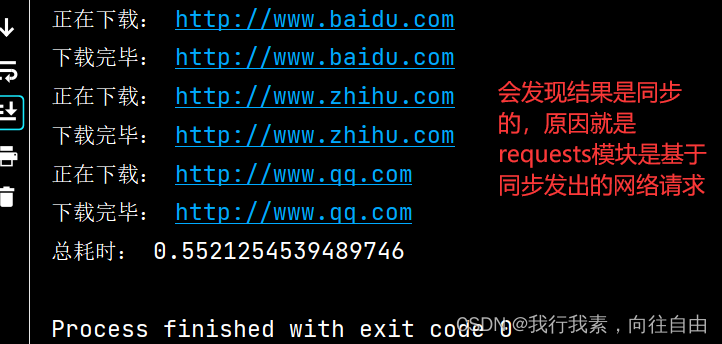
requests发起的请求是基于同步的,aiohttp是基于异步的网络请求模块,必须使用基于异步的网络请求模块进行指定url的请求发送。
import requests,asyncio,time

start=time.time()
urls=[
    'http://www.baidu.com','http://www.zhihu.com','http://www.qq.com'
]
async def get_page(url):
    print('正在下载:',url)
    #requests发起的请求是基于同步的,必须使用基于异步的网络请求模块进行指定url的请求发送
    # aiohttp:是基于异步的网络请求模块
    response=requests.get(url=url)

    print('下载完毕:',url)

tasks=[asyncio.ensure_future(get_page(url)) for url in urls]

loop=asyncio.get_event_loop()
loop.run_until_complete(asyncio.wait(tasks))

end=time.time()
print('总耗时:',end-start)
运行结果:
6.7.2 aiohttp+多任务异步协程实现异步爬虫
环境安装:pip.install aiohttp
使用该模块中的ClientSession
import requests,asyncio,time,aiohttp

start=time.time()
urls=[
    'http://www.baidu.com','http://www.zhihu.com','http://www.qq.com'
]
async def get_page(url):
    print('开始:',url)
    async with aiohttp.ClientSession() as session:
        # get(),post():
        #参数的处理和requests差不多,headers,param[get]/data[post],代理伪装proxy='http://ip:port'
        async with await session.get(url=url) as response:
            #text()返回字符串形式的响应数据
            #read()返回二进制形式的响应数据
            #json()返回的是json对象
            #注意:在获取响应数据操作之前,一定要使用await进行手动挂起
            page_text=await response.text()#注意是text()方法
            print('结束:',url)


tasks=[asyncio.ensure_future(get_page(url)) for url in urls]

loop=asyncio.get_event_loop()
loop.run_until_complete(asyncio.wait(tasks))

end=time.time()
print('总耗时:',end-start)
7.动态加载数据处理
7.1 selenium模块简介
问题:selenium模块和爬虫之间具有怎样的关联?
-便捷的获取网站中动态加载的数据;-便捷实现模拟登录。
什么是selenium模块?
-基于浏览器自动化的一个模块。简介:
selenium最初是一个自动化测试工具,而爬虫中使用它主要是为了解决requests无法直接执行JavaScript代码的问题selenium本质是通过驱动浏览器,完全横拟浏览器的操作,比如跳转、输入、点击、下拉等,来拿到网页渲染之后的结果,可支持多种浏览器。
selenium使用流程:
-下载安装selenium:pip install selenium
-下载浏览器驱动程序(谷歌浏览器):【查看谷歌版本:设置->关于谷歌】
-下载路径:http://chromedriver.storage.googleapis.com/index.html
-查看驱动和浏览器版本的映射关系:【根据谷歌版本,下载相应的驱动程序版本】http://blog.csdn.net/huilan_same/article/details/51896672-实例化一个浏览器对象:
-编写基于浏览器自动化的操作代码
-发起请求:get(url)
-标签定位:find系列的方法
-标签交互:send_keys('str')
-执行js程序:excute_script('js代码')
-前进、后退:forward()、back()
-关闭浏览器:quit()

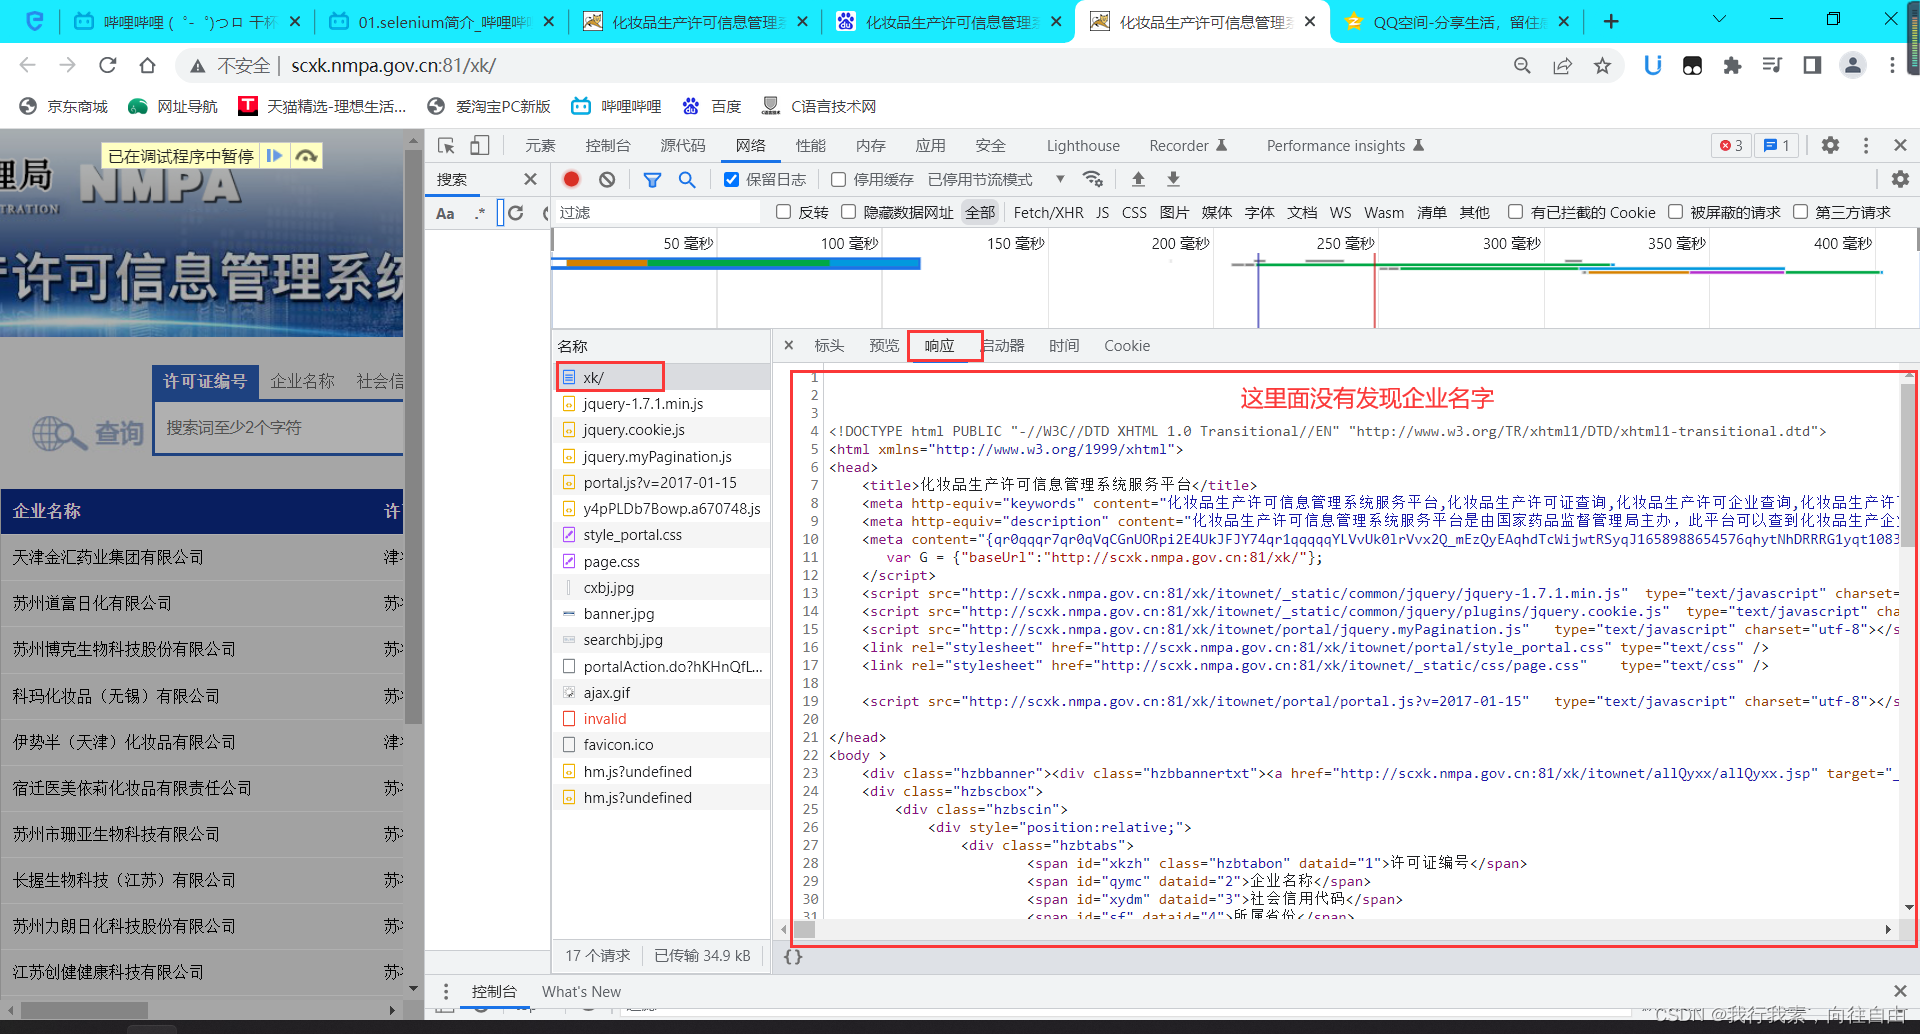
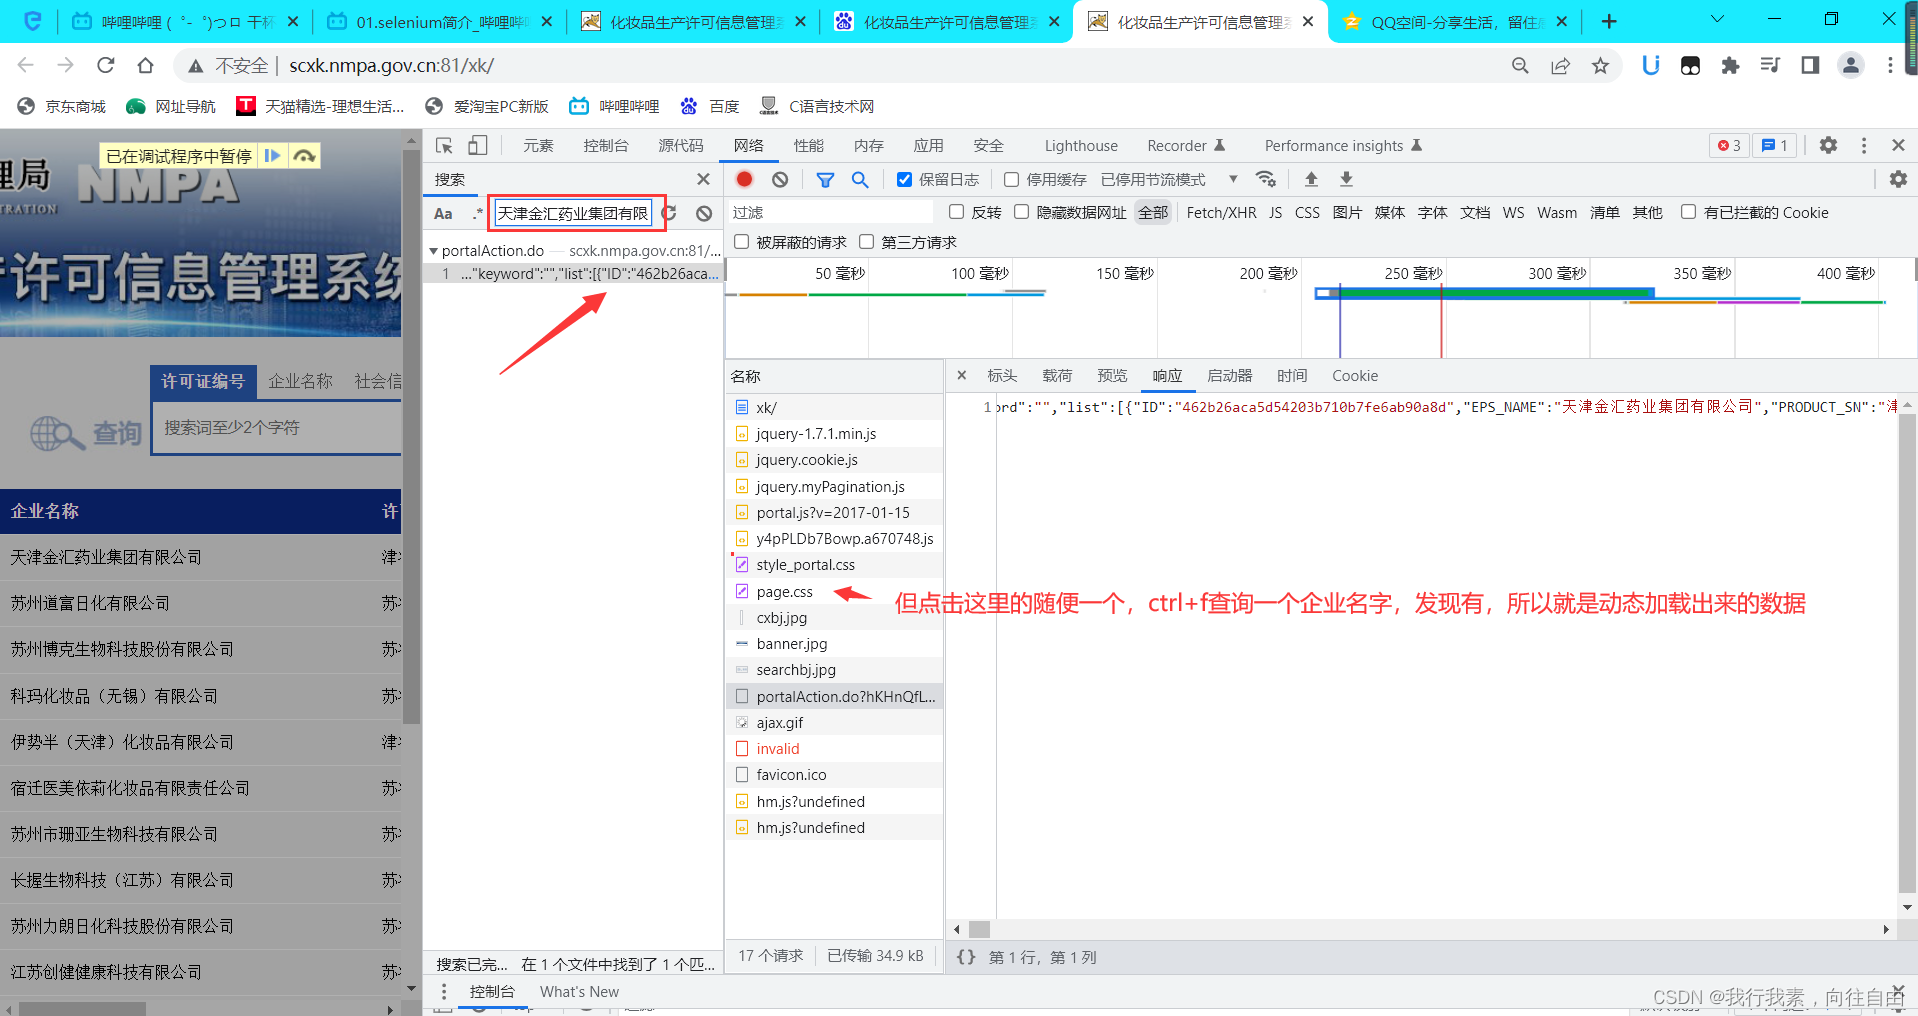
如何判断一个网页的数据是动态加载出来的呢?
浏览器搜索“化妆品生产许可信息管理系统服务平台”,接下来拿这个举例子。
from selenium import webdriver
from lxml import etree
from time import sleep

print('开始')
#实例化一个浏览器对象(传入浏览器的驱动程序)
bro=webdriver.Chrome()#驱动程序在C:\Users\86187\pythonProject12\Scripts\
#让浏览器发起指定url对应的请求
bro.get('http://scxk.nmpa.gov.cn:81/xk/')

#获取浏览器当前页面的页面源码数据
page_text=bro.page_source
print(page_text)
#解析企业名称
tree=etree.HTML(page_text)
li_list=tree.xpath('//*[@id="gzlist"]/li')
for li in li_list:
    name=li.xpath('./dl/@title')[0]
    print(name)

#停留5秒
sleep(5)
#关闭浏览器
bro.quit()
7.2 selenium其他自动化操作
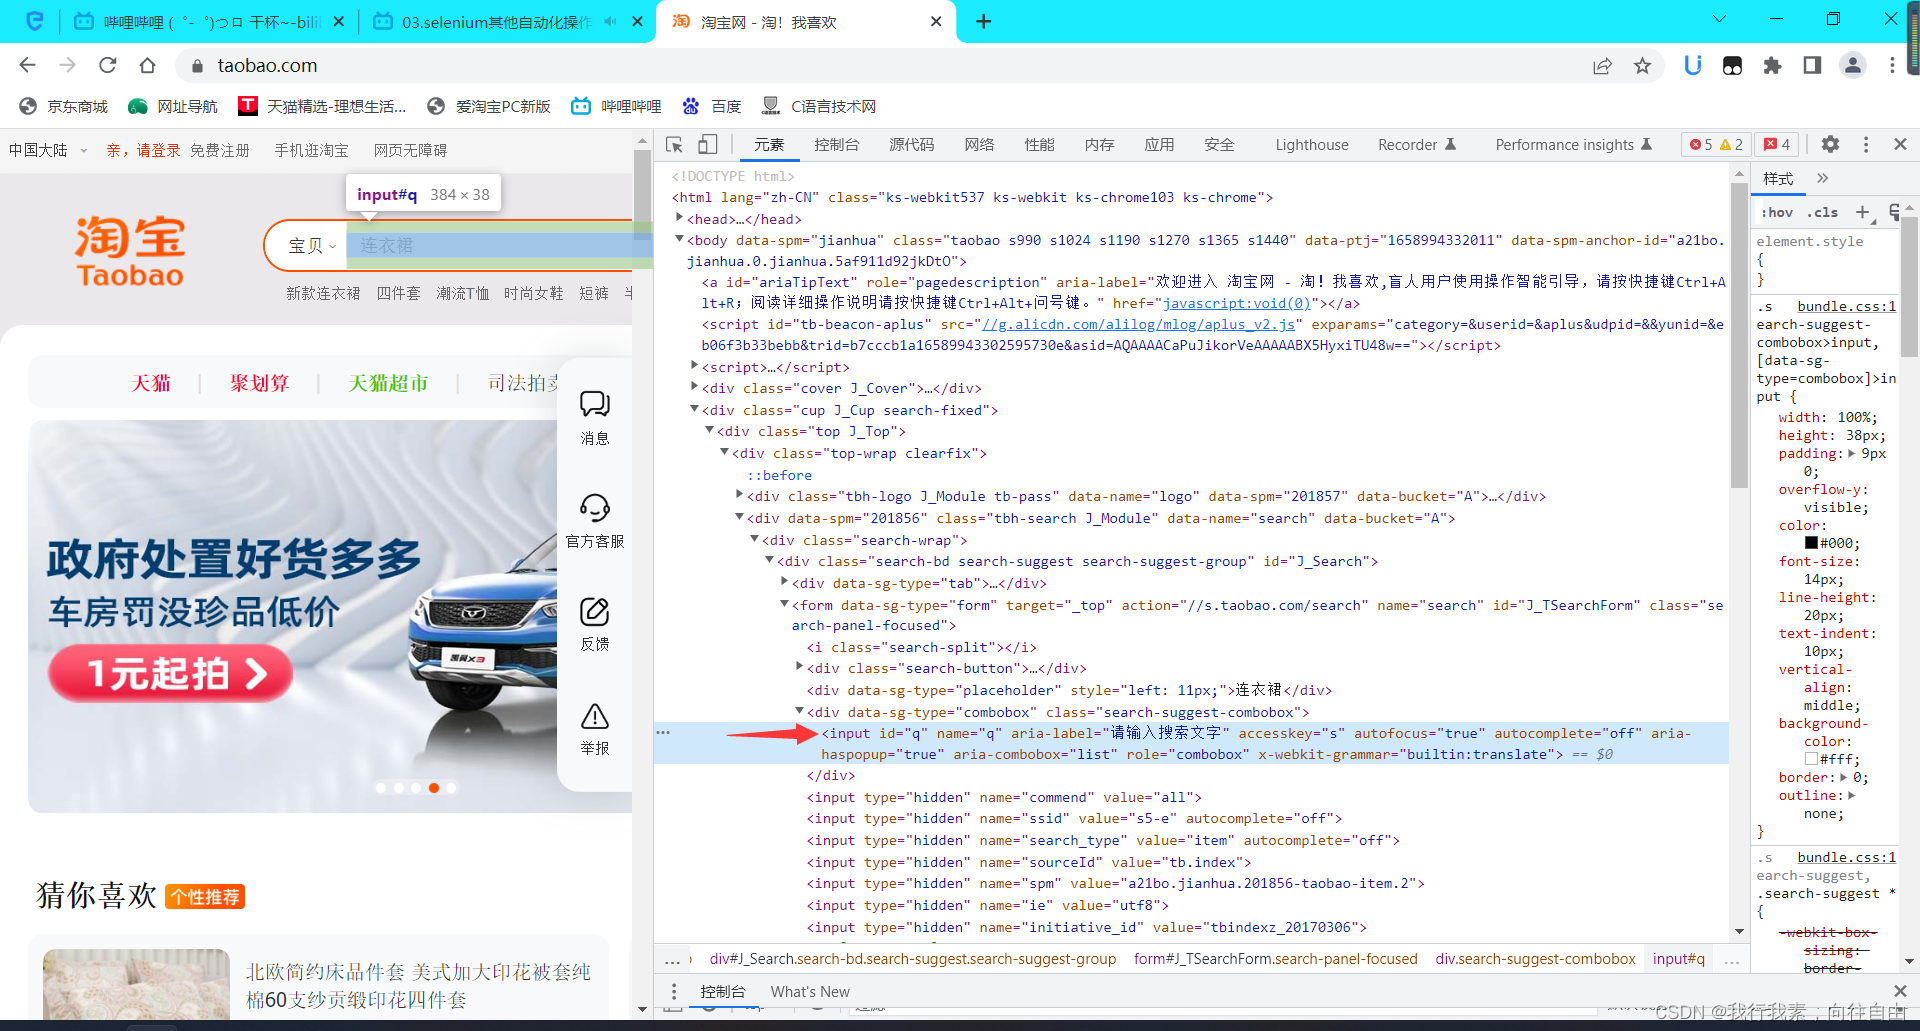
需求:打开淘宝,并录入搜索信息。
编写基于浏览器自动化的操作代码
-发起请求:get(url)
-标签定位:find系列的方法
-标签交互:send_keys('str')
-执行js程序:excute_script('js代码')
-前进、后退:forward()、back()
-关闭浏览器:quit()
from selenium import webdriver
from time import sleep

print('开始')
bro=webdriver.Chrome()
bro.get('https://www.taobao.com/')
#实现标签定位
search_input=bro.find_element(by='id',value='q')
#标签交互
search_input.send_keys('Iphone')

#执行一组js程序
bro.execute_script('window.scrollTo(0,document.body.scrollHeight)')#滑轮滚动
sleep(2)#停留一下,便于观察


#定位并点击搜索按钮
btn=bro.find_element(by='xpath',value='//*[@id="J_TSearchForm"]/div[1]/button')
btn.click()

bro.get('https://www.baidu.com')
sleep(2)
#浏览器回退一次
bro.back()
sleep(2)
#浏览器再前进一次
bro.forward()


print('结束')
sleep(3)
bro.quit()
7.3 iframe处理+动作链
selenium处理iframe:
-如果定位的标签存在于iframe标签之中,则必须使用switch_to.frame(id)
-动作链(拖动):from selenium.webdriver import ActionChains
-实例化一个动作链对象:action=ActionChains(bro)
-click_and_hold(div):点击并长按操作
-move_by_offset(x,y):移动像素值
-perform():让动作链立即执行
-release():释放动作链
url="https://runoob.com/try/try.php?filename=jqueryui-api-droppable"
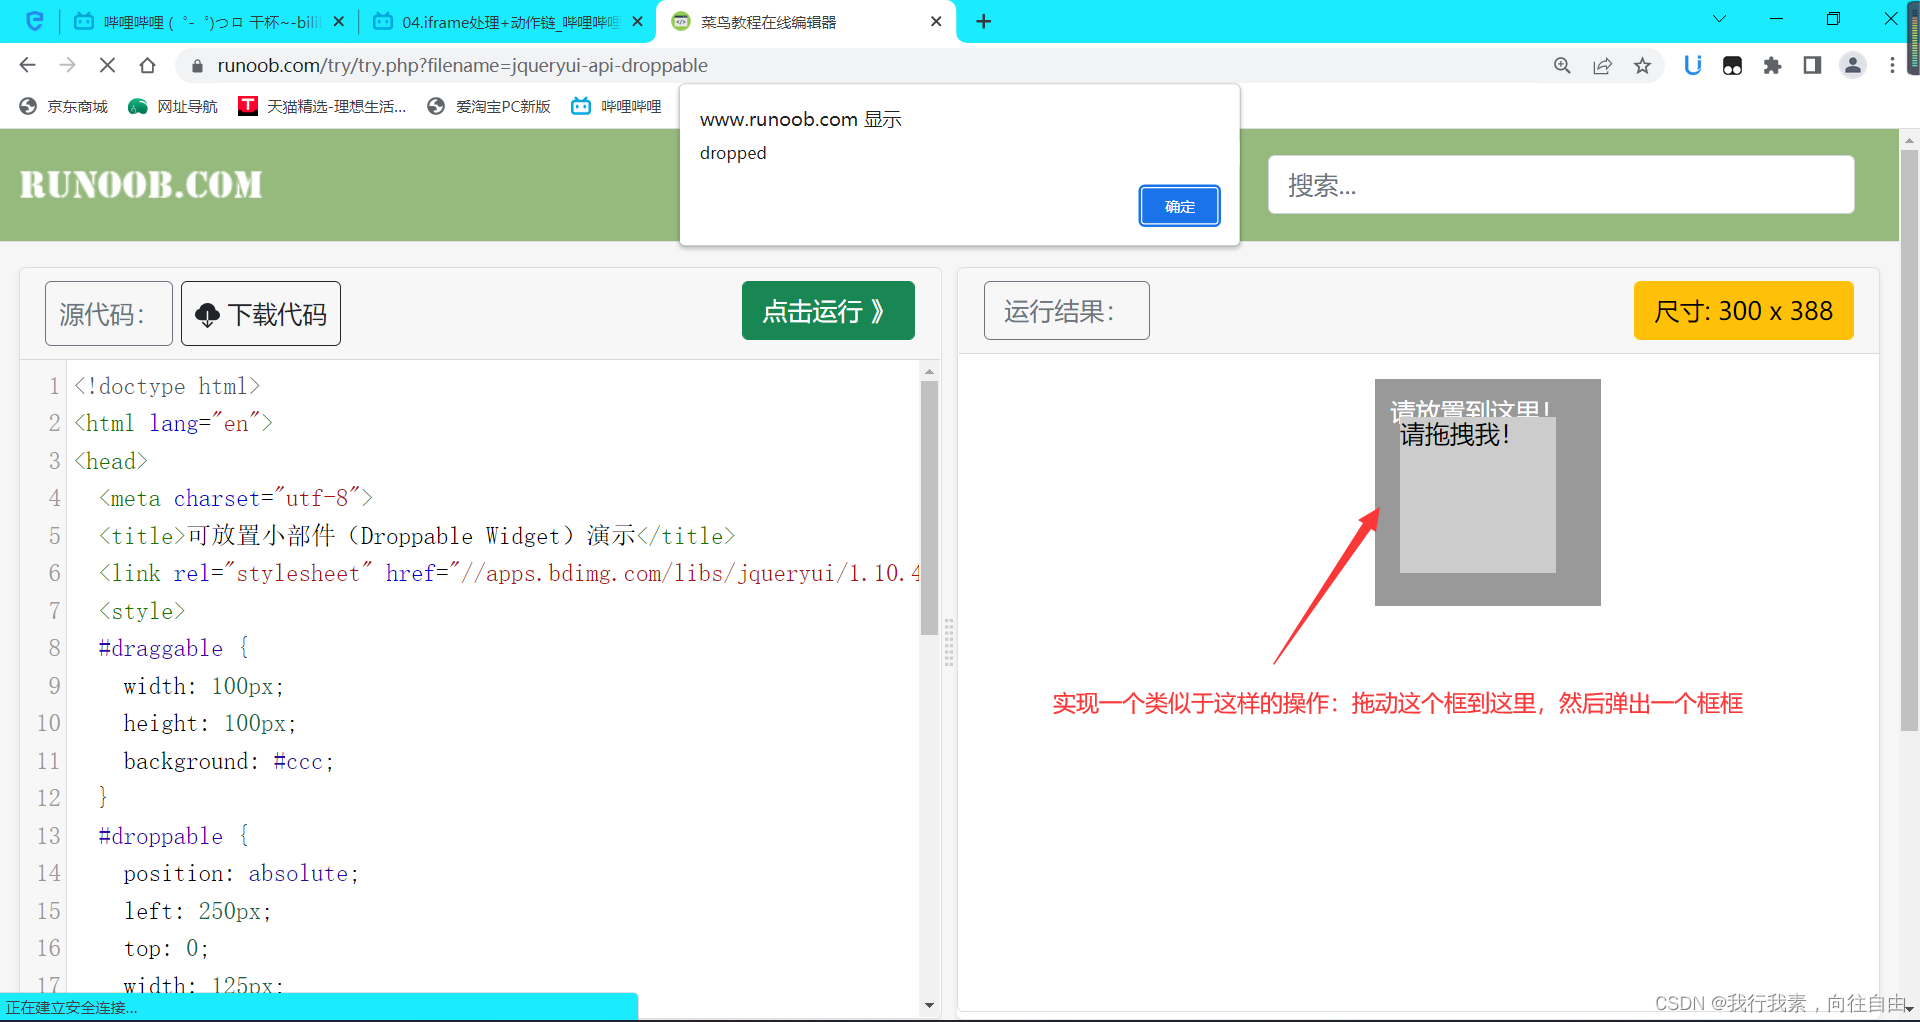
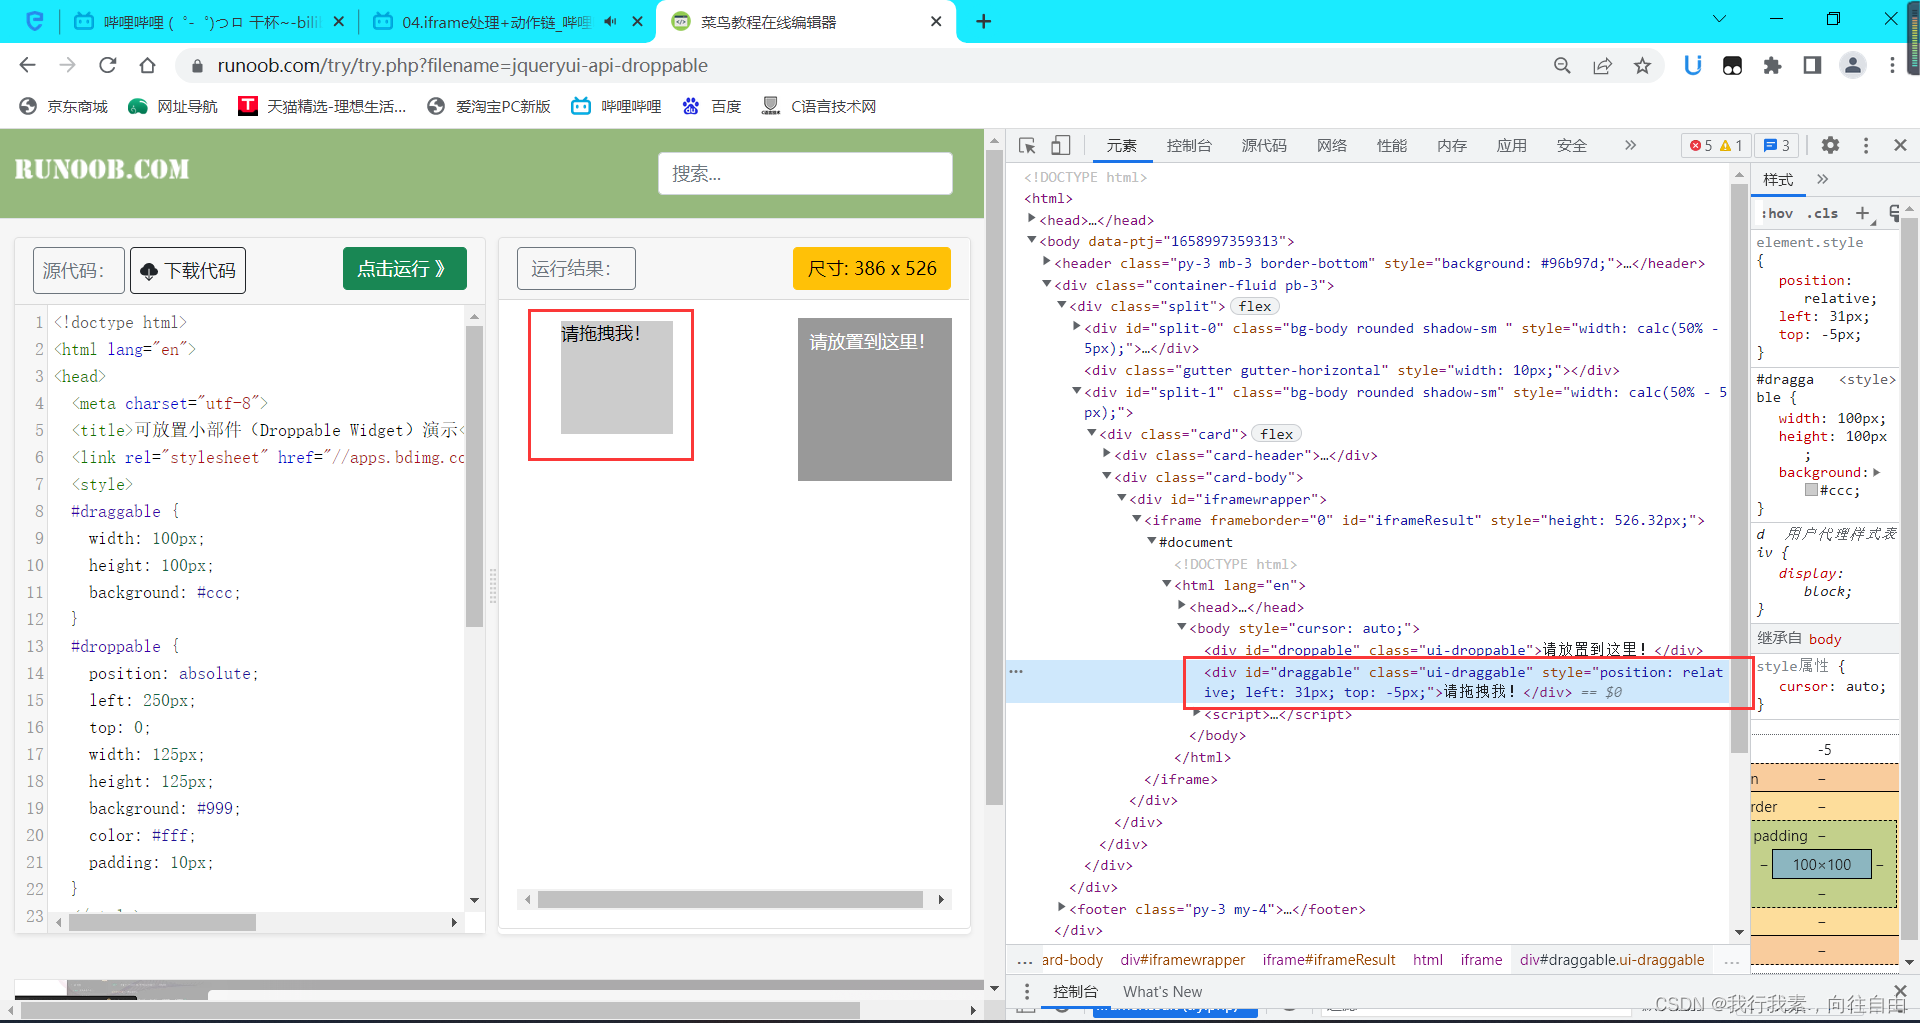
如果定位的标签是存在于iframe标签之中的则必须通过如下操作再进行标签定位 :
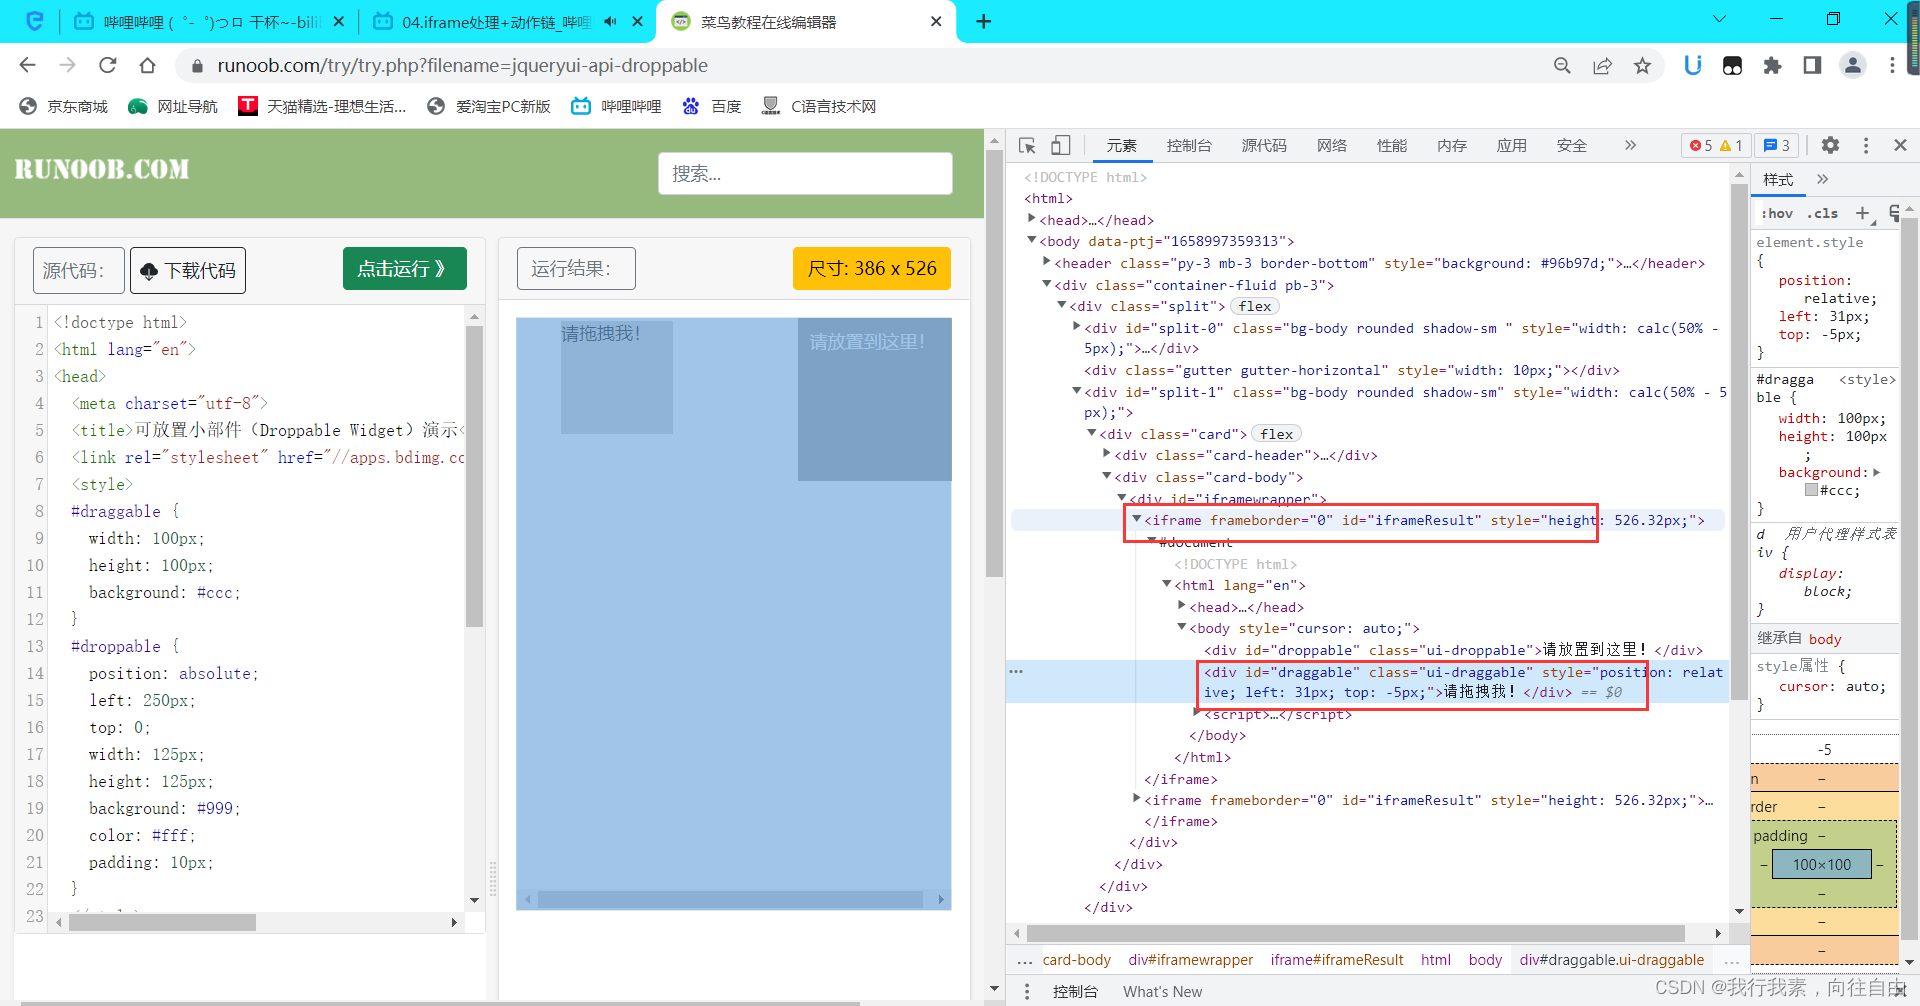
from selenium import webdriver
#导入动作链对应的类
from selenium.webdriver import ActionChains
from time import sleep


bro=webdriver.Chrome()
bro.get('https://www.runoob.com/try/try.php?filename=jqueryui-api-droppable')
#定位拖动框
#如果定位的标签是存在于iframe标签之中的则必须通过如下操作,再进行标签定位
bro.switch_to.frame('iframeResult')#id值传进去;切换浏览器标签定位的作用域
div=bro.find_element(by='id',value='draggable')

#动作链
#实例化对象
action=ActionChains(bro)
#点击并且长按指定的标签
action.click_and_hold(div)
#一点一点的移动
for i in range(10):
    action.move_by_offset(xoffset=25,yoffset=0).perform()#perform表示立即执行动作链操作
    sleep(0.3)

#释放动作链
action.release().perform()

bro.quit()#关闭浏览器

# print(div)
7.4 selenium的模拟登录QQ空间

from selenium import webdriver
from time import sleep
from selenium.webdriver import ActionChains

bro=webdriver.Chrome()
bro.get('https://qzone.qq.com/')

#默认是扫码,所以需要定位到账号登录
#因为该标签在iframe标签下,所以先切换作用域
bro.switch_to.frame('login_frame')
a_tog=bro.find_element(by='id',value='switcher_plogin')
a_tog.click()

#找到输入账号和密码模块
userName_tag=bro.find_element(by='id',value='u')
password_tag=bro.find_element(by='id',value='p')

#录入内容
userName_tag.send_keys('2571029391')
password_tag.send_keys('**************')

#登录
btn=bro.find_element(by='id',value='login_button')
btn.click()


sleep(3)
bro.quit()
滑块拖动还没有实现,所以登陆不上去。
7.5 谷歌无头浏览器+规嫌检测
将谷歌浏览器无可视化界面(无头浏览器)phantomJS。
用的时候直接将下面这写代码粘贴即可:
#无头浏览器设置
from selenium.webdriver.chrome.options import Options
chrome_options=Options()
chrome_options.add_argument('--headless')
chrome_options.add_argument('--disable-gpu')
bro=webdriver.Chrome(chrome_options=chrome_options)
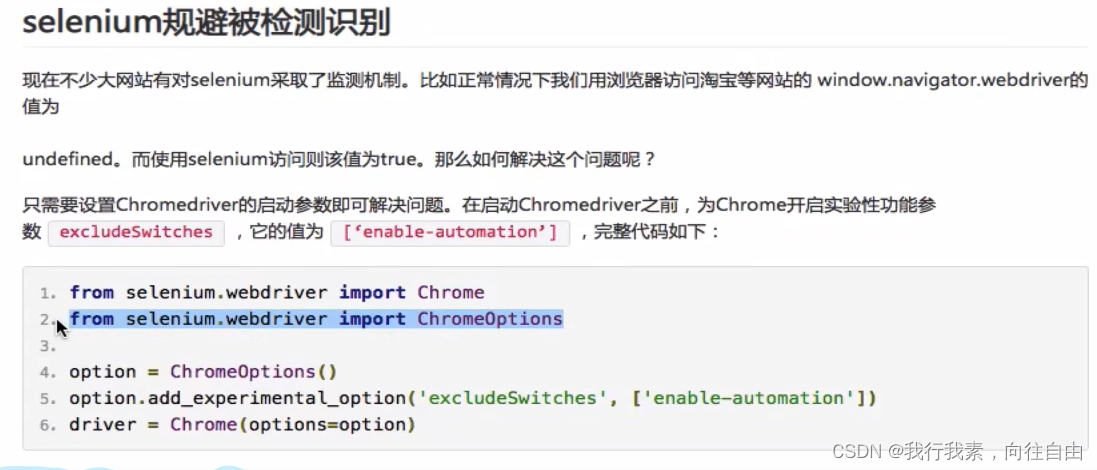
from selenium import webdriver
from time import sleep
#实现无可视化界面
from selenium.webdriver.chrome.options import Options
#实现规避检测
from selenium.webdriver import ChromeOptions


#实现无可视化界面的操作
chrome_options=Options()
chrome_options.add_argument('--headless')
chrome_options.add_argument('--disable-gpu')

#实现规避检测
option=ChromeOptions()
option.add_experimental_option('excludeSwitches',['enable-automation'])

#如何实现让selenium规避被检测到的风险
bro=webdriver.Chrome(chrome_options=chrome_options,options=chrome_options)


#将谷歌浏览器无可视化界面(无头浏览器)phantomJS
bro.get('https://www.baidu.com')

print(bro.page_source)
sleep(2)
bro.quit()
7.6 超级鹰的基本使用
中国地铁12306网址:https://kyfw.12306.cn/otn/login/init
云打码平台:超级鹰 http://www.chaojiying.com/


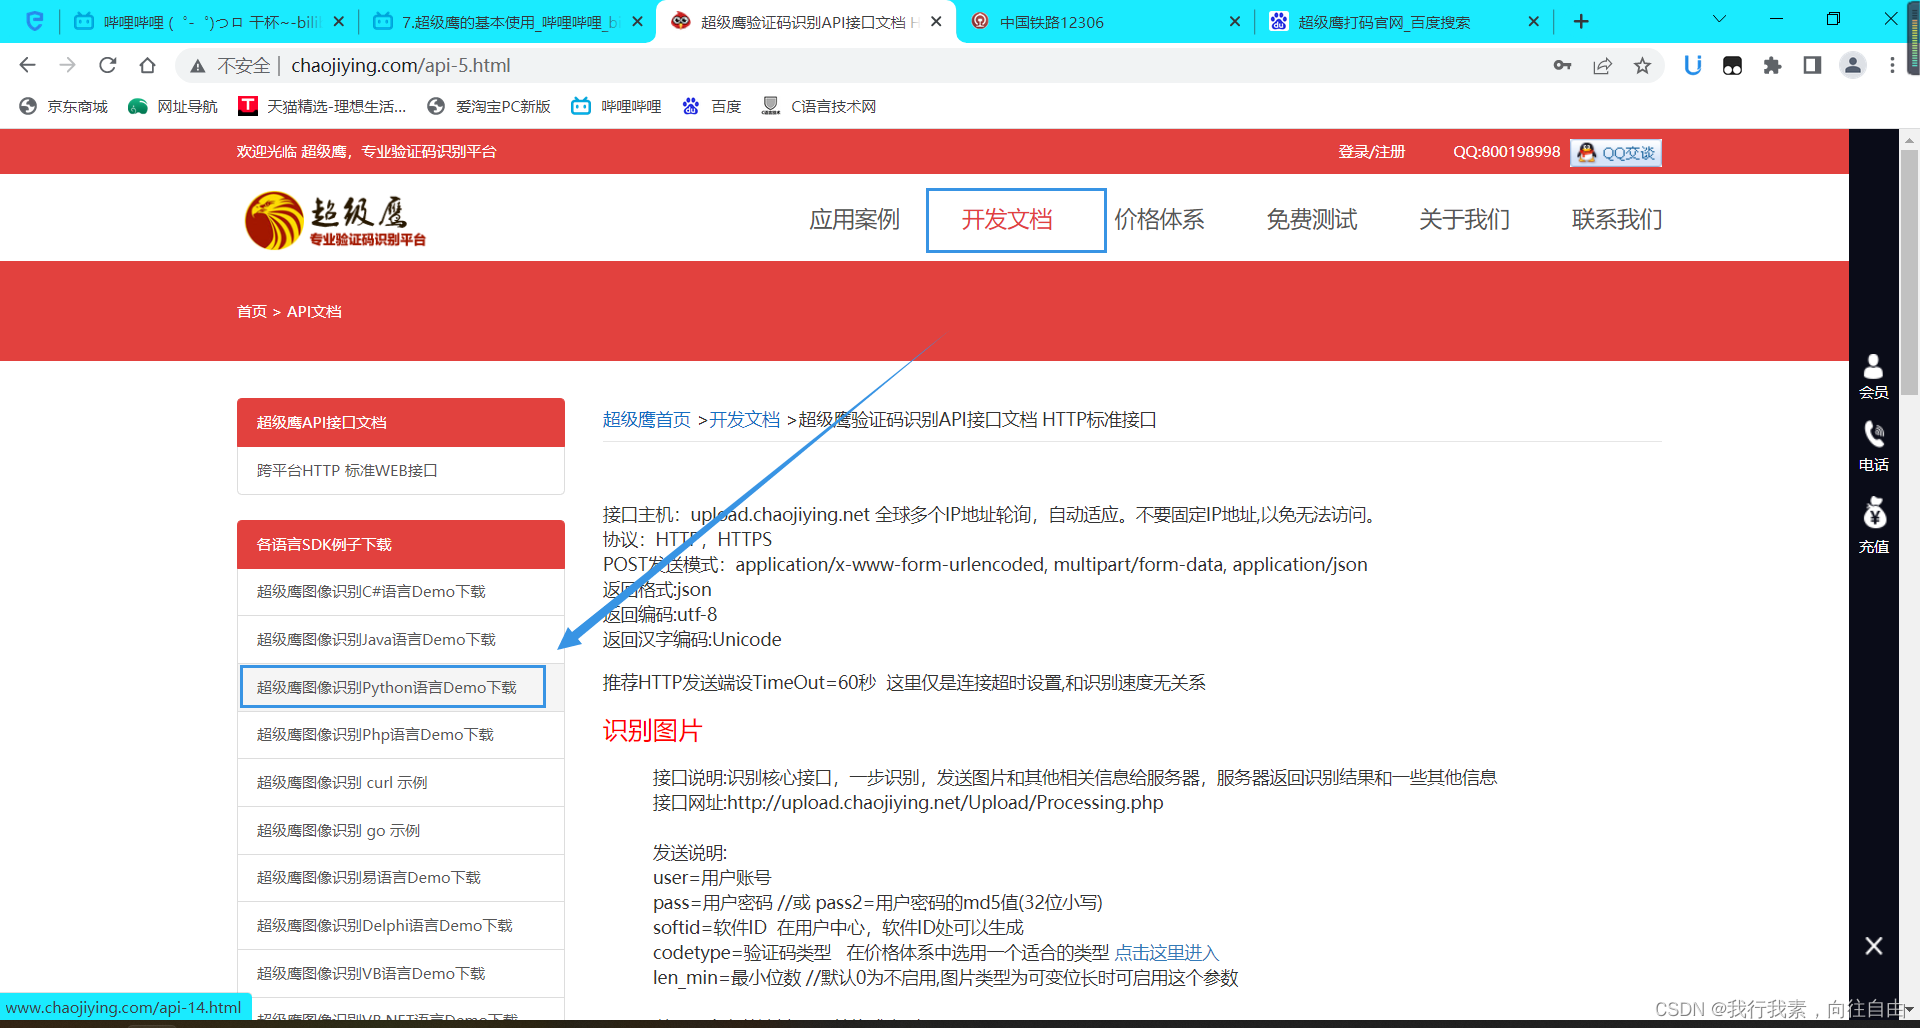
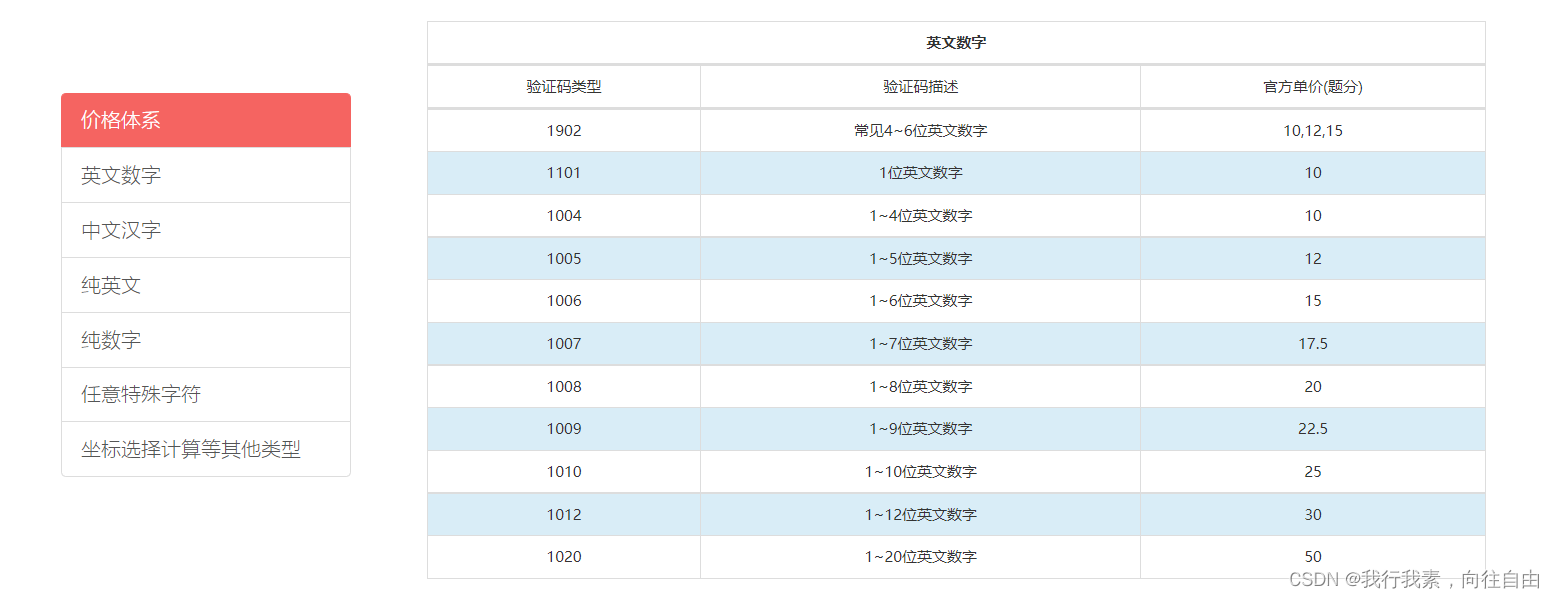
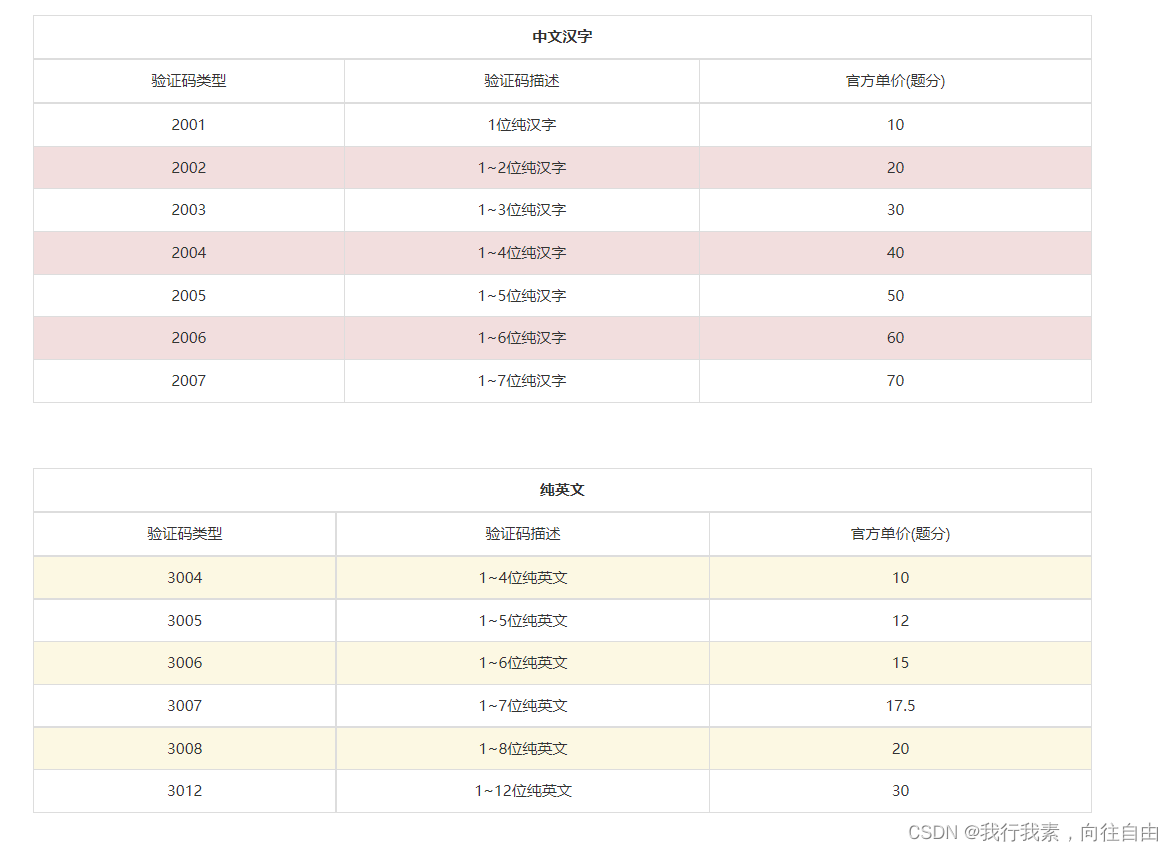
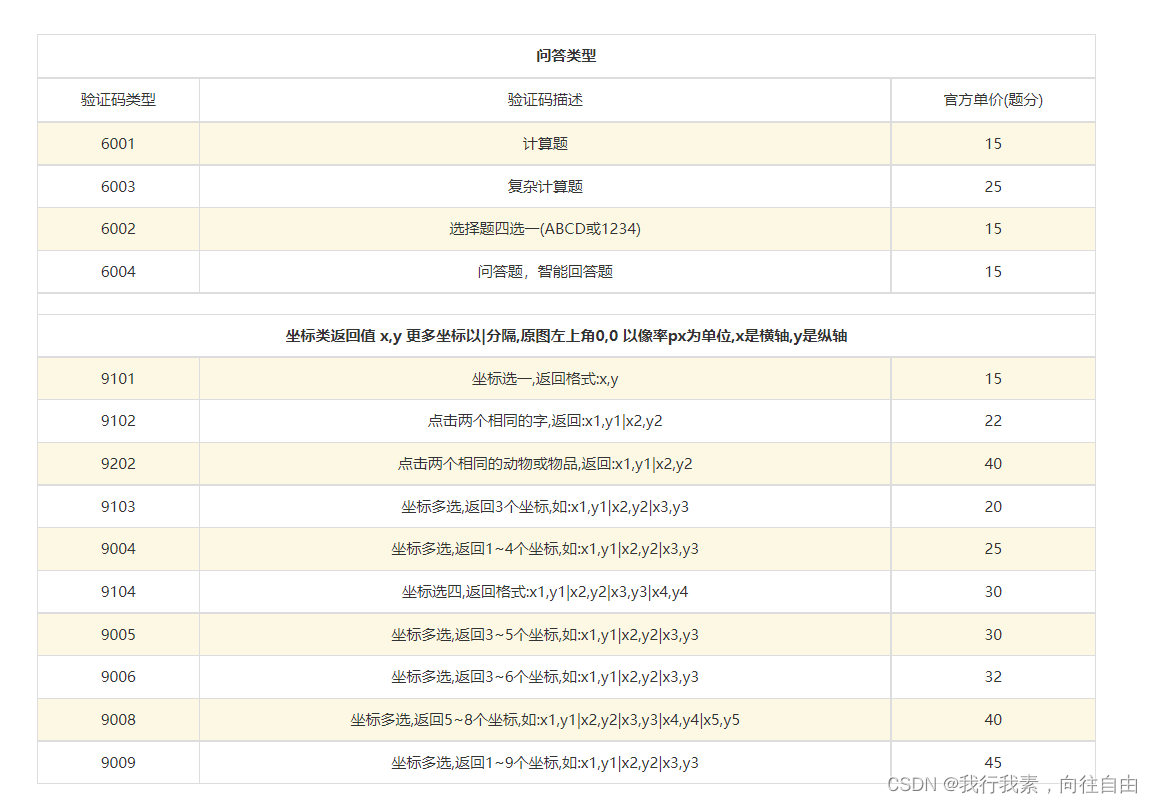
chaojiying.py内容如下:
#!/usr/bin/env python
# coding:utf-8

import requests
from hashlib import md5

class Chaojiying_Client(object):

    def __init__(self, username, password, soft_id):
        self.username = username
        password =  password.encode('utf8')
        self.password = md5(password).hexdigest()
        self.soft_id = soft_id
        self.base_params = {
            'user': self.username,
            'pass2': self.password,
            'softid': self.soft_id,
        }
        self.headers = {
            'Connection': 'Keep-Alive',
            'User-Agent': 'Mozilla/4.0 (compatible; MSIE 8.0; Windows NT 5.1; Trident/4.0)',
        }

    def PostPic(self, im, codetype):
        """
        im: 图片字节
        codetype: 题目类型 参考 http://www.chaojiying.com/price.html
        """
        params = {
            'codetype': codetype,
        }
        params.update(self.base_params)
        files = {'userfile': ('ccc.jpg', im)}
        r = requests.post('http://upload.chaojiying.net/Upload/Processing.php', data=params, files=files, headers=self.headers)
        return r.json()

    def PostPic_base64(self, base64_str, codetype):
        """
        im: 图片字节
        codetype: 题目类型 参考 http://www.chaojiying.com/price.html
        """
        params = {
            'codetype': codetype,
            'file_base64':base64_str
        }
        params.update(self.base_params)
        r = requests.post('http://upload.chaojiying.net/Upload/Processing.php', data=params, headers=self.headers)
        return r.json()

    def ReportError(self, im_id):
        """
        im_id:报错题目的图片ID
        """
        params = {
            'id': im_id,
        }
        params.update(self.base_params)
        r = requests.post('http://upload.chaojiying.net/Upload/ReportError.php', data=params, headers=self.headers)
        return r.json()


if __name__ == '__main__':
    chaojiying = Chaojiying_Client('xxxxxxxxxx', 'xxxxxxxxxxx', 'ddddddd')#用户中心>>软件ID 生成一个替换 ddddddd
    im = open('验证码图片/锅铲.png', 'rb').read()#本地图片文件路径 来替换 a.jpg 有时WIN系统须要//
    print(chaojiying.PostPic(im, 9004))	#9004 验证码类型  官方网站>>价格体系
    #print(chaojiying.PostPic(base64_str, 1902))  #此处为传入 base64代码
    print(chaojiying.PostPic(im, 9004)['pic_str'])#读取图片内容
7.7 中国铁路12306模拟登陆
12306模拟登录编码流程:
-使用selenium打开登录页面心
-对当前selenium打开的这张页面进行截图-对当前图片局部区域(验证码图片)进行裁剪
-好处:将验证码图片和模拟登录进行一一对应。-使用超级鹰识别验证码图片(坐标)
from selenium import webdriver
import time
from PIL import Image
from chaojiying import Chaojiying_Client
from selenium.webdriver import ActionChains

from io import BytesIO

#使用selenium打开登陆页面
bro=webdriver.Chrome()
bro.get('https://kyfw.12306.cn/otn/resources/login.html')
time.sleep(1)

#截图整张页面   save_screenshot就是将当前页面进行截图并保存
bro.save_screenshot('./铁路登录页面.png')

#确定验证码图片对应的左上角和右下角的坐标(裁剪的区域就确定了)
code_img_ele=bro.find_element(by='xpath',value='//*[@id="loginForm"]/div/ul[2]/li[4]/div;div/div[3]/img')
location=code_img_ele.location #验证码图片左上角坐标 x,y
size=code_img_ele.size #验证码标签对应的长和宽
rangle=(int(location['x'],int(location['y']),int(location['x']+size['width']),int(location['y']+size['height'])))
#至此验证码图片区域就确定下来了

i=Image.open('./铁路登录页面.png')
code_img_name='./验证码图片/12306.png'
#crop根据指定区域裁剪
frame=i.crop(rangle)
frame.save(code_img_name)

#将验证码图片提交给超级鹰进行识别
chaojiying=Chaojiying_Client('xxxxxxxxxxxxxx','xxxxxxxx','dddddddd')#账号,密码,id
im=open('./验证码图片/12306.png','rb').read()
result=chaojiying.PostPic(im,9004)['pic_str']

#点击
all_list=[]#存储即将要点击的坐标,有几个点就存几个   [[x1,y1],[x2,y2]]
if '|' in result:
    list_1=result.split('|')
    count_1=len(list_1)
    for i in range(count_1):
        xy_list=[]
        x=int(list_1[i].split(',')[0])
        y=int(list_1[i].split(',')[1])
        xy_list.append(x)
        xy_list.append(y)
        all_list.append(xy_list)
else:
    x = int(result.split(',')[0])
    y = int(result.split(',')[1])
    xy_list=[]
    xy_list.append(x)
    xy_list.append(y)
    all_list.append(xy_list)

#遍历all_list,使用动作链对每一个列表元素对应的x y指定的位置点击操作
for l in all_list:
    x=l[0]
    y=l[1]
    ActionChains(bro).move_to_element_with_offset(code_img_ele,x,y).click().perform()
    time.sleep(0.5)

bro.find_element(by='id',value='username').send_keys('xxxxxxxxxx')
time.sleep(2)
bro.find_element(by='id',value='password').send_keys('xxxxxxxxxx')
time.sleep(2)
bro.find_element(by='id',value='loginSub').click()
time.sleep(5)
bro.quit()
8.scrapy框架
8.1 学前准备
什么是框架?
-就是一个集成了很多功能并且具有很强通用性的一个项目模板。
如何学习框架?
-专门学习框架封装的各种功能的详细用法。什么是scrapy?
-爬虫中封装好的一个明星框架。
scrapy功能:高性能的持久化存储,异步的数据下载,高性能的数据解析,分布式。
-环境的安装:
-mac or linux:pip install scrapy-windows:【看下面的截图】
-pip install wheel
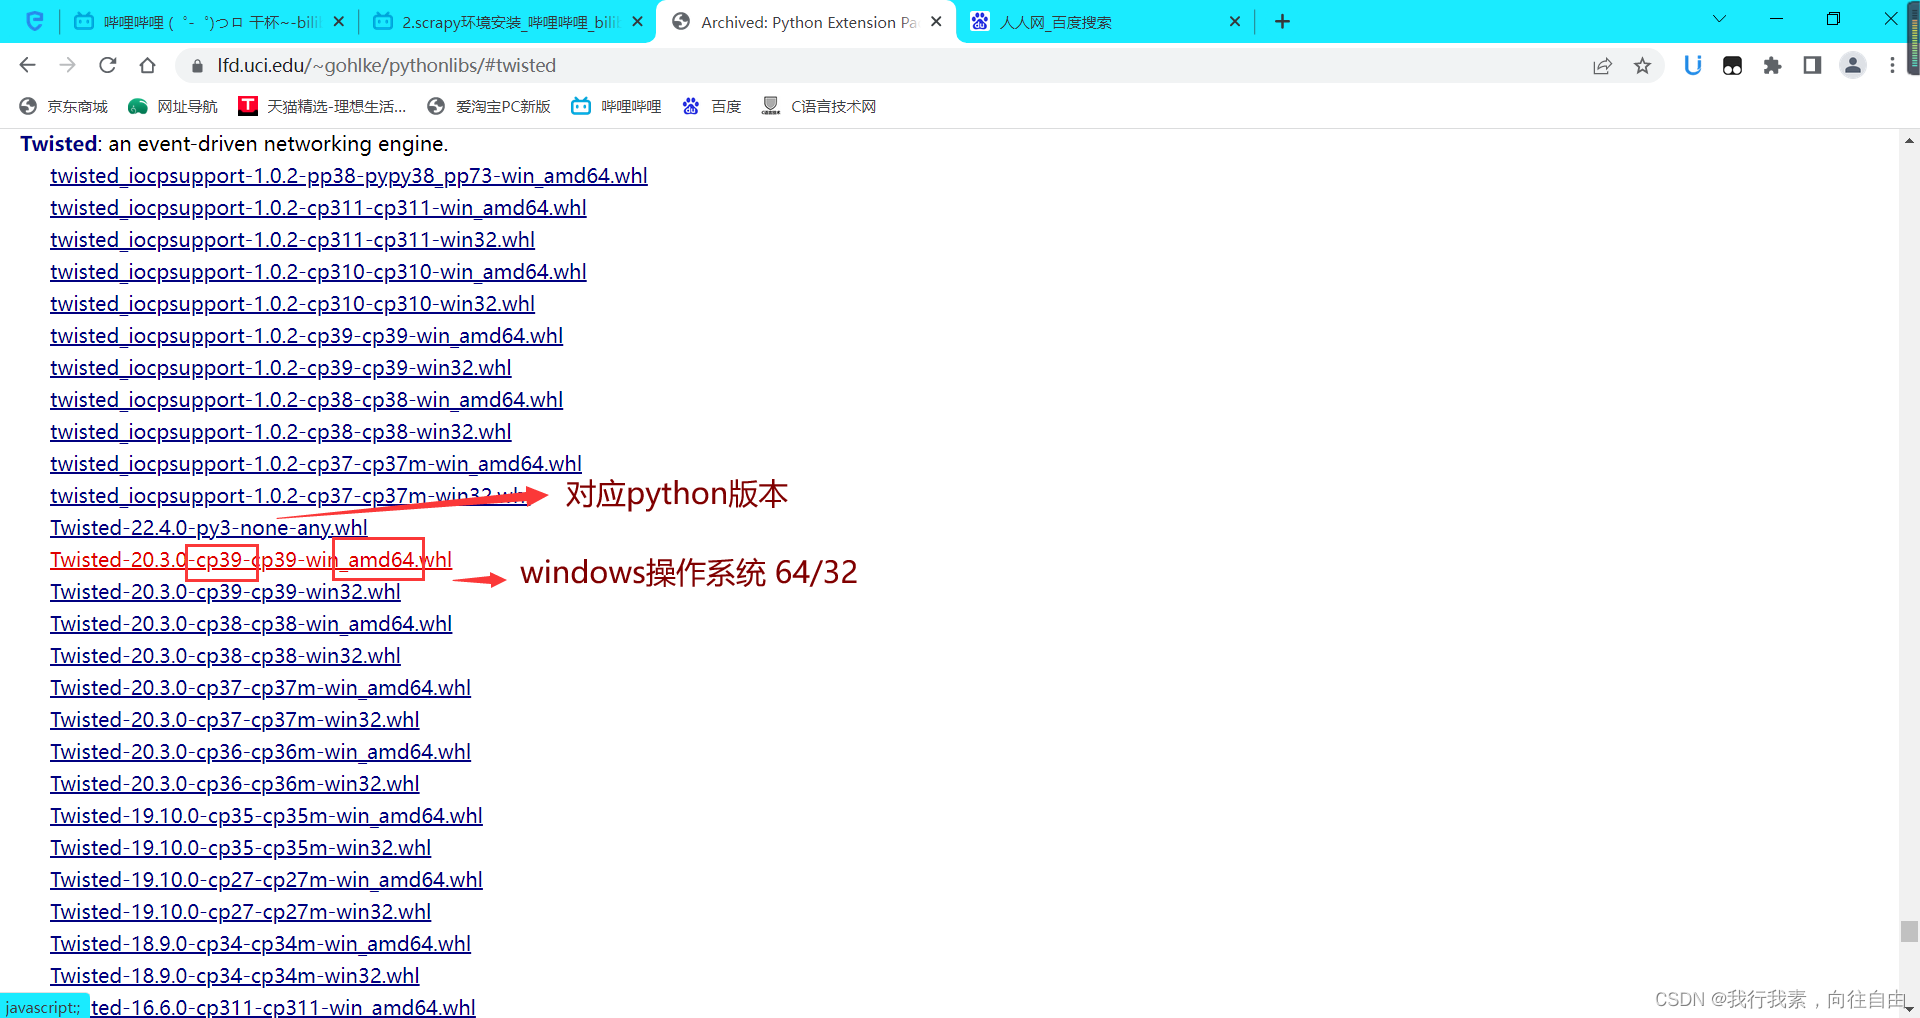
-下载twisted,下载地址:http://www.lfd.uci.edu/~gohlke/pythonlibs/#twisted
-安装twisted,pip install Twisted-20.3.0-cp39-cp39-win amd64.whl
cp39:是指python版本;64:是指操作系统64位
-pip install pywin32-pip install scrapy
测试:在终端里录入scrapy指令,没有报错即表示安装成功!

8.2 scrapy创建工程
1.创建一个工程:scrapy startproject firstBlood
2.cd firstBlood
3.在spiders子目录中创建一个爬虫文件:
-scrapy genspider spiderName www.xxx.com
4.执行工程:
-scrapy crawl spiderName
8.3 数据解析--知乎热榜
需求:爬取知乎热榜内容。
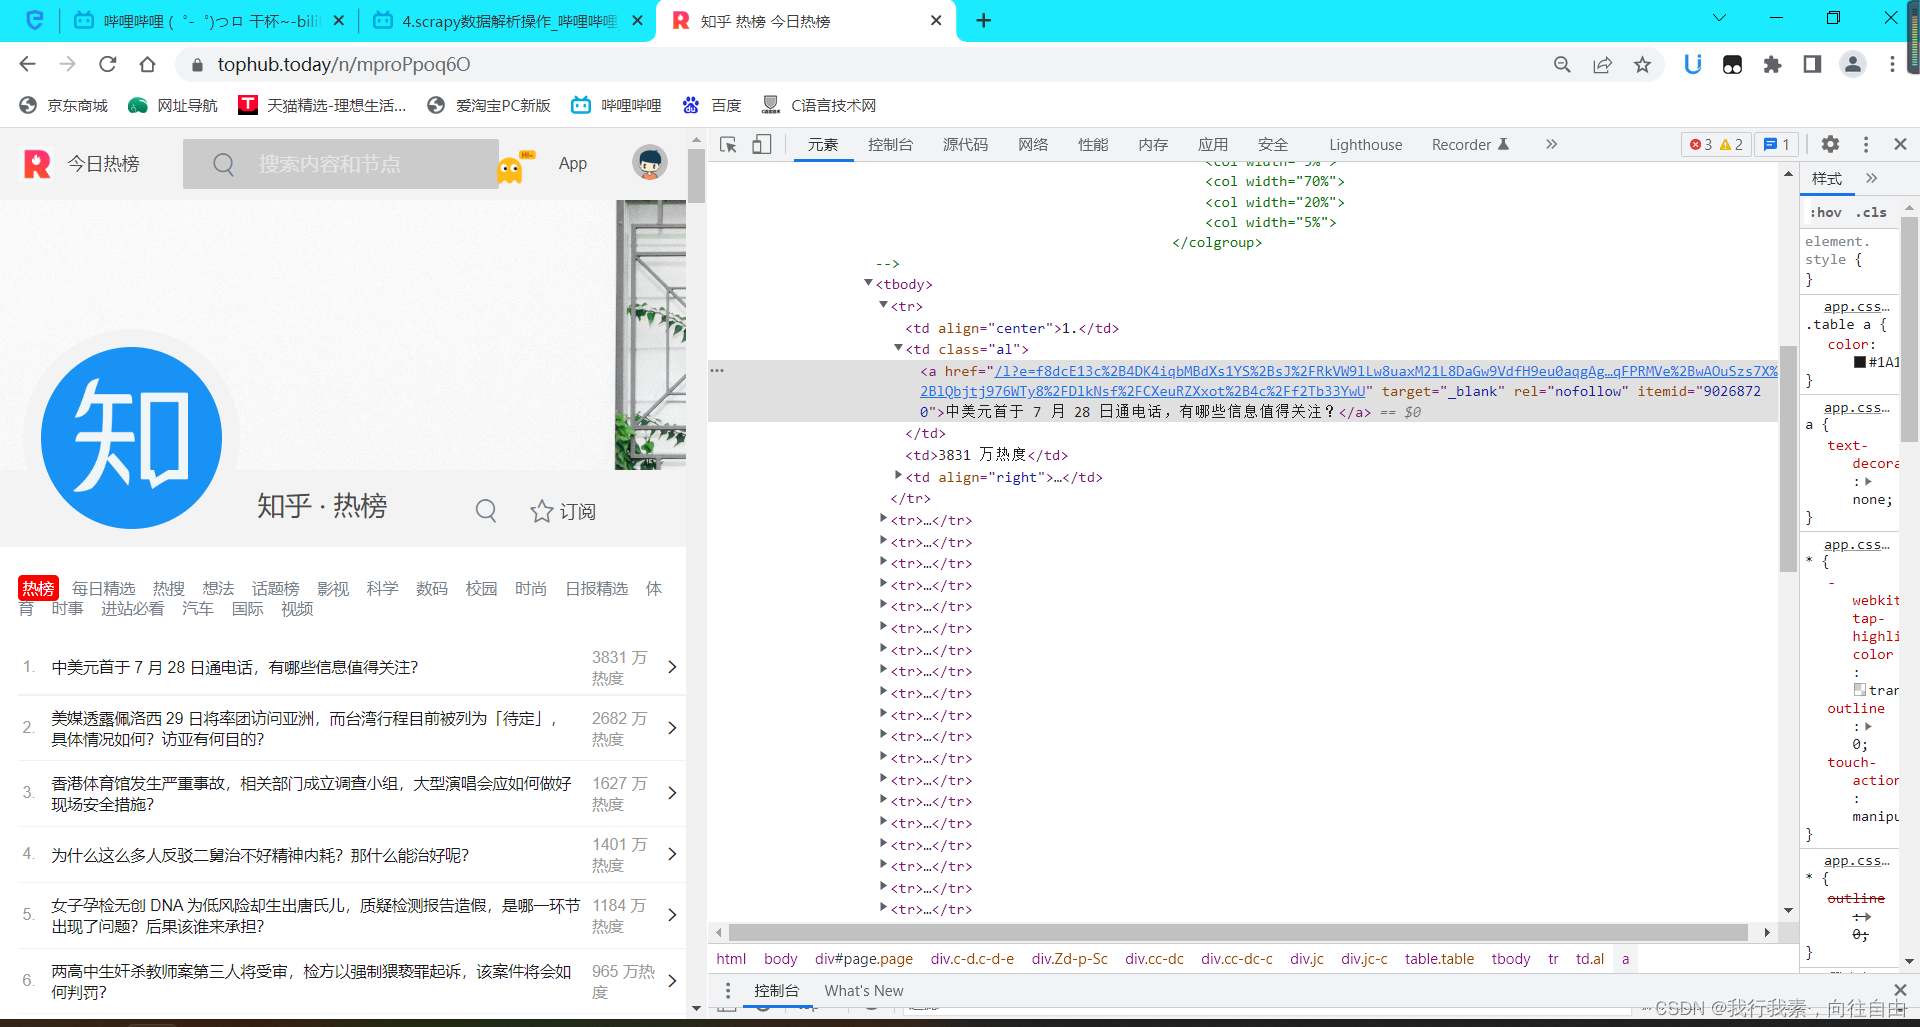
1.创建一个工程,工程名为zhihuPro:scrapy startproject zhihuPro
2. cd .\zhihuPro
3.创建一个爬虫文件: scrapy genspider zhihu www.zhihu.com
4.编写代码
5.修改配置文件
6.运行:scrapy crawl zhihu
zhihu.py文件中的内容如下:
import scrapy


class ZhihuSpider(scrapy.Spider):
    name = 'zhihu'
    # allowed_domains = ['www.zhihu.com']   ==>  一般不用这个
    start_urls = ['https://tophub.today/n/mproPpoq6O']

    def parse(self, response):#数据解析
        #解析
        div_list=response.xpath('//*[@id="page"]/div[2]/div[2]/div[1]/div[2]/div/div[1]/table/tbody/tr')#直接xpath
        # print(div_list)
        i=1
        for div in div_list:
            #xpath返回的是列表,但是列表元素一定是Selector类型的对象
            #extract可以将Selector对象中data参数存储的字符串提取出来
            content=div.xpath('./td[2]/a/text()')[0].extract()
            content=''.join(content)#转换成字符串
            print(i,'   ',content)
            i+=1
爬取结果:

8.4 基于终端命令的持久化存储
8.4.1 基于终端命令方式存储
scrapy持久化存储:
-基于终端指令:
-要求:只可以将parse方法的返回值存储到本地的文件中,不可以往数据库里存储
-命令:scrapy crawl zhihu -o zhihu.csv
-注意:存储文件类中只能是 ('json', 'jsonlines', 'jl', 'csv', 'xml', 'marshal', 'pickle')
-zhihu.py文件的编辑
import scrapy


class ZhihuSpider(scrapy.Spider):
    name = 'zhihu'
    # allowed_domains = ['www.zhihu.com']   ==>  一般不用这个
    start_urls = ['https://tophub.today/n/mproPpoq6O']

    def parse(self, response):#数据解析
        #解析
        div_list=response.xpath('//*[@id="page"]/div[2]/div[2]/div[1]/div[2]/div/div[1]/table/tbody/tr')#直接xpath
        # print(div_list)
        i=1
        all_data= []#存储所有解析到的数据
        for div in div_list:
            #xpath返回的是列表,但是列表元素一定是Selector类型的对象
            #extract可以将Selector对象中data参数存储的字符串提取出来
            content=div.xpath('./td[2]/a/text()')[0].extract()
            content=''.join(content)#转换成字符串
            # print(i,'\t',content)
            dic={
                'index':i,
                'content':content
            }
            all_data.append(dic)
            i+=1

        return all_data
-好处:简洁高效便捷
-缺点:局限性比较强(数据只可以存储到指定后缀文件中)
8.4.2 基于管道方式持久化存储
基于管道:
-编码流程:
-1.数据解析
-2.在item类中定义相关的属性
-3.将解析的数据封装存储到item类型的对象中
-4.将item类型的对象提交给管道进行持久化存储操作zhihu.py文件中的内容如下
import scrapy
from ..items import ZhihuproItem


#基于管道的持久化存储
class ZhihuSpider(scrapy.Spider):
    name = 'zhihu'
    # allowed_domains = ['www.zhihu.com']   ==>  一般不用这个
    start_urls = ['https://tophub.today/n/mproPpoq6O']

    def parse(self, response):#数据解析
        #解析知乎热搜
        div_list=response.xpath('//*[@id="page"]/div[2]/div[2]/div[1]/div[2]/div/div[1]/table/tbody/tr')#直接xpath

        idx=0
        all_data= []#存储所有解析到的数据
        for div in div_list:
            #xpath返回的是列表,但是列表元素一定是Selector类型的对象
            #extract可以将Selector对象中data参数存储的字符串提取出来
            content=div.xpath('./td[2]/a/text()')[0].extract()
            idx+=1
            content=''.join(content)#转换成字符串

            #实例化一个item类型的对象
            item=ZhihuproItem()
            item['idx']=idx
            item['content']=content

            #将item提交给管道
            yield item
-5.在管道类的process_item中要将其接收到的item对象中存储的数据进行持久化存储
# Define your item pipelines here
#
# Don't forget to add your pipeline to the ITEM_PIPELINES setting
# See: https://docs.scrapy.org/en/latest/topics/item-pipeline.html


# useful for handling different item types with a single interface
from itemadapter import ItemAdapter

class ZhihuproPipeline:
    fp=None#因为每次接收到一个item就会调用一次process_item,所以就将打开文件操作写外边
    #重写父类方法:该方法只会开始爬虫时候调用一次,正好可以操作打开文件
    def open_spider(self,spider):
        self.fp=open('./zhihu.txt','w',encoding='utf-8')

    #重写父类的一个方法:该方法在爬虫结束时只会调用一次,刚好用于关闭文件操作
    def close_spider(self):
        self.fp.close()

    #专门用来处理item类型对象的
    #该方法可以接受爬虫文件提交的item对象
    #该方法每接收到一个item,就会被调用一次
    def process_item(self, item, spider):
        idx=item['idx']
        content=item['content']
        #存储
        self.fp.write(idx+'\t'+content+'\n')
        return item
-6.在配置文件中手动开启管道
-7.执行: scrapy crawl zhihu
-好处:通用性强,可以往任意类型文件中存储
-缺点:编码流程繁琐
8.4.3 基于管道方式持久化存储--->面试题
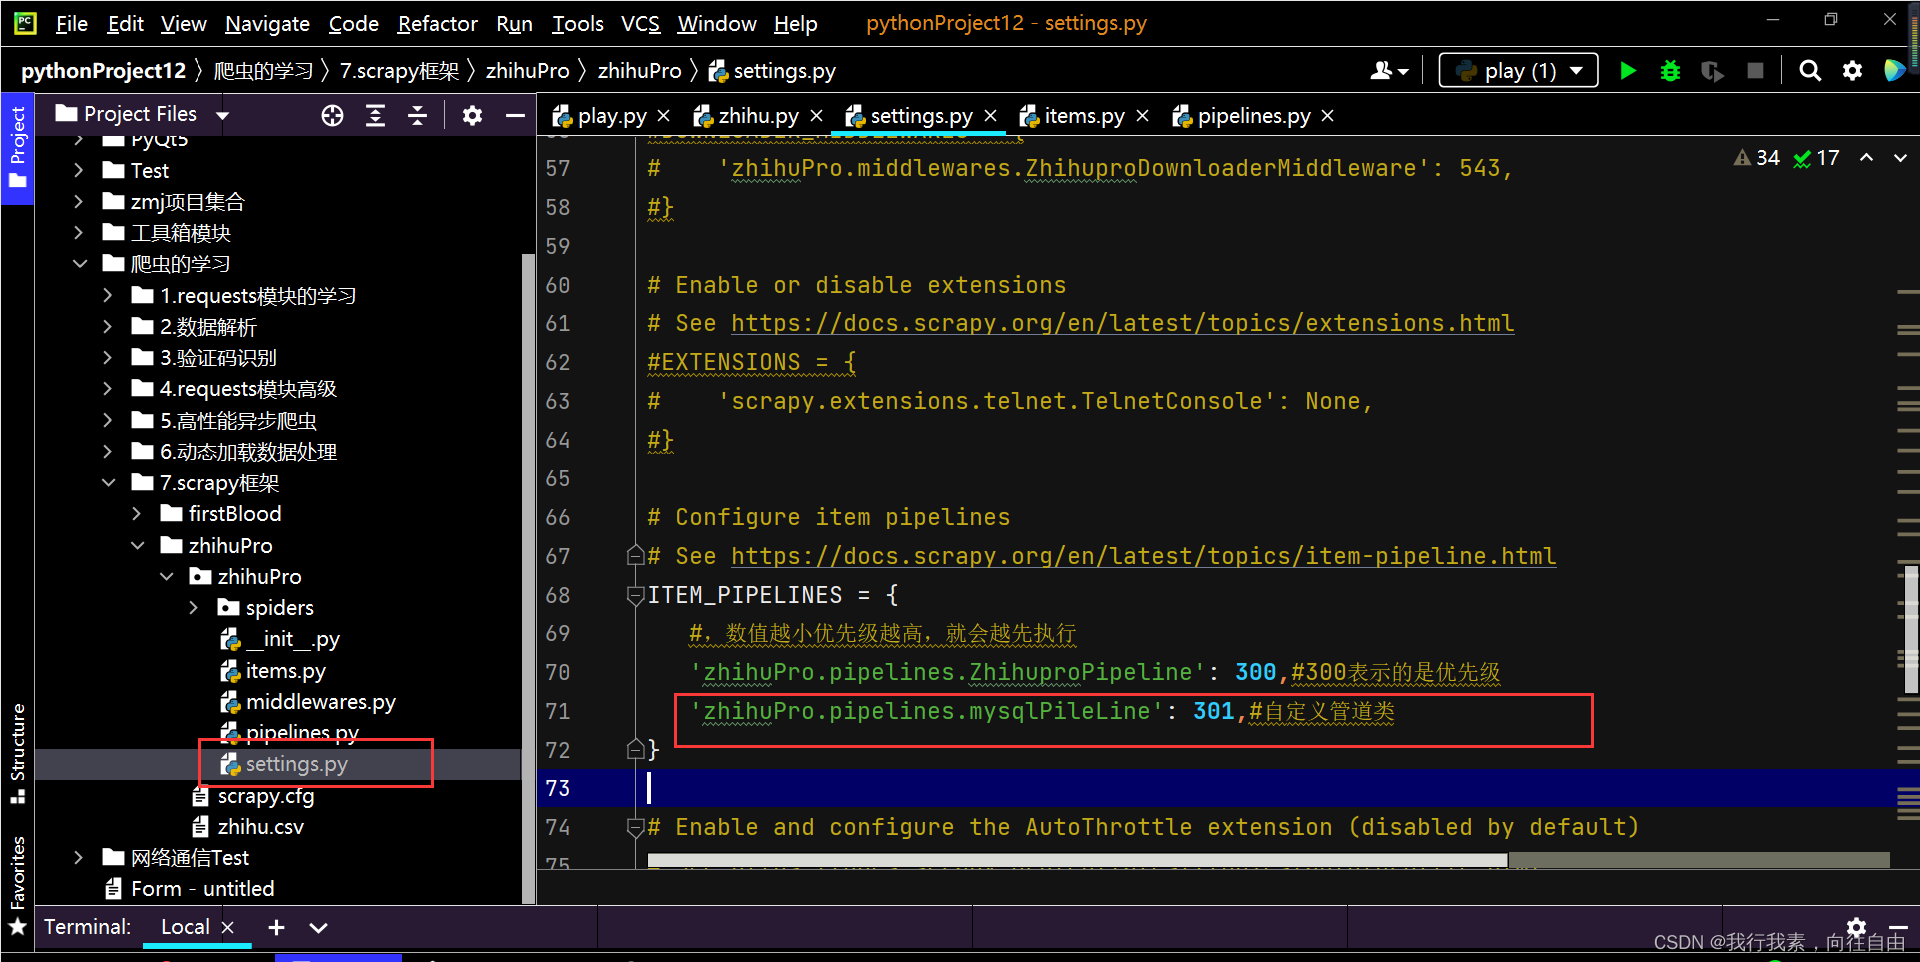
面试题:将爬取到的数据一份存储到本地一份存储到数据库,如何实现?
注意:
-管道文件中一个管道类对应的是将数据存储到一种平台
-爬虫文件提交的item只会给管道文件中第一个被执行的管道类接受
-process_item中的return item表示将item传递给下一个即将被执行的管道类
在pipelines.py文件中加下面内容:
#管道文件中的一个管道类对应的一组数据存储到一个平台或者载体中
#自定义管道类
class mysqlPileLine(object):
    conn=None
    def open_spider(self,spider):
        self.conn=pymysql.Connect(host='127.0.0.1',port=3306,user='root',password='123456',db='zhihu',charset='utf8')
    def process_items(self, item, spider):
        self.cursor=self.conn.cursor()

        try:
            self.cursor.execute('insert into zhihu values("%s","%s")'%(item["idx"],item["content"]))
            self.conn.commit()#提交
        except Exception as e:
            print(e)
            self.conn.rollback()
        return item  # 就会传递给下一个即将被执行的管道类,不管有没有下一个,都建议写上

    def close_spider(self,spider):
        self.cursor.close()
        self.conn.close()

#爬虫文件提交的item类型的对象最终会提交给哪一个管道类呢?
    #先执行优先级高的管道类
修改配置文件:
8.5 基于spider的全站数据爬取
全站数据的爬取:就是将网站中某板块下的全部页码对应的页面数据进行爬取。
需求:爬取所有全部页面的标题。
实现方式:
-1.将所有页面的url添加到start__urls列表 ==> 不推荐
-2.自行手动进行请求发送 ==> 推荐
#手动请求 callback回调函数是是专门用作于数据解析
yield scrapy.Request(url=new_url,callback=self.parse)#递归
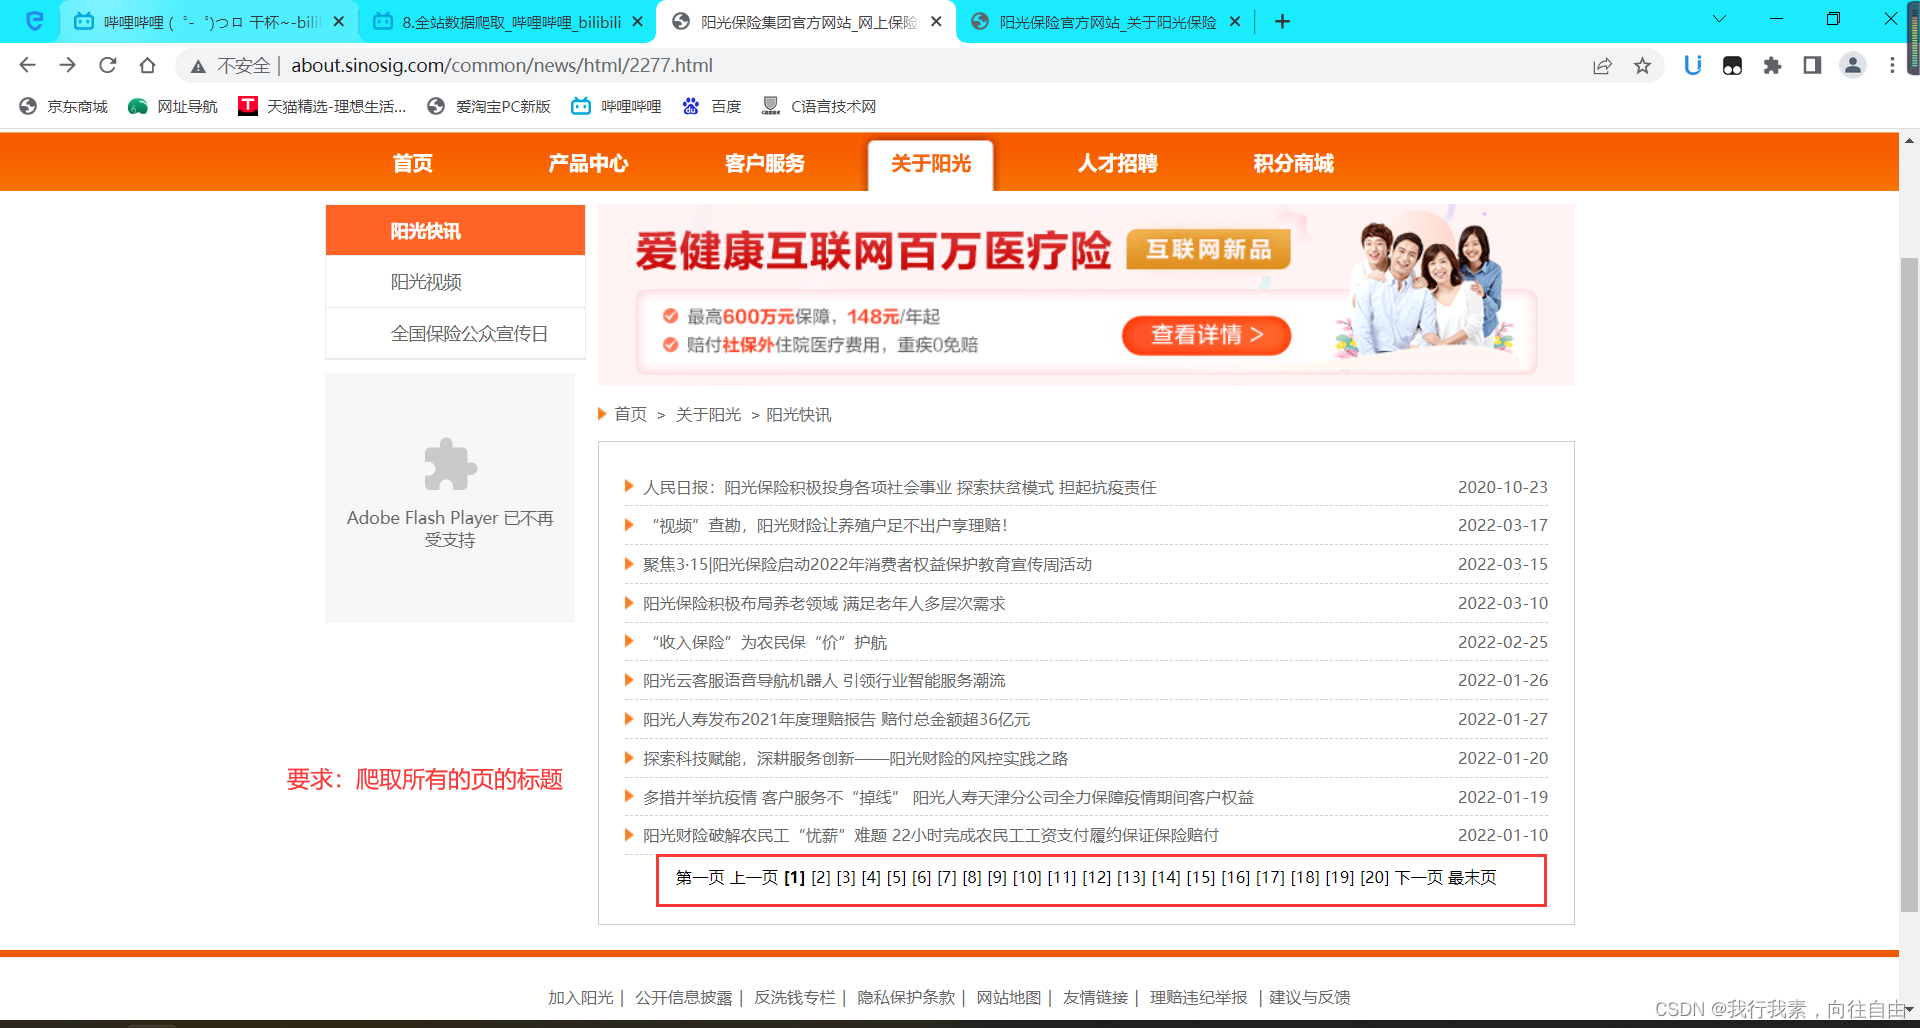
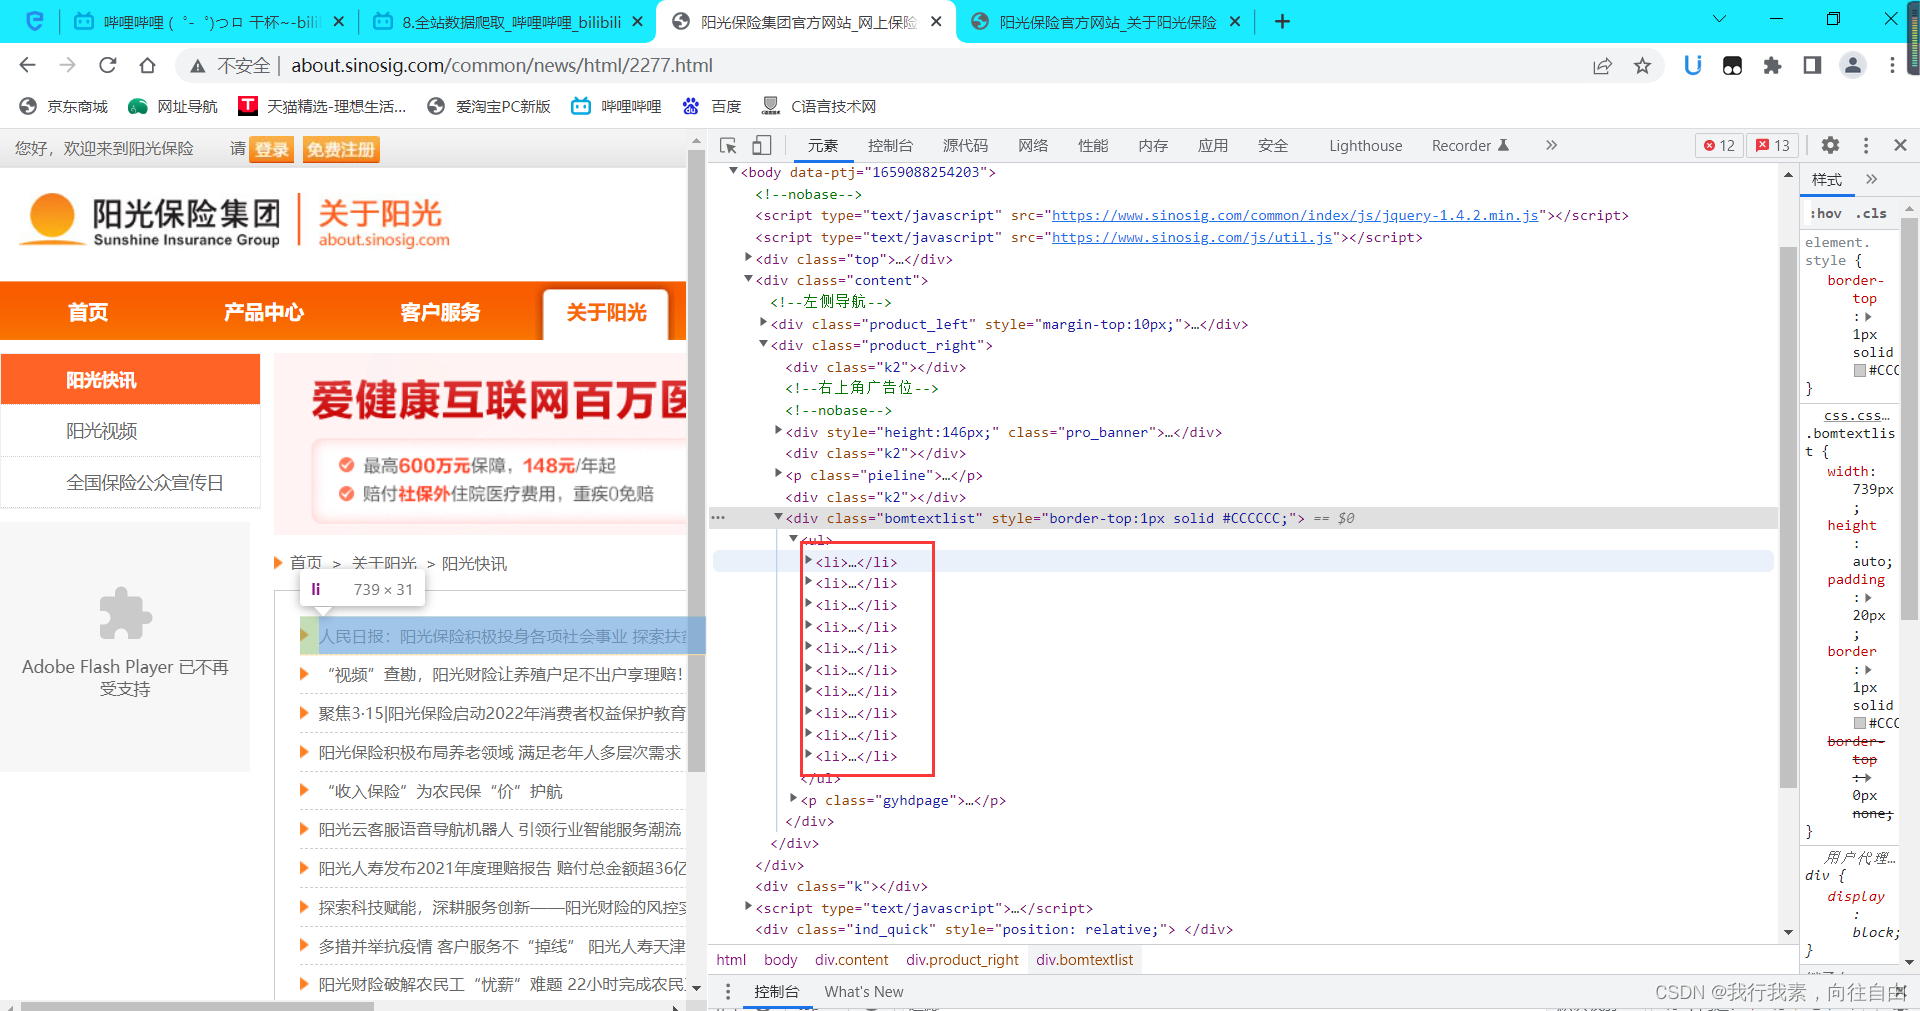

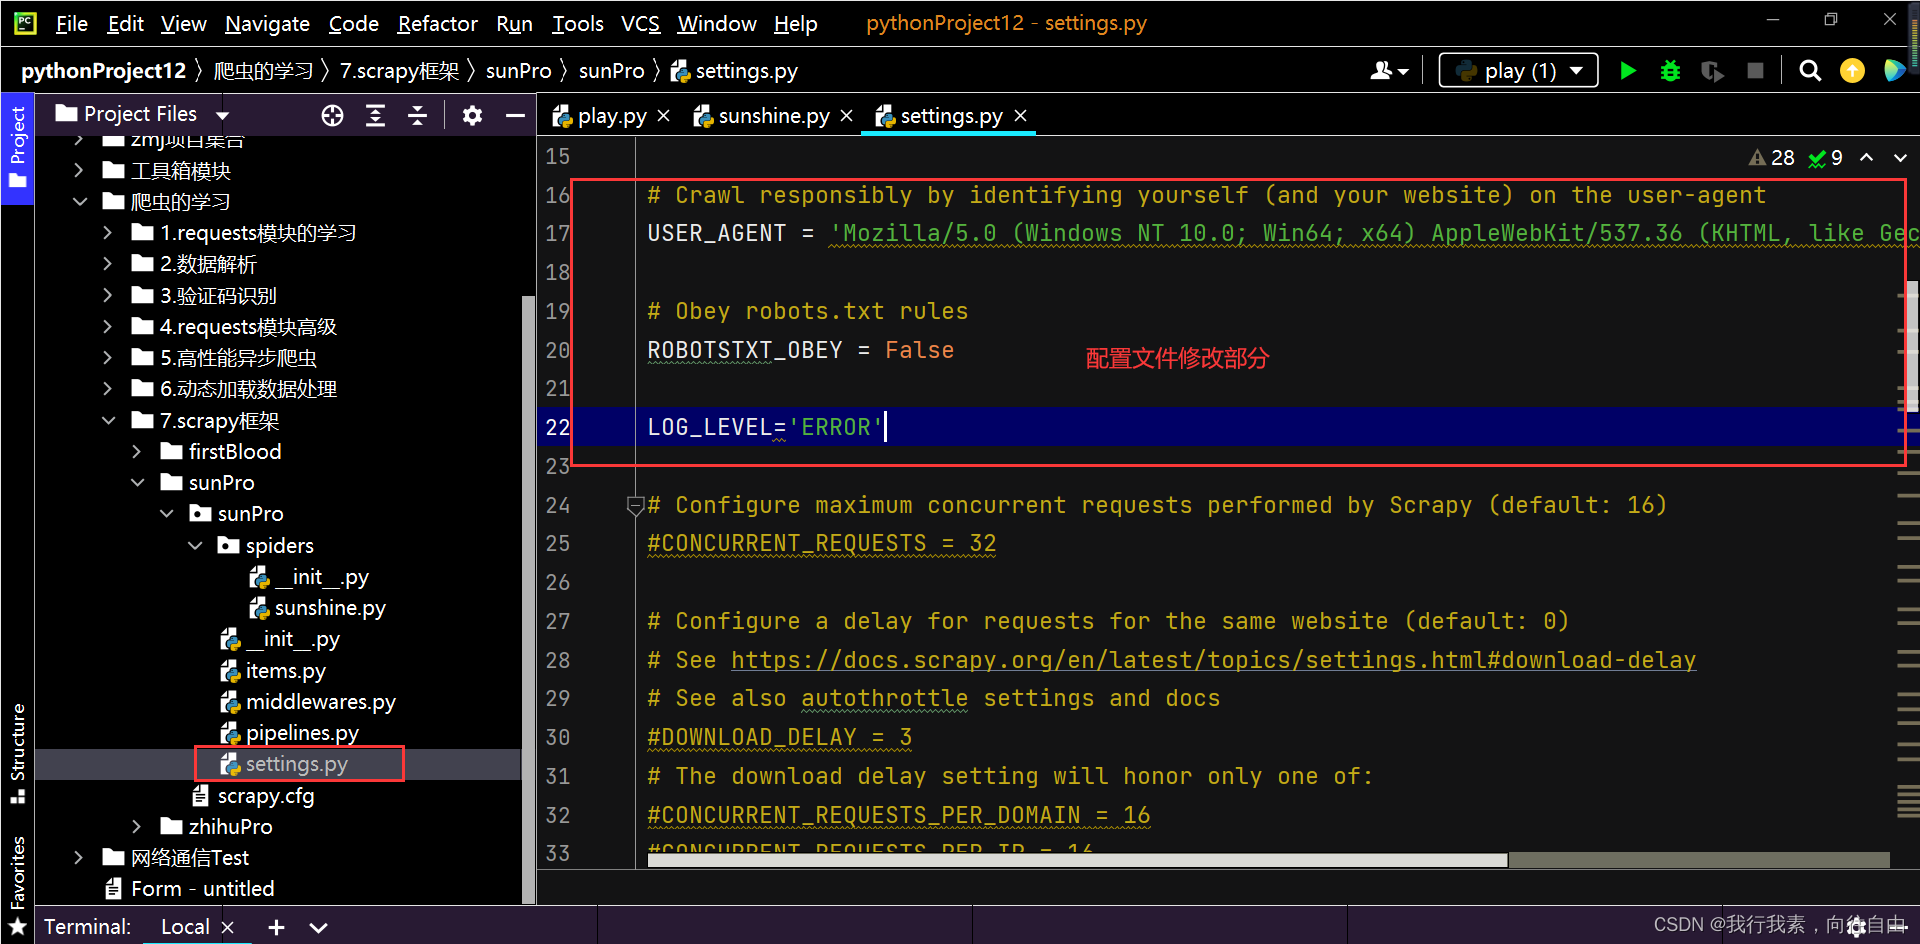
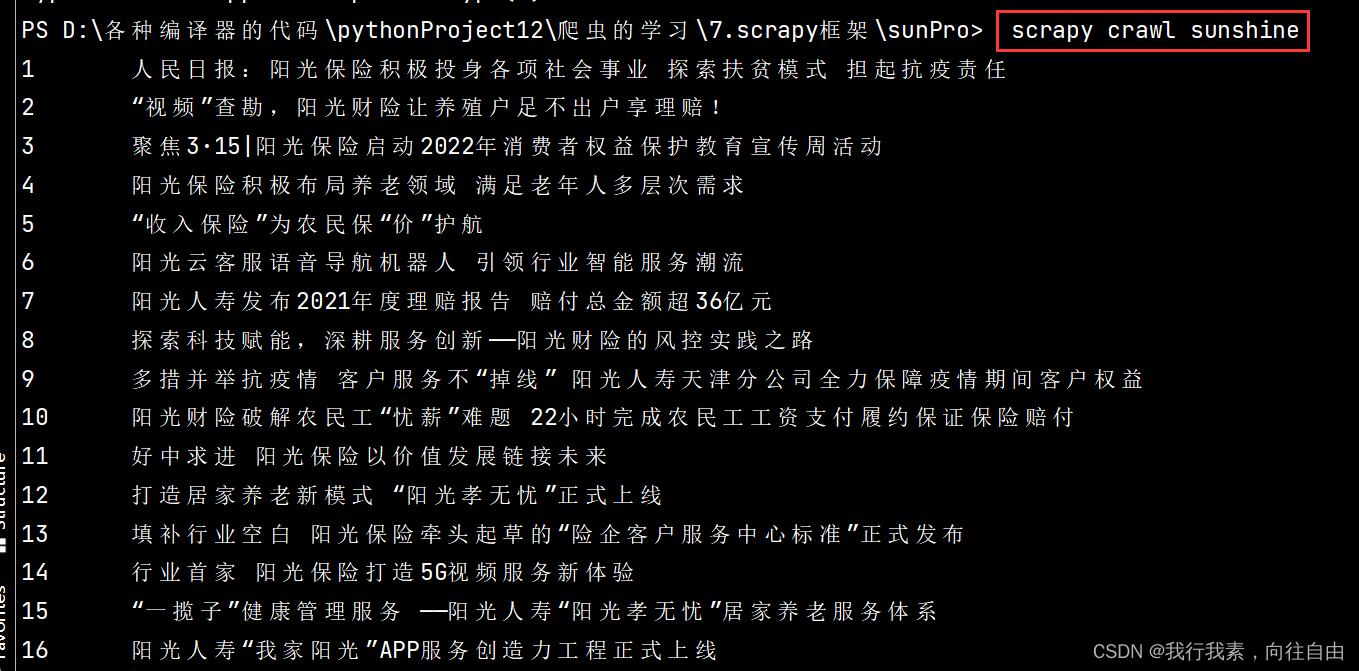
sunshine.py文件的内容如下:
import scrapy


class SunshineSpider(scrapy.Spider):
    idx=1
    name = 'sunshine'
    # allowed_domains = ['about.sinosig.com']
    start_urls = ['http://about.sinosig.com/common/news/html/2277.html']

    #http://about.sinosig.com/common/news/html/2277.html  【第一页】
    #http://about.sinosig.com/common/about_sinosig/html/2277_2.html
    #http://about.sinosig.com/common/about_sinosig/html/2277_5.html
    page_num=2#从第2页开始,但第一页url不一样
    url='http://about.sinosig.com/common/about_sinosig/html/2277_%d.html'#通用模板,不可变

    def parse(self, response):
        li_list=response.xpath('/html/body/div[2]/div[2]/div[5]/ul/li')
        for li in li_list:
            title_name=li.xpath('./a/text()')[0].extract()
            print(str(self.idx)+'\t'+title_name)
            self.idx+=1
            # 持久化存储
        if self.page_num<=20:#控制页数
            new_url=format(self.url%self.page_num)
            self.page_num+=1
            #手动请求   callback回调函数是是专门用作于数据解析
            yield scrapy.Request(url=new_url,callback=self.parse)#递归
运行结果:
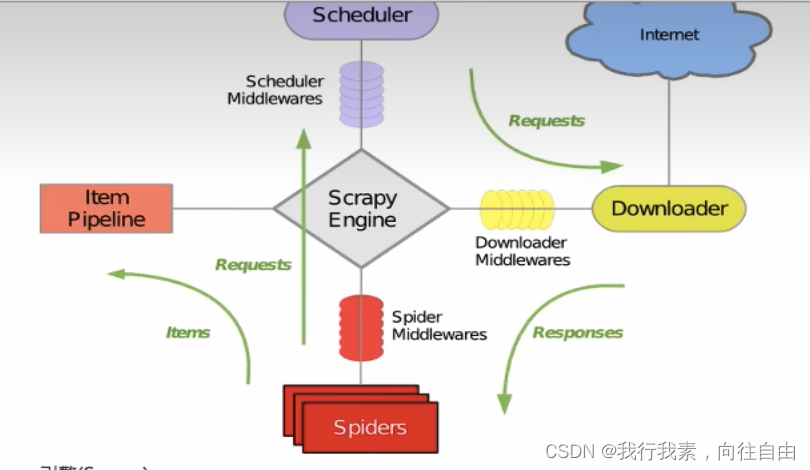
8.6 五大核心组件

引擎(Scrapy):
用来处理整个系统的数据流处理,触发事务(框架核心)。调度器(Scheduler):
用来接受引擎发过来的请求,压入队列中,并在引擎再次请求的时候返回。可以想像成一个URL(抓取网页的网址或者说是链接)的优先队列,由它来决定下一个要抓取的网址是什么,同时去除重复的网址。
下载器(Downloader):
用于下载网页内容,并将网页内容返回给蜘蛛(Scrapy下载器是建立在twisted这个高效的异步模型上的)。爬虫(Spiders):
爬虫是主要干活的,用于从特定的网页中提取自己需要的信息,即所谓的实体(Item)。用户也可以从中提取出链接让Scrapy继续抓取下一个页面。
项目管道(Pipeline):
负责处理爬虫从网页中抽取的实体,主要的功能是持久化实体、验证实体的有效性、清除不需要的信息。当页面被爬虫解析后,将被发送到项目管道,并经过几个特定的次序处理数据。
8.6 请求传参
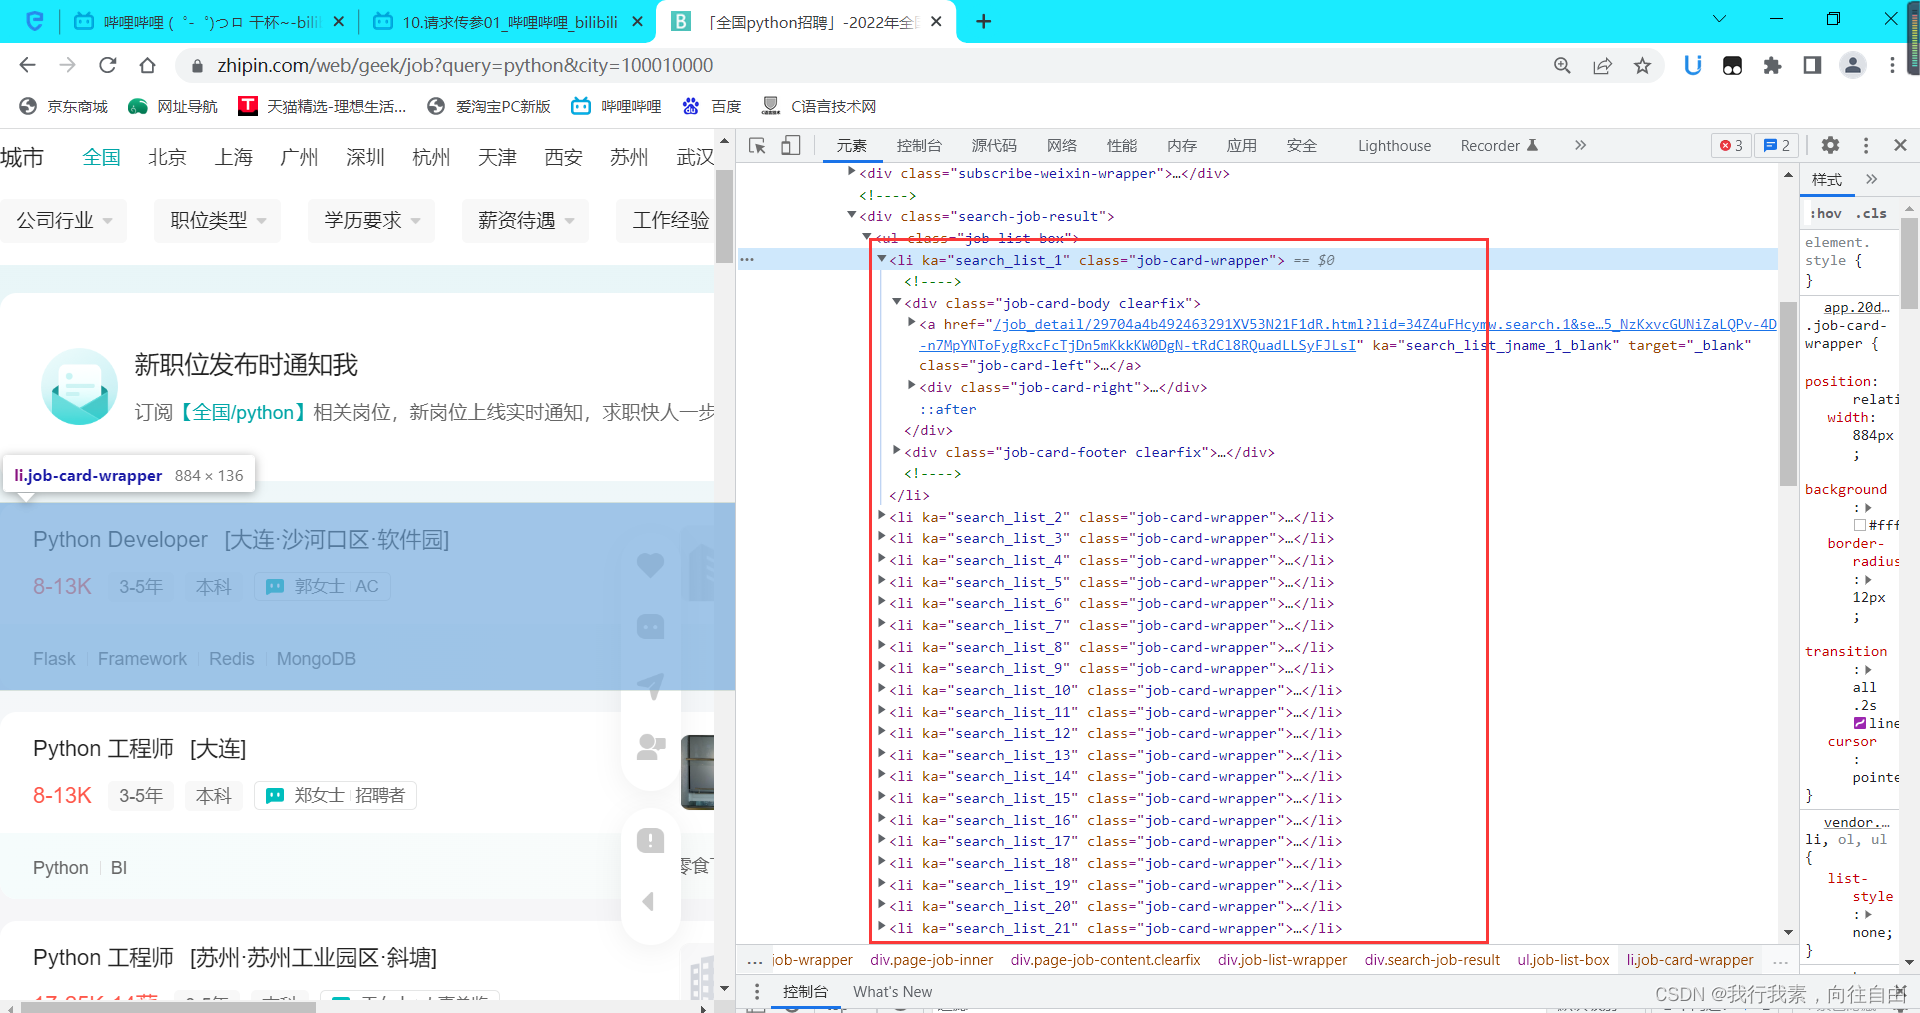
使用场景:如果爬取解析的数据不在同一张页面中。(深度爬取)
需求:爬取boss的岗位名称,岗位描述。https://www.zhipin.com/web/geek/job?query=python&city=100010000

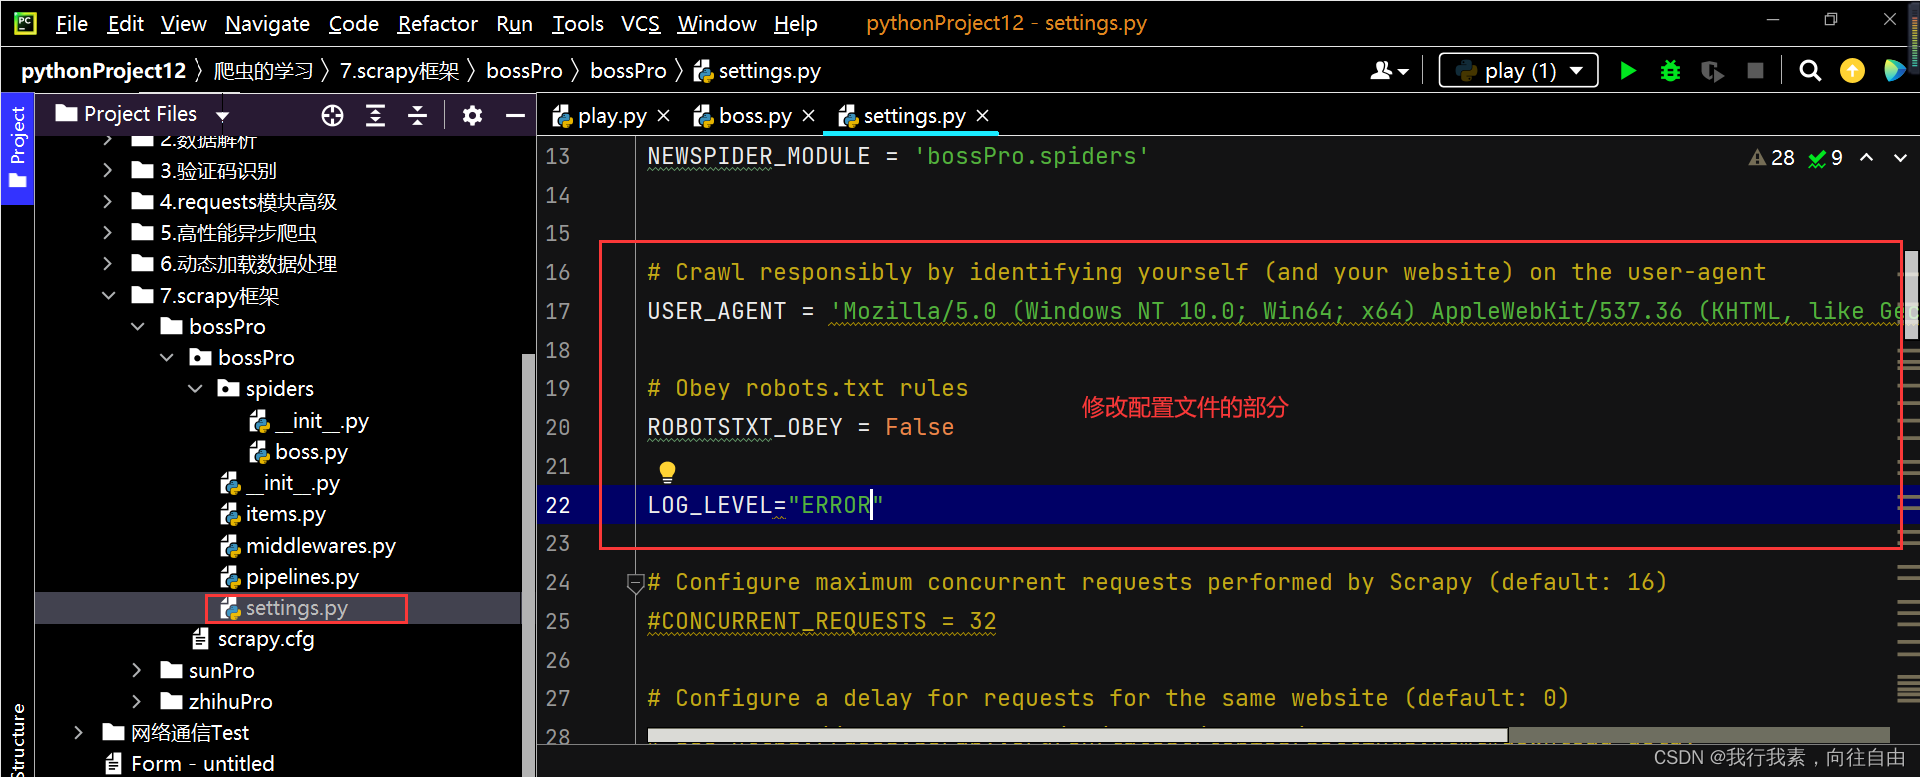
配置文件中的内容:


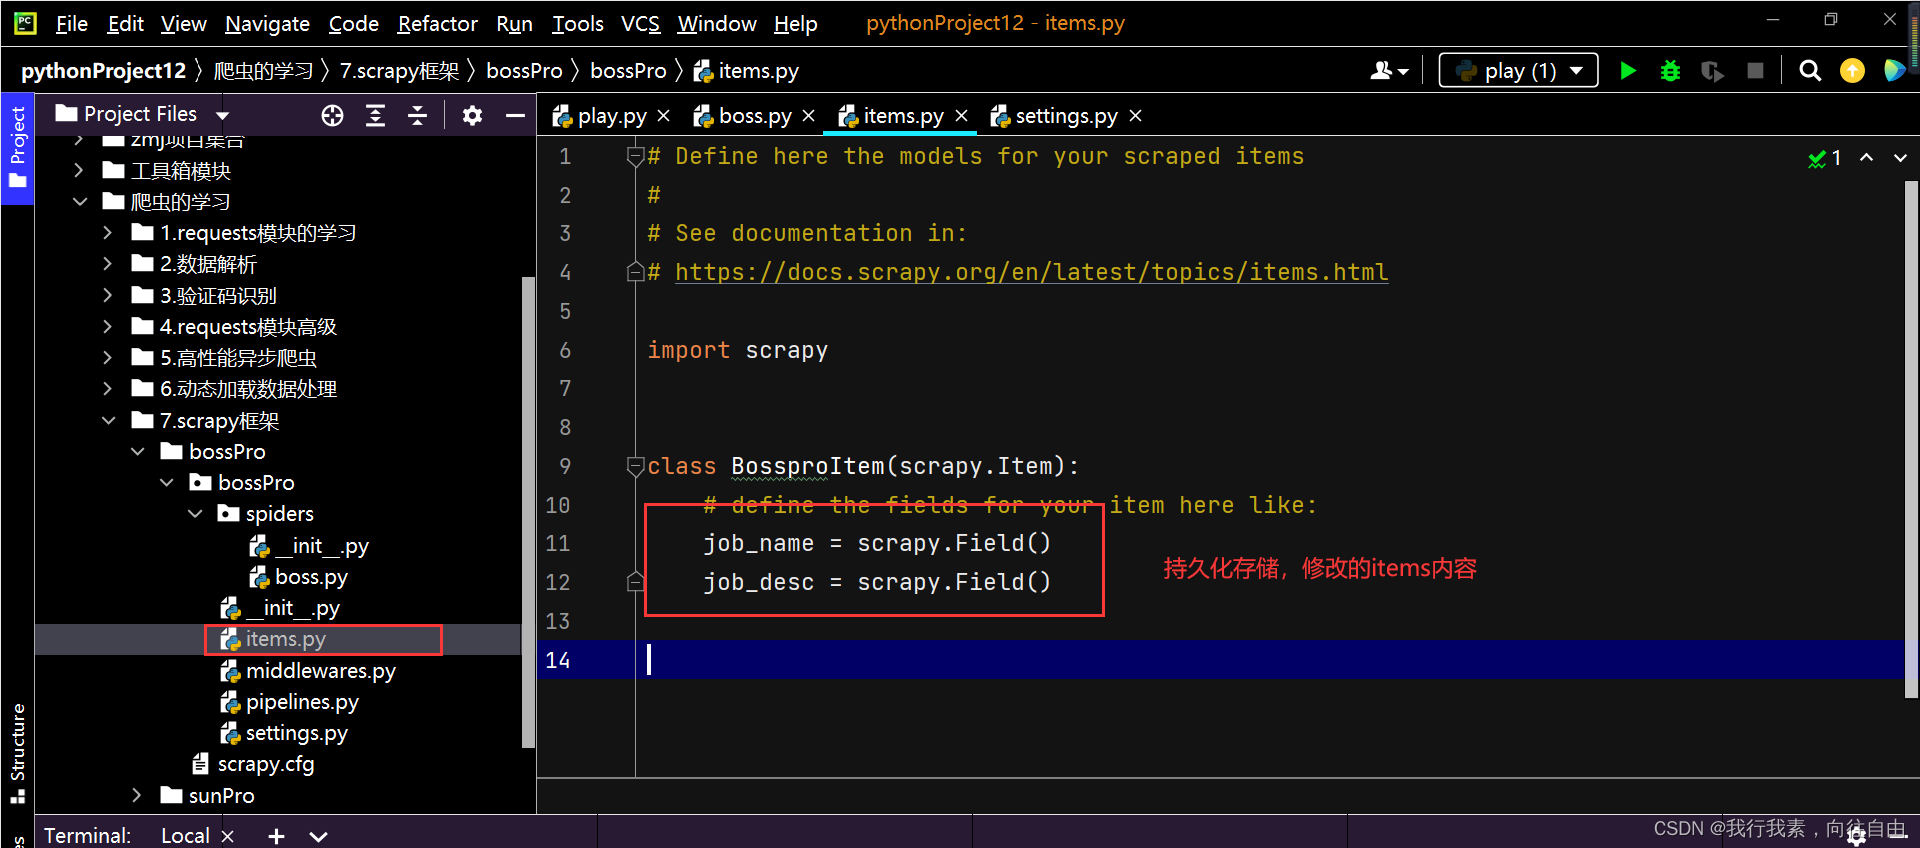
items.py文件中的内容:
piplines.py文件中的内容:
# Define your item pipelines here
#
# Don't forget to add your pipeline to the ITEM_PIPELINES setting
# See: https://docs.scrapy.org/en/latest/topics/item-pipeline.html


# useful for handling different item types with a single interface
from itemadapter import ItemAdapter


class BossproPipeline:
    fp = None
    def open_spider(self, spider):
        self.fp = open('./bossInfo.txt', 'w', encoding='utf-8')

    def close_spider(self):
        self.fp.close()

    def process_item(self, item, spider):
        job_name = item['job_name']
        job_desc = item['job_desc']
        self.fp.write(job_name + '\n\t' + job_desc + '\n\n')
        return item
配置文件boss.py中的内容:
import scrapy
from ..items import BossproItem

class BossSpider(scrapy.Spider):
    name = 'boss'
    allowed_domains = ['www.xx.com']
    start_urls = ['https://www.zhipin.com/web/geek/job?query=python&city=100010000']

    #https://www.zhipin.com/web/geek/job?query=python&city=100010000  第一页
    #https://www.zhipin.com/web/geek/job?query=python&city=100010000&page=2
    #https://www.zhipin.com/web/geek/job?query=python&city=100010000&page=5
    url='https://www.zhipin.com/web/geek/job?query=python&city=100010000&page=%d'#通用url模板
    page_num=2

    # 解析详情页中的职位描述
    #回调函数接收item
    def parse_detal(self, response):
        item=response.meta['item']
        job_desc=response.xpath('//*[@id="main"]/div[3]/div/div[2]/div[2]/div[2]/div//text()').extract()#因为是多行内容,所以拿到的是所有内容,所以是//text(),返回的是列表
        job_desc=''.join(job_desc)#转换成字符串
        item['job_desc']=job_desc
        print('职位描述:\t',job_desc)

    #解析首页的岗位名称
    def parse(self, response):
        li_list=response.xpath('//*[@id="wrap"]/div[2]/div[2]/div/div[1]/div[2]/ul/li')
        print(li_list)
        for li in li_list:
            item=BossproItem()
            job_name=li.xpath('./div[1]/a/div[1]/span[1]/text()')[0].extract()
            item['job_name'] = job_name
            detail_url='https://www.zhipin.com/'+li.xpath('./div[1]/a/@href').extract_first()#同上

            print('岗位名字:\t',job_name)
            #对详情页发请求获取详情页的页面源码是数据
            #手动请求的发送
            #请求传参:meta={},可以将meta字典传递给请求对应的回调函数
            yield scrapy.Request(url=detail_url,callback=self.parse_detal,meta={'item':item})#因为解析详情页代码不一样了,所以自定义个函数

        #进行分页操作
        if self.page_num<=20:#页码控制
            new_url=format(self.url%self.page_num)
            self.page_num+=1
            yield scrapy.Request(url=new_url,callback=self.parse)
8.7 scrapy图片爬取
图片数据爬取之ImagesPipeline
-基于scrapy爬取字符串类型的数据和爬取图片类型的数据区别?
-字符串:只需要基于xpath进行解析且提交管道进行持久化存储
-图片:xpath解析出图片src的属性值。单独的对图片地址发起请求获取图片二进制类型的数据。
-ImagesPipeline:只需要将img的src的属性值进行解析,提交到管道。管道就会对图片的src进行请求发送获取图片的二进制类型的数据,且还会帮我们进行持久化存储。
-需求:爬取站长素材中的高清图片。 https://sc.chinaz.com/tupian/
-使用流程:-1.数据解析(图片的地址)
-2.将存储图片地址的item提交到制定的管道类
-3.在管道文件中自定制一个基于ImagesPipeLine的一个管道类【重写三个方法】-get_media_requests():根据图片地址进行图片数据的请求
-file_path(): 指定图片存储的路径
-item_completed():返回下一个被执行的管道类-4.在配置文件中:
-指定图片存储的目录:IMAGES_STORE='./imgs_zmj'
-指定开启的管道:自定制的管道类,继承于ImagesPipeline
from scrapy.pipelines.images import ImagesPipeline
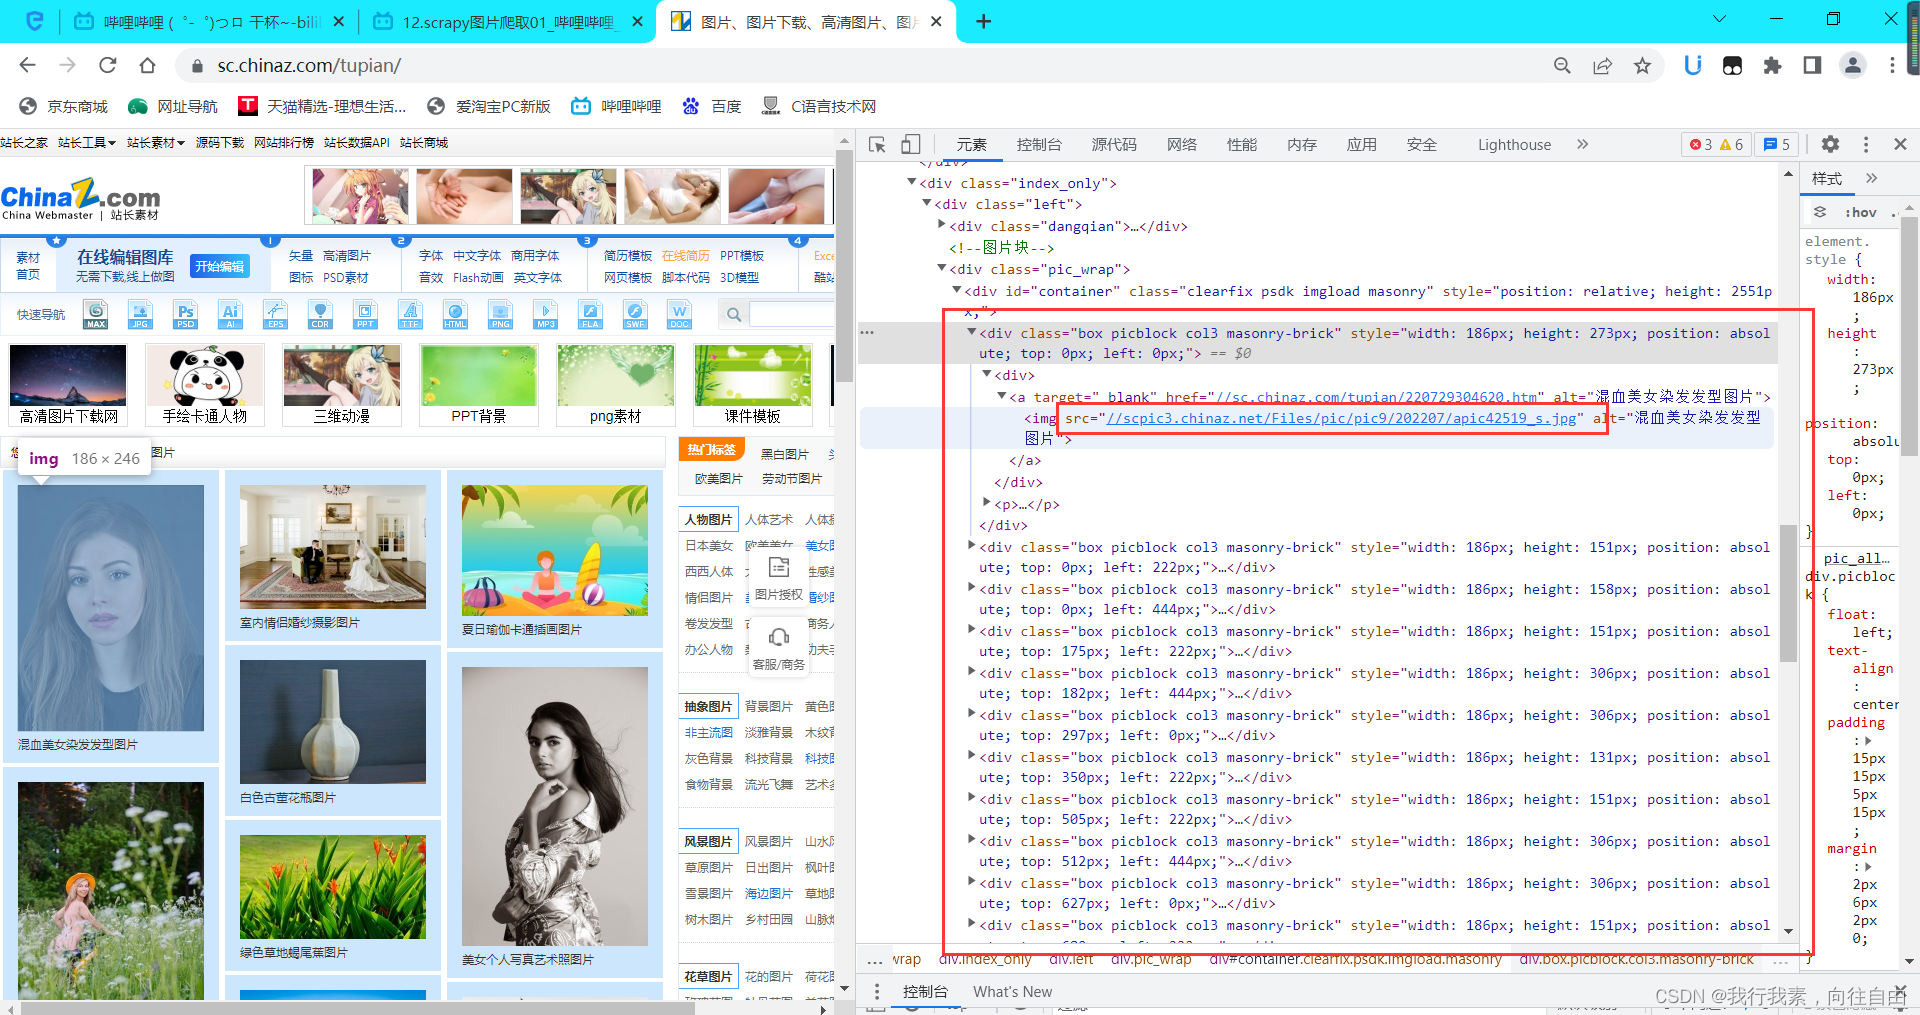

配置文件的修改:
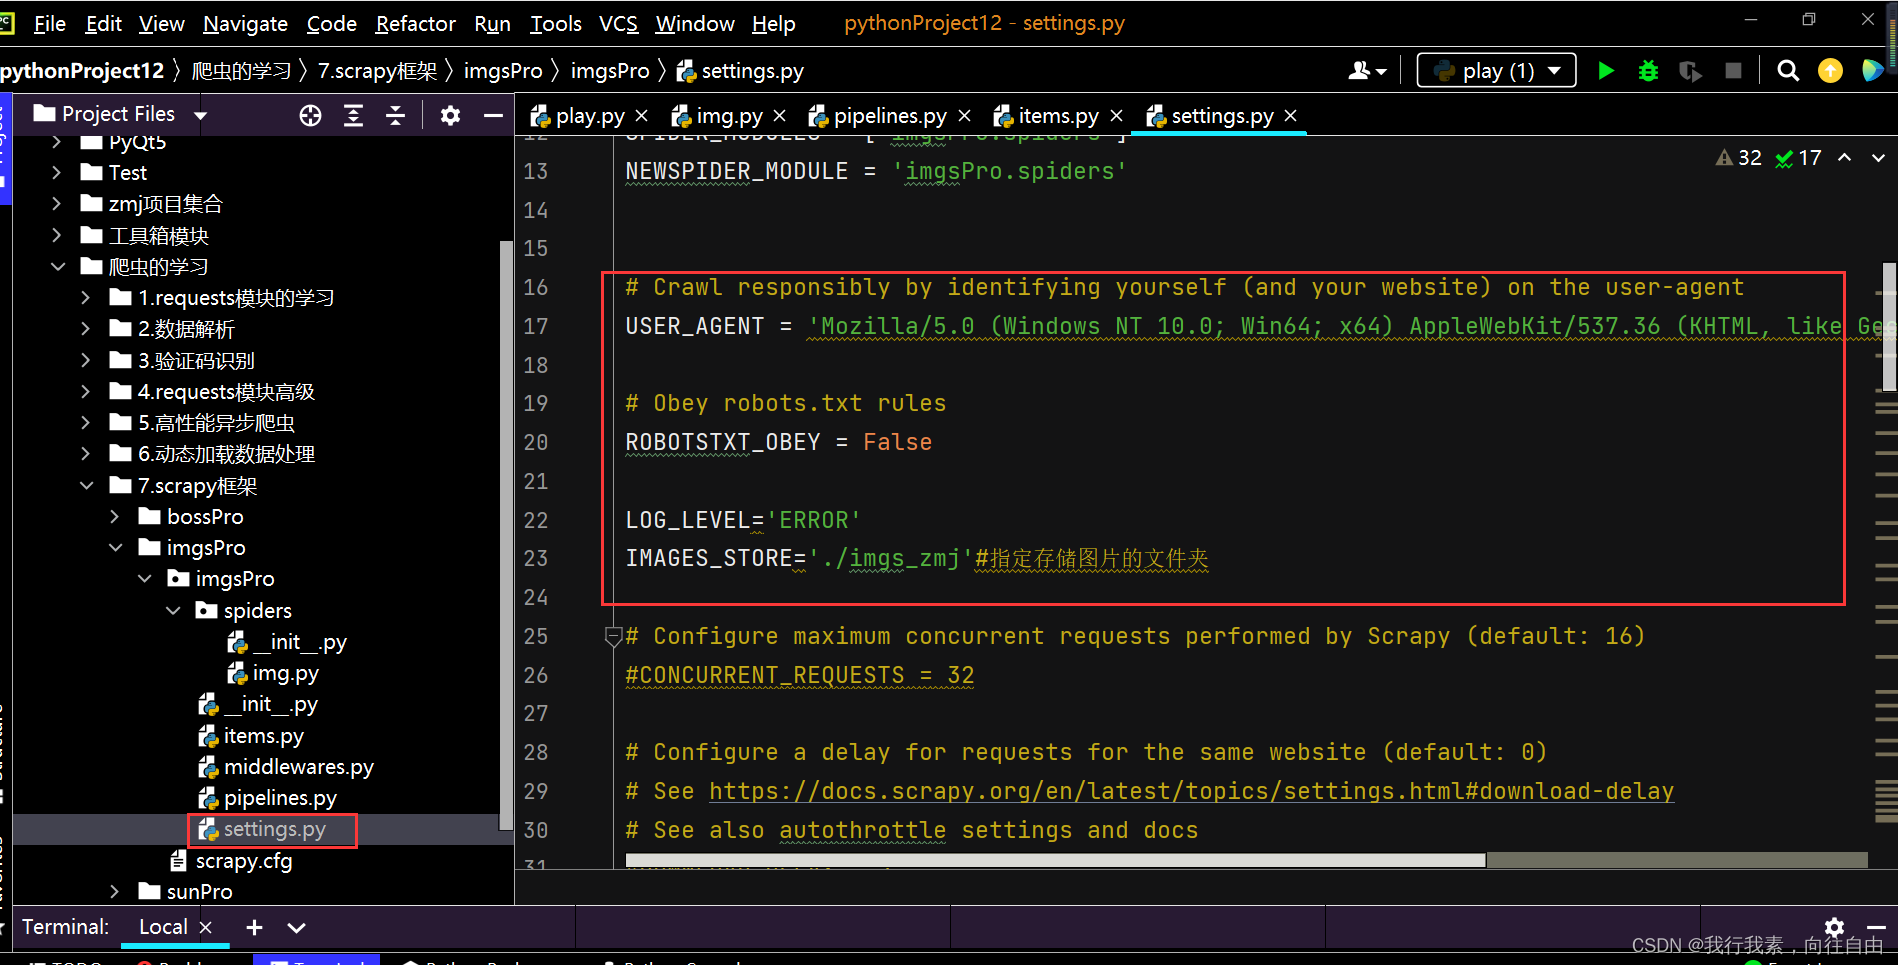

items.py文件的修改:
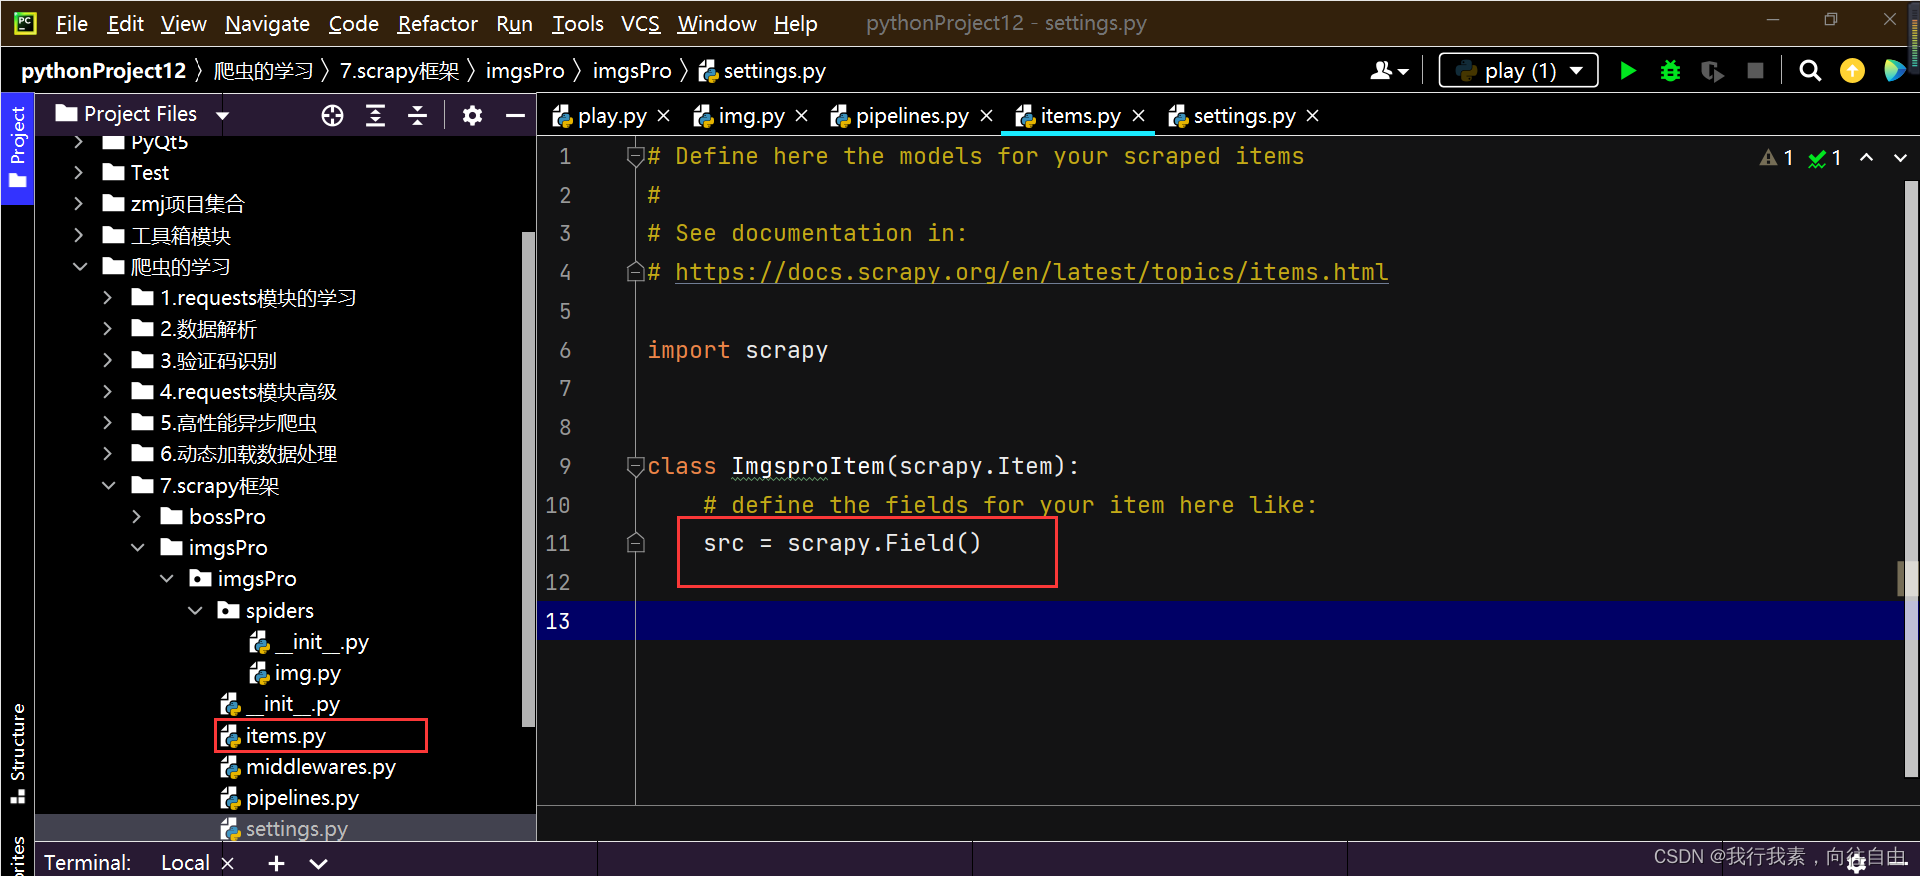
pipelines.py文件的修改:
# Define your item pipelines here
#
# Don't forget to add your pipeline to the ITEM_PIPELINES setting
# See: https://docs.scrapy.org/en/latest/topics/item-pipeline.html

# useful for handling different item types with a single interface
import scrapy
from itemadapter import ItemAdapter

# #这个管道类不能将src请求发送
# class ImgsproPipeline:
#     def process_item(self, item, spider):
#         return item

from scrapy.pipelines.images import ImagesPipeline
import scrapy
#自定义类
class imgsPileLine(ImagesPipeline):
    #这个函数就是可以根据图片地址进行图片数据的请求
    def get_media_requests(self, item, info):
        yield scrapy.Request(url=item['src'])#这里只需要指定url,callback不需要指定

    #该函数指定图片存储的路径
    def file_path(self, request, response=None, info=None, *, item=None):
        img_name=request.url.split('/')[-1]
        return img_name

    #
    def item_completed(self, results, item, info):
        return item#返回下一个被执行的管道类
img.py文件的内容:
import scrapy
from ..items import ImgsproItem

class ImgSpider(scrapy.Spider):
    name = 'img'
    # allowed_domains = ['www.xxx.com']
    start_urls = ['https://sc.chinaz.com/tupian/']

    def parse(self, response):
        div_list=response.xpath('//*[@id="container"]/div')
        i=1
        for div in div_list:
            src='https:'+div.xpath('./div/a/img/@src').extract_first()
            print(i,src)
            item=ImgsproItem()
            item['src']=src
            i+=1
            yield item#将item提交到管道类
运行结果:


8.8 中间件初始

中间件
-下载中间件
-位置:引擎和下载器之间。
-作用:批量拦截到整个工程中发起的所有的请求和响应。-拦截请求:
-UA伪装:写在process_request()函数中
-代理IP的设定:写在process_exception()函数中
-拦截响应:
-串改响应数据或者响应对象
8.8.1 使用中间件拦截请求
-拦截请求:
-UA伪装:写在process_request()函数中
-代理IP的设定:写在process_exception()函数中
终端命令:
配置文件的修改如下:
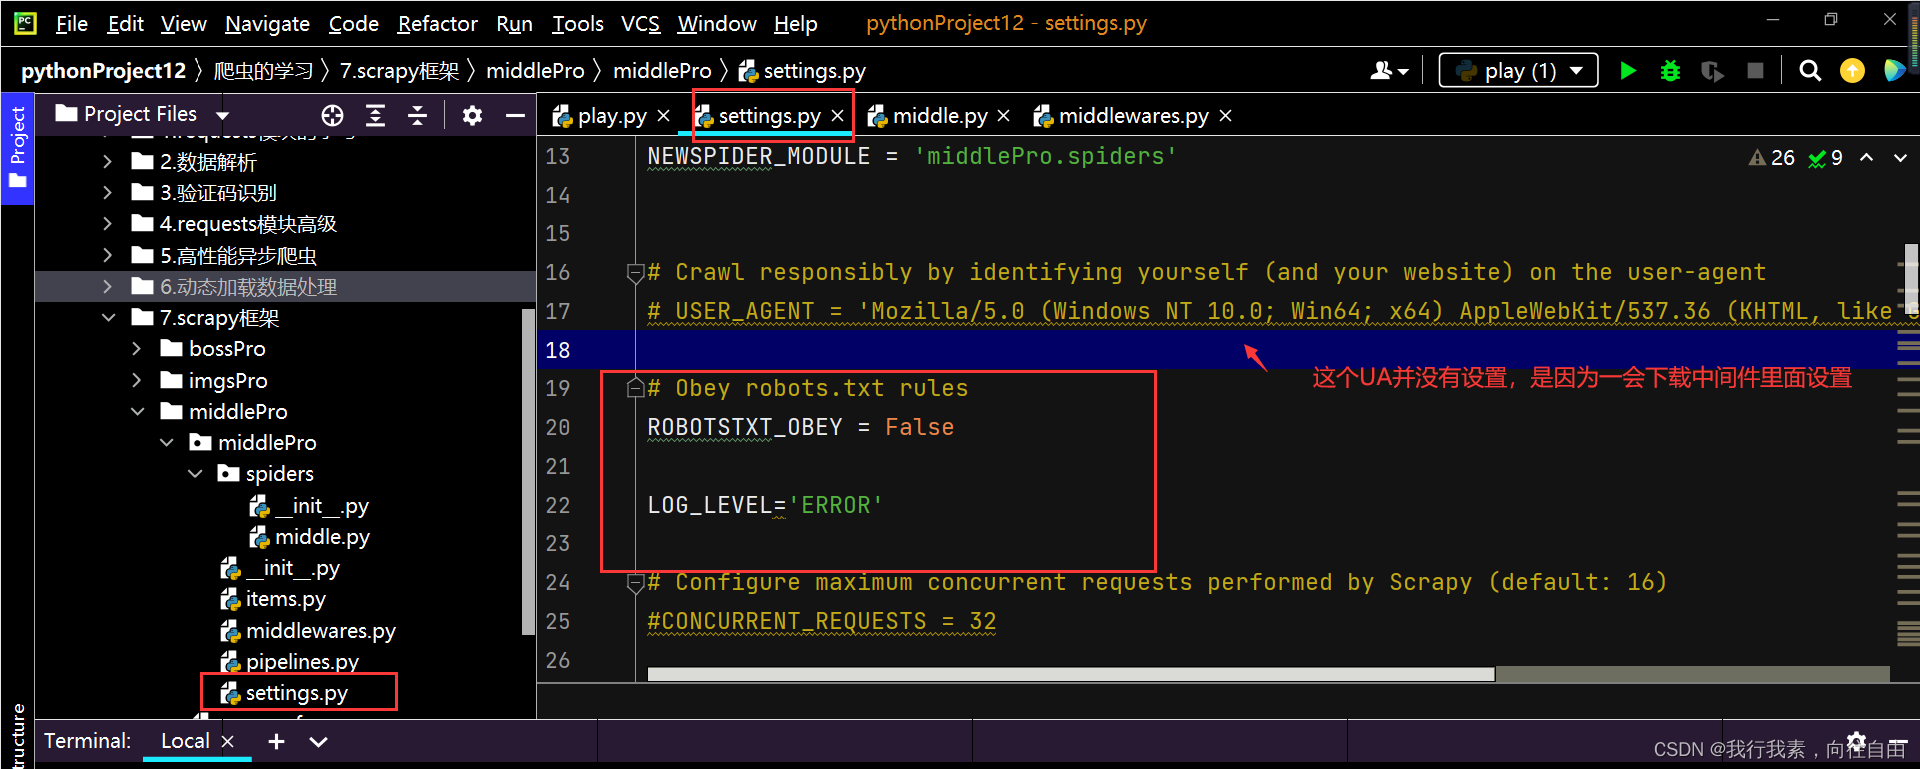

中间件middlewares.py文件内容如下:
from scrapy import signals
from itemadapter import is_item, ItemAdapter
import random

#下载中间件
class MiddleproDownloaderMiddleware:

    #UA列表
    user_agent_list=[
        'Mozilla/5.0 (Windows NT 6.1; WOW64) AppleWebKit/537.36 (KHTML, like Gecko) Chrome/39.0.2171.71 Safari/537.36',
        'Mozilla/5.0 (Windows NT 10.0; Win64; x64) AppleWebKit/537.36 (KHTML, like Gecko) Chrome/103.0.0.0 Safari/537.36',
        'Mozilla/5.0 (X11; Linux x86_64) AppleWebKit/537.11 (KHTML, like Gecko) Chrome/23.0.1271.64 Safari/537.11',
        'Mozilla/5.0 (Windows; U; Windows NT 6.1; en-US) AppleWebKit/534.16 (KHTML, like Gecko) Chrome/10.0.648.133 Safari/534.16',
        'Mozilla/5.0 (Windows NT 10.0; Win64; x64) AppleWebKit/537.36 (KHTML, like Gecko) Chrome/60.0.3100.0 Safari/537.36'
    ]
    #代理池
    PROXY_http=[
        '153.180.102.104:80',
        '195.208.112.214:35508'
    ]
    PROXY_https=[
        '120.83.49.90:9000',
        '95.189.112.214:35508'
    ]

    #拦截请求
    def process_request(self, request, spider):
        #UA伪装
        request.headers['User-Agent']=random.choice(self.user_agent_list)#随机选
        #为了验证代理的操作是否生效
        request.meta['proxy']='http://116.62.198.43:8000'
        return None

    #拦截所有响应
    def process_response(self, request, response, spider):

        return response

    #拦截发生异常的请求
    def process_exception(self, request, exception, spider):
        #代理IP的设定
        if request.url.split(':')[0]=='http':
            request.meta['proxy']='http://'+random.choice(self.PROXY_http)
        else:
            request.meta['proxy'] = 'https://' + random.choice(self.PROXY_https)
        return request#将修正后的请求对象进行重新的请求发送
爬虫文件middle,py内容如下:
import scrapy


class MiddleSpider(scrapy.Spider):
    #爬取百度
    name = 'middle'
    # allowed_domains = ['www.xxx.com']
    start_urls = ['http://www.baidu.com/s?word=ip&tn=59189121_26_oem_dg']

    def parse(self, response):
        page_text=response.text#如果是二进制数据,是body
        with open('ip.html','w',encoding='utf-8') as fp:
            fp.write(page_text)
8.8.2 使用中间件拦截响应
-拦截响应:
-串改响应数据或者响应对象
-需求:爬取网易新闻中的新闻数据(爬取标题和内容) https://news.163.com/-1.通过网易新闻的首页解析出四大板块对应的详情页的url(没有动态加载)
-2.每一个板块对应的新闻标题都是动态加载出来的(动态加载)
-3.通过解析出每一条新闻详情页的url获取详情页的页面源码,解析出新闻内容

终端命令创建项目:

配置文件的修改如下:


items.py文件内容如下:
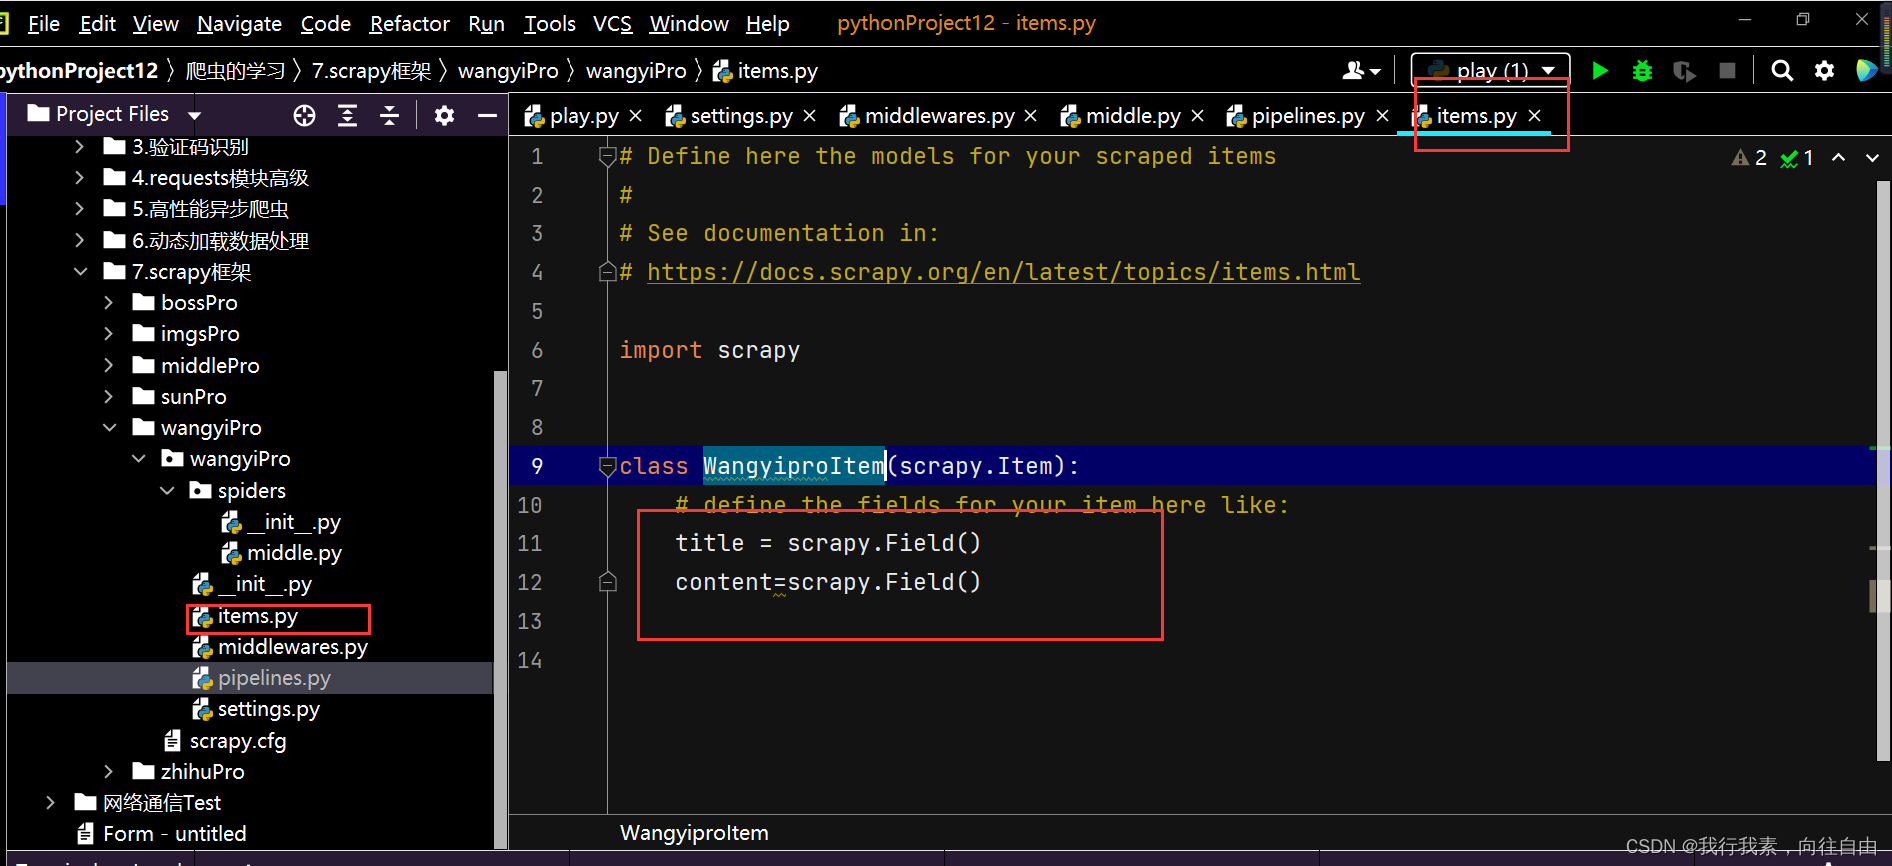
中间件middlewares.py文件如下:
# Define here the models for your spider middleware
#
# See documentation in:
# https://docs.scrapy.org/en/latest/topics/spider-middleware.html

from scrapy import signals

# useful for handling different item types with a single interface
from itemadapter import is_item, ItemAdapter


# class WangyiproSpiderMiddleware:
#     # Not all methods need to be defined. If a method is not defined,
#     # scrapy acts as if the spider middleware does not modify the
#     # passed objects.
#
#     @classmethod
#     def from_crawler(cls, crawler):
#         # This method is used by Scrapy to create your spiders.
#         s = cls()
#         crawler.signals.connect(s.spider_opened, signal=signals.spider_opened)
#         return s
#
#     def process_spider_input(self, response, spider):
#         # Called for each response that goes through the spider
#         # middleware and into the spider.
#
#         # Should return None or raise an exception.
#         return None
#
#     def process_spider_output(self, response, result, spider):
#         # Called with the results returned from the Spider, after
#         # it has processed the response.
#
#         # Must return an iterable of Request, or item objects.
#         for i in result:
#             yield i
#
#     def process_spider_exception(self, response, exception, spider):
#         # Called when a spider or process_spider_input() method
#         # (from other spider middleware) raises an exception.
#
#         # Should return either None or an iterable of Request or item objects.
#         pass
#
#     def process_start_requests(self, start_requests, spider):
#         # Called with the start requests of the spider, and works
#         # similarly to the process_spider_output() method, except
#         # that it doesn’t have a response associated.
#
#         # Must return only requests (not items).
#         for r in start_requests:
#             yield r
#
#     def spider_opened(self, spider):
#         spider.logger.info('Spider opened: %s' % spider.name)


from scrapy.http import HtmlResponse
from time import sleep

class WangyiproDownloaderMiddleware:
    # Not all methods need to be defined. If a method is not defined,
    # scrapy acts as if the downloader middleware does not modify the
    # passed objects.

    # @classmethod
    # def from_crawler(cls, crawler):
    #     # This method is used by Scrapy to create your spiders.
    #     s = cls()
    #     crawler.signals.connect(s.spider_opened, signal=signals.spider_opened)
    #     return s

    def process_request(self, request, spider):
        # Called for each request that goes through the downloader
        # middleware.

        # Must either:
        # - return None: continue processing this request
        # - or return a Response object
        # - or return a Request object
        # - or raise IgnoreRequest: process_exception() methods of
        #   installed downloader middleware will be called
        return None

    #通过该方法拦截四大板块的响应对象,进行篡改:将原来不满足需求的篡改成符合需求的
    def process_response(self, request, response, spider):
        bro=spider.bro#获取了在爬虫类中定义的浏览器对象

        #挑选出指定的响应对象,进行篡改
        #通过url指定request
        #通过request指定response
        if request.url in spider.models_urls:
            bro.get(request.url)#对四个板块对应的url进行请求发送
            sleep(2)
            page_text=bro.page_source#包含了动态加载的新闻数据

            # response#是四大板块对应的响应对象
            #针对定位到的这些response进行篡改
            #实例化一个新的响应对象(符合需求:包含动态加载出来的新闻数据),替代原来旧的响应对象
            #如何获取动态加载出来的新闻数据?  ==>   基于selenium便捷的获取动态加载数据

            new_response=HtmlResponse(url=request.url,body=page_text,encoding='utf-8',request=request)

            return new_response
        else:
            # response#其他板块对应的响应对象
            return response

    def process_exception(self, request, exception, spider):
        # Called when a download handler or a process_request()
        # (from other downloader middleware) raises an exception.

        # Must either:
        # - return None: continue processing this exception
        # - return a Response object: stops process_exception() chain
        # - return a Request object: stops process_exception() chain
        pass

    # def spider_opened(self, spider):
    #     spider.logger.info('Spider opened: %s' % spider.name)
middle.py文件内容:
import scrapy
from selenium import webdriver
from ..items import WangyiproItem

class MiddleSpider(scrapy.Spider):
    name = 'middle'
    allowed_domains = ['www.xxx.com']
    start_urls = ['https://news.163.com/']
    models_urls=[]#存储四个板块详情页的url

    #实例化一个浏览器对象
    def __init__(self):
        self.bro=webdriver.Chrome()

    #解析四大板块对应的详情页url
    def parse(self, response):
        li_list=response.xpath('//*[@id="index2016_wrap"]/div[2]/div[2]/div[2]/div[2]/div/ul/li')
        # print(li_list)
        alist=[1,2,4,5]
        for i in alist:
            modlel_url=li_list[i].xpath('./a/@href').extract_first()
            self.models_urls.append(modlel_url)
            # print(modlel_url)
        #一次对每一个板块对应的页面进行请求
        for url in self.models_urls:
            yield scrapy.Request(url=url,callback=self.parse_model)

    #解析每一个详情页对应的标题和新闻    ==> 动态加载出来的
    def parse_model(self,response):
        div_list=response.xpath('/html/body/div/div[3]/div[3]/div[1]/div[1]/div/ul/li/div/div')
        for div in div_list:
            title=div.xpath('./div/div[1]/h3/a/text()').extract_first()
            new_detail_url=div.xpath('./div/div[1]/h3/a/@href').extract_first()

            item=WangyiproItem()
            item['title']=title
            #对新闻详情页的url发起请求
            yield scrapy.Request(url=new_detail_url,callback=self.parse_detail,meta={'item':item})

    def parse_detail(self,response):
        content=''.join(response.xpath('//*[@id="content"]/div[2]/p//text()').extract())
        item=response.meta['item']
        item['content']=content
        yield item
8.9 CrawlSpider
CrawlSpider:类,是Spider的一个子类。
-全站数据爬取的方式:
-基于Spider:手动请求
-基于CrawlSpider:
-创建一个工程: scrapy startproject 工程名
-cd XXX:cd 工程名
-创建爬虫文件(CrawlSpider):-scrapy genspider -t crawl 爬虫文件名称 起始url
-链接提取器:
-作用:根据指定规则(allow='正则’)进行指定链接的提取。
-规则提取器:
-作用:将链接提取器提取到的链接进行指定规则(callback)的解析操作
follow=True:可以将链接提取器继续做用到连接提取器提取到的链接所对应的页面上,相当于递归。
网站地址:https://wz.sun0769.com/political/index/supervise
需求:爬取sun网站中的编号,新闻标题,新闻内容,标号
-分析:爬取的数据没有在同一张页面中。-1.可以使用链接提取器提取所有的页码链接
-2. 让链接提取器提取所有的新闻详情页的链接
终端命令:

8.10 分布式爬虫
概念:我们需要搭建一个分布式的机群,让其对一组资源进行分布联合爬取。
作用:提升爬取数据的效率。
如何实现分布式?
-安装一个scrapy-redis的组件:pip install scrapy-redis-原生的scarapy是不可以实现分布式爬虫,必须要让scrapy结合着scrapy-redis组件一起实现分布式爬虫。
-为什么原生的scrapy不可以实现分布式?
-调度器不可以被分布式机群共享-管道不可以被分布式机群共享
-scrapy-redis组件作用:
-可以给原生的scrapy框架提供可以被共享的管道和调度器。
实现流程:
-创建一个工程
-创建一个基于CrawlSpider的爬虫文件-修改当前的爬虫文件:
-导包:from scrapy_redis.spiders import RedisCrawlSpider-将allowed_domains和start_urls进行注释
-添加一个新属性:redis_key = 'sun’可以被共享的调度器队列的名称
-编写数据解析相关的操作-将当前爬虫类的父类修改成RedisCrawlSpider
-修改配置文件settings.py:
-指定使用可以被共享的管道:
ITEM_PIPELINES={ 'scrapy_redis.pipelines.RedisPipeline':400}
-指定调度器:
DUPEFILTER_CLASS = "scrapy_redis.dupefilter.RFPDupeFilter"
SCHEDULER = "scrapy_redis.scheduler.Scheduler"
SCHEDULER_PERSIST=True-指定redis服务器:
REDIS_HOST = '127.0.0.1'#最好写成‘redis服务的ip地址’(需要修改)
REDIS_PORT = 6379
-redis相关操作配置:-配置redis的配置文件:
-Linux或者mac:redis.conf
-WIndows:redis.windows.conf
-打开配置文件:
-1.将bind 127.0.0.1 进行注释或删除
-2.关闭保护模式:protected-mode yes 改为 no-结合着配置文件开启redis服务
-redis-server配置文件-启动客户端:
-redis-cli
-执行工程:
-scrapy runspider XXX.py
-向调度器的队列中放入一个起始的url:
-调度器的队列在redis的客户端中
-lpush xxx www.xxx.com-爬取到的数据存储在了redis的proName: ilems这个数据结构中
终端命令:

配置文件的修改:

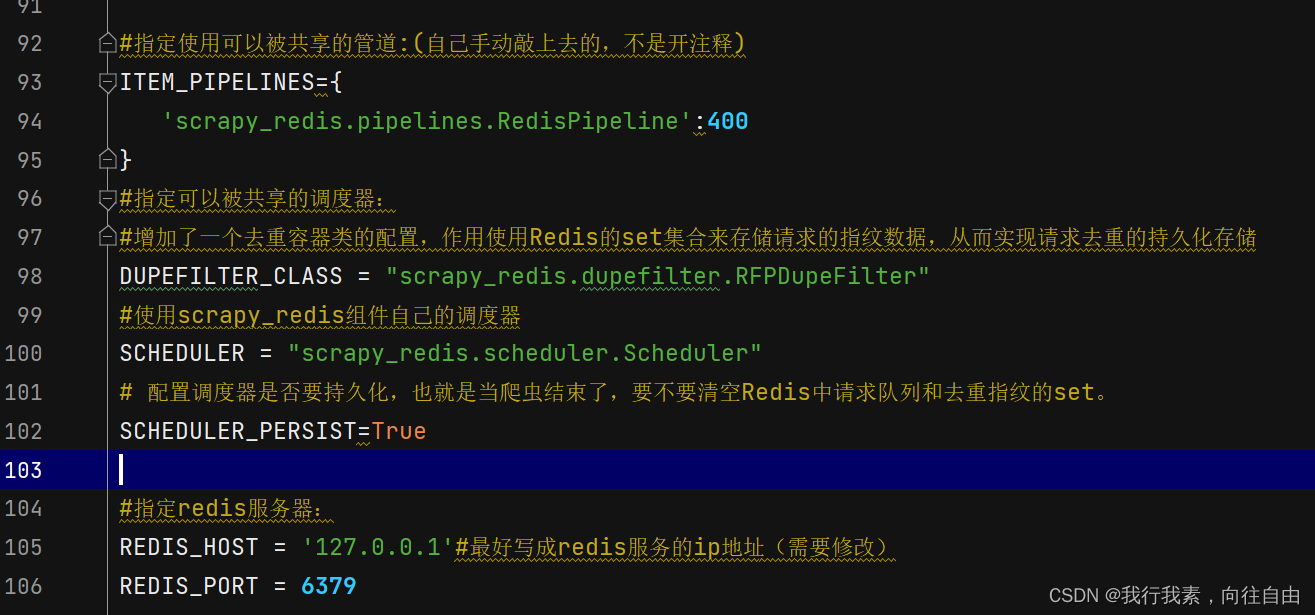
items.py文件中添加属性:
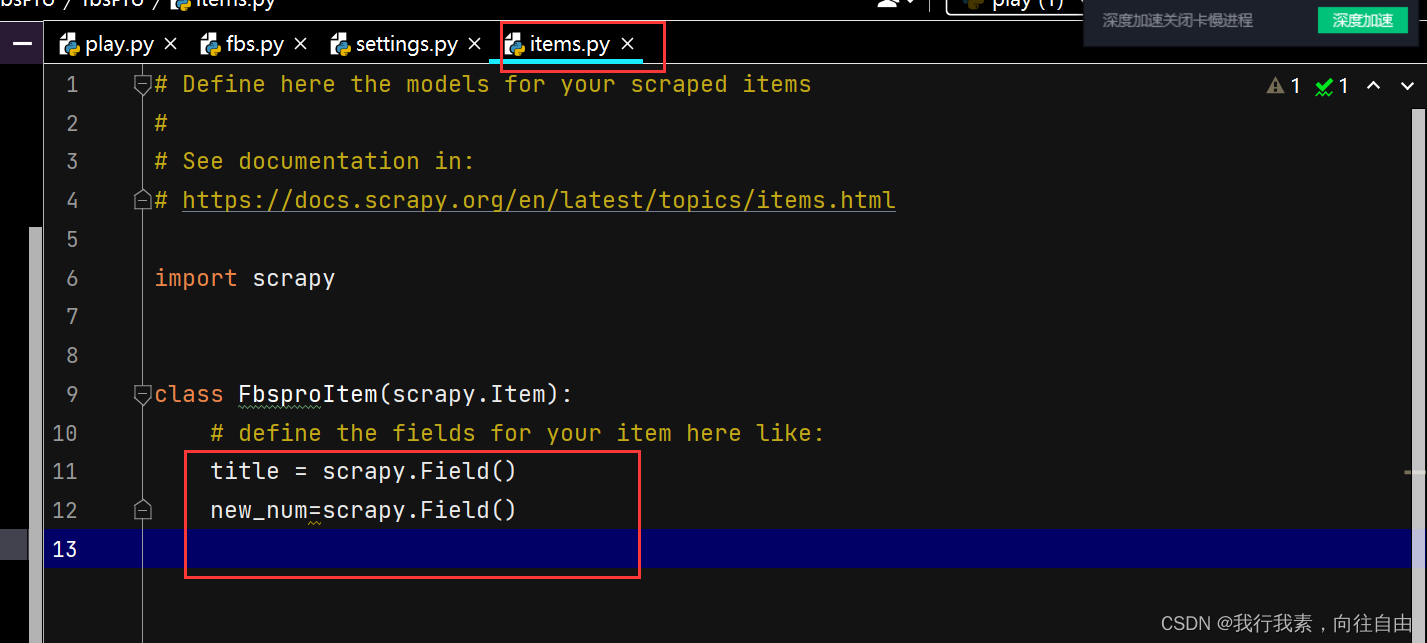
fbs.py文件中的内容:
import scrapy
from scrapy.linkextractors import LinkExtractor
from scrapy.spiders import CrawlSpider, Rule
from scrapy_redis.spiders import RedisCrawlSpider
from ..items import FbsproItem

class FbsSpider(RedisCrawlSpider):
    name = 'fbs'
    # allowed_domains = ['www.xxx.com']
    # start_urls = ['http://www.xxx.com/']
    redis_key='sun'

    rules = (
        Rule(LinkExtractor(allow=r'type=4&page=\d+'), callback='parse_item', follow=True),
    )

    def parse_item(self, response):
        tr_list=response.xpath('//*[@id="morelist"]/div/table[2]//tr/td/table//tr')
        for tr in tr_list:
            new_num=tr.xpath('./td[1]/text()').extract_first()#编号
            new_title=tr.xpath('./td[2]/a[2]/@title').extract_first()#标题
            item=FbsproItem()
            item['new_num']=new_num
            item['title']=new_title

            yield item#
9.增量式爬虫
概念:监测网站数据更新的情况,只会爬取网站最新更新出来的数掘。
分析:-1.指定一个起始url
-2.基于CrawlSpider获取其他页码链接-3.基于Rule将其他页码链接进行请求
-4.从每一个页码对应的页面源码中解析出每一个电影详情页的URL-5.【核心】检测电影详情页的url之前有没有请求过
-将爬取过的电影详情页的url存储
-存储到redis的set数据结构-6.对详情页的ur发起请求,然后解析出电影的名称和简介
-7.进行持久化存储
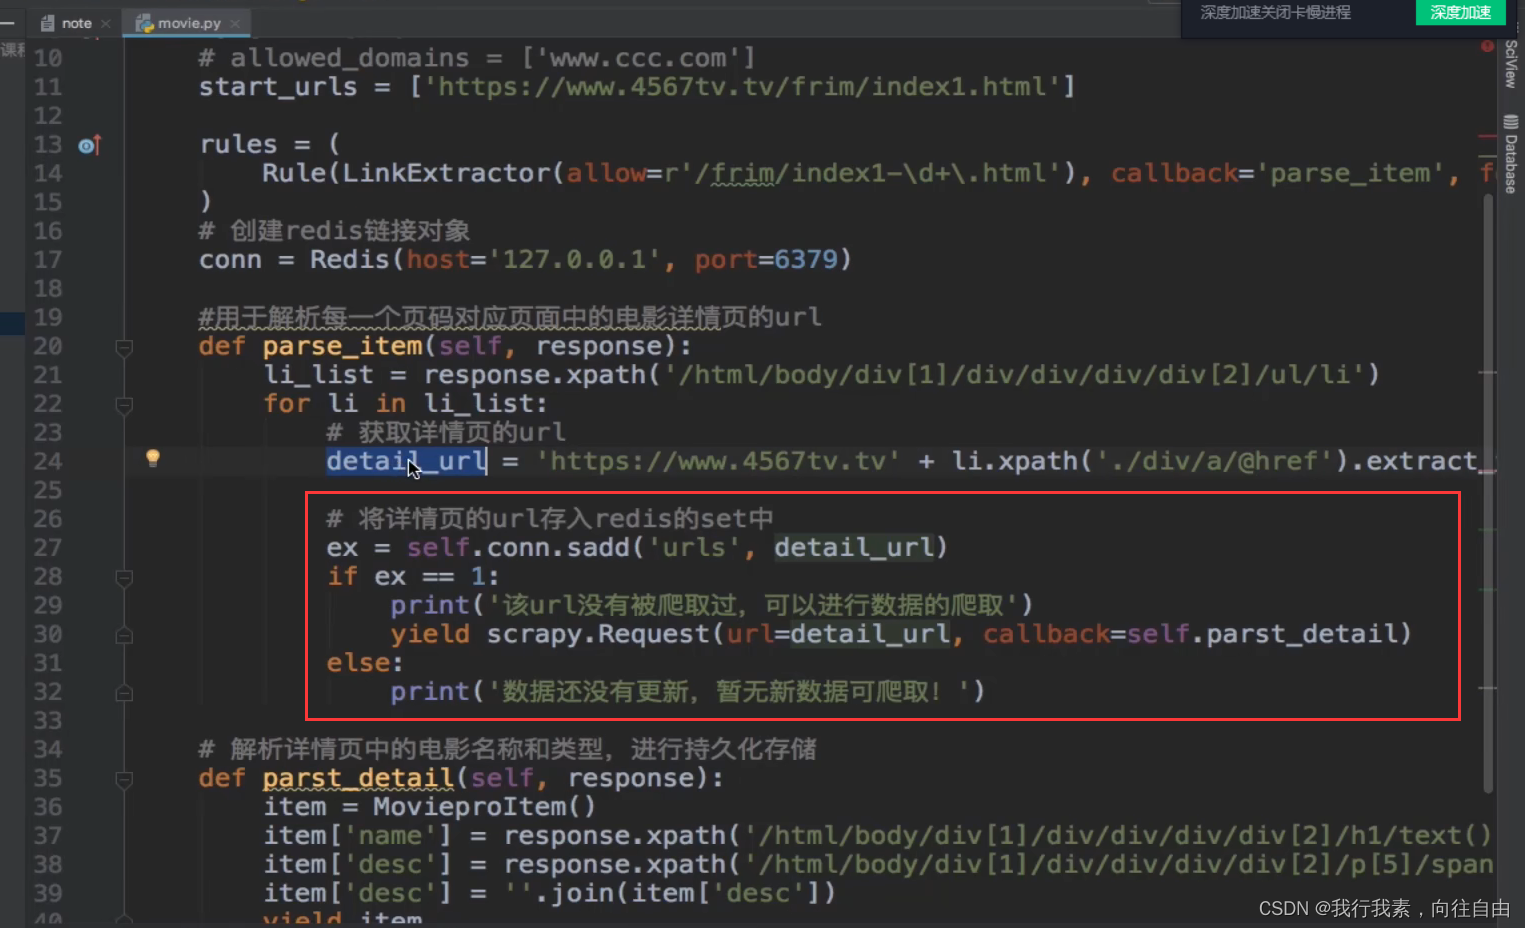
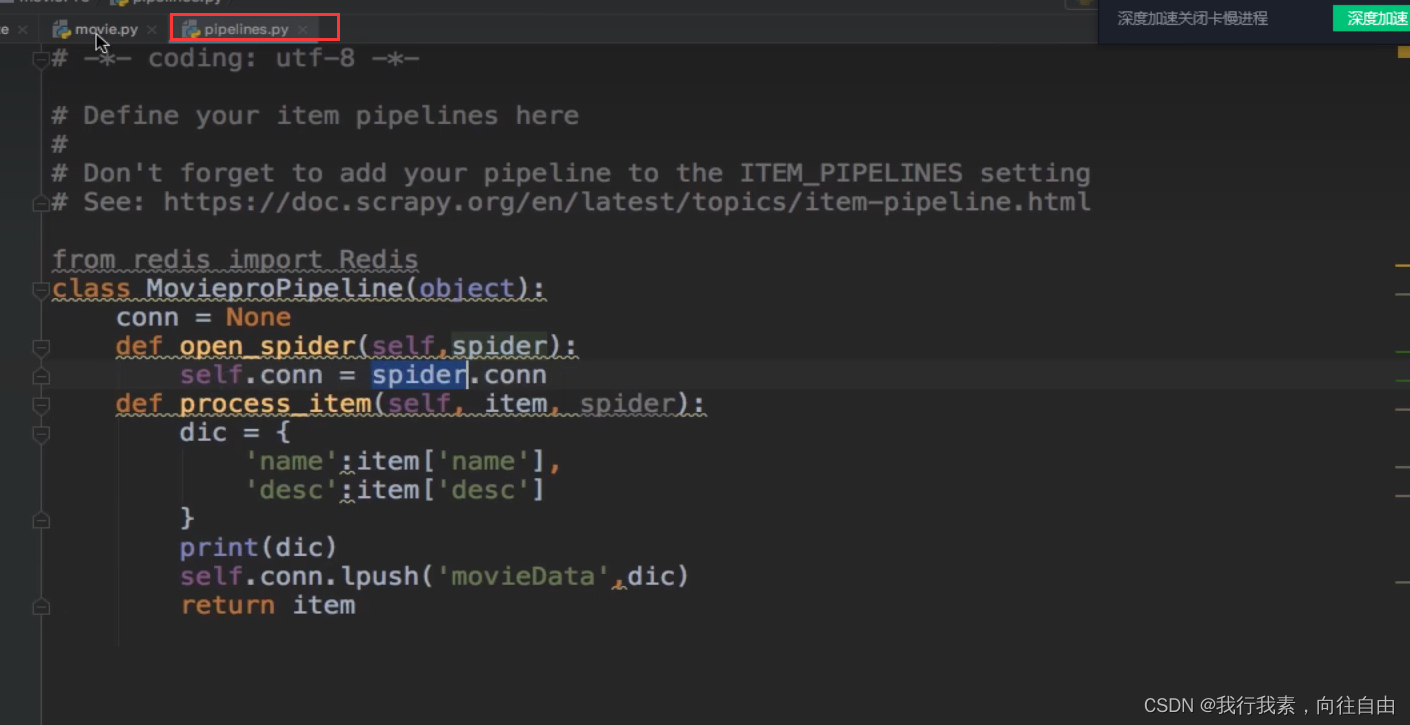


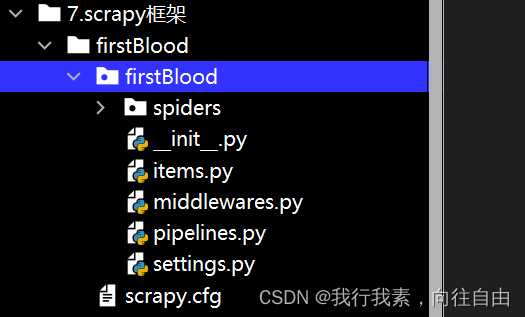
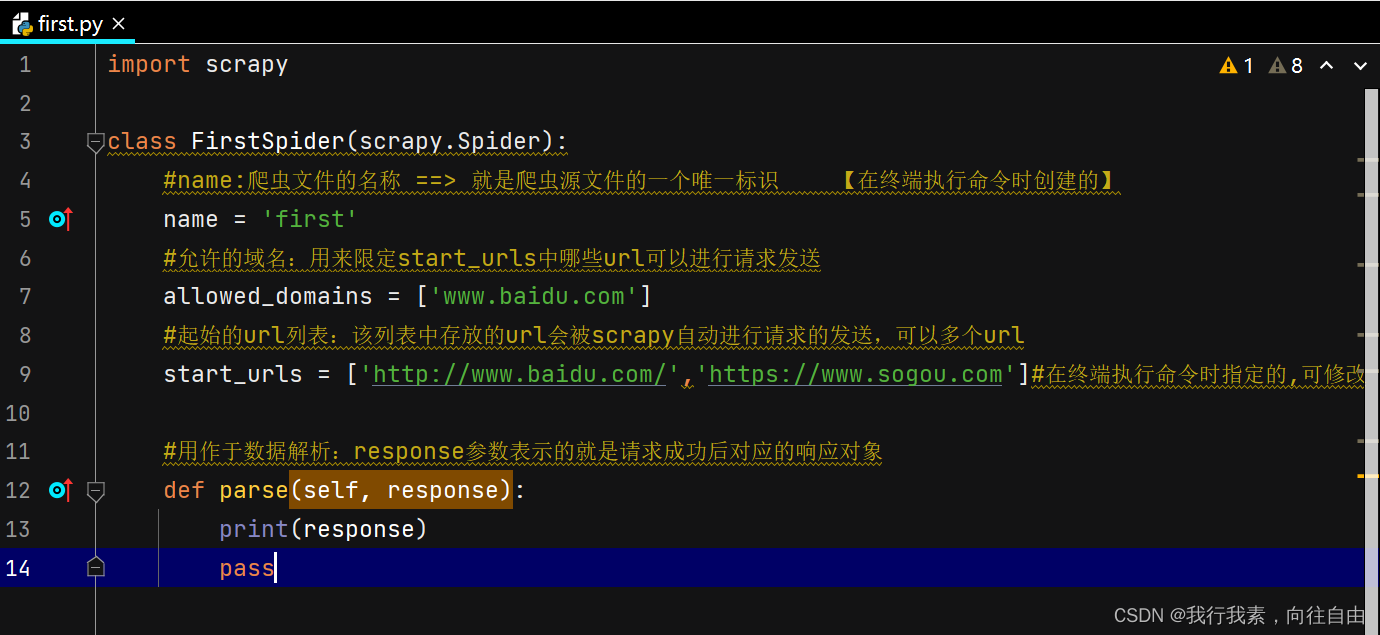

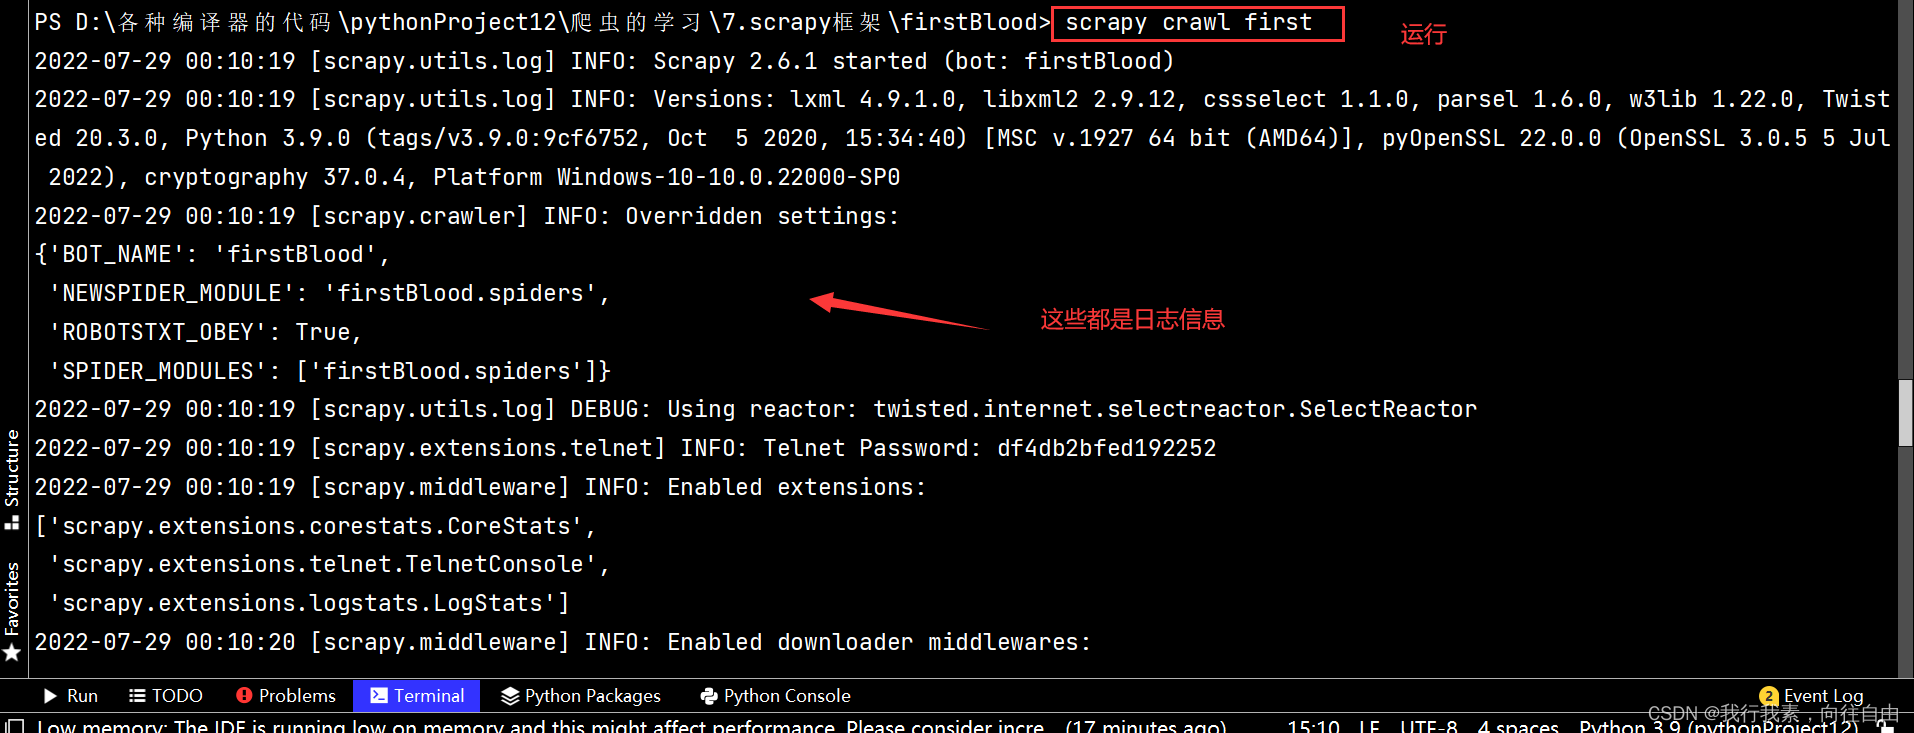

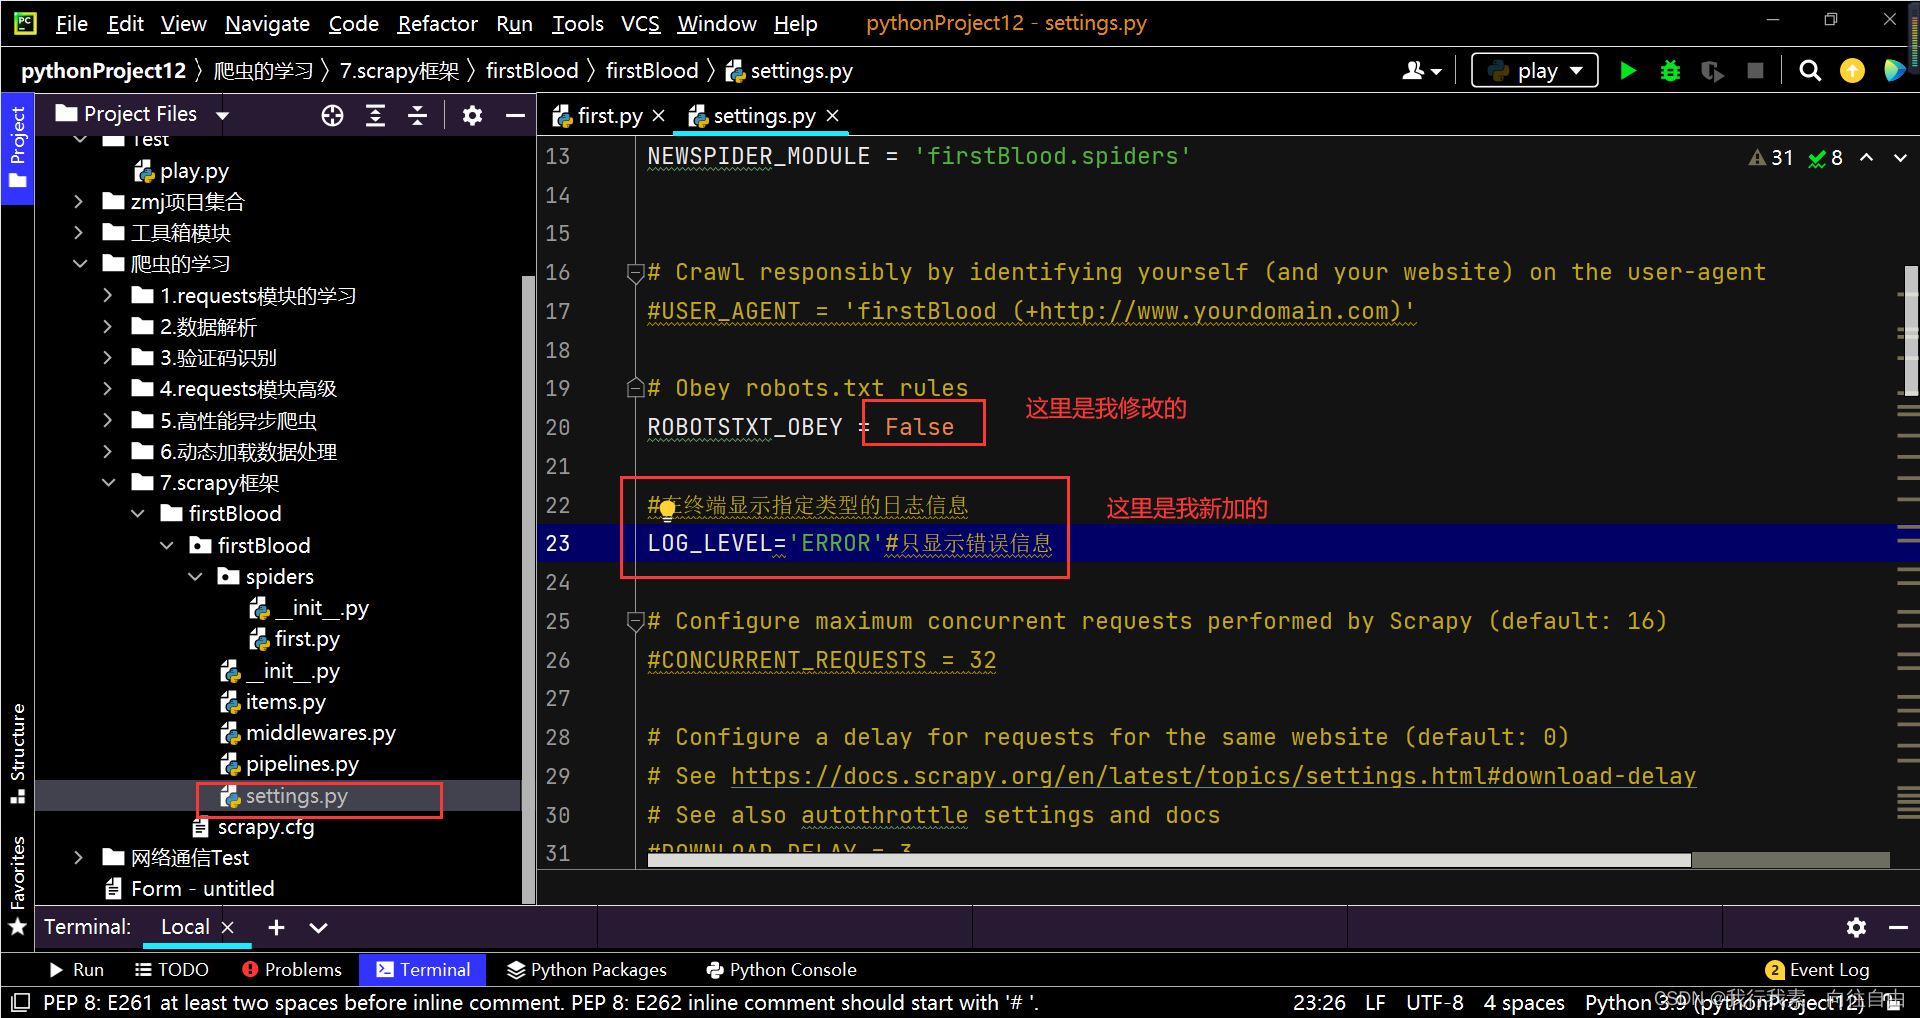

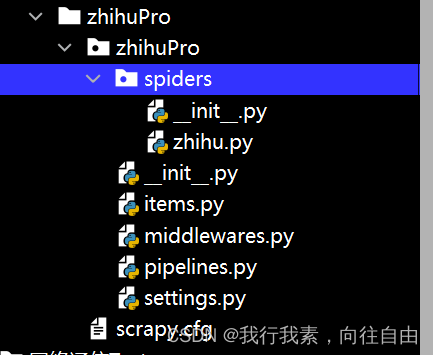
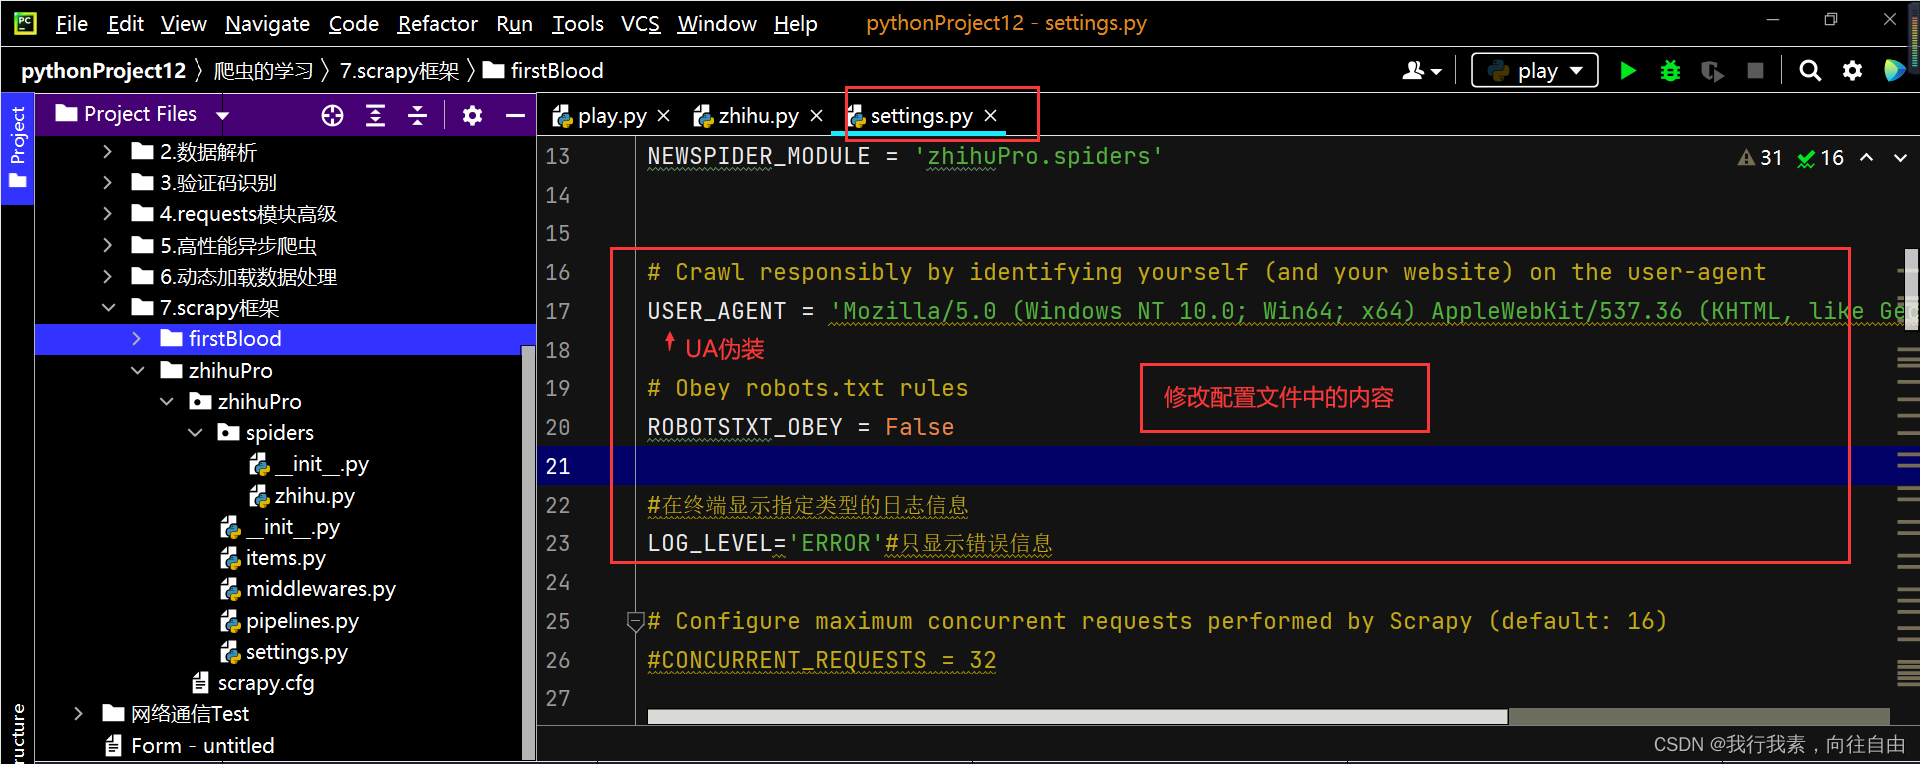

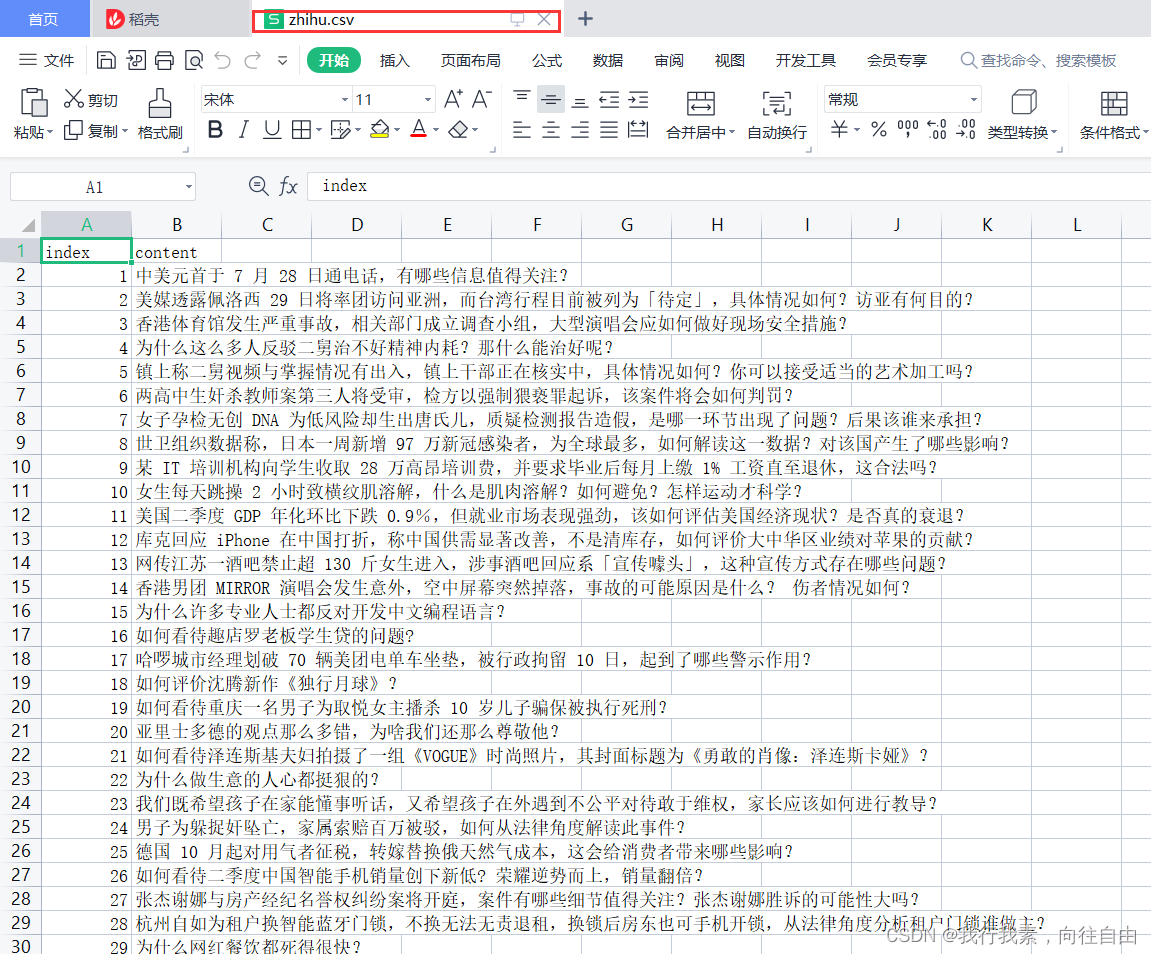
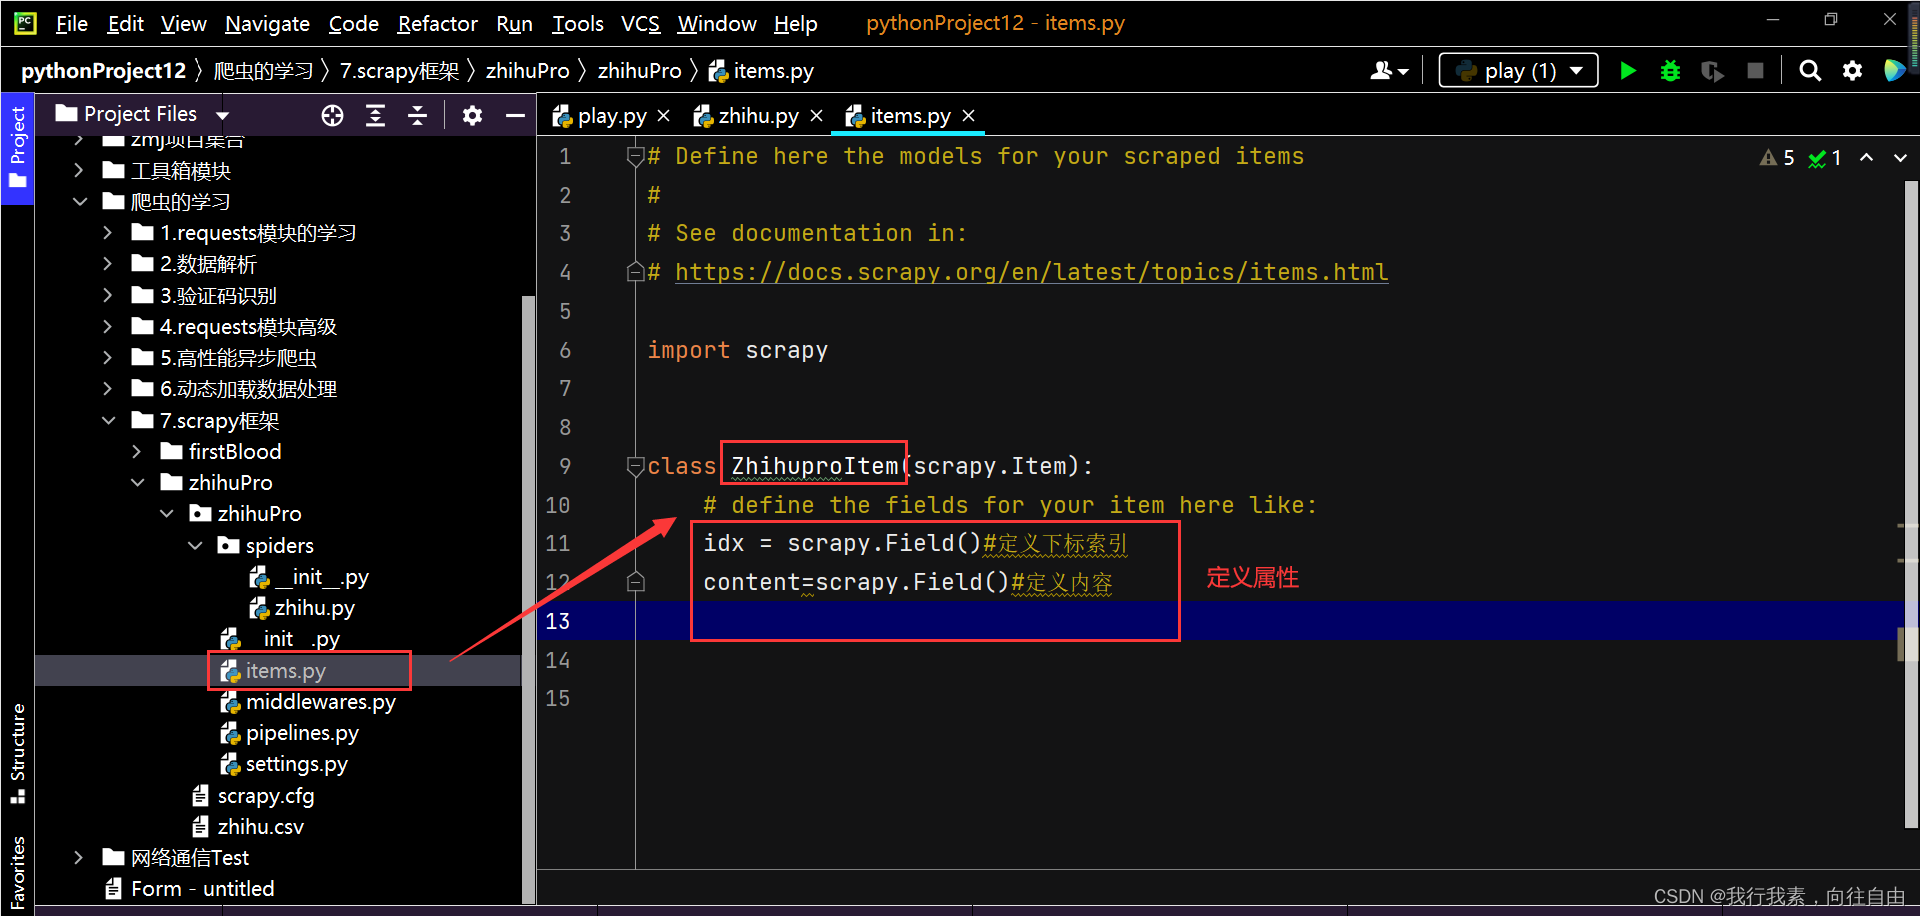
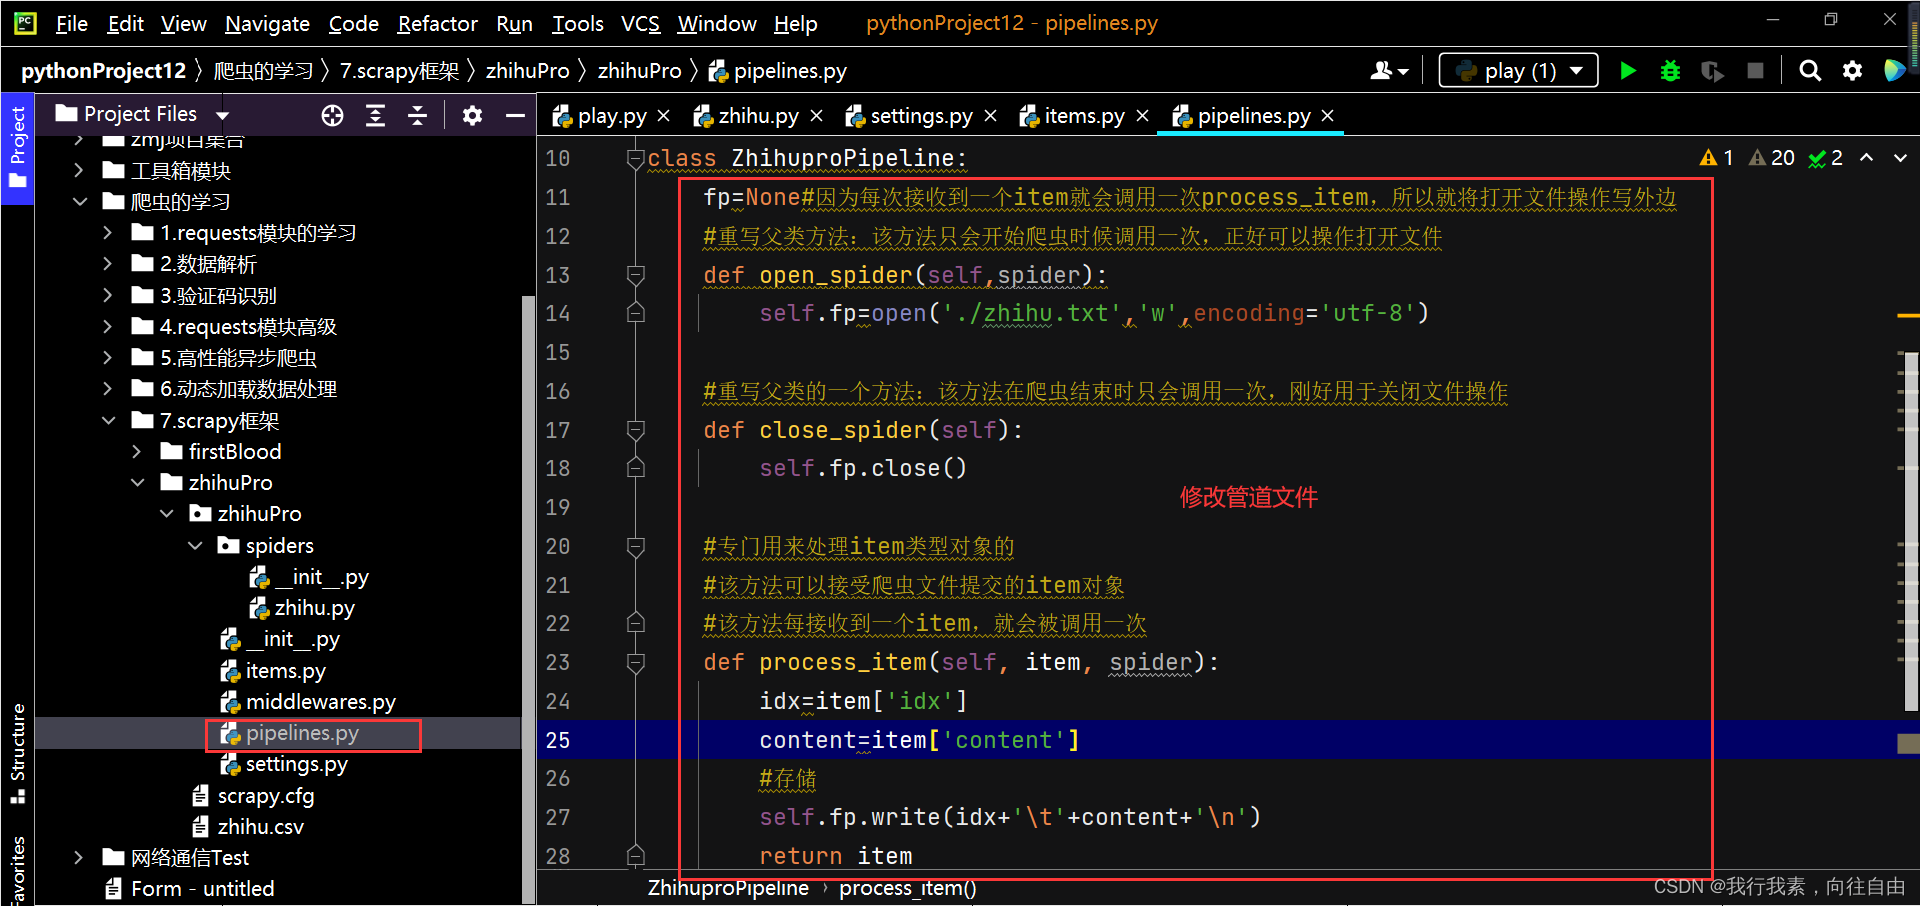
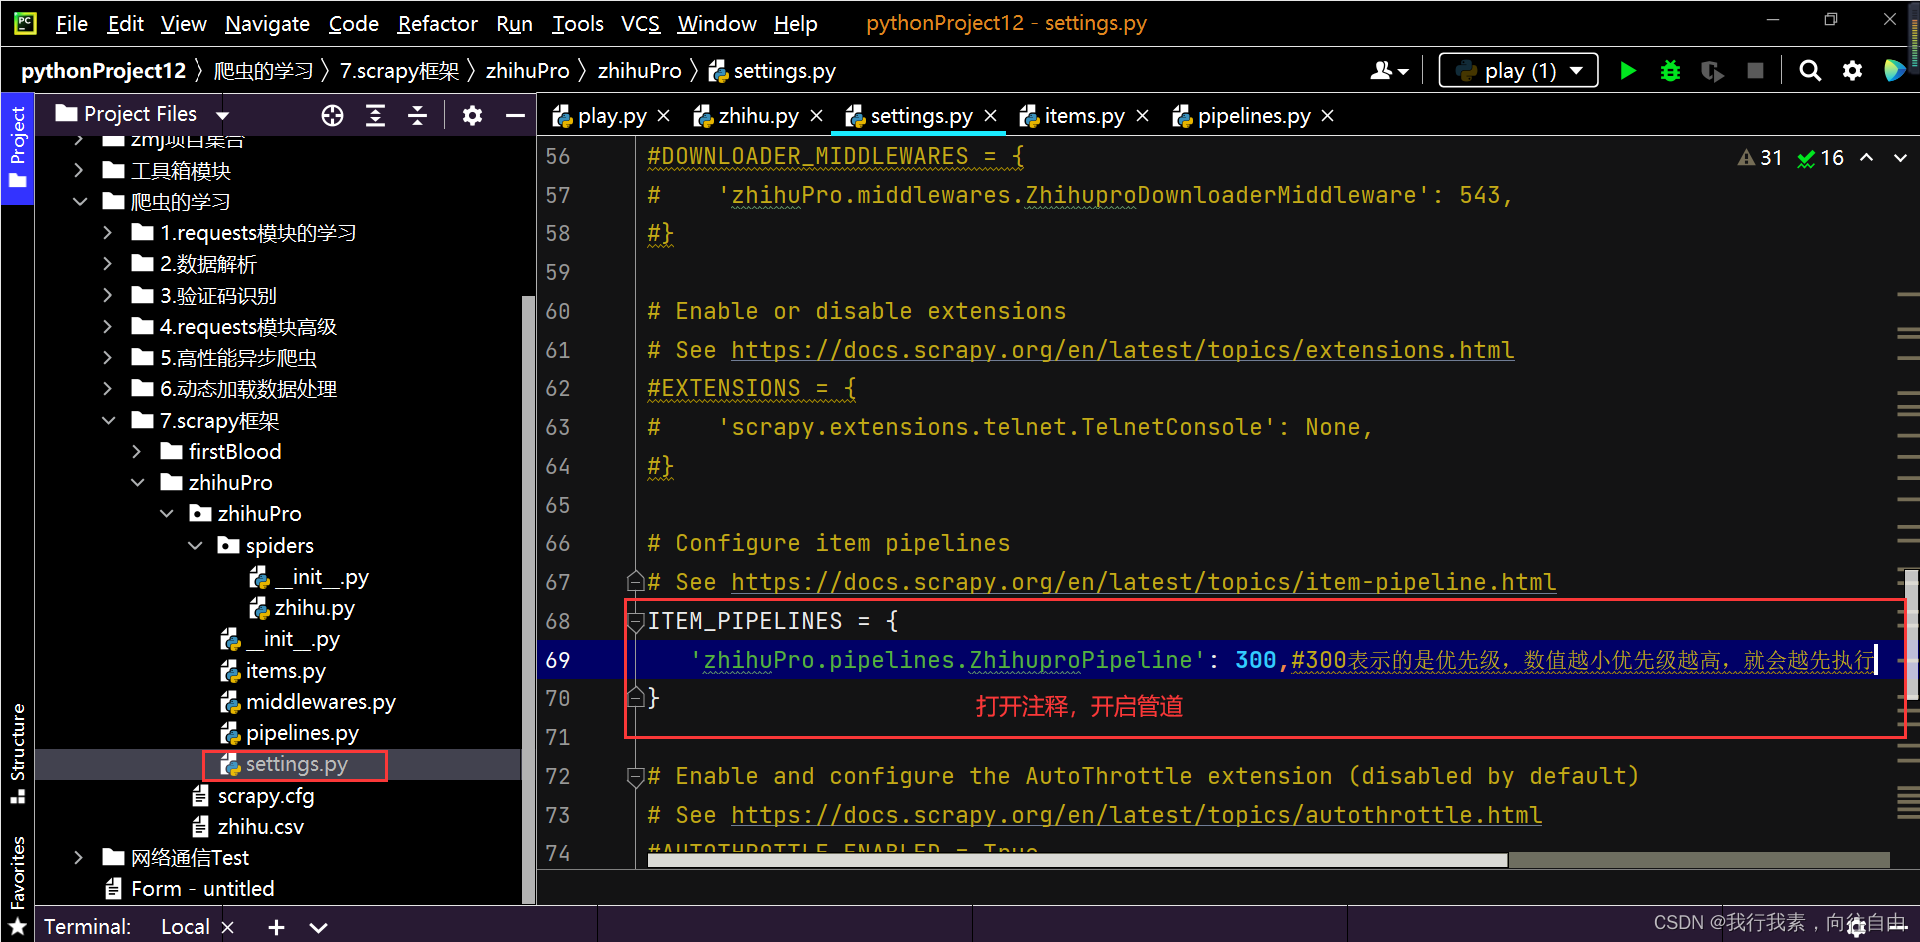
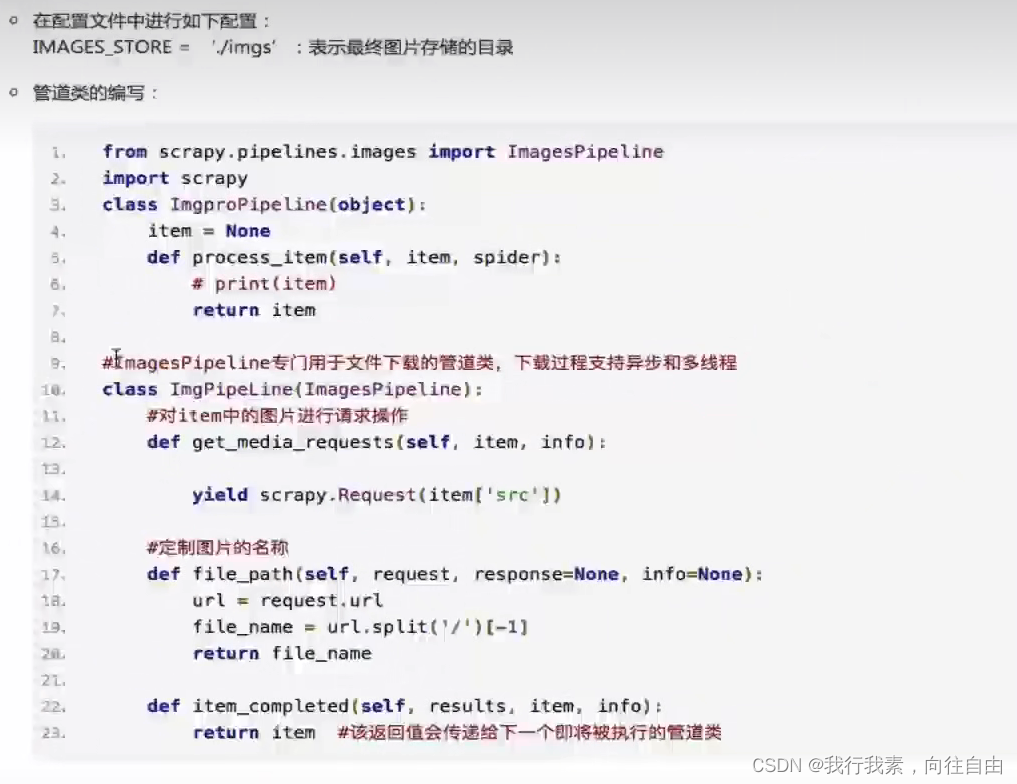


 462
462


 被折叠的 条评论
为什么被折叠?


