


目录
13.2 elementui+vue+axios完成文件上传
1 什么是MVC
MVC就是一个分层架构模式:
MVC是一种软件架构的思想,将软件按照模型、视图、控制器来划分
M: Model, 模型层,指工程中的JavaBean,作用是处理数据
JavaBean分为两类:
●-类称为实体类Bean:专门存储业务数据的,如Student!- User等
●-类称为业务处理Bean: 指Service或Dao对象,专[ ]用于处理业务逻辑和数据访问。
V: View, 视图层,指工程中的html或jsp等页面,作用是与用户进行交互,展示数据
C: Controller, 控制层,指工程中的servlet,作用是接收请求和响应浏览器
MVC的工作流程:
用户通过视图层发送请求到服务器,在服务器中请求被Controller接收, Controller调用相应的Model层处理请求,处理完毕将结果返回到Controller, Controller再根据请求处理的结果找到相应的View视图,渲染数据后最终响应给浏览器。

2 什么是SpringMVC框架
springMVC它是spring框架的一个分支,该springMVC框架主要完成的功能是:==接收浏览器的请求响应,对数据进行处理,然后返回页面进行显示== 可以把它理解为和Servlet干的工作是一样的。
3 为什么要使用SpringMVC框架

4 如何使用springMVC
(1)创建一个maven-web工程。
注意: ==用原来的web.xml文件替换现在的web.xml文件==
<?xml version="1.0" encoding="UTF-8"?>
<web-app xmlns="http://xmlns.jcp.org/xml/ns/javaee"
xmlns:xsi="http://www.w3.org/2001/XMLSchema-instance"
xsi:schemaLocation="http://xmlns.jcp.org/xml/ns/javaee http://xmlns.jcp.org/xml/ns/javaee/web-app_4_0.xsd"
version="4.0">
</web-app>
(2)引入springmvc的依赖
<dependencies>
<dependency>
<groupId>org.springframework</groupId>
<artifactId>spring-webmvc</artifactId>
<version>5.2.15.RELEASE</version>
</dependency>
</dependencies>
(3) 注册DispatcherServlet到web.xml文件上
<?xml version="1.0" encoding="UTF-8"?>
<web-app xmlns="http://xmlns.jcp.org/xml/ns/javaee"
         xmlns:xsi="http://www.w3.org/2001/XMLSchema-instance"
         xsi:schemaLocation="http://xmlns.jcp.org/xml/ns/javaee http://xmlns.jcp.org/xml/ns/javaee/web-app_4_0.xsd"
         version="4.0">

    <filter>
        <filter-name>encodingFilter</filter-name>
        <filter-class>org.springframework.web.filter.CharacterEncodingFilter</filter-class>
        <init-param>
            <param-name>encoding</param-name>
            <param-value>utf-8</param-value>
        </init-param>
    </filter>
    <filter-mapping>
        <filter-name>encodingFilter</filter-name>
        <url-pattern>/*</url-pattern>
    </filter-mapping>


   <!--默认DispactherServlet加载的springmvc配置文件:WEB-INF/[servlet-name]-servlet.xml
        能不能你指定加载的配置文件呢:可以。
    -->
      <servlet>
        <servlet-name>DispatcherServlet</servlet-name>
        <servlet-class>org.springframework.web.servlet.DispatcherServlet</servlet-class>
          <init-param>
              <param-name>contextConfigLocation</param-name>
         <!--classpath:表示编译后的路径-->
              <param-value>classpath:springmvc.xml</param-value>
          </init-param>
      </servlet>
  <servlet-mapping>
    <servlet-name>DispatcherServlet</servlet-name>
    <url-pattern>/</url-pattern>
  </servlet-mapping>
</web-app>
(4) 创建我们的springmvc配置文件

<?xml version="1.0" encoding="UTF-8"?>
<beans xmlns="http://www.springframework.org/schema/beans"
       xmlns:xsi="http://www.w3.org/2001/XMLSchema-instance"
       xmlns:context="http://www.springframework.org/schema/context"
       xmlns:mvc="http://www.springframework.org/schema/mvc"
       xsi:schemaLocation="http://www.springframework.org/schema/beans http://www.springframework.org/schema/beans/spring-beans.xsd http://www.springframework.org/schema/context https://www.springframework.org/schema/context/spring-context.xsd http://www.springframework.org/schema/mvc https://www.springframework.org/schema/mvc/spring-mvc.xsd">
        <!--包扫描-->
        <context:component-scan base-package="com.xzj.controller"/>
        <!--开启注解驱动-->
        <mvc:annotation-driven/>
        <!--放行静态资源:哪些资源为静态资源。css img js html-->
        <mvc:default-servlet-handler/>
</beans>
(5)创建一个controller类
@Controller //该注解标记该类为处理层类---类似@WebServlet
public class HelloController {

   RequestMapping(value = "/Hello")//把请求路径映射到该方法上。
    public String hello(){
        System.out.println("成功");
        return "success.jsp"; //响应一个页面
    }
}
5 springMVC的运行流程
* 1. 客户端发生请求http://localhost:8080/qy151_springmvc01/abc
* 2. 来到tomcat服务器。
* 3. springmvc的前端控制器DipatcherServlet接受所有的请求。
* 4. 查看你的请求地址和哪个@RequestMaping匹配。
* 5. 执行对应的方法。方法会返回一个字符串。springmvc把该字符串解析为要转发的网页。
* 6. 把该字符串经过视图解析器拼接。
* 7. 拿到拼接的地址,找到对应的网页。
* 8. 渲染该网页给客户
6 如何在controller接收请求的参数
request.getParamter("name")----这种接受参数的问题,麻烦。类型都是String.需要手动转型
6.1 接收少量的参数
譬如:删除
只需要给定方法的参数,参数必须要求和请求的参数名称一致。
@RequestMapping("delete")
public String delete(int id,String name){
    System.out.println(id+name);
    return  "success.jsp";
}
常见错误:

400: 参数有误。
6.2 接收大量参数
譬如: 表单提交。
封装一个实体类来接受这些参数:

发现接受的参数值乱码:---只能添加过滤器
(1)自己创建编码过滤器. jdk1.8一定要重写init和destory方法 1.9以后可以不写
public class MyEncodingFilter implements Filter {
    public void init(FilterConfig filterConfig) throws ServletException {

    }

    public void doFilter(ServletRequest servletRequest, ServletResponse servletResponse, FilterChain filterChain) throws IOException, ServletException {
        servletRequest.setCharacterEncoding("utf-8");
        servletResponse.setCharacterEncoding("utf-8");
        filterChain.doFilter(servletRequest,servletResponse);
    }
    public void destroy() {

    }
}
web.xml中
  <filter>
        <filter-name>encodingfilter</filter-name>
        <filter-class>com.xzj.filter.MyEncodingFilter</filter-class>
    </filter>
    <filter-mapping>
        <filter-name>encodingfilter</filter-name>
        <url-pattern>/*</url-pattern>
    </filter-mapping>
(2)springmvc提供了一个编码过滤器.

再web.xml中添加
<filter>
        <filter-name>encodingFilter</filter-name>
        <filter-class>org.springframework.web.filter.CharacterEncodingFilter</filter-class>
        <init-param>
            <param-name>encoding</param-name>
            <param-value>utf-8</param-value>
        </init-param>
    </filter>
    <filter-mapping>
        <filter-name>encodingFilter</filter-name>
        <url-pattern>/*</url-pattern>
    </filter-mapping>
6.3 接收的参数含有日期类型

解决办法:
在时间类型的属性上添加一个注解:@DateTimeFormat(pattern = "yyyy-MM-dd")
//yyyy年 MM:月 dd日 24小时制
@DateTimeFormat(pattern = "yyyy-MM-dd HH:mm:ss")
private Date date;//日期
在springmvc配置文件上开启注解驱动
<!--开启注解驱动-->
<mvc:annotation-driven/>
7 处理静态资源
无法加载图片: 原因:springmvc的前端控制器DispatcherSerlvet也把静态资源拦截器。
在springmvc配置文件上开启放行静态资源
<!--放行静态资源:哪些资源为静态资源。css img js html-->
<mvc:default-servlet-handler/>
8 如何把controller数据返回到网页并回显
request: 作用范围: 同一个请求内有效。setAttribute(key,value)
session:作用范围: 同一个会话有效,只要会话不关闭会一直有效。setAttribute(key,value)
网页如何获取保存的数据呢:可以使用EL表达式。${scope.key}
package com.xzj.controller;

import com.xzj.entity.Student;
import org.springframework.http.HttpRequest;
import org.springframework.stereotype.Controller;
import org.springframework.ui.Model;
import org.springframework.web.bind.annotation.RequestMapping;

import javax.servlet.http.HttpServletRequest;
import javax.servlet.http.HttpSession;
import java.util.Date;


@Controller
public class Contorller02 {
    @RequestMapping("save")
    public String login(Student student){
        System.out.println(student);
        return "success.jsp";
    }
    @RequestMapping("list")
    public String list(Model model){
        Student student = new Student("张三",new Date(),1,"zhengz");
        model.addAttribute("s",student);
        return "main.jsp";
    }
        @RequestMapping("list02")
    public String list(HttpServletRequest request){
            Student student = new Student("张三",new Date(),1,"zhengz");
           request.setAttribute("s",student);
            return "main.jsp";
        }
    @RequestMapping("list03")
    public String list(HttpSession session){
        Student student = new Student("李四",new Date(),1,"zhengz");
       session.setAttribute("stu",student);
        return "main.jsp";
    }
}
9 如何使用重定向跳转
在方法的返回字符串的内容时加上redirect:
@RequestMapping("list5")
public String list5(){
System.out.println("!!!!!!!!!!!!!!!!!");
return "redirect:list.jsp"; //当springmvc看到你返回的字符串钟含有redirect:时 它认为你要进行重定向跳转
}
10 springmvc返回json数据
(1)什么时候需要返回json数据。
异步请求时,ajax请求时。
(2)之前在servlet时如何返回json数据呢
借助了Fastjson---手动把java对象转换为json格式的数据,并使用out.print(json)输出json数据。 关闭out对象
内置了一个jar. jackson的jar包
<!--jackson依赖 可以把java对象转换为json对象-->
<dependency>
<groupId>com.fasterxml.jackson.core</groupId>
<artifactId>jackson-databind</artifactId>
<version>2.13.2.2</version>
</dependency>
在controller返回的数据类型变成javabean对象。
@Controller
public class Contorller03 {
    @RequestMapping("stu")
    @ResponseBody
    public List<Student> list(){
        List<Student> students = new ArrayList<Student>();
        students.add(new Student("张三",new Date(),1,"上海"));
        students.add(new Student("张三",new Date(),1,"杭州"));
        students.add(new Student("张三",new Date(),1,"北京"));
        students.add(new Student("张三",new Date(),1,"苏州"));

        return  students;
    }
访问该路径
返回的时间类型的json数据显示的为毫秒,正常情况应该显示时间格式。如何解决。
@Data
@AllArgsConstructor
@NoArgsConstructor
public class Student {
    private String name;

    @DateTimeFormat(pattern = "yyyy-MM-dd")
    @JsonFormat(pattern = "yyyy-MM-dd")//转发json格式的时间
    private Date date;
    private  Integer sex;
    private  String address;
}
11 springmvc的全局异常处理类
全局异常处理类的作用: 当controller发生异常,则有全局异常类来处理并执行相应的处理方法。
(1)如何使用全局异常处理类
[1] 创建一个异常类: @ControllerAdvice注解
package com.xzj.handle;

import org.springframework.web.bind.annotation.ControllerAdvice;
import org.springframework.web.bind.annotation.ExceptionHandler;
import org.springframework.web.bind.annotation.ResponseBody;

import java.util.HashMap;
import java.util.Map;


@ControllerAdvice
public class MyExceptionHandle {
    @ExceptionHandler(value = RuntimeException.class)
    @ResponseBody
    public Map error(){
        Map map = new HashMap();
        map.put("code",5000);
        map.put("msg","错误");
        return map;
    }
}
[2] 保证springmvc能够扫描到该类。
<context:component-scan base-package="com.xzj"/>
12 springmvc拦截器
过滤器: 过滤掉某些资源,
拦截器只会拦截controller层的资源路径。

如何使用拦截器:
(1)创建一个类,并实现HandlerInterceptor
package com.xzj.interceptor;


import org.springframework.web.servlet.HandlerInterceptor;

import javax.servlet.http.HttpServletRequest;
import javax.servlet.http.HttpServletResponse;

public class  MyInterceptor  implements HandlerInterceptor {
    public boolean preHandle(HttpServletRequest request, HttpServletResponse response, Object handler) throws Exception {
        System.out.println("经过了");
        return true;
    }
}
(2) 把该类注册到springmvc配置文件上。
<mvc:interceptors>
    <mvc:interceptor>
  <!--mapping:哪些路径需要经过拦截器
               /**: 表示n层路径
               /*:表示一层路径
                -->
        <mvc:mapping path="/**"/>
   <!--exclude-mapping:设置不经过该拦截的路径-->
        <mvc:exclude-mapping path="/list02"/>
        <mvc:exclude-mapping path="/list03"/>
    <!--bean表示你自定义的拦截器类路径-->
        <bean class="com.xzj.interceptor.MyInterceptor"/>
    </mvc:interceptor>
</mvc:interceptors>
13 文件上传
13.1 文件上传到本地服务器
(1)引用文件的依赖
<!--文件上传的依赖-->
<dependency>
<groupId>commons-fileupload</groupId>
<artifactId>commons-fileupload</artifactId>
<version>1.4</version>
</dependency>
(2) 创建一个页面
<%@ page contentType="text/html;charset=UTF-8" language="java" %>
<html>
<head>
    <title>Title</title>
</head>
<body>
 <%--
      method: 提交方式 文件上传必须为post提交。
      enctype:默认application/x-www-form-urlencoded 表示提交表单数据
              multipart/form-data:可以包含文件数据

      input的类型必须为file类型,而且必须有name属性
   --%>
<form method="post" action="/day0609_02/upload01" enctype="multipart/form-data">
    <input type="file" name="myfile"/>
    <input type="submit" value="提交"/>
</form>
</body>
</html>
(3)在springmvc中配置文件上传解析器
<!--
     id的名称必须叫multipartResolver
     -->
     <bean id="multipartResolver" class="org.springframework.web.multipart.commons.CommonsMultipartResolver">
          <!--这里的单位为字节10M*1024K*1024-->
          <property name="maxUploadSize" value="10485760"/>
     </bean>
(4)创建upload01接口方法
//注意:MultipartFile 参数名必须和<input type="file" name="myfile"/>中name属性相同
@RequestMapping("upload01")
public String upload01(MultipartFile myfile,HttpServletRequest request)throws Exception{
//(1)得到本地服务目录的地址
String path = request.getSession().getServletContext().getRealPath("upload");
//(2)判断该目录是否存在
File file2 = new File("path");
if(!file2.exists()){
file2.mkdirs();
}
//(3)//把myfile保存到本地服务中某个文件夹下。
String filename =UUID.randomUUID().toString().replace("-","")+myfile.getOriginalFilename();
File target = new File(path+"/"+filename);
myfile.transferTo(target); //把myfile转移到目标目录下
return "index.jsp";
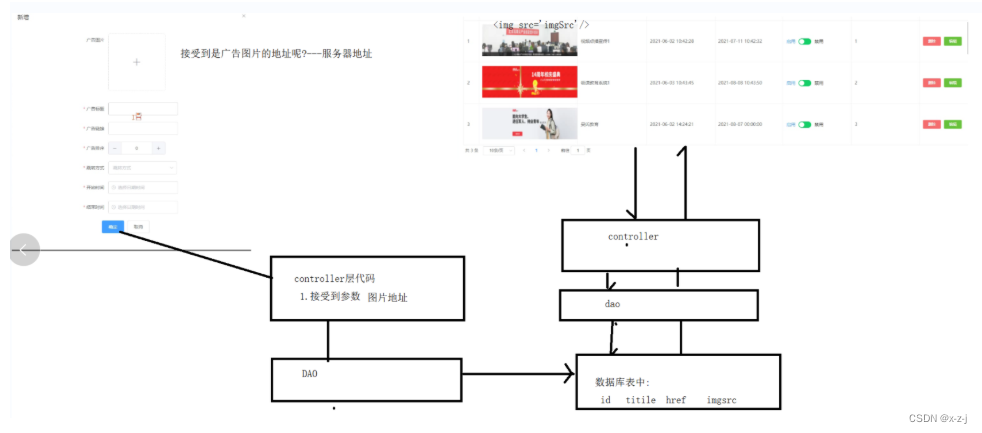
}13.2 elementui+vue+axios完成文件上传
(1)页面的布局
<%@ page contentType="text/html;charset=UTF-8" language="java" %>
<html>
<head>
    <title>Title</title>
    <!--引入element得css样式-->
    <link type="text/css" rel="stylesheet" href="css/index.css"/>
    <!--引入vue得js文件 这个必须在element之前引入-->
    <script type="text/javascript" src="js/vue.js"></script>
    <script type="text/javascript" src="js/qs.min.js"></script>
    <script type="text/javascript" src="js/axios.min.js"></script>
    <!--element得js文件-->
    <script type="text/javascript" src="js/index.js"></script>
</head>
<body>
<div id="app">
    <%--action:文件上传的路径--%>
    <el-upload
            class="avatar-uploader"
            action="/day0609_02/upload02"
            :show-file-list="false"
            :on-success="handleAvatarSuccess"
            :before-upload="beforeAvatarUpload">
        <img v-if="imageUrl" :src="imageUrl" class="avatar">
        <i v-else class="el-icon-plus avatar-uploader-icon"></i>
    </el-upload>
</div>
</body>
<script>
    var app=new Vue({
        el:"#app",
        data:{
            imageUrl:"",
        },
        methods:{
            //上传成功后触发的方法
            handleAvatarSuccess(res, file) {
                this.imageUrl=res.data;
            },
            //上传前触发的方法
            beforeAvatarUpload(file) {
                const isJPG = file.type === 'image/jpeg';
                const isPNG = file.type === 'image/png';
                const isLt2M = file.size / 1024 / 1024 < 2;
                if (!isJPG) {
                    this.$message.error('上传头像图片只能是 JPG 格式!');
                }
                if (!isLt2M) {
                    this.$message.error('上传头像图片大小不能超过 2MB!');
                }
                return isJPG && isLt2M;
            }
        }
    })
</script>
<style>
    .avatar-uploader .el-upload {
        border: 1px dashed #d9d9d9;
        border-radius: 6px;
        cursor: pointer;
        position: relative;
        overflow: hidden;
    }
    .avatar-uploader .el-upload:hover {
        border-color: #409EFF;
    }
    .avatar-uploader-icon {
        font-size: 28px;
        color: #8c939d;
        width: 178px;
        height: 178px;
        line-height: 178px;
        text-align: center;
    }
    .avatar {
        width: 178px;
        height: 178px;
        display: block;
    }
</style>
</html>
(2)后台的接口
@RequestMapping("upload02")
    @ResponseBody
    public Map upload02(MultipartFile file,HttpServletRequest request){
        try {
         //获取上传到服务器的文件夹路径
            String path = request.getSession().getServletContext().getRealPath("upload");
          //判断指定的目录是否存在
            File file1 = new File("path");
            if (!file1.exists()) {
                file1.mkdirs();
            }
        //设置上传后的文件名称
            String filename = UUID.randomUUID().toString().replace("-", "") + file.getOriginalFilename();
            File target = new File(path + "/" + filename);
            file.transferTo(target);
            Map  map = new HashMap();
            map.put("code",2000);
            map.put("msg","上传成功");
        //通过访问服务器地址来访问图片.
            map.put("data","http://localhost:8080/day0609_03/upload/"+filename);
            return map;
        }catch (Exception e){
            e.printStackTrace();
        }
        Map map = new HashMap();
        map.put("code",5000);
        map.put("msg","上传失败");
        return map;
    }
13.3 上传到OSS阿里云的服务器
上传到本地服务器的缺点: 如果搭建集群,导致文件无法在集群中共享。 它的解决方法就是把文件专门上传到一个文件服务器上,这些tomcat服务器都操作同一个文件服务器。

申请oss文件服务

在oss界面上操作文件上传
(1)创建bucket容器

可以在该bucket中通过网页面板的形式操作该bucket.
但是实际开发我们应该通过java代码往bucket中上传文件。
申请阿里云的密钥


14 上传到OSS文件服务器
14.1 普通的文件上传到OSS文件服务器


(1)引入阿里云的OSS依赖

<dependency>
    <groupId>com.aliyun.oss</groupId>
    <artifactId>aliyun-sdk-oss</artifactId>
    <version>3.10.2</version>
</dependency>
(2)代码的书写

@RequestMapping("/upload03")
    public String upload03(MultipartFile myfile,HttpServletRequest request){
        // Endpoint以华东1(杭州)为例,其它Region请按实际情况填写。
        String endpoint = "oss-cn-hangzhou.aliyuncs.com";

        //LTAI78XQAZq2s5Rv
        //qdyZxR0x4LoUpTVbuyvCGdcrhEyw7H
        // 阿里云账号AccessKey拥有所有API的访问权限,风险很高。强烈建议您创建并使用RAM用户进行API访问或日常运维,请登录RAM控制台创建RAM用户。
        String accessKeyId = "LAI78XQAZq2s5Rv";
        String accessKeySecret = "qyZxR0x4LoUpTVbuyvCGdcrhEyw7H";
        // 填写Bucket名称,例如examplebucket。
        String bucketName = "xxxx";
        //你上传到oss后的名字 会根据日期帮你创建文件夹。
        Calendar calendar=Calendar.getInstance();
        String objectName =calendar.get(Calendar.YEAR)+"/"+(calendar.get(Calendar.MONTH)+1)+"/"+
                calendar.get(Calendar.DATE)+"/"+UUID.randomUUID().toString().replace("-","")+
                myfile.getOriginalFilename();

        // 创建OSSClient实例。
        OSS ossClient = new OSSClientBuilder().build(endpoint, accessKeyId, accessKeySecret);

        try {
            InputStream inputStream =myfile.getInputStream();
            // 创建PutObject请求。
            ossClient.putObject(bucketName, objectName, inputStream);
        } catch (Exception oe) {

        } finally {
            if (ossClient != null) {
                ossClient.shutdown();
            }
        }

        String url="https://"+bucketName+"."+endpoint+"/"+objectName;
        request.setAttribute("imgUrl",url);
        return "success.jsp";
    }
14.2 elementui 异步上传OSS服务器
(1)前端
<%@ page contentType="text/html;charset=UTF-8" language="java" %>
<html>
<head>
    <title>Title</title>
    <!--引入element得css样式-->
    <link type="text/css" rel="stylesheet" href="css/index.css"/>
    <!--引入vue得js文件 这个必须在element之前引入-->
    <script type="text/javascript" src="js/vue.js"></script>
    <script type="text/javascript" src="js/qs.min.js"></script>
    <script type="text/javascript" src="js/axios.min.js"></script>
    <!--element得js文件-->
    <script type="text/javascript" src="js/index.js"></script>
</head>
<body>
<div id="app">
    <%--action:文件上传的路径--%>
    <el-upload
            class="avatar-uploader"
            action="/day/upload03"
            :show-file-list="false"
            :on-success="handleAvatarSuccess"
            :before-upload="beforeAvatarUpload">
        <img v-if="imageUrl" :src="imageUrl" class="avatar">
        <i v-else class="el-icon-plus avatar-uploader-icon"></i>
    </el-upload>
</div>
</body>
<script>
    var app = new Vue({
        el:"#app",
        data:{
            imageUrl:"",
        },
        methods:{
            //上传成功后触发的方法
            handleAvatarSuccess(res, file) {
                this.imageUrl=res.data;
            },
            //上传前触发的方法
            beforeAvatarUpload(file) {
                const isJPG = file.type === 'image/jpeg';
                const isPNG = file.type === 'image/png';
                const isLt2M = file.size / 1024 / 1024 < 2;
                if (!isJPG) {
                    this.$message.error('上传头像图片只能是 JPG 格式!');
                }
                if (!isLt2M) {
                    this.$message.error('上传头像图片大小不能超过 2MB!');
                }
                return isJPG && isLt2M;
            }
        }
    })
</script>
<style>
    .avatar-uploader .el-upload {
        border: 1px dashed #d9d9d9;
        border-radius: 6px;
        cursor: pointer;
        position: relative;
        overflow: hidden;
    }
    .avatar-uploader .el-upload:hover {
        border-color: #409eff;
    }
    .avatar-uploader-icon {
        font-size: 28px;
        color: #8c939d;
        width: 178px;
        height: 178px;
        line-height: 178px;
        text-align: center;
    }
    .avatar {
        width: 178px;
        height: 178px;
        display: block;
    }
</style>
</html>
(2)后端工具:
 public static String upload(MultipartFile myfile){
        // Endpoint以华东1(杭州)为例,其它Region请按实际情况填写。
        String endpoint = "oss-cn-hangzhou.aliyuncs.com";

        //LTAI78XQAZq2s5Rv
        //qdyZxR0x4LoUpTVbuyvCGdcrhEyw7H
        // 阿里云账号AccessKey拥有所有API的访问权限,风险很高。强烈建议您创建并使用RAM用户进行API访问或日常运维,请登录RAM控制台创建RAM用户。
        String accessKeyId = "LAI78XQAZq2s5Rv";
        String accessKeySecret = "qyZxR0x4LoUpTVbuyvCGdcrhEyw7H";
        // 填写Bucket名称,例如examplebucket。
        String bucketName = "xxxxx";
        //你上传到oss后的名字 会根据日期帮你创建文件夹。
        String objectName =fileName(myfile);
        // 创建OSSClient实例。
        OSS ossClient = new OSSClientBuilder().build(endpoint, accessKeyId, accessKeySecret);

        try {
            InputStream inputStream =myfile.getInputStream();
            // 创建PutObject请求。
            ossClient.putObject(bucketName, objectName, inputStream);
        } catch (Exception oe) {

        } finally {
            if (ossClient != null) {
                ossClient.shutdown();
            }
        }
        //https://qy151.oss-cn-hangzhou.aliyuncs.com/2022/6/10/20d3d7e6b5bb455cb548675501f7270fgdnj.jpg
        String url="https://"+bucketName+"."+endpoint+"/"+objectName;
        return url;
    }

    //获取上传到oss后的名字
    private static String fileName(MultipartFile myfile){
        Calendar calendar=Calendar.getInstance();
        String name=calendar.get(Calendar.YEAR)+"/"+(calendar.get(Calendar.MONTH)+1)+"/"+
                calendar.get(Calendar.DATE)+"/"+ UUID.randomUUID().toString().replace("-","")+
                myfile.getOriginalFilename();

        return name;
    }
(3) controller接口
 @RequestMapping("upload03")
    public CommonResult addAvatar(MultipartFile file){
        try{
            String avatar = OSSUtils.upload(file);
            return  new CommonResult(2000,"上传成功",avatar);
        }catch (Exception e){
            e.printStackTrace();
        }
        return  new CommonResult(5000,"上传失败",null);
    }
14.3 保存用户信息--头像
(1)前端的布局
%@ page contentType="text/html;charset=UTF-8" language="java" %>
<html>
<head>
    <title>Title</title>
    <!--引入element得css样式-->
    <link type="text/css" rel="stylesheet" href="css/index.css"/>
    <!--引入vue得js文件 这个必须在element之前引入-->
    <script type="text/javascript" src="js/vue.js"></script>
    <script type="text/javascript" src="js/qs.min.js"></script>
    <script type="text/javascript" src="js/axios.min.js"></script>
    <!--element得js文件-->
    <script type="text/javascript" src="js/index.js"></script>
</head>
<body>
<div id="app">
    <div id="mydiv">
        <el-form  label-width="80px" :model="userForm">
            <el-form-item label="头像:">
                <el-upload
                        class="avatar-uploader"
                        action="/day0610/addAvatar"
                        :show-file-list="false"
                        :on-success="handleAvatarSuccess"
                        :before-upload="beforeAvatarUpload">
                    <img v-if="imageUrl" :src="imageUrl" class="avatar">
                    <i v-else class="el-icon-plus avatar-uploader-icon"></i>
                </el-upload>
            </el-form-item>
            <el-form-item label="账号:">
                <el-input v-model="userForm.name"></el-input>
            </el-form-item>
            <el-form-item label="密码:">
                <el-input v-model="userForm.pwd"></el-input>
            </el-form-item>
            <el-form-item label="地址:">
                <el-input v-model="userForm.address"></el-input>
            </el-form-item>
            <el-form-item>
                <el-button type="primary" @click="onSubmit">提交</el-button>
            </el-form-item>
        </el-form>
    </div>
</div>
</body>
<script>
    var app = new Vue({
        el:"#app",
        data:{
            userForm:{},
            imageUrl:"",
        },
        methods:{
            //上传成功后触发的方法
            handleAvatarSuccess(res, file) {
                this.imageUrl=res.data;
                this.userForm.avatarUrl=res.data;
            },
            onSubmit(){
                axios.post("addUser",this.userForm).then(function (result){

                })
            },
            //上传前触发的方法
            beforeAvatarUpload(file) {
                const isJPG = file.type === 'image/jpeg';
                const isPNG = file.type === 'image/png';
                const isLt2M = file.size / 1024 / 1024 < 2;
                if (!isJPG) {
                    this.$message.error('上传头像图片只能是 JPG 格式!');
                }
                if (!isLt2M) {
                    this.$message.error('上传头像图片大小不能超过 2MB!');
                }
                return isJPG && isLt2M;
            }
        }
    })
</script>
<style>
    .avatar-uploader .el-upload {
        border: 1px dashed #d9d9d9;
        border-radius: 6px;
        cursor: pointer;
        position: relative;
        overflow: hidden;
    }
    .avatar-uploader .el-upload:hover {
        border-color: #409eff;
    }
    .avatar-uploader-icon {
        font-size: 28px;
        color: #8c939d;
        width: 100px;
        height: 100px;
        line-height: 100px;
        text-align: center;
    }
    .avatar {
        width: 100px;
        height: 100px;
        display: block;
    }
    #mydiv{
        width:300px;
        height:300px;
    }
</style>
</html>
(2)后台代码
@RestController
public class UserController {
    @RequestMapping("addAvatar")
    public CommonResult addAvatar(MultipartFile file){
        try{
            String avatar = OSSUtils.upload(file);
            return  new CommonResult(2000,"上传成功",avatar);
        }catch (Exception e){
            e.printStackTrace();
        }
        return  new CommonResult(5000,"上传失败",null);
    }
    @RequestMapping("addUser")
    public CommonResult addUser(@RequestBody User user){
        System.out.println(user);

        return new CommonResult(2000,"成功",null);
    }
}
15 小内容
@RestController----类上等价于 @COntroller+@ResponseBody
该注解下所有的方法都是返回json数据
@RequestMapping: 作用: 把请求路径映射到响应的方法上。@RequestParam(value = "u"):设置你接受的请求参数名。查询参数
@RequestMapping(value = "/addUser",method = RequestMethod.POST)
method:表示该接口接受的请求方式.不设置可以接受任意请求方式。
@GetMapping("addUser"):表示只接受get提交方式的请求@RequestBody:把请求的json数据转换为java对象。从前端到后端
@ResponseBody:把java转换为json数据 从后端转前端


 404
404


 被折叠的 条评论
为什么被折叠?
被折叠的 条评论
为什么被折叠?
 到【灌水乐园】发言


