


‘Statues’: 0,
‘RemarkPYQuanPin’: ‘’,
‘UserName’: ‘@132a8de5d97228087bc656f29cc2c5d67bbde904cdfaaeedb7ff7db72d4bce0e’,
‘Province’: ‘’,
‘KeyWord’: ‘’,
‘Uin’: 401807140,
‘RemarkName’: ‘’,
‘VerifyFlag’: 0,
‘PYInitial’: ‘’,
‘ContactFlag’: 0,
‘MemberList’: <ContactList: []>,
‘DisplayName’: ‘’,
‘Sex’: 1,
‘HeadImgUrl’: ‘/cgi-bin/mmwebwx-bin/webwxgeticon?seq=1142454089&username=@132a8de5d97228087bc656f29cc2c5d67bbde904cdfaaeedb7ff7db72d4bce0e&skey=@crypt_82a3c949_8b576ebec932b4b550498cb7f3e88855’,
‘Alias’: ‘’,
‘EncryChatRoomId’: ‘’,
‘HeadImgFlag’: 1,
‘UniFriend’: 0,
‘PYQuanPin’: ‘’,
‘MemberCount’: 0
}
对于我们而言,一个好友中,最重要的是他的 NickName 字段和 UserName 字段,因为通过这两个字段的值,我们可以搜索到这个好友。


**搜索好友**


搜索好友的方法为 search\_friends(),我们可以传入 NickName 或 UserName 的值进行搜索,如果不传入参数,则会返回自己的用户信息。所以一下三种搜索方式返回的都是我的微信号的用户信息:
coding:utf-8
import itchat
itchat.auto_login()
user_info = itchat.search_friends()
user_info_2 = itchat.search_friends(nickName=“州的先生”)
user_info_3 = itchat.search_friends(userName=‘@132a8de5d97228087bc656f29cc2c5d67bbde904cdfaaeedb7ff7db72d4bce0e’)
**获取群聊列表**


除了获取到好友的信息外,我们还需要获取到群聊的信息以便对群聊发送消息,通过 get\_chatrooms() 方法,我们也将获取到微信号中完整的群聊列表,示例代码如下:
coding:utf-8
import itchat
itchat.auto_login()
chatrooms = itchat.get_chatrooms()
for chatroom in chatrooms:
print(chatroom)
运行代码,会将群聊列表中的每一个群聊的信息以字典的形式打印出来,其格式如下所示(以我的一个群聊信息为例):
{‘RemarkPYQuanPin’: ‘’,
‘KeyWord’: ‘’,
‘IsAdmin’: None,
‘ChatRoomId’: 0,
‘VerifyFlag’: 0,
‘UserName’: ‘@@a4a7e4cd2430919cb41c2ea4f5bda7cb1c6ed7f2f4f7a649b62d4c9c1e02eead’,
‘PYInitial’: ‘’,
‘Province’: ‘’,
‘NickName’: ‘州的先生Python学习交流’,
‘IsOwner’: 1,
‘Self’: <User: {‘RemarkPYQuanPin’: ‘’, ‘KeyWord’: ‘’, ‘ChatRoomId’: 0, ‘VerifyFlag’: 0,
‘UserName’: ‘@fb371ab870eb94642cc3c62c573b8268305e81f00ab868c15a15dd40504e5036’,
‘PYInitial’: ‘’, ‘MemberCount’: 0, ‘NickName’: ‘州的先生’, ‘RemarkName’: ‘’,
‘MemberList’: <ContactList: []>, ‘HideInputBarFlag’: 0,
‘AppAccountFlag’: 0, ‘HeadImgFlag’: 1, ‘EncryChatRoomId’: ‘’, ‘Province’: ‘’, ‘StarFriend’: 0, ‘Uin’: 401807140, ‘UniFriend’: 0, ‘RemarkPYInitial’: ‘’, ‘DisplayName’: ‘’, ‘Signature’: ‘觉来知是梦,不胜悲。’, ‘PYQuanPin’: ‘’, ‘City’: ‘’, ‘OwnerUin’: 0, ‘ContactFlag’: 0, ‘HeadImgUrl’: ‘/cgi-bin/mmwebwx-bin/webwxgeticon?seq=67715570&username=@fb371ab870eb94642cc3c62c573b8268305e81f00ab868c15a15dd40504e5036&skey=@crypt_82a3c949_1acf9a2dae8b8a3f849e0c247f45c4c1’, ‘WebWxPluginSwitch’: 0, ‘Statues’: 0, ‘Sex’: 1, ‘Alias’: ‘’, ‘AttrStatus’: 0, ‘SnsFlag’: 1}>, ‘RemarkName’: ‘’, ‘Alias’: ‘’, ‘HideInputBarFlag’: 0, ‘AppAccountFlag’: 0, ‘EncryChatRoomId’: ‘’, ‘MemberCount’: 147, ‘Uin’: 0, ‘StarFriend’: 0, ‘UniFriend’: 0, ‘RemarkPYInitial’: ‘’, ‘Statues’: 1, ‘Signature’: ‘’, ‘PYQuanPin’: ‘’, ‘City’: ‘’, ‘DisplayName’: ‘’, ‘OwnerUin’: 0, ‘ContactFlag’: 0, ‘HeadImgUrl’: ‘/cgi-bin/mmwebwx-bin/webwxgetheadimg?seq=0&username=@@a4a7e4cd2430919cb41c2ea4f5bda7cb1c6ed7f2f4f7a649b62d4c9c1e02eead&skey=@crypt_82a3c949_1acf9a2dae8b8a3f849e0c247f45c4c1’, ‘Sex’: 0, ‘MemberList’: <ContactList: []>, ‘AttrStatus’: 0, ‘SnsFlag’: 0}
如同好友信息一样,在返回的群聊信息中,我们最在乎的还是群聊的 NickName 和 UserName 属性的值。通过这两个属性值,我们可以通过 search\_chatrooms() 方法搜索到特定的群聊,代码如下所示:
coding:utf-8
import itchat
itchat.auto_login()
chat_info = itchat.search_chatrooms(userName=“@@a4a7e4cd2430919cb41c2ea4f5bda7cb1c6ed7f2f4f7a649b62d4c9c1e02eead”)
chat_info_2 = itchat.search_chatrooms(name=“州的先生Python学习交流”)
**3.1.4、发送消息**


在 itchat 中,我们可以通过 send() 方法主动发送一条消息出去。send() 方法接受两个参数:


* msg:消息的内容,内容为'@fil@文件地址'将会被识别为传送文件,'@img@图片地址'将会被识别为传送图片,'@vid@视频地址'将会被识别为小视频,除此之外都将作为文本消息发送;
* toUserName:发送对象,如果为空,那么将发送给自己


所以如果我们需要给自己发送一条消息,那么代码如下所示:
coding:utf-8
import itchat
itchat.auto_login()
itchat.send(msg=“哈哈,给自己发送一条信息”)
**3.1.5、接收消息**
除了主动发送消息,我们还需要根据接收的消息来进行处理。在微信中,能够收到的消息有很多种类型,itchat.content 中包含了所有的消息类型的参数,其内容如下所示:

为什么要了解消息类型呢,在 itchat 中,如果我们想要登录后的微信能够接收到某个类型的消息,必须首先使用 itchat.msg\_register() 装饰器对这个类型的消息进行注册。一个简单的示例如下所示:
import itchat
from itchat.content import TEXT
@itchat.msg_register(TEXT)
def simple_reply(msg):
print(‘收到了一个消息: %s’ % msg[‘Text’])
itchat.auto_login(True)
itchat.run()
在上面的代码中,我们首先引入了 itchat 模块和 itchat 的 TEXT 文本消息类型,然后对一个函数 simplereply() 调用了消息注册方法对文本消息进行注册,simplereply() 返回接收到的消息,最后调用 auto\_login() 方法登录微信和 run() 方法侦听微信消息。
运行这段代码并登录微信后,程序将会一直侦听接收消息,如果收到文本消息,那么将会将消息打印出来,效果如下 gif 动图所示:

如果我们需要接收其他类型的消息,同样使用 @itchat.msgregister() 对消息类型进行注册即可。除了上述的通用消息注册方法,我们还可以指定消息的发送对象,来接收特定用户对象发来的特定消息类型,其通过 @itchat.msgregister() 装饰器的 isFriendChat 参数、isGroupChat 参数和 isMpChat 来实现。例如:
只接收来自好友的文本消息
@itchat.msg_register(TEXT,isFriendChat=True)
只接收来自于群聊的文本消息
@itchat.msg_register(TEXT,isGroupChat=True)
接收来自好友和群聊的文本消息
@itchat.msg_register(TEXT,isGroupChat=True,isFriendChat=True)
这样,我们就可以自由地对接收的消息进行处理了。


**3.1.6、注销登录**


注销登录,就是退出在电脑网页端的登录状态。这在手机上可以直接操作,但是我们可以通过 itchat 来简单地实现:
itchat.logout()
如此一句代码,就完成了微信的注销。关于 itchat 更多的功能和使用方法,大家可以阅读官方文档进行学习,链接为:[项目简介 - itchat](https://bbs.csdn.net/topics/618317507)


下面我们借助 itchat 来写一个微信群聊机器人,并结合淘宝客 API 将淘宝客的功能加入其中。


3.2、在微信机器人中加入淘宝客功能


删除 wechat\_bot.py 中所有的内容,开始我们的淘宝客微信机器人的编写。


**引用相关模块**


首先,我们引用接下来需要使用到的相关内置模块和第三方模块:
coding:utf-8
import itchat
from itchat.content import *
import json
import requests
import re
from urllib.request import urlretrieve
from datetime import datetime
import time
import threading
import os
import top
其中:


* itchat 用于实现微信的一系列操作;
* json 用于解析淘宝客 API 返回的 json 字符串;
* requests 用于请求淘宝客 API;
* re 用于正则匹配商品优惠信息中的数据;
* urlretrieve 用于下载商品图片;
* datetime 用于获取当前时间;
* time 用于设置时间间隔;
* threading 用于启用多线程;
* os 用于获取系统变量信息;
* top 是我们下载的淘宝客 SDK


**定义几个全局变量**


接着我们定义几个需要使用到的全局变量,其中包括淘宝客 api 中需要的 AppKey、AppSecret、adzone\_id,以及当前文件的路径:
current_path = os.path.dirname(os.path.abspath(file))
appkey = ‘你自己的appkey’
secret = ‘你自己的appsecret’
adzone_id = 推广位的adzone_id
**定义淘宝客商品优惠券获取函数**


随后,定义两个函数,一个是通过关键词获取淘宝客商品优惠券信息的函数,一个是将淘宝客商品优惠券转换为淘口令的函数:
通过淘宝客API搜索优惠券
def get_tk_coupon(kw,size=5):
req = top.api.TbkDgItemCouponGetRequest()
req.set_app_info(top.appinfo(appkey, secret))
req.adzone_id = int(adzone_id)
req.platform = 2
req.page_size = size
req.q = kw
req.page_no = 1
**try**:
    resp = req.getResponse()['tbk\_dg\_item\_coupon\_get\_response']['results']['tbk\_coupon']
    **return** resp
**except** Exception **as** e:
    print(e)
    **return** **None**
获取淘口令
def get_token(url, text):
req = top.api.TbkTpwdCreateRequest()
req.set_app_info(top.appinfo(appkey, secret))
req.text = text
req.url = url
**try**:
    resp = req.getResponse()['tbk\_tpwd\_create\_response']['data']['model']
    **return** resp
**except** Exception **as** e:
    print(e)
    **return** **None**
**注册接收微信文本消息并回复**
接着,我们按照上一小节介绍的 itchat 注册消息类型的方法,使用 @itchat.msg\_register() 装饰器注册群聊的文本消息,同时只接收 @我们的消息,然后对接收的消息进行回复。在本例中,我们通过群昵称来判断 @我们的消息是否来自于指定的群聊中:

回复群聊搜索
@itchat.msg_register(TEXT, isGroupChat=True)
def text_reply(msg):
# 如果消息为@我,且我的群昵称为“@我 + 商品”
if msg[‘isAt’] and msg[‘Content’][0:8] == ‘@@我 + 商品’:
# 截取消息正文字符串,提取出搜索词
searchword = msg[‘Content’][9:]
print(‘消息来自于:{0},内容为:{1}\n’.format(msg[‘ActualNickName’], msg[‘Content’]))
# 通过搜索词获取淘宝客商品优惠券信息
response = get_tk_coupon(searchword)
# 遍历获取到的淘宝客商品优惠券信息
for r in response:
# 商品标题
ordername = r[‘title’]
# 商品当前价
orderprice = r[‘zk_final_price’]
# 优惠券信息
coupon_info = r[‘coupon_info’]
# 通过正则表达式提取优惠券信息中的面额
coupon_demonination = int(re.findall(r’(\d+)‘, coupon_info)[-1])
# 商品图片
orderimg = r[‘pict_url’]
# 获取淘口令
token = get_token(url=r[‘coupon_click_url’], text=r[‘title’])
# 券后价
couponprice = round(float(orderprice) - int(coupon_demonination), 1)
# 通过新浪微博API生成优惠券链接的短链
link = r[‘item_url’]
link_resp = requests.get(
‘http://api.weibo.com/2/short_url/shorten.json?source=2849184197&url_long=’ + link).text
link_short = json.loads(link_resp, encoding=‘utf-8’)[‘urls’][0][‘url_short’]
# 拼接组合文本消息字符串
msgs = ‘’’/:gift{name}\n/:rose【在售价】{orderprice}元\n/:heart【券后价】{conponprice}元\n/:cake 【抢购链接】{link_short}\n-----------------\n复制这条信息\n{token}打开【手机淘宝】,即可查看\n------------------\n
‘’‘.format(name=ordername, orderprice=orderprice, conponprice=couponprice, token=token,
link_short=link_short)
# 发送文本消息
itchat.send(msg=str(msgs), toUserName=msg[‘FromUserName’])
# 发送商品图片
try:
image = urlretrieve(url=orderimg, filename=r’%s’ % os.path.join(current_path, ‘orderimg.jpg’))
itchat.send_image(fileDir=r’%s’ % os.path.join(current_path, ‘orderimg.jpg’),
toUserName=msg[‘FromUserName’])
except Exception as e:
print(“发送图片失败,{}\n”.format(e))
# 等待3秒继续发送
time.sleep(3)
**主动发送消息**


除了被动的回复别人的搜索,为了保持群聊的活跃程度,在此我们设置主动推送商品优惠券的功能。
定时发送消息
def send_order_info():
n = 1
while True:
# 判断当前时间是否大于早上7点且小于晚上十一点
if datetime.today().hour > 8 and datetime.today().hour < 23:
print(‘现在时间:’,datetime.today())
# 获取群聊列表
chatroom = itchat.get_chatrooms()
# 遍历群聊列表
for c in chatroom:
n = datetime.today().hour - 7
print(c[‘UserName’],c[‘NickName’])
# 只选择指定的群聊
if c[‘NickName’] == ‘天猫内部精选优惠券1群’:
try:
# 获取淘宝客商品优惠券信息
response = get_tk_coupon(‘’)
# 遍历商品优惠券信息
for r in response:
# 商品标题
ordername = r[‘title’]
# 商品当前价
orderprice = r[‘zk_final_price’]
coupon_info = r[‘coupon_info’]
coupon_demonination = int(re.findall(r’(\d+)‘, coupon_info)[-1])
# 商品图片
orderimg = r[‘pict_url’]
# 获取淘口令
token = get_token(url=r[‘coupon_click_url’], text=r[‘title’])
# 券后价
couponprice = round(float(orderprice) - int(coupon_demonination), 1)
# 生成短链
link = r[‘item_url’]
link_resp = requests.get(
‘http://api.weibo.com/2/short_url/shorten.json?source=2849184197&url_long=’ + link).text
link_short = json.loads(link_resp, encoding=‘utf-8’)[‘urls’][0][‘url_short’]
msgs = ‘’’【{times}点档特惠精选】\n/:gift{name}\n/:rose【在售价】{orderprice}元\n/:heart【券后价】{conponprice}元\n/:cake 【抢购链接】{link_short}\n-----------------\n复制这条信息\n{token}打开【手机淘宝】,即可查看
‘’‘.format(times=str(datetime.today().hour),
name=ordername,
orderprice=orderprice,
conponprice=couponprice,
token=token,
link_short=link_short)
# 发送文本消息
itchat.send(msg=str(msgs), toUserName=c[‘UserName’])
# 发送商品图片
try:
image = urlretrieve(url=orderimg,
filename=r’%s’ % os.path.join(current_path, ‘orderimg.jpg’))
itchat.send_image(fileDir=r’%s’ % os.path.join(current_path, ‘orderimg.jpg’),
toUserName=c[‘UserName’])
except Exception as e:
print(“发送图片失败,{}\n”.format(e))
time.sleep(3)
except Exception as e:
print(‘发送失败’,e)
n += 1
else:
n = 1
time.sleep(3600)
在此,我们创建了一个定时发送淘宝客商品优惠券信息的函数,设定每天的早上 9 点到晚上 10 点间,每一个小时调用搜索淘宝客商品优惠券的函数 gettkcoupon() 来发送给指定的群。


**运行机器人**


完成了上述搜索淘宝客优惠券函数 gettkcoupon()、生成淘口令函数 gettoken()、被动回复群聊搜索函数 textreply() 和定时发送消息函数 sendorderinfo() 的创建后,我们的命令行版本的淘宝客微信机器人就基本完成了功能函数的创建,接下来对其进行运行即可:
if name == ‘__main__’:
# 登录
itchat.auto_login(hotReload=True,enableCmdQR=False,picDir=r’%s’%os.path.join(current_path,‘qrcode.jpg’))
# 创建一个线程用于侦听微信的消息
t_reply = threading.Thread(target=itchat.run)
# 创建一个线程用于定时发送消息
t_send = threading.Thread(target=send_order_info)
# 启动线程
t_reply.start()
t_send.start()
t_reply.join()
t_send.join()
在这里,我们调用的 itchat 的 auto\_login() 方法来进行登录,然后创建了两个线程,分别用于侦听微信的消息和定时发送消息。 最后,完整的代码如下所示:


更多Python视频、源码、资料加群725638078免费获取
coding:utf-8
‘’’
@name:淘宝客微信机器人命令行版
@author:州的先生
@version:beta0.1
‘’’
import itchat,time
from itchat.content import *
import json
import requests
import re
from urllib.request import urlretrieve
from datetime import datetime
import threading
import os
import top
current_path = os.path.dirname(os.path.abspath(file))
appkey = ‘24842110’
secret = ‘4887183bf0e9d5ce4e5db53d9319253e’
adzone_id = 404486820
通过淘宝客API搜索优惠券
def get_tk_coupon(kw,size=5):
req = top.api.TbkDgItemCouponGetRequest()
req.set_app_info(top.appinfo(appkey, secret))
req.adzone_id = int(adzone_id)
req.platform = 2
req.page_size = size
req.q = kw
req.page_no = 1
**try**:
    resp = req.getResponse()['tbk\_dg\_item\_coupon\_get\_response']['results']['tbk\_coupon']
    **return** resp
**except** Exception **as** e:
    print(e)
    **return** **None**
获取淘口令
def get_token(url, text):
req = top.api.TbkTpwdCreateRequest()
req.set_app_info(top.appinfo(appkey, secret))
req.text = text
req.url = url
**try**:
    resp = req.getResponse()['tbk\_tpwd\_create\_response']['data']['model']
    **return** resp
**except** Exception **as** e:
    print(e)
    **return** **None**
回复群聊搜索
@itchat.msg_register(TEXT, isGroupChat=True)
def text_reply(msg):
# 如果消息为@我,且我的群昵称为“@我 + 商品”
if msg[‘isAt’] and msg[‘Content’][0:8] == ‘@@我 + 商品’:
# 截取消息正文字符串,提取出搜索词
searchword = msg[‘Content’][9:]
print(‘消息来自于:{0},内容为:{1}\n’.format(msg[‘ActualNickName’], msg[‘Content’]))
# 通过搜索词获取淘宝客商品优惠券信息
response = get_tk_coupon(searchword)
# 遍历获取到的淘宝客商品优惠券信息
for r in response:
# 商品标题
ordername = r[‘title’]
# 商品当前价
orderprice = r[‘zk_final_price’]
# 优惠券信息
coupon_info = r[‘coupon_info’]
# 通过正则表达式提取优惠券信息中的面额
coupon_demonination = int(re.findall(r’(\d+)‘, coupon_info)[-1])
# 商品图片
orderimg = r[‘pict_url’]
# 获取淘口令
token = get_token(url=r[‘coupon_click_url’], text=r[‘title’])
# 券后价
couponprice = round(float(orderprice) - int(coupon_demonination), 1)
# 通过新浪微博API生成优惠券链接的短链
link = r[‘item_url’]
link_resp = requests.get(
‘http://api.weibo.com/2/short_url/shorten.json?source=2849184197&url_long=’ + link).text
link_short = json.loads(link_resp, encoding=‘utf-8’)[‘urls’][0][‘url_short’]
# 拼接组合文本消息字符串
msgs = ‘’’/:gift{name}\n/:rose【在售价】{orderprice}元\n/:heart【券后价】{conponprice}元\n/:cake 【抢购链接】{link_short}\n-----------------\n复制这条信息\n{token}打开【手机淘宝】,即可查看\n------------------\n
‘’‘.format(name=ordername, orderprice=orderprice, conponprice=couponprice, token=token,
link_short=link_short)
# 发送文本消息
itchat.send(msg=str(msgs), toUserName=msg[‘FromUserName’])
# 发送商品图片
try:
image = urlretrieve(url=orderimg, filename=r’%s’ % os.path.join(current_path, ‘orderimg.jpg’))
itchat.send_image(fileDir=r’%s’ % os.path.join(current_path, ‘orderimg.jpg’),
toUserName=msg[‘FromUserName’])
except Exception as e:
print(“发送图片失败,{}\n”.format(e))
# 等待3秒继续发送
time.sleep(3)
定时发送消息
def send_order_info():
n = 1
while True:
# 判断当前时间是否大于早上7点且小于晚上十一点
if datetime.today().hour > 8 and datetime.today().hour < 23:
print(‘现在时间:’,datetime.today())
# 获取群聊列表
chatroom = itchat.get_chatrooms()
# 遍历群聊列表
for c in chatroom:
n = datetime.today().hour - 7
print(c[‘UserName’],c[‘NickName’])
# 只选择指定的群聊
if c[‘NickName’] == ‘天猫内部精选优惠券1群’:
try:
# 获取淘宝客商品优惠券信息
response = get_tk_coupon(‘’)
# 遍历商品优惠券信息
for r in response:
# 商品标题
ordername = r[‘title’]
# 商品当前价
orderprice = r[‘zk_final_price’]
coupon_info = r[‘coupon_info’]
coupon_demonination = int(re.findall(r’(\d+)‘, coupon_info)[-1])
# 商品图片
orderimg = r[‘pict_url’]
# 获取淘口令
token = get_token(url=r[‘coupon_click_url’], text=r[‘title’])
# 券后价
couponprice = round(float(orderprice) - int(coupon_demonination), 1)
# 生成短链
link = r[‘item_url’]
link_resp = requests.get(
‘http://api.weibo.com/2/short_url/shorten.json?source=2849184197&url_long=’ + link).text
link_short = json.loads(link_resp, encoding=‘utf-8’)[‘urls’][0][‘url_short’]
msgs = ‘’’【{times}点档特惠精选】\n/:gift{name}\n/:rose【在售价】{orderprice}元\n/:heart【券后价】{conponprice}元\n/:cake 【抢购链接】{link_short}\n-----------------\n复制这条信息\n{token}打开【手机淘宝】,即可查看
‘’‘.format(times=str(datetime.today().hour),
name=ordername,
orderprice=orderprice,
conponprice=couponprice,
token=token,
link_short=link_short)
# 发送文本消息
itchat.send(msg=str(msgs), toUserName=c[‘UserName’])
# 发送商品图片
try:
image = urlretrieve(url=orderimg,
filename=r’%s’ % os.path.join(current_path, ‘orderimg.jpg’))
itchat.send_image(fileDir=r’%s’ % os.path.join(current_path, ‘orderimg.jpg’),
toUserName=c[‘UserName’])
except Exception as e:
print(“发送图片失败,{}\n”.format(e))
time.sleep(3)
except Exception as e:
print(‘发送失败’,e)
n += 1
else:
n = 1
time.sleep(3600)
if name == ‘__main__’:
# 登录
itchat.auto_login(hotReload=True,enableCmdQR=False,picDir=r’%s’%os.path.join(current_path,‘qrcode.jpg’))
# 创建一个线程用于侦听微信的消息
t_reply = threading.Thread(target=itchat.run)
# 创建一个线程用于定时发送消息
t_send = threading.Thread(target=send_order_info)
# 启动线程
t_reply.start()
t_send.start()
t_reply.join()
t_send.join()
最后我们来运行一下这个微信机器人,如果当前时间在早上 9 点到晚上 10 点之间,那么在程序运行之后他会首先主动发送 5 条淘宝客商品优惠券消息,效果如图所示:

如果有人在这个指定的群聊里面 @我们,我们就会调用 gettkcoupon() 方法获取淘宝客商品并回复,效果如下图所示:

只要我们的网络不断、电脑不关、微信不退,那么这个淘宝客微信机器人就会一直运行下去。
#### 4、使用 PyQt5 创建微信机器人的桌面程序
上面创建的淘宝客微信机器人完全通过代码来操作和控制,自己使用倒是没什么问题,如果想给更多的人使用,就很不方便了。其便利性和使用的友好性很是欠缺,如果做成一个桌面应用程序,那么就很方便了。
Python 中提供了多种模块来支持编写桌面应用程序,其中包括内置的 tkinter 模块、第三方的 wxPython、PyQt、Kivy 等。这个模块各有优缺点,在此我们选择 PyQt5 来编写我们的淘宝客微信机器人桌面程序。
在开始使用 PyQt5 编写桌面程序之前,我们先来了解一下桌面应用程序的结构。
有前端开发经验的同学都知道,在最基础的前端架构(HTML、CSS、JS)中,HTML 用来定义网页的结构、CSS 用来定义网页页面的样式和布局,JS 则用来控制页面的行为。
而对于一个桌面应用程序,其势必也是有一个结构的,而且其与前端结构中的 HTML、CSS、JS 也有相似之处,比如:
* 主窗体相当于 HTML 中的 标签;
* 主窗体中的窗口部件相当于 HTML 中的标签;
* 窗体中的 Layout 布局层则相当于 CSS 中的浮动定位、绝对定位、Flex 布局定位等;
* 程序中的一些按钮可能点击后停留在上面会执行一些操作,则相当于 JS 的 click 等事件及其所执行的 javascript 代码。
这样应该就能理解了。那么咱们开始使用 PyQt5 写我们的淘宝客微信群聊机器人桌面程序。
4.1、创建 UI 界面和布局
PyQt5 可以通过 pip 命令直接进行安装:
pip install PyQt5
在安装完成之后,我们在我们的项目目录下再新建一个名为 mainUI.py 的 Python 文件:
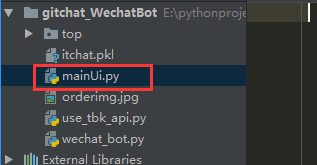
我们的桌面程序的代码主要在这个文件中编写。在开始设计 UI 界面之前,我们先来规划一下我们的淘宝客微信群聊机器人的界面(画一个简单的原型图):

可以发现,界面主要由两部分组成:
* 上层的功能按钮和输入框;
* 下层的文本输入控制台;
上层的功能按钮和输入框使用两个 GroupBox 分组:
* 一个为登录和注销按钮的按钮组;
* 一个为功能选项的按钮和输入框组;
下层的文本控制台则就是一个文本标签。
**4.1.1、创建主窗体**
照例我们先引入所需要的所有模块:
coding:utf-8
from PyQt5.QtCore import QThread
from PyQt5.QtWidgets import *
from PyQt5 import QtGui
import sys
import itchat
from itchat.content import *
import datetime
import time
import os
import top.api
import requests
import json
import re
from urllib.request import urlretrieve
然后定义一个全局变量,用于获取当前文件的路径:
current_path = os.path.dirname(os.path.abspath(file))
接着,通过继承 QMainWindow,创建一个主窗口的类:
class MainGUI(QMainWindow):
def __init__(self):
super()._init_()
在 MainGUI 类中,创建一个 iniUI() 方法,用于初始化设置主窗体的信息:
'''
程序默认UI界面信息
‘’’
def iniUI(self):
self.setWindowTitle(“州的先生淘宝客微信机器人v0.1”)
self.resize(1200, 600)
    # 设置程序图标
    icon = QtGui.QIcon()
    icon.addPixmap(QtGui.QPixmap("logo.png"), QtGui.QIcon.Normal, QtGui.QIcon.Off)
    self.setWindowIcon(icon)
在 iniUI() 方法中,我们通过 setWindowTitle() 设置了主窗体的标题,通过 resize() 设置了主窗体的初始大小,通过 setWindowIcon() 设置了主窗体的 logo 图标。我们将这个 iniUI() 方法添加到 MainGUI() 类的**init**() 方法中,然后运行代码:
class MainGUI(QMainWindow):
def __init__(self):
super().init()
self.iniUI()
‘’’
程序默认UI界面信息
‘’’
def iniUI(self):
self.setWindowTitle(“州的先生淘宝客微信机器人v0.1”)
self.resize(1200, 600)
# 设置程序图标
icon = QtGui.QIcon()
icon.addPixmap(QtGui.QPixmap(“logo.png”), QtGui.QIcon.Normal, QtGui.QIcon.Off)
self.setWindowIcon(icon)
if name == ‘__main__’:
app = QApplication(sys.argv)
gui = MainGUI()
gui.show()
sys.exit(app.exec_())
最后出现了如下图这样的一个 GUI 界面:

里面空空如也,只有一个主窗体,没关系接下来我们就在这个主窗体里面添加其他的窗口部件和布局。
**4.1.2、添加窗口部件和布局**
在主窗体创建之后,我们继续在主窗体中添加最基础的窗口部件。在 MainUI() 类中新建一个方法 verticalboxlayout(),在其中创建布局和部件:
# 水平垂直布局
**def** **vertical\_box\_layout**(self):
    '''
上层功能盒子
‘’’
# 创建一个用于存放登录相关按钮的窗口部件
login_buttons = QWidget()
login_buttons_box = QVBoxLayout()
# 设置窗口部件的布局为垂直盒子布局
login_buttons.setLayout(login_buttons_box)
    # 创建两个登录相关的按钮
    self.refresh_button = QPushButton("点击登录")
    self.exit_button = QPushButton("退出登陆")
    self.exit_button.setEnabled(**False**)
    # 将按钮添加到窗口部件中
    login_buttons_box.addWidget(self.refresh_button)
    login_buttons_box.addWidget(self.exit_button)

    # 创建一个登录按钮的组盒子
    login_box = QGroupBox()
    login_box.setTitle("登陆选项")
    # 设置登陆盒子布局为网格布局
    login_box_layout = QGridLayout()
    login_box.setLayout(login_box_layout)
    # 将按钮窗口部件添加到网格布局中
    login_box_layout.addWidget(login_buttons,0,1)

    # 创建群聊列表子盒子
    chatroom_box = QGroupBox()
    chatroom_box.setTitle("群聊列表")
    # 创建群聊列表的垂直布局层
    chatroom_box_layout = QVBoxLayout()
    # 设置群聊列表子盒子的布局层
    chatroom_box.setLayout(chatroom_box_layout)
    # 创建一个群聊部件
    scroll_widget = QWidget()
    # 创建群聊不见的布局层
    self.scroll_widget_layout = QVBoxLayout()
    # 设置群聊不见的布局层为self.scroll\_widget\_layout
    scroll_widget.setLayout(self.scroll_widget_layout)
    # 创建一个可滚动区域
    scroll = QScrollArea()
    # 在可滚动区域中设置窗口部件为scroll\_widget
    scroll.setWidget(scroll_widget)
    scroll.setAutoFillBackground(**True**)
    scroll.setWidgetResizable(**True**)
    # 在群里盒子布局中添加可滚动区域
    chatroom_box_layout.addWidget(scroll)

    # 创建文件及Token子盒子
    settings_box = QGroupBox()
    settings_box.setTitle("配置信息")
    settings_box_layout = QGridLayout()
    settings_box.setLayout(settings_box_layout)
    # 创建输入框
    key_name = QLabel("AppKey:")
    sec_name = QLabel("Secret:")
    adzone_name = QLabel("Adzone\_id:")
    self.appkey = QLineEdit()
    self.secret = QLineEdit()
    self.adzone_id = QLineEdit()
    file_name = QLabel("优惠券文件路径:")
    self.coupon_file = QLineEdit()
    choose_file = QPushButton("选择文件")
    # 添加输入框到settings\_box\_layout中
    settings_box_layout.addWidget(key_name,0,0)
    settings_box_layout.addWidget(self.appkey,0,1)
    settings_box_layout.addWidget(sec_name,1,0)
    settings_box_layout.addWidget(self.secret,1,1)
    settings_box_layout.addWidget(adzone_name,2,0)
    settings_box_layout.addWidget(self.adzone_id,2,1)
    settings_box_layout.addWidget(file_name,3,0)
    settings_box_layout.addWidget(self.coupon_file,3,1)
    settings_box_layout.addWidget(choose_file,4,0)

    # 创建控制按钮盒子
    control_box = QGroupBox()
    control_box.setTitle("控制开关")
    control_box_layout = QVBoxLayout()
    control_box.setLayout(control_box_layout)
    # 创建控制按钮
    self.start_run = QPushButton("开启机器人")
    self.end_run = QPushButton("停止机器人")
    self.end_run.setEnabled(**False**)
    self.check_info = QPushButton("检查配置信息")
    # 将控制按钮添加到控制按钮盒子中
    control_box_layout.addWidget(self.start_run,0)
    control_box_layout.addWidget(self.end_run,1)
    control_box_layout.addWidget(self.check_info,2)

    # 选项盒子
    select_box = QGroupBox()
    select_box.setTitle("功能选项")
    # 选项盒子布局
    select_box_layout = QGridLayout()
    select_box.setLayout(select_box_layout)
    # 将群聊列表盒子、配置信息盒子和控制按钮盒子添加到选项盒子中
    select_box_layout.addWidget(chatroom_box,0,0)
    select_box_layout.addWidget(settings_box,0,1)
    select_box_layout.addWidget(control_box,0,2)

    # 窗口主部件中上层功能按钮的布局
    utils_box = QGridLayout()
    # 添加登录盒子和选项盒子到上层布局中
    utils_box.addWidget(login_box,0,0)
    utils_box.addWidget(select_box,0,1)

    '''
下层控制台盒子
‘’’
# 创建一个文本框
self.label_1 = QTextEdit()
self.label_1.setReadOnly(True)
    # 窗口主部件中下层控制台的布局
    console_box = QVBoxLayout()
    console_box.addWidget(self.label_1)

    '''
主窗体的布局
‘’’
# 窗口主部件
self.Widget = QWidget()
# 设置窗口主部件的布局层
widget_box = QVBoxLayout()
self.Widget.setLayout(widget_box)
# 在窗口主部件的布局层中添加功能按钮层和控制台层
widget_box.addLayout(utils_box)
widget_box.addLayout(console_box)
    '''页面初始化层'''

    # 设置UI界面的核心窗口为layout\_widget
    self.setCentralWidget(self.Widget)
之后,我们再将 verticalboxlayout() 方法添加到 iniUI() 方法中:
**def** **iniUI**(**self**):
    **self**.setWindowTitle("州的先生淘宝客微信机器人v0.1")
    **self**.resize(1200, 600)

    **self**.vertical_box_layout()
    # 用于存放群聊列表元素
    **self**.chatroom_list = []
    **self**.current_date = datetime.datetime.strftime(datetime.datetime.today(),'%Y-%m-%d')

    # 设置程序图标
    icon = QtGui.QIcon()
    icon.addPixmap(QtGui.QPixmap("logo.png"), QtGui.QIcon.Normal, QtGui.QIcon.Off)
    **self**.setWindowIcon(icon)
这样,我们的窗口 UI 界面就已经创建好了,运行代码,会出现如下图所示的界面:

在这个 UI 界面中,我们:
* 使用 QWidget() 来创建空的窗口部件;
* 使用 QVBoxLayout() 来创建垂直盒子布局层;
* 使用 QGroupBox() 来创建分组盒子;
* 使用 QGridLayout() 来创建网格布局层;
* 使用 QScrollArea() 来创建一个可滚动区域;
* 使用 QPushButton() 来创建按钮;
* 使用 QLabel() 来创建文本标签;
* 使用 QLineEdit() 来创建单行文本输入框;
* 使用 QTextEdit() 创建一个多行文本域;
代码中基本上每一句都有注释,还有不懂的地方可以加我微信 taoist\_ling 咨询。
程序的 UI 界面创建好了,接下来就需要创建界面背后的功能函数了:
* 点击登录按钮:实现弹出微信登录的二维码供我们扫码登录,登录成功之后,按钮变为禁用状态,同时退出登录按钮状态变为激活状态;同时动态获取群聊列表,将其以复选框的形式添加到群聊列表部件中;
* 点击退出按钮:实现微信网页端的注销;
* 点击开启机器人按钮:实现侦听微信消息自动回复群聊的搜索和主动发送消息;
* 点击检查配置信息:在控制台中输出配置信息中填写的信息和选择的群聊;
* 文本控制台中输出每个操作的提示;
这些功能中有一些只是简单的操作,而有一些操作则涉及到了很多耗时的的运算,如果直接写在主类里面,在主线程中运行会直接堵塞 UI 界面导致 UI 界面无响应,所以上述的功能中一部分我们直接写在 MainGUI 主类中,一部分我们使用 QThread 子线程来实现。
4.2、创建功能方法
**4.2.1、创建一个控制台文本输出函数**
因为在我们的 UI 界面中,下次的多行文本框是用作程序的信息输出控制台的,所以我们先来定义一个文本输入函数,在 MainGUI 类中定义一个方法 outputWritten(),详细代码如下所示:
# 在控制台中写入信息
**def** **outputWritten**(**self**, text=None):
    # 获取文本框中文本的游标
    cursor = **self**.label_1.textCursor()
    # 将游标位置移动到当前文本的结束处
    cursor.movePosition(QtGui.QTextCursor.End)
    # 写入文本
    cursor.insertText(text)
    # 设置文本的游标为创建了cursor
    **self**.label_1.setTextCursor(cursor)
    **self**.label_1.ensureCursorVisible()
在这个方法中,我们通过移动文本框的游标来实现不断地在多行文本框中写入文本。


4.2.2、创建微信注销功能函数


在前面介绍 itchat 的时候我们知道,可以直接通过 itchat.logout() 实现微信的注销。现在我们将其加入到一个功能函数中:
# 退出登陆
**def** **logOut**(**self**):
    # 设置登录按钮为激活状态
    **self**.refresh_button.setEnabled(True)
    # 在文本控制台中输入
    **self**.outputWritten("退出微信登录\n")
    # 注销微信登录
    itchat.logout()
    # 设置注销按钮为禁用状态
    **self**.exit_button.setEnabled(False)
在这里,我们首先通过按钮的 setEnabled() 方法设置登录按钮的状态为激活,然后调用刚刚创建的控制台文本输出方法 outputWritten() 在控制台中输入文本,接着调用 itchat.logout() 方法执行注销,最后设置注销按钮的状态为禁用。


**4.2.3、创建一个动态生成群聊选项的方法**


在微信登录成功之后,我们会获取到群聊的对象然后将其添加到可滚动区域部件中,这个操作我们通过新建一个方法来实现:
# 生成群聊列表
def generate_chatroom(**self**,chatrooms):
    # 清空原有群里列表
    **while** **self**.scroll_widget_layout.count():
        item = **self**.scroll_widget_layout.takeAt(0)
        widget = item.widget()
        widget.deleteLater()
    # 获取群里字典
    chatrooms = chatrooms
    **self**.chatroom_dict = dict()
    **try**:
        **for** c,i in zip(chatrooms, range(len(chatrooms))):
            **print**(c['NickName'],c['UserName'])
            checkbox = QCheckBox(c['NickName'])
            checkbox.id_ = i
            **self**.chatroom_dict[c['NickName']] = c['UserName']
            checkbox.stateChanged.connect(**self**.checkChatRoom)  # 1
            **self**.scroll_widget_layout.addWidget(checkbox)
        **self**.outputWritten("生成群聊成功!\n")
    except **Exception** **as** e:
        **print**(e)
**4.2.4、获取群聊的选择状态:**


在动态添加群聊选项到可滚动区域部件中后,我们还需要在选择一个群聊的时候能够在文本控制台中有相应的提示。所以我们再新建一个方法:
# 获取群聊复选框选择状态
**def** **checkChatRoom**(self, state):
    **try**:
        checkBox = self.sender()
        **if** state == Qt.Unchecked:
            self.outputWritten(u'取消选择了{0}: {1}\n'.format(checkBox.id_, checkBox.text()))
            self.chatroom_list.remove(self.chatroom_dict[checkBox.text()])
        **elif** state == Qt.Checked:
            self.outputWritten(u'选择了{0}: {1}\n'.format(checkBox.id_, checkBox.text()))
            self.chatroom_list.append(self.chatroom_dict[checkBox.text()])
    **except** Exception **as** e:
        self.outputWritten("获取群聊选择状态失败:{}\n".format(e))
**4.2.5、创建获取所有输入值和选择值的方法**


在 UI 界面中我们有很多需要填写和选择的选择框、输入框等。我们的 UI 界面也创建了一个 “检查配置信息” 的按钮,我们为其创建一个方法,用于获取所有的输入值和选择值:
# 获取输入及选择的参数
**def** **get\_check\_info**(**self**):
    **try**:
        **self**.outputWritten("选择的群聊为:{}\**n**".format(**self**.chatroom\_list))
        **self**.outputWritten("输入的**AppKey**为:{}\**n**".format(**self**.appkey.text()))
        **self**.outputWritten("输入的**sercet**为:{}\**n**".format(**self**.secret.text()))
        **self**.outputWritten("输入的**adzone\_id**为:{}\**n**".format(**self**.adzone\_id.text()))
        **self**.outputWritten("选择的优惠券文件为:{}\**n**".format(**self**.coupon\_file.text()))
        **self**.outputWritten("++++++++++++++++++++++++++++++++++++++++++++++++++++++\**n**")
    **except** **Exception** **as** **e**:
        **print**(**e**)
**4.2.6、创建微信登录子线程**


为了在程序功能执行的时候不堵塞主线程的 UI 界面,接下来,我们对微信的登录、自动回复消息和定时发送消息都使用 PyQt 提供的线程类 QThread 来实现子线程的调用。


首先,定义一个名为 LoginWechat() 的类,继承 QThread:
登陆微信
class LoginWechat(QThread):
然后,定义一个 PyQt5 中的自定义信号,用于在主线程中能够对其进行调用:
# 自定义一个信号
**finished\_signal** = pyqtSignal(str)
接着,定义初始化方法\*\* init\*\*(),因为在子线程中也要对主线程的 UI 界面中的元素和部件进行操作,所以需要接受那些元素和部件作为参数:
**def** **\_\_init\_\_**(**self**,parent=None,label=None,scroll_widget_layout=None,refresh_button=None,exit_button=None):
    **super**().__init_\_(parent)
    **self**.l = label
    **self**.scroll_widget_layout = scroll_widget_layout
    **self**.refresh_button = refresh_button
    **self**.exit_button = exit_button
同样定义一个控制台的文本输出方法:
# 在控制台中写入信息
**def** **outputWritten**(**self**, text=None):
    cursor = **self**.l.textCursor()
    cursor.movePosition(QtGui.QTextCursor.End)
    cursor.insertText(text)
    **self**.l.setTextCursor(cursor)
    **self**.l.ensureCursorVisible()
接着,我们自定义 itchat 对微信登录的过程,在登录成功之后返回群聊列表:
# 获取uuid
**def** **open\_qr**(self):
    **for** get_count **in** range(1):
        self.outputWritten('获取uuid中……\n')
        uuid = itchat.get_QRuuid()
        **while** uuid **is** **None**:
            uuid = itchat.get_QRuuid()
            time.sleep(1)
        self.outputWritten('成功获取uuid\n')
        **if** itchat.get_QR(uuid,picDir=r'%s'%os.path.join(current_path,'qrcode.jpg')):
            **break**
        **elif** get_count >= 1:
            self.outputWritten("获取二维码出错,请重启程序\n")
            sys.exit()

    **return** uuid

# 二维码登陆
**def** **login\_wechat**(self):
    **try**:
        uuid = self.open_qr()
        self.outputWritten("请扫描二维码\n")
        waitForConfirm = **False**
        **while** 1:
            status = itchat.check_login(uuid)
            **if** status == '200':
                **break**
            **elif** status == '201':
                **if** waitForConfirm:
                    self.outputWritten('请进行确认\n')
                    waitForConfirm = **True**
            **elif** status == '408':
                self.outputWritten('重新加载二维码\n')
                time.sleep(3)
                uuid = self.open_qr()
                waitForConfirm = **False**
        userInfo = itchat.web_init()
        itchat.show_mobile_login()
        itchat.get_friends(**True**)
        self.outputWritten('登陆成功!账号为:%s\n' % userInfo['User']['NickName'])
        itchat.start_receiving()
        self.refresh_button.setText("已登录:{}".format(userInfo['User']['NickName']))
        self.exit_button.setEnabled(**True**)
    **except** Exception **as** e:
        print("登录出错:",e)
        self.outputWritten('登陆出错:{}\n'.format(e))
    **try**:
        # 获取群聊列表
        chatrooms = itchat.get_chatrooms()
        **return** chatrooms
    **except** Exception **as** e:
        self.outputWritten("获取群聊列表出错:{}\n".format(e))
最后,重写 run() 方法,在 run() 方法中设置两个登录按钮的状态,并将 login\_wechat() 方法中返回的群聊数据进行返回:
def run(**self**):
    **try**:
        **self**.refresh_button.setEnabled(**False**)
        **self**.exit_button.setEnabled(**True**)
        **self**.finished_signal.emit(**self**.login_wechat())
    except **Exception** **as** e:
        **self**.outputWritten("运行登录线程出错:{}\n".format(e))
**4.2.7、创建自动回复消息子线程**


继续创建一个继承于 QThread 的类,用于自动回复群聊搜索:
启动自动回复
class StartBot(QThread):
finished_signal = pyqtSignal(str)
# 接受一些按钮和文本信息作为参数
def __init__(self,parent=None,appkey=None,secret=None,adzone_id=None,label=None,start_button=None,end_button=None,chatrooms=None):
super().init(parent)
self.appkey = appkey
self.secret = secret
self.adzone_id = adzone_id
self.l = label
self.start_button = start_button
self.end_button = end_button
self.chatrooms = chatrooms
# 在控制台中写入信息
**def** **outputWritten**(self, text=None):
    cursor = self.l.textCursor()
    cursor.movePosition(QtGui.QTextCursor.End)
    cursor.insertText(text)
    self.l.setTextCursor(cursor)
    self.l.ensureCursorVisible()

# 通过淘宝客API搜索优惠券
**def** **get\_tk\_coupon**(self,kw,size=5):
    req = top.api.TbkDgItemCouponGetRequest()
    req.set_app_info(top.appinfo(self.appkey.text(), self.secret.text()))

    req.adzone_id = int(self.adzone_id.text())
    req.platform = 2
    # req.cat = "16,18"
    req.page_size = size
    req.q = kw
    req.page_no = 1
    **try**:
        resp = req.getResponse()['tbk\_dg\_item\_coupon\_get\_response']['results']['tbk\_coupon']
        **return** resp
    **except** Exception **as** e:
        self.outputWritten(str(e))

# 通过类目返回优惠券
**def** **get\_cat\_coupon**(self,cate_id):
    req = top.api.TbkDgItemCouponGetRequest()
    req.set_app_info(top.appinfo(self.appkey.text(), self.secret.text()))

    req.adzone_id = int(self.adzone_id.text())
    req.platform = 2
    req.cat = cate_id
    req.page_size = 10
    req.page_no = 1
    **try**:
        resp = req.getResponse()['tbk\_dg\_item\_coupon\_get\_response']['results']['tbk\_coupon']
        **return** resp
    **except** Exception **as** e:
        self.outputWritten(str(e))

# 获取淘口令
**def** **get\_token**(self,url, text):
    req = top.api.TbkTpwdCreateRequest()
    req.set_app_info(top.appinfo(self.appkey.text(), self.secret.text()))

    req.text = text
    req.url = url
    **try**:
        resp = req.getResponse()['tbk\_tpwd\_create\_response']['data']['model']
        **return** resp
    **except** Exception **as** e:
        print(e)
        **return** **None**

**def** **run**(self):
    self.start_button.setEnabled(**False**)
    self.end_button.setEnabled(**True**)
    # 回复群聊搜索
@itchat.msg_register(TEXT, isGroupChat=True)
def text_reply(msg):
if msg[‘isAt’] and msg[‘FromUserName’] in self.chatrooms:
searchword = msg[‘Content’][9:]
self.outputWritten(‘消息来自于:{0},内容为:{1}\n’.format(msg[‘ActualNickName’], msg[‘Content’]))
response = self.get_tk_coupon(searchword)
for r in response:
# 商品标题
ordername = r[‘title’]
# 商品当前价
orderprice = r[‘zk_final_price’]
coupon_info = r[‘coupon_info’]
coupon_demonination = int(re.findall(r’(\d+)‘, coupon_info)[-1])
# 商品图片
orderimg = r[‘pict_url’]
# 获取淘口令
token = self.get_token(url=r[‘coupon_click_url’], text=r[‘title’])
# 券后价
couponprice = round(float(orderprice) - int(coupon_demonination), 1)
# 生成短链
link = r[‘item_url’]
link_resp = requests.get(
‘http://api.weibo.com/2/short_url/shorten.json?source=2849184197&url_long=’ + link).text
link_short = json.loads(link_resp, encoding=‘utf-8’)[‘urls’][0][‘url_short’]
msgs = ‘’’/:gift{name}\n/:rose【在售价】{orderprice}元\n/:heart【券后价】{conponprice}元\n/:cake 【抢购链接】{link_short}\n-----------------\n复制这条信息\n{token}打开【手机淘宝】,即可查看\n------------------\n
‘’‘.format(name=ordername, orderprice=orderprice, conponprice=couponprice, token=token,
link_short=link_short)
itchat.send(msg=str(msgs), toUserName=msg[‘FromUserName’])
try:
image = urlretrieve(url=orderimg, filename=r’%s’ % os.path.join(current_path, ‘orderimg.jpg’))
itchat.send_image(fileDir=r’%s’ % os.path.join(current_path, ‘orderimg.jpg’),
toUserName=msg[‘FromUserName’])
except Exception as e:
self.outputWritten(“发送图片失败,{}\n”.format(e))
time.sleep(3)
itchat.run()
**4.2.8、创建定时发送消息子线程**


在上一节的命令行界面的微信群聊机器人中,我们设置了从早上 9 点到晚上 10 点每一个小时都主动发送商品优惠券信息,后面思考了一下,觉得这样的发送频率太高,容易对用户造成信息骚扰。所以在此将定时发送消息的机制改为两次,早上发上 8 点主动发送一次商品优惠券信息,晚上 8 点主动发送一次搜索的使用方法:
定时自动发送消息
class AutoSend(QThread):
finished_signal = pyqtSignal(str)
**def** **\_\_init\_\_**(self,parent=None,appkey=None,secret=None,adzone_id=None,label=None,start_button=None,end_button=None,chatrooms=None):
    super().__init__(parent)
    self.appkey = appkey
    self.secret = secret
    self.adzone_id = adzone_id
    self.l = label
    self.start_button = start_button
    self.end_button = end_button
    self.chatrooms = chatrooms

# 在控制台中写入信息
**def** **outputWritten**(self, text=None):
    cursor = self.l.textCursor()
    cursor.movePosition(QtGui.QTextCursor.End)
    cursor.insertText(text)
    self.l.setTextCursor(cursor)
    self.l.ensureCursorVisible()

# 通过淘宝客API搜索优惠券
**def** **get\_tk\_coupon**(self,kw,size=5):
    req = top.api.TbkDgItemCouponGetRequest()
    req.set_app_info(top.appinfo(self.appkey.text(), self.secret.text()))

    req.adzone_id = int(self.adzone_id.text())
    req.platform = 2
    # req.cat = "16,18"
    req.page_size = size
    req.q = kw
    req.page_no = 1
    **try**:
        resp = req.getResponse()['tbk\_dg\_item\_coupon\_get\_response']['results']['tbk\_coupon']
        **return** resp
    **except** Exception **as** e:
        self.outputWritten(str(e))

# 获取淘口令
**def** **get\_token**(self,url, text):
    req = top.api.TbkTpwdCreateRequest()
    req.set_app_info(top.appinfo(self.appkey.text(), self.secret.text()))

    req.text = text
    req.url = url
    **try**:
        resp = req.getResponse()['tbk\_tpwd\_create\_response']['data']['model']
        **return** resp
    **except** Exception **as** e:
        print(e)
        **return** **None**

# 定时自动发送优惠券消息
**def** **send\_coupon**(self):
    **while** **True**:
        # 获取选择的群聊列表
        **for** c **in** self.chatrooms:
            # 每天早上8点定时推送商品优惠券
            **if** datetime.datetime.today().hour == 8:
                print('现在时间:', datetime.datetime.today())
                **try**:
                    response = self.get_tk_coupon(kw='精选',size=3)
                    **for** r **in** response:
                        # 商品标题
                        ordername = r['title']
                        # 商品当前价
                        orderprice = r['zk\_final\_price']
                        coupon_info = r['coupon\_info']
                        coupon_demonination = int(re.findall(r'(\d+)', coupon_info)[-1])
                        # 商品图片
                        orderimg = r['pict\_url']
                        # 获取淘口令
                        token = self.get_token(url=r['coupon\_click\_url'], text=r['title'])
                        # 券后价
                        couponprice = round(float(orderprice) - int(coupon_demonination), 1)
                        # 生成短链
                        link = r['item\_url']
                        link_resp = requests.get(
                            'http://api.weibo.com/2/short\_url/shorten.json?source=2849184197&url\_long=' + link).text
                        link_short = json.loads(link_resp, encoding='utf-8')['urls'][0]['url\_short']
                        msgs = '''【清晨特惠精选】\n/:gift{name}\n/:rose【在售价】{orderprice}元\n/:heart【券后价】{conponprice}元\n/:cake 【抢购链接】{link\_short}\n-----------------\n复制这条信息\n{token}打开【手机淘宝】,即可查看
‘’‘.format(name=ordername,
orderprice=orderprice,
conponprice=couponprice,
token=token,
link_short=link_short)
itchat.send(msg=str(msgs), toUserName=c)
try:
image = urlretrieve(url=orderimg,
filename=r’%s’ % os.path.join(current_path, ‘orderimg.jpg’))
itchat.send_image(fileDir=r’%s’ % os.path.join(current_path, ‘orderimg.jpg’),
toUserName=c)
except Exception as e:
self.outputWritten(“发送图片失败,{}\n”.format(e))
time.sleep(3)
except Exception as e:
self.outputWritten(“发送失败:{}\n”.format(e))
# 晚上六点定时发送使用说明消息
elif datetime.datetime.today().hour == 20:
itchat.send(msg=“【优惠券搜索使用说明】\n,@我+搜索名称,即可收到5条精选天猫淘宝商品内部优惠券\n”,
toUserName=c)
time.sleep(3600)
**def** **run**(self):
    **try**:
        self.send_coupon()
    **except** Exception **as** e:
        self.outputWritten("定时发送消息出错:{}\n".format(e))
**4.2.9、在 MainGUI 类中创建调用子线程的方法**


在上面,我们新建了三个继承自 QThread 的类,分别是:


* LoginWechat():用于登录微信,返回群聊对象;
* StartBot():用于恢复群聊中的搜索;
* AutoSend():用于启动定时发送消息;


现在,我们需要在主类 MainGUI 中对其进行调用,所以我们分别在 MainGUI() 中创建三个方法,用于实例化这三个线程并启动它们:


首先是登录微信的线程:
# 登录微信 - 线程
def login_wechat(**self**):
    **try**:
        **self**.login_wechat_thread = LoginWechat(
            label=**self**.label_1,
            scroll_widget_layout=**self**.scroll_widget_layout,
            refresh_button=**self**.refresh_button,
            exit_button=**self**.exit_button,

        )
        **self**.login_wechat_thread.finished_signal.connect(**self**.generate_chatroom)
        **self**.login_wechat_thread.start()
    except **Exception** **as** e:
        **print**("执行登录线程出错:",e)
        **self**.outputWritten("执行登录线程出错:{}\n".format(e))
然后,我们在一个方法中同时启用群聊回复和主动发送消息的线程:
# 启动自动回复和主动发送消息 - 线程
def start_bot(**self**):
    **try**:
        **self**.outputWritten("开始自动回复……\n")
        **self**.start_boot_thread = StartBot(
            appkey=**self**.appkey,
            secret=**self**.secret,
            adzone_id=**self**.adzone_id,
            label=**self**.label_1,
            start_button=**self**.start_run,
            end_button=**self**.end_run,
            chatrooms=**self**.chatroom_list
        )
        **self**.auto_send_coupon_tread = AutoSend(
            appkey=**self**.appkey,
            secret=**self**.secret,
            adzone_id=**self**.adzone_id,
            label=**self**.label_1,
            start_button=**self**.start_run,
            end_button=**self**.end_run,
            chatrooms=**self**.chatroom_list
        )
        **self**.start_boot_thread.finished_signal.connect(**self**._show_message)
        **self**.auto_send_coupon_tread.finished_signal.connect(**self**._show_message)
        **self**.start_boot_thread.start()
        **self**.auto_send_coupon_tread.start()
    except **Exception** **as** e:
        **self**.outputWritten('{}\n'.format(e))
**4.2.10 将按钮与功能函数方法进行绑定**


经过上面的若干步骤,我们创建好了一个 UI 界面,同时也创建了诸多个实际的功能方法。现在问题来了,如何将它们一一对应进行关联呢?我们可以使用 PyQt5 中部件的 clicked 事件 connect 方法来关联对应的方法。先来看一下每个方法所对应的按钮部件:


* “点击登录” 按钮对应于 login\_wechat() 方法;
* “退出登录” 按钮对应于 logOut() 方法;
* “开启机器人” 按钮对应于 start\_bot() 方法;
* “检查配置信息” 按钮对应于 getcheckinfo() 方法;


下面,我们调用这些按钮 clicked 事件将对应的方法绑定在一起,在 MainGUI 类的 verticalboxlayout() 方法中继续添加以下代码:
    **self**.refresh\_button.clicked.connect(**self**.login\_wechat)
    **self**.exit\_button.clicked.connect(**self**.logOut)
    **self**.check\_info.clicked.connect(**self**.get\_check\_info)
    **self**.start\_run.clicked.connect(**self**.start\_bot)
这样,就完成了整个淘宝客微信群聊机器人的编写。我们来运行一下看看效果如何。 登录微信并动态生成群聊列表:

开启自动回复和主动发送消息:
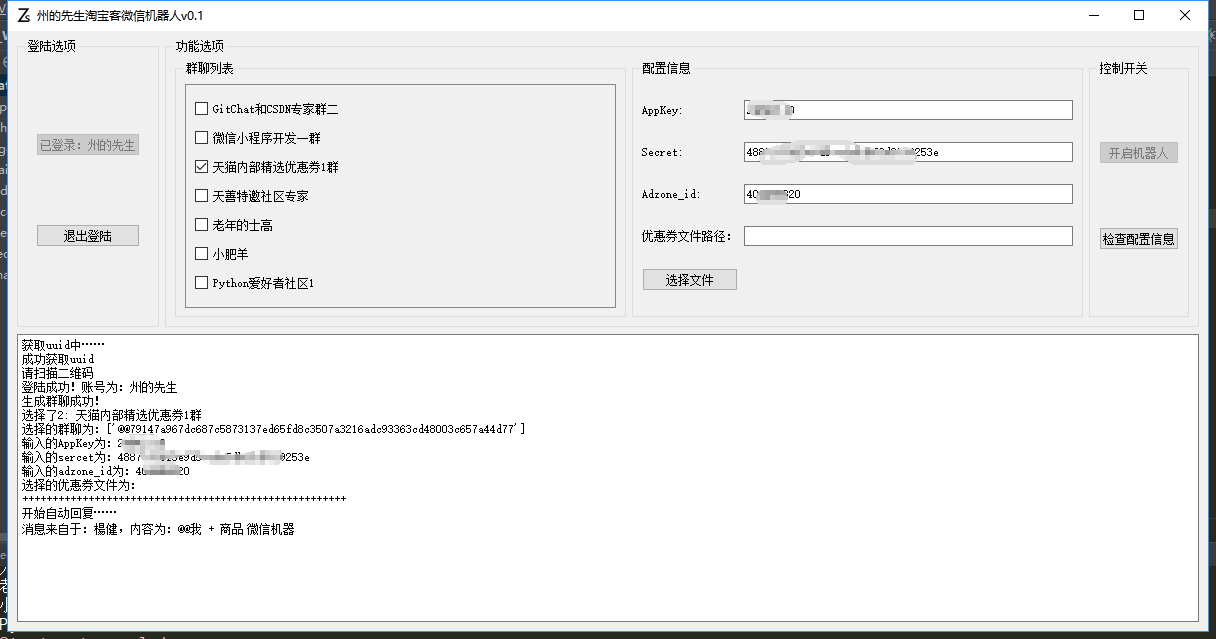
手机上的效果:

最后,完整的代码如下所示,对程序和代码有任何不理解的,欢迎添加添加我的私人微信号: taoist\_ling,交流讨论:
coding:utf-8
from PyQt5.QtCore import QThread, pyqtSignal, Qt
from PyQt5.QtWidgets import *
from PyQt5 import QtGui
import sys
import itchat
from itchat.content import *
import datetime
import time
import os
import top.api
import requests
import json
import re
from urllib.request import urlretrieve
import traceback
current_path = os.path.dirname(os.path.abspath(file))
global chatrooms
class MainGUI(QMainWindow):
def __init__(self):
super().init()
self.iniUI()
'''
程序默认UI界面信息
‘’’
def iniUI(self):
self.setWindowTitle(“州的先生淘宝客微信机器人v0.1”)
self.resize(1200, 600)
    self.vertical_box_layout()

    self.chatroom_list = []
    self.current_date = datetime.datetime.strftime(datetime.datetime.today(),'%Y-%m-%d')

    # 设置程序图标
    icon = QtGui.QIcon()
    icon.addPixmap(QtGui.QPixmap("logo.png"), QtGui.QIcon.Normal, QtGui.QIcon.Off)
    self.setWindowIcon(icon)

# 水平垂直布局
**def** **vertical\_box\_layout**(self):

    '''
上层功能盒子
‘’’
    # 创建一个用于存放登录相关按钮的窗口部件
    login_buttons = QWidget()
    login_buttons_box = QVBoxLayout()
    # 设置窗口部件的布局为垂直盒子布局
    login_buttons.setLayout(login_buttons_box)

    # 创建两个登录相关的按钮
    self.refresh_button = QPushButton("点击登录")
    self.refresh_button.clicked.connect(self.login_wechat)
    self.exit_button = QPushButton("退出登陆")
    self.exit_button.clicked.connect(self.logOut)
    self.exit_button.setEnabled(**False**)
    # 将按钮添加到窗口部件中
    login_buttons_box.addWidget(self.refresh_button)
    login_buttons_box.addWidget(self.exit_button)

    # 创建一个登录按钮的组盒子
    login_box = QGroupBox()
    login_box.setTitle("登陆选项")
    # 设置登陆盒子布局为网格布局
    login_box_layout = QGridLayout()
    login_box.setLayout(login_box_layout)
    # 将按钮窗口部件添加到网格布局中
    login_box_layout.addWidget(login_buttons,0,1)

    # 创建群聊列表子盒子
    chatroom_box = QGroupBox()
    chatroom_box.setTitle("群聊列表")
    # 创建群聊列表的垂直布局层
    chatroom_box_layout = QVBoxLayout()
    # 设置群聊列表子盒子的布局层
    chatroom_box.setLayout(chatroom_box_layout)
    # 创建一个群聊部件
    scroll_widget = QWidget()
    # 创建群聊不见的布局层
    self.scroll_widget_layout = QVBoxLayout()
    # 设置群聊不见的布局层为self.scroll\_widget\_layout
    scroll_widget.setLayout(self.scroll_widget_layout)
    # 创建一个可滚动区域
    scroll = QScrollArea()
    # 在可滚动区域中设置窗口部件为scroll\_widget
    scroll.setWidget(scroll_widget)
    scroll.setAutoFillBackground(**True**)
    scroll.setWidgetResizable(**True**)
    # 在群里盒子布局中添加可滚动区域
    chatroom_box_layout.addWidget(scroll)

    # 创建文件及Token子盒子
    settings_box = QGroupBox()
    settings_box.setTitle("配置信息")
    settings_box_layout = QGridLayout()
    settings_box.setLayout(settings_box_layout)
    # 创建输入框
    key_name = QLabel("AppKey:")
    sec_name = QLabel("Secret:")
    adzone_name = QLabel("Adzone\_id:")
    self.appkey = QLineEdit()
    self.secret = QLineEdit()
    self.adzone_id = QLineEdit()
    file_name = QLabel("优惠券文件路径:")
    self.coupon_file = QLineEdit()
    choose_file = QPushButton("选择文件")
    choose_file.clicked.connect(self.choose_coupon_file)
    # 添加输入框到settings\_box\_layout中
    settings_box_layout.addWidget(key_name,0,0)
    settings_box_layout.addWidget(self.appkey,0,1)
    settings_box_layout.addWidget(sec_name,1,0)
    settings_box_layout.addWidget(self.secret,1,1)
    settings_box_layout.addWidget(adzone_name,2,0)
    settings_box_layout.addWidget(self.adzone_id,2,1)
    settings_box_layout.addWidget(file_name,3,0)
    settings_box_layout.addWidget(self.coupon_file,3,1)
    settings_box_layout.addWidget(choose_file,4,0)

    # 创建控制按钮盒子
    control_box = QGroupBox()
    control_box.setTitle("控制开关")
    control_box_layout = QVBoxLayout()
    control_box.setLayout(control_box_layout)
    # 创建控制按钮
    self.start_run = QPushButton("开启机器人")
    self.start_run.clicked.connect(self.start_bot)
    self.end_run = QPushButton("停止机器人")
    self.end_run.setEnabled(**False**)
    self.check_info = QPushButton("检查配置信息")
    self.check_info.clicked.connect(self.get_check_info)
    # 将控制按钮添加到控制按钮盒子中
    control_box_layout.addWidget(self.start_run,0)
    # control\_box\_layout.addWidget(self.end\_run,1)
    control_box_layout.addWidget(self.check_info,2)

    # 选项盒子
    select_box = QGroupBox()
    select_box.setTitle("功能选项")
    # 选项盒子布局
    select_box_layout = QGridLayout()
    select_box.setLayout(select_box_layout)
    # 将群聊列表盒子、配置信息盒子和控制按钮盒子添加到选项盒子中
    select_box_layout.addWidget(chatroom_box,0,0)
    select_box_layout.addWidget(settings_box,0,1)
    select_box_layout.addWidget(control_box,0,2)

    # 窗口主部件中上层功能按钮的布局
    utils_box = QGridLayout()
    # 添加登录盒子和选项盒子到上层布局中
    utils_box.addWidget(login_box,0,0)
    utils_box.addWidget(select_box,0,1)

    '''
下层控制台盒子
‘’’
# 创建一个文本框
self.label_1 = QTextEdit()
# 设置文本框为只读
self.label_1.setReadOnly(True)
    # 窗口主部件中下层控制台的布局
    console_box = QVBoxLayout()
    console_box.addWidget(self.label_1)

    '''
主窗体的布局
‘’’
最后
Python崛起并且风靡,因为优点多、应用领域广、被大牛们认可。学习 Python 门槛很低,但它的晋级路线很多,通过它你能进入机器学习、数据挖掘、大数据,CS等更加高级的领域。Python可以做网络应用,可以做科学计算,数据分析,可以做网络爬虫,可以做机器学习、自然语言处理、可以写游戏、可以做桌面应用…Python可以做的很多,你需要学好基础,再选择明确的方向。这里给大家分享一份全套的 Python 学习资料,给那些想学习 Python 的小伙伴们一点帮助!
👉Python所有方向的学习路线👈
Python所有方向的技术点做的整理,形成各个领域的知识点汇总,它的用处就在于,你可以按照上面的知识点去找对应的学习资源,保证自己学得较为全面。

👉Python必备开发工具👈
工欲善其事必先利其器。学习Python常用的开发软件都在这里了,给大家节省了很多时间。

👉Python全套学习视频👈
我们在看视频学习的时候,不能光动眼动脑不动手,比较科学的学习方法是在理解之后运用它们,这时候练手项目就很适合了。

👉实战案例👈
学python就与学数学一样,是不能只看书不做题的,直接看步骤和答案会让人误以为自己全都掌握了,但是碰到生题的时候还是会一筹莫展。
因此在学习python的过程中一定要记得多动手写代码,教程只需要看一两遍即可。

👉大厂面试真题👈
我们学习Python必然是为了找到高薪的工作,下面这些面试题是来自阿里、腾讯、字节等一线互联网大厂最新的面试资料,并且有阿里大佬给出了权威的解答,刷完这一套面试资料相信大家都能找到满意的工作。

一个人可以走的很快,但一群人才能走的更远!不论你是正从事IT行业的老鸟或是对IT行业感兴趣的新人,都欢迎加入我们的的圈子(技术交流、学习资源、职场吐槽、大厂内推、面试辅导),让我们一起学习成长!


 1645
1645

 被折叠的 条评论
为什么被折叠?
被折叠的 条评论
为什么被折叠?
 到【灌水乐园】发言


