


文章目录
一、UnitTest框架
UnitTest框架是python自带的一种单元测试框架。
为什么使用UnitTest框架?
1.批量执行用例
2.提供丰富的断言知识
3.可以生成报告
核心要素:
1). TestCase (测试用例)
2). TestSuite (测试套件)
3). TextTestRunner (以文本的形式运行测试用例)
4). TestLoader (批量执行测试用例–搜索指定文件夹内指定字母开头的模块) [ 推荐 ]
5). Fixture (固定装置(两个固定的函数,一个初始化时使用,一个结束时使用)
1. TestCase使用
# 1.导包
import unittest

def add(x,y):
    return x + y

# 2. 定义测试类并继承
class TestUni1(unittest.TestCase):
    def test1(self):
        res = add(10,20)
        print("结果为:", res)
    def test2(self):
        res = add(30,20)
        print("结果为:", res)
2. TestSuite 和 TestRunner
TestSuite: 测试套件
步骤:
1.导包
2.获取测试套件对象 suite = unittest.TestSuite()
3.调用addTest()方法添加测试用例
添加测试用例方法:
suite.addTest(类名("方法名称")) 添加指定类中指定的测试方法
suite.addTest(unittest.makeSuite(类名))并添加指定类中所有己test开头的方法
TextTestRunner: 执行测试套件方法
步骤:
1.导包
2.实例化后去执行套件对象runner = unittest.TextTestRunner()
3.调用run方法去执行 runner.run(suite)
# 1.导包
import unittest
from testCase.test_unitest import TestUni1

# 2.实例化获取TestSuite对象
suite = unittest.TestSuite()
# 3.调用addTest方法添加用例到指定套件中
suite.addTest(TestUni1("test2"))
# suite.addTest(unittest.makeSuite(TestUni1))
# 4. 执行测试套件
runner = unittest.TextTestRunner().run(suite)
3. TestLoader
1.将符合条件的测试方法添加到测试套件中
2.搜索指定目录文件下指定字母开头的模块文件下test开始的方法,并将这些方法添加到测试套件中,最后返回测试套件。
操作:
1.导包:import unittest
2.调用TestLoader()
写法1: suite = unittest.TestLoader().discover("指定搜索的目录文件", "指定字母开头模块文件")
写法2: suite = unittest.defaultTestLoader.discover ("指定搜索的目录文件", "指定字母开头模块文件") [推荐 ]
注意:如果使用写法1,TestLoader() 必须有括号。
3.执行测试套件: unittest.TextTestRunner().run(suite)
# 1.导包
import unittest

# 2.调用方法
suite = unittest.TestLoader().discover("../testCase")
# 推荐使用
suite = unittest.defaultTestLoader.discover("../testCase")

# 3. 执行测试套件
unittest.TextTestRunner().run(suite)
4. Fixture装置
1).函数级别def setUp() / def tearDown()
特性: 几个测试函数,执行几次。每个测试函数执行之前都会执行setUp, 执行之后都会执行tearDwon
2).类级别def setUpClass() / def tearDownClass()
特性:测试类运行之前运行一次setUpClass类运行之后运行一次tearDownClass
注意:类方法必须使用@classmethod修饰
常用场景:
初始化:
1.获取浏览器实例化对象
2.最大化浏览器
3.隐式等待
结束: 关闭浏览器驱动对象
# 1.导包
import unittest
def add(x,y):
return x + y
# 2. 定义测试类并继承
class TestUni1(unittest.TestCase):
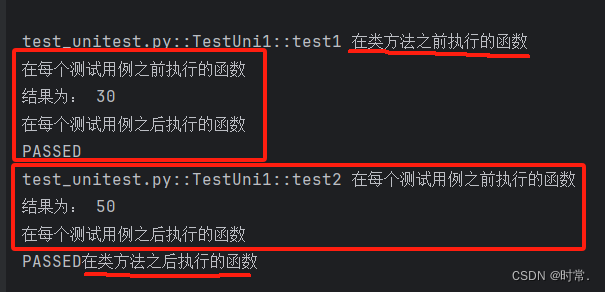
@classmethod
def setUpClass(cls):
print("在类方法之前执行的函数")
@classmethod
def tearDownClass(cls):
print("在类方法之后执行的函数")
def setUp(self):
print("在每个测试用例之前执行的函数")
def tearDown(self):
print("在每个测试用例之后执行的函数")
def test1(self):
res = add(10,20)
print("结果为:", res)
def test2(self):
res = add(30,20)
print("结果为:", res)
5. UnitTest断言
断言:让程序代替人为判断执行结果是否与预期结果相等的过程
为什么要断言?
自动化脚本执行时都是无人值守,需要通过断言来判断自动化脚本的执行是否通过
注:自动化脚本不写断言,相当于没有执行测试一个效果。
# 一、unitTest断言(常用3个断言)
# 1.判断是否为True
self.assertTrue(True)
self.assertFalse(False)
# 2.判断两个字符串是否相等
self.assertEqual("good","good")
# 3.判断后边的字符串是否包含前边的字符串(不能跳字符)
self.assertIn("成功","欢迎您xx,登陆成功")

# 二、python自带断言
1. assert str1 == str2 #判断str1是否与str2相等
2. assert str1 in str2 #判断str2是否包含str1
3. assert True/1 #判断是否为True(False为 False/0)
1. 登录案例
import time
import unittest
from time import sleep
import selenium
from selenium import webdriver
from selenium.webdriver.common.by import By

class TestLogin(unittest.TestCase):
    def setUp(self):
        self.driver = webdriver.Edge()
        self.driver.get("https://www.xx.com") # 打开浏览器
        self.driver.maximize_window()
        self.driver.implicitly_wait(10)
    def tearDown(self):
        sleep(3)
        self.driver.quit() # 关闭浏览器

    def test_login(self):
        driver = self.driver
        driver.find_element(By.CLASS_NAME, "loginPage").click() # 点击跳转到登录页面
        driver.find_element(By.CLASS_NAME, 'username').send_keys("admin1") # 输入用户名
        driver.find_element(By.CLASS_NAME, 'password').send_keys("123456") # 输入密码
        driver.find_element(By.CLASS_NAME, "code").send_keys() # 验证码为空(不填写)
        driver.find_element(By.CLASS_NAME, "login").click() # 点击登录
        res = driver.find_element(By.CLASS_NAME, "failTxt").text # 获取失败的文字提醒

        except_res = "验证码不能为空!" # 定义预期的结果
        # 断言
        try:
            self.assertEqual(res, except_res)
        except AssertionError:
            # 错误截图
            driver.get_screenshot_as_file("./image/error{}.png".format(time.strftime("%Y%m%d %H%M%S")))
            # 抛异常
            raise
6. 参数化
参数化解决冗余代码问题;
什么是参数化:根据需求动态获取参数并引用的过程
参数化应用场景: 解决相同业务逻辑,不同测试数据问题。
1. parameterized插件
安装: pip install parameterized
应用插件
1.导包from parameterized import parameterized
2.修饰测试函数@parameterized.expand([数据])
数据格式:
1.单个参数:类型为列表
2.多个参数:类型为列表嵌套元祖
3.在测试函数中的参数设置变量引用参数值,注意:变量的数量必须和数据值的个数相同
import unittest
from parameterized import parameterized

class TestUni01(unittest.TestCase):
    # 写法一:实际不推荐 数据不会存在当前文件
    data = [("a",1,"a1"),(1,2,3)]
    @parameterized.expand(data)
    def test_add(self,param1,param2,res):
        print("{}+{}={}".format(param1,param2,res))

    # 写法二:推荐  data从外部读取数据进来
  	...
    @parameterized.expand(data)
    def test_add(self, param1, param2, res):
        print("{}+{}={}".format(param1, param2, res))
7. unitTest 跳过
1.直接跳过:
语法: unittest.skip(说明)
场景:一般适合功能未实现完成用例
2.条件满足跳过:
语法: @unittest.skipIf(条件,原因)
场景:一般判断条件满足,就不执行:如:达到指定版本,此功能失效
import unittest

class TestUni01(unittest.TestCase):
    ver = 22
    @unittest.skip("跳过~")
    def test_1(self):
        print("用例1")

    @unittest.skipIf(ver > 20,"版本大于20,跳过")
    def test_2(self):
        print("用例2")
二、pytest 框架
- pytest是一个非常 成熟的python的单元框架,比unittest更灵活,容易上手。
- pytest可以和selenium,requests , appium结合实现web自动化,接口自动化,app自动化。
- pytest可以实现测试用例的跳过以及reruns失败用例重试。
- pytest可以和allure生成非常美观的测试报告。
- pytest可以和Jenkins持续集成。
- pytest有很多非常强大的插件,并且这些插件能够实现很多的实用的操作。
pip install pytest
pip install pytest-html( 生成html格式的自动化测试报告)
pip install pytest-xdist测试用例分布式执行。 多CPU分发。
pip install pytest-ordering用于改变测试用例的执行顺序
pip install pytest-rerunfailures用例失败后重跑
pip install allure-pytest用于生成美观的测试报告。
文件命名规范(重要)
(1) py测试文件必须以“test_”开头(或“_test’结尾)
(2)测试方法必须以“ test_” 开头
def test_1():
    name = 'mario'
    assert name =='mario'
(3)测试类必须以Test开头,并且不能有init方法
class TestCase:
    def test_one(self):
        assert 1 == 1

    def test_two(self):
        assert 1 == 2
1. 运行方式
1.主函数模式
(1)运行所有: pytest main()
(2)指定模块: pytest main("-vs",'test_login.py'])
(3)指定目录: pytest main(['-vs',./interface_testcase'])
(4)通过nodeid指定用例运行: nodeid由模块名,分隔符,类名,方法名,函数名组成。
pytest.main('-vs',"./interface_testcase/test_interface.py::test_04_func"])
pytest.main(['-vs','./interface_testcase/test_interface.py::TestInterface::test_03_func'])
2.命令行模式
(1)运行所有: pytest
(2)指定模块: pytest -vs test_login.py
(3)指定目录: pytest -vs ./interface_testcase
(4)指定目录: pytest -vs ./interface_testcase/test_interface.py::test_04_func
参数详解:
-s :表示输出调试信息,包括print打印的信息
-v :显示更详细的信息
-vs :这两个参数一起用
-n:支持多线程或者分布式运行测试用例。
如:pytest -VS ./testcase/test_login.py -n 2
--reruns NUM:失败用例重跑
-x :表示只要有一个用例报错,那么测试停止。
--maxfail=2出现两个用例失败就停止。
-k :根据测试用例的部分字符串指定测试用例。
如:pytest -VS .itestcase -K "ao"
--html ./report/report.html:生成htmI的测试报告。
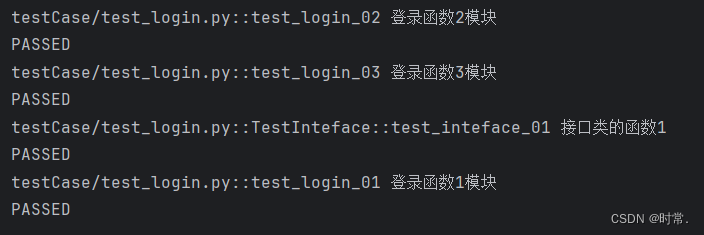
test_login.py
import pytest

def test_login_01():
    print("登录函数模块")

class TestInteface:
    def test_inteface_01(self):
        print("接口类的函数1")
all.py 运行:
import pytest

if __name__ == '__main__':
    pytest.main(['-vs','./testCase/test_login.py']) # 详细信息执行
    pytest.main(['-vs', './testCase/test_login.py', "-n=2"])  # 多(2)线程执行
    pytest.main(['-vs','./testCase/test_login.py',"--reruns=2"]) # 失败用例会再次执行2次
3.读取配置文件(常用方式)
一般要放在根目录下面。
通过读取pytest.ini配置文件运行。
pytest.ini这个文件它是pytest单元测试框架的核心配置文件。
1.位置: 一般放在项目的根目录
2.编码:必须是ANSI ,可以使用notpad++等修改编码格式。
3.作用:改变pytest默认的行为。
4.运行的规则;不管是主函数的模式运行,命令行模式运行,都会去读取这个配置文件。
pytest.ini 文件的配置
[pytest]
addopts = -VS # 命令行的参数,用空格分隔
testpaths = ./testcase # 测试用例的路径
python_ files= test_*.py # 模块名的规则
python_ classes = Test* # 类名的规则
python_ functions = test # 方法名的规则
2. pytest执行用例的顺序
unittest:ascll 的大小来绝对的执行的顺序
pytest: 默认从上到下
改变默认的执行顺序:使用mark标记。
@pytest.mark.run(order=3)
import pytest

def test_login_01():
    print("登录函数1模块")

@pytest.mark.run(order=3)
class TestInteface:
    def test_inteface_01(self):
        print("接口类的函数1")

@pytest.mark.run(order=1)
def test_login_02():
    print("登录函数2模块")
    # assert 1 == 2

@pytest.mark.run(order=2)
def test_login_03():
    print("登录函数3模块")
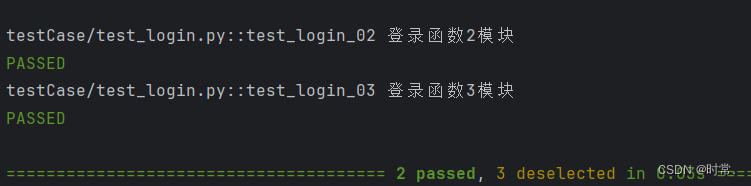
1. 分组执行(冒烟,分模块执行,分接口和web执行)
pytest.ini 配置文件
[pytest]
addopts = -vs -m "smoke"
testpaths = ./testCase
python_files = test_*.py
python_classes = Test*
python_functions = test
markers =
    smoke:冒烟测试
    usermanage:用户管理模块
    productmanage:商品管理模块
smoke :冒烟用例,分布在各个模块里面
pytest -m "smoke"
pytest -m "smoke or usermanage or productmanage"
import pytest

def test_login_01():
    print("登录函数1模块")

@pytest.mark.smoke
def test_login_02():
    print("登录函数2模块")
    # assert 1 == 2

@pytest.mark.smoke
@pytest.mark.usermanage
def test_login_03():
    print("登录函数3模块")
2. 跳过用例
# 无条件跳过
@pytest.mark.skip
# 有条件跳过
@pytest.mark.skipif(age>=18,"已成年")
3. 常见断言类型
def test_one():
    assert 1 == 1
    assert 1 != 2
    assert 2 > 1
    assert 1 < 4
    assert 3 >= 3
    assert 1 <= 1
    assert 'a' in 'china'
    assert 's' not in 'china'
    assert True is True
    assert False is not True
pytest + selenium 练习
百度为例:
from selenium import webdriver
from selenium.webdriver.common.by import By

def test_baidu():
    driver = webdriver.Edge()
    driver.get('https://www.baidu.com')
    title = driver.title
    url = driver.current_url
    text = driver.find_element(By.CSS_SELECTOR,'a[href="http://news.baidu.com"]').text
    button_text = driver.find_element(By.ID,'su').accessible_name
    assert title == '百度一下,你就知道'
    assert url == 'https://www.baidu.com/'
    assert text == '新闻'
    assert button_text == '百度一下'
4. 前后置(固件,夹具)的处理
Pytest框架实现一些前后置(固件,夹具)的处理,常用三种。
1. setup/teardown,setp_ class/teardown_ class
为什么需要这些功能?
比如: web自动化执行用例之前,请问需要打开浏览器吗?用例执行后需要关闭浏览器?
注意:全是小写
import pytest
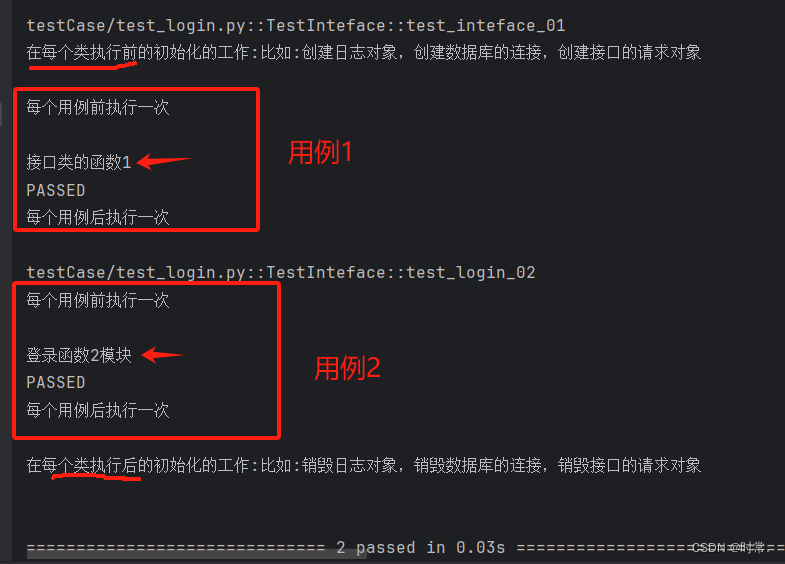
class TestInteface:
# 这个在所有的用例之前只执行一次
def setup_class(self):
print('\n在每个类执行前的初始化的工作:比如:创建日志对象,创建数据库的连接,创建接口的请求对象')
# 在每个用例之前执行一次。
def setup_method(self):
print("\n每个用例前执行一次")
def test_inteface_01(self):
print("\n接口类的函数1")
def test_login_02(self):
print("\n登录函数2模块")
def teardown_method(self):
print("\n每个用例后执行一次")
def teardown_class(self):
print('\n在每个类执行后的初始化的工作:比如:销毁日志对象,销毁数据库的连接,销毁接口的请求对象')
2. fixture实现部分用例的前后置(推荐)
使用@pytest.fixture()装饰器来实现部分用例的前后置。
@pytest.fixture(scope="",params="",autouse="",ids="",name="")有五个参数:
(1)scope表示的是被@pytest.fixture标记的方法的作用域。function(默认) , class , module ,package/session.
(2)params :参数化
(3)autouse=True :自动每个用例都执行,默认False
(4)ids :当使用params参数化时,给每一个值设置一个变量名。意义不大。中文会出现
(5)name :给表示的是被@pytest fixture标记的方法取一一个别名。当取了别名之后,那么原来的名称就用不了了。
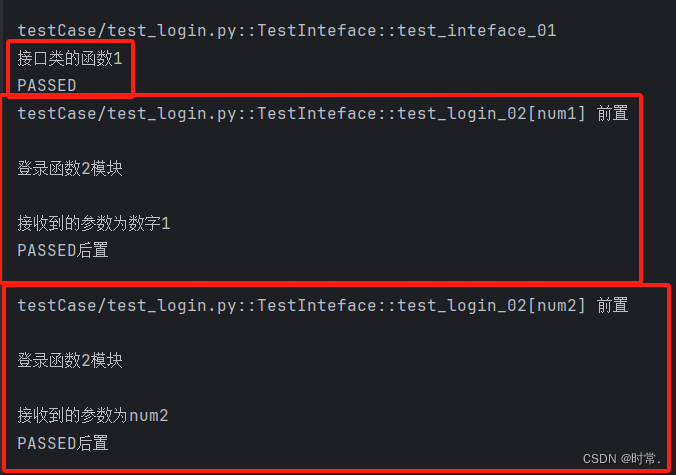
import pytest
@pytest.fixture(scope="function",params=["数字1","num2"],ids=["num1","num2"])
def my_fixtrue(request):
    print("前置")
    yield request.param # return和yield都表示返回的意思, 但是return的后面不能有代码, yield返回后后面可以接代码。
    print('后置')
    # return request.param  # 注意:return和yield不能同时存在

class TestInteface:
    def test_inteface_01(self):
        print("\n接口类的函数1")

    def test_login_02(self,my_fixtrue):
        print("\n登录函数2模块")
        print("\n接收到的参数为"+str(my_fixtrue))
5. conftest.py和@pytest.fixture()结合实现全局的前置
通过conftest.py和@pytest.fixture()结合使用实现全局的前置应用(比如:项目的全局登录,模块的全局处理)
1.conftest. py文件是单独存放的一一个夹具配置文件,名称是不能更改。
2.用处可以在不同的py文件中使用同一个fixture函数。
3.原则上conftest.py需要和运行的用例放到同一层。并且不需要做任何的import导入的操作。
conftest.py
import pytest
@pytest.fixture(scope="function")
def my_fixtrue(request):
    print("前置")
    yield request.param # return和yield都表示返回的意思, 但是return的后面不能有代码, yield返回后后面可以接代码。
    print('后置')
    # return request.param  # 注意:return和yield不能同时存在
test_login.py
class TestInteface:
    def test_inteface_01(self):
        print("\n接口类的函数1")

    def test_login_02(self,my_fixtrue):
        print("\n登录函数2模块")
        print("\n接收到的参数为"+str(my_fixtrue))
6. @pytest.mark.parametrize()参数化
@pytest.mark.parametrize(args_name ,args_value)
args_name :参数名
args_value :参数值(列表,元祖,字典列表,字典元祖) ,有多个值用例就会执行多少次
import pytest
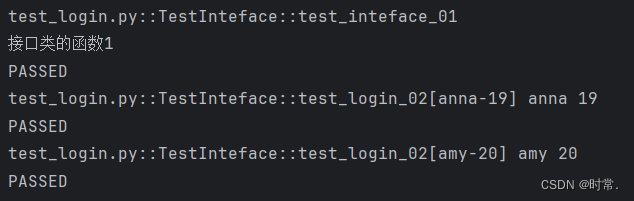
class TestInteface:
def test_inteface_01(self):
print("\n接口类的函数1")
# 相当于解包
@pytest.mark.parametrize('name,age',[["anna",19],["amy",20]])
def test_login_02(self,name,age):
print(name,age)
7. pytest结合allure-pytest插件生成allure测试报告
1.下载,解压,配置path路径。
https://github.com/allure-framework/allure2/releases
https://repo.maven.apache.org/maven2/io/qameta/allure/allure-commandline/
验证: allure --version
问题: dos可以验证但是pycharm验证失败,怎么办,重启pycharm
1.加入命令生成json格式的临时报告: --alluredir .temp
pytest.ini
[pytest]
addopts = -vs --alluredir ./temp
testpaths = ./testCase
python_files = test_*.py
python_classes = Test*
python_functions = test
markers =
    smoke:冒烟测试
    usermanage:用户管理模块
    productmanage:商品管理模块
2.生成allure报告
os.system('allure generate ./temp -o ./report --clearn')
allure generate:命令,固定的
./temp:临时的json格式报告的路径
-o:输出output
/report:生成的allure报告的路径
--clean:清空./report路径原来的报告


 1452
1452

 被折叠的 条评论
为什么被折叠?
被折叠的 条评论
为什么被折叠?
 到【灌水乐园】发言


