


一、概述
Websocket是一种基于TCP的全双工通信协议,像我们日常使用的http协议是一种“半双工”也就是只能是客户端请求----服务器响应。而Websocket却可以实现让服务器主动给客户端发送消息。在没有Websocket之前想要实现客户端和服务器之间的,服务器主动发送消息给客户端,一般是通过客户端,轮询或者长连接的方式。Websocket在建立连接的时候用的是http协议,之后就使用的ws协议。
二、代码实现
1. pom依赖
        <dependency>
            <groupId>org.springframework.boot</groupId>
            <artifactId>spring-boot-starter-websocket</artifactId>
        </dependency>
2. 配置类
/**
 * WebSocket config
 */
@Configuration
public class WebSocketConfig {

    @Bean
    public ServerEndpointExporter serverEndpointExporter(){
        return new ServerEndpointExporter();
    }
}
3. Websocket核心实现类
@Component
@ServerEndpoint("/api/pushMessage/{userId}")
public class WebSocketServer {

    private static final Logger log = LoggerFactory.getLogger(WebSocketServer.class);

    /**
     *  online number user
     */
    private static int onlineCount = 0;
    /**
     *  ConcurrentHashMap
     */
    private static ConcurrentHashMap<String,WebSocketServer> concurrentHashMap = new ConcurrentHashMap<>();
    /**
     *  WebSocket Session
     */
    private Session session;
    /**
     *  Current userId;
     */
    private String userId = "";


    /**
     * made success next
     * @param session
     * @param userId
     */
    @OnOpen
    public void onOpen(Session session, @PathParam("userId") String userId){
        this.session = session;
        this.userId = userId;
        if(concurrentHashMap.containsKey(userId)){
            concurrentHashMap.remove(userId);
            concurrentHashMap.put(userId,this);
        }else{
            concurrentHashMap.put(userId,this);
            addOnlineCount();
        }
        log.info("userId:"+userId+"online user num:"+getOnlineCount());
        sendMessage("link WebSocket is success!");

    }


    @OnMessage
    public void onMessage(String message){
        log.info("userId :"+userId+",send message:"+message+"to :other");
        if(StringUtils.isNotBlank(message)){
            Map<String,String> map = (Map<String, String>) JSONObject.parse(message);
            String toUserId = map.get("toUserId");
            String msg = map.get("contentText");
            if(StringUtils.isNotBlank(toUserId) && concurrentHashMap.containsKey(toUserId)){
                concurrentHashMap.get(toUserId).sendMessage(msg);
            }else{
                log.error("this userId is not this System");
            }
        }

    }

    @OnError
    public void onError(Throwable error){
        log.error("用户错误:"+this.userId+",原因:"+error.getMessage());
        error.printStackTrace();
    }

    @OnClose
    public void onClose(){
        if(concurrentHashMap.containsKey(userId)){
            concurrentHashMap.remove(userId);
            subOnlineCount();
        }else{
            log.info("user downed :"+userId+"online num is:"+getOnlineCount());
        }
    }


    private void sendMessage(String message) {
        try{
            this.session.getBasicRemote().sendText(message);
        }catch (IOException e){
            e.printStackTrace();
        }
    }


    private static void sendText(String message,String userId){
        log.info("send message:"+message+",to userId:"+userId);
        if(StringUtils.isNotBlank(userId) && concurrentHashMap.containsKey(userId)){
            concurrentHashMap.get(userId).sendMessage(message);
        }else {
            log.error("userId:"+userId+"is down");
        }

    }


    //广播
    public void sendAllMessage(String message){
        Set<Map.Entry<String, WebSocketServer>> entries = concurrentHashMap.entrySet();
        for(Map.Entry<String, WebSocketServer> enty : entries){
            enty.getValue().sendMessage("【服务器】 广播消息:"+message);
        }
    }

    //多发
    public void sendMoneyMessage(String[] userIds,String message){
        for (String userId : userIds){
            if(concurrentHashMap.containsKey(userId)){
                concurrentHashMap.get(userId).sendMessage("【服务器】VIP定向广播:"+message);
            }else{
                log.error(userId+"已断开无法通信");
            }
        }
    }


    public static synchronized int getOnlineCount(){
        return onlineCount;
    }

    public static synchronized void addOnlineCount(){
        log.info("调用++");
        onlineCount++;
    }

    public static synchronized void subOnlineCount(){
        log.info("调用--");
        onlineCount--;
    }

}
4. controller类
@Controller
@RequestMapping("/websocket")
public class WebSocketController {

    @Autowired
    private WebSocketServer webSocketServer;

    @GetMapping
    public String goIndex(){

        return "WebSocketDemo";
    }

    @GetMapping("/index")
    public String index(){
        return "PollingDemo";
    }


    @GetMapping("/sendAllMessage")
    @ResponseBody
    public void sendAllMessage(String msg){
        webSocketServer.sendAllMessage(msg);
    }

    @PostMapping("/sendMoneyMessage")
    @ResponseBody
    public void sendMoneyMessage(String[] userIds,@RequestParam("msg") String msg2){
        System.out.println("==============="+userIds);
        webSocketServer.sendMoneyMessage(userIds,msg2);
    }
}
5. 前端页面
<!DOCTYPE html>
<html lang="en">
<head>
<meta charset="UTF-8">
<title>WebSocket Demo</title>
</head>
<script src="https://cdn.bootcss.com/jquery/3.3.1/jquery.js"></script>
<script>
let socket;
function openSocket() {
const socketUrl = "ws://127.0.0.1:8099/api/pushMessage/" + $("#userId").val();
console.log(socketUrl);
if(socket!=null){
socket.close();
socket=null;
}
socket = new WebSocket(socketUrl);
//打开事件
socket.onopen = function() {
console.log("websocket已打开");
};
//获得消息事件
socket.onmessage = function(msg) {
console.log(msg.data);
//发现消息进入,开始处理前端触发逻辑
};
//关闭事件
socket.onclose = function() {
console.log("websocket已关闭");
};
//发生了错误事件
socket.onerror = function() {
console.log("websocket发生了错误");
}
}
function closeSocket() {
socket.close();
socket=null;
console.log('手动退出');
}
function sendMessage() {
if(socket == null){
console.log('请先开启Socket连接');
}
socket.send('{"toUserId":"'+$("#toUserId").val()+'","contentText":"'+$("#contentText").val()+'"}');
//console.log('{"toUserId":"'+$("#toUserId").val()+'","contentText":"'+$("#contentText").val()+'"}');
}
function sendAllMessage() {
$.ajax({
url:"/websocket/sendAllMessage?msg="+$("#msg").val(),
type:"GET"
})
}
function sendMoneyMessage() {
$.ajax({
url: "/websocket/sendMoneyMessage",
type: 'POST',
traditional: true,
data:{
userIds: ['10','20','40'],
msg: $("#msg2").val()
}
})
}
</script>
<body>
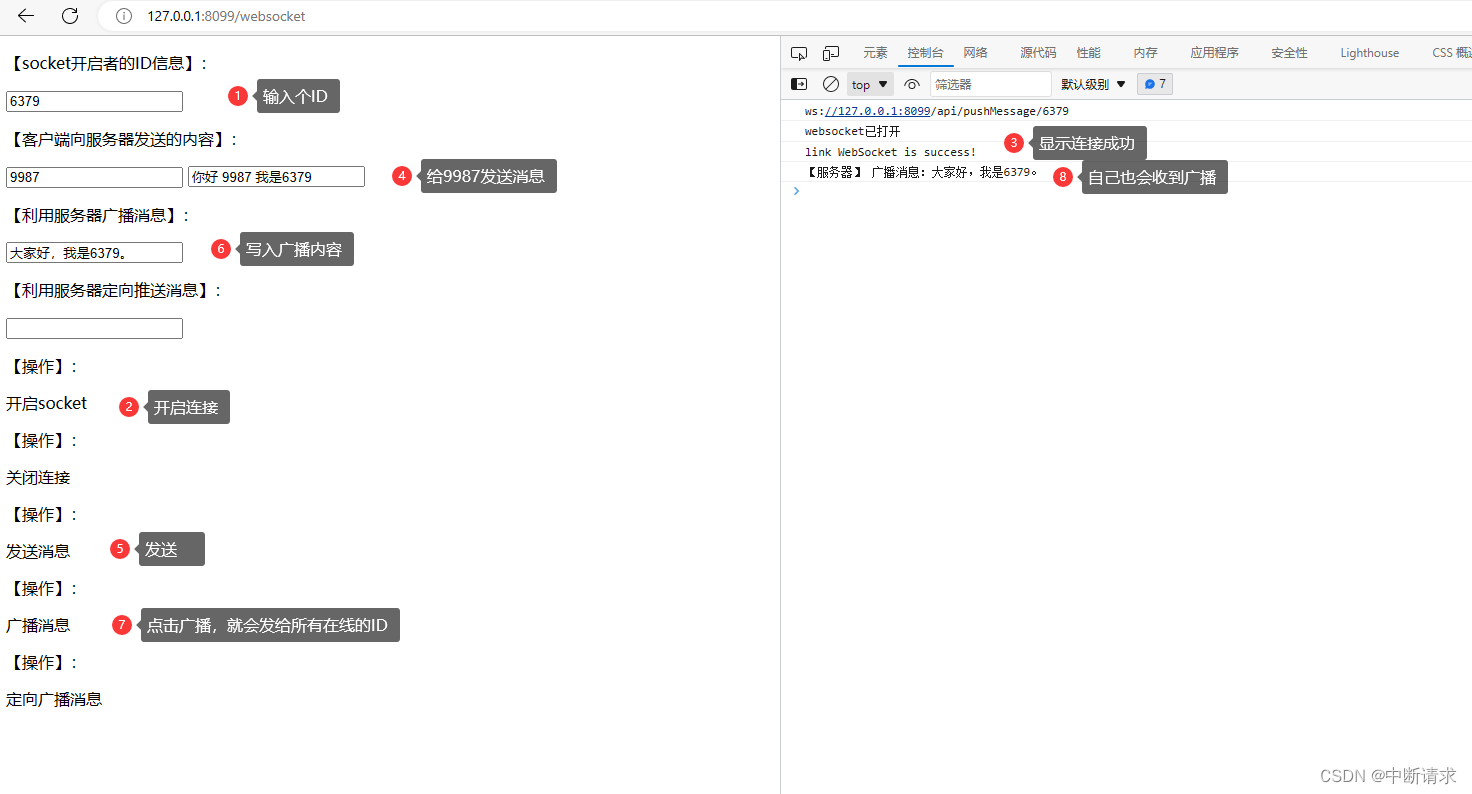
<p>【socket开启者的ID信息】:<div><input id="userId" name="userId" type="text" value="10"></div>
<p>【客户端向服务器发送的内容】:<div><input id="toUserId" name="toUserId" type="text" value="20">
<input id="contentText" name="contentText" type="text" value="hello websocket"></div>
<p>【利用服务器广播消息】:<div><input id="msg" name="msg" type="text">
<p>【利用服务器定向推送消息】:<div><input id="msg2" name="msg2" type="text">
<p>【操作】:<div><a onclick="openSocket()">开启socket</a></div>
<p>【操作】:<div><a onclick="closeSocket()">关闭连接</a></div>
<p>【操作】:<div><a onclick="sendMessage()">发送消息</a></div>
<p>【操作】:<div><a onclick="sendAllMessage()">广播消息</a></div>
<p>【操作】:<div><a onclick="sendMoneyMessage()">定向广播消息</a></div>
</body>
</html>三、测试效果


 3560
3560

 被折叠的 条评论
为什么被折叠?
被折叠的 条评论
为什么被折叠?
 到【灌水乐园】发言


