


目录
🐲 2. Servlet中操作 Cookie 和 Session 的api
🐲 1. Cookie 的工作流程
Cookie 是浏览器在本地持久化保存数据的一种方案,
具体可以看我这一篇博客第6.6中: HTTP(http+抓包Fiddler+协议格式+请求+响应)
它的一种典型的使用方式: 存储登录信息
登录过程中,它的工作流程是这样的

Cookie 是在浏览器中工作的
Session 是在服务器中工作的
在 Servlet 中也提供了相关的 API, 让我们来操作 Cookie 和 Session
🐲 2. Servlet中操作 Cookie 和 Session 的api
HttpServletRequest 类的相关方法
| 方法 | 描述 |
|---|---|
| HttpServlet getSession() | 在服务器中获取会话,
|
| Cookie[] getCookies() | 返回一个数组,包含客户端发送该请求的所有的 Cookie 对象, 会自动把 Cookie 中的格式解析成键值对 |

HttpServletResponse 类的相关方法
| 方法 | 描述 |
|---|---|
| void addCookie(Cookie cookie) | 返回响应, 想给浏览器返回哪些 cookie, 都可以通过这个方法来添加 (在这里添加的键值对,都会体现在 HTTP 响应报文的 SetCookie 字段上) |
HttpSession 类中的相关方法
一个 HttpSession 对象中包含多个键值对, 我们可以给 HttpSession 中保存任何我们需要的信息
| 方法 | 描述 |
|---|---|
| Object getAttribute(String name) | 返回在该 session 会话中具有指定名称的对象, 如果没有指定名称的对象,返回 null |
| void setAttribute(String name, Object value) | 该使用指定的名称绑定一个对象到该 session 会话 |
| boolean isNew() | 判定当前是否是新创建出的会话 |
Cookie 类中的相关方法
每个 Cookie 对象是一个键值对
| 方法 | 描述 |
|---|---|
| String getName() | 返回 cookie 的名称.名称在创建后不能改变, (这个值是 Set-Cookie 字段设置给浏览器的) |
| String getValue() | 获取与 cookie 关联的值 |
| void setValue(String newValue) | 设置与 cookie 关联的值 |
(1) HTTP 的 Cookie 字段中存储的实际上是多组键值对,每个键值对在 Servlet 中都对应了一个 Cookie 对象
(2) 通过 HttpServletRequest.getCookies() 获取到请求中的一系列 Cookie 键值对
(3) 通过 HttpServletResonse,addCookie() 可以向响应中添加新的 Cookie 键值对
🐲 3. 案例1: 模拟登录
具体应该考虑这几个方面
(1) 登录页面,用户可以填写用户名+密码
(2) Servlet 来处理登录请求
(3) 使用另一个 Servlet 来生成主页内容(登录成功后,跳转到的页面)


LoginServlet
package login;
import javax.servlet.ServletException;
import javax.servlet.annotation.WebServlet;
import javax.servlet.http.HttpServlet;
import javax.servlet.http.HttpServletRequest;
import javax.servlet.http.HttpServletResponse;
import javax.servlet.http.HttpSession;
import java.io.IOException;
/**
* Created with IntelliJ IDEA.
* Description:
* User: 28463
* Date: 2022—11—24
* Time: 8:37
*/
// 使用这个类来处理登录请求
@WebServlet("/login")
public class LoginServlet extends HttpServlet {
@Override
protected void doPost(HttpServletRequest req, HttpServletResponse resp) throws ServletException, IOException {
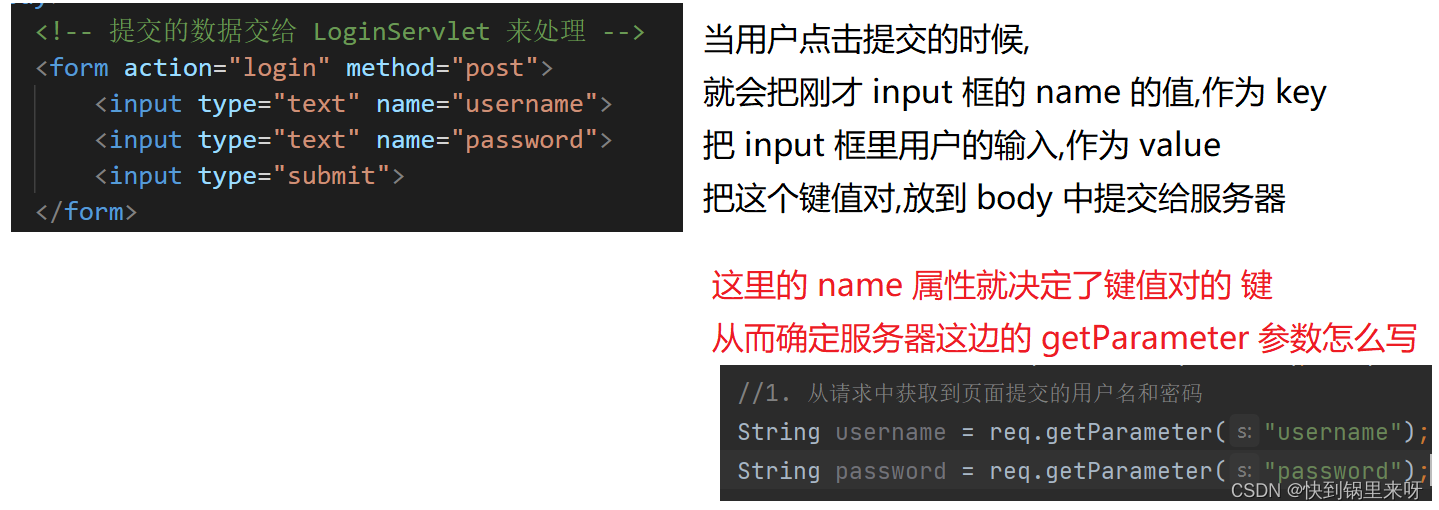
//1. 从请求中获取到页面提交的用户名和密码
String username = req.getParameter("username");
String password = req.getParameter("password");
//2. 验证用户名和密码是否正确
//正常这个操作是要查数据库的,此处为了简单,就直接写成硬编码了
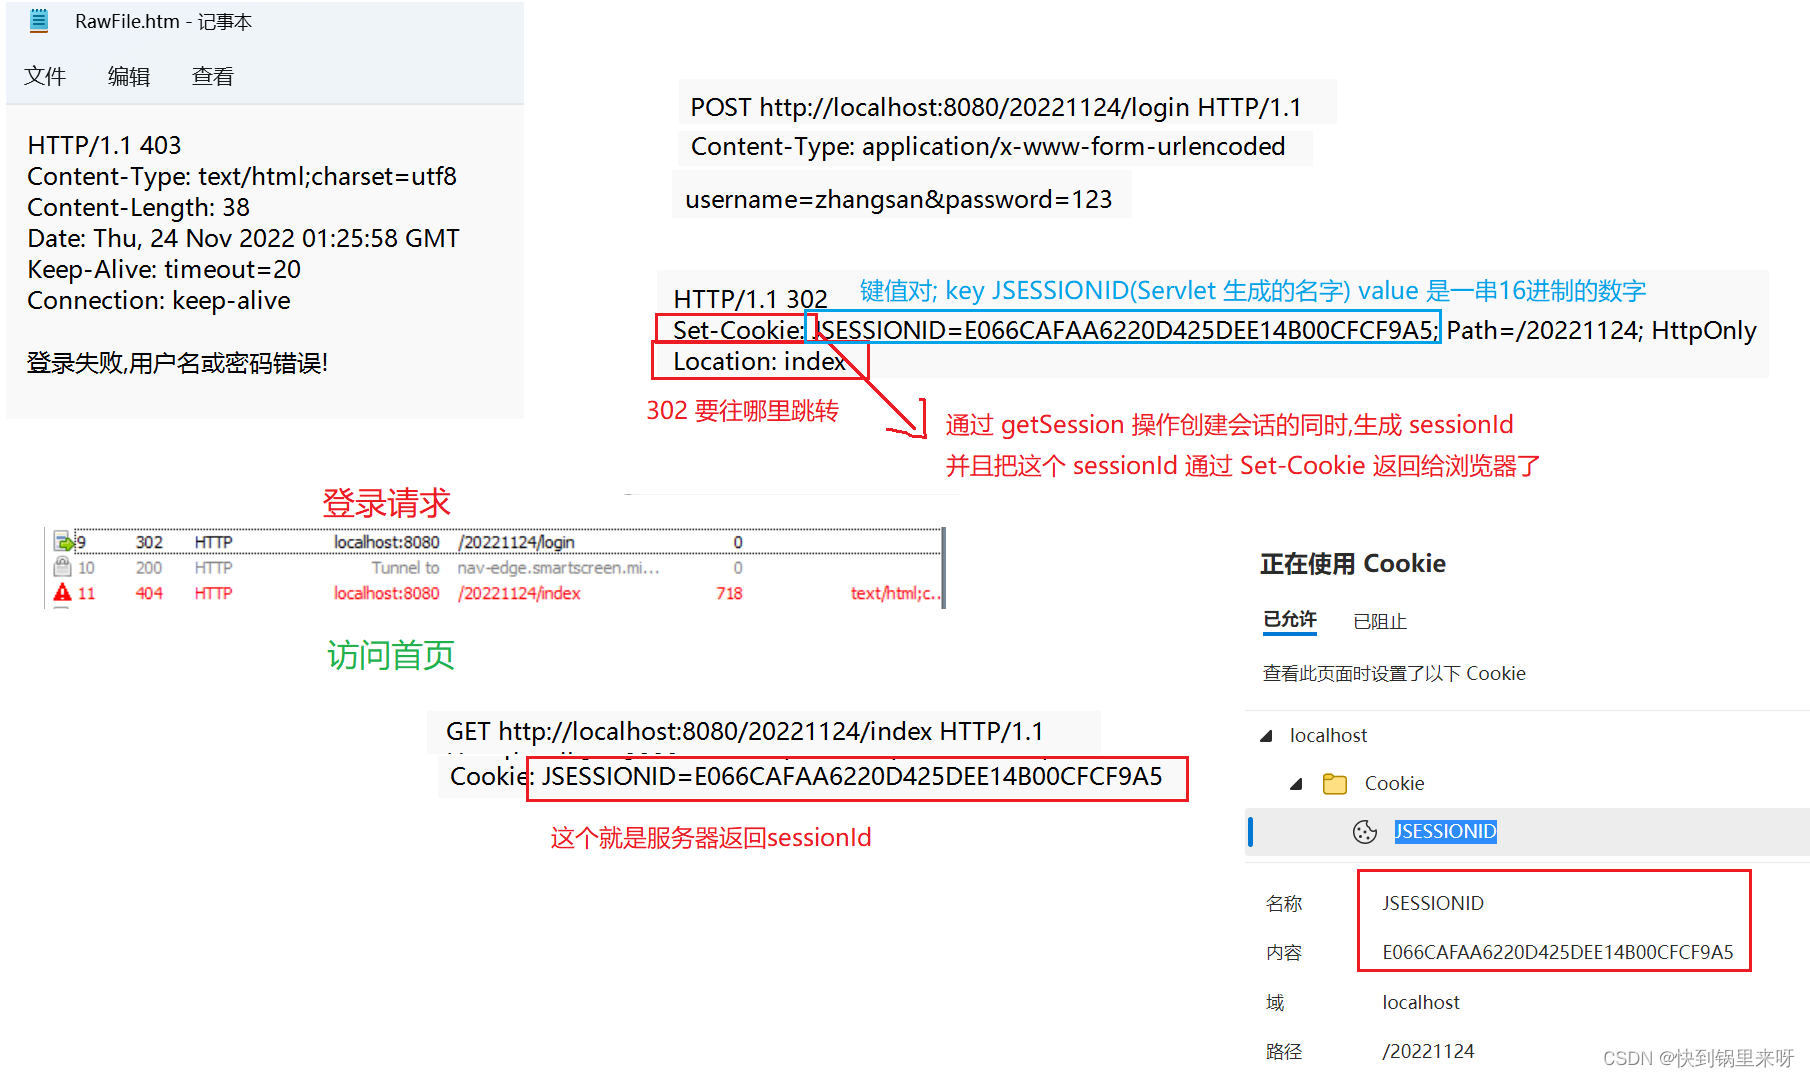
if("zhangsan".equals(username) && "123".equals(password)) {
//登录成功
// 1) 创建一个会话,用户刚登录成功,之前是没有会话的,重新分配个新的会话给用户
// getSession所做的操作
// 创建 sessionId 和 一个 HttpSession 对象
// 把这个两个内容以键值对的形式插入到内存的 哈希表中
// 把sessionId 通过 Set-Cookie 写到响应中
HttpSession session = req.getSession(true);
// 得到 HttpSession对象后,就可以随意的设置"键值对"了
session.setAttribute("username","zhangsan");
// 2) 让响应重定向到"主页"
resp.sendRedirect("index");
}else {
// 登录失败
resp.setStatus(403);
resp.setContentType("text/html; charset=utf8");
resp.getWriter().write("登录失败,用户名或密码错误!");
}
}
}
IndexServlet
package login;

import javax.servlet.ServletException;
import javax.servlet.annotation.WebServlet;
import javax.servlet.http.HttpServlet;
import javax.servlet.http.HttpServletRequest;
import javax.servlet.http.HttpServletResponse;
import javax.servlet.http.HttpSession;
import java.io.IOException;

/**
 * Created with IntelliJ IDEA.
 * Description:
 * User: 28463
 * Date: 2022—11—24
 * Time: 8:38
 */
//登录成功后, 跳转到的主页
@WebServlet("/index")
public class IndexServlet extends HttpServlet {
    @Override
    protected void doGet(HttpServletRequest req, HttpServletResponse resp) throws ServletException, IOException {
        // 首页中也先获取 session,此处的 session 正式刚才登录页的时候,登录成功的逻辑中创建出来的
        // 此处 参数 写为 false, 表示不新建,如果不存在,就返回null
        HttpSession session = req.getSession(false);
        if(session == null) {
            resp.setStatus(403);
            resp.setContentType("text/html; charset=utf8");
            resp.getWriter().write("您尚未登录,不能访问主页!");
            return;
        }
        String username = (String)session.getAttribute("username");
        resp.setContentType("text/html; charset=utf8");
        resp.getWriter().write("欢迎来到主页! " + username);
    }
}
login.html
<!DOCTYPE html>
<html lang="en">
<head>
    <meta charset="UTF-8">
    <meta http-equiv="X-UA-Compatible" content="IE=edge">
    <meta name="viewport" content="width=device-width, initial-scale=1.0">
    <title>登录</title>
</head>
<body>
    <!-- 提交的数据交给 LoginServlet 来处理 -->
    <form action="login" method="post">
        <input type="text" name="username">
        <input type="text" name="password">
        <input type="submit" value="登录">
    </form>
</body>
</html>
🐲 4. 上传文件
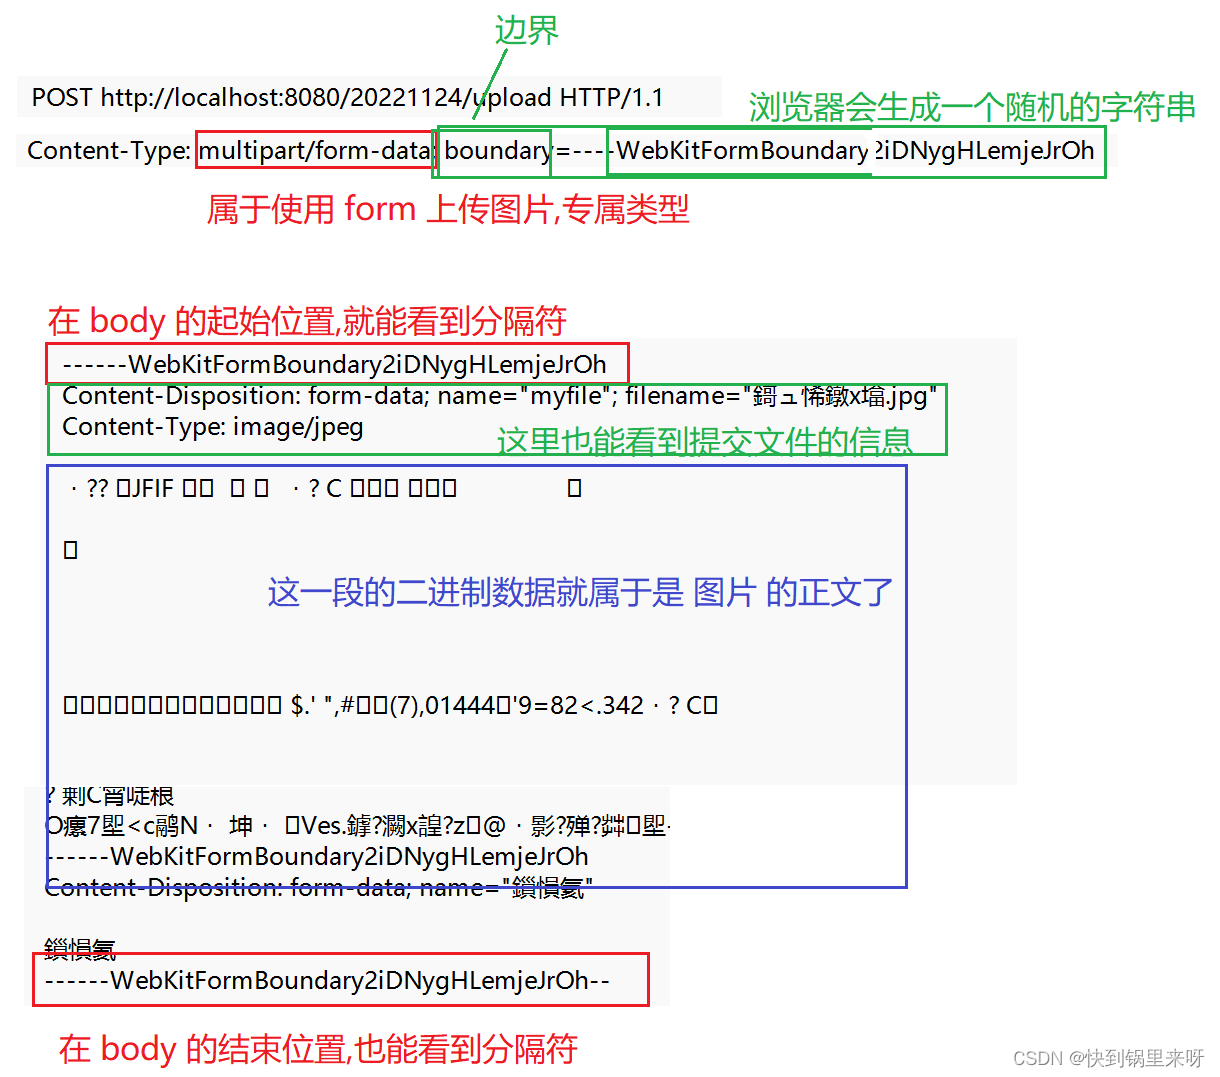
在前端搭配form表单, form input type = "file", 允许通过浏览器选中一个文件,上传给服务器
Servlet 就支持处理这种上传文件的请求,把这个请求到的文件在后端获取到
HttpServletRequest 类方法
| 方法 | 描述 |
|---|---|
| part getPart(String name) | 获取请求中给定 name 的文件 input标签的 name 属性(就和 getParameter 类似的); Part 表示一个文件,一次上传,可以包含多个文件 (可以有多个 input type = "file") 每个文件都是一个 Part 对象 |
| Collection<Part> getParts() | 获取所有的文件 |
Part 类方法
| 方法 | 描述 |
|---|---|
| String getSubmittedFileName() | 获取提交的文件名 |
| String getContentType() | 获取提交的文件类型 |
| long getSize() | 获取文件的大小 |
| void write(String path) | 把提交的文件数据写入磁盘文件 (保存到服务器的本地路径) |
🐲 5. 案例2: 上传文件


uploadServlet
package upload;

import javax.servlet.ServletException;
import javax.servlet.annotation.MultipartConfig;
import javax.servlet.annotation.WebServlet;
import javax.servlet.http.HttpServlet;
import javax.servlet.http.HttpServletRequest;
import javax.servlet.http.HttpServletResponse;
import javax.servlet.http.Part;
import java.io.IOException;

/**
 * Created with IntelliJ IDEA.
 * Description:
 * User: 28463
 * Date: 2022—11—24
 * Time: 10:27
 */
@WebServlet("/upload")
@MultipartConfig
public class uploadServlet extends HttpServlet {
    @Override
    protected void doPost(HttpServletRequest req, HttpServletResponse resp) throws ServletException, IOException {
        Part part = req.getPart("myfile");
        System.out.println(part.getSubmittedFileName());
        System.out.println(part.getSize());
        System.out.println(part.getContentType());
        part.write("D:/idea/tmp/result.jpg");
    }
}
upload.html
<!DOCTYPE html>
<html lang="en">
<head>
    <meta charset="UTF-8">
    <meta http-equiv="X-UA-Compatible" content="IE=edge">
    <meta name="viewport" content="width=device-width, initial-scale=1.0">
    <title>上传文件</title>
</head>
<body>
<form action="upload" method="post" enctype="multipart/form-data">
    <input type="file" name="myfile">
    <input type="submit" name="提交">
</form>
</body>
</html>


 2万+
2万+


 被折叠的 条评论
为什么被折叠?
被折叠的 条评论
为什么被折叠?
 到【灌水乐园】发言


