


目录
总结:建议使用显示指定类型的方式,调用函数模板,因为可以自己确定通用类型T
1.模板:
1.1模板的概念:
模板就是建立通用的模具,大大提高复用性。
模板的特点:
-模板并不是万能的
-模板不可以直接使用,它只是一个框架。
1.2函数模板:
-C++另一种编程思想就是泛型编程,主要利用的就是模板。
-C++提供了两种模板机制:函数模板和类模板。
1.2.1函数模板语法
语法:
1 template<typename T>
2 函数声明或定义
解释:
template ----声明创建函数模板
typename ----表明其后面的符号是一种数据类型,可以用class代替
T ----通用的数据类型,名称可以替换,通常为大写字母
实例:
//交换两个整形函数
void swapInt(int& a, int& b)
{
	int tmp = a;
	a = b;
	b = tmp;
}
//交换两个浮点型函数
void swapDouble(double& a, double& b)
{
	double tmp = a;
	a = b;
	b = tmp;
}
//函数模板
template<typename T>//声明一个模板,告诉编译器后面紧跟着的T不要报错,T是一个通用数据类型
void mySwap(T& a, T& b)
{
	T tmp = a;
	a = b;
	b = tmp;
}

void test01()
{
	int a = 10;
	int b = 20;
	//swapInt(a, b);
	//利用函数模板
	//两种方式调用
	//1.自动类型推导
	mySwap(a, b);
	//2.显示指定类型
	mySwap<int>(a, b);

	cout << "a = " << a << endl;
	cout << "b = " << b << endl;
}
总结:
-函数模板利用关键字template
-使用函数模板有两种方式:自动推导类型(mySwap(a, b);),显示指定类型(mySwap<int>(a, b);)
-模板的目的是为了复用性,将类型参数化
1.2.2函数模板注意事项
注意事项:
-自动推导类型,必须推导出一致的数据类型才可以用
-模板必须要确实出T的数据类型,才可以使用
template<typename T>//声明一个模板,告诉编译器后面紧跟着的T不要报错,T是一个通用数据类型
void mySwap(T& a, T& b)
{
T tmp = a;
a = b;
b = tmp;
}
//1.自动推导类型,必须推导出一致的数据类型才可以用
void test01()
{
int a = 10;
int b = 20;
//1.自动类型推导
mySwap(a, b);
cout << "a = " << a << endl;
cout << "b = " << b << endl;
}
//2.模板必须要确实出T的数据类型,才可以使用
template<class T>
void func()
{
cout << "func调用" << endl;
}
void test02()
{
func<int>();
}
int main()
{
//test01();
test02();
return 0;
}
总结:
使用模板要确定出类型T.
1.2.3函数模板案例
案例描述:
-利用函数模板封装一个排序的函数,可以对不同数据类型数组进行排序
-排序规则从大到小,排序算法为选择排序
-分别利用char数组和int数组进行测试
实例:
template<typename T>//声明一个模板,告诉编译器后面紧跟着的T不要报错,T是一个通用数据类型
void mySwap(T& a, T& b)
{
T tmp = a;
a = b;
b = tmp;
}
template<class T>
void mySort(T arr[], int len)//选择排序
{
for (int i = 0; i < len; i++)
{
int max = i;//默认第一个就是最大的
for (int j = i + 1; j < len; j++)
{
if (arr[max] < arr[j]) {
max = j;//更新最大值下标
}
}
if (max != i)
{
mySwap(arr[max], arr[i]);
}
}
}
template<class T>
void printArray(T arr[], int len)
{
for (int i = 0; i < len; i++)
{
cout << arr[i] << " ";
}
cout << endl;
}
void test01()
{
//测试char数组
char charArr[] = "badcfe";
int num = sizeof(charArr) / sizeof(char);
mySort(charArr, num);
printArray(charArr, num);
}
//测试int数组
void test02()
{
int intArr[] = { 7,5,4,3,26,8,9,1 };
int num = sizeof(intArr) / sizeof(int);
mySort(intArr, num);
printArray(intArr, num);
}
1.2.4普通函数与函数模板的区别
普通函数与函数模板的区别:
-普通函数调用时可以发生自动类型转换(隐式类型转换)
-函数模板调用时,如果利用自动类型推导,不会发生隐式类型转换
-如果利用显示指定类型方式,可以发生隐式类型转换
实例
//普通函数
int myAdd01(int a,int b)
{
return a + b;
}
//模板函数
template<class T>
T myAdd02(T a, T b)
{
return a + b;
}
void test01()
{
int a = 10;
int b = 20;
char c = 'c';
cout<<myAdd01(a, c) << endl;
//cout << myAdd02(a, c) << endl;//报错,自动类型推导会报错,不会发生隐式转换
cout << myAdd02<int>(a, c) << endl;//正确,可以发生转换
}
int main()
{
test01();
return 0;
}

总结:建议使用显示指定类型的方式,调用函数模板,因为可以自己确定通用类型T
1.2.5普通函数与函数模板的调用规则
调用规则如下:
1.如果函数模板和普通函数都可以实现,优先调用普通函数
2.可以通过空函数参数列表来强制调用函数模板
3.函数模板也可以发生重载
4.如果函数模板可以产生更好的匹配,优先调用函数模板
实例
void myPrint(int a,int b)
{
cout << "调用普通函数" << endl;
}
//函数模板重载
template<class T>
void myPrint(T a, T b)
{
cout << "调用函数" << endl;
}
template<class T>
void myPrint(T a,T b,T c)
{
cout << "调用函数重载" << endl;
}
int main()
{
int a = 10;
int b = 20;
//myPrint(a,b);//使用普通函数
myPrint<>(a, b);//使用函数模板
//3.函数模板也可以发生重载
int c = 30;
myPrint(a, b, c);
//4.如果函数模板可以产生更好的匹配,优先调用函数模板
char c1 = 'a';
char c2 = 'b';
myPrint(c1, c2);
return 0;
}
总结:提供函数模板最好不用提供普通函数了。
1.2.6模板的局限性
局限性:
-模板的通用性并不是万能的
例如:
template<class T>
void f(T a,T b)
{
a = b;
}
在上述代码中提供的赋值操作,如果传入的a和b是一个数组,就无法实现了
再例如
class Person
{
public:
Person(string name, int age)
{
this->m_Name = name;
this->m_Age = age;
}
//姓名
string m_Name;
//年龄
int m_Age;
};
//对比两个数据是否相等函数
template<class T>
bool myCompare(T& a, T& b)
{
if (a == b)
{
return true;
}
else
{
return false;
}
}
//利用具体化Person的版本实现代码,具体化优先调用
template<>bool myCompare(Person& p1, Person& p2)
{
if (p1.m_Name == p2.m_Name && p1.m_Age == p2.m_Age)
{
return true;
}
else
{
return false;
}
}
void test01()
{
int a = 10;
int b = 20;
bool ret = myCompare(a, b);
if (ret)
{
cout << "a==b" << endl;}
else
{
cout << "a!=b" << endl;
}
}
void test02()
{
Person p1("Tom", 10);
Person p2("Tom", 10);
bool ret = myCompare(p1, p2);
if(ret)
{
cout << "p1==p2" << endl;}
else
{
cout << "p1!=p2" << endl;
}
}
int main()
{
/*test01();*/
test02();
return 0;
}
总结:
-利用具体化的模板,可以解决自定义类型的通用化
-学习模板并不是为了写模板,而是在STL能够运用系统提供的模板
1.3类模板
1.3.1类模板语法
类模板作用:
-建立一个通用类,类中的成员数据类型可以不具体制定,用一个虚拟的类型来代表。
语法:
template<typename T>
类
解释:
template ---声明创建模板
typename ---表面其后面的符号是一种数据类型,可以用class代替
T ---通用的数据类型,名称可以替换,通常为大写字母
//类模板
template<class NameType,class AgeType>
class Person
{
public:
Person(NameType name, AgeType age)
{
this->m_Name = name;
this->m_Age = age;
}
void showPerson()
{
cout << "name:" << this->m_Name << "age" << this->m_Age << endl;
}
NameType m_Name;
AgeType m_Age;
};
void test01()
{
Person<string, int>P1("孙悟空",20);
P1.showPerson();
}
int main()
{
test01();
return 0;
}
总结:类模板和函数模板语法相似,在声明模板template后面加类,此类称为模板
1.3.2类模板与函数模板区别
类模板与函数模板区别主要有两点:
1.类模板没有自动类型推导的使用方式
2.类模板在模板参数列表中可以有默认参数
//类模板
template<class NameType,class AgeType>
class Person
{
public:
Person(NameType name, AgeType age = int)
{
this->m_Name = name;
this->m_Age = age;
}
void showPerson()
{
cout << "name:" << this->m_Name << "age" << this->m_Age << endl;
}
NameType m_Name;
AgeType m_Age;
};
//1.模板类型没有自动类型推导使用方式
void test01()
{
Person<string, int>p("孙悟空",20);
p.showPerson();
}
//类模板在函数参列表中可以有默认参数
void test02()
{
Person<string>p("猪八戒",21);
p.showPerson();
}
int main()
{
test01();
return 0;
}
总结:
-类模板使用只能用于显示指定类型方式
-类模板中的模板参数列表可以有默认参数
1.3.3类模板中成员函数创建时机
类模板中成员函数和普通函数中成员函数创建时机是有区别的:
-普通类种的成员函数一开始就可以创建
-类模板中的成员函数在调用时才创建
实例:
//类模板
class Person1
{
public:
void showPerson1()
{
cout << "Person1 show" << endl;
}
};
class Person2
{
public:
void showPerson2()
{
cout << "Person2 show" << endl;
}
};
template<class T>
class MyClass
{
public:
T obj;
//类模板中的成员函数
void func1()
{
obj.showPerson1();
}
void func2()
{
obj.showPerson2();
}
};
void test01()
{
MyClass<Person1>m;
m.func1();
//m.func2();编译会出错,说明函数调用才会去创建成员函数
}
int main()
{
test01();
return 0;
}
总结:类模板中的成员函数并不是一开始就创建的,在调用时才去创建
1.3.4类模板对象做函数参数
学习目标:
-类模板实例化出得对象,向函数参数传参的方式
一共有三种传入方式:
1.指定传入的类型 ---直接显示对象的数据类型
2.参数模板化 ---讲对象中的参数变为模板进行传递
3.整个类模板化 ---将这个对象类型 模板进行传递
实例:
template<class T1,class T2>
class Person
{
public:
Person(T1 name, T2 age)
{
this->m_Name = name;
this->m_Age = age;
}
void showPerson()
{
cout << "姓名 :" << this->m_Name << "年龄" << this->m_Age << endl;}
T1 m_Name;
T2 m_Age;
};
//1.指定传入类型
void printPerson1(Person<string, int>&p)
{
p.showPerson();
}
void test01()
{
Person<string, int>p("孙悟空",144);
printPerson1(p);
}
//2.参数模板化
template<class T1,class T2>
void printPerson2(Person<T1, T2>& p)
{
p.showPerson();
}
void test02()
{
Person<string, int>p("猪八戒",10000);
printPerson2(p);
}
//3.整个类模板化
template<class T>
void printPerson3(T&p)
{
p.showPerson();
}
void test03()
{
Person<string, int>p("唐僧",30);
printPerson3(p);
}
int main()
{
/*test01();
test02();*/
test03();
return 0;
}
总结:
-通过类模板创建的对象,可以有三种方式向函数中进行传参
-使用比较广泛是第一种:指定传入的类型
1.3.5类模板与继承
当类模板碰到继承时,需要注意以下几点:
-当子类继承的父类是一个类模板时,子类在声明的时候,要指定父类中T的类型
-如果不指定,编译器无法给子类分配内存
-如果想灵活指定出父类中T的类型,子类也需变为类模板
实例:
//类模板与继承
template<class T>
class Base
{
T m;
};
//class Son:public Base//错误,必须要知道父类中的T类型,才能继承给子类
class Son:public Base<int>
{};
void testo1()
{
Son s1;
}
//如果想灵活指定父类中T类型,子类也需要边类模板
template<class T1,class T2>
class Son2 :public Base<T2>
{
public:
Son2()
{
cout << "T1的类型为 " << typeid(T1).name() << endl;
cout << "T2的类型为 " << typeid(T2).name() << endl;
}
T1 obj;
};
void test02()
{
Son2<int, char>S2;
}
int main()
{
test02();
return 0;
}
总结:如果父类是类模板,子类需要指定出父类中T的数据类型
1.3.6类模板成员函数类外实现
学习目标:能够掌握类模板中的成员函数类外实现
实例:
//类模板成员函数类外实现
template<class T1,class T2>
class Person
{
public:
Person(T1 name, T2 age);
//{
// /*this->n_Name = name;
// this->n_Age = age;*/
//}
void showPerson();
//{
// /*cout << "1" << this->n_Name << endl;
// cout << "2 " << this->n_Age << endl;*/
//}
T1 n_Name;
T2 n_Age;
};
//构造函数类外实现
template<class T1, class T2>
Person<T1,T2>::Person(T1 name,T2 age)
{
this->n_Name = name;
this->n_Age = age;
}
template<class T1, class T2>
void Person<T1, T2>::showPerson()
{
cout << "姓名" << this->n_Name << endl;
cout << "年龄" << this->n_Age << endl;
}
void test02()
{
Person<string, int>P("dasda", 20);
P.showPerson();
}
int main()
{
test02();
return 0;
}
总结:类模板中成员函数类外实现时,需要加上模板参数列表
1.3.7类模板分文件编写
学习目标:
-掌握类模板成员函数份文件产生的问题以及解决方式
问题:
-类模板中成员函数创建时机是在调用阶段,导致分文件编写时链接不到
解决:
-解决方式1:直接包含.cpp源文件
-解决方式2:将声明和实现写到同一个文件中,并更改后缀名为.hpp,hpp是约定的名称,并不是强制的
实例:
//第一种解决方式,直接包含源文件
#include"源1.cpp"
using namespace std;
//类模板文件编写问题以及解决
//template<class T1,class T2>
//class Person
//{
//public:
// Person(T1 name, T2 age);
// void showPerson();
// T1 n_Name;
// T2 n_Age;
//};
//构造函数类外实现
//template<class T1, class T2>
//Person<T1,T2>::Person(T1 name,T2 age)
//{
// this->n_Name = name;
// this->n_Age = age;
//}
//template<class T1, class T2>
//void Person<T1, T2>::showPerson()
//{
// cout << "姓名" << this->n_Name << endl;
// cout << "年龄" << this->n_Age << endl;
//}
void test02()
{
Person<string, int>P("dasda", 20);
P.showPerson();
}
int main()
{
test02();
return 0;
}
#include"标头.h"
template<class T1, class T2>
Person<T1, T2>::Person(T1 name, T2 age)
{
this->n_Name = name;
this->n_Age = age;
}
template<class T1, class T2>
void Person<T1, T2>::showPerson()
{
cout << "姓名" << this->n_Name << endl;
cout << "年龄" << this->n_Age << endl;
}
#include<string>
template<class T1, class T2>
class Person
{
public:
Person(T1 name, T2 age);
void showPerson();
T1 n_Name;
T2 n_Age;
};
总结:主流的解决方式是第二种,将类模板成员函数写到一起,并将后缀名改为.hpp
1.3.8类模板与友元
学习目标:
-掌握类模板配合友元函数的类内和类外实现
全局函数类内实现-直接在类内声明友元即可
全局函数类外实现-需要提前让编译器知道全局函数的存在
实例:
//让编译器提前知道
template<class T1,class T2>
class Person;
template<class T1, class T2>
void printPerson2(Person<T1, T2>p)
{
cout << "类外实现——————姓名" << p.n_Name << "年龄" << p.n_Age << endl;
}
//通过全局函数打印Person信息template<class T1,class T2>
class Person
{
//全局函数 类内实现
friend void printPerson(Person<T1, T2>p)
{
cout << "姓名" << p.n_Name << "年龄" << p.n_Age << endl;
}
//全局函数类外实现
//加空模板参数列表
//如果全局函数,是类外实现,需要让编译器提前知道这个函数的存在
friend void printPerson2<>(Person<T1, T2>p);
public:
Person(T1 name, T2 age) {
this->n_Name = name;
this->n_Age = age;
}
private:
T1 n_Name;
T2 n_Age;
};
//类外实现//全局函数在类内实现
void test01()
{
Person<string, int>p("Tom", 100);
printPerson(p);
}
//全局函数在类外实现
void test02()
{
Person<string, int>p("xxx", 100);
printPerson2(p);
}
int main()
{
test02();
return 0;
}
总结:建议全局函数做类内实现,用法简单,而且编译器可以直接识别
1.3.9类模板案例
案例描述:
- 可以对内置数据类型以及自定义数据类型的数据进行存储
- 将数组中的数据存储到堆区
- 构造函数中可以传入数组的容量
- 提供对应的拷贝构造函数以及operator=防止浅拷贝问题
- 提供尾插法和尾删法对数组中的数据进行增加和删除
- 可以通过下标的方式访问数组中的元素
- 可以获取数组汇中当前元素个数和数组的容量
MyArry.hpp中代码
//自己的通用的数组类
#pragma once
#include<iostream>
using namespace std;

template<class T>
class MyArry
{
public:
	//有参构造 参数 容量
	MyArry(int capacity)
	{
		//cout << "MyArry的有参构造调用" << endl;
		this->m_Capacity = capacity;
		this->m_Size = 0;
		this->pAddress = new T[this->m_Capacity];
	}

	//拷贝构造
	MyArry(const MyArry& arr)
	{
		//cout << "MyArry的拷贝构造调用" << endl;

		this->m_Capacity = arr.m_Capacity;
		this->m_Size = arr.m_Size;
		//this->pAddress = arr.pAddress;

		//深拷贝
		this->pAddress = new T[arr.m_Capacity];

		//将arr中的数据都拷贝过来
		for (int i = 0; i < this->m_Size; i++)
		{
			this->pAddress[i] = arr.pAddress[i];
		}
	}
	//operator= 防止浅拷贝问题
	MyArry& operator =(const MyArry& arr)
	{

		//cout << "MyArry的operator=调用" << endl;

		//先判断原来堆区是否有数据,如果有先释放
		if (this->pAddress != NULL)
		{
			delete[] this->pAddress;
			this->pAddress = NULL;
			this->m_Capacity = 0;
			this->m_Size = 0;
		}

		//深拷贝
		this->m_Capacity = arr.m_Capacity;
		this->m_Size = arr.m_Size;
		this->pAddress = new T[arr.m_Capacity];
		for (int i = 0; i < this->m_Size; i++)
		{
			this->pAddress[i] = arr.pAddress[i];
		}
		return *this;
	}


	//尾插法
	void PushBack(const T& val)
	{
		//判断容量是否等于大小
		if (this->m_Capacity == this->m_Size)
		{
			return;
		}
		this->pAddress[this->m_Size] = val;//在数组末尾插入数据
		this->m_Size++;//更新数组大小

	}
	//尾删法
	void PopBack()
	{
		//让用户访问不到最后一个元素,即为尾删,逻辑删除
		if (this->m_Size == 0)
		{
			return;
		}
		this->m_Size--;
	}

	//通过下标的方式访问数组中的元素
	T& operator[](int index)
	{

		return this->pAddress[index];
	}

	//返回数组容量
	int getCapacity()
	{
		return this->m_Capacity;
	}

	//返回数组大小
	int getSize()
	{
		return this->m_Size;
	}

	//析构函数
	~MyArry()
	{
		if (this->pAddress != NULL)
		{
			//cout << "MyArry的析构函数调用" << endl;
			delete[] this->pAddress;
			this->pAddress = NULL;
		}
	}

private:
	T* pAddress;//指针指向堆区开辟的真实数组

	int m_Capacity;//数组容量

	int m_Size;//数组大小
};
test.cpp中代码
#include<iostream>
#include"MyArray.hpp"
#include<string>
using namespace std;

void PrintArry(MyArry <int> &arr)
{
	for (int i = 0; i < arr.getSize(); i++)
	{
		cout << arr[i] << endl;
	}
}
void test01()
{
	MyArry <int>arr1(5);

	for (int i = 0; i < 5; i++)
	{
		//利用尾插法向数组中插入数据
		arr1.PushBack(i);
	}

	cout << "arr1的打印输出" << endl;
	PrintArry(arr1);
	cout << "arr1的容量为" << arr1.getCapacity() << endl;
	cout << "arr1的大小为" << arr1.getSize() << endl;


	cout << "arr2的打印输出" << endl;
	MyArry <int>arr2(arr1);
	PrintArry(arr2);

	//尾删
	arr2.PopBack();
	cout << "arr2尾删后" << endl;
	cout << "arr2的容量为" << arr2.getCapacity() << endl;
	cout << "arr2的大小为" << arr2.getSize() << endl;

	/*MyArry<int>arr3(100);

	arr3 = arr1;*/

}


//测试自定义数据类型
class Person
{
public:
	Person(){};
	Person(string name,int age)
	{
		this->m_Name = name;
		this->m_Age = age;
	}
	string m_Name;
	int m_Age;
};

void PrintPersonArry(MyArry<Person>& arr)
{
	for (int i = 0; i < arr.getSize(); i++)
	{
		cout << "姓名" << arr[i].m_Name << "年龄" << arr[i].m_Age << endl;
	}
}

void test02()
{
	MyArry<Person>arr(10);
	Person p1("伞兵1", 21);
	Person p2("伞兵2", 22);
	Person p3("伞兵3", 23);
	Person p4("伞兵4", 24);
	Person p5("伞兵5", 25);

	//将数据插入到数组中
	arr.PushBack(p1);
	arr.PushBack(p2);
	arr.PushBack(p3);
	arr.PushBack(p4);
	arr.PushBack(p5);

	//打印数组
	PrintPersonArry(arr);
	//输出容量
	cout << "arr容量为" << arr.getCapacity() << endl;
	//输出大小
	cout << "arr大小为" << arr.getSize() << endl;
}


int main(void)
{
	test01();
	test02();
	system("pause");
	return 0;
}
总结:能够利用所学知识点实现通用的数组。
2 STL初识
2.1STL的诞生
-长久以来,软件界一直希望建立一种可重复利用的东西
-C++的面向对象和泛型编程思想,目的就是复用性的提升
-大多情况下,数据结构和算法都未能有一套标准,导致被迫从事大量重复工作
-为了建立数据结构和算法的一套标准,诞生了STL
2.2 STL基本概念
-STL(Stsndard Template Library,标准模板库)
-STL从广义上分为:容器(container)算法(algorithm)迭代器(iterator)
-容器和算法之间通过迭代器进行无缝链接
-STL几乎所有代码都采用了模板类或者模板函数
2.3 STL六大组件
STL大体分为六大组件,分别是:容器,算法,迭代器,仿函数,适配器(配接器),空间配置器
1.容器:各种数据结构,如vector,list,deque,set,map等,用来存放数据。
2.算法:各种常用的算法,如sort,find,copy,for_each等
3.迭代器:扮演了容器与算法之间的胶合剂
4.仿函数:行为类似函数,可以作为算法的某种策略。
5.适配器:一种用来修饰容或者仿函数或迭代器接口的东西。
6.空间适配器:负责空间的配置与管理
2.4 STL中容器,算法,迭代器
容器:置物之所也
STL容器就是将运用最广泛的一些数据结构实现出来
常用的数据结构:数组、链表、树、栈、队列、集合、映射表等
这些容器分为序列式容器和关联式容器
序列式容器:强调值的排序,序列式容器中的每个元素均有固定的位置
关联式容器:二叉树结构体,各元素之间没有严格上的物理上的顺序关系
算法:问题之解法也
有限的步骤,解决逻辑或数学上的问题,这一门学科我们叫做算法(Algorithms)
算法分为:质变算法和非质变算法
质变算法:是指运算过程中会更改区间内元素的内容。例如拷贝、查找、删除等等
非质变算法:是指在运算过程中不会更改区间内的元素内容,例如查找、
计数、遍历、寻找极值等等
迭代器:容器和算法之间的的粘合剂
提供一种方法,使之能够依序寻访某个容器所含的各个元素,而又无需暴露该容器的内部表示方式。
每个容器都有自己专属的迭代器。
迭代器的使用非常类似于指针,初学阶段我们可以先理解迭代器为指针。
迭代器的种类: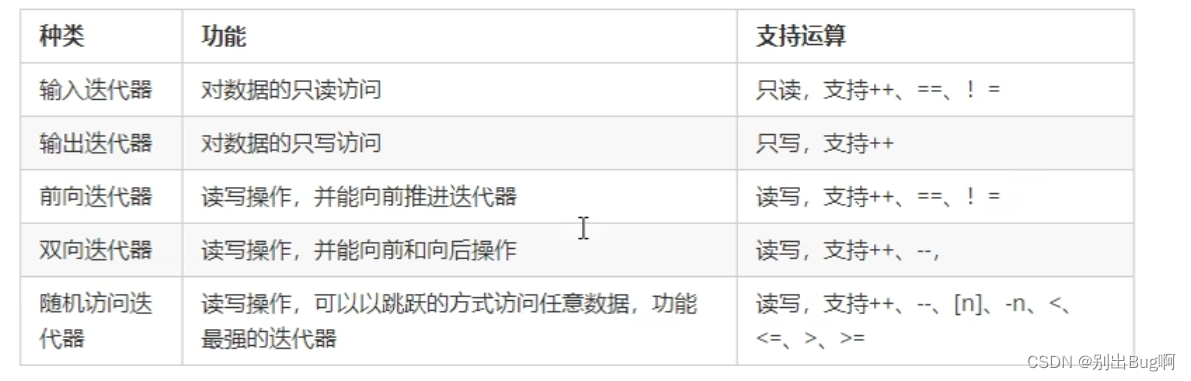
常用的迭代器种类为双向迭代器,和随机访问迭代器
2.5容器算法迭代器初识
了解STL容器、算法、迭代器概念之后,我们利用代码感受STL的魅力
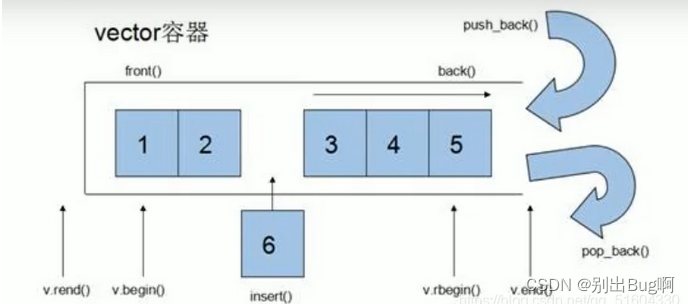
STL中最常用的容器为Vector,可以理解为数组,下面我们将学习如何向这个容器中插入数据、并遍历这个容器
2.5.1Vector存放内置数据类型
容器:vector
算法:for_each
迭代器:vector<int>::iterator
#include<iostream>
#include<vector>
#include<algorithm>//标准算法头文件
using namespace std;
void myPrint(int val)
{
cout << val << endl;
}
void test01()
{
//创建了一个vector容器,数组
vector<int> v;
//向容器中插入数据
v.push_back(10);
v.push_back(20);
v.push_back(30);
v.push_back(40);
//通过迭代器访问容器中的数据
vector<int>::iterator itBegin = v.begin();//其实迭代器 指向容器中的第一个元素
vector<int>::iterator itEnd = v.end();//结束迭代器 指向容器中最后一个元素的下一位置
//第一种遍历方式
/*while (itBegin!=itEnd)
{
cout << *itBegin << endl;
itBegin++;
}*/
//第二种遍历方式
/*for (vector<int>::iterator it = v.begin(); it != v.end(); it++)
{
cout << *it << endl;
}*/
//第三种遍历方式
for_each(v.begin(), v.end(), myPrint);
}
int main()
{
test01();
return 0;
}
2.5.2Vector存放自定义数据类型
学习目标:vector中存放自定义数据类型,并打印输出
实例:
#include<iostream>
#include<string>
#include<vector>
using namespace std;
//vectorR容器中存放自定义数据类型
class Person {
public:
	Person(string name, int age)
	{
		this->n_Name = name;
		this->n_Age = age;

	}
	string n_Name;
	int n_Age;
};
void test01()
{
	vector<Person>v;
	Person p1("aaa", 10);
	Person p2("bbb", 23);
	Person p3("ccc", 34);
	Person p4("ddd", 44);
	//向容器中添加数据
	v.push_back(p1);
	v.push_back(p2);
	v.push_back(p3);
	v.push_back(p4);
	//便利容器中的数据
	for (vector<Person>::iterator it = v.begin(); it != v.end(); it++)
	{
		cout << "姓名:" << (*it).n_Name << "年龄 :" << (*it).n_Age << endl;
	}
}
void test02()
{
	vector<Person*>v;
	Person p1("aaa", 10);
	Person p2("bbb", 23);
	Person p3("ccc", 34);
	Person p4("ddd", 44);
	//向容器中添加数据
	v.push_back(&p1);
	v.push_back(&p2);
	v.push_back(&p3);
	v.push_back(&p4);
	for (vector<Person *>::iterator it = v.begin(); it != v.end(); it++)
	{
		cout << "姓名:" << (*it)->n_Name<< "年龄 :" << (*it)->n_Age << endl;
	}
}
int main()
{
	//test01();
	test02();
	return 0;
}
2.5.3Vector容器嵌套容器
学习目标:容器中嵌套容器,我们将所有数据遍历一遍
#define _CRT_SECURE_NO_WARNINGS 1
#pragma warning(disable:6031)
#include<iostream>
#include<vector>
#include<string>
using namespace std;
//容器嵌套
void test01()
{
	vector<vector<int>>v;
	//创建小容器
	vector<int>v1;
	vector<int>v2;
	vector<int>v3;
	vector<int>v4;
	//想小容器中添加数据
	for (int i = 0; i < 4; i++)
	{
		v1.push_back(i + 1);
		v1.push_back(i + 2);
		v1.push_back(i + 3);
		v1.push_back(i + 4);
	}
	//将小容器插入到大容器中
	v.push_back(v1);
	v.push_back(v2);
	v.push_back(v3);
	v.push_back(v4);
	//通过大容器,把所有数据遍历一遍
	for (vector<vector<int>>::iterator it = v.begin(); it != v.end(); it++)
	{
		//(*it)----容器vector<int>
		for (vector<int>::iterator vit = (*it).begin(); vit != (*it).end(); vit++)
		{
			cout << *vit << " ";
		}
		cout << endl;
	}
}
int main()
{
	test01();
	return 0;
}
3.STL常用容器
3.1.1string 基本概念
本质:
特点:
strint类内部封装了很多成员方法
例如;查找find,拷贝copy,删除delete,替换replace,插入insert
string管理char*所分配的内存,不用但是赋值越界和取值越界等,由类内部进行负责
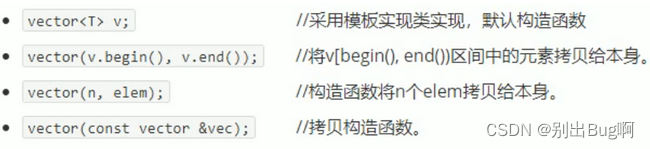
3.1.2构造函数原型
- string是C++风格的字符串,而string本质上是一个类
-
string和char*区别:
- char*是一个指针
- string是一个类,类内部封装了char*,管理者个字符串,是一个char&型的容器
- string()创建一个空的字符串
- string(const char* s)使用字符串s初始化
- string(const string& str)使用一个string对象初始化另一个string对象
- string(int n,char c)使用n个字符c初始化
#include<iostream>
#include<string>
#include<vector>
#include<algorithm>
using namespace std;

//string的构造函数
void test01()
{
	string s1;//默认构造
	const char* str = "hellow world";
	string s2(str);
	cout << "s2:"<<s2 << endl;

	string s3(s2);
	cout << "s3" << s3 << endl;
}
int main(void)
{
	test01();
	system("pause");
	return 0;
}
3.1.3string赋值操作
功能描述;
- 给string字符串进行赋值
赋值的函数原型:
- string& operator = (const char* s)char*类型字符串 赋值给当前的字符串
- string& operator = (const string &s)把字符串s赋给当前的字符串
- string& operator = (char c)把字符赋值给当前的字符串
- string& assign(const char* s)把字符串s赋值给当前的字符串
- string& assign(const char*s,int n)把字符串s的当前n个字符赋给当前的字符串
- string& assign(const string &s)把字符串s赋给当前字符串
- string& assign(int n,char c)用n个字符c赋给当前字符串
#include<iostream>
#include<string>
#include<vector>
#include<algorithm>
using namespace std;

void test01()
{
	string str1;
	str1 = "hello world";
	cout << "str1=" << str1 << endl;

	string str2;
	str2 = str1;
	cout << "str2=" << str2 << endl;

	string str3;
	str3 = 'c';
	cout << "str3=" << str3 << endl;

	string str4;
	str4.assign("hello c艹");
	cout << "str4=" << str4 << endl;

	string str5;
	str5.assign("hello c++",5);
	cout << "str5=" << str5 << endl;

	string str6;
	str6.assign(str5);
	cout << "str6=" << str6 << endl;

	string str7;
	str7.assign(10, 'w');
	cout << "str7=" << str7 << endl;
}
int main(void)
{
	test01();
	system("pause");
	return 0;
}
总结:
string赋值方式很多,operator=这种方式是比较实用的。
3.1.4string字符串拼接
功能描述:
- 实现在字符串末尾拼接字符串
函数原型:
- string& operator+=(const char* str)重载+=操作符
- string& operator+=(const char c)重载+=操作符
- string& operator+=(const string& str)重载+=操作符
- string& append(const char* s)把字符串s连接到当前字符串结尾
- string& append(const char* s,int n)把字符串s的前n个字符连接到当前字符串的结尾
- string& append(const string &s)同operator+=(const string& str)
- string& append(const string &s,int pos,int n)把字符串s中从pos开始的n个字符连接到字符串结尾
#include<iostream>
#include<string>
#include<vector>
#include<algorithm>
using namespace std;

void test01()
{
	string str1 = "你";
	str1 += "是伞兵";
	cout << "str1=" << str1<< endl;

	str1 += '?';
	cout << "str1=" << str1 << endl;

	string str2 = "zbc";
	str1 += str2;
	cout << "str1=" << str1 << endl;

	string str3 = "You";
	str3.append(" SB");
	cout << "str3=" << str3 << endl;

	str3.append("hahaha hahaha", 4);
	cout << "str3=" << str3 << endl;

	str3.append(str2);
	cout << "str3=" << str3 << endl;

	str3.append(str2, 0, 1);
	cout << "str3=" << str3 << endl;
}
int main(void)
{
	test01();
	system("pause");
	return 0;
}
总结:
字符串拼接的重载版本很多,初学阶段记住几种即可。
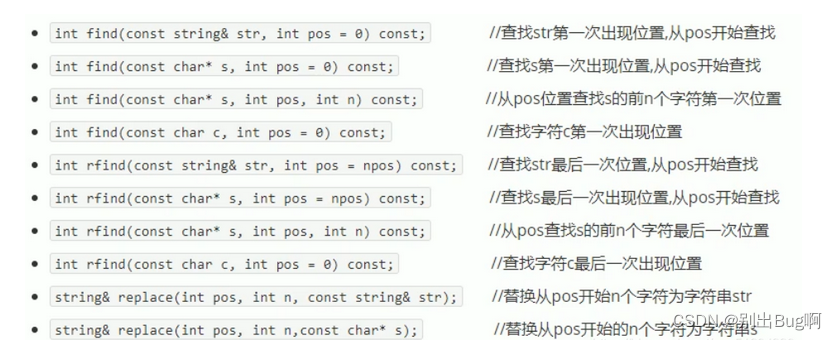
3.1.5string查找和替换
功能描述:
- 查找:查找指定位置字符串是否存在
- 替换:在指定的位置替换字符串
函数原型:
#include<iostream>
#include<string>
#include<vector>
#include<algorithm>
using namespace std;

//字符串的查找和替换
//查找
void test01()
{
	string str1 = "abcdefg";
	//找到返回下标,找不到返回-1
	int pos1 = str1.find("de");
	cout << "pos1=" << pos1 << endl;
	int pos2 = str1.find("z");
	cout << "pos2=" << pos2<< endl;

	pos1 = str1.rfind("ab");//从右往左
	cout << "pos1=" << pos1 << endl;;
}

void test02()
{
	string str2 = "abcdef";
	str2.replace(1, 3, "1111");//从1号位置起,3个字符替换为1111
	cout << "str2=" << str2 << endl;
}
int main(void)
{
	test01();
	test02();
	system("pause");
	return 0;
}
总结:
- find查找是从左往右,rfind从右往左
- find找到字符串后返回查找的第一个字符位置,找不到返回1
- replace在替换时,要指定从哪个位置起,多少个字符,替换成什么样的字符串
3.1.6string字符串比较
功能描述:
字符串之间的比较
比较方式:
字符串比较是按字符的ASCII码进行对比
=返回0>返回1<返回-1
- 1
函数原型:

#include<iostream>
#include<string>
#include<vector>
#include<algorithm>
using namespace std;

//字符串比较
void test01()
{
	string str1 = "zello";
	string str2 = "hello";
	if (str1.compare(str2) == 0)
	{
		cout << "相等" << endl;
	}
	else if (str1.compare(str2) > 0)
	{
		cout << "str1大" << endl;
	}
	else
	{
		cout << "str2大" << endl;
	}
}
int main(void)
{
	test01();
	system("pause");
	return 0;
}
总结:
字符串对比主要是用于比较两个字符串是否相等,判断谁大谁小的意义并不是很大。
3.1.7string字符读取
string中单个字符存取方式有两种

#include<iostream>
#include<string>
#include<vector>
#include<algorithm>
using namespace std;

//string字符存取
void test01()
{
	string str1 = "hello";
	//通过[]访问单个字符
	for (int i = 0; i < str1.size(); i++)
	{
		cout << str1[i] << " ";
	}
	cout << endl;
	//通过at方式访问的单个字符
	for (int i = 0; i < str1.size(); i++)
	{
		cout << str1.at(i) << " ";
	}
	cout << endl;

	//修改单个字符
	str1[0] = 'z';
	cout << str1 << endl;

	str1.at(0) = 'x';
	cout << str1 << endl;
}
int main(void)
{
	test01();
	system("pause");
	return 0;
}
总结:
string字符串中单个字符存取有两种方式,利用[]或at
3.1.8string插入和删除
功能描述:
对string字符串进行插入和删除字符操作。
函数原型: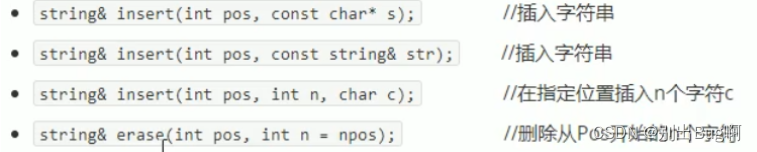
#include<iostream>
#include<string>
#include<vector>
#include<algorithm>
using namespace std;
//字符串 插入和删除
void test01()
{
	string str = "hello";
	//插入
	str.insert(1, "111");
	cout << "str = " << str << endl;

	//删除
	str.erase(1,3);
	cout << "str = " << str << endl;
}
int main(void)
{
	test01();
	system("pause");
	return 0;
}
总结:
插入和删除的起始下标都是从0开始。
3.1.9string字串
功能描述:
从字符串中获得想要的字串。
函数原型:![]()
#include<iostream>
#include<string>
using namespace std;

//string求字串
void test01()
{
	string str = "abcdef";
	string subStr = str.substr(1, 3);
	cout << "subStr=" << subStr << endl;
}
//使用操作
void test02()
{
	string email = "zhangsan@qq.com";
	//从邮箱地址中获取用户名信息
	int pos = email.find("@");
	string usrName = email.substr(0, pos);
	cout << usrName << endl;
}
int main(void)
{
	test01();
	test02();
	system("pause");
	return 0;
}
总结:
灵活的运用求字串功能,可以在实际开发中获取有效的信息。
3.2vector容器
3.2.1vector基本概念
功能:
vector数据结构和数组非常相似,也称为单端数组
vector与普通数组区别:
不同之处在于数组是静态空间,而vector可以动态扩展
动态扩展:
- 并不是在原空间之后续接新空间,而是找更大的内存空间,然后将原数据拷贝到新空间,释放原空间。
- vector容器的迭代器是支持随机访问的迭代器
3.2.2vector构造函数
功能描述:
创建vector容器
函数原型:
#include<iostream>
#include<string>
#include<algorithm>
#include<vector>
using namespace std;

void printVector(vector<int>& v)
{
	for (vector<int>::iterator it = v.begin(); it != v.end(); it++)
	{
		cout << *it << " ";
	}
	cout << endl;
}

//vector容器构造
void test01()
{
	vector<int>v1;//默认构造 无参构造
	for (int i = 0; i < 10; i++)
	{
		v1.push_back(i);
	}
	printVector(v1);

	//通过区间的方式进行构造
	vector<int>v2(v1.begin(), v1.end());
	printVector(v2);

	//n个elem方式构造
	vector<int>v3(10, 100);//10个100
	printVector(v3);

	//拷贝构造
	vector<int>v4(v3);
	printVector(v4);
}

int main(void)
{
	test01();
	system("pause");
	return 0;
}
正在上传…重新上传取消正在上传…重新上传取消正在上传…重新上传取消正在上传…重新上传取消
总结:
vector的多种构造方式没有可比性,灵活使用即可。
3.2.3vector赋值操作
功能描述:
给vector容器进行赋值
函数原型: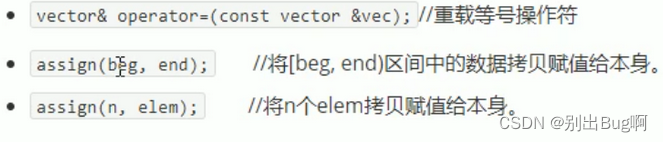
#include<iostream>
#include<string>
#include<algorithm>
#include<vector>
using namespace std;
//vector赋值
void PrintVector(vector<int>& v)
{
	for (vector<int>::iterator it = v.begin(); it != v.end(); it++)
	{
		cout << *it << " ";
	}
	cout << endl;
}
void test01()
{
	vector<int>v1;
	for (int i = 0; i < 10;i++)
	{
		v1.push_back(i);
	}
	PrintVector(v1);

	//赋值 operator=
	vector<int>v2;
	v2 = v1;
	PrintVector(v2);

	//assign
	vector<int>v3;
	v3.assign(v1.begin(), v1.end());//闭 开
	PrintVector(v3);

	//n个elem方式赋值
	vector<int>v4;
	v4.assign(10, 100);//10个100
	PrintVector(v4);
}
int main(void)
{
	test01();
	system("pause");
	return 0;
}
正在上传…重新上传取消正在上传…重新上传取消正在上传…重新上传取消正在上传…重新上传取消
总结:
vector赋值方式比较简单,使用operator=,或者assign都可以。
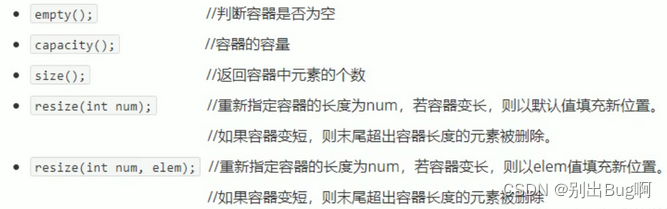
3.2.4vector容量和大小
功能描述:
对vector容器的容量和大小操作
函数原型:
#include<iostream>
#include<string>
#include<algorithm>
#include<vector>
using namespace std;
//vector容器的容量和大小操作
void PrintVector(vector<int>& v)
{
	for (vector<int>::iterator it = v.begin(); it != v.end(); it++)
	{
		cout << *it << " ";
	}
	cout << endl;
}
void test01()
{
	vector<int>v1;
	for (int i = 0; i < 10; i++)
	{
		v1.push_back(i);
	}
	PrintVector(v1);

	if (v1.empty())
	{
		cout << "空" << endl;
	}
	else
	{
		cout << "不空" << endl;
	}

	cout << "v1的容量=" << v1.capacity() << endl;
	cout << "v1的大小=" << v1.size() << endl;

	//重新指定大小
	v1.resize(15,100);//利用重载版本,可以指定默认填充值,第二个参数
	PrintVector(v1);//如果重新指定的比原来的长,默认用0填充

	v1.resize(5);
	PrintVector(v1);//如果重新指定的比原来短,超出的部分会删除掉
}
int main(void)
{
	test01();
	system("pause");
	return 0;
}
总结:
- 判断是否为空——empty
- 返回元素个数——size
- 返回容器容量——capacity
- 重新指定大小——resize
3.2.5vector的插入和删除
功能描述:
对vector容器进行插入、删除操作
函数原型: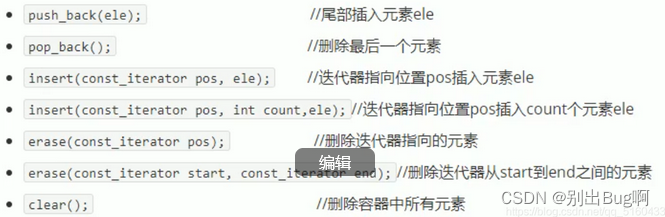
#include<iostream>
#include<vector>
#include<algorithm>
using namespace std;

//vector容器的插入和删除
void PrintVector(vector<int>& v)
{
	for (vector<int>::iterator it = v.begin(); it != v.end(); it++)
	{
		cout << *it << " ";
	}
	cout << endl;
}

void test01()
{
	vector<int>v1;

	//尾插法
	v1.push_back(10);
	v1.push_back(20);
	v1.push_back(30);
	v1.push_back(40);
	v1.push_back(50);

	//遍历
	PrintVector(v1);

	//尾删
	v1.pop_back();
	PrintVector(v1);

	//插入
	v1.insert(v1.begin(), 100);
	PrintVector(v1);

	v1.insert(v1.begin(), 2, 1000);
	PrintVector(v1);

	//删除 参数也是迭代器
	v1.erase(v1.begin());
	PrintVector(v1);

	//清空
	//v1.erase(v1.begin(), v1.end());
	v1.clear();
	PrintVector(v1);
}
int main(void)
{
	test01();
	system("pause");
	return 0;
}
总结:
- 尾插——push_back
- 尾删——pop_back
- 插入——insert(位置迭代器)
- 删除——erase(位置迭代器)
- 清空——clear
3.2.6 vector数据存取
功能描述:
对vector中的数据进行存取操作
函数原型: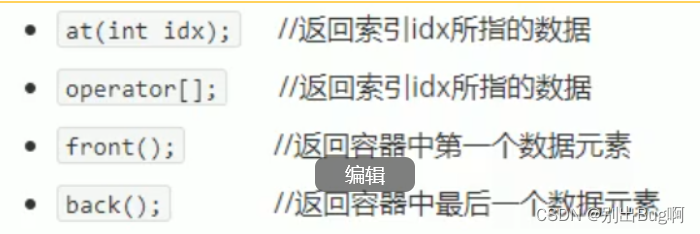
#include<iostream>
#include<vector>
#include<algorithm>
using namespace std;

//vector容器 数据存取
void test01()
{

	vector<int>v1;
	for (int i = 0; i < 10; i++)
	{
		v1.push_back(i);
	}
	//利用[]访问数组中的元素
	for (int i = 0; i < v1.size(); i++)
	{
		cout << v1[i] << " ";
	}
	cout << endl;

	//利用at方式访问元素
	for (int i = 0; i < v1.size(); i++)
	{
		cout << v1.at(i) << " ";
	}
	cout << endl;

	//获取第一个元素
	cout << "第一个元素=" << v1.front() << endl;

	//获取最后一个元素
	cout << "最后一个元素=" << v1.back()<<endl;
}
int main(void)
{
	test01();
	system("pause");
	return 0;
}总结:
- 除了用迭代器获取vector中元素,[]和at也可以
- front返回容器第一个元素
- back返回容器最后一个元素
3.2.7vector互换容器
功能描述;
实现两个容器内元素进行互换
函数原型:

#include<iostream>
#include<vector>
#include<algorithm>
using namespace std;

//vector容器互换

void PrintVector(vector<int> &v)
{
	for (vector<int>::iterator it = v.begin(); it != v.end(); it++)
	{
		cout << *it << " ";
	}
	cout << endl;
}

void test01()
{
	vector<int>v1;
	cout << "交换前" << endl;
	for (int i = 0; i < 10; i++)
	{
		v1.push_back(i);
	}
	PrintVector(v1);
	vector<int>v2;

	for (int i = 10; i > 0; i--)
	{
		v2.push_back(i);
	}
	PrintVector(v2);
	cout << "交换后" << endl;

	v1.swap(v2);

	PrintVector(v1);
	PrintVector(v2);
}


//实际 用途
//巧用swap可以收缩内存空间
void test02()
{
	vector<int>v;
	for (int i = 0; i < 10000; i++)
	{
		v.push_back(i);
	}

	cout << "容量" << v.capacity() << endl;
	cout << "大小" << v.size() << endl;
	cout <<  endl;
	v.resize(3);//重新指定大小
	cout << "容量" << v.capacity() << endl;
	cout << "大小" << v.size() << endl;


	//巧用swap收缩内存
	vector<int>(v).swap(v);
	cout << endl;
	cout << "容量" << v.capacity() << endl;
	cout << "大小" << v.size() << endl;
}
int main(void)
{
	test01();
	test02();
	system("pause");
	return 0;
}
总结:
swap可以使两个容器互换,可以达到实用的收缩内存效果。
3.2.8 vector预留空间
功能描述:
减少vector在动态内存扩容时的扩展次数
函数原型:

#include<iostream>
#include<vector>
#include<algorithm>
using namespace std;

//vector容器 预留空间
void test01()
{
	vector<int>v1;
	int num = 0;//统计开辟次数
	int* p = NULL;
	for (int i = 0; i < 100000; i++)
	{
		v1.push_back(i);

		if (p != &v1[0])
		{
			p = &v1[0];
			num++;
		}
	}
	cout << num << endl;
}
int main(void)
{
	test01();
	system("pause");
	return 0;
}总结:
如果数据量较大,可以一开始利用reserve预留空间。
3.3 deque容器
3.3.1 deque容器基本概念
功能:
双端数组,可以对头端进行插入删除操作
deque与vector区别:
- vector对于头部的插入删除效率低,数据量越大,效率越低
- deque相对而言,对头部的插入删除速度会比vector快
- vector访问元素时的速度会比deque快,这和两者内部实现有关
deque的内部工作原理
deque内部有个中控器,维护每段缓冲区中的内容,缓冲区中存放真实数据。
中控器维护的是每个缓冲区的地址,使得使用deque时像一片连续的内存空间。
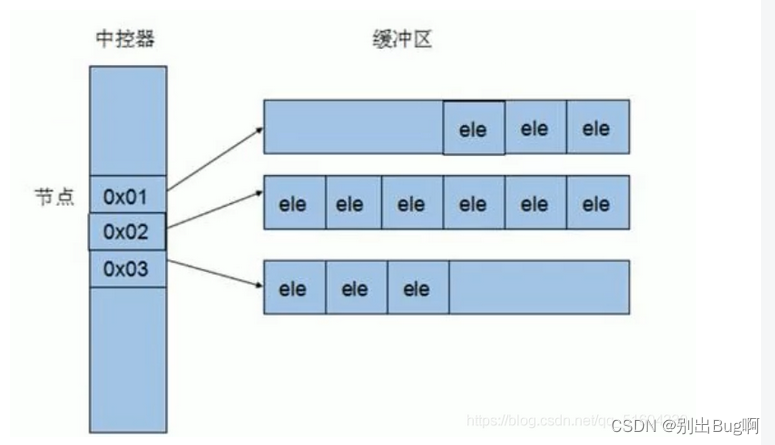
deque容器的迭代器也是支持随机访问的。
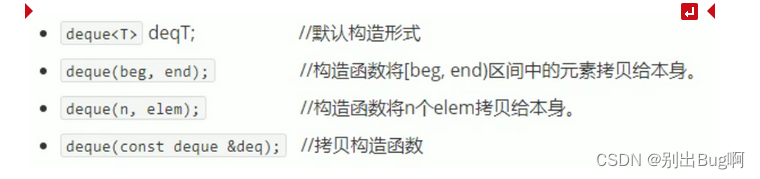
3.3.2 deque构造函数
deque构造函数
功能描述:
deque容器构造
函数原型:
#include<iostream>
#include<deque>
using namespace std;
void PrintDeque(const deque<int>& d)
{
	for (deque<int>::const_iterator it = d.begin(); it != d.end(); it++)
	{
		cout << *it << " ";
	}
	cout << endl;
}
void test01()
{
	deque<int>d1;
	for (int i = 0; i < 10; i++)
	{
		d1.push_back(i);
	}
	PrintDeque(d1);

	deque<int>d2(d1.begin(), d1.end());
	PrintDeque(d2);

	deque<int>d3(10, 100);
	PrintDeque(d3);

	deque<int>d4(d3);
	PrintDeque(d4);
}
int main(void)
{
	test01();
	system("pause");
	return 0;
}
总结:
deque容器和vector容器的构造方式几乎一致,灵活使用即可。
3.3.3deque赋值操作
功能描述:
给deque容器进行赋值
函数原型:

#include<iostream>
#include<deque>
using namespace std;
void PrintDeque(const deque<int>& d)
{
	for (deque<int>::const_iterator it = d.begin(); it != d.end(); it++)
	{
		cout << *it << " ";
	}
	cout << endl;
}
void test01()
{
	deque<int>d1;
	for (int i = 0; i < 10; i++)
	{
		d1.push_back(i);
	}
	PrintDeque(d1);

	//operator=赋值
	deque<int>d2;
	d2 = d1;
	PrintDeque(d2);

	//assign赋值
	deque<int>d3;
	d3.assign(d1.begin(),d1.end());
	PrintDeque(d3);

	deque<int>d4;
	d4.assign(10, 100);
	PrintDeque(d4);
}
int main(void)
{
	test01();
	system("pause");
	return 0;
}
总结:
deque赋值操作也与vector相同,需熟练掌握
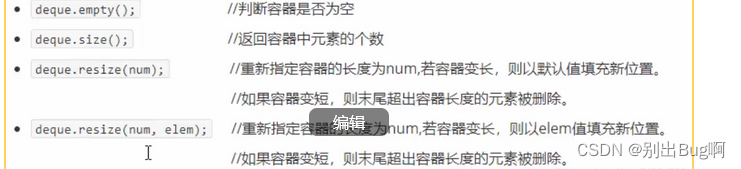
3.3.4 deque大小操作
功能描述:
对deque容器的大小进行操作
函数原型:
#include<iostream>
#include<deque>
using namespace std;
void PrintDeque(const deque<int>& d)
{
	for (deque<int>::const_iterator it = d.begin(); it != d.end(); it++)
	{
		cout << *it << " ";
	}
	cout << endl;
}
void test01()
{
	deque<int>d1;
	for (int i = 0; i < 10; i++)
	{
		d1.push_back(i);
	}
	PrintDeque(d1);

	//operator=赋值
	deque<int>d2;
	d2 = d1;
	PrintDeque(d2);

	//assign赋值
	deque<int>d3;
	d3.assign(d1.begin(),d1.end());
	PrintDeque(d3);

	deque<int>d4;
	d4.assign(10, 100);
	PrintDeque(d4);
}
int main(void)
{
	test01();
	system("pause");
	return 0;
}
总结:
deque赋值操作也与vector相同,需熟练掌握。
3.3.5 deque大小操作
功能描述:
对deque容器的大小进行操作
函数原型:
#include<iostream>
#include<deque>
using namespace std;
void PrintDeque(const deque<int>& d)
{
	for (deque<int>::const_iterator it = d.begin(); it != d.end(); it++)
	{
		cout << *it << " ";
	}
	cout << endl;
}
void test01()
{
	deque<int>d1;
	for (int i = 0; i < 10; i++)
	{
		d1.push_back(i);
	}
	PrintDeque(d1);
	if (d1.empty())
	{
		cout<<"空"<<endl;
	}
	else
	{
		cout<<"不空"<<endl;
	}
	//deque容器没有容量概念
	cout << "大小" << d1.size() << endl;

	//重新指定大小,并填充
	d1.resize(15,1);
	PrintDeque(d1);

	d1.resize(5);
	PrintDeque(d1);
}
int main(void)
{
	test01();
	system("pause");
	return 0;
}总结:
- deque没有容量概念
- 判断是否为空——empty
- 返回元素个数——size
- 重新指定个数——resize
-
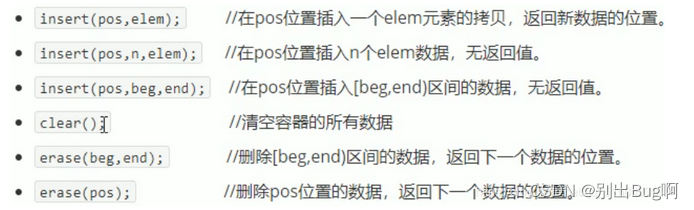
3.3.5deque插入和删除
功能描述:
向deque容器中插入和删除数据函数原型:
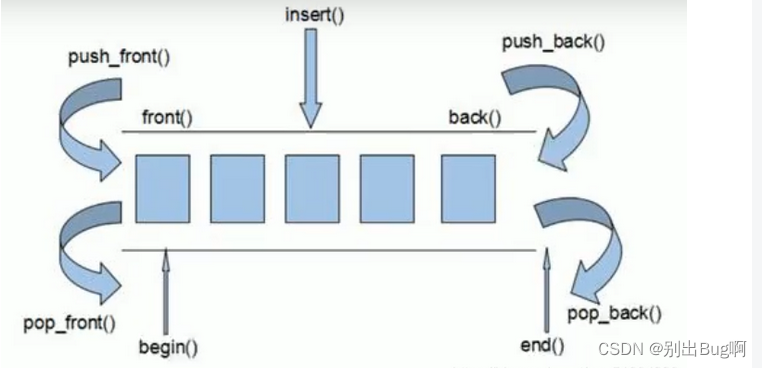
两端插入操作: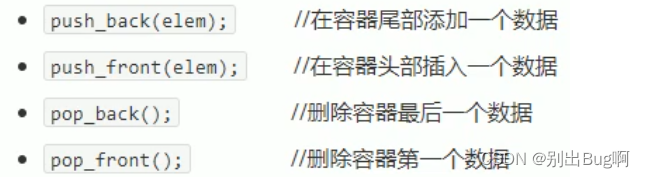
指定位置操作:
#include<iostream>
#include<deque>
using namespace std;
void PrintDeque(const deque<int>& d)
{
	for (deque<int>::const_iterator it = d.begin(); it != d.end(); it++)
	{
		cout << *it << " ";
	}
	cout << endl;
}
//两端操作
void test01()
{
	deque<int>d1;
	//尾插
	d1.push_back(10);
	d1.push_back(20);

	//头插
	d1.push_front(100);
	d1.push_front(200);

	PrintDeque(d1);
	//尾删
	d1.pop_back();
	PrintDeque(d1);

	//头删
	d1.pop_front();
	PrintDeque(d1);
}

void test02()
{
	deque<int>d2;
	//尾插
	d2.push_back(10);
	d2.push_back(20);

	//头插
	d2.push_front(100);
	d2.push_front(200);

	PrintDeque(d2);

	//insert插入
	d2.insert(d2.begin(), 1000);
	PrintDeque(d2);

	d2.insert(d2.begin(), 2,10000);
	PrintDeque(d2);

	//按照区间进行插入
	deque<int>d3;
	d3.push_back(1);
	d3.push_back(2);
	d3.push_back(3);

	d2.insert(d2.begin(), d3.begin(), d3.end());
	PrintDeque(d2);
}

void test03()
{


	deque<int>d4;
	//尾插
	d4.push_back(10);
	d4.push_back(20);

	//头插
	d4.push_front(100);
	d4.push_front(200);

	PrintDeque(d4);

	//删除
	deque<int>::iterator it = d4.begin();
	it++;
	d4.erase(it);
	PrintDeque(d4);

	//按照区间方式删除
	d4.erase(d4.begin(), d4.end());
	PrintDeque(d4);
	//清空
	d4.clear();
	PrintDeque(d4);
}
int main(void)
{
	test01();
	test02();
	test03();
	system("pause");
	return 0;
}总结:
- 插入和删除提供的位置是迭代器!
- 尾插——push_back
- 尾删——pop_back
- 头插——push_front
- 头删——pop_front
3.3.6 deque数据存取
功能描述:
对deque中的数据的存取操作
函数原型:
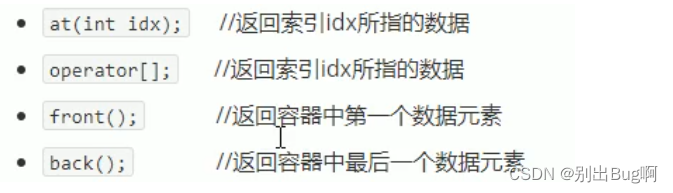
#include<iostream>
#include<deque>
using namespace std;
void PrintDeque(const deque<int>& d)
{
	for (deque<int>::const_iterator it = d.begin(); it != d.end(); it++)
	{
		cout << *it << " ";
	}
	cout << endl;
}
void test01()
{
	deque<int>d1;
	for (int i = 0; i < 3; i++)
	{
		d1.push_back(i);
	}
	d1.push_front(100);
	d1.push_front(200);
	d1.push_front(300);

	//通过[]方式访问元素
	for (int i = 0; i < d1.size(); i++)
	{
		cout << d1[i] << " ";
	}
	cout << endl;
	//通过at方式访问元素
	for (int i = 0; i < d1.size(); i++)
	{
		cout << d1.at(i) << " ";
	}
	cout << endl;

	cout << "第一个元素=" << d1.front() << endl;
	cout << "最后一个元素=" << d1.back() << endl;
}
int main(void)
{
	test01();
	system("pause");
	return 0;
}总结:
- 除了用迭代器获取deque容器中元素
- front返回容器第一个元素
- back返回容器最后一个元素
3.3.7 deque排序
deque排序
功能描述:
利用算法实现对deque容器进行排序
算法:![]()
#include<iostream>
#include<deque>
#include<algorithm>//标准算法头文件
using namespace std;
void PrintDeque(const deque<int>& d)
{
	for (deque<int>::const_iterator it = d.begin(); it != d.end(); it++)
	{
		cout << *it << " ";
	}
	cout << endl;
}
void test01()
{
	deque<int>d1;
	d1.push_back(10);
	d1.push_back(20);
	d1.push_back(30);
	d1.push_front(100);
	d1.push_front(200);
	d1.push_front(300);

	PrintDeque(d1);

	//排序-默认升序
	//对于支持随机访问的迭代器容器,都可以用sort算法对其进行排序
	//vector容器也可以利用sort进行排序
	cout << "排序后" << endl;
	sort(d1.begin(), d1.end());
	PrintDeque(d1);

}
int main(void)
{
	test01();
	system("pause");
	return 0;
}
3.4案例——评委打分
3.4.1案例描述
有五名选手,选手ABCDE,10个评委分别对每一个选手打分,去除最高分和最低分,取平均分。
3.4.2实现步骤
- 创建五名选手,放到vector中
- 遍历vector容器,取出来每一个选手,执行for循环,可以把10个评分打分存到deque容器中
- sort算法对deque容器中分数排序,去除最高分和最低分
- deque容器遍历一遍,累加总分
- 获取平均分
#define _CRT_SECURE_NO_WARNINGS 1
#pragma warning(disable:6031)
#include<iostream>
using namespace std;
#include<vector>
#include<deque>
#include<ctime>
#include<algorithm>
#include<string>
//小选手类
class Person
{
public:
	Person(string name, int score)
	{
		this->m_Name = name;
		this->m_Score = score;
	}
	string m_Name;
	int m_Score;
};
//创建五名选手
void createPerson(vector<Person>& v)
{
	string nameSeed = "ABCDE";
	for (int i = 0; i < 5; i++) {
		string name = "选手";
		name += nameSeed[i];
		int score = 0;
		Person p(name, score);
		//将创建的Person对象 放入到容器中
		v.push_back(p);
	}


}
//给五名选手打分
void setScore(vector<Person>& v)
{
	for (vector<Person>::iterator it = v.begin(); it != v.end(); it++)
	{
		//奖评委的分数 放入到deque容器中
		deque<int>d;
		for (int i = 0; i < 10; i++)
		{
			int score = rand() % 41 + 60;
			d.push_back(score);
		}
		/*cout << "选手:" << it->m_Name << "的分数是" << it->m_Score << endl;
		for (deque<int>::iterator dit = d.begin(); dit != d.end(); dit++)
		{
			cout << *dit << " ";
		}
		cout << endl;*/
		//排序
		sort(d.begin(), d.end());
		//去除最高分和最低分
		d.pop_back();
		d.pop_front();
		//取平均分
		int sum = 0;
		for (deque<int>::iterator dit = d.begin(); dit != d.end();dit++)
		{
			sum += *dit;//累加每个评委的分数
		}
		int avg = sum / d.size();
		it->m_Score = avg;
	}
}
//显示最后得分
void showScore(vector<Person>& v)
{
	for (vector<Person>::iterator it = v.begin(); it != v.end(); it++)
	{
		cout << "姓名:" << it->m_Name << "平均分:" << it->m_Score << endl;
	}
}
int main()
{
	srand((unsigned int)time(NULL));

	//1.创建五名选手
	vector<Person>v;
	createPerson(v);
	//2.给5名选手打分
	setScore(v);
	//3.显示最后得分
	showScore(v);
	return 0;
}
3.5 stack容器
3.5.1 stack基本概念
stack基本概念
概念:
stack是一种先进后出的数据结构,它只有一个出口。
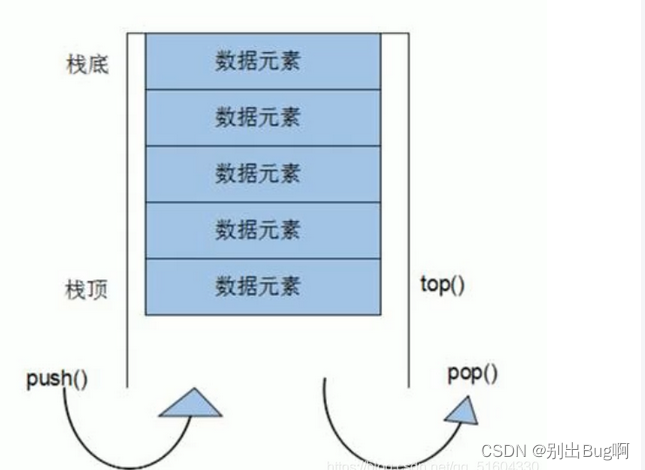
栈中只有栈顶的元素才可以被外界使用,因此栈不允许有遍历行为。
栈可以判断容器是否为空。
栈可以返回元素个数。
栈中进入数据——进栈。
栈中弹出数据——出栈。
3.5.2stack常用接口
功能描述:
栈容器常用的对外接口。
构造函数:
赋值操作:
数据存取: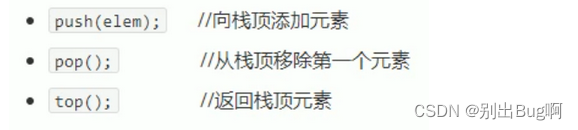
大小操作:
#include<iostream>
#include<stack>
using namespace std;
void test01()
{
	stack<int>s;
	//入栈
	s.push(1);
	s.push(2);
	s.push(3);
	s.push(4);
	cout << "栈的大小:" << s.size() << endl;
	//只要栈不为空,就查看栈顶,并且执行出栈操作
	while (!s.empty())
	{
		cout << s.top() << endl;
		s.pop();
	}
	cout << "栈的大小:" << s.size()<< endl;
}
int main(void)
{
	test01();
	system("pause");
	return 0;
}
总结:
- 入栈——push
- 出栈——pop
- 返回栈顶——top
- 判断栈是否为空——empty
- 返回栈大小——size
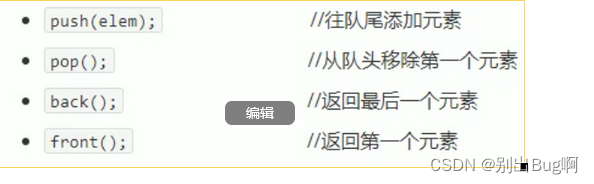
3.6queue容器
3.6.1queue基本概念
概念:
Queue是一种先进先出的数据结构,它有两个出口。
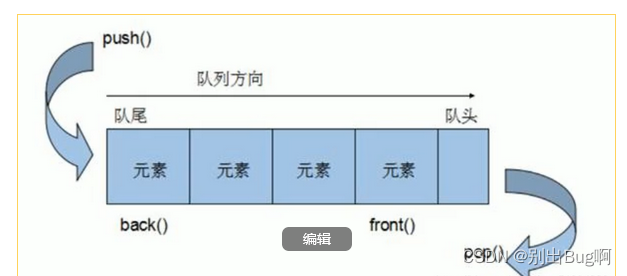
只有队头和队尾能被外界访问,因此不允许有遍历行为。
队列容器允许从一端新增元素,从另一端移除元素。
队列中进入数据——入队。
队列中出数据——出队。
3.6.2queue常用接口
功能描述:
栈容器常用的对外接口。
构造函数:
赋值操作:![]()
数据存取:
大小操作:
#include<iostream>
#include<queue>
#include<string>
using namespace std;
class Person
{
public:
	Person(string name, int age)
	{
		this->m_Name = name;
		this->m_Age = age;
	}
	string m_Name;
	int m_Age;
};
void test01()
{
	queue<Person>q;

	Person p1("s1", 1);
	Person p2("s2", 2);
	Person p3("s3", 3);
	Person p4("s4", 4);

	q.push(p1);
	q.push(p2);
	q.push(p3);
	q.push(p4);
	cout << "大小=" << q.size() << endl;
	while (!q.empty())
	{
		cout << q.front().m_Name <<" " << q.front().m_Age << endl;
		q.pop();
	}
	cout << "大小=" << q.size() << endl;
}
int main(void)
{
	test01();
	system("pause");
	return 0;
}
总结:
- 入队——push
- 出队——pop
- 返回队头元素——front
- 返回队尾元素——back
- 判断队是否为空——empty
- 返回队列大小——size
3.7 list容器
3.7.1list基本概念
功能:将数据进行链式存储
链表(list):是一种物理存储单元上非连续的存储结构,数据元素的逻辑顺序是通过链表中的指针链接来实现的。
链表的组成:链表由一系列结点组成。
结点的组成:一个是存储数据元素的数据域,另一个是存储下一个结点地址的指针域。
SLT中的链表是一个双向循环链表。

由于链表的存储方式并不是连续的内存空间,因此链表list中的迭代器只支持前移和后移,属于双向迭代器。
list的优点:
- 采用动态存储分配,不会造成内存浪费和溢出
- 链表执行插入和删除操作十分方便,修改指针即可,不需要移动大量元素
list的缺点:
链表灵活,但是空间(指针域)和时间(遍历)额外耗费较大。
list有一个重要的性质,插入操作和删除操作都不会造成原有list迭代器的失效,这在vector是不成立的。
总结:
STL中List和vector是两个最常用的容器,各有优缺点。
3.7.2list构造函数
功能描述:
创建list容器
函数原型: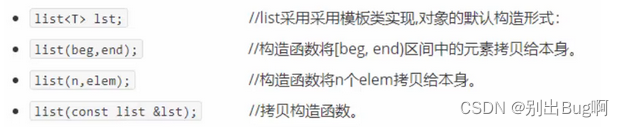
#include<iostream>
#include<list>
using namespace std;
void PrintList(const list<int>& L)
{
	for (list<int>::const_iterator it = L.begin(); it != L.end(); it++)
	{
		cout << *it << " ";
	}
	cout << endl;
}
void test01()
{
	list<int>l1;
	l1.push_back(1);
	l1.push_back(2);
	l1.push_back(3);
	l1.push_back(4);
	PrintList(l1);
    //区间构造
	list<int>l2(l1.begin(), l1.end());
	PrintList(l2);

    //拷贝构造
	list<int>l3(l2);
	PrintList(l3);
	//10个100
	list<int>l4(10, 100);
	PrintList(l4);
}
int main(void)
{
	test01();
	system("pause");
	return 0;
}总结:
list构造方式同其他几个STL常用容器,熟练掌握即可。
3.7.3list赋值和交换
功能描述:
给list容器进行赋值,以及交换list容器。
函数原型: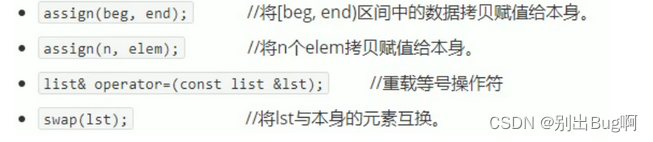
 #include<iostream>
#include<list>
using namespace std;
void PrintList(const list<int>& L)
{
	for (list<int>::const_iterator it = L.begin(); it != L.end(); it++)
	{
		cout << *it << " ";
	}
	cout << endl;
}
void test01()
{
	list<int>l1;

	l1.push_back(1);
	l1.push_back(2);
	l1.push_back(3);
	l1.push_back(4);
	PrintList(l1);

	list<int>l2;
	l2 = l1;//operator=
	PrintList(l2);

	list<int>l3;
	l3.assign(l2.begin(), l2.end());
	PrintList(l3);

	list<int>l4;
	l4.assign(10, 100);
	PrintList(l4);

}
void test02()
{
	list<int>l5;

	l5.push_back(1);
	l5.push_back(2);
	l5.push_back(3);
	l5.push_back(4);

	list<int>l6;
	l6.push_back(4);
	l6.push_back(3);
	l6.push_back(2);
	l6.push_back(1);
	cout << "交换前" << endl;
	PrintList(l5);
	PrintList(l6);

	l5.swap(l6);
	cout << "交换后" << endl;
	PrintList(l5);
	PrintList(l6);
}
int main(void)
{
	test01();
	test02();
	system("pause");
	return 0;
}总结:
list赋值和交换能够灵活运用即可。
3.7.4 list大小操作
功能描述:
对list容器的大小进行操作。
函数原型: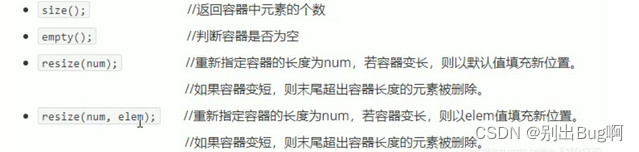
#include<iostream>
#include<list>
using namespace std;
void PrintList(const list<int>& L)
{
	for (list<int>::const_iterator it = L.begin(); it != L.end(); it++)
	{
		cout << *it << " ";
	}
	cout << endl;
}
void test01()
{
	list<int>l1;
	l1.push_back(1);
	l1.push_back(2);
	l1.push_back(3);
	l1.push_back(4);

	PrintList(l1);

	if (l1.empty())
	{
		cout << "空" << endl;
	}
	else
	{
		cout << "不空" << endl;
		cout << "元素个数=" << l1.size()<<endl;
	}

	//重新指定大小
	l1.resize(10, 1000);
	PrintList(l1);
}
int main(void)
{
	test01();
	system("pause");
	return 0;
}
总结:
- 判断是否为空——empty
- 返回元素个数——size
- 重新指定个数——resize
3.7.5 list插入和删除
功能描述:
对list容器进行数据的插入和删除
函数原型: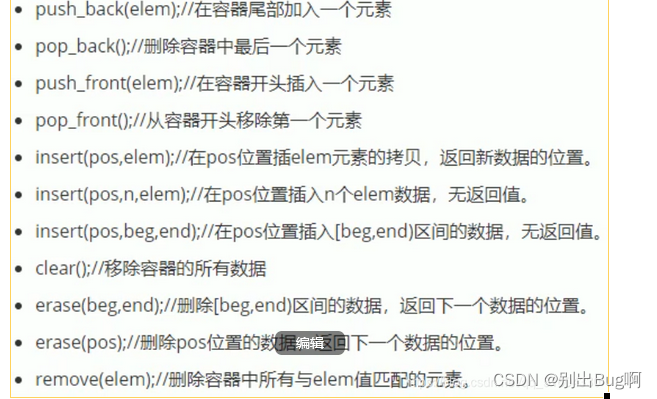
#include<iostream>
#include<list>
using namespace std;
void PrintList(const list<int>& L)
{
	for (list<int>::const_iterator it = L.begin(); it != L.end(); it++)
	{
		cout << *it << " ";
	}
	cout << endl;
}
void test01()
{
	list<int>l1;
	//尾
	l1.push_back(1);
	l1.push_back(2);
	l1.push_back(3);
	l1.push_back(4);
	//头
	l1.push_front(10);
	l1.push_front(20);

	PrintList(l1);

	//删
	l1.pop_back();
	PrintList(l1);

	l1.pop_front();
	PrintList(l1);

	//插入
	list<int>::iterator it = l1.begin();
	it++;
	l1.insert(it, 1000);
	PrintList(l1);

	//删除
	//用的时候指定it
	it = l1.begin();
	l1.erase(++it);
	PrintList(l1);

	//移除
	l1.push_back(1000);
	l1.push_back(1000);
	l1.push_back(1000);
	PrintList(l1);
	l1.remove(1000);//删除所有匹配的元素

	PrintList(l1);


	//清空
	l1.clear();
	PrintList(l1);
}

int main(void)
{
	test01();
	system("pause");
	return 0;
}总结:
- 尾插——push_back
- 尾删——pop_back
- 头插——push_front
- 头删——pop_front
- 插入——insert
- 删除——erase
- 移除——remove
- 清空——clear
3.7.6 list数据存取
功能描述:
对list容器中数据进行存储。
函数原型:
#include<iostream>
#include<list>
using namespace std;
void PrintList(const list<int>& L)
{
	for (list<int>::const_iterator it = L.begin(); it != L.end(); it++)
	{
		cout << *it << " ";
	}
	cout << endl;
}
void test01()
{
	list<int>l1;
	l1.push_back(1);
	l1.push_back(2);
	l1.push_back(3);
	l1.push_back(4);

	//list中不可以用[]访问容器中的元素
	//at()也不行
	//因为List本质是链表,不是用连续的线性空间存储数据,迭代器也是不支持随机访问的

	cout << "第一个元素=" << l1.front() << endl;
	cout << "最后一个元素=" << l1.back() << endl;

	//验证迭代器是不支持随机访问的
	list<int>::iterator it = l1.begin();
	it++;//支持++ --  双向
	it--;
	//it = it+1;不行——不支持随机访问

}
int main(void)
{
	test01();
	system("pause");
	return 0;
}
总结:
- list容器中不可以通过[]或者at方式访问数据
- 返回第一个元素——front
- 返回最后一个元素——back
3.7.7 list反转和排序
功能描述:
将容器中的元素反转,以及将容器中的数据进行排序。
函数原型: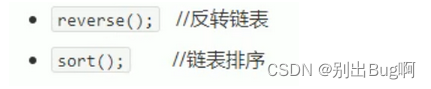
include<iostream>
#include<list>
#include<algorithm>
using namespace std;
void PrintList(const list<int>& L)
{
	for (list<int>::const_iterator it = L.begin(); it != L.end(); it++)
	{
		cout << *it << " ";
	}
	cout << endl;
}
void test01()
{
	list<int>l1;
	l1.push_back(1);
	l1.push_back(2);
	l1.push_back(3);
	l1.push_back(4);

	cout << "反转前" << endl;
	PrintList(l1);

	//反转
	cout << "反转后" << endl;
	l1.reverse();
	PrintList(l1);
}

bool myCompare(int v1, int v2)
{
	//降序 第一个数>第二个数
	return v1 > v2;
}

//排序
void test02()
{
	list<int>l2;
	l2.push_back(20);
	l2.push_back(10);
	l2.push_back(50);
	l2.push_back(30);
	l2.push_back(40);
	cout << "排序前" << endl;
	PrintList(l2);

	//所有不支持随机访问迭代器的容器不可以用标准算法
	//不支持随机访问迭代器的容器,内部会提供对应的一些算法

	cout << "排序后" << endl;
	l2.sort();
	PrintList(l2);

	l2.sort(myCompare);//降序
	PrintList(l2);
}
int main(void)
{
	test01();
	test02();
	system("pause");
	return 0;
}
总结:
- 反转——reverse
- 排序——sort(成员函数)
3.7.8 排序案例
案例描述:将Person自定义类型进行排序,Person中属性有姓名、年龄、身高。
排序规则:按照年龄进行升序,如果年龄相同则按照身高进行降序。
#include<iostream>
#include<list>
#include<string>
using namespace std;
class Person
{
public:
	Person(string name, int age, int height)
	{
		this->m_Age = age;
		this->m_Height = height;
		this->m_Name = name;
	}
	string m_Name;
	int m_Age;
	int m_Height;
};
//指定排序规则
bool comparePerson(Person &p1,Person &p2)
{
	//按照年龄升序
	if (p1.m_Age == p2.m_Age)
	{
		//年龄相同 按照身高降序
		return p1.m_Height > p2.m_Height;
	}
	else
	{
		return p1.m_Age < p2.m_Age;
	}

}


void test01()
{
	list<Person>L;
	Person p1("s11",23,166);
	Person p2("s12",23,156);
	Person p3("s13",23,178);
	Person p4("s14",33,172);
	Person p5("s15",43,190);
	Person p6("s16",45,175);

	L.push_back(p1);
	L.push_back(p2);
	L.push_back(p3);
	L.push_back(p4);
	L.push_back(p5);
	L.push_back(p6);

	for (list<Person>::iterator it = L.begin(); it != L.end(); it++)
	{
		cout << it->m_Name <<" " << it->m_Age <<" "<< it->m_Height << endl;
	}

	cout << "排序后" << endl;

	L.sort(comparePerson);
	for (list<Person>::iterator it = L.begin(); it != L.end(); it++)
	{
		cout << it->m_Name << " " << it->m_Age << " " << it->m_Height << endl;
	}
}
int main(void)
{
	test01();
	system("pause");
	return 0;
}
总结:
- 对于自定义数据类型,必须要指定排序规则,否则编译器不知道如何进行排序
- 高级排序只是在排序规则上再进行一次逻辑规则制定,并不复杂。
3.8 set/multiset容器
3.8.1 set基本概念
简介:
所有元素都会在插入时被自动排序。
本质:
set/multiset属于关联式容器,底层结构是用二叉树实现。
set和multiset区别:
- set不允许容器中有重复的元素。
- multiset允许容器中有重复的元素
3.8.2 set构建和赋值
功能描述:
创建set容器以及赋值。
构造:
赋值:
#include<iostream>
#include<set>
using namespace std;

void PrintSet(set<int> &s)
{
	for (set<int>::iterator it = s.begin(); it != s.end(); it++)
	{
		cout << *it << " ";
	}
	cout << endl;
}

void test01()
{
	set<int>s1;
	//只有insert,自动排序,不能插入重复数据
	s1.insert(30);
	s1.insert(20);
	s1.insert(10);
	s1.insert(40);

	PrintSet(s1);

	set<int>s2(s1);

	PrintSet(s2);

	set<int>s3;
	s3 = s2;
	PrintSet(s3);

}
int main(void)
{
	test01();
	system("pause");
	return 0;
}
总结:
- set容器插入数据时用insert
- set容器插入的数据会自动排序
3.8.3 set大小和交换
功能描述:
统计set容器大小以及交换set容器。
函数原型: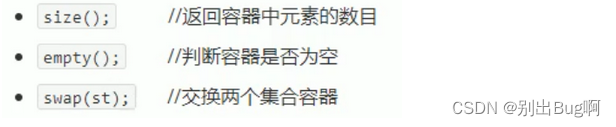
#include<iostream>
#include<set>
using namespace std;

void PrintSet(set<int> &s)
{
for (set<int>::iterator it = s.begin(); it != s.end(); it++)
{
	cout << *it << " ";
}
cout << endl;
}

void test01()
{
	set<int>s1;
	s1.insert(10);
	s1.insert(20);
	s1.insert(30);
	s1.insert(40);

	PrintSet(s1);

	if (s1.empty())
	{
		cout << "空" << endl;
	}
	else
	{
		cout << "不空" << endl;
		cout << "大小:" << s1.size() << endl;
	}

}

void test02()
{
	set<int>s2;
	set<int>s3;

	s2.insert(100);
	s2.insert(200);
	s2.insert(300);

	s3.insert(1);
	s3.insert(2);
	s3.insert(3);


	cout << "交换前:" << endl;
	PrintSet(s2);
	PrintSet(s3);
	s2.swap(s3);
	cout << "交换后:" << endl;

	PrintSet(s2);
	PrintSet(s3);
}
int main(void)
{
	test01();
	test02();
	system("pause");
	return 0;
}
总结:
- 统计大小——size
- 判断是否为空——empty
- 交换容器——swap
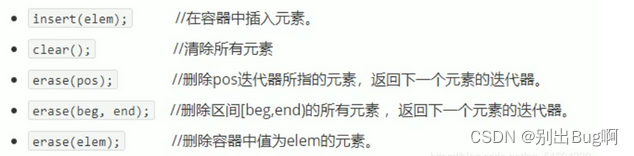
3.8.4 set插入和删除
功能描述:
set容器进行插入数据和删除数据
函数原型:
#include<iostream>
#include<set>
using namespace std;

void PrintSet(set<int> &s)
{
for (set<int>::iterator it = s.begin(); it != s.end(); it++)
{
	cout << *it << " ";
}
cout << endl;
}
void test01()
{
	set<int>s1;

	s1.insert(2);
	s1.insert(1);
	s1.insert(3);
	s1.insert(4);

	PrintSet(s1);

	s1.erase(s1.begin());
	PrintSet(s1);

	s1.erase(3);
	PrintSet(s1);

	s1.erase(s1.begin(), s1.end());
	PrintSet(s1);

	s1.clear();
	PrintSet(s1);
}
int main(void)
{
	test01();
	system("pause");
	return 0;
}
总结:
- 插入——insert
- 删除——erase
- 清空——clear
3.8.5 ser查找和统计
功能描述:
对set容器进行查找数据以及统计数据
函数原型:![]()
#include<iostream>
#include<set>
using namespace std;

void PrintSet(set<int> &s)
{
for (set<int>::iterator it = s.begin(); it != s.end(); it++)
{
	cout << *it << " ";
}
cout << endl;
}
void test01()
{
	set<int>s1;
	s1.insert(1);
	s1.insert(2);
	s1.insert(3);
	s1.insert(4);

	set<int>::iterator pos = s1.find(3);

	if (pos != s1.end())
	{
		cout << "找到" << *pos << endl;
	}
	else
	{
		cout << "没找到" << endl;
	}

	int num = s1.count(3);
	//对于set而言 统计结果 0 或 1,因为无重复
	cout << num << "个" << endl;
}


int main(void)
{
	test01();

	system("pause");
	return 0;
}总结:
- 查找——find(返回的是迭代器)
- 统计——count(对于set,结果为0或者1)
3.8.6 set和multiset区别
学习目标:
掌握set和multiset的区别
区别:
- set不可以插入重复数据,而multiset可以
- set插入数据的同时会返回插入结果,表示插入是否成功
- multiset不会检测数据,因此可以插入重复数据
#include<iostream>
#include<set>
using namespace std;


void PrintMultiSet(multiset<int>& ms)
{
	for (multiset<int>::iterator it = ms.begin(); it != ms.end(); it++)
	{
		cout << *it << " ";
	}
	cout << endl;
}
void test01()
{
	set<int>s1;
	pair<set<int>::iterator,bool>ret = s1.insert(10);

	if (ret.second)
	{
		cout << "插入成功" << endl;
	}
	else
	{
		cout << "插入失败" << endl;
	}

	//第二次
	ret = s1.insert(10);

	if (ret.second)
	{
		cout << "插入成功" << endl;
	}
	else
	{
		cout << "插入失败" << endl;
	}

	multiset<int>ms;

	ms.insert(10);
	ms.insert(10);

	PrintMultiSet(ms);

}
int main(void)
{
	test01();
	system("pause");
	return 0;
}总结:
- 如果不允许插入重复数据可以利用set
- 如果需要插入重复数据利用multiset
3.8.7 pair对组创建
功能描述:
成对出现的数据,利用对组可以返回两个数据。
两种创建方式:

#include<iostream>
#include<string>
using namespace std;


void test01()
{
	//第一种
	pair<string, int>p("Tom", 11);
	cout << p.first <<" "<< p.second << endl;

	//第二种
	pair<string, int>p2 = make_pair("Jerry", 12);
	cout << p2.first << " " << p2.second << endl;
}
int main(void)
{
	test01();
	system("pause");
	return 0;
}
总结:
两种方式都可以创建对组,记住一种即可。
3.8.8 set容器排序
学习目标:
set容器默认排序规则为从小到大,掌握如何改变排序规则。
主要技术点:
利用仿函数,可以改变排序顺序。
内置类型
#include<iostream>
#include<set>
using namespace std;


class MyCompare
{
public:
	//vs2019结尾加const
	bool operator()(int v1,int v2)const
	{
		return v1 > v2;
	}
};

void test01()
{
	set<int,MyCompare>s1;

	//set容器要在还没插数据之前对排序进行改变


	s1.insert(10);
	s1.insert(20);
	s1.insert(30);
	s1.insert(40);

	for (set<int,MyCompare>::iterator it = s1.begin(); it != s1.end(); it++)
	{
		cout << *it << " ";
	}
	cout << endl;
}
int main(void)
{
	test01();
	system("pause");
	return 0;
}
自定义类型
#include<iostream>
#include<set>
#include<string>
using namespace std;


class Person
{
public:

	Person(string name, int age)
	{
		this->m_Age = age;
		this->m_Name = name;
	}
	string m_Name;
	int m_Age;
};


class Mycompare
{
public:
	bool operator()(const Person& p1, const Person& p2)const
	{
		return p1.m_Age > p2.m_Age;
	}
};


void test01()
{
	set<Person, Mycompare>s1;
	Person p1("s1",11);
	Person p2("s2",22);
	Person p3("s3",33);
	Person p4("s4",44);

	s1.insert(p1);
	s1.insert(p2);
	s1.insert(p3);
	s1.insert(p4);
	for (set<Person, Mycompare>::iterator it = s1.begin(); it != s1.end(); it++)
	{
		cout << it->m_Name << " " << it->m_Age << endl;
	}
}
int main(void)
{
	test01();
	system("pause");
	return 0;
}
总结:
-
利用仿函数可以指定set容器的排序规则。
-
对于自定义数据类型,set必须指定排序规则才可以插入数据
3.9 map/multimap容器
3.9.1 map基本概念
简介:
- map中所有元素都是pair
- pair中第一个元素为key(键值),起到索引作用,第二个元素为value(实值)
- 所有元素都会根据元素的键值自动排序
本质:
map/multimap属于关联式容器,底层结构是用二叉树实现。
优点:
可以根据key值快速找到value值
区别:
map和multimap区别
- map不允许容器中有重复key值元素
- multimap允许容器中有重复key值元素
3.9.2 map构造和赋值
功能描述:
对map容器进行构造和赋值操作。
函数原型:
构造:
赋值:![]()
#include<iostream>
#include<map>
using namespace std;

void PrintMap(map<int, int>& m)
{
	for (map<int, int>::iterator it = m.begin(); it != m.end(); it++)
	{
		cout << "key=" << (*it).first << "value=" << (*it).second << "   " ;
	}
	cout << endl;
}

void test01()
{
	map<int, int>m1;
	m1.insert(pair<int, int>(1, 10));
	m1.insert(pair<int, int>(2, 20));
	m1.insert(pair<int, int>(3, 30));
	m1.insert(pair<int, int>(4, 40));

	PrintMap(m1);

	map<int, int>m2(m1);
	PrintMap(m1);

	map<int, int>m3;
	m3 = m2;
	PrintMap(m3);
}
int main(void)
{
	test01();
	system("pause");
	return 0;
}总结:
map中所有元素都是成对出现,插入数据时要使用对组。
3.9.3 map大小和交换
功能描述:
统计map容器大小以及交换map容器
函数原型:

#include<iostream>
#include<map>
using namespace std;

void PrintMap(map<int, int>& m)
{
	for (map<int, int>::iterator it = m.begin(); it != m.end(); it++)
	{
		cout << "key=" << (*it).first << "value=" << (*it).second << "   " ;
	}
	cout << endl;
}

void test01()
{


	map<int, int>m1;
	m1.insert(pair<int, int>(1, 10));
	m1.insert(pair<int, int>(2, 20));
	m1.insert(pair<int, int>(3, 30));
	m1.insert(pair<int, int>(4, 40));

	PrintMap(m1);

	if (m1.empty())
	{
		cout << "空" << endl;
	}
	else
	{
		cout << "不空" << endl;
		cout << "大小=" << m1.size() << endl;
	}


	map<int, int>m2;
	m2.insert(pair<int, int>(10, 1));
	m2.insert(pair<int, int>(20, 2));
	m2.insert(pair<int, int>(30, 3));
	m2.insert(pair<int, int>(40, 4));

	cout << "交换前" << endl;
	PrintMap(m1);
	PrintMap(m2);

	cout << "交换后" << endl;

	m1.swap(m2);
	PrintMap(m1);
	PrintMap(m2);

}
int main(void)
{
	test01();
	system("pause");
	return 0;
}总结:
- 统计大小——size
- 判断是否为空——empty
- 交换容器——swap
3.9.4 map插入和删除
功能描述:
map容器进行插入数据和删除数据
函数原型: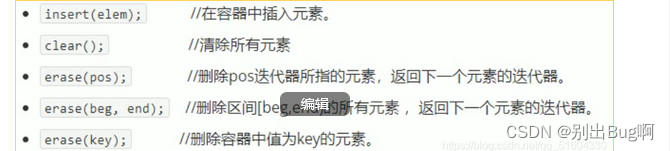
#include<iostream>
#include<map>
using namespace std;

void PrintMap(map<int, int>& m)
{
	for (map<int, int>::iterator it = m.begin(); it != m.end(); it++)
	{
		cout << "key=" << it->first << " " << "value=" << it->second << endl;
	}
	cout << endl;
}
void test01()
{
	map<int, int>m1;
	//第一种
	m1.insert(pair<int, int>(1, 10));
	//第二种
	m1.insert(make_pair(2, 20));
	//第三种
	m1.insert(map<int, int>::value_type(3, 30));
	//第四种
	m1[4] = 40;//不建议这种,用途是利用key访问到value,不存在会自动创建,所以应该确定存在再访问
	cout << m1[4] << endl;

	PrintMap(m1);

	m1.erase(m1.begin());
	PrintMap(m1);

	m1.erase(3);//按照key删除
	PrintMap(m1);

	m1.erase(m1.begin(), m1.end());
	PrintMap(m1);

	m1.clear();
	PrintMap(m1);
}
int main(void)
{
	test01();
	system("pause");
	return 0;
}总结:
- map插入方式很多,记住其一即可
- 插入——insert
- 删除——erase
- 清空——clear
3.9.5 map查找和统计
功能描述:
对map容器进行查找和数据以及统计数据
函数原型:
#include<iostream>
#include<map>
using namespace std;

void PrintMap(map<int, int>& m)
{
	for (map<int, int>::iterator it = m.begin(); it != m.end(); it++)
	{
		cout << "key=" << it->first << " " << "value=" << it->second << endl;
	}
	cout << endl;
}
void test01()
{
	map<int, int>m1;

	m1.insert(pair<int, int>(1, 10));
	m1.insert(pair<int, int>(2, 20));
	m1.insert(pair<int, int>(3, 30));

	map<int, int>::iterator pos = m1.find(3);//返回迭代器

	if (pos != m1.end())
	{
		cout << "找到了" <<pos->first<<" "<<pos->second<< endl;
	}
	else
	{
		cout << "没找到" << endl;
	}

	//map不允许插入重复key,0 or 1
	//multimap可以大于1,可以重复
	int num = m1.count(3);
	cout << num << endl;
}
int main(void)
{
	test01();
	system("pause");
	return 0;
}总结:
- 查找——find(返回的是迭代器)
- 统计——cout(对于map,结果为0或1)
3.9.6 map容器排序
学习目标:
map容器默认排序规则为按照key值进行从小到大排序,掌握如何改变排序规则。
主要技术点:
利用仿函数,可以改变排序规则。
#include<iostream>
#include<map>
using namespace std;


class MyCompare
{
public:
	bool operator()(int v1,int v2)const
	{
		return v1 > v2;
	}
};

void PrintMap(map<int, int, MyCompare>& m)
{
	for (map<int, int, MyCompare>::iterator it = m.begin(); it != m.end(); it++)
	{
		cout << "key=" << it->first << " " << "value=" << it->second << endl;
	}
	cout << endl;
}
void test01()
{
	map<int, int,MyCompare>m1;
	m1.insert(make_pair(1, 10));
	m1.insert(make_pair(2, 20));
	m1.insert(make_pair(3, 30));
	m1.insert(make_pair(4, 40));
	m1.insert(make_pair(5, 50));

	PrintMap(m1);
}
int main(void)
{
	test01();
	system("pause");
	return 0;
}总结:
- 利用仿函数可以指定map容器的排序规则
- 对于自定义数据类型,map必须要指定排序规则,同set容器
3.10 案例——员工分组
3.10 .1 案例描述
- 公司今天招聘了10个员工(ABCDEFGHIJ),10名员工进入公司之后,需要指派员工在哪个部门工作。
- 员工信息有:姓名、工资组成、部门分为:策划、美术、研发
- 通过multimap进行信息的插入 key(部门编号)value(员工)
- 分部门显示员工信息
3.10.2 实现步骤
- 创建10名员工,放到vector中
- 遍历vector容器,取出每个员工,进行随机分组
- 分组后,将员工部门编号作为key,具体员工作为value,放入到multimap容器中
- 分部门显示员工信息
#include<iostream>
#include<string>
using namespace std;
#include<vector>
#include<map>
#define CEHUA 0
#define MEISHU 1
#define YANFA 2

class Worker
{
public:
	string m_Name;
	int m_Salary;
};
void creatWork(vector<Worker>&v)
{
	string nameSeed = "ABCDEFGHIJ";
	for (int i = 0; i < 10; i++)
	{
		Worker worker;
		worker.m_Name = "员工";
		worker.m_Name += nameSeed[i];
		worker.m_Salary = rand() % 10000 + 10000;
		//将员工放到容器中
		v.push_back(worker);
	}
}
void SetGroup(vector<Worker>& v, multimap<int, Worker>& m)
{
	for (vector<Worker>::iterator it = v.begin(); it != v.end(); it++)
	{
		//产生随机部门编号
		int deptId = rand() % 3;
		//将员工插入到分组中
		//key部门编号,value具体员工
		m.insert(make_pair(deptId, *it));
	}
}
void ShowWorkerByGroup(multimap<int, Worker>& m)
{
	cout << "策划部门:" << endl;
	multimap<int, Worker>::iterator pos = m.find(CEHUA);
	int count = m.count(CEHUA);
	int index = 0;
	for (; pos != m.end() && index < count; pos++, index++)
	{
		cout << "姓名" << pos->second.m_Name << "工资" << pos->second.m_Salary << endl;
	}
	cout << "研发部门" << endl;
	pos = m.find(YANFA);
	count = m.count(YANFA);
	index = 0;
	for (; pos != m.end() && index < count; pos++, index++)
	{
		cout<<"姓名"<<pos->second.m_Name<< "工资" << pos->second.m_Salary << endl;
	}
}
int main()
{
	//创建员工
	vector<Worker>vWorker;
	creatWork(vWorker);
	//分组
	multimap<int,Worker>mWorker;
	SetGroup(vWorker, mWorker);
	ShowWorkerByGroup(mWorker);
	return 0;
}
4 STL函数对象
4.1.1 函数对象概念
概念:
-重载函数调用操作符的类,其对象也称为函数对象
函数对象使用重载()时,行为类似函数调用,也叫仿函数
本质:
函数对象(仿函数)是一个类,不是一个函数。
4.1.2 函数对象在使用时
特点:
可以像普通函数那样调用,可以有参数,可以有返回值
函数对象超出普通函数的概念,函数对象可以有自己的状态
函数对象可以作为参数传递
#include<iostream>
using namespace std;
#include<string>
class MyAdd
{
public:
	int operator()(int v1, int v2)
	{
		return v1 + v2;
	}
};
//2.函数对象超出普通函数的概念,函数对象可以有自己的状态
class MyPrint
{
public:
	MyPrint()
	{
		this->count = 0;
	}
	void operator()(string test)
	{
		cout << test << endl;
		this->count++;
	}
	int count;//内部自己的状态
};
void doPrint(MyPrint& mp, string test)
{
	mp(test);
}

void test03()
{
	MyPrint myPrint;
	doPrint(myPrint, "hello c++");
}
void test01()
{
	MyAdd myadd;
	cout << myadd(10, 20) << endl;
}
void test02()
{
	MyPrint myprint;
	myprint("hello world");
	myprint("hello world");
	myprint("hello world");
	myprint("hello world");
	myprint("hello world");
	myprint("hello world");
	cout << "MyPrint调用次数为:" << myprint.count << endl;
}
int main()
{
	test01();
	test02();
	test03();
	return 0;
}总结:
仿函数写法非常灵活,可以作为参数进行传递。
4.2 谓词
4.2.1 谓词概念
概念:
- 返回bool类型的仿函数称为谓词
- 如果operator()接受一个参数,那么叫做一元谓词
- 如果operator()接收两个参数,那么叫做二元谓词
4.2.2 一元谓词
#include<iostream>
#include<vector>
#include<algorithm>

using namespace std;


class CreaterFive
{
public:
	bool operator()(int val)
	{
		return val > 5;
	}
};

void test01()
{
	vector<int>v;
	for (int i = 0; i < 10; i++)
	{
		v.push_back(i);
	}

	//查找容器中,有没有大于5的数字
	//CreaterFive()匿名函数对象
	vector<int>::iterator pos = find_if(v.begin(), v.end(), CreaterFive());

	if (pos == v.end())
	{
		cout << "未找到" << endl;
	}
	else
	{
		cout << "找到了,大于5的数字为:" << *pos << endl;
	}
}
int main(void)
{
	test01();
	system("pause");
	return 0;
}总结:
参数中只有一个的谓词,叫做一元谓词
4.2.3 二元谓词
#include<iostream>
#include<vector>
#include<algorithm>

using namespace std;
class MyCompare
{
public:
	bool operator()(int val1,int val2)
	{
		return val1 > val2;
	}
};

void test01()
{
	vector<int>v;

	v.push_back(10);
	v.push_back(40);
	v.push_back(20);
	v.push_back(30);
	v.push_back(50);

	sort(v.begin(), v.end());
	for (vector<int>::iterator it = v.begin(); it != v.end(); it++)
	{
		cout << *it << " ";
	}
	cout << endl;

	//改变为降序
	sort(v.begin(), v.end(),MyCompare());
	for (vector<int>::iterator it = v.begin(); it != v.end(); it++)
	{
		cout << *it << " ";
	}
	cout << endl;
}
int main(void)
{
	test01();
	system("pause");
	return 0;
}
总结:
参数只有两个的谓词,称为二元谓词。
4.3 内建函数对象
4.3.1内建函数对象意义
概念:
STL内建了一些函数对象
分类:
- 算数仿函数
- 关系仿函数
- 逻辑仿函数
用法:
- 这些仿函数所产生的对象,用法和一般函数完全相同
- 使用内建函数对象,需要引入头文件#include< functional>
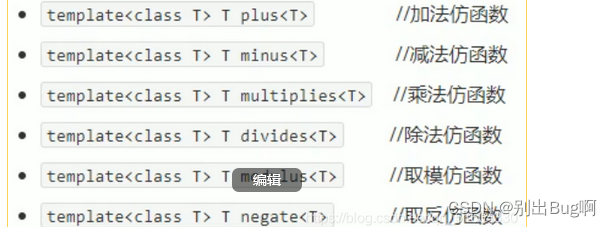
4.3.2 算数仿函数
功能描述:
- 实现四则运算
- 其中negate是一元运算,其它都是二元运算
仿函数原型:
#include<iostream>
#include<vector>
#include<algorithm>
#include<functional>//内建函数对象头文件
using namespace std;

//megate一元仿函数 取反仿函数
void test01()
{
	negate<int>n;
	cout << n(50) << endl;
}

void test02()
{
	//加法仿函数——其他算数仿函数同理
	plus<int>p;//默认认定传的是同种数据类型
	cout << p(10, 20) << endl;
}
int main(void)
{
	test01();
	test02();
	system("pause");
	return 0;
} 总结:
使用内建函数对象时,需要引入头文件#include< functional>
4.3.3 关系仿函数
功能描述:
实现关系对比
仿函数原型: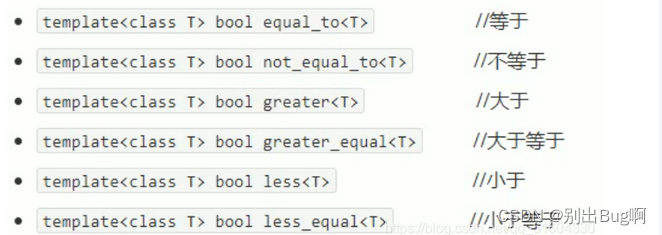
#include<iostream>
#include<vector>
#include<algorithm>
#include<functional>
using namespace std;

class MyCompare
{
public:
	bool operator()(int v1,int v2)
	{
		return v1 > v2;
	}
};

void test01()
{
	vector<int>v;
	v.push_back(1);
	v.push_back(3);
	v.push_back(4);
	v.push_back(2);
	v.push_back(5);

	for (vector<int>::iterator it = v.begin(); it != v.end(); it++)
	{
		cout << *it << " ";
	}
	cout << endl;

	//sort(v.begin(),v.end(), MyCompare());
	//greater<int>() 内建函数对象
	sort(v.begin(),v.end(), greater<int>());
	for (vector<int>::iterator it = v.begin(); it != v.end(); it++)
	{
		cout << *it << " ";
	}
	cout << endl;
}
int main(void)
{
	test01();
	system("pause");
	return 0;
}总结:
关系仿函数最常用的就是greater<>大于
4.3.4 逻辑仿函数
功能描述:
实现逻辑运算
函数原型:
#include<iostream>
#include<vector>
#include<algorithm>
#include<functional>
using namespace std;

void test01()
{
	vector<bool>v;
	v.push_back(true);
	v.push_back(false);
	v.push_back(true);
	v.push_back(false);

	for (vector<bool>::iterator it = v.begin(); it != v.end(); it++)
	{
		cout << *it << " ";
	}
	cout << endl;

	//利用逻辑非 将容器v 搬运到容器v2中,并执行取反操作

	vector<bool>v2;
	v2.resize(v.size());

	transform(v.begin(), v.end(), v2.begin(),logical_not<bool>());//()代表对象的创建

	for (vector<bool>::iterator it = v2.begin(); it != v2.end(); it++)
	{
		cout << *it << " ";
	}
	cout << endl;
}
int main(void)
{
	test01();
	system("pause");
	return 0;
}
5 STL
概述:
- 算法主要是由头文件< algorithm >< functional > < numeric >组成
- < algorithm >是所有STL头文件中最大的一个,范围涉及到比较、交换、查找、遍历操作、复制、修改等等。
- < functional >定义了一些模板类,用以声明函数对象
- < numeric >体积很小,只包括几个在序列上面进行简单数据运算的模板函数
5.1 常用遍历算法
学习目标:
掌握常用的遍历算法
算法简写:
5.1.1 for_each
功能描述:
实现遍历容器
函数原型: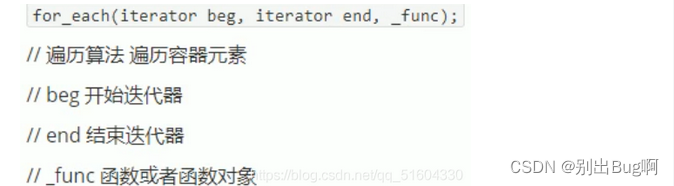
#include<iostream>
#include<vector>
#include<functional>
#include <algorithm>
using namespace std;
//普通函数
void print01(int val)
{
	cout << val << " ";
}
//仿函数
class print02
{
public:
	void operator()(int val)
	{
		cout << val << " ";
	}
};
void test01()
{
	vector<int>v;
	for (int i = 0; i < 10; i++)
	{
		v.push_back(i);
	}
	for_each(v.begin(), v.end(), print01);
	cout << endl;
	for_each(v.begin(), v.end(), print02());//仿函数必须要加()
	cout << endl;

}

int main()
{
	test01();
	return 0;
}总结:
for_each在实际开发中是最常用的遍历算法,需要熟练掌握。
5.1.2 transform
功能描述:
搬运容器到另一个容器中。
函数原型: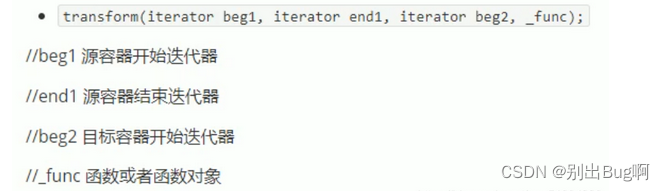
#include<iostream>
#include<vector>
#include<algorithm>
#include<functional>
using namespace std;


class TransForm
{
public:
	int operator()(int val)
	{
		return val + 100;
	}
};

class MyPrint
{
public:
	void operator()(int val)
	{
		cout << val << " ";
	}
};

void test01()
{
	vector<int>v;
	for (int i = 0; i < 10; i++)
	{
		v.push_back(i);
	}
	vector<int>vTarget;//目标容器
	vTarget.resize(v.size());//目标容器需要提前开辟空间
	transform(v.begin(), v.end(), vTarget.begin(), TransForm());
	for_each(vTarget.begin(), vTarget.end(), MyPrint());
	cout << endl;
}
int main(void)
{
	test01();
	system("pause");
	return 0;
} 总结:
搬运的目标容器必须提前开辟空间,否则无法正常搬运。
5.2 常用查找算法
学习目标:
掌握常用的查找算法
算法简介:

#include<iostream>
#include<vector>
#include<algorithm>
#include<functional>
#include<string>
using namespace std;

class Person
{
public:
	Person(string name,int age)
	{
		this->m_Age = age;
		this->m_Name = name;
	}
	//重载==
	bool operator ==(const Person& p)
	{
		if (this->m_Age == p.m_Age && this->m_Name == p.m_Name)
		{
			return true;
		}
		else
		{
			return false;
		}
	}
	string m_Name;
	string m_Age;
};


//内置
void test01()
{
	vector<int>v;
	for (int i = 0; i < 10; i++)
	{
		v.push_back(i);
	}

	vector<int>::iterator it = find(v.begin(), v.end(), 5);
	if (it == v.end())
	{
		cout << "没找到" << endl;
	}
	else
	{
		cout << "找到" << *it << endl;
	}
}
//自定义数据类型
void test02()
{
	vector<Person>V;
	Person p1("1",11);
	Person p2("2",22);
	Person p3("3",33);
	Person p4("4",44);

	V.push_back(p1);
	V.push_back(p2);
	V.push_back(p3);
	V.push_back(p4);

	vector<Person>::iterator it = find(V.begin(), V.end(), p2);
	if (it == V.end())
	{
		cout << "没找到" << endl;
	}
	else
	{
		cout << "找到" << it->m_Name << " " << it->m_Age << endl;
	}
}
int main(void)
{
	test01();
	test02();
	system("pause");
	return 0;
}总结:
利用find可以在容器中找指定的元素,返回值是迭代器。
5.2.2 find_if
功能描述:
按条件查找元素。
函数原型: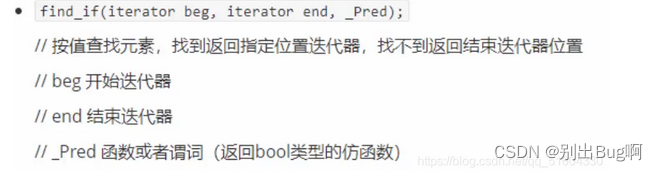
#include<iostream>
#include<vector>
#include<algorithm>
#include<functional>
#include<string>
using namespace std;


class GreaterFive
{
public:
	bool operator()(int val)
	{
		return val > 5;
	}
};

//内置数据类型
void test01()
{
	vector<int>v;
	for (int i = 0; i < 10; i++)
	{
		v.push_back(i);
	}
	vector<int>::iterator it = find_if(v.begin(), v.end(), GreaterFive());
	if (it == v.end())
	{
		cout << "没找到" << endl;
	}
	else
	{
		cout << "找到了" << *it << endl;
	}
}

//自定义数据类型

class Person
{
public:
	Person(string name,int age)
	{
		this->m_Age = age;
		this->m_Name = name;
	}
	string m_Name;
	int m_Age;
};
class Greater20
{
public:
	bool operator()(Person &p)
	{
		return p.m_Age > 20;
	}
};
void test02()
{
	vector<Person>V;
	Person p1("1",11);
	Person p2("2",22);
	Person p3("3",33);
	Person p4("4",44);

	V.push_back(p1);
	V.push_back(p2);
	V.push_back(p3);
	V.push_back(p4);

	vector<Person>::iterator it = find_if(V.begin(), V.end(), Greater20());
	if (it == V.end())
	{
		cout << "没找到" << endl;
	}
	else
	{
		cout << "找到了" << it->m_Name<<" "<<it->m_Age << endl;
	}
}
int main(void)
{
	test01();
	test02();
	system("pause");
	return 0;
}
5.2.3 adjacent_find
功能描述:
查找相邻重复元素。
函数原型: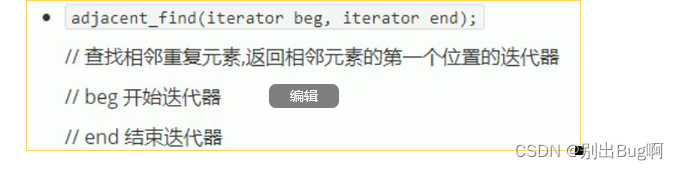
#include<iostream>
#include<vector>
#include<algorithm>
#include<functional>
using namespace std;


void test01()
{
	vector<int>v;
	v.push_back(0);
	v.push_back(2);
	v.push_back(1);
	v.push_back(2);
	v.push_back(7);
	v.push_back(3);
	v.push_back(3);

	vector<int>::iterator it = adjacent_find(v.begin(), v.end());
	if (it == v.end())
	{
		cout << "没找到" << endl;
	}
	else
	{
		cout << "找到相邻重复元素" << *it << endl;
	}
}
int main(void)
{
	test01();
	system("pause");
	return 0;
}
总结:
面试题中如果出现查找相邻重复元素,记得用STL中的adjacent_find算法
5.2.4 binary_search
功能描述:
查找指定元素是否存在。
函数原型: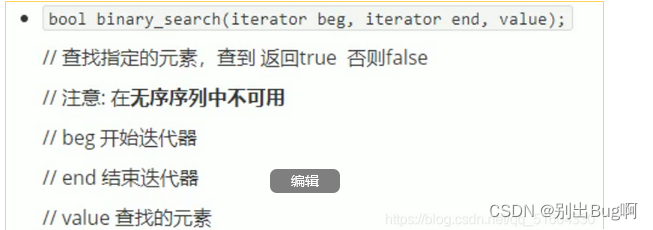
#include<iostream>
#include<vector>
#include<algorithm>
#include<functional>
using namespace std;


void test01()
{
	vector<int>v;
	for (int i = 0; i < 10; i++)
	{
		v.push_back(i);
	}

	//这个容器必须是有序的序列,如果是无序的序列,结果未知
	bool ret = 	binary_search(v.begin(), v.end(),9);

	if (ret)
	{
		cout << "找到了" << endl;
	}
	else
	{
		cout << "没找到" << endl;
	}
}
int main(void)
{
	test01();
	system("pause");
	return 0;
}总结“
二分查找法效率很高,值得注意的是查找的容器中元素必须得是有序序列,否则结果未知。
5.2.5 count
功能描述:
统计元素个数。
函数原型:

#include<iostream>
#include<vector>
#include<algorithm>
#include<functional>
#include<string>
using namespace std;


//内置
void test01()
{
	vector<int>v;
	v.push_back(10);
	v.push_back(10);
	v.push_back(40);
	v.push_back(20);
	v.push_back(30);

	int num = count(v.begin(), v.end(), 10);
	cout << num << endl;
}
class Person
{
public:
	Person(string name, int age)
	{
		this->m_Age = age;
		this->m_Name = name;
	}
	bool operator==(const Person& p)
	{
		if (this->m_Age == p.m_Age)
		{
			return true;
		}
		else
		{
			return false;
		}
	}
	string m_Name;
	int m_Age;
};

void test02()
{
	vector<Person>v;
	Person p1("s1",11 );
	Person p2("s2",12 );
	Person p3("s3",13 );
	Person p4("s4",14 );
	Person p5("s5",14 );

	v.push_back(p1);
	v.push_back(p2);
	v.push_back(p3);
	v.push_back(p4);
	v.push_back(p5);

	int num = count(v.begin(), v.end(), p5);

	cout << num << endl;
}
int main(void)
{
	test01();
	test02();
	system("pause");
	return 0;
}
总结:
统计自定义数据类型时候,需要配合重载operator==
5.2.6 count_if
功能描述:
按条件统计元素个数。
函数原型: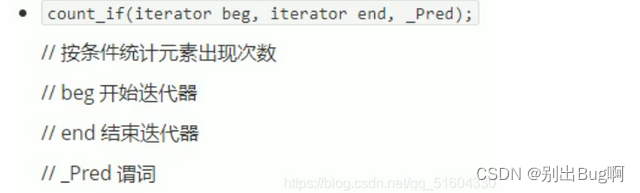
5.3 常用排序算法
学习目标:
掌握常用的排序算法。
算法简介: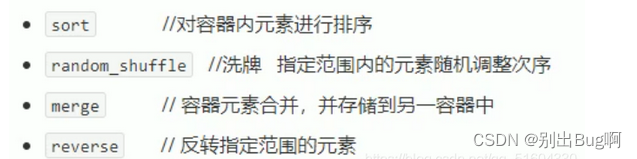
5.3.1 sort
功能描述:
对容器内元素进行排序。
函数原型:
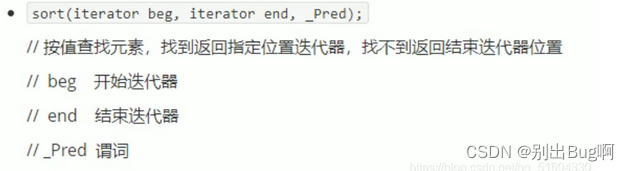
#include<iostream>
#include<vector>
#include<algorithm>
#include<functional>
using namespace std;


void myPrint(int val)
{
	cout << val << " ";
}
void test01()
{
	vector<int>v;
	v.push_back(20);
	v.push_back(10);
	v.push_back(60);
	v.push_back(5);
	v.push_back(30);
	v.push_back(2);

	//升
	sort(v.begin(), v.end());
	for_each(v.begin(), v.end(), myPrint);
	cout << endl;

	//降
	sort(v.begin(), v.end(), greater<int>());
	for_each(v.begin(), v.end(), myPrint);
	cout << endl;
}
int main(void)
{
	test01();
	system("pause");
	return 0;
} 总结:
sort属于开发中最常用的算法之一,需熟练掌握。
5.3.2 random_shuffle
功能描述:
洗牌 指定范围内的元素随机调整次序。
函数原型:
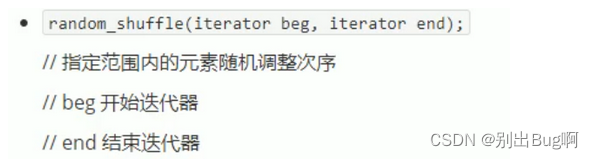
#include<iostream>
#include<vector>
#include<algorithm>
#include<functional>
#include<ctime>
using namespace std;

void myPrint(int val)
{
	cout << val << " ";
}
void test01()
{
	vector<int>v;
	for (int i = 0; i < 10; i++)
	{
		v.push_back(i);
	}
	for_each(v.begin(), v.end(),myPrint);
	cout << endl;

	random_shuffle(v.begin(), v.end());
	for_each(v.begin(), v.end(), myPrint);
	cout << endl;

}
int main(void)
{
	srand((unsigned int)time(NULL));
	test01();
	system("pause");
	return 0;
}
总结:
random_shuffle洗牌算法比较使用,使用时记得加随机数种子。
5.3.3 merge
功能描述:
两个容器元素合并,并存储到另一个容器中。
函数原型:
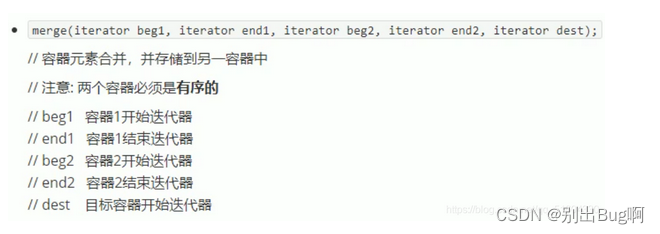
#include<iostream>
#include<vector>
#include<algorithm>
#include<functional>
using namespace std;

void myPrint(int val)
{
	cout << val << " ";
}
void test01()
{
	vector<int>v1;
	vector<int>v2;
	for (int i = 0; i < 5; i++)
	{
		v1.push_back(i);
		v2.push_back(i+5);
	}
	//目标容器
	vector<int>vTarget;
	vTarget.resize(v1.size() + v2.size());

	merge(v1.begin(),v1.end(),v2.begin(),v2.end(),vTarget.begin());

	for_each(vTarget.begin(), vTarget.end(), myPrint);
	cout << endl;
}
int main(void)
{
	test01();
	system("pause");
	return 0;
}
总结:
merge合并的两个容器必须得是有序序列。
5.3.4 reverse
功能描述:
将容器内元素进行反转。
函数原型: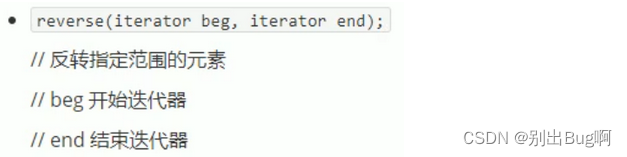
#include<iostream>
#include<vector>
#include<algorithm>
#include<functional>
using namespace std;


void myPrint(int val)
{
	cout << val << " ";
}
void test01()
{
	vector<int>v;
	v.push_back(20);
	v.push_back(10);
	v.push_back(60);
	v.push_back(5);
	v.push_back(30);
	v.push_back(2);

	for_each(v.begin(), v.end(), myPrint);
	cout << endl;

	reverse(v.begin(), v.end());
	for_each(v.begin(), v.end(), myPrint);
	cout << endl;

}
int main(void)
{
	test01();
	system("pause");
	return 0;
} 总结:
reverse反转区间内元素,面试题可能涉及到。
5.4 常用的拷贝和替换算法
学习目标:
掌握常用的拷贝和替换算法。
算法简介: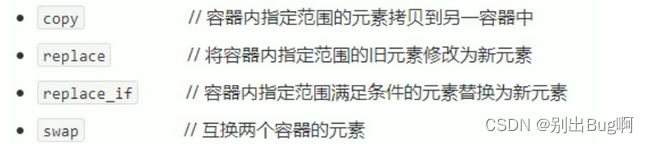
5.4.1copy
功能描述:
容器内指定范围的元素拷贝到另一容器中。
函数原型“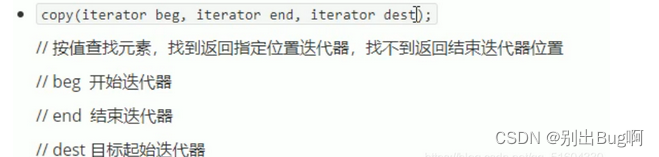
#include<iostream>
#include<vector>
#include<algorithm>
#include<functional>
using namespace std;

void myPrint(int val)
{
	cout << val << " ";
}
void test01()
{
	vector<int>v1;
	for (int i = 0; i < 10; i++)
	{
		v1.push_back(i);
	}

	vector<int>v2;
	v2.resize(v1.size());
	copy(v1.begin(), v1.end(), v2.begin());

	for_each(v2.begin(), v2.end(), myPrint);
	cout << endl;

}
int main(void)
{
	test01();
	system("pause");
	return 0;
}总结:
利用copy算法在拷贝时,目标容器记得提前开辟空间。
5.4.2 replace
功能描述:
将容器内指定范围的旧元素修改为新元素。
函数原型:
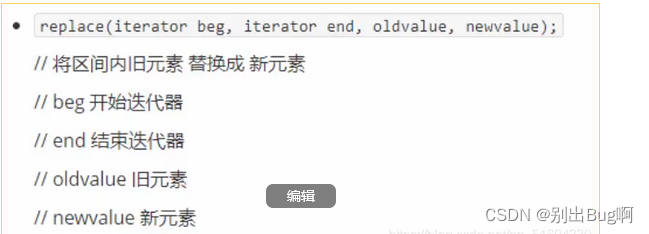
#include<iostream>
#include<vector>
#include<algorithm>
#include<functional>
using namespace std;

void myPrint(int val)
{
	cout << val << " ";
}
void test01()
{
	vector<int>v;
	v.push_back(20);
	v.push_back(10);
	v.push_back(60);
	v.push_back(50);
	v.push_back(30);
	v.push_back(20);

	cout << "替换前" << endl;
	for_each(v.begin(), v.end(), myPrint);
	cout << endl;

	cout << "替换后" << endl;
	replace(v.begin(), v.end(), 20, 2000);
	for_each(v.begin(), v.end(), myPrint);
	cout << endl;


}
int main(void)
{
	test01();
	system("pause");
	return 0;
}总结:
replace会替换区间内满足条件的所有元素。
5.4.3 replace_if
功能描述:
将区间内满足条件的元素,替换成指定元素。
函数原型:
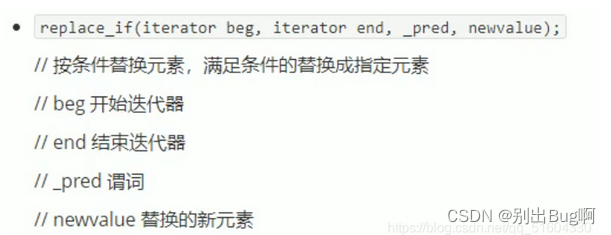
#include<iostream>
#include<vector>
#include<algorithm>
#include<functional>
using namespace std;

void myPrint(int val)
{
	cout << val << " ";
}
class Great30
{
public:
	bool operator()(int val)
	{
		return val > 30;
	}
};
void test01()
{
	vector<int>v;
	v.push_back(20);
	v.push_back(10);
	v.push_back(60);
	v.push_back(50);
	v.push_back(30);
	v.push_back(20);

	cout << "替换前" << endl;
	for_each(v.begin(), v.end(), myPrint);
	cout << endl;
	cout << "替换后" << endl;
	replace_if(v.begin(), v.end(),Great30(),3000);
	for_each(v.begin(), v.end(), myPrint);
	cout << endl;
}
int main(void)
{
	test01();
	system("pause");
	return 0;
}
总结:
replace_if按条件查找,可以利用仿函数灵活筛选满足的条件。
5.4.4 swap
功能描述:互换两个容器的元素。
函数原型: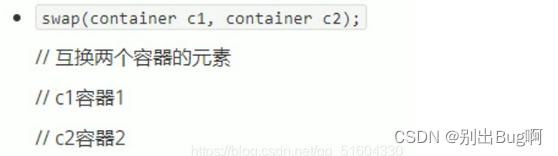
#include<iostream>
#include<algorithm>
#include<string>
#include<functional>
#include<vector>
using namespace std;
void MyPrint(int val)
{
	cout << val << " ";
}
void test01()
{
	vector<int>v1;
	vector<int>v2;
	for (int i = 0; i < 10; i++)
	{
		v1.push_back(i);
		v2.push_back(i+100);
	}

	cout << "交换前" << endl;
	for_each(v1.begin(), v1.end(), MyPrint);
	cout << endl;

	for_each(v2.begin(), v2.end(), MyPrint);
	cout << endl;

	cout << "交换后" << endl;
	swap(v1, v2);

	for_each(v1.begin(), v1.end(), MyPrint);
	cout << endl;

	for_each(v2.begin(), v2.end(), MyPrint);
	cout << endl;
}
int main(void)
{
	test01();
	system("pause");
	return 0;
} 总结:
swap交换容器时,注意交换的容器是同种类型。
5.5 常用算数生成算法
学习目标:
掌握常用的算数生成算法。
注意:
算数生成算法属于小型算法,使用时包含的头文件为#include< numeric >
算法简介:
5.5.1 accumulate
功能描述:
计算区间内容器元素累计总和。
函数原型: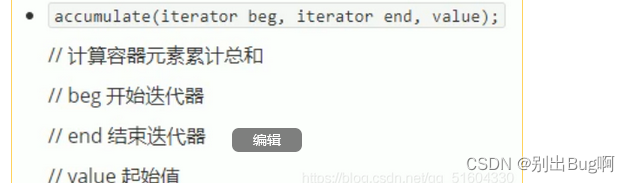
#include<iostream>
#include<vector>
#include<numeric>
using namespace std;
void MyPrint(int val)
{
	cout << val << " ";
}
void test01()
{
	vector<int>v;
	for (int i = 0; i <= 100; i++)
	{
		v.push_back(i);
	}
	//参数3是起始累加值
	int total = accumulate(v.begin(), v.end(), 0);
	cout << total << endl;

}
int main(void)
{
	test01();
	system("pause");
	return 0;
}
总结:
accumulate使用时头文件注意是numeric,这个算法很实用。
5.5.2 fill
功能描述:
向容器中填充指定的元素。
函数原型:
#include<iostream>
#include<algorithm>
#include<numeric>
#include<vector>
#include<algorithm>

using namespace std;
void MyPrint(int val)
{
	cout << val << " ";
}
void test01()
{
	vector<int>v;
	v.resize(10);
    //后期重新填充
	fill(v.begin(),v.end(),100);
	for_each(v.begin(), v.end(), MyPrint);
	cout << endl;
}
int main(void)
{
	test01();
	system("pause");
	return 0;
}总结:利用fill可以将容器区间内元素填充为指定的值。
5.6 常用集合算法
学习目标:
掌握常用的集合算法。
算法简介: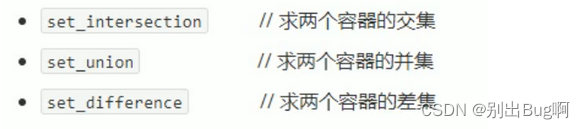
5.6.1 set_intersection
功能描述:
求两个容器的交集。
函数原型: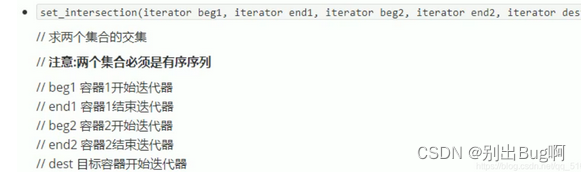
#include<iostream>
#include<algorithm>
#include<string>
#include<functional>
#include<vector>
#include<algorithm>
using namespace std;
void MyPrint(int val)
{
	cout << val << " ";
}
void test01()
{
	vector<int>v1;
	vector<int>v2;
	for (int i = 0; i < 10; i++)
	{
		v1.push_back(i);
		v2.push_back(i+5);
	}
	vector<int>vTarget;
	//最特殊情况,大容器包含小容器,开辟空间 取消的容器的size即可
	vTarget.resize(min(v1.size(),v2.size()));

	//返回迭代器的位置是交集的末尾位置,帮助下面for_each划定区间
	vector<int>::iterator itEnd = set_intersection(v1.begin(), v1.end(), v2.begin(), v2.end(), vTarget.begin());

	for_each(vTarget.begin(), itEnd, MyPrint);
	cout << endl;
}
int main(void)
{
	test01();
	system("pause");
	return 0;
}总结:
- 求交集的两个容器必须得是有序序列。
- 目标容器开辟空间需要从两个容器中取小值。
- set_intersection返回值(迭代器)是交集中最后一个元素的位置。
5.6.2 set_union
功能描述:
求两个集合的并集。
函数原型:
#include<iostream>
#include<algorithm>
#include<vector>
using namespace std;
void MyPrint(int val)
{
	cout << val << " ";
}
void test01()
{
	vector<int>v1;
	vector<int>v2;
	for (int i = 0; i < 10; i++)
	{
		v1.push_back(i);
		v2.push_back(i+5);
	}
	vector<int>vTarget;
	vTarget.resize(v1.size() + v2.size());
	vector<int>::iterator itEnd = set_union(v1.begin(), v1.end(), v2.begin(), v2.end(), vTarget.begin());
	for_each(vTarget.begin(), itEnd, MyPrint);
	cout << endl;
}
int main(void)
{
	test01();
	system("pause");
	return 0;
}总结:
- 求并集的两个集合必须得是有序序列。
- 目标容器开辟空间需要两个容器相加。
- set_union返回值(迭代器)是并集中最后一个元素的位置。
5.6.3 set_difference
功能描述:
求两个集合的差集。
函数原型: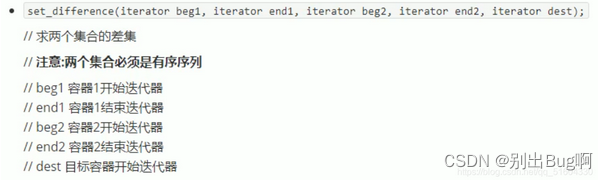
#include<iostream>
#include<algorithm>
#include<vector>
using namespace std;

void MyPrint(int val)
{
	cout << val << " ";
}

void test01()
{
	vector<int>v1;
	vector<int>v2;
	for (int i = 0; i < 10; i++)
	{
		v1.push_back(i);
		v2.push_back(i+5);
	}
	//考虑特殊情况

	vector<int>vTarget;
	//最特殊情况 两个容器没有交集 取两个容器大的size作为目标容器开辟的空间
	vTarget.resize(max(v1.size(), v2.size()));

	cout << "v1和v2的差集" << endl;


	vector<int>::iterator itEnd = set_difference(v1.begin(), v1.end(), v2.begin(), v2.end(), vTarget.begin());

	for_each(vTarget.begin(),itEnd, MyPrint);
	cout << endl;

	cout << "v2和v1的差集" << endl;

	itEnd = set_difference(v2.begin(), v2.end(), v1.begin(), v1.end(), vTarget.begin());

	for_each(vTarget.begin(), itEnd, MyPrint);
	cout << endl;
}
int main(void)
{
	test01();
	system("pause");
	return 0;
}总结:
- 求差集的两个集合必须得是有序序列。
- 目标容器开辟空间需要从两个容器取较大值。


 14万+
14万+


 被折叠的 条评论
为什么被折叠?
被折叠的 条评论
为什么被折叠?
 到【灌水乐园】发言


