


目录
跟新配置文件/etc/hosts + /etc/yum.repo.d/ftp.repo
概述
创建虚拟机,从新构建项目
1. VMware创建虚拟机
2. IP 配置
3. Yum 源配置
4. 文件共享系统配置
5. Ansible 安装配置
6. 系统初始化脚本
1. VMware创建虚拟机
虚拟机配置


(45条消息) VMware Workstation 网络备忘 + 集群规模_HJJ-DREAMER的博客-CSDN博客
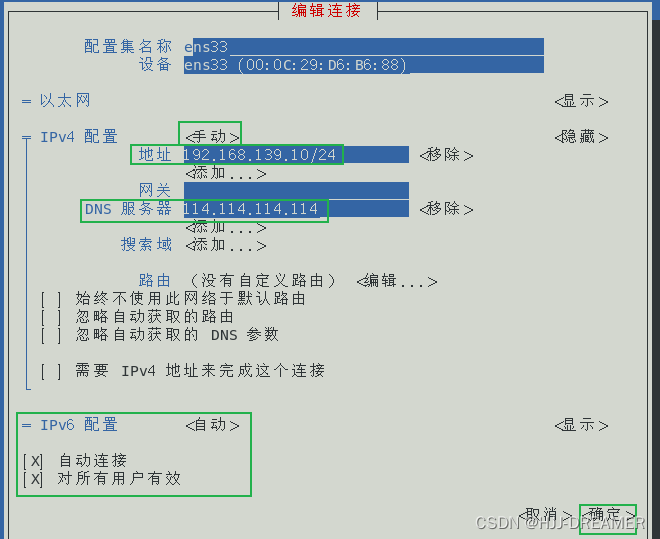
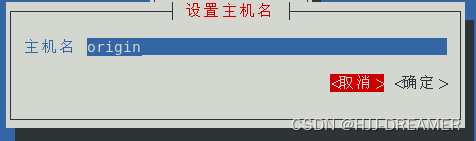
2. IP 配置
nmtui
nmtui

使用xshell或其他软件验证

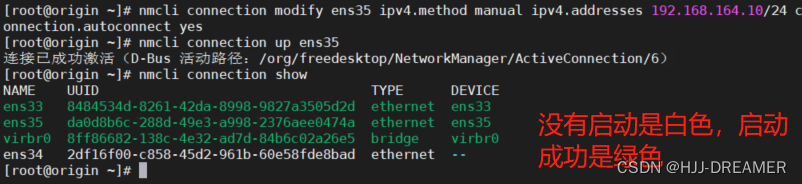
nmcli
# 查看链接状态
nmcli connection show

# 修改现有网络配置ens35
nmcli connection modify ens35 ipv4.method manual ipv4.addresses 192.168.164.10/24 connection.autoconnect yes

# 启动ip网段
nmcli connection up ens35

# 关闭ip网段
nmcli connection up ens33
连通性测试

3. Yum 源配置
光盘的Packages作为Yum源

# 备份已有yum仓库的配置
cd /etc/yum.repos.d/    # 进入仓库

# 备份配置
mkdir bakup ; mv ./Cent* ./bakup/

# 挂载光盘
mount /dev/cdrom /mnt

# 更新配置
cat > /etc/yum.repos.d/dvd.repo << EOF
[centos7-dvd-repo]
name=centos7
baseurl=file:///mnt
enabled=1
gpgcheck=1
gpgkey=file:///mnt/RPM-GPG-KEY-CentOS-7
EOF

# YUM 源更新
yum clean all   # 清理所有缓存
yum makecache   # 创建缓存
yum update      # 升级linux 系统
yum repolist    # 验证仓库信息

# 安装测试
yum install -y net-tools lftp rsync psmisc vim-enhanced tree vsftpd  bash-completion createrepo lrzsz iproute zip unzip yum-utils wget

# 卸载不必要程序,系统优化
yum remove -y postfix at audit kexec-tools firewalld-*

# 更新/etc/hosts文件
cat /etc/hosts
127.0.0.1   localhost localhost.localdomain localhost4 localhost4.localdomain4
::1         localhost localhost.localdomain localhost6 localhost6.localdomain6
192.168.164.10          orgin
192.168.164.16          reporsitory
192.168.164.11          master01
192.168.164.12          master02
192.168.164.13          master03
192.168.164.14          node04
192.168.164.15          node05
192.168.164.17          node07
192.168.164.51          db01
192.168.164.52          db02
192.168.164.53          db03
192.168.164.54          db04
192.168.164.55          db05
192.168.164.56          db06
192.168.164.26          node6

# 最后重启服务器
reboot| 名称 | 作用 | 备忘 |
| net-tools | 用于管理网络的工具 | |
| lftp | 命令行界面的 FTP 客户端软件 | |
| rsync | 可实现全量及增量(差异化备份)的本地或远程数据同步备份的优秀工具 | |
| psmisc | 进程管理软件包套装 | |
| vim-enhanced | vim | |
| tree | 树形结构列出指定目录下的所有内容 | |
| vsftpd | 建构一个以安全为重的 FTP 服务器 | |
| bash-completion | bash 自动补全 | |
| createrepo | 用于更新已有的yum仓库 | |
| lrzsz | 可拖拽上传下载linux代码到windows | |
| iproute | 一个网络管理工具包合集 | |
| yum-utils | yum的工具包集合 | |
| wget | 下载 | |
| zip unzip | zip 压缩包的解压和压缩 |
配置开机自动挂载(光盘)
# 查看光驱设备文件系统类型
blkid  /dev/cdrom

# 追加 /etc/fstab 下面的配置
echo "/dev/cdrom   /mnt    iso9660    defaults   0  0"  >> /etc/fstab
cat /etc/fstab

# 挂载检测
umount /mnt
mount  -a
ls   /mnt
配置私有Yum仓库
# 创建 /var/ftp/localrepo/centos7
mkdir -p /var/ftp/localrepo/centos7

# 将光盘挂载到 /var/ftp/localrepo/centos7
echo "/dev/cdrom   /var/ftp/localrepo/centos7    iso9660    defaults   0  0"  >> /etc/fstab

# 修改配置
cat /etc/yum.repos.d/dvd.repo
[centos7-dvd-repo]
name=centos7
baseurl=file:///var/ftp/localrepo/centos7
enabled=1
gpgcheck=0

# 更新yum源
yum clean all && yum makecache && yum repolist


# 开机自启动 vsftpd
systemctl enable --now vsftpd

# 初始化私有镜像仓库
createrepo --update /var/ftp/localrepo
ls /var/ftp/localrepo
跟新私有yum仓库
# 解压文件
tar xvf ansible_centos7.tar.gz

# 配置私有仓库
cat /etc/yum.repos.d/ftp.repo
[ftp-yum-repo]
name=ansible
baseurl=ftp://192.168.164.16/localrepo/ansible
enabled=1
gpgcheck=0

# 更新仓库
createrepo --update /var/ftp/localrepo/ansible
yum clean all && yum makecache && yum repolist
ls /var/ftp/localrepo/ansible
报错和修复
failure: repodata/repomd.xml from ftp-yum-repo: [Errno 256] No more mirrors to try.
ftp://192.168.164.16/localrepo/ansible/repodata/repomd.xml: [Errno 14] FTP Error 550 - Server denied you to change to the given directory报错原因是错误指定rpm包的位置 ( /var/ftp/localrepo )
正确指定rpm的位置是 /var/ftp/localrepo/ansible
正确更新yum仓库的命令是 createrepo --update /var/ftp/localrepo/ansible

详细报错
[root@reporsitory localrepo]# createrepo --update /var/ftp/localrepo
Spawning worker 0 with 2 pkgs
Spawning worker 1 with 2 pkgs
Workers Finished
Saving Primary metadata
Saving file lists metadata
Saving other metadata
Generating sqlite DBs
Sqlite DBs complete
[root@reporsitory localrepo]# yum clean all && yum makecache && yum repolist
已加载插件:fastestmirror
正在清理软件源: centos7-dvd-repo ftp-yum-repo
Cleaning up list of fastest mirrors
已加载插件:fastestmirror
Determining fastest mirrors
centos7-dvd-repo                                                           | 3.6 kB  00:00:00
ftp://192.168.164.16/localrepo/ansible/repodata/repomd.xml: [Errno 14] FTP Error 550 - Server denied you to change to the given directory
正在尝试其它镜像。


 One of the configured repositories failed (ansible),
 and yum doesn't have enough cached data to continue. At this point the only
 safe thing yum can do is fail. There are a few ways to work "fix" this:

     1. Contact the upstream for the repository and get them to fix the problem.

     2. Reconfigure the baseurl/etc. for the repository, to point to a working
        upstream. This is most often useful if you are using a newer
        distribution release than is supported by the repository (and the
        packages for the previous distribution release still work).

     3. Run the command with the repository temporarily disabled
            yum --disablerepo=ftp-yum-repo ...

     4. Disable the repository permanently, so yum won't use it by default. Yum
        will then just ignore the repository until you permanently enable it
        again or use --enablerepo for temporary usage:

            yum-config-manager --disable ftp-yum-repo
        or
            subscription-manager repos --disable=ftp-yum-repo

     5. Configure the failing repository to be skipped, if it is unavailable.
        Note that yum will try to contact the repo. when it runs most commands,
        so will have to try and fail each time (and thus. yum will be be much
        slower). If it is a very temporary problem though, this is often a nice
        compromise:

            yum-config-manager --save --setopt=ftp-yum-repo.skip_if_unavailable=true

failure: repodata/repomd.xml from ftp-yum-repo: [Errno 256] No more mirrors to try.
ftp://192.168.164.16/localrepo/ansible/repodata/repomd.xml: [Errno 14] FTP Error 550 - Server denied you to change to the given directory
4. 文件共享系统配置
跟新配置文件/etc/hosts + /etc/yum.repo.d/ftp.repo
# 更新配置文件
]# cat /etc/hosts
127.0.0.1   localhost localhost.localdomain localhost4 localhost4.localdomain4
::1         localhost localhost.localdomain localhost6 localhost6.localdomain6
192.168.164.10          origin
192.168.164.16          reporsitory
192.168.164.11          master01
192.168.164.12          master02
192.168.164.13          master03
192.168.164.14          node04
192.168.164.15          node05
192.168.164.17          node07
192.168.164.51          db01
192.168.164.52          db02
192.168.164.53          db03
192.168.164.54          db04
192.168.164.55          db05
192.168.164.56          db06
192.168.164.26          node6

]# cat /etc/yum.repos.d/ftp.repo
[ftp-yum-repo]
name=ansible
baseurl=ftp://192.168.164.16/localrepo/ansible
enabled=1
gpgcheck=0

[centos7-yum-repo]
name=centos7
baseurl=ftp://192.168.164.16/localrepo/centos7
enabled=1
gpgcheck=0
同步配置文件
scp /etc/yum.repos.d/ftp.repo root@reporsitory:/etc/yum.repos.d/ftp.repo

rsync -av /etc/hosts root@origin:/etc/hosts
linux上的rsync命令详解 - 简书 (jianshu.com)
测试yum私有仓库
yum clean all && yum makecache && yum repolist
sudo yum -y install ansible
5. Ansible 安装配置
ssh 配置
# 安装系统
yum -y install ansible
mkdir -p ~/ansible

# 配置ssh服务
ssh-keygen -t rsa -b 2048 -N '' -f /root/.ssh/id_rsa

# 更新权限
chmod 0400 /root/.ssh/id_rsa

# 循环传输公钥
for ip in 192.168.164.{10..17} 192.168.164.{51..56}
do
  ssh-copy-id -f -o stricthostkeychecking=no -i /root/.ssh/id_rsa.pub root@${ip}
done
hostlist 配置
ansible]# cat hostlist
[k8s]
192.168.164.[11:15]
192.168.164.17

[k8sm]
192.168.164.[11:13]

[k8ss]
192.168.164.[14:15]
192.168.164.17

[mysql]
192.168.164.[51:53]

[mysqlslave]
192.168.164.[52:53]

[redis]
192.168.164.[51:56]

[redismaster]
192.168.164.[51:53]

[redisslave]
192.168.164.[54:56]

[origin]
192.168.164.10

[repo]
192.168.164.16
ansible.cfg
Ansible的配置文件 — 国内最专业的Ansible中文官方学习手册
]# cat ansible.cfg
[defaults]
inventory   = /home/junjie/ansible/hostlist
roles_path  = /home/junjie/ansible/roles
host_key_checking = False
6. init.yaml == 系统初始化脚本
---
- name: init
  hosts: k8s,redis
  tasks:
  - name: delete the error dir
    file:
      path: /etc/yum.repos.d
      state: absent
  - name: cp the ftp.repo
    copy:
      src: /etc/yum.repos.d/
      dest: /etc/yum.repos.d
      force: yes
      mode: "0755"
  - name: cp the hosts
    copy:
      src: /etc/hosts
      dest: /etc/hosts
      mode: "0644"
  - name: init the yum repo
    shell: yum clean all && yum makecache && yum repolist
  - name: install softwares
    yum:
      name: zip,unzip
      state: present
  - name: remove softwares
    yum:
      name: postfix,at,audit,kexec-tools,firewalld
      state: absent
  - name: create ssh key
    shell: "ssh-keygen -t rsa -b 2048 -N '' -f /root/.ssh/id_rsa"
  - name: chmod ssh file
    shell: "chmod 0400 /root/.ssh/id_rsa"

command
# 查看命令帮助
ansible-doc yum

# 检查
ansible-playbook file.yml --syntax-check    #检查yaml文件的语法是否正确
ansible-playbook file.yml --list-task       #检查tasks任务
ansible-playbook file.yml --list-hosts      #检查生效的主机

# 执行命令
ansible-playbook init.yaml

ansible  k8s,redis -m   command   -a   "ls -l /etc/yum.repo.d"


 581
581


 被折叠的 条评论
为什么被折叠?
被折叠的 条评论
为什么被折叠?
 到【灌水乐园】发言


