#Spring Security简介
信息安全可以说是任何公司的红线,一般项目都会有严格的认证和授权操作。Spring Security是一个功能强大且高度可定制的身份验证和访问控制框架,来自于Spring家族,专注于为 Java 应用程序提供身份验证和授权,它是保护基于Spring应用程序的事实上的行业标准。
就我理解和使用而言,Spring Security配置即用、功能强大、非常灵活,能将开发人员从大量安全协议和开发中解脱出来,更加专注于业务。
#Login登录页面设计思路和流程图:
认证和授权是登录流程两个主要操作。
- 身份验证是要求用户提供有效凭据来验明正身。
- 授权意味着验证登录用户对此应用程序具有哪些权限(角色)。

#第一步:前期准备工作
项目架构:
- 开发环境Spring-boot 2.5.5
- Maven
- 数据库MySQL8.0+,存放用户、角色、用户角色对照表
- 持久层Mybatis
MySQL数据库设计:
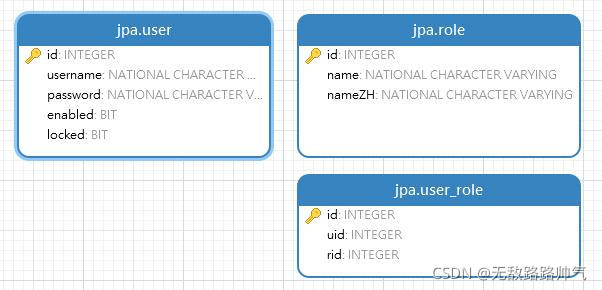
新建三张表,分别是用户表user,角色表role以及用户角色关联表user_role,角色名有一个默认的前缀"ROLE_"。
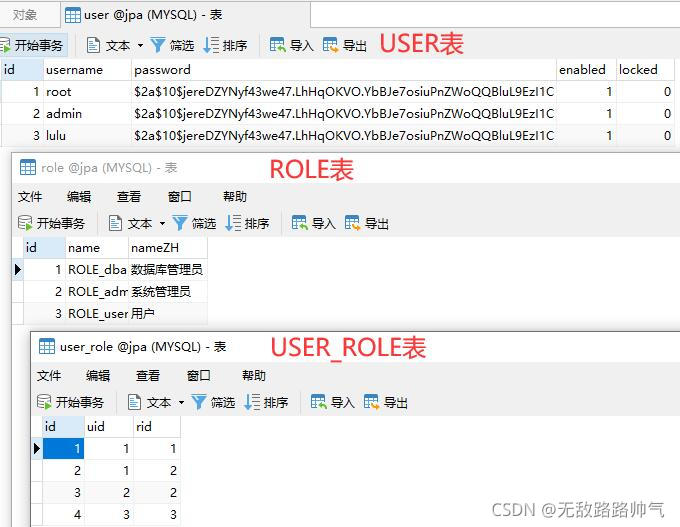
我们预制一些数据, 注意:用户密码Password加密策略我们采用SpringSecurity安全框架的BCryptPasswordEncoder(10),加密强度10,数据库中我们存入已经进行加密后的密文。


Maven依赖:
        <!--Spring Security-->
        <dependency>
            <groupId>org.springframework.boot</groupId>
            <artifactId>spring-boot-starter-security</artifactId>
        </dependency>
        <!--mybatis-->
        <dependency>
            <groupId>org.mybatis.spring.boot</groupId>
            <artifactId>mybatis-spring-boot-starter</artifactId>
            <version>2.2.0</version>
        </dependency>
        <!--Mysql-->
        <dependency>
            <groupId>mysql</groupId>
            <artifactId>mysql-connector-java</artifactId>
            <scope>runtime</scope>
        </dependency>
因为选用Mybatis作为持久层,所以在pom.xml配置文件中将XML文件加入项目中。
        <resources>
            <resource>
                <!-- XML默认是放在resource下面,如果有自定义,需要把resource加上 -->
                <directory>src/main/java</directory>
                <includes>
                    <include>**/*.xml</include>
                </includes>
            </resource>
            <resource>
                <directory>src/main/resources</directory>
            </resource>
        </resources>
Spring配置文件application.properties:
写入数据库配置信息:
#datasource mybatis配置--------------------------------
spring.datasource.url=jdbc:mysql://127.0.0.1:3306/jpa?characterEncoding=UTF-8
spring.datasource.username=root
spring.datasource.password=lulu@123456
spring.datasource.driver-class-name=com.mysql.cj.jdbc.Driver
#datasource mybatis配置--------------------------------
#第二步:用户角色实体类、持久层、用户服务类
Role角色实体类:
package com.example.springsecurity.Entity;
import java.io.Serializable;
public class Role implements Serializable {
    private Integer id;
    private String name;
    private String nameZH;
    public Integer getId() {return id;}
    public void setId(Integer id) {this.id = id;}
    public String getName() {return name;}
    public void setName(String name) {this.name = name;}
    public String getNameZH() {return nameZH;}
    public void setNameZH(String nameZH) {this.nameZH = nameZH;}
}
User用户实体类:
package com.example.springsecurity.Entity;
import org.springframework.security.core.GrantedAuthority;
import org.springframework.security.core.authority.SimpleGrantedAuthority;
import org.springframework.security.core.userdetails.UserDetails;
import java.util.ArrayList;
import java.util.Collection;
import java.util.List;

public class User implements UserDetails {
    private Integer id;
    private String username;
    private String password;
    private Boolean enabled;
    private Boolean locked;
    private List<Role> roles;
    @Override
    public Collection<? extends GrantedAuthority> getAuthorities(){
        List<SimpleGrantedAuthority> authorities =new ArrayList<>();
        for (Role r:roles){
            authorities.add(new SimpleGrantedAuthority(r.getName()));
        }
        return authorities;
    }
    @Override
    public String getPassword() {return password;}
    @Override
    public String getUsername() {return username;}
    @Override
    public boolean isAccountNonExpired() {return true;}
    @Override
    public boolean isAccountNonLocked() {return true;}
    @Override
    public boolean isCredentialsNonExpired() {return true;}
    @Override
    public boolean isEnabled() {return true;}
    public Integer getId() {return id;}
    public void setId(Integer id) {this.id = id;}
    public void setUsername(String username) {this.username = username;}
    public void setPassword(String password) {this.password = password;}
    public Boolean getEnabled() {return enabled;}
    public void setEnabled(Boolean enabled) {this.enabled = enabled;}
    public Boolean getLocked() {return locked;}
    public void setLocked(Boolean locked) {this.locked = locked;}
    public List<Role> getRoles() {return roles;}
    public void setRoles(List<Role> roles) {this.roles = roles;}
}
Mybais持久层UserMapper和UserMapper.xml:
package com.example.springsecurity.Repository;
import com.example.springsecurity.Entity.Role;
import com.example.springsecurity.Entity.User;
import org.apache.ibatis.annotations.Mapper;
import java.util.List;
@Mapper
public interface UserMapper {
    User loadUserByUsername(String username);
    List<Role> getUserRolesByUid(Integer id);
}
<?xml version="1.0" encoding="UTF-8"?>
<!DOCTYPE mapper
PUBLIC "-//mybatis.org//DTD Mapper 3.0//EN"
"http://mybatis.org/dtd/mybatis-3-mapper.dtd">
<mapper namespace="com.example.springsecurity.Repository.UserMapper">
<select id="loadUserByUsername" resultType="com.example.springsecurity.Entity.User">
select * from user where username=#{username}
</select>
<select id="getUserRolesByUid" resultType="com.example.springsecurity.Entity.Role">
select * from role r,user_role ur where r.id=ur.rid and ur.uid=#{id}
</select>
</mapper>UserService用户服务类:
package com.example.springsecurity.Service;
import com.example.springsecurity.Entity.User;
import com.example.springsecurity.Repository.UserMapper;
import org.springframework.beans.factory.annotation.Autowired;
import org.springframework.security.core.userdetails.UserDetails;
import org.springframework.security.core.userdetails.UserDetailsService;
import org.springframework.security.core.userdetails.UsernameNotFoundException;
import org.springframework.stereotype.Service;
@Service
public class UserService implements UserDetailsService {
    @Autowired
    UserMapper userMapper;
    @Override
    public UserDetails loadUserByUsername(String username) throws UsernameNotFoundException{
        User user = userMapper.loadUserByUsername(username);
        if(user == null){
            throw new UsernameNotFoundException("账户不存在!");
        }
        user.setRoles(userMapper.getUserRolesByUid(user.getId()));
        return user;
    }
}
#第三步:WebSecurityConfig核心配置类
- 首先注入UserService用于userDetailsService用户身份认证(包含密码、角色、锁定等)。
- 再配置用户登录密码需要BCryptPasswordEncoder密文认证。
- 最后配置HttpSecurity用于完成用户访问URL授权、登录跳转、注销登录等功能。
- antMatchers().hasRole()表明对URL资源访问需要相应角色。
- anyRequest().authenticated()表明用户访问其他URL资源都必须认证后访问。
- formLogin()开启表单登录,loginProcessingUrl()表明登录接口地址,permitAll()表示不需认证即可访问。
- successHandler为成功登陆后操作内容。这里我们设置了一个Cookie用于演示注销登陆是如何清除Cookie的。
- sendRedirect()表明跳转网页地址。
- logoutUrl()表明注销接口地址,clearAuthentication(true)表明清除身份认证,invalidateHttpSession(true)表明注销后线程失效,deleteCookies()表明清除Cookie的名称。
- addLogoutHandler为注销逻辑,可以在这里执行数据清理。
- logoutSuccessHandler为注销后逻辑,可以返回JSON代码或者跳转到登录页面。
package com.example.springsecurity.Config;
import com.example.springsecurity.Service.UserService;
import org.springframework.beans.factory.annotation.Autowired;
import org.springframework.context.annotation.Bean;
import org.springframework.context.annotation.Configuration;
import org.springframework.security.config.annotation.authentication.builders.AuthenticationManagerBuilder;
import org.springframework.security.config.annotation.web.builders.HttpSecurity;
import org.springframework.security.config.annotation.web.configuration.WebSecurityConfigurerAdapter;
import org.springframework.security.core.Authentication;
import org.springframework.security.crypto.bcrypt.BCryptPasswordEncoder;
import org.springframework.security.crypto.password.PasswordEncoder;
import org.springframework.security.web.authentication.AuthenticationSuccessHandler;
import org.springframework.security.web.authentication.logout.LogoutHandler;
import org.springframework.security.web.authentication.logout.LogoutSuccessHandler;
import javax.servlet.http.Cookie;
import javax.servlet.http.HttpServletRequest;
import javax.servlet.http.HttpServletResponse;
import java.io.IOException;
import java.util.UUID;
@Configuration
public class WebSecurityConfig extends WebSecurityConfigurerAdapter {
    //注入用户服务
    @Autowired
    UserService userService;
    //配置用户登录密码需要BCryptPasswordEncoder密文认证
    @Bean
    PasswordEncoder passwordEncoder(){
        return new BCryptPasswordEncoder(10);
    }
    //基于数据库的用户账号密码、角色、过期、锁定等认证
    @Override
    protected void configure(AuthenticationManagerBuilder auth) throws Exception{
        auth.userDetailsService(userService);
    }
    @Override
    protected void configure(HttpSecurity httpSecurity) throws Exception{
        httpSecurity.authorizeRequests()
                //对可访问URL资源进行角色控制
                .antMatchers("/admin/**")
                .hasRole("admin")
                .antMatchers("/user/**")
                .access("hasAnyRole('admin','user')")
                .antMatchers("/db/**")
                .access("hasRole('dba') and hasRole('admin')")
                //用户访问其他URL资源都必须认证后访问,即登陆后访问
                .anyRequest()
                .authenticated()
                //开启表单登录,即登录界面,登录URL为/login,登录参数用户名username密码password
                //Ajax或移动端通过POST请求登录,接口为/login,permitAll表示登录不需要认证即可访问
                .and()
                .formLogin()
                .loginProcessingUrl("/login")
                .permitAll()
                //成功登录后跳转到hello页面
                .successHandler(new AuthenticationSuccessHandler() {
                    @Override
                    public void onAuthenticationSuccess(HttpServletRequest request, HttpServletResponse response, Authentication authentication) throws IOException {
                        response.setContentType("application/json;charset=utf-8");
                        //创建一个Cookie用于演示
                        Cookie cookie=new Cookie("Authentication", UUID.randomUUID().toString().replace("-",""));
                        cookie.setMaxAge(24 * 60 * 60);
                        response.addCookie(cookie);
                        response.sendRedirect("/hello");
                    }
                })
                //配置注销登录,logoutUrl为注销接口,clearAuthentication清除身份认证信息
                //invalidateHttpSession表示是线程失效,deleteCookies清除Cookie
                .and()
                .logout()
                .logoutUrl("/logout")
                .clearAuthentication(true)
                .invalidateHttpSession(true)
                .deleteCookies("Authentication")
                //配置注销逻辑,可以执行数据清理
                .addLogoutHandler(new LogoutHandler() {
                    @Override
                    public void logout(HttpServletRequest request, HttpServletResponse response, Authentication authentication) {
                    }
                })
                //配置注销后的逻辑,返回JSON代码或者跳转到登录页面
                .logoutSuccessHandler(new LogoutSuccessHandler() {
                    @Override
                    public void onLogoutSuccess(HttpServletRequest request, HttpServletResponse response, Authentication authentication) throws IOException {
                        response.sendRedirect("/login");
                    }
                })
                .and()
                .csrf()
                .disable();
    }
}
#第四步:创建HelloController用于控制验证URL按角色访问
package com.example.springsecurity.Controller;
import org.springframework.web.bind.annotation.GetMapping;
import org.springframework.web.bind.annotation.RestController;
@RestController
public class HelloController {
    @GetMapping("/admin/hello")
    public String admin(){
        return "hello admin";
    }
    @GetMapping("/user/hello")
    public String user(){
        return "hello user";
    }
    @GetMapping("/db/hello")
    public String dba(){
        return "hello dba";
    }
    @GetMapping("/hello")
    public String hello(){
        return "hello";
    }
}
#启动项目开始测试
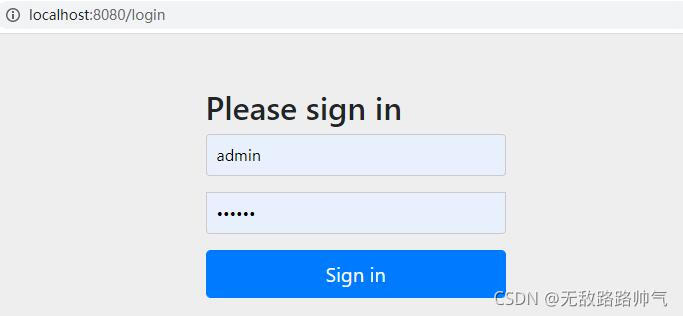
启动MySQL数据库和Spring-boot项目,在网页中输入http://localhost:8080,将会自动跳转到登录页面http://localhost:8080/login,需要输入username和password进行认证登录。

登录成功后则会自动跳转到hello接口。

我们输入http://localhost:8080/admin/hello,admin接口,将会返回hello admin。

我们输入http://localhost:8080/db/hello,dba接口,将会因为admin角色权限不够,提示被拒绝,这时候就需要用root账号登录,就可以访问dba接口了。

最后我们输入http://localhost:8080/logout,注销登录,会跳转到登录页面上重新登录。上一次登录的身份信息、Cookie信息、Session线程信息均清空或失效。


 本文详细介绍了如何在Spring Boot项目中使用Spring Security实现用户登录、角色管理与权限控制,包括配置、实体类、持久层及核心配置,展示了如何通过HTTP Security进行URL访问控制和登录逻辑设计。


 被折叠的 条评论
为什么被折叠?


