


文章目录
1.安装 Anaconda(2023.03.1)根据需要自行选择版本下载,推荐2022.05版本以上
2.使用 Anaconda 配置 python3.7 的环境,建议使用 python 3.6 或 python3.7,如果安装其他版本的 python 会导致环境配置失败
3.robotframework 和 robotframework-ride 直接安装即可,无需指定版本,会自动拉取当前环境支持的最新版本的安装包并编译安装
前言
该文章是记录本人的学习进度。本周的学习任务是:
1.调研现有的自动化测试并选择适用于 Linux 系统的动化测试框架;
框架要求:
① 效果模拟鼠标的操作
② 适用于 Linux 系统
③ 支持界面
2.在 Ubuntu 16.04 上完成配置和使用。
可以通过 autotest.sh 文件进行一键配置,如果只想直接使用 RIDE 可以直接从第 二 部分的第 5 点开始看。
一、环境要求
1.安装 Anaconda(2023.03.1)根据需要自行选择版本下载,推荐2022.05版本以上
wget https://repo.anaconda.com/archive/Anaconda3-2023.03-1-Linux-x86_64.sh
sh Anaconda3-2023.03-1-Linux-x86_64.sh
注意:conda init 初始化时 最好选择no
source ~/.bashrc
conda --version # 此时安装成功后默认进入 base 查看 conda 的版本
conda config --set auto_activate_base false # 取消默认进入 base
source ~/.bashrc
2.使用 Anaconda 配置 python3.7 的环境,建议使用 python 3.6 或 python3.7,如果安装其他版本的 python 会导致环境配置失败
conda create --name python3.7 python=3.7 # python 版本为 3.7.13
conda activate python3.7
二、RobotFramework框架的部署和RIDE的使用
1.环境部署
① robotframework 除 python 环境以外,无其他依赖,所以直接安装即可,但是要注意安装的版本,要与其他库和 python 环境兼容;
② RIDE(robotframework-ride)是 RobotFramework 带图形界面的编辑器,基于 wxpython (GUI库 支持 python 图形化界面)库开发的,所以必须先安装 wxpython 再安装RIDE。
可能涉及到的第三方库的版本:
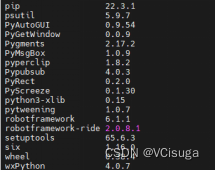
wxpython == 4.0.7
robotframework == 6.1.1
robotframework-ride == 2.0.8.1
PyAutoGUI == 0.9.54
2.安装 wxpython (容易出错)
①直接 pip install wxpython 会出现以下的错误:
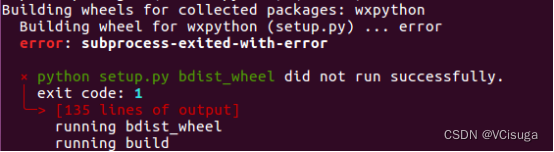
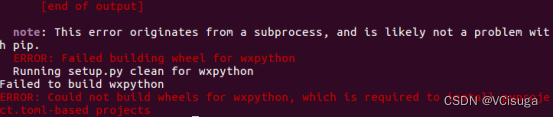
②解决方法:
直接下载/拉取 wxpython 安装包,考虑到兼容性,选择的是 4.0.7 版本。
a.官网下载:Index of /wxPython4/extras/linux/gtk3/ubuntu-16.04
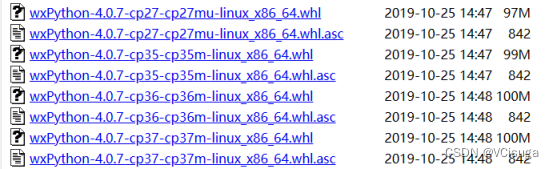
b.直接拉取:
wget https://extras.wxpython.org/wxPython4/extras/linux/gtk3/ubuntu-16.04/wxPython-4.0.7-cp37-cp37m-linux_x86_64.whl
.whl 文件会保存在 /home/user 目录下,直接安装
pip install wxPython-4.0.7-cp37-cp37m-linux_x86_64.whl
pip install filename.whl可能会遇到的问题,这是因为 .whl 和系统 python 版本不匹配,通过输入:
pip debug --verbose
指令,查看当前 python 版本可以适配的标签,并将文件名中的“cp37-cp37m-linux_x86_64”改为 python可适配的文件名,重新 pip install <newname.whl>。
3.robotframework 和 robotframework-ride 直接安装即可,无需指定版本,会自动拉取当前环境支持的最新版本的安装包并编译安装
pip install robotframework
pip install robotframework-ride
4.使用 RIDE (会遇到错误)
①必须要在配置好的虚拟环境下,执行 ride.py
ride.py
②第一次运行,可能会碰到如下错误(缺失 SDL)
ImportError: libSDL2-2.0.so.0: cannot open shared object file: No such file
解决方法:
sudo apt-get install git curl libsdl2-mixer-2.0-0 libsdl2-image-2.0-0 libsdl2-2.0-0
③其他问题

这种情况是因为 wxpython 安装的版本与 python 版本不匹配,所以导致当前 python 环境找不到有效的 wxpython
解决方法:重新安装匹配的 wxpython 或 python 环境
5.自动化测试的形式,需求是通过模拟鼠标进行操作,因此需要安装相应的库
① Windos 系统可以直接使用依赖库 robotframework-autoitlibrary
![]()
pip install robotframework-autoitlibrary
RIDE 导入:
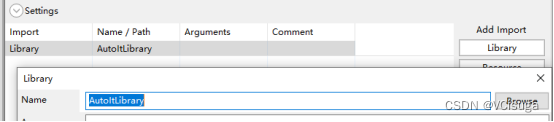
AutoItLibrary是一个用于Robot Framework的第三方库,它提供了与AutoIt脚本语言的交互能力,而AutoIt是一个Windows平台上的脚本语言。实际 robotframework-autoitlibrary 在 Linux 配置失败,因其不支持Linux 系统,所以 Linux 系统中无法使用这个依赖库。
② linux 系统通过引入 Python 脚本(自定义 py 模块)
暂未找到满足条件的依赖库,因此自定义符合功能需求的 py 模块。使用 pyautogui 库模拟测试时鼠标的一系列操作,相当于对 pyautogui 库再封装一层,并作为 robotframework 的第三方依赖库,因为 robotframework 本身除了 AutoItLibrary 以外并没有提供专门用于模拟鼠标操作的库,所以 Linux 系统基于 pyautogui 实现自动化测试。
pip install pyautogui
③ RIDE 导入自定义 py 模块的方法
a.方式一 打包成 Robotframework 的依赖库(推荐):
在 python 目录 Python3\Lib\site-packages 下创建自己的库文件夹,如果是搭建在虚拟环境下,需要到虚拟环境的 python 目录做以下操作:
mkdir anaconda3/envs/python3.7/lib/python3.7/site-packages/AutoGuiLibrary
vim anaconda3/envs/python3.7/lib/python3.7/site-packages/AutoGuiLibrary/autogui.py
将以下的代码复制到 autogui.py 并保存,自定义 py 模块:
import pyautogui
# pyautogui.FAILSAFE = True
class autogui(object):
    def __init__(self):
        pyautogui.FAILSAFE = True
    def get_screen_size(self):
        '''
        Descriptive: Get current computer resolution.
        Return: computer resolution.
        '''
        screen_size = pyautogui.size()
        return screen_size
    def on_screen(self, args):
        '''
        Descriptive: Determine if the coordinates are within the screen range.
        args: x coordinate y coordinate.
        Return: True or False.
        '''
        x, y, = args.split(" ")
        ifon = pyautogui.onScreen(int(x), int(y))
        return  ifon
    def get_mouse_move(self):
        '''
        Descriptive: Get current mouse coordinates.
        Return: x coordinate y coordinate.
        '''
        x, y = pyautogui.position()
        return x, y
    def move(self, args):
        '''
        Descriptive: Move to a certain coordinate.
        args: x coordinate, y coordinate, s action duration in seconds.
        '''
        x, y, s = args.split(" ")
        # Move to x, y for a duration of s seconds
        pyautogui.moveTo(int(x), int(y), int(s))
    def left_click(self):
        pyautogui.click()
    def right_click(self):
        pyautogui.rightClick()
    def middle_click(self):
        pyautogui.middleClick()
    def left_double_click(self):
        pyautogui.doubleClick()
    def left_mouse_down(self):
        pyautogui.mouseDown()
    def left_mouse_up(self):
        pyautogui.mouseUp()
    def right_mouse_down(self):
        pyautogui.mouseDown(button='right')
    def right_mouse_up(self):
        pyautogui.mouseUp(button='right')
    def left_move_drag(self, args):
        '''
        Descriptive: Hold down the left button and drag to a certain coordinate (absolute coordinate).
        args: x coordinate, y coordinate, s action duration in seconds.
        '''
        x, y, s = args.split(" ")
        pyautogui.dragTo(int(x), int(y), int(s))
    def left_drag_to(self, args):
        '''
        Descriptive: Hold down the left button and drag to a certain coordinate (relative coordinate).
        args: x coordinate, y coordinate, s action duration in seconds.
        '''
        x, y, s = args.split(" ")
        pyautogui.drag(int(x), int(y), int(s))
    def right_move_drag(self, args):
        '''
        Descriptive: Hold down the right button and drag to a certain coordinate (absolute coordinate).
        args: x coordinate, y coordinate, s action duration in seconds.
        '''
        x, y, s = args.split(" ")
        pyautogui.dragTo(int(x), int(y), int(s), button='right')
    def right_drag_to(self, args):
        '''
        Descriptive: Hold down the right button and drag to a certain coordinate (relative coordinate).
        args: x coordinate, y coordinate, s action duration in seconds.
        '''
        x, y, s = args.split(" ")
        pyautogui.drag(int(x), int(y), int(s), button='right')
    def mouse_scroll(self, amount_scroll):
        '''
        Descriptive: Mouse scrolling.
        amount_to_scroll: Mouse scrolling number of frames | Positive number scrolling up | Negative number scrolling down.
        '''
        amount_to_scroll = int(amount_scroll)
        pyautogui.scroll(amount_to_scroll)
    def key_write(self, strinfo, interval):
        '''
        Descriptive: Keyboard text input.
        strinfo: Input content | Note the switch between English and Chinese.
        interval: Typing interval seconds.
        '''
        pyautogui.typewrite(strinfo, interval)
    def key_press(self, keys):
        '''
        Descriptive: Key names on the keyboard (can be a list), press them in order.
        keys: Key names | Separate key names with a space.
        '''
        keys = keys.split(" ")
        pyautogui.press(keys)
    def key_down(self, key):
        '''
        Descriptive: Pressing a key on the keyboard and not releasing it.
        key: Key names.
        '''
        pyautogui.keyDown(key)
    def key_up(self, key):
        '''
        Descriptive: Release a key.
        key: Key names.
        '''
        pyautogui.keyUp(key)
    def key_hot(self, key1, key2):
        '''
        Descriptive: key combination.
        key1: The first button.
        key2: The Second button.
        '''
        pyautogui.hotkey(key1, key2)
创建 __init__.py 程序文件的代码如下:
# coding = utf-8
from AutoGuiLibrary.autogui import autogui
version = '1.0'
class AutoGuiLibrary(autogui):
    ROBOT_LIBRARY_SCOPE = 'GLOBAL'
创建成功:
![]()
直接在 RIDE 界面直接导入 AutoGuiLibrary 即可:
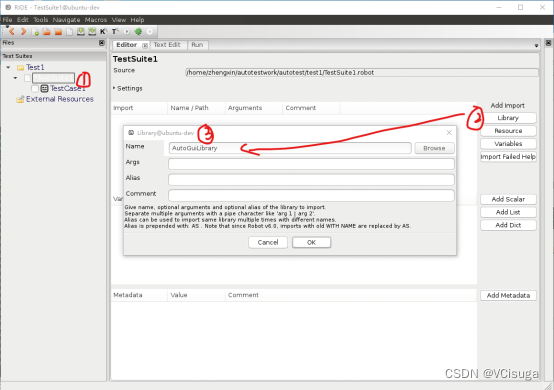
黑色导入成功,如果出现红色,请检查前面创建 __init__.py 文件内容是否有误。
按 F5 键,查看关键字如何使用:

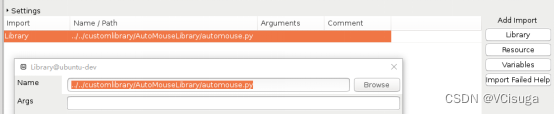
b.方式二 Browse直接导入创建好的 autogui.py 文件:
6.使用 autotest.sh 文件进行配置(省流版)
①在执行 autotest.sh 文件时,必须将 autotest.sh、AutoGuiLibrary、wxPython-4.0.7-cp37-cp37m-linux_x86_64.whl 复制到 root 目录下(前提);
②autotest.sh 文件的内容:
#!/bin/sh
cd ~
ifExistConda="command -v conda"
file_anaconda=Anaconda3-2023.03-1-Linux-x86_64.sh
if $ifExistConda >/dev/null 2>&1; then
    echo "Anaconda installed."
    conda -V
else
    file_path_="/root/$file_anaconda"
    echo "Anaconda file path: $file_path_"
    if ls $file_path_ >/dev/null 2>&1; then
	echo "The installation package for Anaconda has been downloaded and installation has begun."
    else
	echo "Anaconda not installed, Start downloading."
	wget https://repo.anaconda.com/archive/$file_anaconda
fi
    sh $file_anaconda
fi

eval "$(/root/anaconda3/bin/conda shell.bash hook)"
conda config --set auto_activate_base false
export PATH=$PATH:/root/anaconda3/bin
source ~/.bashrc

python_version="3.7"
if conda env list | grep "python$python_version"; then
    echo "A virtual environment with Python version 3.7 already exists."
else
    echo "No Python 3.7 virtual environment available, start creating."
    conda create --name "python$python_version" python=$python_version
fi
conda activate python$python_version

file_wxPython=wxPython-4.0.7-cp37-cp37m-linux_x86_64.whl

if pip list | grep wxPython >/dev/null 2>&1; then
    echo "wxPython has been correctly configured."
else
    file_path="/root/$file_wxPython"
    echo "wxPython file path: $file_path"
    if [ -f $file_path ]; then
        echo "The wxPython installation package already exists."
    else
        echo "Start downloading wxPython."
        wget https://extras.wxpython.org/wxPython4/extras/linux/gtk3/ubuntu-16.04/$file_wxPython
    fi
    pip install $file_wxPython
fi

pip install robotframework
pip install robotframework-ride
sudo apt-get install git curl libsdl2-mixer-2.0-0 libsdl2-image-2.0-0 libsdl2-2.0-0
pip install pyautogui
sudo cp -r /root/AutoGuiLibrary /root/anaconda3/envs/python3.7/lib/python3.7/site-packages

echo "RIDE configuration successful!"
read -p "Do you want to delete the files downloaded during the configuration process(y/n): " confirmation
if [[ $confirmation == 'y' || $confirmation == 'Y' ]]; then
    echo "Deleting files..."
    rm $file_anaconda $file_wxPython
    echo "Delete successful."
else
    echo "Keep files."
fi

read -p "Do you want to open RIDE(y/n): " openride
if [[ $openride == 'y' || $openride == 'Y' ]]; then
    echo "About to awaken RIDE..."
    ride.py
else
    echo "Please run ride.py in the Python 3.7 environment."
fi
②执行 autotest.sh 文件(如果是配置在 root 用户,需要保证无权限限制):
bash autotest.sh
运行 autotest.sh 自动将 robotfeamework 框架配置完成,只需根据提示输入 y/n。
注:
a.conda init 时,最好输入 no;
b.autotest.sh 文件中涉及到路径的命令,其中的路径需要根据具体情况修改;
c.因为 robotfeamework 框架配置在 anaconda 创建的 python3.7 虚拟环境,所以每次运行 ride.py 都需要先切换到对应的用户和虚拟环境下运行;
d.AutoGuiLibrary 是自定义的 py 模块,可以根据需要修改功能。
7.RIDE的使用(重要)
①启动 RIDE
conda activate python3.7
ride.py
a.恭喜!!成功启动!!!
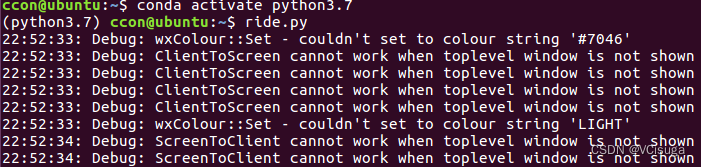
b.可恶!启动失败了
我在配置完成后,启动的时候还遇到了以下的错误(如果未遇到可以跳过):
CommandNotFoundError: Your shell has not been properly configured to use 'conda activate'.
To initialize your shell, run$ conda init <SHELL_NAME>
Currently supported shells are:
- bash
- fish
- tcsh
- xonsh
- zsh
- powershellSee 'conda init --help' for more information and options.
IMPORTANT: You may need to close and restart your shell after running 'conda init'.
我分析了一下,可能是我写的 autobase.sh 不够完善,导致激活失败,你们可以根据自己的需求进行修改 bash 文件,而我是直接通过重新激活,然后切换环境,就可以解决:
conda activate
conda activate python3.7
ride.py

②最常用的快捷键
| F5 | 查看关键字 (需要先导入依赖库 才可查看该依赖库的关键字信息) |
| ctrl + # | 代码注释 |
| ctrl + $ | 取消注释 |
| ctrl + d | 删除整行代码 |
| ctrl + z | 撤销操作 |
| ctrl+shift(alt)+space | 补全关键字 |
关键字查询界面:

③程序中的函数对应的关键字形式
例如:
| 函数名 | 关键字 |
|---|---|
| move_drag | Move Drag |
| move | Move |
| moveup | Moveup |
函数名的 “_” 对应关键字的空格,关键字首字母会大写,“_”下划线后的单词首字母也会大写,可以通过 F5 键来查找关键字
④最基本流程
a.创建测项目 File --> New Project --> Type 选择 Directory

Type 选择 Directory ,在 Directory 的项目下可以创建测试套件,便于测试用例的管理
Browse 选择测试文件保存的地址
b.创建测试套件 右击项目目录 --> New Suite --> Type 选择 File

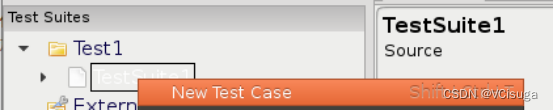
c.创建测试用例 右击测试套件 --> Ned Test Case
d.导入依赖库或自定义的 python 程序文件
选中测试套件 --> Editor 界面点击Library导库 --> 填写库名 或 点击Browse 选择 py文件
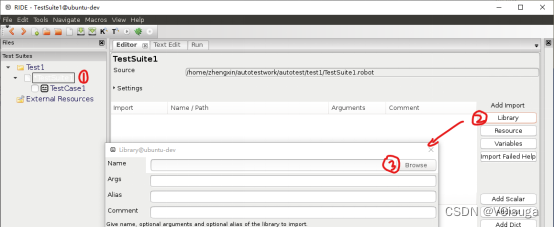
显示黑色:表示导入成功,此时可以通过 F5 快捷键查看该库的关键字使用方式

![]()
显示红色:表示导入失败,无法使用,检查库名(路径)是否正确、该库(文件)是否存在
![]()
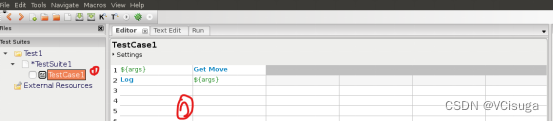
e.点击测试用例,并在 Editor 上编写测试案例
f.常用关键字详解
| 关键字 | 功能 |
|---|---|
| Log [args] | 打印 [args] |
| Get Mouse Move | 获取当前鼠标所处的位置坐标 |
| Get Screen Size | 获取显示器屏幕大小 |
| On Screen [args] | 判断某个坐标是否在屏幕外 |
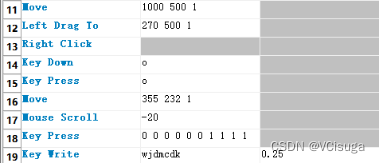
| Move [args] | 鼠标移动指定坐标 |
| Left Click | 点击左键一次 |
| Left Double Click | 双击左键 |
| Left Mouse Down | 按下左键不松开 |
| Left Mouse Up | 松开左键 |
| Left Move Drag [args] | 按住左键拖拽到某个坐标 |
| Left Drag To [args] | 按住左键以当前鼠标坐标为准,拖拽到某个相对位置 |
| Right Click | 点击右键一次 |
| Right Mouse Down | 按下右键不松开 |
| Right Mouse Up | 松开右键 |
| Right Move Drag [args] | 按住右键拖拽到某个坐标 |
| Right Drag To [args] | 按住右键以当前鼠标坐标为准,拖拽到某个相对位置 |
| Middle Click | 点击滚轮一次 |
| Mouse Scroll [amount_scroll] | 滚动滚轮 |
| Key Down [key] | 按下某键 |
| Key Up [key] | 松开某键 |
| Key Hot [key1] [key2] | 组合键 |
| Key Press [keys] | 依次按下键盘 |
| Key Write [strinfo] [interval] | 键盘间隔依次输入指定内容 |
示例:
测试运行结果及打印的信息:
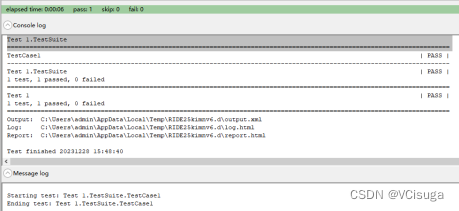
⑤结果报告
结果报告包含三个文件,这些文件默认生成在当前目录,提供全面的测试信息:
a. output.xml 记录测试结果;
b. log.html 追踪测试执行过程;
c. report.html 提供整理性的测试报告。
更改结果报告输出目录:
robot -d/–outputdir <指定目录>
指定文件的输出名:
-o/–output <指定名称>
-l/–log <指定名称>
-r/–report <指定名称>
不输出某个报告,可以通过设置None:
robot -l NONE -i test1 FirstTest\TestSuite.robot
总结
然后推荐一下,快速入门 RF 框架和 RIDE 的使用时我看的文章,因为本文集中在如何正确配置 RF 框架上,在 RF 的使用上只是简单的介绍,这篇文章更加具体的介绍了 RF 的使用,有需要的同学可以自行查看:
RobotFramework自动化测试框架使用大全(一篇解决)快速入门-CSDN博客
以上就是对本周任务的完成过程,本文仅简单介绍了 RF 的使用以及 RF 框架在 Ubuntu 16.04 上的配置流程,因为存在一些环境不兼容,所以也换了很多的方式,但是这是目前唯一成功的,已经开始使用了。
因为是第一篇的文章,略显粗糙,如果有错误会及时更正,感谢大家看到这里!!


 1040
1040


 被折叠的 条评论
为什么被折叠?
被折叠的 条评论
为什么被折叠?
 到【灌水乐园】发言


