


黑马vue2项目的智慧商城,自己仿写一个鸿蒙版的
前言
黑马的接口调用基础地址更换了,之前的接口需要更换
需要用到黑马智慧商城接口。地址:wiki - 智慧商城-实战项目 (apifox.com)
一、分析布局
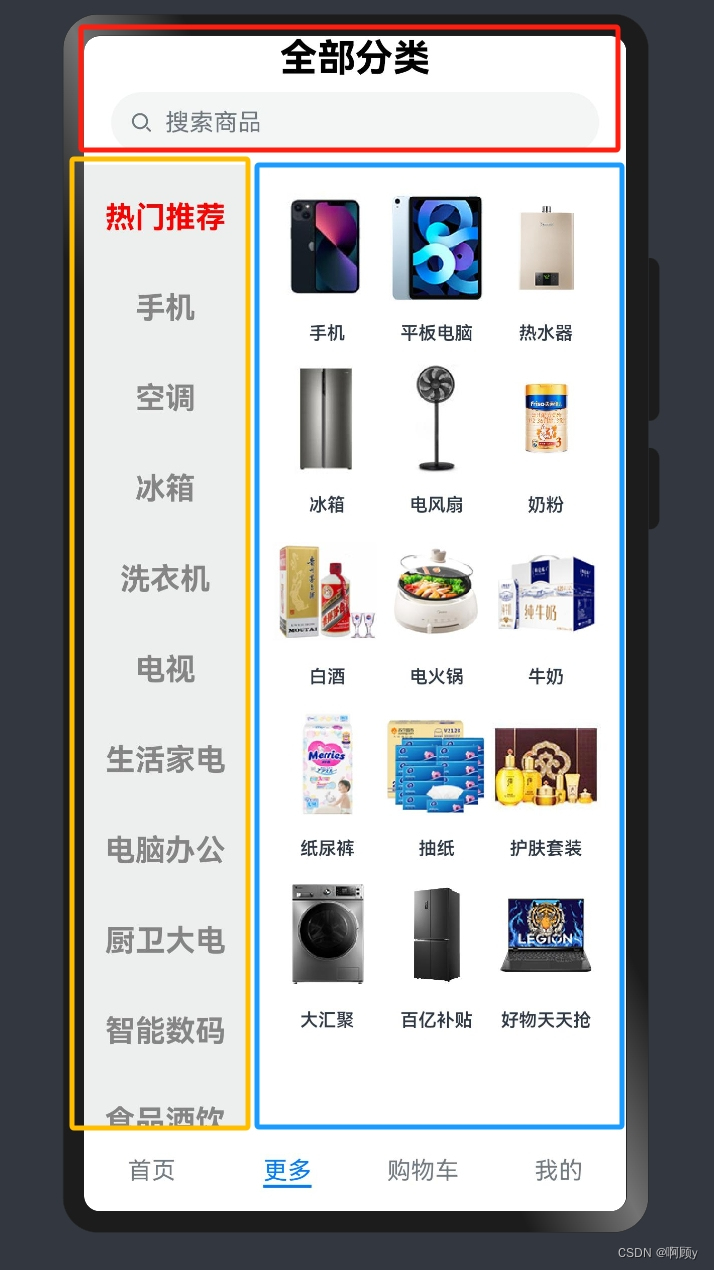
总体为纵向布局,分为头部和内容区
内容区左边框框为一个可以滚动的菜单栏
内容区右边框框为一个展示主菜单选项中的子选项内容(可以使用Flex或者Grid布局展示)
二、编写UI界面
1.头部块(红色框内容)
 //头部文字
        Row() {
          Text('全部分类')
            .width('100%')
            .fontSize(25)
            .fontWeight(800)
            .fontColor(Color.Black)
            .textAlign(TextAlign.Center)
        }.width('100%')
      //顶部搜索栏
        Row() {
          Search({ placeholder: '搜索商品' })
            .width('90%')
        }.width('100%').justifyContent(FlexAlign.Center)
2.主菜单块(黄色框内容)
//左边主菜单选项
        Column(){
          List(){
            //渲染主菜单名字
            ForEach(this.allGoodsData,(item:string,index:number)=>{
              ListItem(){
                Text(item)
                  .width('100%').height(50)
                  .fontColor(this.backColor[index === this.currentIndex ? 1 : 0])
                  .fontSize(20).fontWeight(700).textAlign(TextAlign.Center)
              }.padding({top:10})
              .onClick(()=>{
                //当用户点击其他主菜单选项的时候将索引赋值
                this.currentIndex = index
                //这里可以判断后台获取的数据是否包含子选项,我这里偷懒直接定义静态的了
                this.i = index
                if(this.i>7){
                  //索引大于7的主菜单选项没有子选项内容,那么就在子菜单内容展示无内容
                  this.flag = true
                }else{
                  this.flag = false
                }
                //清空子菜单数组内容,便于后面重新赋值
                this.goodsInfo = []
                //更新子菜单内容
                this.updateInfo()
              })
            })
          }.backgroundColor("#ffedefef")
        }.width('30%').height('100%')
3.子选项块(蓝色框内容)
//右边子选项
        Column(){
          //判断用户点击的主菜单获取的数据,子选项是否有数据
          if(!this.flag){//有数据,则渲染数据
            Flex({wrap:FlexWrap.Wrap,justifyContent:FlexAlign.Center}){
              ForEach(this.goodsInfo,(item:any,index:number)=>{
                Column(){
                  Image(item.url)
                    .width('30%').height(100).objectFit(ImageFit.Contain)
                  Text(item.name).fontSize(12).fontWeight(600)
                }
              })
            }.padding('2%')
          }else {//没有数据,展示无数据提示
            Text('暂时没有数据').fontSize(30).fontWeight(800)
          }
        }.width('70%').height('100%')
三 、发送请求获取数据
1.页面出现之前的时候执行
获取默认内容
 //获取分类页的后台数据
  async getGoodsClass(){
    //发送请求
    const data = await axios.get('http://smart-shop.itheima.net/index.php?s=/api/category/list')
    //左边
    const len1 = data.data.data.list.length//获取数据的长度,便于下面渲染
    const category = data.data.data.list//简化
    //循环,将后台数据中的主菜单内容添加到数组中
    for (let i = 0; i < len1; i++) {
      this.allGoodsData.push(category[i].name)
    }
    //右边
    const len2 = category[this.i].children.length//获取每一个主菜单对应的子选项的长度
    //循环将对应的主菜单的子选项的内容添加到数组中
    for (let i = 0; i < len2; i++) {
      var item = {
        name:category[this.i].children[i].name,
        url:category[this.i].children[i].image.preview_url
      }
      this.goodsInfo.push(item)
    }
  }
2.更新主菜单对应的子选项
当用户点击不同的主菜单的时候,需要刷新子选项
//更新对应的商品信息
  async updateInfo(){
    const data = await axios.get('http://smart-shop.itheima.net/index.php?s=/api/category/list')
    const category = data.data.data.list
    const len2 = category[this.i].children.length
      for (let i = 0; i < len2; i++) {
        var item = {
          name:category[this.i].children[i].name,
          url:category[this.i].children[i].image.preview_url
        }
        this.goodsInfo.push(item)
      }
  }
总结
该页面主要实现主菜单的滑动,点击然后展示不同类别的子选项内容
完整代码如下:
import axios from '@ohos/axios'
@Component
export struct More{

  //存放商品总列表的数组
  @State allGoodsData:string[]=[]
  //存放分类商品的信息数组
  @State goodsInfo:any[]=[]
  //默认查询分类商品组
  @State i:number = 0
  //背景颜色数组
  @State backColor:string[]=["#ff868585", "#ffff0000"]
  //用户点击现在的索引
  @State currentIndex:number = 0
  //判断是否有商品信息的标志
  @State flag:boolean = false

 aboutToAppear(){
    this.getGoodsClass()
  }

  //获取分类页的后台数据
  async getGoodsClass(){
    //发送请求
    const data = await axios.get('http://smart-shop.itheima.net/index.php?s=/api/category/list')
    //左边
    const len1 = data.data.data.list.length//获取数据的长度,便于下面渲染
    const category = data.data.data.list//简化
    //循环,将后台数据中的主菜单内容添加到数组中
    for (let i = 0; i < len1; i++) {
      this.allGoodsData.push(category[i].name)
    }
    //右边
    const len2 = category[this.i].children.length//获取每一个主菜单对应的子选项的长度
    //循环将对应的主菜单的子选项的内容添加到数组中
    for (let i = 0; i < len2; i++) {
      var item = {
        name:category[this.i].children[i].name,
        url:category[this.i].children[i].image.preview_url
      }
      this.goodsInfo.push(item)
    }
  }

  //更新对应的商品信息
  async updateInfo(){
    const data = await axios.get('http://smart-shop.itheima.net/index.php?s=/api/category/list')
    const category = data.data.data.list
    const len2 = category[this.i].children.length
      for (let i = 0; i < len2; i++) {
        var item = {
          name:category[this.i].children[i].name,
          url:category[this.i].children[i].image.preview_url
        }
        this.goodsInfo.push(item)
      }
  }


  build(){
    //总体纵向布局
    Column(){
      //头部文字
        Row() {
          Text('全部分类')
            .width('100%')
            .fontSize(25)
            .fontWeight(800)
            .fontColor(Color.Black)
            .textAlign(TextAlign.Center)
        }.width('100%')
      //顶部搜索栏
        Row() {
          Search({ placeholder: '搜索商品' })
            .width('90%')
        }.width('100%').justifyContent(FlexAlign.Center)

      Row(){
        //左边主菜单选项
        Column(){
          List(){
            //渲染主菜单名字
            ForEach(this.allGoodsData,(item:string,index:number)=>{
              ListItem(){
                Text(item)
                  .width('100%').height(50)
                  .fontColor(this.backColor[index === this.currentIndex ? 1 : 0])
                  .fontSize(20).fontWeight(700).textAlign(TextAlign.Center)
              }.padding({top:10})
              .onClick(()=>{
                //当用户点击其他主菜单选项的时候将索引赋值
                this.currentIndex = index
                //这里可以判断后台获取的数据是否包含子选项,我这里偷懒直接定义静态的了
                this.i = index
                if(this.i>7){
                  //索引大于7的主菜单选项没有子选项内容,那么就在子菜单内容展示无内容
                  this.flag = true
                }else{
                  this.flag = false
                }
                //清空子菜单数组内容,便于后面重新赋值
                this.goodsInfo = []
                //更新子菜单内容
                this.updateInfo()
              })
            })
          }.backgroundColor("#ffedefef")
        }.width('30%').height('100%')
        //右边子选项
        Column(){
          //判断用户点击的主菜单获取的数据,子选项是否有数据
          if(!this.flag){//有数据,则渲染数据
            Flex({wrap:FlexWrap.Wrap,justifyContent:FlexAlign.Center}){
              ForEach(this.goodsInfo,(item:any,index:number)=>{
                Column(){
                  Image(item.url)
                    .width('30%').height(100).objectFit(ImageFit.Contain)
                  Text(item.name).fontSize(12).fontWeight(600)
                }
              })
            }.padding('2%')
          }else {//没有数据,展示无数据提示
            Text('暂时没有数据').fontSize(30).fontWeight(800)
          }
        }.width('70%').height('100%')
      }.width('100%').layoutWeight(1)
    }
    .width('100%').height('100%')
  }
}


 1463
1463


 被折叠的 条评论
为什么被折叠?
被折叠的 条评论
为什么被折叠?
 到【灌水乐园】发言


