


刚开始学ssm环境搭建的时候,犯过很多错,比如扫不到xml文件,错误的创建bean对象等等。虽然现在ssm基本不用了,主要因为配置起来十分繁琐,SpringBoot的自动装配能让我们省略太多配置,但是ssm的搭建和使用我们还是应该掌握,下面我将SSM环境搭建流程和大家回顾一下。
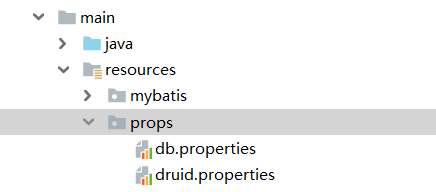
1.我们建的还是maven的web项目,目录如下图

2.添加相关的依赖,这是我的完整pom.xml
<?xml version="1.0" encoding="UTF-8"?>

<project xmlns="http://maven.apache.org/POM/4.0.0" xmlns:xsi="http://www.w3.org/2001/XMLSchema-instance"
  xsi:schemaLocation="http://maven.apache.org/POM/4.0.0 http://maven.apache.org/xsd/maven-4.0.0.xsd">
  <modelVersion>4.0.0</modelVersion>

  <groupId>com.tencent</groupId>
  <artifactId>test-ssm</artifactId>
  <version>1.0-SNAPSHOT</version>
  <packaging>war</packaging>

  <name>test-ssm Maven Webapp</name>
  <!-- FIXME change it to the project's website -->
  <url>http://www.example.com</url>

  <properties>
    <project.build.sourceEncoding>UTF-8</project.build.sourceEncoding>
    <maven.compiler.source>1.7</maven.compiler.source>
    <maven.compiler.target>1.7</maven.compiler.target>
    <!--通过自定义标签,配置版本号-->
    <!-- spring版本号 -->
    <spring.version>5.1.18.RELEASE</spring.version>
    <!-- mybatis版本号 -->
    <mybatis.version>3.5.3</mybatis.version>
    <!-- mysql驱动版本号 -->
    <mysql.version>5.1.38</mysql.version>
  </properties>

  <dependencies>
    <dependency>
      <groupId>junit</groupId>
      <artifactId>junit</artifactId>
      <version>4.11</version>
      <scope>test</scope>
    </dependency>
    <dependency>
      <groupId>org.springframework</groupId>
      <artifactId>spring-test</artifactId>
      <version>${spring.version}</version>
      <scope>test</scope>
    </dependency>

    <!-- 添加spring核心依赖 -->
    <dependency>
      <groupId>org.springframework</groupId>
      <artifactId>spring-webmvc</artifactId>
      <version>${spring.version}</version>
    </dependency>
    <!--<dependency>-->
    <!--<groupId>org.springframework</groupId>-->
    <!--<artifactId>spring-oxm</artifactId>-->
    <!--<version>${spring.version}</version>-->
    <!--</dependency>-->
    <dependency>
      <groupId>org.springframework</groupId>
      <artifactId>spring-context-support</artifactId>
      <version>${spring.version}</version>
    </dependency>
    <dependency>
      <groupId>org.springframework</groupId>
      <artifactId>spring-jdbc</artifactId>
      <version>${spring.version}</version>
    </dependency>

    <!--aop相关依赖-->
    <dependency>
      <groupId>org.aspectj</groupId>
      <artifactId>aspectjweaver</artifactId>
      <version>1.9.2</version>
    </dependency>

    <!-- 添加mybatis依赖 -->
    <dependency>
      <groupId>org.mybatis</groupId>
      <artifactId>mybatis</artifactId>
      <version>${mybatis.version}</version>
    </dependency>

    <!-- 添加mybatis/spring整合包依赖 -->
    <!--该jar是Mybatis公司开发-->
    <dependency>
      <groupId>org.mybatis</groupId>
      <artifactId>mybatis-spring</artifactId>
      <version>2.0.0</version>
    </dependency>

    <!-- 添加mysql驱动依赖 -->
    <dependency>
      <groupId>mysql</groupId>
      <artifactId>mysql-connector-java</artifactId>
      <version>${mysql.version}</version>
    </dependency>
    <!-- 添加数据库连接池依赖,参考文档:https://github.com/alibaba/druid/ -->
    <dependency>
      <groupId>com.alibaba</groupId>
      <artifactId>druid</artifactId>
      <version>1.1.10</version>
    </dependency>

    <!--JSON-->
    <dependency>
      <groupId>com.fasterxml.jackson.core</groupId>
      <artifactId>jackson-databind</artifactId>
      <version>2.9.8</version>
    </dependency>
    <!--mybatis分页PageHelper,参考文档:https://github.com/pagehelper/Mybatis-PageHelper-->
    <dependency>
      <groupId>com.github.pagehelper</groupId>
      <artifactId>pagehelper</artifactId>
      <version>5.1.2</version>
    </dependency>
    <dependency>
      <groupId>org.projectlombok</groupId>
      <artifactId>lombok</artifactId>
      <version>1.18.20</version>
    </dependency>
  </dependencies>

  <build>
    <resources>
      <resource>
        <directory>src/main/java</directory>
        <includes>
          <include>**/*.xml</include>
        </includes>
      </resource>
    </resources>
    <finalName>test-ssm</finalName>
    <pluginManagement><!-- lock down plugins versions to avoid using Maven defaults (may be moved to parent pom) -->
      <plugins>
        <plugin>
          <artifactId>maven-clean-plugin</artifactId>
          <version>3.1.0</version>
        </plugin>
        <!-- see http://maven.apache.org/ref/current/maven-core/default-bindings.html#Plugin_bindings_for_war_packaging -->
        <plugin>
          <artifactId>maven-resources-plugin</artifactId>
          <version>3.0.2</version>
        </plugin>
        <plugin>
          <artifactId>maven-compiler-plugin</artifactId>
          <version>3.8.0</version>
        </plugin>
        <plugin>
          <artifactId>maven-surefire-plugin</artifactId>
          <version>2.22.1</version>
        </plugin>
        <plugin>
          <artifactId>maven-war-plugin</artifactId>
          <version>3.2.2</version>
        </plugin>
        <plugin>
          <artifactId>maven-install-plugin</artifactId>
          <version>2.5.2</version>
        </plugin>
        <plugin>
          <artifactId>maven-deploy-plugin</artifactId>
          <version>2.8.2</version>
        </plugin>
      </plugins>
    </pluginManagement>
  </build>
</project>
其中需要注意的就是各项依赖版本不能冲突,我这个是没有冲突的。下面这是指定mapper.xml文件的路径。
  <resources>
      <resource>
        <directory>src/main/java</directory>
        <includes>
          <include>**/*.xml</include>
        </includes>
      </resource>
    </resources>
3.开始整合spring和myabtis

这是resources下面的文件,下面我会把每一个文件的作用及其里面的内容进行解读
1 applicationContext.xml 配置基本Spring的IOC,扫描加载业务层
<?xml version="1.0" encoding="UTF-8"?>
<beans xmlns="http://www.springframework.org/schema/beans"
       xmlns:xsi="http://www.w3.org/2001/XMLSchema-instance"
       xmlns:context="http://www.springframework.org/schema/context"
       xsi:schemaLocation="http://www.springframework.org/schema/beans
http://www.springframework.org/schema/beans/spring-beans.xsd
http://www.springframework.org/schema/context
https://www.springframework.org/schema/context/spring-context.xsd">
    <!--配置自行开发的业务层IOC-->
    <context:component-scan base-package="com.hq.service.impl"/>
</beans>
业务层根据自己的路径来做相应的修改
2.applicationContext-dao.xml 配置数据源
我们讲mysql 和druid的数据源用文件封装
db.properties

jdbc.driverClass=com.mysql.jdbc.Driver
jdbc.jdbcUrl=jdbc:mysql://localhost:3306/mystudy?useUnicode=true&characterEncoding=utf-8
jdbc.username=root
jdbc.password=root
druid.properties
#连接池建立时创建的初始化连接数
pool.init=1
#连接池中最小空闲连接数
pool.minIdle=3
#连接池中最大的活跃连接数
pool.maxActive=20
#定义最长等待时间
pool.maxWait=60000
application.xml完整如下图
<?xml version="1.0" encoding="UTF-8"?>
<beans xmlns="http://www.springframework.org/schema/beans"
       xmlns:xsi="http://www.w3.org/2001/XMLSchema-instance"
       xsi:schemaLocation="http://www.springframework.org/schema/beans
       http://www.springframework.org/schema/beans/spring-beans.xsd">

    <!--加载属性文件 -->
    <!--单个属性文件使用:-->
    <!--<context:property-placeholder location="classpath:jdbc.properties"/>-->
    <!--多个属性文件使用:-->
    <bean class="org.springframework.beans.factory.config.PropertyPlaceholderConfigurer">
        <property name="locations">
            <list>
                <value>classpath:props/db.properties</value>
                <value>classpath:props/druid.properties</value>
            </list>
        </property>
    </bean>

    <!-- 配置数据源 -->
    <!--参考文档:https://github.com/alibaba/druid/-->
    <bean id="dataSource" class="com.alibaba.druid.pool.DruidDataSource">
        <!-- 基本属性 url、user、password -->
        <property name="driverClassName" value="${jdbc.driverClass}"/>
        <property name="url" value="${jdbc.jdbcUrl}"/>
        <property name="username" value="${jdbc.username}"/>
        <property name="password" value="${jdbc.password}"/>

        <!--数据源控制属性-->
        <!-- 配置初始化大小、最小、最大 -->
        <property name="initialSize" value="${pool.init}"/>
        <property name="minIdle" value="${pool.minIdle}"/>
        <property name="maxActive" value="${pool.maxActive}"/>

        <!-- 配置获取连接等待超时的时间 -->
        <property name="maxWait" value="${pool.maxWait}" />

        <!-- 配置监控统计拦截的filters -->
        <property name="filters" value="stat" />

        <!-- 配置间隔多久才进行一次检测,检测需要关闭的空闲连接,单位是毫秒 -->
        <property name="timeBetweenEvictionRunsMillis" value="2000" />

        <!--其他配置-->
        <property name="minEvictableIdleTimeMillis" value="300000" />
        <property name="testWhileIdle" value="true" />
        <property name="testOnBorrow" value="false" />
        <property name="testOnReturn" value="false" />
        <property name="poolPreparedStatements" value="true" />
        <property name="maxOpenPreparedStatements" value="20" />

    </bean>
</beans>
application-mybatis.xml 文件 整合myabtis
主要是用于扫描mapper包,mapper下的xml文件,要注意有需要修改的地方应做相应的修改。
<?xml version="1.0" encoding="UTF-8"?>
<beans xmlns="http://www.springframework.org/schema/beans"
       xmlns:xsi="http://www.w3.org/2001/XMLSchema-instance"
       xsi:schemaLocation="http://www.springframework.org/schema/beans
       http://www.springframework.org/schema/beans/spring-beans.xsd">
    <!-- 1.配置SqlSessionFactoryBean -->
    <!--参考官方文档:https://github.com/abel533/Mybatis-Spring-->
    <bean id="sqlSessionFactory" class="org.mybatis.spring.SqlSessionFactoryBean">
        <property name="dataSource" ref="dataSource"/>
        <!--##############使用Mybatis全局文件配置###########-->
       <!-- <property name="configLocation" value="classpath:mybatis/mybatis-config.xml"/>-->

       <!-- ##############使用bean属性装载代替Mybatis全局配置文件##########
        替换映射文件加载-->
       <!--  当mybatis的xml文件和mapper接口不在相同包下时,需要用mapperLocations属性指定xml文件的路径。在同名包下,建议在全局文件中直接扫描接口包加载映射文件
         *是个通配符,代表所有的文件,**代表所有目录下-->
        <property name="mapperLocations">
        <array>
        <value>classpath:com/hq/mapper/xml/*.xml</value>
        </array>
        </property>
        <!--替换配置文件中的settings-->
        <property name="configuration">
            <bean class="org.apache.ibatis.session.Configuration">
                <property name="mapUnderscoreToCamelCase" value="true"/>
            </bean>
        </property>
        <!--替换配置别名:-->
        <property name="typeAliasesPackage" value="com.hq.pojo"/>
        <!--替换插件配置-->
        <property name="plugins">
            <array>
                <bean class="com.github.pagehelper.PageInterceptor">
                    <!-- 这里的几个配置主要演示如何使用,如果不理解,一定要去掉下面的配置 -->
                    <property name="properties">
                        <value>
                            <!--配置数据库方言-->
                            helperDialect=mysql
                            <!--分页合理化参数-->
                            reasonable=true
                            <!--supportMethodsArguments=true-->
                            <!--params=count=countSql-->
                            <!--autoRuntimeDialect=true-->
                        </value>
                    </property>
                </bean>
            </array>
        </property>
    </bean>

    <!-- 2.生成dao代理對象 -->
    <bean class="org.mybatis.spring.mapper.MapperScannerConfigurer">
        <!--通过指定标识装载sqlSessionFactoryBean-->
        <property name="sqlSessionFactoryBeanName" value="sqlSessionFactory"/>
        <!-- 通过扫描加载指定目录下的mapper-->
        <property name="basePackage" value="com.hq.mapper"/>
    </bean>
</beans>
application-tx.xml 文件主要是开启事务管理
有两种方式,一种是以bean方式配置切面,切入点等等。另外一种就是使用注解方式,一般采用使用注解方式,所以只需要在这里开启注解支持驱动
<?xml version="1.0" encoding="UTF-8"?>
<beans xmlns="http://www.springframework.org/schema/beans"
xmlns:xsi="http://www.w3.org/2001/XMLSchema-instance" xmlns:tx="http://www.springframework.org/schema/tx"
xmlns:aop="http://www.springframework.org/schema/aop"
xsi:schemaLocation="http://www.springframework.org/schema/beans
http://www.springframework.org/schema/beans/spring-beans.xsd http://www.springframework.org/schema/tx http://www.springframework.org/schema/tx/spring-tx.xsd http://www.springframework.org/schema/aop https://www.springframework.org/schema/aop/spring-aop.xsd">
<!--配置事务相关-->
<!--1:配置事务管理器-->
<bean id="transactionManager" class="org.springframework.jdbc.datasource.DataSourceTransactionManager">
<!--指定关联数据源-->
<property name="dataSource" ref="dataSource"/>
</bean>
<!--开启注解支持-->
<tx:annotation-driven/>
</beans>
<!-- <!–2:配置事务通知增强,设置不同方法的事务属性–>
<tx:advice id="txAdvice" transaction-manager="transactionManager">
<tx:attributes>
<!–配置查询方法事务属性–>
<tx:method name="get*" propagation="SUPPORTS" read-only="true"/>
<tx:method name="find*" propagation="SUPPORTS" read-only="true"/>
<tx:method name="select*" propagation="SUPPORTS" read-only="true"/>
<tx:method name="search*" propagation="SUPPORTS" read-only="true"/>
<!–配置新增方法–>
<tx:method name="add*"/>
<tx:method name="insert*"/>
<tx:method name="save*"/>
<tx:method name="post*"/>
<!–配置修改方法–>
<tx:method name="set*"/>
<tx:method name="update*"/>
<tx:method name="change*"/>
<tx:method name="put*"/>
<!–配置删除方法–>
<tx:method name="remove*"/>
<tx:method name="delete*"/>
<tx:method name="drop*"/>
<!–配置其他–>
<tx:method name="*"/>
</tx:attributes>
</tx:advice>
<!–3:配置AOP–>
<aop:config>
<!–配置切入点–>
<aop:pointcut id="pt" expression="execution(* com.hq.service.impl.*.*(..))"/>
<!–配置切入点和事务增强通知关联–>
<aop:advisor advice-ref="txAdvice" pointcut-ref="pt"/>
</aop:config>-->二、spring整合
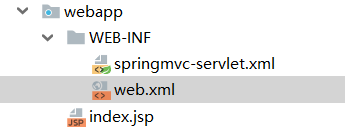
1.修改web.xml文件 默认的web.xml是无法支持的 要4.0以上才可以。
这里面的<context-param>中配置了applicationContext*.xml用于加载前面的配置文件,通过 web.xml 中的 <context-param> 元素可以为 Web 应用设置一些全局的初始化参数,这些参数被称为上下文初始化参数。
与 Servlet 的初始化参数不同,应用中的所有 Servlet 都共享同一个上下文初始化参数。在 Web 应用的整个生命周期中,上下文初始化参数会一直存在,并且可以随时被任意一个 Servlet 访问。
下面还有监听器,拦截器等等。其中的servlet是加载同名包下的springmvc-servlet.xml文件
<?xml version="1.0" encoding="UTF-8"?>
<web-app xmlns="http://xmlns.jcp.org/xml/ns/javaee"
         xmlns:xsi="http://www.w3.org/2001/XMLSchema-instance"
         xsi:schemaLocation="http://xmlns.jcp.org/xml/ns/javaee
          http://xmlns.jcp.org/xml/ns/javaee/web-app_4_0.xsd"
         version="4.0">
  <!-- 针对Spring配置:读取配置文件 -->
  <context-param>
    <param-name>contextConfigLocation</param-name>
    <param-value>classpath:spring/applicationContext*.xml</param-value>
  </context-param>

  <!-- 注册ServletContext监听器,创建Spring容器对象,并且将ApplicationContext对象放到Application域中 -->
  <listener>
    <listener-class>org.springframework.web.context.ContextLoaderListener</listener-class>
  </listener>

  <!-- 配置springmvc-->
  <servlet>
    <servlet-name>springmvc</servlet-name>
    <servlet-class>org.springframework.web.servlet.DispatcherServlet</servlet-class>
    <!--
        contextConfigLocation不是必须的, 如果不配置contextConfigLocation,
        springmvc的配置文件默认找:WEB-INF/servlet的name+"-servlet.xml"
    -->
    <!--<init-param>-->
    <!--<param-name>contextConfigLocation</param-name>-->
    <!--<param-value>classpath:spring/springmvc.xml</param-value>-->
    <!--</init-param>-->

    <!-- 配置springmvc什么时候启动,参数必须为整数 -->
    <!-- 如果等于0或大于0,则springmvc随服务器的启动而启动 -->
    <!-- 小于0,则在第一次访问的时候启动 -->
    <load-on-startup>1</load-on-startup>
  </servlet>
  <servlet-mapping>
    <servlet-name>springmvc</servlet-name>
    <!--
        1. /*  拦截所有   jsp  js png .css
        2. *.action *.do 拦截以do action 结尾的请求
        3. /  拦截所有 (不包括jsp) (包含.js .png.css)
    -->
    <url-pattern>/</url-pattern>
  </servlet-mapping>
</web-app>
2.配置springmvc-servlet.xml文件 这个配置文件遵循约定一般是放在WEB-INF下面
这个主要是用于扫描控制层,还有加载注解驱动,在这里面还可以配置很多资源放行,跨域处理等等。
<?xml version="1.0" encoding="UTF-8"?>
<beans xmlns="http://www.springframework.org/schema/beans"
xmlns:xsi="http://www.w3.org/2001/XMLSchema-instance" xmlns:mvc="http://www.springframework.org/schema/mvc"
xmlns:context="http://www.springframework.org/schema/context"
xsi:schemaLocation="http://www.springframework.org/schema/beans
http://www.springframework.org/schema/beans/spring-beans.xsd http://www.springframework.org/schema/mvc http://www.springframework.org/schema/mvc/spring-mvc.xsd http://www.springframework.org/schema/context http://www.springframework.org/schema/context/spring-context.xsd">
<!-- 自动扫描@Controller-->
<context:component-scan base-package="com.yaorange.ssm.web"/>
<!--注解驱动-->
<mvc:annotation-driven/>
<!--可选配置-->
<!--静态放行-->
<!--1:全部资源放行 -->
<!--<mvc:default-servlet-handler/>-->
<!--2:对指定目录下的静态资源放行 -->
<!--<mvc:resources location="/images/" mapping="/images/**"/>-->
<!--<mvc:resources location="/css/" mapping="/css/**"/>-->
<!--<mvc:resources location="/js/" mapping="/js/**"/>-->
<!--视图解析器-->
<!--<bean class="org.springframework.web.servlet.view.InternalResourceViewResolver">-->
<!--<property name="prefix" value="/pages/"/>-->
<!--<property name="suffix" value=".jsp"/>-->
<!--</bean>-->
<!--跨域处理-->
<!--<mvc:cors>-->
<!--<!–放行所有–>-->
<!--<!–allowed-headers="*" :指定允许跨域请求的请求头,*标识所有–>-->
<!--<!–allowed-origins="*" :指定允许跨域请求的请求地址,*标识所有,一般实际开发会显式指定–>-->
<!--<!–allowed-methods="*" :指定允许跨域请求的请求方法,*标识所有,常用值get,post,delete,put,options–>-->
<!--<mvc:mapping path="/**" allowed-headers="*" allowed-origins="*" allowed-methods="*"/>-->
<!--</mvc:cors>-->
</beans>总结:这样我们的环境基本搭建完成了 需要完成一个测试看看完成是否搭建成功。简单的连接数据库查询数据,这是一个简单的查询数据,相信大家肯定是不用看的,下面用tomcat运行测试结果是如下图,说明环境搭建成功。后面我会基于这个环境完成简单的crud操作。


 692
692


 被折叠的 条评论
为什么被折叠?
被折叠的 条评论
为什么被折叠?
 到【灌水乐园】发言


