


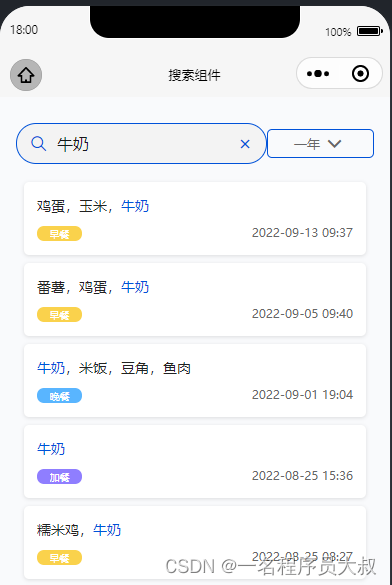
效果展示:
实现原理:
- 一共分为两部分,搜索框、展示面板;
- 搜索框和展示面板根据业务需求,使用了 小程序ui组 tdesign-miniprogram ;当然你也可以用原生的输入框做搜索框。差别不大,想要好看的话。样式多写点就是了!!
- 通过请求后端接口数据 异步进行搜索,拿到数据后将数组重新处理赋值。
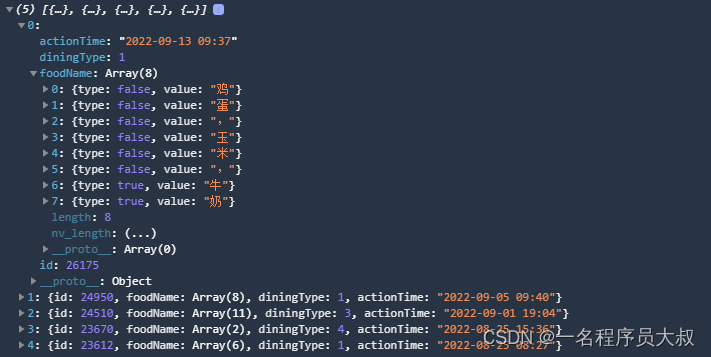
- 处理数据主要的思路是将数组中每个value的值通过arr.split()将字符转成数组而后遍历对比添加需要高亮颜色的flag。
- 视图模板遍历判断,话不多说上代码!
wxml
<view class="food-query">
<!-- 搜索框部分 -->
<view class="food-query-search">
<t-search
t-class-cancel="t-class-cancel"
placeholder="请输入需要查询的关键字"
shape="round"
bindclear="clearSearch"
bindchange="searchChange"/>
<!-- 自定义下拉框 -->
<view class="select-box">
<view
class="select-input"
bindtap="onSelectShow">
<text class="select-input-text">{{selectValue}}</text>
<t-icon name="chevron-down" size="25"/>
</view>
<view class="select-item" wx:if="{{showSelect}}">
<view
class="select-item-text"
wx:for="{{selectConfig}}"
wx:key="key"
data-value="{{item.value}}"
data-key="{{item.key}}"
bindtap="onSelectItem">
{{item.value}}
</view>
</view>
</view>
</view>
<!-- 展示面板 -->
<view class="food-query-content">
<view
class="food-query-items"
wx:for="{{dietDataList}}"
wx:key="id"
data-id="{{item.id}}"
data-date="{{item.actionTime}}"
bindtap="fondQueryDetails">
<text class="items-title {{str.type ? 'title-Highlight' : ''}}" wx:for="{{item.foodName}}" wx:key="index" wx:for-item="str">{{str.value}}</text>
<view class="food-query-tag-date">
<t-tag
t-class="margin-right-tag active-{{item.diningType}}"
theme="warning">
{{ isTags[item.diningType] }}
</t-tag>
<text class="food-query-date">{{item.actionTime}}</text>
</view>
</view>
</view>
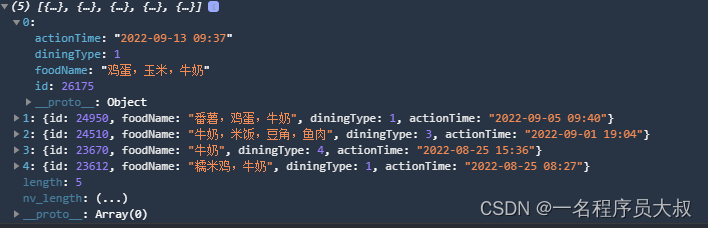
</view>原始数据结构
处理完后的数据结构
关键点/数据处理
- 双重遍历数据,搜索的关键词对比,需要高亮的文字加上type:true,不需要的加上type: false;
- 最终 return 出一个新数组来;
  const data = res?.data?.data || [];
  const dietDataList = data.map((item) => {
        const originStr = item.foodName.split('');
        const keywordStr = keyword.split('');
        const list = originStr.map((org) => {
            if (keywordStr.includes(org)) {
                return {
                    type: true,
                    value: org,
                  };
            }
            return {
              type: false,
              value: org,
            };
        })
        return {
            ...item,
            foodName: list,
        };
   });

   this.setData({
        dietDataList,
    });
搜索框的频繁触发问题
- 当你搜索时,你的接口请求在频繁的触发,着不是我们想看到的结果,我们期望搜索完成后再去发送请求,这里简单举个栗子和解决方法!!
- 最简单的解决方法就是使用定时器去做节流,在change事件的时候加个定时器 setTimeout;
- 先把定时器清除一遍 再创建定时器,起到每次触发这个函数 都会先清除定时器!!!
 clearTimeout(this.data.timeId) //清除定时器
    this.setData({
      timeId: setTimeout(()=>{
            this.checkTheFoodClock();
        },1000);
    })
如果对你有用,欢迎您的star+订阅!
你听我说, 我谢谢你,那么可爱还给我点了赞 ♥♥♥...........


 1449
1449


 被折叠的 条评论
为什么被折叠?
被折叠的 条评论
为什么被折叠?
 到【灌水乐园】发言


