这篇文章主要介绍了python之PySide2安装使用及QT Designer UI设计案例教程,本篇文章通过简要的案例,讲解了该项技术的了解与使用,以下就是详细内容,需要的朋友可以参考下
pyside2
| 1 | >>> pip install pyside2
|
QT Designer
| 1 2 3 4 5 6 7 | >>> pip show pyside2
Location: c:\users\Administrator\appdata\roaming\python\python39\site-packages
文件位置
C:\Users\Administrator\AppData\Roaming\Python\Python39\site-packages\PySide2\designer.exe
|
Unable to lanch C:
PySide2目录下复制uic.exe到新建的bin文件夹
| 1 | C:\...\Python\Python39\site-packages\PySide2\bin\uic.exe
|
Ⅰ. Init
| 1 2 3 4 5 6 7 8 9 10 11 | from PySide2.QtWidgets import *
class Window:
def __init__(self):
self.win = QMainWindow()
if __name__ == '__main__':
app = QApplication([])
w = Window()
w.win.show()
app.exec_()
|
| 1 2 3 4 5 6 7 | from PySide2.QtWidgets import *
if __name__ == '__main__':
app = QApplication([])
win = QMainWindow()
win.show()
app.exec_()
|
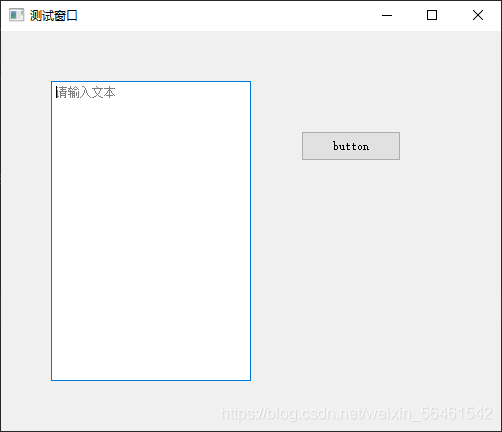
Ⅱ Example
| 1 2 3 4 5 6 7 8 9 10 11 12 13 14 15 16 17 18 19 20 21 22 23 24 25 26 27 28 29 30 31 32 33 34 35 | from PySide2.QtWidgets import *
class Window:
def __init__(self):
self.win = QMainWindow()
self.win.resize(500, 400)
self.win.move(700, 210)
self.win.setWindowTitle("测试窗口")
self.textEdit = QTextEdit(self.win)
self.textEdit.move(50, 50)
self.textEdit.resize(200, 300)
self.textEdit.setPlaceholderText("请输入文本")
self.button = QPushButton("button", self.win)
self.button.move(300, 100)
self.button.clicked.connect(self.btnClick)
def btnClick(self):
info = self.textEdit.toPlainText() # 获取文本信息
print(info)
# print("button被点击")
if __name__ == '__main__':
app = QApplication([])
# win = QMainWindow()
# win.show()
w = Window()
w.win.show()
app.exec_()
|
QT Designer
1.自动生成代码
| 1 2 3 4 5 6 7 8 9 10 11 12 13 | ...
from PySide2.QtCore import QFile
from PySide2.QtUiTools import QUiLoader
...
if __name__ == "__main__":
app = QApplication([])
win = QMainWindow()
w = Ui_Form()
w.setupUi(win)
win.show()
app.exec_()
|
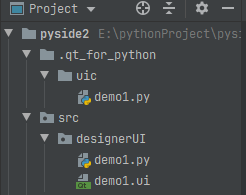
2.动态www.meimeitu8.com加载ui文件
| 1 2 3 4 5 6 7 8 9 10 11 12 13 14 15 16 17 18 19 20 21 22 23 24 25 26 27 28 29 30 31 | from PySide2.QtWidgets import *
from PySide2.QtCore import QFile
from PySide2.QtUiTools import QUiLoader
class Window:
def __init__(self):
super(Window, self).__init__()
# 从文件中加载UI定义
qfile = QFile("demo1.ui")
qfile.open(QFile.ReadOnly)
qfile.close()
# 从UI定义中动态创建一个相应的窗口对象, 将其内部文件定义为self.ui.button
self.ui = QUiLoader().load(qfile)
self.ui.button.clicked.connect(self.btnClick)
# self.button.clicked.connect(self.btnClick)
def btnClick(self):
info = self.ui.textEdit.toPlainText() # 获取文本信息
# info = self.textEdit.toPlainText()
print(info)
if __name__ == '__main__':
app = QApplication([])
w = Window()
w.ui.show()
# w.win.show()
app.exec_()
|
到此www.rsxedu.com这篇关于python之PySide2安装使用及QT Designer UI设计案例教程的文章


 被折叠的 条评论
为什么被折叠?
被折叠的 条评论
为什么被折叠?
 到【灌水乐园】发言


