


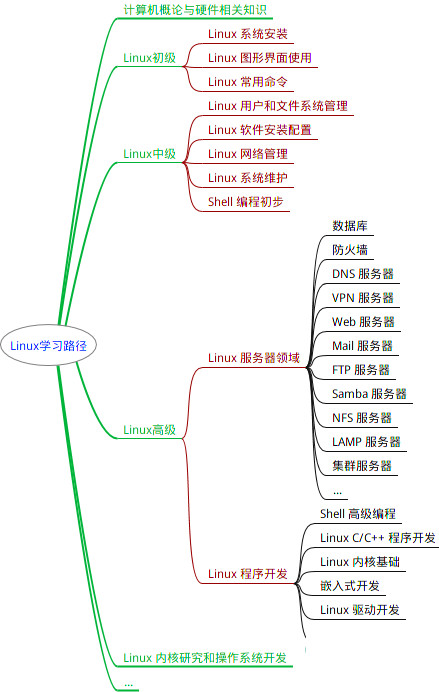
最全的Linux教程,Linux从入门到精通
======================
-
linux从入门到精通(第2版)
-
Linux系统移植
-
Linux驱动开发入门与实战
-
LINUX 系统移植 第2版
-
Linux开源网络全栈详解 从DPDK到OpenFlow

第一份《Linux从入门到精通》466页
====================
内容简介
====
本书是获得了很多读者好评的Linux经典畅销书**《Linux从入门到精通》的第2版**。本书第1版出版后曾经多次印刷,并被51CTO读书频道评为“最受读者喜爱的原创IT技术图书奖”。本书第﹖版以最新的Ubuntu 12.04为版本,循序渐进地向读者介绍了Linux 的基础应用、系统管理、网络应用、娱乐和办公、程序开发、服务器配置、系统安全等。本书附带1张光盘,内容为本书配套多媒体教学视频。另外,本书还为读者提供了大量的Linux学习资料和Ubuntu安装镜像文件,供读者免费下载。

本书适合广大Linux初中级用户、开源软件爱好者和大专院校的学生阅读,同时也非常适合准备从事Linux平台开发的各类人员。
需要《Linux入门到精通》、《linux系统移植》、《Linux驱动开发入门实战》、《Linux开源网络全栈》电子书籍及教程的工程师朋友们劳烦您转发+评论
网上学习资料一大堆,但如果学到的知识不成体系,遇到问题时只是浅尝辄止,不再深入研究,那么很难做到真正的技术提升。
一个人可以走的很快,但一群人才能走的更远!不论你是正从事IT行业的老鸟或是对IT行业感兴趣的新人,都欢迎加入我们的的圈子(技术交流、学习资源、职场吐槽、大厂内推、面试辅导),让我们一起学习成长!
Terabase-scale metagenome coassembly with MetaHipMer | Scientific Reports
MetaHipMer (MHM) 是一种从头开始的宏基因组短读组装器。这是版本 2 (MHM2),完全用 UPC++、CUDA 和 HIP 编写,可以在单服务器和多节点超级计算机上高效运行,可以扩展以共同组装 terabase 大小的元基因组。有关 MetaHipMer 的更多信息可以在 Exascale 计算项目的 ExaBiome 项目下以及多个出版物中找到:
- E. Georganas et al., “Extreme Scale De Novo Metagenome Assembly,” SC18: International Conference for High Performance Computing, Networking, Storage and Analysis, Dallas, TX, USA, 2018, pp. 122-13.E. Georganas 等人,“Extreme Scale De Novo Metagenome Assembly”,SC18:高性能计算、网络、存储和分析国际会议,美国德克萨斯州达拉斯,2018 年,第 122-13 页。
- Hofmeyr, S., Egan, R., Georganas, E. et al. Terabase-scale metagenome coassembly with MetaHipMer. Sci Rep 10, 10689 (2020).Hofmeyr, S.、Egan, R.、Georganas, E. 等人。与 MetaHipMer 进行兆兆级宏基因组共组装。科学报告 10, 10689 (2020)。.Hofmeyr, S.、Egan, R.、Georganas, E. 等人。与 MetaHipMer 进行兆兆级宏基因组共组装。科学报告 10, 10689 (2020)。")
- Awan, M.G., Deslippe, J., Buluc, A. et al. ADEPT: a domain independent sequence alignment strategy for gpu architectures. BMC Bioinformatics 21, 406 (2020).Awan, M.G.、Deslippe, J.、Buluc, A. 等人。 ADEPT:GPU 架构的域独立序列比对策略。 BMC 生物信息学 21, 406 (2020)。.Awan, M.G.、Deslippe, J.、Buluc, A. 等人。 ADEPT:GPU 架构的域独立序列比对策略。 BMC 生物信息学 21, 406 (2020)。")
- Muaaz Awan, Steven Hofmeyr, Rob Egan et al. “Accelerating large scale de novo metagenome assembly using GPUs.”, SC 2021Muaaz Awan、Steven Hofmeyr、Rob Egan 等人。 “使用 GPU 加速大规模从头宏基因组组装。”,SC 2021
组装的质量与其他领先的宏基因组组装程序相当,正如 CAMI2 竞赛结果中记录的那样,其中 MetaHipMer 在三个数据集中的两个中获得质量第一,在第三个数据集中获得第二:
- F. Meyer et al., “Critical Assessment of Metagenome Interpretation: the second round of challenges”, Nature Methods volume 19, pages429–440 (2022)F. Meyer 等人,“宏基因组解释的批判性评估:第二轮挑战”,《自然方法》第 19 卷,第 429–440 页(2022 年)F. Meyer 等人,“宏基因组解释的批判性评估:第二轮挑战”,《自然方法》第 19 卷,第 429–440 页(2022 年)")
the user guide有关构建、安装和运行 MHM2 的信息可以在用户指南中找到
Building and Installing 搭建和安装
MHM2 depends on UPC++, with the C++17 standard, and CMake. GPU builds require CUDA and/or HIP.MHM2 依赖于 UPC++、C++17 标准和 CMake。 GPU 构建需要 CUDA 和/或 HIP。
A script, build.sh, is provided for building and installing MHM2.提供了一个脚本 build.sh 用于构建和安装 MHM2。
Before building MHM2, ensure that either the UPC++ compiler wrapper, upcxx is in your PATH, or set the MHM2_BUILD_ENV environment variable to point to a script that loads the appropriate environment, for example, on NERSC’s Perlmutter supercomputer, you would set the following for the gnu compiler on the KNL partition:在构建 MHM2 之前,请确保 UPC++ 编译器包装器 upcxx 位于您的 PATH 中,或者将 MHM2_BUILD_ENV 环境变量设置为指向加载适当的环境,例如,在 NERSC 的 Perlmutter 超级计算机上,您可以为 KNL 分区上的 gnu 编译器设置以下内容:
export MHM2_BUILD_ENV=contrib/environments/perlmutter/gnu.sh
There are several scripts provided for different build choices on NERC’s and OLCF’s systems, in directories that start with contrib/environments. You do not need to use any scripts such as these when building on a Linux server, although you may want to create your own when setting up the build. On NERSC and OLCF we recommend using the gnu (contrib/environments/*/gnu.sh) environments. Building with Intel is very slow.在以 contrib/environments 开头的目录中,为 NERC 和 OLCF 系统上的不同构建选择提供了多个脚本。在 Linux 服务器上构建时,您不需要使用任何脚本,尽管您可能希望在设置构建时创建自己的脚本。在 NERSC 和 OLCF 上,我们建议使用 gnu (contrib/environments/*/gnu.sh) 环境。使用英特尔构建速度非常慢。
To build a release version (optimized for performance), execute:要构建发布版本(针对性能进行优化),请执行:
./build.sh Release
Alternatively, you can build a debug version with:或者,您可以使用以下命令构建调试版本:
./build.sh Debug
This will capture a great deal of information useful for debugging but will run a lot slower (up to 5x slower at scale on multiple nodes).这将捕获大量对调试有用的信息,但运行速度会慢很多(在多个节点上速度最多慢 5 倍)。
An alternative to the pure debug version is the “release” debug version, which still captures a reasonable amount of debugging information, but is a lot faster (although still up to 2x slower than the release version):纯调试版本的替代方案是“发布”调试版本,它仍然捕获合理数量的调试信息,但速度要快得多(尽管仍然比发布版本慢 2 倍):
./build.sh RelWithDebInfo
The ./build.sh script will install the binaries by default into the install/bin subdirectory in the repository root directory. To set a different install directory, set the environment variable MHM2_INSTALL_PATH, e.g.:默认情况下,./build.sh 脚本会将二进制文件安装到存储库根目录中的 install/bin 子目录中。要设置不同的安装目录,请设置环境变量 MHM2_INSTALL_PATH,例如:
MHM2_INSTALL_PATH=/usr/local/share/mhm2 ./build.sh Release
Once MHM2 has been built once, you can rebuild withMHM2 构建完成后,您可以使用
./build.sh
and it will build using the previously chosen setting (Release, Debug, or RelWithDebInfo).它将使用之前选择的设置(Release、Debug 或 RelWithDebInfo)进行构建。
You can also run 你也可以运行
./build.sh clean
to start from scratch. If you run this, then the next call to build.sh should be with one of the three configuration settings.从头开始。如果运行此命令,则下一次调用 build.sh 应该使用三个配置设置之一。
By default, the build occurs within the root of the repository, in a subdirectory called .build. This is created automatically by the build.sh script.默认情况下,构建发生在存储库根目录中名为 .build 的子目录中。这是由 build.sh 脚本自动创建的。
The MHM2 build uses cmake, which you can call directly, instead of through the build.sh script, e.g.:MHM2 构建使用 cmake,您可以直接调用它,而不是通过 build.sh 脚本,例如:
mkdir -p .build
cd .build
cmake -DCMAKE_INSTALL_PREFIX=path-to-install ..
make -j all install
Consult the build.sh script to see how it executes these commands.请查阅 build.sh 脚本以了解它如何执行这些命令。
You’ll need to first set the environment, e.g.:您需要首先设置环境,例如:
source contrib/environments/perlmutter/gnu.sh
If you see an error message when building like the following:如果您在构建时看到如下错误消息:
include could not find load file: GetGitVersion
Then you have probably not cloned the git submodules. You need to execute the following from the root directory:那么您可能还没有克隆 git 子模块。您需要从根目录执行以下命令:
git submodule init
git submodule updateDoker
docker pull robegan21/mhm2
Running 运行
To execute MHM2, run the mhm2.py script located at install/bin. Most parameters have sensible defaults, so it is possible to run with only the read FASTQ files specified, e.g. to run with two interleaved reads files, lib1.fastq and lib2.fastq, you could execute:要执行 MHM2,请运行位于 install/bin 的 mhm2.py 脚本。大多数参数都有合理的默认值,因此可以仅使用指定的读取 FASTQ 文件运行,例如要使用两个交错读取文件 lib1.fastq 和 lib2.fastq 运行,您可以执行:
mhm2.py -r lib1.fastq,lib2.fastq
A list of all the command line options can be found by running with -h. Because mhm2.py is a python script that wraps the UPC++ binary, mhm2, there will be two levels of options, one from the python script, and one from the binary. Some of the options have a short form (a single dash with a single character) and a long form (starting with a double-dash). In the options described below, where both a short form and a long form exist, they are separated by a comma. The type of the option is indicated as one of STRING (a string of characters), INT (an integer), FLOAT (a floating point value) or BOOL (a boolean flag). For BOOL, the option can be given as true, false, yes, no, 0, 1, or omitted altogether, in which case the option will be true, and if an option is specfied, the = must be used, e.g.通过运行 -h 可以找到所有命令行选项的列表。由于 mhm2.py 是包装 UPC++ 二进制文件 mhm2 的 Python 脚本,因此将有两层选项,一层来自 Python 脚本,一层来自二进制文件。某些选项具有短形式(带有单个字符的单破折号)和长形式(以双破折号开头)。在下面描述的选项中,如果同时存在短形式和长形式,则它们之间用逗号分隔。选项的类型指示为 STRING(字符串)、INT(整数)、FLOAT(浮点值)或BOOL(布尔标志)。对于 BOOL,选项可以指定为 true、false、yes、no、 、1,或完全省略,在这种情况下选项将为 true,如果指定了选项,则必须使用 = ,例如
mhm2.py --checkpoint=false
By default, the run will generate files in a specific output directory (see the --output option below). At a minimum, this will include the following files:默认情况下,运行将在特定输出目录中生成文件(请参阅下面的 --output 选项)。至少,这将包括以下文件:
final_assembly.fasta: the contigs for the assembly, in FASTA format.final_assembly.fasta:装配体的重叠群,采用 FASTA 格式。mhm2.log: a log file containing details about the run, including various quality statistics, details about the assembly process and timing information.mhm2.log:包含有关运行的详细信息的日志文件,包括各种质量统计数据、有关组装过程的详细信息和计时信息。mhm2.config: a configuration file containing all the non-default options used for the run.mhm2.config:包含运行时使用的所有非默认选项的配置文件。per_thread: a subdirectory containing per-process files that record memory usage and debugging information in Debug mode.per_thread:包含每个进程文件的子目录,这些文件记录调试模式下的内存使用情况和调试信息。
In addition, many more files may be generated according to which command-line options are specified. These are described in detail below where relevant.此外,根据指定的命令行选项,还可以生成更多文件。下面将在相关的地方详细描述这些内容。
The mhm2 binary can be executed directly using upcxx-run, srun or another suitable launcher. Generally we recommend using mhm2.py, because it takes care of many facets of starting the executable in a given environment and provides additional functionality, e.g. automatically restarting on errors, easily enabling communication tracing, etc.mhm2 二进制文件可以使用 upcxx-run、srun 或其他合适的启动器直接执行。一般来说,我们建议使用 mhm2.py,因为它负责在给定环境中启动可执行文件的许多方面,并提供附加功能,例如出错时自动重启、轻松启用通信跟踪等。
Basic options 基本选项
These are the most commonly used options.这些是最常用的选项。
The input files of reads are specified with either -r, -p, or -u. At least one of these options must be specified. When running on a Lustre file system (such as on OLCF’s Frontier), it is recommended that all input files be striped to ensure adequate I/O performance. Usually this means first striping a directory and then moving files into it, e.g. for a file reads.fastq:读取的输入文件由 -r、-p 或 -u 指定。必须至少指定这些选项之一。当在Lustre文件系统上运行时(例如在OLCF的Frontier上),建议对所有输入文件进行条带化以确保足够的I/O性能。通常这意味着首先分割一个目录,然后将文件移入其中,例如对于文件 reads.fastq:
mkdir data
lfs setstripe -c 72 data
mv reads.fastq data
-r, --reads STRING,STRING,...
A collection of names of files containing interleaved paired reads in FASTQ format. Multiple files must be comma-separated, or can be separated by spaces. For paired reads in separate files, use the -p option. For unpaired reads, use the -u option. Long lists of read files can be set in a configuration file and loaded with the --config option, to avoid having to type them in on the command line.包含 FASTQ 格式的交错配对读取的文件名称的集合。多个文件必须以逗号分隔,或者可以用空格分隔。对于单独文件中的配对读取,请使用 -p 选项。对于不配对的读取,请使用 -u 选项。可以在配置文件中设置读取文件的长列表并使用 --config 选项加载,以避免在命令行中输入它们。
-p, --paired-reads STRING,STRING,...
A collection of names of files containing separate paired reads in FASTQ format. Multiple files must be comma-separated, or can be separated by spaces. For each library, the file containing the reads for the first pairs must be followed by the file containing the reads for the second pairs, e.g. for two libraries with separate paired reads files lib1_1.fastq, lib1_2.fastq and lib2_1.fastq, lib2_2.fastq, the option should be specified as:包含 FASTQ 格式的单独配对读取的文件名称的集合。多个文件必须以逗号分隔,或者可以用空格分隔。对于每个库,包含第一对读数的文件后面必须跟有包含第二对读数的文件,例如对于两个具有单独配对读取文件 lib1_1.fastq、lib1_2.fastq 和 lib2_1.fastq、lib2_2.fastq 的库,该选项应指定为:
-p lib1_1.fastq,lib1_2.fastq,lib2_1.fastq,lib2_2.fastq
This option only supports reads where each pair of reads has the same sequence length, usually only seen in raw reads. For support of trimmed reads of possibly different lengths, first interleave the files and then call with the -r option. The separate files can be interleaved with reformat.sh from bbtools.此选项仅支持每对读取具有相同序列长度的读取,通常仅在原始读取中看到。为了支持可能不同长度的修剪读取,首先交错文件,然后使用 -r 选项调用。单独的文件可以与 bbtools 中的 reformat.sh 交错。
-u, --unpaired-reads STRING,STRING,...
A collection of names of files containing unpaired reads in FASTQ format. Multiple files must be comma-separated, or can be separated by spaces.包含 FASTQ 格式的未配对读取的文件名称的集合。多个文件必须以逗号分隔,或者可以用空格分隔。
--adapter-refs STRING
A file containing adapter sequences in the FASTA format. If specified, it will be used to trim out all adapters when the input reads are first loaded. Two files containing adapter sequences are provided in the contrib directory: adapters_no_transposase.fa and all_adapters.fa.gz. The latter must be gunzipped before it can be used.包含 FASTA 格式的接头序列的文件。如果指定,它将用于在首次加载输入读数时修剪所有适配器。 contrib 目录中提供了两个包含接头序列的文件:adapters_no_transposase.fa 和all_adapters.fa.gz。后者必须先gunzipped后才能使用。
-i, --insert INT:INT
The insert size for paired reads. The first integer is the average insert size for the paired reads and the second integer is the standard deviation of the insert sizes. MHM2 will automatically attempt to compute these values so this parameter is usually not necessary. However, there are certain cases where it may be useful, for example, if MHM2 prints a warning about being unable to compute the insert size because of the nature of the reads, or if only doing scaffolding. MHM2 will also compare its computed value to any option set on the command line and print a warning if the two differ significantly; this is useful for confirming assumptions about the insert sise distribution.配对读取的插入大小。第一个整数是配对读取的平均插入大小,第二个整数是插入大小的标准偏差。 MHM2 将自动尝试计算这些值,因此通常不需要此参数。然而,在某些情况下它可能有用,例如,如果 MHM2 打印一条警告,提示由于读取的性质而无法计算插入大小,或者仅进行脚手架。 MHM2 还将其计算值与命令行上设置的任何选项进行比较,如果两者差异显着,则打印警告;这对于确认有关插入尺寸分布的假设很有用。
-k, --kmer-lens INT,INT,...
The k-mer lengths used for the contigging rounds. MHM2 performs one or more contigging rounds, each of which performs k-mer counting, followed by a deBruijn graph traversal, then alignment and local assembly to extend the contigs. Typically, multiple rounds are used with increasing values of k; the shorter values are useful for low abundance genomes, whereas the longer k values are useful for resolving repeats. This option defaults to -k 21,33,55,77,99, which is fine for reads of length 150. For shorter or longer reads, it may be a good idea to adjust these values, for example, for reads of length 101, a better set is usually -k 21,33,47,63. Also, each round of contigging takes time, so the overall assembly time an be reduced by reducing the number of rounds, although this will likely reduce the quality of the final assembly.用于重叠轮次的 k 聚体长度。 MHM2 执行一轮或多轮重叠群,每一轮执行 k 聚体计数,然后进行 deBruijn 图遍历,然后进行比对和局部组装以扩展重叠群。通常,随着 k 值的增加,使用多轮;较短的值对于低丰度基因组有用,而较长的 k 值对于解决重复很有用。此选项默认为 -k 21,33,55,77,99,这对于长度为 150 的读取来说很好。对于较短或较长的读取,调整这些值可能是一个好主意,例如,对于长度为 101 的读取,更好的设置通常是-k 21,33,47,63。此外,每轮重叠都需要时间,因此可以通过减少轮数来减少总装配时间,尽管这可能会降低最终装配的质量。
-s, --scaff-kmer-lens INT,INT,...
The k-mer lengths used for the scaffolding rounds. In MHM2, the contigging rounds are followed by one or more scaffolding rounds. These rounds usually proceed from a high k to a low one, i.e. the reverse ordering of contigging. This option defaults to -s 99,33. The first value should always be set to the final k used in contigging, e.g. for reads of length 101 with parameter -k 21,33,47,63, the scaffolding values could be -s 63,33. More rounds may improve contiguity but will likely increase misassemblies. To disable scaffolding altogether, set this value to 0, i.e. -s 0.用于脚手架回合的 k 聚体长度。在 MHM2 中,连续轮次之后是一轮或多轮脚手架轮次。这些轮通常从高 k 到低 k 进行,即重叠的相反顺序。此选项默认为-s 99,33。第一个值应始终设置为重叠中使用的最终 k,例如对于带有参数 -k 21,33,47,63 的长度为 101 的读取,脚手架值可以是 -s 63,33。更多轮数可能会改善连续性,但可能会增加错误组装。要完全禁用脚手架,请将此值设置为 0,即 -s 0。
--min-ctg-print-len INT
The minimum length for contigs to be included in the final assembly, final_assembly.fasta. This defaults to 500.最终组装中包含的重叠群的最小长度,final_assembly.fasta。默认为 500。
-o, --output STRING
The name for the output directory. If not specified, it will be set to a default value of the following form:输出目录的名称。如果未指定,它将设置为以下形式的默认值:
mhm2-run-<READS_FNAME1>-n<PROCS>-N<NODES>-YYMMDDhhmmss-<JOBID>
where <READS_FNAME1> is the name of the first reads file, PROCS is the number of processes and NODES is the number of nodes. Following this is the date and time when the run was started: YY is the last two digits of the year, MM is the number of the month, DD is the day of the month, hh is the hour of day, mm is the minute and ss is the second. Be warned that if two runs are started at exactly the same time, with the same parameters, then with the default values, they could both end up running in the same output directory, which will lead to corrupted results.其中 <READS_FNAME1> 是第一个读取文件的名称,PROCS 是进程数,NODES 是节点数。接下来是运行开始的日期和时间:YY 是年份的最后两位数字,MM 是月份数字,DD是月份中的日期,hh 是一天中的小时,mm 是分钟,ss 是秒。请注意,如果两次运行完全在同一时间启动,并且使用相同的参数,那么使用默认值,它们最终可能会在同一输出目录中运行,这将导致结果损坏。
If the output directory is created by MHM2 (either as the default or when passed as a parameter), it will automatically be striped in the most effective way on a Lustre filesystem. If using a pre-existing directory that was not created by MHM2, the user should ensure that on Lustre filesystems it is adequately striped.如果输出目录是由 MHM2 创建的(无论是默认目录还是作为参数传递),它将在 Lustre 文件系统上以最有效的方式自动进行条带化。如果使用不是由 MHM2 创建的预先存在的目录,用户应确保在 Lustre 文件系统上对其进行了充分的条带化。
If the output directory already exists, files produced by a previous run of MHM2 may be overwritten, depending on whether or not this is a restart of a previous run. If there is an existing log file (mhm2.log), it will be renamed with the date appended before the new one is written as mhm2.log, so log information about previous runs will always be retained.如果输出目录已存在,则先前运行 MHM2 生成的文件可能会被覆盖,具体取决于这是否是先前运行的重新启动。如果存在现有日志文件 (mhm2.log),则会将其重命名,并在新日志文件写入之前附加日期,将其写入为 mhm2.log,因此将始终保留有关先前运行的日志信息。
--checkpoint BOOL
Checkpoint runs. If set to true, this will checkpoint the run by saving intermediate files that can later be used to restart the run (see the --restart option below). The intermediate files are FASTA files of contigs, and they are saved at the end of each contigging round (contigs-<k>.fasta) and at the end of each scaffolding round (scaff-contigs-<k>.fasta), where the <k> value is the k-mer size for that round. Checkpointing is on by default and can be disabled by passing --checkpoint=false.检查点运行。如果设置为 true,这将通过保存稍后可用于重新启动运行的中间文件来检查运行(请参阅下面的 --restart 选项)。中间文件是重叠群的 FASTA 文件,它们保存在每个重叠轮次结束时 (contigs-<k>.fasta) 和每个脚手架轮次结束时 (scaff-contigs-<k>.fasta),其中 < b3> 值是该轮的 k-mer 大小。检查点默认处于启用状态,可以通过传递 --checkpoint=false 来禁用。
--restart BOOL
Restart a previous incomplete run. If set to true, MHM2 will attempt to restart a run from an existing directory. The output directory option must be specified and must contain a previous checkpointed run. The restart will use the same options as the previous run, and will load the most recent checkpointed contigs file in order to resume. This defaults to false.重新开始之前未完成的运行。如果设置为 true,MHM2 将尝试从现有目录重新启动运行。必须指定输出目录选项,并且必须包含先前的检查点运行。重新启动将使用与上次运行相同的选项,并将加载最新的检查点重叠群文件以便恢复。这默认为 false。
--post-asm-align BOOL
Perform alignment of reads to final assembly after assembly has completed. If set to true. MHM2 will align the original reads to the final assembly and report the results in a file, final_assembly.sam, in SAM format. This defaults to false.组装完成后,将读数与最终组装进行对齐。如果设置为 true。 MHM2 会将原始读数与最终组装进行比对,并以 SAM 格式在文件 final_assembly.sam 中报告结果。这默认为 false。
--post-asm-abd BOOL
Compute contig abundances after assembly has completed. If set to true, MHM2 will compute the abundances (depths) for the contigs in the final assembly and write the results to the file, final_assembly_depths.txt. The format of this file is the same as that used by MetaBAT, and so can be used together with the final_assembly.fasta for post-assembly binning, e.g.:组装完成后计算重叠群丰度。如果设置为 true,MHM2 将计算最终组装中重叠群的丰度(深度)并将结果写入文件 final_assembly_depths.txt。该文件的格式与 MetaBAT 使用的格式相同,因此可以与 final_assembly.fasta 一起使用进行组装后装箱,例如:
metabat2 -i final_assembly.fasta -a final_assembly_depths.txt -o bins_dir/bin
This defaults to false. 这默认为 false。
--post-asm-only BOOL
Perform only post-assembly operations. If set to true, this requires an existing directory containing a full run (i.e. with a final_assembly.fasta file), and it will execute any specified post-assembly options (--post-asm-align, --post-asm-abd) on that assembly without any other steps. This provides a convenient means to run alignment and/or abundance calculations on an already completed assembly. By default this post-assembly analysis will use the final_assembly.fasta file in the output directory, but any FASTA file could be used, including those not generated by MHM2 (see the --contigs in the advanced options section below). This defaults to false.仅执行组装后操作。如果设置为 true,则需要包含完整运行的现有目录(即带有 final_assembly.fasta 文件),并且它将执行任何指定的组装后选项(--post-asm-align、 )在该程序集上,无需任何其他步骤。这提供了一种在已完成的组件上运行比对和/或丰度计算的便捷方法。默认情况下,此组装后分析将使用输出目录中的 final_assembly.fasta 文件,但可以使用任何 FASTA 文件,包括那些不是由 MHM2 生成的文件(请参阅高级中的 --contigs下面的选项部分)。这默认为 false。
--write-gfa BOOL
Produce an assembly graph in the GF2 format. If set to true, MHM2 will output an assembly graph in the GFA2 format in the file, final_assembly.gfa. This represents the assembly graph formed by aligning the reads to the final contigs and using those alignments to infer edges between the contigs. This defaults to false.生成 GF2 格式的装配图。如果设置为 true,MHM2 将在文件 final_assembly.gfa 中输出 GFA2 格式的装配图。这表示通过将读数与最终重叠群对齐并使用这些对齐来推断重叠群之间的边缘而形成的组装图。这默认为 false。
-Q, --quality-offset INT
The phred encoding offset. In most cases, MHM2 will be able to detect this offset from analyzing the reads file, so it usually does not need to be explicitly set.phred 编码偏移量。在大多数情况下,MHM2 将能够通过分析读取文件来检测此偏移量,因此通常不需要显式设置。
--progress BOOL
Display progress indicators during a run. If true, many time-consuming stages will be shown updating with a simple progress bar. The progress bar output will not be written into the log file, mhm2.log. This defaults to false.在运行期间显示进度指示器。如果为真,许多耗时的阶段将通过一个简单的进度条显示更新。进度条输出不会写入日志文件mhm2.log。这默认为 false。
-v, --verbose BOOL
Verbose output. If true, MMHM2 will produce verbose output, which prints out a lot of additional information about the timing of the run and the various computations that are being performed. This defaults to false. All of the information seen in verbose mode will always be written to the log file, mhm2.log. This defaults to false.详细输出。如果为 true,MMHM2 将产生详细输出,打印出有关运行时间和正在执行的各种计算的大量附加信息。这默认为 false。在详细模式下看到的所有信息将始终写入日志文件 mhm2.log。这默认为 false。
--config STRING
Use a config file for the parameters. If this is specified, the options will be loaded from the named config file. The file is a plain text file of the format:使用配置文件作为参数。如果指定了此选项,将从指定的配置文件中加载选项。该文件是格式为的纯文本文件:
key = value
where key is the name of an option and value is the value of the option. All blank lines and lines beginning with a semi-colon will be ignored. When the config file is not specified as an option, MHM2 always writes out all of the non-default options to the file mhm2.config in the output directory. Even when options are loaded from a config file, they can still be overridden by options on the command line. For example, if the config file, test.config, contains the line:其中 key 是选项的名称,value 是选项的值。所有空白行和以分号开头的行都将被忽略。当配置文件未指定为选项时,MHM2 始终将所有非默认选项写入输出目录中的文件 mhm2.config 中。即使从配置文件加载选项,它们仍然可以被命令行上的选项覆盖。例如,如果配置文件 test.config 包含以下行:
k = 21,33,55,77,99
but the command line is:但命令行是:
mhm2.py --config test.config -k 45,63
then MHM2 will run with k-mer lengths of 45, 63.那么 MHM2 将以 45、63 的 k 聚体长度运行。
Advanced options 高级选项
These are additional options for tuning performance or the quality of the output, selecting precisely how to restart a run, or for additonal debugging information. Most users will not need any of these options.这些是用于调整性能或输出质量、精确选择如何重新启动运行或用于附加调试信息的附加选项。大多数用户不需要任何这些选项。
Restarting runs 重新开始运行
Although the --restart option provides for simple restarts of previous runs, it is possible to restart at very specific points, with different options from those of the original run, e.g. restarting scaffolding with different k-mer values, set using the -s option.尽管 --restart 选项提供了先前运行的简单重新启动,但也可以在非常特定的点重新启动,并使用与原始运行不同的选项,例如使用不同的 k-mer 值重新启动脚手架,使用 -s 选项进行设置。
The relevant options are listed below.下面列出了相关选项。
-c, --contigs STRING
The file name containing contigs in FASTA format that are to be used as the most recent checkpoint for a restart. Any contigs file generated during a checkpointed run can be used, so it is possible to restart at any stage. It is also possible to specify any FASTA file if running only post-assembly analysis (--post-asm-only).包含 FASTA 格式的重叠群的文件名,这些重叠群将用作重新启动的最新检查点。可以使用检查点运行期间生成的任何重叠群文件,因此可以在任何阶段重新启动。如果仅运行组装后分析 (--post-asm-only),也可以指定任何 FASTA 文件。
--max-kmer-len INT
The maximum k-mer length that was previously used in contigging. This is usually derived from the -k parameter, and so only needs to be specified if the restart will run scaffolding rounds only. For example, the following command will restart after the scaffolding round with k=99 and will run run two more scaffolding rounds with k=55 and k=21:先前在重叠中使用的最大 k 聚体长度。这通常源自 -k 参数,因此仅在重新启动仅运行脚手架轮次时才需要指定。例如,以下命令将在使用 k=99 的脚手架回合后重新启动,并使用 k=55 和 k=21 运行另外两轮脚手架:
mhm2.py -o outdir -r reads.fq -c scaff-contigs-99.fasta --max-kmer-len 99 -s 55,21
为了做好运维面试路上的助攻手,特整理了上百道 【运维技术栈面试题集锦】 ,让你面试不慌心不跳,高薪offer怀里抱!
这次整理的面试题,小到shell、MySQL,大到K8s等云原生技术栈,不仅适合运维新人入行面试需要,还适用于想提升进阶跳槽加薪的运维朋友。
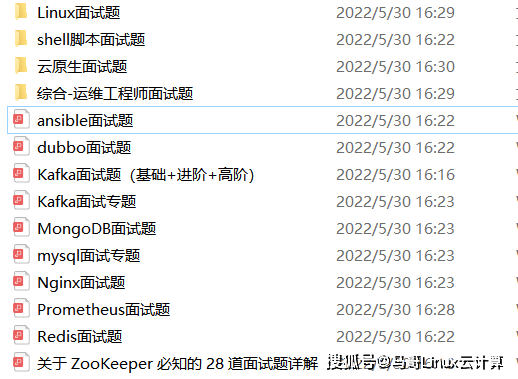
本份面试集锦涵盖了
- 174 道运维工程师面试题
- 128道k8s面试题
- 108道shell脚本面试题
- 200道Linux面试题
- 51道docker面试题
- 35道Jenkis面试题
- 78道MongoDB面试题
- 17道ansible面试题
- 60道dubbo面试题
- 53道kafka面试
- 18道mysql面试题
- 40道nginx面试题
- 77道redis面试题
- 28道zookeeper
总计 1000+ 道面试题, 内容 又全含金量又高
- 174道运维工程师面试题
1、什么是运维?
2、在工作中,运维人员经常需要跟运营人员打交道,请问运营人员是做什么工作的?
3、现在给你三百台服务器,你怎么对他们进行管理?
4、简述raid0 raid1raid5二种工作模式的工作原理及特点
5、LVS、Nginx、HAproxy有什么区别?工作中你怎么选择?
6、Squid、Varinsh和Nginx有什么区别,工作中你怎么选择?
7、Tomcat和Resin有什么区别,工作中你怎么选择?
8、什么是中间件?什么是jdk?
9、讲述一下Tomcat8005、8009、8080三个端口的含义?
10、什么叫CDN?
11、什么叫网站灰度发布?
12、简述DNS进行域名解析的过程?
13、RabbitMQ是什么东西?
14、讲一下Keepalived的工作原理?
15、讲述一下LVS三种模式的工作过程?
16、mysql的innodb如何定位锁问题,mysql如何减少主从复制延迟?
17、如何重置mysql root密码?
网上学习资料一大堆,但如果学到的知识不成体系,遇到问题时只是浅尝辄止,不再深入研究,那么很难做到真正的技术提升。
一个人可以走的很快,但一群人才能走的更远!不论你是正从事IT行业的老鸟或是对IT行业感兴趣的新人,都欢迎加入我们的的圈子(技术交流、学习资源、职场吐槽、大厂内推、面试辅导),让我们一起学习成长!


 被折叠的 条评论
为什么被折叠?
被折叠的 条评论
为什么被折叠?
 到【灌水乐园】发言


