


目录
1、使用axios发送网络请求
//第一步:下载axios npm i axios //引入axios import axios from "axios" //发送get axios.get("url").then(res=>{console.log(res)}) .catch(err=>{console.log(err)}) //发送post axios.post("url",{data:data}).then(res=>{console.log(res)}) .catch(err=>{console.log(err)})(还有还多发送网络请求的必入vue-resource的,推荐使用axios)
2、插槽相关
2.1、默认插槽
//App.vue
<template>
  <div id="app">
    <Page01>
      我是默认插槽
    </Page01>
  </div>
</template>

<script>

import Page01 from "./components/Page01.vue"

export default {
  name: 'App',
  components: {
    Page01
  }
}
</script>
//Page01.vue <template> <div style="width:200px;height:100px;border:2px solid #000;margin:auto"> <slot></slot> </div> </template> <script> export default { name:'Page01' } </script>2.2、具名插槽
当我的这个页面需要插入多个东西时,就需要给插槽起名字,让他插到合适的位置。
//App.vue
<template>
  <div id="app">
    <Page01>
      <div slot="num1">
        kkk
      </div>
      <template slot="num2">
        sss
      </template>
      <!-- 用v-slot时必须用template -->
      <template v-slot:num3>
        333
      </template>
    </Page01>
  </div>
</template>

<script>
import Page01 from "./components/Page01.vue"

export default {
  name: 'App',
  components: {
    Page01
  }

}
</script>
//Page01.vue <template> <div style="width:200px;height:100px;border:2px solid #000;margin:auto"> <slot name="num1"></slot> <slot name="num2"></slot> <slot name="num3"></slot> </div> </template> <script> export default { name:'Page01' } </script>2.3、作用域插槽
当我们要展示的数据在插槽里面的时候,会产生作用域的问题,所以需要我们吧插槽内的数据送到使用插槽的地方
//Page.vue
<template>
  <div style="width:200px;height:100px;border:2px solid #000;margin:auto">
       /*这里的名字随便起*/
      <slot :names="names"></slot>
  </div>
</template>

<script>
export default {
    name:'Page01',
    data(){
        return{
            names:"kk"
        }
    }
}
</script>
//App.vue <template> <div id="app"> <Page01> <template v-slot:default="num"> {{num}} </template> </Page01> </div> </template> <script> import Page01 from "./components/Page01.vue" export default { name: 'App', components: { Page01 } } </script>3、Vuex的开发环境
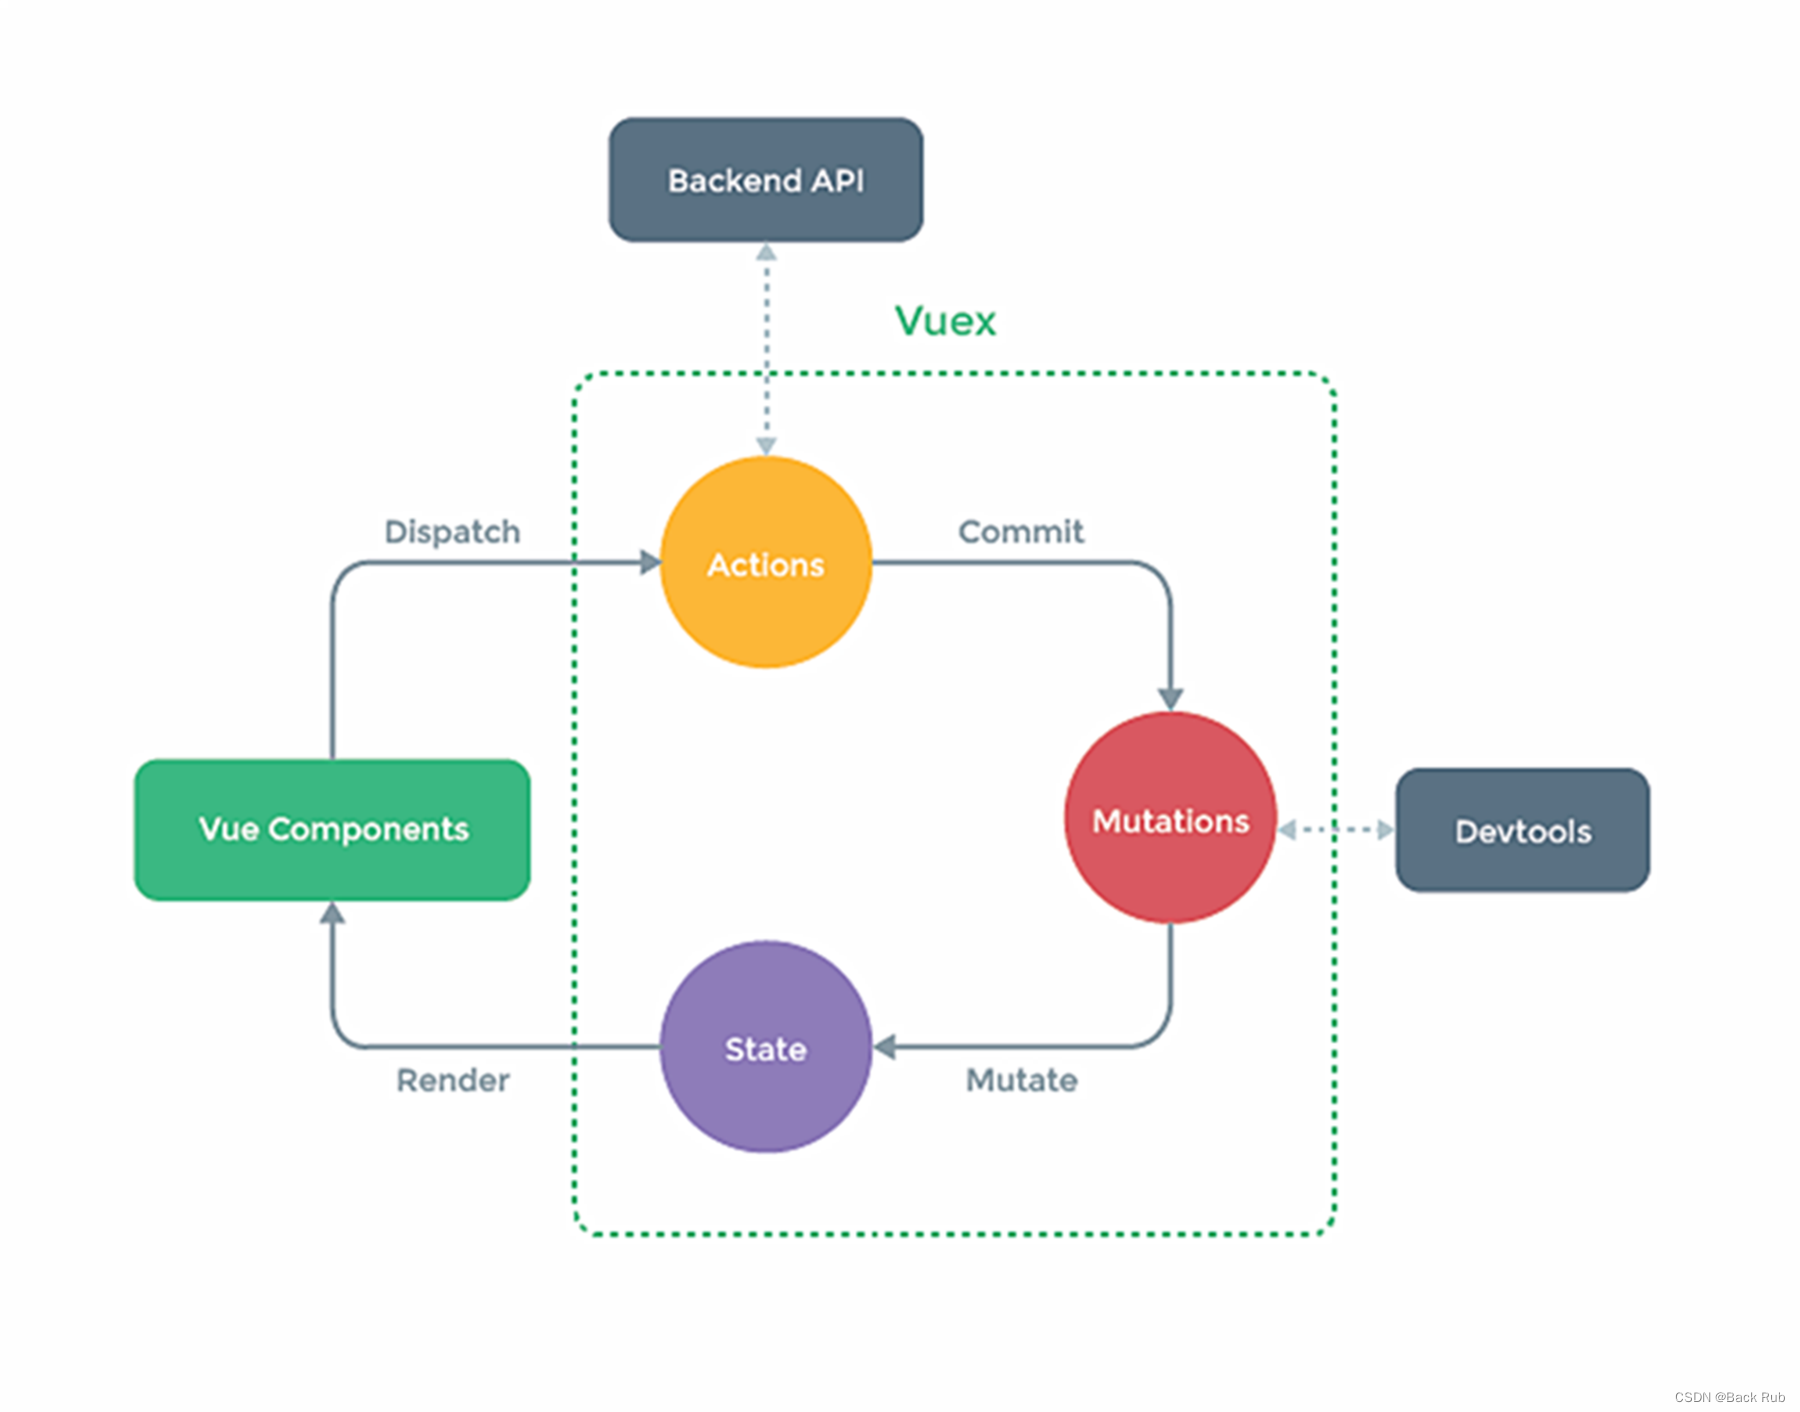
Vuex就是吧一些公共的数据用vuex来管理,然后所有组件就都可以获取和处理这些数据了。
3.1、第一步:下载Vuex
//注意:vue2只能使用vuex3的版本,vue3使用vuex4版本,
//所以这里我们下在vuex3版本
npm i vuex@3
3.2、创建vuex的开发环境
//在src下创建一个store的文件夹,在文件夹里创建一个index.js,内容如下

import Vuex from "vuex"
import Vue from "vue"
/*在这里使用vuex插件的原因是,如果在main.js里面引入这个文件,
    他会在vue实例创建之前执行这个文件,然后就白干了
*/
Vue.use(Vuex)

const actions = {}
const mutations = {}
const state = {}

export default new Vuex.Store({
    actions,
    mutations,
    state
})
//main.js文件里面引入store,然后在传入配置项store import Vue from 'vue' import App from './App.vue' import store from "./store" Vue.config.productionTip = false new Vue({ render: h => h(App), store, beforeCreate(){ Vue.prototype.$bus = this } }).$mount('#app')4、Vuex的使用
4.1、vuex的基本使用
我们可以通过store的dispatch(派遣),吧数据传到actions里面,然后进行一些业务逻辑,之后,在通过commit吧数据发送到mutations(改变)里面,然后在mutations里面可以直接操作state,如果我们不需要进行业务逻辑,就直接调用commit就行。
//Page01.vue
<template>
  <div style="width:200px;height:100px;border:2px solid #000;margin:auto;padding:10px;box-sizing:border-box;">
      {{$store.state.num}}
      <button @click="addNum">点击+1</button>
      <button @click="unaddWait">点击等一会-1</button>
  </div>
</template>

<script>
export default {
    name:'Page01',
    methods:{
        addNum(){
            /*这里因为不需要进行发送请求之类的事情去做
            所以直接使用commit让mutations直接改变num
            */
            this.$store.commit('ADD',1)
        },
        unaddWait(){
            /*这里需要等会在减数字,所以先要使用dispatch(派送)
            在actions里面先处理完,然后在执行,项目中我们吧post等
            请求放在actions里
            */
            this.$store.dispatch("unadd",1)
        }
    }
}
</script>

<style>

</style>
// src/store/index.js import Vuex from "vuex" import Vue from "vue" Vue.use(Vuex) const actions = { unadd(context,value){ context.commit('UNADD',value) } } const mutations = { ADD(state,value){ state.num += value; }, UNADD(state,value){ setTimeout(() => { state.num -= value }, 500); } } const state = { num:0, } export default new Vuex.Store({ actions, mutations, state })4.2、getter是使用
这个配置项是可选配置项,作用类似于vue重的computed属性,可以说属于vuex的computed属性,当然,简单的处理我们可以使用vue的computed属性来做,复杂的运算,最好放在getters里面,作为一个公共的值。
//Page01.vue
<template>
  <div style="width:200px;height:100px;border:2px solid #000;margin:auto;padding:10px;box-sizing:border-box;">
    {{$store.state.name}}
     {{$store.state.age}}
      {{$store.getters.numTimes10}}
  </div>
</template>

<script>
export default {
    name:'Page01',
}
</script>

<style>

</style>
// src/store/index.js import Vuex from "vuex" import Vue from "vue" Vue.use(Vuex) const actions = {} const mutations = {} const state = { name:'potkiss', age:90 } const getters = { numTimes10(value){ return value.age * 10 } } export default new Vuex.Store({ actions, mutations, state, getters })4.3、mapState和mapGetters的使用
这里用到的...是将对象里面的值展开了,有两种写法,一种是对象写法,一种是数组写法,当然,如果不嫌麻烦可以自己封装函数或者使用computed属性弄出,最终要实现的就是,让模版里面的内容简化。
//Page.vue页面
<template>
  <div style="width:200px;height:100px;border:2px solid #000;margin:auto;padding:10px;box-sizing:border-box;">
     <!-- {{$store.state.name}}
     {{$store.state.age}}  -->
     <!-- 为了让模版简化的写 ,而不是上面的这一大串
        1、可以使用computed一个一个写,也可以用
        2、Vuex提供的mapState和mapGetters
     -->
      {{name}}<br>
      {{age}}<br>
      {{numTimes10}}
  </div>
</template>

<script>
import {mapState,mapGetters} from "vuex"
export default {
    name:'Page01',
    computed:{
        // 这里是使用了自己手写的方式
        // name(){
        //     return this.$store.state.name
        // },
        // age(){
        //     return this.$store.state.age
        // },
        // numTimes10(){
        //     return this.$store.getters.numTimes10
        // },
        /*这里是简化的写法,...是吧函数展开了,这是对像写法
         注意:不能用对象的简写形式,因为后面的是个字符串*/
        //  ...mapState({name:"name",age:"age"}),
        //  ...mapGetters({numTimes10:'numTimes10'})
        //这里是简化的写法,...是吧函数展开了,这是数组写法
        ...mapState(['name','age']),
         ...mapGetters(['numTimes10'])
    }
}
</script>

<style>

</style>
// src/store/index.js import Vuex from "vuex" import Vue from "vue" Vue.use(Vuex) const actions = {} const mutations = {} const state = { name:'potkiss', age:90 } const getters = { numTimes10(value){ return value.age * 10 } } export default new Vuex.Store({ actions, mutations, state, getters })4.4、mapActions和mapMutations
这两个是为了简写调用的methos函数,注意,传参数要在模版里面传入。
//Page01.vue
<template>
  <div style="width:200px;height:100px;border:2px solid #000;margin:auto;padding:10px;box-sizing:border-box;">
    {{$store.state.num}}
    <br>
   <!-- <button @click="add">点击加一</button>
    <button @click="unadd">点击等1s减一</button> -->
    <!-- 如果使用mapActions和mapMutations时需要在这里传参数 -->
    <button @click="add(1)">点击加一</button>
    <button @click="unadd(1)">点击等1s减一</button>
  </div>
</template>
<script>
import {mapActions,mapMutations} from "vuex"
export default {
    name:'Page01',
    methods:{
        // add(){
        //     this.$store.commit('ADD',1)
        // },
        // unadd(){
        //     this.$store.dispatch('unadd',1)
        // },
        // unadd2(){
        //     this.$store.dispatch('unadd2',2)
        // }
        /*为了简化这里的方法,可以使用
        mapMutations和mapActions,来
        这里也是同样的两种写法,对象和数组写法
        如果用数组写法,就需要两边都一样,
        注意:这里如果使用这两简写的形式,参数必须在
        绑定方法时传入
        */
        ...mapMutations({add:"ADD"}),
        // ...mapMutations(['ADD']),
        ...mapActions({unadd:"unadd"}),
        // ...mapActions(["unadd"]),

    }
}
</script>
// src/store/index.js import Vuex from "vuex" import Vue from "vue" Vue.use(Vuex) const actions = { unadd(minState,value){ setTimeout(() => { minState.commit('UNADD',value) }, 1000); }, } const mutations = { ADD(state,value){ state.num += value }, UNADD(state,value){ state.num -= value } } const state = { num:0, } export default new Vuex.Store({ actions, mutations, state, })第一步,在src/store文件夹下创建想要的模块的js文件,第二步,在src/store/index.js里面引入这些模块,并且使用module配置项,配置这俩模块。第三步,打开命名空间,使用data的数据。
//src/store/index.js

import Vuex from "vuex"
import Vue from "vue"
import page01 from "./page01"
import page02 from "./page02"
Vue.use(Vuex)

export default new Vuex.Store({
    modules:{
        page01,
        page02
    }
})
//page01.js,模块1 export default { namespaced:true, //namespaced这个属性可以让模块化后的vuex的state读取变得容易 actions:{ TimeAdd(minState,value){ setTimeout(() => { console.log(minState) minState.commit('TIMEADD',value) }, 1000); } }, mutations:{ TIMEADD(state,value){ state.num += value } }, state:{ num:9, List:[1,2] } }//page02.js 模块2 export default { namespaced:true, //namespaced这个属性可以让模块化后的vuex的state读取变得容易 actions:{}, mutations:{ ADD(state,value){ state.num +=value } }, state:{ num:90, List:[3,4] }, getters:{ sum(value){ return value.List[0] + value.List[1] } } }后面是使用的两种写法,一种是简写的,另一种是不简写的
/*简写的
    使用了mapState,mapMutations,mapGetters,mapActions这四个简写的形式
*/

<template>
  <div style="width:200px;height:100px;border:2px solid red;margin:auto;padding:10px;box-sizing:border-box;">
      <!-- 如果我们采用了模块化的开发方式,这里要这样写
      但是,比较繁琐,Vuex给我们提供了一个namespaced
      让我们直接可以使用 -->
      <!-- {{page01.List}}
      <br>
      {{page02.List}} -->
      {{List}}
      {{num}}
      <br>
      {{sum}}
      {{num2}}
      <br>
      <button @click="TimeAdd(1)">点击延时加</button>
      <button @click="ADD(1)">点击加</button>
  </div>
</template>
<script>
import {mapState,mapGetters, mapActions, mapMutations} from "vuex"
export default {
    name:'Page02',
    computed:{
        //模块化后没处理
        // ...mapState(['page01',"page02"])
        // 在模块的page01.js加上namespaced:true,
        // 就可以这样写,然后上面就可以直接使用了
        ...mapState('page01',['List','num']),
        ...mapState('page02',{num2:'num'}),
        ...mapGetters('page02',['sum'])
    },
    methods:{
        ...mapActions('page01',['TimeAdd']),
        ...mapMutations('page02',['ADD'])
    }
}
</script>
/*不简写的 需要注意模块化后的getters和methods的使用 */ <template> <div style="width:200px;height:100px;border:2px solid red;margin:auto;padding:10px;box-sizing:border-box;"> <!-- 如果我们采用了模块化的开发方式,这里要这样写 但是,比较繁琐,Vuex给我们提供了一个namespaced 让我们直接可以使用 --> <!-- {{page01.List}} <br> {{page02.List}} --> {{List}} {{num}} <br> {{sum}} {{num2}} <br> <button @click="TimeAdd">点击延时加</button> <button @click="ADD">点击加</button> </div> </template> <script> export default { name:'Page02', computed:{ List(){ return this.$store.state.page01.List }, num(){ return this.$store.state.page01.num }, num2(){ return this.$store.state.page02.num }, //注意:getters的非简写使用是这样的 sum(){ return this.$store.getters['page02/sum'] } }, methods:{ //注意:methods里面的模块的使用是这样写的 TimeAdd(){ this.$store.dispatch('page01/TimeAdd',1) }, ADD(){ this.$store.commit('page02/ADD',1) } } } </script>


08-10
11-23
 2490
2490
2490
08-10
08-10
“相关推荐”对你有帮助么?
-

 非常没帮助
非常没帮助 -

 没帮助
没帮助 -

 一般
一般 -

 有帮助
有帮助 -

 非常有帮助
非常有帮助
提交

 被折叠的 条评论
为什么被折叠?
被折叠的 条评论
为什么被折叠?
 到【灌水乐园】发言


