


 前言:
    公司的项目app在上架苹果商店时发现人家要求里面的部分购买项目必须使用iap购买的方式,使用原本的微信支付方式审核不给通过,无奈只能重新研究这个东西。做起来还是有点麻烦,主要是网上的文章很少,不能直接硬抄。自己做完总结一下,希望对小伙伴们有帮助。
    1、代码有部分因为隐私性会省略,但我会注释说明这部分代码是做什么的,大致应该怎么写,小伙伴们可以根据自己的具体情况继续写。
    2、当前代码写的有些混乱,只是正好满足当前app需求,对于iap内购的许多其他功能和小细节也没有深度研究,后续如果有机会会继续钻研这个东西,本篇文章只是记录一下开发过程与实现的代码,为以后相关开发作参考。
    3、本人小白一枚,写的代码质量不是很好,如果哪里有错误,希望大佬发现后给予斧正。
    4、对于在apple开发者中心进行协议,税务,银行账户等信息的配置与设置本文并没有给出教程,小伙伴可以自行根据网上教程设置,那些内容相对代码来说还是比较规范的,本文就不在细数。
1、首先看一下iap内购的订单支付流程图:
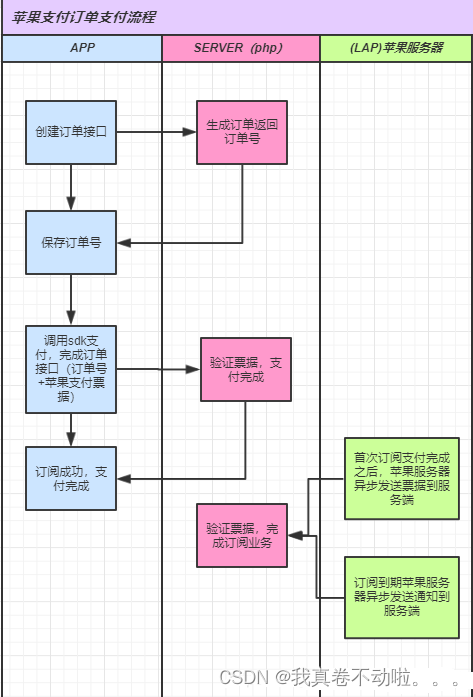
分析:
    由图我们可以发现:在我们支付时,会先由app端发送请求至开发者服务器,在开发者服务器上创建订单号,插入订单记录,然后返回我们的订单号至app端,在app端拿到订单号就会调用sdk发起支付,这里的支付完成后会自动由苹果服务器返回给我们一个支付的票据,与微信支付不同(微信支付完成后会返回给开发者服务器支付结果来校验),iap支付会将支付的票据给app端,这时我们需要再次向开发者服务器把票据发送过去,让开发者服务器拿到这个票据请求苹果服务器验证支付的有效性,最终校验成功后修改订单记录并发放购买的内容。

总结一下:
    服务器端:需要两个接口,一个用来创建订单号,一个用来向苹果服务器发送请求验证app传过来的票据
    app端:引入sdk,并完成整个支付流程

(在研究这种使用原生的方式的过程中,发现貌似还有另一种不用写服务器端的的方式就可以完成支付,好像是unipay,但是那个没理解了,就放弃了,有需要的可以看一下https://doc.dcloud.net.cn/uniCloud/uni-pay/uni-app.html,如果使用可以实现,小编恳求发我看看,如果是小编当初理解有误,就请当没看到这段话...)
2、接下来我们看看uniapp在开发iap时官方文档是怎么写的:
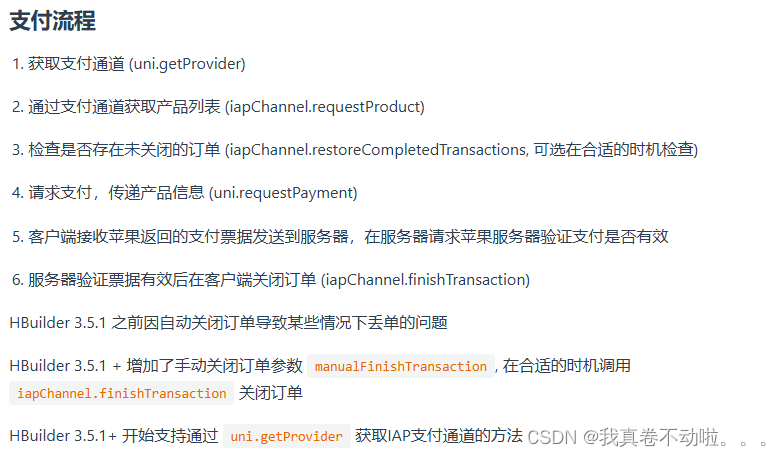
说明:
    这是官方文档的支付流程介绍,看这个有没有很迷,小编刚开始看这个的时候也是不理解,但这个确实就是支付的流程
    1、2、3都是我们调用sdk实现,然后我们应该向开发者服务器发送请求获取订单号,将订单号获取到再进行4,返回值就是获取到的支付票据信息,我们再执行5、6,如此就是整个流程了,只不过他这个写的只是app端要做的事,我们整个盘下来的话思路就很清晰了
3、支付流程明白了我们就可以开始代码的编写了:
说明:
    小编找到网上有大佬把代码封装好也说可以直接复制使用,于是借鉴了过来,但是发现这个与自己代码的逻辑还是有不同之处,于是将大佬的代码改了很多以适应,最终把代码改的相当不优雅,因此下面代码大家可以借鉴实现的逻辑,但是想要直接使用还是不太现实的

    借鉴大佬的文章:一:https://blog.csdn.net/lonerwolfs/article/details/130292489 二:https://blog.csdn.net/weixin_41258075/article/details/131202351
3.1:前端代码都有这些:
charge.vue充值页面中调用(记得引入下面的js文件):
this._iap = new realize()
this._iap.init(money);    //自己改的需要,将充值金额直接传过来,方便后面判断
ApplePay.js引入sdk,处理app端所有的支付逻辑:
/*
    1、class Iap{}这个类中的是uniapp官方文档中写明的支付方法,可以获取支付通道,拉起支付等;
    2、class realize{}这里被页面实例化,里面含有整个具体的支付逻辑,这里有小编提示的地方都会在注释后添加“~~~~~~~~~~~~~~~~~~~~~~~~~~~”,可以着重看一看
    3、代码中逻辑大致如下:首先会实例化realize,然后调用里面的init初始化,通过创建支付通道,检测产品正常等逻辑判断可以支付后,跳转restore()方法,在这个方法中先检测当前用户未关闭的订单。如果没有,直接再跳转到payment()方法,在这个方法中会请求服务器创建订单,拉起sdk的支付,向服务器发送票据进行验证,验证成功后关闭订单;如果上一步的restore()方法中检测到了未关闭的订单,就会对这个订单判断是是否支付成功的,如果未支付,就直接关闭订单,如果支付成功了,先从数据库中获取该用户最近的一次订单判断是否完成即使用购买的项目发放成功与否(因为这里小编确保了购买的项目订单只能一个一个完成),如果发放了,代表订单完成了但是还没有关闭,此时直接关闭即可,如果订单是未完成的,意味着票据验证成功但未发放购买项目就因为网络等问题服务器端执行失败了,这时重新发送请求至开发者服务器进行再次验证即可。
    4、第3条的逻辑分析可能有些混乱,大家多看看代码与文字分析对比一下,逻辑还是不难的
    5、注意一下代码中发送请求的接口,大家注意根据自己的更改一下

*/
import store from'../store/index.js'    //数据仓库,用来获取到当前的用户名,让订单与用户相关联
import { reqPost } from './index.js'    //用来发送post请求,向服务器获取订单号等

const IapTransactionState = {
	purchasing: "0", // 应用程序商店正在处理的交易.
	purchased: "1", // 成功处理的交易.
	failed: "2", // 一个失败的交易.
	restored: "3", // 恢复用户以前购买的内容的事务.
	deferred: "4" // 处于队列中的事务,但其最终状态为等待外部操作
};

class Iap {

	_channel = null; // 支付渠道

	_channelError = null; // 获取支付渠道失败的对象

	_productIds = []; // Apple 官网后台 配置的内部购买项目列表

	_ready = false; // 是否还有未处理的交易

	constructor({
		products
	}) {
		this._productIds = products;
	}

	/*
	    初始化、获取支付渠道
	*/
	init() {
		return new Promise((resolve, reject) => {
			this.getChannels((channel) => {
				this._ready = true;
				resolve(channel);
			}, (err) => {
				reject(err);
			})
		})
	}

	/**
	 * @description 向苹果服务器获取产品列表
	 * @param productIds 产品列表
	 */
	getProduct(productIds) {
		return new Promise((resolve, reject) => {
			this._channel.requestProduct(productIds || this._productIds, (res) => {
				resolve(res);
			}, (err) => {
				reject(err);
			})
		});
	}

	/**
	 * @description 发起支付请求
	 * @param orderInfo 订单信息
	 */
	requestPayment(orderInfo) {
		return new Promise((resolve, reject) => {
			uni.requestPayment({
				provider: 'appleiap',
				orderInfo: orderInfo,
				success: (res) => {
					resolve(res);
				},
				fail: (err) => {
					uni.hideLoading();
					reject(err);
				}
			});
		});
	}

	/**
	 * @description 获取苹果服务器已支付且未关闭的交易列表
	 * @param username 用户姓名
	 */
	restoreCompletedTransactions(username) {
		return new Promise((resolve, reject) => {
			this._channel.restoreCompletedTransactions({
				manualFinishTransaction: true,
				username,
			}, (res) => {
				resolve(res);
			}, (err) => {
				reject(err);
			})
		});
	}

	/**
	 * @description 关闭订单
	 * @param transaction 订单对象
	 */
	finishTransaction(transaction) {
		return new Promise((resolve, reject) => {
			this._channel.finishTransaction(transaction, (res) => {
				resolve(res);
			}, (err) => {
				uni.hideLoading();
				reject(err);
			});
		});
	}

	/**
	 * @description 获取支付渠道
	 * @param success 成功获取回调
	 * @param fail    失败获取回调
	 */
	getChannels(success, fail) {
		if (this._channel !== null) {
			success(this._channel)
			return
		}

		if (this._channelError !== null) {
			fail(this._channelError)
			return
		}

		uni.getProvider({
			service: 'payment',
			success: (res) => {
				this._channel = res.providers.find((channel) => {
					return (channel.id === 'appleiap')
				})

				if (this._channel) {
					success(this._channel)
				} else {
					this._channelError = {
						errMsg: 'paymentContext:fail iap service not found'
					}
					fail(this._channelError)
				}
			}
		});
	}

	get channel() {
		return this._channel;
	}
}

/* 实现支付 自定义逻辑   */
class realize {

	productItem = null; // 当前选择充值项id

	loading = false; // 是否允许提交充值

	//应用内购项目~~~~~~~~~~~~~~~这里写的要与你在项目app官网上配置的那些内购项目的产品id一致
	productList = ['xxxxxx1', 'xxxxx2', 'xxxxx3', 'xxxxxx4', 'xxxxx5', 'xxxxx6'];

	// 获取当前登录用户的用户名
	username = store.state.userInfo.username;

	// 调用官方案例
	_iap = new Iap({
		products: this.productList,
	});

	async init(price) {
		try {

			// 初始化,获取iap支付通道
			await this._iap.init();

			// 从苹果服务器获取产品列表
			this.productList = await this._iap.getProduct();

			//根据价格判断是哪个商品
			console.log(price);
			// 将price转换为整数
			const priceInt = parseInt(price);
			// 使用find方法查找符合条件的产品项
			const foundProduct = this.productList.find(product => product.price === priceInt);
			console.log(foundProduct)

			if (foundProduct) {
			    // 如果找到符合条件的产品项,则将其赋值给this.productItem
			    this.productItem = foundProduct;
			} else {
			    // 如果未找到符合条件的产品项,则输出错误信息
			    console.log('未定义价格错误');
			}
			console.log(this.productItem)

		} catch (e) {
			uni.showModal({
				title: "init",
				content: e.message,
				showCancel: false
			});
			console.log(e)
		} finally {
			uni.hideLoading();
		}

		if (this._iap._ready) {
			this.restore();
		}

	}

	async restore() {

			uni.showLoading({
				title: '正在检测未关闭的订单...'
			});

			try {
				console.log("本地用户名:" + this.username)
				// 从苹果服务器检查未关闭的订单,可选根据 username 过滤,和调用支付时透传的值一致
				const transactions = await this._iap.restoreCompletedTransactions({
					username: this.username
				});
				console.log(transactions)

				if (!transactions.length) {
					uni.showLoading({
						title: '正在创建新的订单...'
					});
					await this.payment()
					return;
				}

				// 开发者业务逻辑,从服务器获取当前用户未完成的订单列表,和本地的比较
				// 此处省略
				console.log("------有未关闭订单" + transactions)
				console.log(transactions)
				const statusInt = parseInt(transactions[0].transactionState);    //~~~~~~~~~~~~~~~~~小编这里确保了每次只会有一个订单因此这个返回的票据数组只有一个,所以直接取数组的第一个,如果你有多个返回的票据,这里需要自行更改,以适应自己的逻辑

				switch (statusInt) {
					case 1:
						// 用户已付款但未关闭,在此处请求开发者服务器,在服务器端请求苹果服务器验证票据
						//获取当前用户充值的订单号和充值金额
						let resVerifyData = await reqPost("getVerifyData",);
						console.log(resVerifyData)
						if(resVerifyData['data']['close_order'] === true){		//金额都修改好了,可以直接关闭订单
							await this._iap.finishTransaction(transactions[0]);
							uni.showModal({
							    title: "success",
							    content: "关闭订单完成,请重新拉起订单...",
							    showCancel: false
							});
						}else{		//票据校验时间太长,数据没有修改。需要重新校验
							// 在此处请求开发者服务器,在服务器端请求苹果服务器验证票据
							const requestVerify = {
								orderId: resVerifyData['data']['order_no'],
								money: resVerifyData['data']['money'],
								transaction: transactions[0],
								transactionReceipt: transactions[0].transactionReceipt
							};
							console.log(requestVerify)
							let verifyRes = await reqPost("iosVerify",requestVerify);
							console.log(verifyRes)

							//判断校验结果
							if (verifyRes["data"]["code"] === 401) {
								// 验证成功后关闭订单
								await this._iap.finishTransaction(transactions[0]);
								uni.showModal({
								    title: "success",
								    content: verifyRes['data']['message'],
								    showCancel: false
								});
							} else {
								// uni.showToast('支付失败')
								uni.showModal({
								    title: "failed",
								    content: verifyRes['data']['message'],
								    showCancel: false
								});
							}
						}

						break;
					case 2:
						// 关闭未支付的订单
						console.log("正在关闭未支付的订单")
						await this._iap.finishTransaction(transactions[0]);
						uni.showModal({
						    title: "success",
						    content: "关闭未支付订单成功!请重新拉起支付...",
						    showCancel: false
						});
						break;
					default:
						break;
				}
			} catch (e) {
				console.log(e)
				uni.showModal({
					content: e.message,
					showCancel: false
				});
			} finally {
				uni.hideLoading();
			}
		}

		async payment() {

		// 请求苹果支付
		let transaction;

			console.log(this.loading)

			if (this.loading == true) {
				console.log(this.loading)
				return;
			}

			this.loading = true;
			console.log(this.loading)

			uni.showLoading({
				title: '支付处理中...'
			});


			try {

				// 从开发者服务器创建订单
				var orderId = '';
				const requestData = {
				    // data: {
				        money: this.productItem.price
				    // }
				};
				await reqPost("applePay",requestData)
				.then(res=>{
					console.log(res)
					orderId = res.data.order_no
				})
				console.log(orderId)
				console.log("--------请求获取订单号完成--------")

				transaction = await this._iap.requestPayment({
					productid: this.productItem.productid,
					manualFinishTransaction: true,
					orderId: orderId,
					username: this.username, //根据业务需求透传参数,关联用户和订单关系
				});
				console.log(transaction)
				console.log("--------请求支付完成--------")

				// 在此处请求开发者服务器,在服务器端请求苹果服务器验证票据
				const requestVerify = {
					orderId: orderId,
					money: this.productItem.price,
					transaction: transaction,
					transactionReceipt: transaction.transactionReceipt
				};
				let verifyRes = await reqPost("iosVerify",requestVerify);
				console.log(verifyRes)

				if (verifyRes["data"]["code"] === 401) {
					// 验证成功后关闭订单
					await this._iap.finishTransaction(transaction);
					uni.showModal({
					    title: "success",
					    content: "购买成功,请返回刷新余额!",
					    showCancel: false
					});
				} else {
					// uni.showToast('支付失败')
					uni.showModal({
					    title: "failed",
					    content: verifyRes['data']['message'],
					    showCancel: false
					});
				}

				// 支付成功
			} catch (e) {
				console.log(e)
				this._iap.finishTransaction(transaction);

				if (e.errCode == 2) {
					uni.showModal({
					    title: "failed",
					    content: "取消支付",
					    showCancel: false
					});
					return false;
				}
				uni.showModal({
				    title: "failed",
				    content: e.message,
				    showCancel: false
				});
			} finally {
				this.loading = false;
				uni.hideLoading();
			}

		}


}

export {
	realize
}
3.2:服务器端的代码都有哪些:
/**
 * 后端有这四个方法
 *1、applePay()方法用来创建订单记录,将订单号返回给app端,前端只传过来一个money代表金额

 *2、iosVerify()验证app端传过来的票据,前端传票据,支付后返回的结果,订单id,充值金额
 *3、getVerifyData()从数据库中获取该用户最近的一笔订单的订单号和金额,前端无传值
 *4、iosVerifyTickets()ios验证票据,iosVerify方法调用的,无需修改
 *5、小编提示的地方都会在注释后添加“~~~~~~~~~~~~~~~~~~~~~~~~~~~”,可以着重看一看
 */

  /**
	 * 苹果内购创建订单号
	 */
    public function
    {
        if ($this->request->isPost()) {
            $params["user_id"] = $this->auth->id;
            $params["money"] =$this->request->post("money");
            xxxxxxxxx...// ~~~~~~~~~~~~~根据自己的表中的订单创建有哪些字段自行添加            $params["order_no"]=order_no();
            Db::startTrans();
            try {
                if(empty($params['user_id']) || !is_numeric($params['money'])){
                    throw new \think\Exception('参数错误!', 100006);
                }
                $params["after"] =$params["before"]+$params["money"];
                //添加
                xxxxxxxxxxxxxxxxx // ~~~~~~~~~~~~~~~~~~自行插入订单记录
                if(!$result){
                    throw new \think\Exception('操作异常,稍后重试!', 100006);
                }
                Db::commit();
            }catch (\think\Exception $e) {
                Db::rollback();
                $this->error($e->getMessage());
            }
            if ($result !== false) {
                $this->success("success",['order_no' => $params["order_no"]]);
            } else {
                $this->error("网络异常,请重试!");
            }
        }
        return $this->error('post请求');
    }
		/**
		* 苹果订单验证
		* 验证返回的状态码
		* 0     验证成功
		* 21000 App Store不能读取你提供的JSON对象
		* 21002 receipt-data域的数据有问题
		* 21003 receipt无法通过验证
		* 21004 提供的shared secret不匹配你账号中的shared secret
		* 21005 receipt服务器当前不可用
		* 21006 receipt合法,但是订阅已过期。服务器接收到这个状态码时,receipt数据仍然会解码并一起发送
		* 21007 receipt是Sandbox receipt,但却发送至生产系统的验证服务
		* 21008 receipt是生产receipt,但却发送至Sandbox环境的验证服务
		*/
		public function iosVerify()
		{
			$params["user_id"] = $this->auth->id;	//用户id
			$params["money"] = $this->request->post("money");	//充值金额
			$transaction = $this->request->post("transaction/a");	//支付结果
	        $receipt = $this->request->post("transactionReceipt"); // 票据
			$orderId = $this->request->post("orderId"); // 当前交易的订单id
	        // 返回信息定义
	        $resultMsg = [
	            'code' => 400,
	            'message' => '支付验证失败',
				'result' => '',
	        ];
	        // 验证票据结果
	        $result = $this->iosVerifyTickets($receipt);
	        // 沙盒模式
	        if ($result['status'] == 21007) {
	            $result = $this->iosVerifyTickets($receipt, true);
	        }

			// // 设置超时时间为1秒
			// $timeout_seconds = 1;
			// // ~~~~~~~~~~~~~~~~~~~~~此处苹果服务器长时间不回复导致订单失败的情况。模拟延迟,使请求超时
			// sleep($timeout_seconds + 1);
			// // 请求超时,将 $result 设置为空
			// $result = null;

	        if (!is_array($result)) {//大概率是超时
	            $resultMsg['code'] = 403;
				$resultMsg['message'] = '支付验证超时,请重新拉起支付验证本次结果...';
	        }
	        if ($result['status'] == 0) {//验证成功
				$resultMsg['result'] = $result;	//返回校验结果
	            //当订购一个套餐后再次订购此套餐可能会出现这种情况,非常规操作
	            if (empty($transaction)) {
	                $resultMsg['code'] = 402;
	            }else{
						$resultMsg['code'] = 401;
						$resultMsg['message'] = '支付验证成功';
						Db::startTrans(); // 开启事务
						try {
						    // 更新订单信息
							$res=Db::table('xxxxxxx')->where(['order_no'=>$orderId,'status'=>0])->find();//~~~~~~~~~~~~找到订单记录							if($res)
							{
							    Db::table('xxxxxxx')->where(['order_no'=>$orderId,'status'=>0])->update(["status"=>1,"updatetime"=>time()]);//~~~~~~~~~~~~~~~~~修改为已支付
							    Db::table('xxxxxxx').....//~~~~~~~~~~~~~~发放购买内容
							}
						    Db::commit(); // 提交事务
						} catch (Exception $e) {
							Db::rollback(); // 事务回退
						}
					// }
				}
	        } else {
	            $resultMsg['code'] = 400;
	        }
	        // return response()->json($resultMsg);
			$this->success("success",$resultMsg);
	    }
		/**
		 * 已支付但未关闭的订单从表中获取必要数据   order_no money
		 */
		public function getVerifyData()
		{
		    if ($this->request->isPost()) {
		        $params["user_id"] = $this->auth->id;
		        try {
		                    // ~~~~~~~~~~~~~~~~~~~~~获取最大ID对应的订单号和充值金额
		                    $result = Db::table("xxxxxxx")
		                        ->where('user_id', $params["user_id"])
		                        ->order('id', 'desc')
		                        ->limit(1)
		                        ->find();

		                    if (!$result) {
		                        throw new \think\Exception('未找到相关订单信息!', 100006);
		                    }
							if($result['status'] == 1){	//~~~~~~~~~~数据库判断订单状态的字段,根据自己的修改。余额加上了,直接关闭订单
								$this->success("success", [
								    'close_order' => true // 设置关闭订单标志为true
								]);
							}
							if($result['status'] == 0){ //~~~~~~~~~~~~~~~~数据库判断订单状态的字段,根据自己的修改。余额没加上,返回订单号和充值金额重新进行校验
								$this->success("success", [
									'close_order' => false, // 设置关闭订单标志为false
								    'order_no' => $result['order_no'],
								    'money' => $result['money']
								]);
							}


		                } catch (\think\Exception $e) {
		                    $this->error($e->getMessage());
		                }
		    }
		    return $this->error('post请求');
		}
		/**
	     * ios验证票据
	     * @param string $receipt
	     * @param false $sandbox
	     * @return array|int|mixed
	     * @throws Exception
	     */
	    protected function iosVerifyTickets(string $receipt, bool $sandbox = false)
	    {
	        if ($sandbox) {
	            $url = 'https://sandbox.itunes.apple.com/verifyReceipt'; // 测试环境
	        } else {
	            $url = 'https://buy.itunes.apple.com/verifyReceipt'; // 正式环境
	        }
	        $params = json_encode(array("receipt-data" => $receipt));
	        $curl = curl_init($url);
	        curl_setopt($curl, CURLOPT_RETURNTRANSFER, 1);
	        curl_setopt($curl, CURLOPT_POST, 1);
	        curl_setopt($curl, CURLOPT_POSTFIELDS, $params);
	        curl_setopt($curl, CURLOPT_SSL_VERIFYPEER, false);
	        curl_setopt($curl, CURLOPT_SSL_VERIFYHOST, false);
	        $data = curl_exec($curl);
	        $errno = curl_errno($curl);
	        curl_close($curl);
	        $data = json_decode($data, true);
	        if (!is_array($data)) { // 开发过程中经常遇到curl 35错误码,或者28超时
	            return $errno;
	        }
	        return $data;
	    }
4、其他内容:
说明:
    由于当前这个app需要加的内容是余额充值和会员的购买,所以小编将上面的内容写成了两份 ,每份的产品id不一样,但逻辑是大致相同的,小伙伴可以根据自己情况进行开发。
    会员的购买小编使用了非续期订阅的方式,如果是自动续期的好像还和这种有些地方不同,有需要的小伙伴可以根据自己情况继续研究。


 7105
7105

 被折叠的 条评论
为什么被折叠?
被折叠的 条评论
为什么被折叠?
 到【灌水乐园】发言


