


有没有人和我一样觉得axios官方文档读的一愣一愣的?经过视频课程学习我们梳理一下axios的用法。下面我们话不多说,直接上代码示例:
// axios.html

<p sclass="my-p">
<script>
axios({
	// 请求类型
	method: 'GET',		// 不写默认为GET
	// URL
	url: 'http://xxxxx/yy'
}).then(response =>{
	console.log(result)
	// 将结果插入到p标签
	console.log(result.data.join('<br>'))		// A<br>B<br>C<br>D
	document.querySelector('my-p').innerHTML = result.data.join('<br>')
	// ABCD每个字母换行输出
})
</script>
该代码中,我们请求到了ABCD四个数据,并通过处理渲染到HTML页面上呈现换行输出的效果
axios介绍
定义:Axios 是一个基于 promise 网络请求库,作用于node.js 和浏览器中
作用:
- 从浏览器创建 XMLHttpRequests
- 从 node.js 创建 http 请求
- 支持 Promise API
- 拦截请求和响应
- 转换请求和响应数据
- 取消请求
- 超时处理
- 查询参数序列化支持嵌套项处理
- 自动将请求体序列化为:
- JSON (application/json)
- Multipart / FormData (multipart/form-data)
- URL encoded form (application/x-www-form-urlencoded)
- 将 HTML Form 转换成 JSON 进行请求
- 自动转换JSON数据
- 获取浏览器和 node.js 的请求进度,并提供额外的信息(速度、剩余时间)
- 为 node.js 设置带宽限制
- 兼容符合规范的 FormData 和 Blob(包括 node.js)
- 客户端支持防御XSRF
安装:npm install axios 或 yarn add axios
为了直接使用 require 导入预构建的 CommonJS 模块(如果您的模块打包器无法自动解析它们),我们提供了以下预构建模块:
const axios = require('axios/dist/browser/axios.cjs'); // browser
const axios = require('axios/dist/node/axios.cjs'); // node
接口文档
接口文档:描述接口的文章
接口:使用AJAX和服务器通讯时使用的URL、请求方法、参数
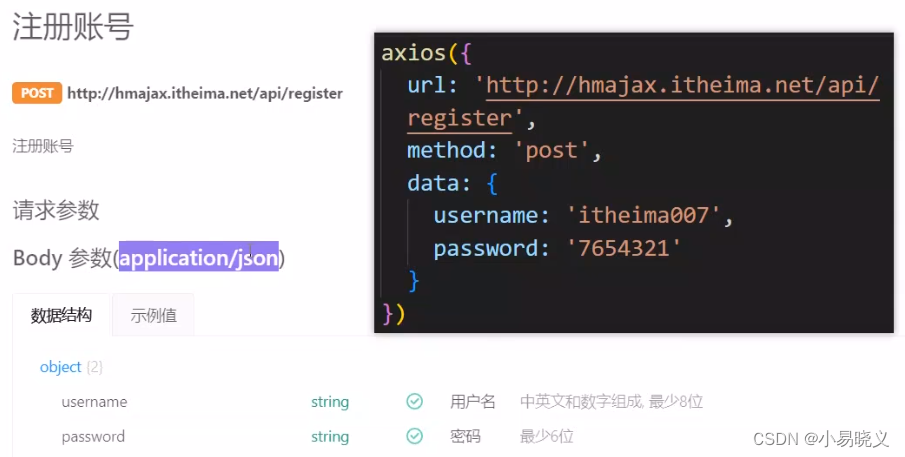
注意:axios会将data中的对象默认转成json格式的数据
URL
定义:统一资源定位符
组成:协议(http) + 域名(baidu.com) + 资源路径(api/xxx)
如:http://baidu.com/api/xxx
HTTP协议【超文本传输协议】
定义:规定了浏览器发送及服务器返回内容的格式
HTTP报文的流动方向:一次HTTP请求,HTTP报文会从“客户端”流到“代理”再流到“服务器”,在服务器工作完成之后,报文又会从“服务器”流到“代理”再流到“客户端”。
请求报文
定义:浏览器按照HTTP协议要求的格式,发送给服务器的内容
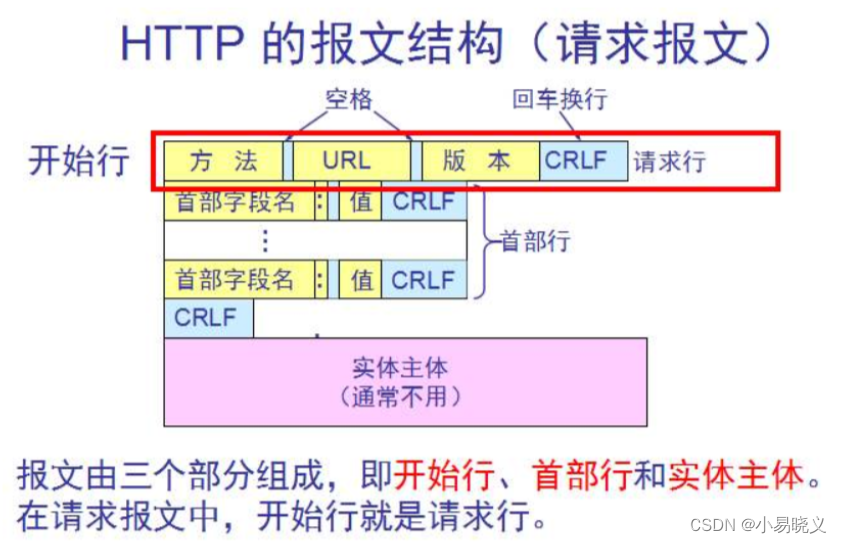
组成部分:
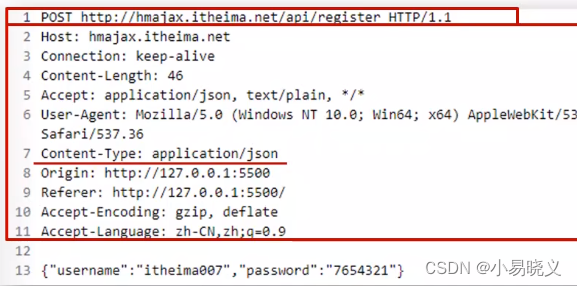
- 请求行:请求方法、URL、协议
- 请求头:以键值对的格式携带的附加信息,如:Content-Type(浏览器携带的内容类型)
- 空行:分割请求头,空行之后是发送给服务器的资源
- 请求体:发送的资源,包含所有二进制数据和文本。
① 常见的请求方法
| 请求方法 | 操作 |
|---|---|
| GET | 获取数据 |
| POST | 提交数据 |
| PUT | 修改数据(全部) |
| DELETE | 删除数据 |
| PATCH | 修改数据(部分) |
② 常见的请求头
Content-Type:内容的类型
| 常见类型 | 含义 |
|---|---|
| text/html | 用于浏览器间响应 |
| x-www-form-urlencoded | 纯⽂本表单的提交⽅式 |
| multitype/form-data | 含有⼆进制⽂件时的提交⽅式 |
| application/json | json格式 |
Content-Length:指定 Body 的⻓度(字节)
Location:指定重定向的⽬标 URL
User-Agent:⽤户代理,即是谁发送或接受响应的,可以用来区分浏览器发送的请求还是手机发送的请求。
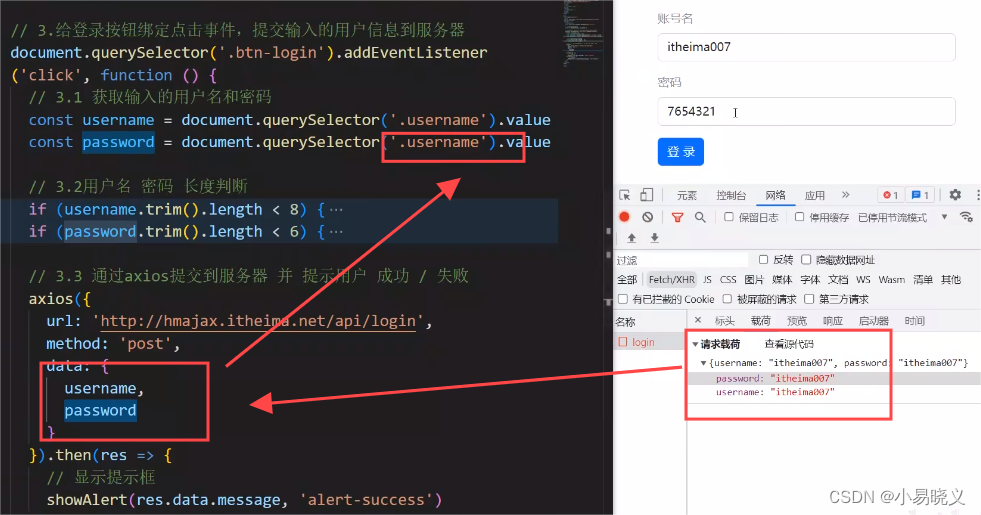
错误排查
网络请求查看:F12 ———> Fetch/XHR:过滤监测请求方式
标头:请求行、请求头;载荷:请求体
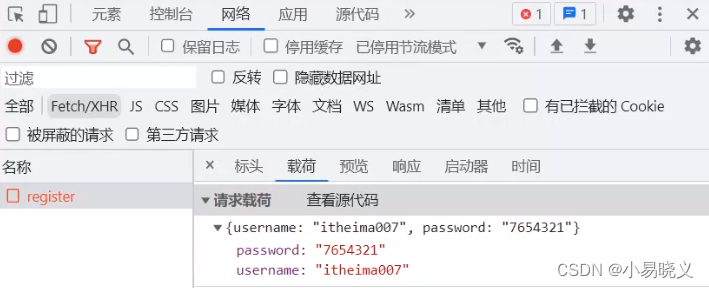
发送登录验证出现错误,右键密码点击检查,将type=password改为type=text,发现密码正确。检查网络请求报文传输的数据,发现误将密码的值写成用户名的值
响应报文
定义:服务器按HTTP协议要求的格式,返回给浏览器的内容
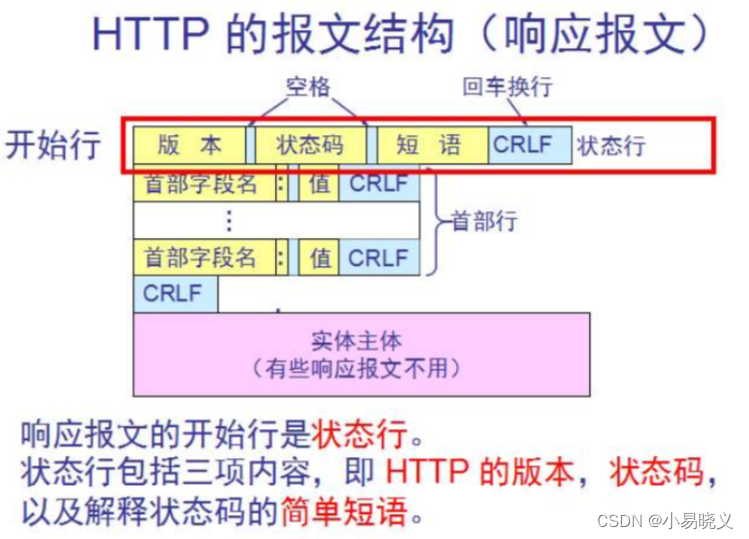
组成部分:
- 响应行:协议、HTTP响应状态码、状态信息
- 响应头:以键值对的格式携带的附加信息,如:Content-Type
- 空行:分割请求头,空行之后是发送给服务器的资源
- 响应体:返回的资源
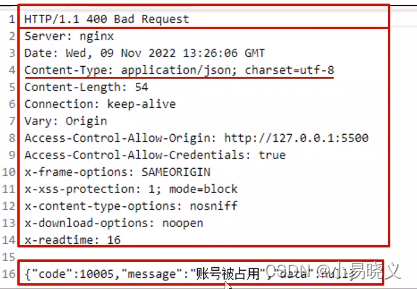
① HTTP响应状态码:表明请求是否成功
| 状态码 | 说明 |
|---|---|
| 1xx | 服务器收到请求,需要继续处理。如101表示服务器将通知客户端使用更高版本的HTTP协议 |
| 2xx | 请求成功。如200表示请求希望的响应头或数据体将随此响应返回 |
| 3xx | 重定向。如302表示临时重定向,请求将包含一个新的URL地址,客户端将会对新地址进行GET请求 |
| 4xx | 客户端错误。如404表示客户端请求资源不存在 |
| 5xx | 服务器错误。如500表示服务器遇到意料外的情况,导致无法完成响应 |
URL 查询参数
定义:浏览器提供给服务器的额外信息,让服务器返回浏览器想要的数据
语法:http://xxxx.com/yyy?参数名1=值1&参数名2=值2

axios查询参数:params
// 目标资源地址?参数名1=值1&参数名2=值2
axios({
	url: '目标资源地址',
	params: {
		参数名1: 值1,	// 属性名为后端定义,属性值为变量随便写
		参数名2: 值2	// es5中若参数名与值相同则可简写为一个
	}
}).then(res => {
	// 数据处理
})
axios配置
请求配置 Request Config
{
	url: '/user',
	method: 'get',
	baseURL: 'http://xxx.com/api/'	,	// 默认地址

	// 处理发送请求的数据
	transformRequest: [function (data, headers) {
    	// Do whatever you want to transform the data
    	return data;
  	}],

  	// 处理接收响应的数据
  	transformResponse: [function (data) {
    	// Do whatever you want to transform the data
    	return data;
  	}],

  	// 请求头
  	headers: {'X-Requested-With': 'XMLHttpRequest'},

  	// 查询参数 http://xxx.com/api/user?ID=1234
  	params: {
		ID: 1234
	},
  	data: 'Country=Brasil&City=Belo Horizonte',

  	// 延迟中断时间
  	timeout: 1000,

  	// 跨域请求时对cookie携带设置
  	withCredentials: false, // 默认不携带

  	// 对请求的适配器做设置【①AJAX ②nodejs的HTTP请求】
  	adapter: function (config) {
    	/* ... */
    }

    // 设置用户名密码。【使用较少】
    auth: {
		  username: 'janedoe',
		  password: 's00pers3cret'
	},

	// 设置响应体
	responseType: 'json',		// default
	// 设置响应结果编码字符集
	 responseEncoding: 'utf8', 		// default
	 // 设置跨域标识(安全设置,保证是自己的客户端而不是未知的,避免跨站攻击)
	 xsrfCookieName: 'XSRF-TOKEN',		 // default
	 xsrfHeaderName: 'X-XSRF-TOKEN',		 // default

	 // 设置上传和下载时的回调
	 onUploadProgress: function ({loaded, total, progress, bytes, estimated, rate, upload = true}) {
	    // Do whatever you want with the Axios progress event
	  },
	 onDownloadProgress: function ({loaded, total, progress, bytes, estimated, rate, download = true}) {
	    // Do whatever you want with the Axios progress event
	  },

	// 设置HTTP响应体的最大尺寸	【字节】
	maxContentLength: 2000,
	// 设置HTTP请求体的最大尺寸	【字节】
	maxBodyLength: 2000,

	// 设置响应结果的成功的范围
	validateStatus: function (status) {
	    return status >= 200 && status < 300;	 // default
	  },

	 // 设置最大跳转次数【nodejs中使用】
	 maxRedirects: 21, 	// default
	 // 重定向请求中添加认证或其他自定义行为
	 beforeRedirect: (options, { headers }) => {
	    if (options.hostname === "example.com") {
	      options.auth = "user:password";
	    }
	  },

	// 向docker的守护进程发送请求
	// Only either `socketPath` or `proxy` can be specified.
	socketPath: null,		// default

	// nodejs代理配置
	proxy: {
	    protocol: 'https',
    	host: '127.0.0.1',
    	// hostname: '127.0.0.1' // Takes precedence over 'host' if both are defined
   		port: 9000,
	    auth: {
		      username: 'mikeymike',
		      password: 'rapunz3l'
		 }
	}

	// 取消Ajax请求
	cancelToken: new CancelToken(function (cancel) {}),
}
响应结构 Response Config
{
  // `data` is the response that was provided by the server
  data: {},

  // `status` is the HTTP status code from the server response
  status: 200,

  // `statusText` is the HTTP status message from the server response
  statusText: 'OK',

  // `headers` the HTTP headers that the server responded with
  // All header names are lowercase and can be accessed using the bracket notation.
  // Example: `response.headers['content-type']`
  headers: {},

  // `config` is the config that was provided to `axios` for the request
  config: {},

  // `request` is the request that generated this response
  // It is the last ClientRequest instance in node.js (in redirects)
  // and an XMLHttpRequest instance in the browser
  request: {}
}
代码示例
GET请求
axios({
	url:‘请求的网址’,
	method:'get',		// 可省略
	params: {				// 查询参数
		参数名1: 值1,	// 属性名为后端定义,属性值为变量随便写
		参数名2: 值2	// es6中若参数名与值相同则可简写为一个
	}
}).then()
POST请求
axios({
	url:‘请求的网址’,
	method:'post',
	data:{		// 提交数据
		属性名1: '属性值1',
		属性名2: '属性值2'
	}
}).then()
axios错误处理
axios({
	// 请求选项
}).then(result => {
	// 处理数据
}).catch(error => {
	// 处理错误
	console.log(error)
	alert(error.data.xxx)		// 显示错误信息
})
axios默认配置
默认请求类型axios.default.method = 'GET'
默认基础URLaxios.default.baseURL = 'http://localhost:3000'
默认请求参数axios.default..params = { id:100 }
axios自定义实例
const instance = axios.create({
  baseURL: 'https://api.example.com',
  timeout: 2000
});
instance.defaults.headers.common['Authorization'] = AUTH_TOKEN;

// 用法一
instance({
	url: '/user',
}).then({})

// 用法二
instance.get('/user').then({})
axios请求别名
axios.request(config)
axios.request({
	method: 'GET',
	url: 'URL'
}).then(response => {
	console.log(response)
})
axios.get(url[, config])
axios.delete(url[, config])
axios.head(url[, config])
axios.options(url[, config])
axios.post(url[, data[, config]])
axios.post('URL',{
	// data请求体对象
}).then({})
axios.put(url[, data[, config]])
axios.patch(url[, data[, config]])
axios拦截器
作用:在请求或响应被 then 或 catch 处理前拦截它们。
执行顺序:
①请求拦截器:发送请求前借助回调函数对参数和内容进行检查和处理【代码后进先执行】
②响应拦截器:结果接收之前进行检查或预处理【代码后进后执行】
③最后再由用户自定义处理
// 设置请求拦截器
axios.interceptors.request.use(function (config) {
    // 在发送请求之前做些什么
    console.log('请求拦截器 成功')
    return config;
  }, function (error) {
    // 对请求错误做些什么
    console.log('请求拦截器 失败')
    return Promise.reject(error);
  });

// 设置响应拦截器
axios.interceptors.response.use(function (response) {
    // 2xx 范围内的状态码都会触发该函数。
    // 对响应数据做点什么
     console.log('响应拦截器 成功')
    return response;
  }, function (error) {
    // 超出 2xx 范围的状态码都会触发该函数。
    // 对响应错误做点什么
    console.log('响应拦截器 失败')
    return Promise.reject(error);
  });

// 发送请求
axios({
	method: 'GET',
	url: 'http://localhost:3000/api'
}).then(response => {
	console.logI('自定义回调处理成功结果')
}).catch(error => {
	console.logI('自定义回调失败')
})
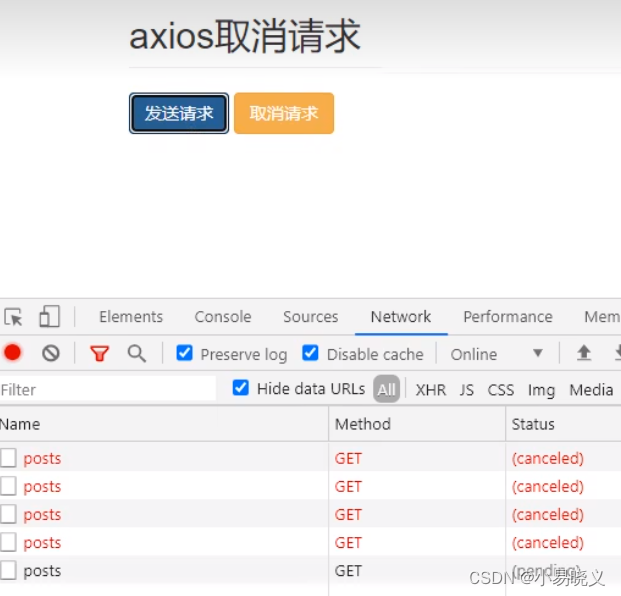
axios取消请求
AbortController【v0.22.0 开始,Axios 支持以 fetch API 方式取消请求】
const controller = new AbortController();

axios.get('/foo/bar', {
   signal: controller.signal
}).then(function(response) {
   //...
});
// 取消请求
controller.abort()
CancelToken【此 API 从 v0.22.0 开始已被弃用,不应在新项目中使用。】
方法1:使用 CancelToken.source 工厂方法创建一个 cancel token
const CancelToken = axios.CancelToken;
const source = CancelToken.source();

axios.get('/user/12345', {
  cancelToken: source.token
}).catch(function (thrown) {
  if (axios.isCancel(thrown)) {
    console.log('Request canceled', thrown.message);
  } else {
    // 处理错误
  }
});

axios.post('/user/12345', {
  name: 'new name'
}, {
  cancelToken: source.token
})

// 取消请求(message 参数是可选的)
source.cancel('Operation canceled by the user.');
方法2:通过传递一个 executor 函数到 CancelToken 的构造函数来创建一个 cancel token。可通过cancel的值判断请求是否发送了
const CancelToken = axios.CancelToken;
// 2. 声明全局变量
let cancel = null;

// 检测上一次的请求是否已经完成
if(cancel !== null){    // 未完成
	// 取消上一次的请求
	cancel();
}

axios.get('/user/12345', {
	// 1. 添加配置对象的属性
   cancelToken: new CancelToken(function executor(c) {		// executor 函数接收一个 cancel 函数作为参数
    // 3. 将 c 的值赋给 cancel
    cancel = c;
  })
}).then(response => {
	console.log(response)
	// 将cancel的值初始化
	cancel = null
})

// 取消请求
cancel();
上面代码实现的效果:在上一次消息未发送完成时,每次点击发送请求的按钮都会取消上一次的请求。


 4462
4462


 被折叠的 条评论
为什么被折叠?
被折叠的 条评论
为什么被折叠?
 到【灌水乐园】发言


