


MyBatis首页![]() https://mybatis.net.cn/
https://mybatis.net.cn/
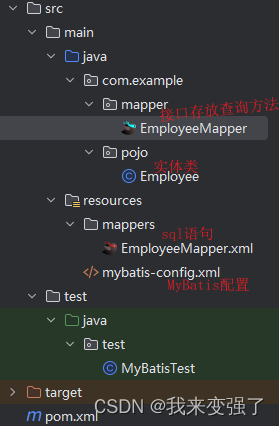
1.项目目录
2.数据库
CREATE DATABASE `mybatis-example`;

USE `mybatis-example`;

CREATE TABLE `t_emp`(
  emp_id INT AUTO_INCREMENT,
  emp_name CHAR(100),
  emp_salary DOUBLE(10,5),
  PRIMARY KEY(emp_id)
);

INSERT INTO `t_emp`(emp_name,emp_salary) VALUES("lamu",200.33);
INSERT INTO `t_emp`(emp_name,emp_salary) VALUES("leimu",666.66);
INSERT INTO `t_emp`(emp_name,emp_salary) VALUES("486",777.77);
3.依赖导入pom.xml
<dependencies>
  <!-- mybatis依赖 -->
  <dependency>
      <groupId>org.mybatis</groupId>
      <artifactId>mybatis</artifactId>
      <version>3.5.11</version>
  </dependency>

  <!-- MySQL驱动 mybatis底层依赖jdbc驱动实现,不需要导入连接池,mybatis自带! -->
  <dependency>
      <groupId>mysql</groupId>
      <artifactId>mysql-connector-java</artifactId>
      <version>8.0.25</version>
  </dependency>

  <!--junit5测试-->
  <dependency>
      <groupId>org.junit.jupiter</groupId>
      <artifactId>junit-jupiter-api</artifactId>
      <version>5.3.1</version>
  </dependency>

  <dependency>
      <groupId>org.projectlombok</groupId>
      <artifactId>lombok</artifactId>
      <version>1.18.28</version>
      <scope>provided</scope>
  </dependency>
</dependencies>
4.实体类
@Data
public class Employee {

    private Integer empId;
    private String empName;
    private Double empSalary;

    @Override
    public String toString() {
        return "Employee{" +
                "empId=" + empId +
                ", empName='" + empName + '\'' +
                ", empSalary=" + empSalary +
                '}';
    }
}
5.定义mapper接口
public interface EmployeeMapper {
    Employee queryById(Integer id);

    //int返回值用于接受受影响的行数
    int insertEmployee(Employee employee);

    //根据工资查询员工信息
    List<Employee> queryBySalary(Double salary);

    //根据员工姓名和工资查询员工信息
    List<Employee> queryByNameAndSalary(@Param("param1") String name, @Param("param2") Double salary);

    //插入员工数据,传入的是一个map(name=员工的名字,salary=员工的薪水)
    //mapper接口中不允许重载!!! 方法名重复了  id名重复了!
    int insertEmpMap(Map data);

    //员工插入
    int insertEmp(Employee employee);
}
6.准备MyBatis配置文件
<?xml version="1.0" encoding="UTF-8" ?>
<!DOCTYPE configuration
        PUBLIC "-//mybatis.org//DTD Config 3.0//EN"
        "http://mybatis.org/dtd/mybatis-3-config.dtd">
<configuration>

    <settings>
        <!-- 开启了 mybatis的日志输出,选择使用system进行控制台输出-->
        <setting name="logImpl" value="STDOUT_LOGGING"/>

        <!--开启驼峰式自动映射 数据库 a_column->java aColumn -->
        <setting name="mapUnderscoreToCamelCase" value="true"/>
    </settings>
    <!-- 定义自己类的别名 -->
    <typeAliases>
        <!-- 单独定义 -->
        <!--        <typeAlias type="com.example.pojo.Employee" alias="hahaha" />-->
        <!-- 批量将包下的类给与别名,别名就是类的首字母小写! -->
        <package name="com.example.pojo"/>
    </typeAliases>
    <!-- environments表示配置Mybatis的开发环境,可以配置多个环境,在众多具体环境中,使用default属性指定实际运行时使用的环境。default属性的取值是environment标签的id属性的值。 -->
    <environments default="development">
        <!-- environment表示配置Mybatis的一个具体的环境 -->
        <environment id="development">
            <!-- Mybatis的内置的事务管理器
                 MANAGED  不会自动开启事务!  | JDBC 自动开启事务  , 需要自己提交事务!
            -->
            <transactionManager type="JDBC"/>
            <!-- 配置数据源
                 type=POOLED  mybatis帮助我们维护一个链接池 | UNPOOLED  每次都新建或者释放链接
            -->
            <dataSource type="POOLED">
                <!-- 建立数据库连接的具体信息 -->
                <property name="driver" value="com.mysql.cj.jdbc.Driver"/>
                <property name="url" value="jdbc:mysql://localhost:3306/mybatis-example"/>
                <property name="username" value="root"/>
                <property name="password" value="123456"/>
            </dataSource>
        </environment>
    </environments>
    <mappers>
        <!-- Mapper注册:指定Mybatis映射文件的具体位置 -->
        <!-- mapper标签:配置一个具体的Mapper映射文件 -->
        <!-- resource属性:指定Mapper映射文件的实际存储位置,这里需要使用一个以类路径根目录为基准的相对路径 -->
        <!--      对Maven工程的目录结构来说,resources目录下的内容会直接放入类路径,所以这里我们可以以resources目录为基准 -->
        <mapper resource="mappers/EmployeeMapper.xml"/>
    </mappers>

</configuration>
7.定义mapper xml
- 方法名和SQL的id一致
- 方法返回值和resultType一致
- 方法的参数和SQL的参数一致
<?xml version="1.0" encoding="UTF-8" ?>
<!DOCTYPE mapper
        PUBLIC "-//mybatis.org//DTD Mapper 3.0//EN"
        "https://mybatis.org/dtd/mybatis-3-mapper.dtd">

<!--  namespace =  mapper对应接口的全限定符 -->
<mapper namespace="com.example.mapper.EmployeeMapper">
    <select id="queryById" resultType="com.example.pojo.Employee">
        select emp_id empId , emp_name empName , emp_salary empSalary
        from t_emp where emp_id = ${id}
    </select>
    <insert id="insertEmployee">
        insert into t_emp(emp_name,emp_salary) values(#{empName},#{empSalary})
    </insert>

    <!--zai配置中typeAliases标签声明批量将包下的类给与别名,别名就是类的首字母小写-->
    <select id="queryBySalary" resultType="Employee">
        select emp_id empId , emp_name empName , emp_salary empSalary
        from t_emp where emp_salary = #{ salary }
    </select>

    <!--
        场景3: 传入多个简单类型数据如何取值 key!
                可以不可以随便写? 不可以!
                按照形参名称获取? 也不可以!
                方案1: 注解指定  @Param注解  指定多个简单参数的key   key = @Param("value值")  [推荐]
                方案2: mybatis默认机制
                        argo arg1 .... 形参左到右依次对应 argo arg1..
                        (name,salary) name-> key = arg0  salary -> key = arg1
                        param1 param2 ....
                        (name,salary) name-> key = param1  salary -> key = param2
    -->
    <select id="queryByNameAndSalary" resultType="Employee">
        select emp_id empId , emp_name empName , emp_salary empSalary
        from t_emp where emp_name = #{param1} and emp_salary = #{param2}
    </select>
<!--    <select id="queryByNameAndSalary" resultType="com.example.pojo.Employee">-->
<!--        select emp_id empId , emp_name empName , emp_salary empSalary-->
<!--        from t_emp where emp_name = #{arg0} and emp_salary = #{arg1}-->
<!--    </select>-->

    <!-- 场景4: 传入map 如何指定key的值
                 key = map的key即可!
     -->
    <insert id="insertEmpMap">
        insert into t_emp (emp_name , emp_salary )  values (#{name},#{salary});
    </insert>


    <!--输出:
       场景1: 返回单个简单类型如何指定  resultType的写法! 返回值的数据类型!!
               resultType语法:
                   1.类的全限定符号
                   2.别名简称
                      mybatis给我们提供了72种默认的别名!
                      这些都是我们常用的Java数据类型!  [java的常用数据类型]
                             基本数据类型 int  double  -> _int _double
                             包装数据类型 Integer Double  -> int integer double
                             集合容器类型 Map List  HashMap -> 小写即可 map list hashmap

                扩展:如果没有没有提供的需要自己定义或者写类的全限定符号
                   给自己声明的类如何定义别名:
                   mybatis-config.xml
                     给类单独定义别名!!!
                      <typeAliases>
                          <typeAlias type="com.example.pojo.Employee" alias="hahaha" />
                      </typeAliases>
                      批量设置:
                       <typeAliases>
                           批量将包下的类给与别名,别名就是类的首字母小写!
                           <package name="com.example.pojo"/>
                       </typeAliases>
                       扩展,如果不想使用批量的别名,可以使用注解给与名字!
                       @Alias("hahaha")
    -->

    <select id="queryNameById" resultType="string">
        select emp_name from t_emp where emp_id = #{id}
    </select>

    <select id="querySalaryById" resultType="_double">
        select emp_salary from t_emp where emp_id = #{id}
    </select>

    <!--
       场景2: 返回单个自定义类类型
        //返回单个自定义实体类型
        Employee queryById(Integer id);
        resultType : 返回值类型即可

        默认要求:
           查询,返回单个实体类型,要求列名和属性名要一致!
           这样才可以进行实体类的属性映射!

        但是可以进行设置,设置支持驼峰式自动映射!
           emp_id  -> empId ===  empId
        mybatis-config.xml
        <setting name="mapUnderscoreToCamelCase" value="true"/>
    -->

    <select id="queryById1" resultType="employee" >
        select  *
        from t_emp where emp_id = ${id}
    </select>


    <!-- 场景3: 返回map
                 当没有实体类可以使用接值的时候!
                 我们可以使用map接受数据!
                 key - > 查询的列
                 value -> 查询的值
    -->
    <select id="selectEmpNameAndMaxSalary" resultType="map">
        SELECT
        emp_name 员工姓名,
        emp_salary 员工工资,
        (SELECT AVG(emp_salary) FROM t_emp) 部门平均工资
        FROM t_emp WHERE emp_salary=(
        SELECT MAX(emp_salary) FROM t_emp
        )
    </select>

    <!--
       场景4: 返回的是集合类型如何指定
        //查询工资高于传入值的员工姓名们 200
        List<String> queryNamesBySalary(Double salary);

        //查询全部员工信息
        List<Employee> queryAll();
        Employee queryById();

        切记: 返回值是集合。resultType不需要指定集合类型,只需要指定泛型即可!!
        为什么?
            mybatis -> ibatis -> selectOne 单个  | selectList 集合 ->  selectOne中 调用 [ selectList ]
    -->
    <select id="queryNamesBySalary" resultType="string">
        select emp_name from t_emp where emp_salary > #{ salary }
    </select>

    <select id="queryAll" resultType="employee">
        select * from t_emp
    </select>


    <!--
       场景5: 主键回显 获取插入数据的主键
          1. 自增长主键回显 mysql  auto_increment
            //员工插入
            int insertEmp(Employee employee);
            useGeneratedKeys="true" 我们想要数据库自动增强的主键值
            keyColumn="emp_id" 主键列的值!!!
            keyProperty="empId" 接收主键列值的属性!!!
    -->
    <insert id="insertEmp" useGeneratedKeys="true" keyColumn="emp_id" keyProperty="empId">
        insert into t_emp (emp_name,emp_salary)
        value(#{empName},#{empSalary});
    </insert>

    <!--
       期望,非自增长的主键,交给mybatis帮助我们维护!
    -->
    <insert id="insertxxx">
        <!-- 插入之前,先指定一段sql语句,生成一个主键值!
             order="before|after" sql语句是在插入语句之前还是之后执行!
             resultType = 返回值类型
             keyProperty = 查询结果给哪个属性赋值

              //自己维护主键
                String id = UUID.randomUUID().toString().replaceAll("-", "")
                teacher.settId(id);
        -->
        <selectKey order="BEFORE" resultType="string" keyProperty="tId">
            SELECT  REPLACE(UUID(),'-','');
        </selectKey>

        INSERT INTO teacher (t_id,t_name)
        VALUE(#{tId},#{tName});
    </insert>

    <!--
        Teacher queryById(String tId);
        列名和属性不一致如何解决:
           方案1: 别名  select t_id tId , t_name tName from teacher where t_id = #{tId}
           方案2: 开启驼峰式映射  <setting name="mapUnderscoreToCamelCase" value="true"/>
                  t_id  tId 自动映射
           方案3: resultMap自定义映射  (resultType和resultMap二选一)
                 resultType按照规则自动映射  按照是否开启驼峰式映射,自己映射属性和列名! 只能映射一层结构!
                 深层次的对象结构无法映射,多表查询的时候结果无法映射!

                 Order                  -   数据库
                    orderId                        order_id
                    orderName                      order_name
                    OrderItem orderItem
                                 item_id           item_id

                resultMap标签,自定义映射关系,可以深层次可以单层次!!!
     -->

    <!-- 声明resultMap标签,自己定义映射规则
               id标识 -> select resultMap="标识"
               type   -> 具体的返回值类型 全限定符和别名 | 集合只写泛型即可
                   <id 主键映射关系
                   <result 普通列的映射关系
    -->
    <resultMap id="tMap" type="employee">
        <id column="emp_id" property="empId" />
        <result  column="emp_name" property="empName"/>
    </resultMap>

    <select id="queryById2"  resultMap="tMap">
        select * from teacher where t_id = #{tId}
    <!--select t_id tId , t_name tName from teacher where t_id = #{tId}-->
    </select>
</mapper>
8.测试
public class MyBatisTest {
    @Test
    public void test() throws IOException {
        //读取外部配置文件
        InputStream ips = Resources.getResourceAsStream("mybatis-config.xml");
        SqlSessionFactory sf = new SqlSessionFactoryBuilder().build(ips);
        //openSession自动开启事务,不会自动提交 !
        //openSession(true)自动开启事务,自动提交事务!  不需要sqlSession.commit();
        SqlSession session = sf.openSession(true);
        EmployeeMapper mapper = session.getMapper(EmployeeMapper.class);

        Employee employee = new Employee();
        employee.setEmpSalary(8888.0);
        employee.setEmpName("艾米莉亚");

        System.out.println(employee.getEmpId());

        System.out.println("----------------------");
        int rows =  mapper.insertEmp(employee);
        System.out.println("rows = " + rows);
        System.out.println(employee.getEmpId());
        session.close();
    }
}


 2061
2061


 被折叠的 条评论
为什么被折叠?
被折叠的 条评论
为什么被折叠?
 到【灌水乐园】发言


