


文章目录
04 Spring集成MyBatis
将 MyBatis 与 Spring 进行整合,主要解决的问题就是将 SqlSessionFactory 对象交由 Spring 来管理。所以,该整合只需要将 SqlSessionFactory 的对象生成器 SqlSessionFactoryBean 注册在 Spring 容器中,再将其注入给 Dao 的实现类即可完成整合。
实现 Spring 与 MyBatis 的整合。常用的方式:扫描的 Mapper 动态代理。Spring 像插线板一样,mybatis 框架是插头,可以容易的组合到一起。插线板 spring 插上 mybatis,两个框架就是一个整体。
4.1 Spring的事务管理
事务原本是数据库中的概念,在实际项目的开发中,进行事务的处理一般是在业务逻辑层, 即 Service 层。这样做是为了能够使用事务的特性来管理关联操作的业务。
在 Spring 中通常可以通过以下两种方式来实现对事务的管理:
(1)使用 Spring 的事务注解管理事务
(2)使用 AspectJ 的 AOP 配置管理事务(声明式事务管理)
4.2 Spring中事务的五大隔离级别
- 读未提交(Read Uncommitted):允许脏读,也就是可能读取到其他会话中未提交事务修改的数据
- 读已提交(Read Committed):只能读取到已经提交的数据。Oracle等多数数据库默认都是该级别 (不重复读)
- 可重复读(Repeated Read):可重复读。在同一个事务内的查询都是事务开始时刻一致的,InnoDB默认级别。在SQL标准中,该隔离级别消除了不可重复读,但是还存在幻象读,但是innoDB解决了幻读
- 串行读(Serializable):完全串行化的读,每次读都需要获得表级共享锁,读写相互都会阻塞
![[外链图片转存失败,源站可能有防盗链机制,建议将图片保存下来直接上传(img-0TUD2unA-1658679269317)(../../../../Pictures/Spring/wps289.jpg)]](https://i-blog.csdnimg.cn/blog_migrate/15363a842eca88d92d45838f027121c5.jpeg)
4.3 不同数据库的隔离级别(面试点)
MySQL:mysql默认的事务处理级别是’REPEATABLE-READ’,也就是可重复读
Oracle:oracle数据库支持READ COMMITTED 和 SERIALIZABLE这两种事务隔离级别。
默认系统事务隔离级别是READ COMMITTED,也就是读已提交
4.4 Spring事务的传播特性
![[外链图片转存失败,源站可能有防盗链机制,建议将图片保存下来直接上传(img-14yp3uxn-1658679269318)(../../../../Pictures/Spring/wps290.jpg)]](https://i-blog.csdnimg.cn/blog_migrate/cdcada51ef23a09413d1680a0947136c.jpeg)
总结:
常用
- PROPAGATION_REQUIRED:必被包含事务
- PROPAGATION_REQUIRES_NEW:自己新开事务,不管之前是否有事务
- PROPAGATION_SUPPORTS:支持事务,如果加入的方法有事务,则支持事务,如果没有,不单开事务
- PROPAGATION_NEVER:不能运行中事务中,如果包在事务中,抛异常
- PROPAGATION_NOT_SUPPORTED:不支持事务,运行在非事务的环境
不常用
- PROPAGATION_MANDATORY:必须包在事务中,没有事务则抛异常
- PROPAGATION_NESTED:嵌套事务
4.5 @Transactional的参数讲解
![[外链图片转存失败,源站可能有防盗链机制,建议将图片保存下来直接上传(img-rjBNYKIA-1658679269319)(../../../../Pictures/Spring/wps291.jpg)]](https://i-blog.csdnimg.cn/blog_migrate/c94995a11b39fa08e874818126066c15.jpeg)
示例:
@Transactional(readOnly = false,  // 读写事务
			timeout = -1,    // 事务的超时时间不限制(数据库有异常或没有连接上,等待的时间,但还是要看连接的数据库是如何设置的。
			//noRollbackFor = ArithmeticException.class,  // noRollbackFor设置遇到指定的错误不用回滚。此处是遇到数学异常不回滚
			isolation = Isolation.DEFAULT,   // 事务的隔离级别,数据库的默认
			propagation = Propagation.REQUIRED	// 事务的传播行为,此处是指当前的方法要在事务中去执行。
	)
@Transactional有几点需要注意
- 只能声明在public的method。原因是spring是通过JDK代理或者CGLIB代理的,生成的代理类,只能处理public方法,注解放在类名称上面,这样你配置的这个@Transactional 对这个类中的所有public方法都起作用,@Transactional 在方法名上,只对这个方法有作用,同样必须是public的方法。
- 不能被类内部方法调用。还是因为代理的原因,类内部自调用,不会经过代理类,所以@Transactional不会生效
4.6 MyBatis框架与Hibernate框架使用的事务管理器(面试点)
4.6.1 Spring+MyBatis的事务管理器配置
<!-- 定义事务管理器 -->
<bean id="transactionManager"		class="**org.springframework.jdbc.datasource.DataSourceTransactionManager**">
    <property name="dataSource" ref="dataSource" />
</bean><!--使用注解事务 -->
<tx:annotation-driven  transaction-manager="transactionManager" />
4.6.2 Spring+ Hibernate的事务管理器配置
<!-- 事务管理器配置,单数据源事务 -->
<bean id="transactionManager" class="**org.springframework.orm.hibernate3.HibernateTransactionManager**">
    <property name="sessionFactory" ref="sessionFactory" />
</bean>
<!-- 使用annotation定义事务 -->
<tx:annotation-driven  transaction-manager="transactionManager"  proxy-target-class="true" />
4.7Spring中事务的实现
Spring中事务的实现有两种方式,一种是基于xml文件的实现,一种是基于注解方式实现。在SSM的开发中,多使用注解方式实现事务的处理。
4.7.1 基于xml方式的实现
实现步骤:
(1) 导入相关依赖
<dependencies>
    <!--单元测试-->
    <dependency>
        <groupId>junit</groupId>
        <artifactId>junit</artifactId>
        <version>4.11</version>
        <scope>test</scope>
    </dependency>
    <!--aspectj依赖-->
    <dependency>
        <groupId>org.springframework</groupId>
        <artifactId>spring-aspects</artifactId>
        <version>5.2.5.RELEASE</version>
    </dependency>
    <!--spring核心ioc-->
    <dependency>
        <groupId>org.springframework</groupId>
        <artifactId>spring-context</artifactId>
        <version>5.2.5.RELEASE</version>
    </dependency>
    <!--做spring事务用到的-->
    <dependency>
        <groupId>org.springframework</groupId>
        <artifactId>spring-tx</artifactId>
        <version>5.2.5.RELEASE</version>
    </dependency>
    <dependency>
    <groupId>org.springframework</groupId>
        <artifactId>spring-jdbc</artifactId>
        <version>5.2.5.RELEASE</version>
    </dependency>
    <!--mybatis依赖-->
    <dependency>
        <groupId>org.mybatis</groupId>
        <artifactId>mybatis</artifactId>
        <version>3.5.1</version>
    </dependency>
    <!--mybatis和spring集成的依赖-->
    <dependency>
        <groupId>org.mybatis</groupId>
        <artifactId>mybatis-spring</artifactId>
        <version>1.3.1</version>
    </dependency>
    <!--mysql驱动-->
    <dependency>
        <groupId>mysql</groupId>
        <artifactId>mysql-connector-java</artifactId>
        <version>8.0.22</version>
    </dependency>
    <!--阿里公司的数据库连接池-->
    <dependency>
        <groupId>com.alibaba</groupId>
        <artifactId>druid</artifactId>
        <version>1.1.12</version>
    </dependency> </dependencies><build>
        <!--目的是把src/main/java目录中的xml文件包含到输出结果中。输出到classes目录中-->
        <resources>
        <resource>
        <directory>src/main/java</directory><!--所在的目录-->
            <includes>
                <!--包括目录下的.properties,.xml 文件都会扫描到-->
                <include>**/*.properties</include>
                <include>**/*.xml</include>
            </includes>
            <filtering>false</filtering>
        </resource>
        <resource>
        <directory>src/main/resources</directory>
            <!--所在的目录-->
            <includes>
                <!--包括目录下的.properties,.xml 文件都会扫描到-->
                <include>**/*.properties</include>
                <include>**/*.xml</include>
            </includes>
            <filtering>false</filtering>
        </resource>
        </resources>
</build>
(2) 引入aop名称空间
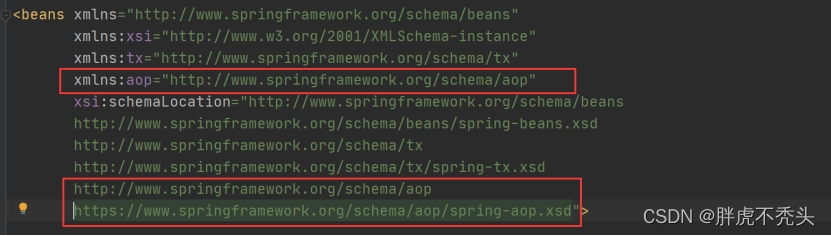
(3) 引入tx名称空间
![[外链图片转存失败,源站可能有防盗链机制,建议将图片保存下来直接上传(img-GS5G5z4O-1658763749526)(../../../../Pictures/Spring/wps293.jpg)] [外链图片转存失败,源站可能有防盗链机制,建议将图片保存下来直接上传(img-VJYlK7N9-1658763749527)(../../../../Pictures/Spring/wps294.jpg)]](https://i-blog.csdnimg.cn/blog_migrate/f9000494870c9f673f96ad5b350d0deb.jpeg)

(4) 配置事务
<!--声明式事务的配置-->
<bean id="transactionManager" class="org.springframework.jdbc.datasource.DataSourceTransactionManager">
    <property name="dataSource" ref="dataSource"></property>
</bean>
<!--使用xml方式声明事务-->
<!--配置切面的属性,哪些方法需要添加什么事务传播特性-->
<tx:advice id="txAdvice" transaction-manager="transactionManager">
    <tx:attributes>
        <tx:method name="*get*" read-only="true"/>
        <tx:method name="*select*" read-only="true"/>
        <tx:method name="*find*" read-only="true"/>
        <tx:method name="*search*" read-only="true"/>
        <tx:method name="*add*" propagation="REQUIRED" />
        <tx:method name="*save*" propagation="REQUIRED" no-rollback-for="ArithmeticException"/>
        <tx:method name="*insert*" propagation="REQUIRED"  no-rollback-for="ArithmeticException"/>
        <tx:method name="*delete*" propagation="REQUIRED"/>
        <tx:method name="*remove*" propagation="REQUIRED"/>
        <tx:method name="*clean*" propagation="REQUIRED"/>
        <tx:method name="*update*" propagation="REQUIRED"/>
        <tx:method name="*modify*" propagation="REQUIRED"/>
        <tx:method name="*set*" propagation="REQUIRED"/>
        <tx:method name="*change*" propagation="REQUIRED"/>
        <tx:method name="*" propagation="SUPPORTS"/>
    </tx:attributes>
</tx:advice>
<!--使用AOP的技术进行切入点织入-->
<aop:config >
    <!--切入点表达式:指定在哪个包下的哪些类中的哪些方法添加事务处理-->
    <aop:pointcut id="pointcat" expression="execution(* com.bjpowernode.service.*.*(..))"></aop:pointcut>
    <!--完成切面与切入点绑定-->
    <aop:advisor advice-ref="txAdvice" pointcut-ref="pointcat"></aop:advisor>
</aop:config>
4.7.2 基于注解方式实现
(1)导入相关依赖(同xml方式)
(2)配置注解驱动
 <!--声明式事务的配置-->
<bean id="transactionManager" class="org.springframework.jdbc.datasource.DataSourceTransactionManager">
    <property name="dataSource" ref="dataSource"></property>
</bean> <!--   配置注解驱动-->
<tx:annotation-driven></tx:annotation-driven>
(3)@Transactional设置传播特性
@Service
//交给Spring接管,进行对象的创建,并且自动注入mapper
@Transactional( propagation = Propagation.*REQUIRED*
               //必须添加事务
               ,readOnly = true
               //只读事务(用于查询操作)
               ,timeout = -1  //设置连接永不超时
               ,noRollbackForClassName = "ArithmeticException"
               //遇到这个异常不回滚事务
               ,isolation = Isolation.*DEFAULT*
              //使用数据库的隔离级别
              ) public class UsersServiceImpl implements UsersService {
4.7.3 Spring+MyBatis整合案例
整合实现步骤:
1.新建maven工程,添加各种依赖
2.修改目录结构
3.添加SqlMapConfig.xml和XXXMapper.xml模板
![[外链图片转存失败,源站可能有防盗链机制,建议将图片保存下来直接上传(img-eXCv8zlV-1658763749527)(../../../../Pictures/Spring/wps295.jpg)] 添加模板内容[外链图片转存失败,源站可能有防盗链机制,建议将图片保存下来直接上传(img-DOwp3gUa-1658763749528)(../../../../Pictures/Spring/wps296.jpg)]](https://i-blog.csdnimg.cn/blog_migrate/027d68c4a24f905de8ab0c910cab3f78.jpeg)

4.添加db.properties文件
5.添加SqlMapConfig.xml文件
6.添加applicationContext_dao.xml文件并实现功能
![[外链图片转存失败,源站可能有防盗链机制,建议将图片保存下来直接上传(img-V4T8vUXW-1658763749528)(../../../../Pictures/Spring/wps297.jpg)]](https://i-blog.csdnimg.cn/blog_migrate/3c4400615f525cbd8ee7a05ace49302f.jpeg)
7.添加applicationContext_service.xml文件并实现功能(注解驱动)
![[外链图片转存失败,源站可能有防盗链机制,建议将图片保存下来直接上传(img-wQmEJWC7-1658763749528)(../../../../Pictures/Spring/wps298.jpg)]](https://i-blog.csdnimg.cn/blog_migrate/e80bb6c9aa1f5561e69832eb8355d2f5.jpeg)
8.添加applicationContext_trans.xml文件(xml配置文件方式)
<!--   导入applicationContext_dao.xml文件-->
<import resource="classpath:applicationContext_dao.xml"></import>
<!--   为Spring框架管理的业务逻辑层的对象配置扫描器,因为我们是使用注解的方式进行开发-->
<context:component-scan base-package="com.bjpowernode.service"></context:component-scan>
<!--   进行事务管理器的配置,分别由各自框架自己的事务管理器进行事务的管理     DataSourceTransactionManager:MyBatis框架的事务管理器
   一定要进行数据源的配置,因为事务一定是访问数据库的 -->
<bean id="transactionManager" class="org.springframework.jdbc.datasource.DataSourceTransactionManager">
    <property name="dataSource" ref="dataSource"></property>
</bean>
<!--   使用xml配置的方式进行事务管理-->
<tx:advice id="txAdvice" transaction-manager="transactionManager">
    <tx:attributes>
        <!--    查询操作都设置为只读事务-->
        <tx:method name="get*" read-only="true" />
        <tx:method name="select*" read-only="true"/>
        <tx:method name="find*" read-only="true"/>
        <tx:method name="search*" read-only="true"/>
        <!--     增删改的操作必要添加事务REQUIRED-->
        <tx:method name="insert*" propagation="REQUIRED"></tx:method>
        <tx:method name="add*" propagation="REQUIRED"></tx:method>
        <tx:method name="save*" propagation="REQUIRED" no-rollback-for="ArithmeticException"></tx:method>
        <tx:method name="set*" propagation="REQUIRED"></tx:method>
        <tx:method name="update*" propagation="REQUIRED"></tx:method>
        <tx:method name="modify*" propagation="REQUIRED"></tx:method>
        <tx:method name="change*" propagation="REQUIRED"></tx:method>
        <tx:method name="delete*" propagation="REQUIRED"></tx:method>
        <tx:method name="remove*" propagation="REQUIRED"></tx:method>
        <tx:method name="clear*" propagation="REQUIRED"></tx:method>
        <tx:method name="empty*" propagation="REQUIRED"></tx:method>
        <!--       其它方法支持事务就行-->
        <tx:method name="*" propagation="SUPPORTS"></tx:method>
    </tx:attributes>
</tx:advice>
<aop:config>
        <!--   指定切入点表达式,切入到业务逻辑层上-->
        <aop:pointcut id="pointcut" expression="execution(* com.bjpowernode.service.*.*(..))"/>
        <aop:advisor advice-ref="txAdvice" pointcut-ref="pointcut"></aop:advisor>   </aop:config>
9.新建库springuser,新建表users,accounts
10.新建实体类Users,Accounts
![[外链图片转存失败,源站可能有防盗链机制,建议将图片保存下来直接上传(img-C7KnCAHO-1658763749529)(../../../../Pictures/Spring/wps299.jpg)]](https://i-blog.csdnimg.cn/blog_migrate/ab2ddddf129bd45cb5f47ffd7603f873.jpeg)
11.新建mapper包下的接口和.xml文件
![[外链图片转存失败,源站可能有防盗链机制,建议将图片保存下来直接上传(img-KldEXUXe-1658763749529)(../../../../Pictures/Spring/wps300.jpg)]](https://i-blog.csdnimg.cn/blog_migrate/e52e2b097379e6815d6dbf2a3694abb2.jpeg)
12.新建service包下的接口和接口实现类
![[外链图片转存失败,源站可能有防盗链机制,建议将图片保存下来直接上传(img-7VLZhmyl-1658763749529)(../../../../Pictures/Spring/wps301.jpg)]](https://i-blog.csdnimg.cn/blog_migrate/2dcbc13ba8d3d010cefc3a5c27d2b83d.jpeg)
![UsersServiceImpl.java[外链图片转存失败,源站可能有防盗链机制,建议将图片保存下来直接上传(img-KWrX6lLQ-1658763749529)(../../../../Pictures/Spring/wps302.jpg)]](https://i-blog.csdnimg.cn/blog_migrate/a2a963c55c1fecb608c17555d4522ded.jpeg)
![AccountsServiceImpl.java[外链图片转存失败,源站可能有防盗链机制,建议将图片保存下来直接上传(img-0XDDewtl-1658763749530)(../../../../Pictures/Spring/wps303.jpg)]](https://i-blog.csdnimg.cn/blog_migrate/e21a256349f0ae982cefc2cafe7a9470.jpeg)
13.新建测试类,完成功能测试
测试结果总结如下:
![[外链图片转存失败,源站可能有防盗链机制,建议将图片保存下来直接上传(img-r50yIFxi-1658763749530)(../../../../Pictures/Spring/wps304.jpg)]](https://i-blog.csdnimg.cn/blog_migrate/654f98c0e29b76fc4d8ed95b74df814c.jpeg)
4.8 Spring Bean的生命周期
4.8.1 Spring Bean的生命周期图示
- Spring作为当前Java最流行、最强大的轻量级框架,受到了程序员的热烈欢迎。
- 准确的了解Spring Bean的生命周期是非常必要的。
- 我们通常使用ApplicationContext作为Spring容器,这里我们讲的也是 ApplicationContext中Bean的生命周期。
![[外链图片转存失败,源站可能有防盗链机制,建议将图片保存下来直接上传(img-DN5mYzV4-1658763749531)(../../../../Pictures/Spring/wps305.jpg)] [外链图片转存失败,源站可能有防盗链机制,建议将图片保存下来直接上传(img-IGCaYZm2-1658763749531)(../../../../Pictures/Spring/wps306.jpg)]](https://i-blog.csdnimg.cn/blog_migrate/661a487376fe05ad8cee97a67bcfd699.jpeg)

4.8.2 Spring Bean的生命周期中各种方法分类
Bean的完整生命周期经历了各种方法调用,这些方法可以划分为以下几类:
1、Bean自身的方法:这个包括了Bean本身调用的方法和通过配置文件中的init-method和destroy-method指定的方法
2、Bean级生命周期接口方法:这个包括了BeanNameAware、BeanFactoryAware、InitializingBean和DiposableBean这些接口的方法
3、容器级生命周期接口方法:这个包括了InstantiationAwareBeanPostProcessor 和 BeanPostProcessor 这两个接口实现,一般称它们的实现类为“后处理器”。
4、工厂后处理器接口方法:这个包括了AspectJWeavingEnabler, ConfigurationClassPostProcessor, CustomAutowireConfigurer等等非常有用的工厂后处理器 接口的方法。工厂后处理器也是容器级的。在应用上下文装配配置文件之后立即调用。
总结:class(UsersService)-实例化-对象属性填充(AccountsService)-初始化(DefaultUsers)AOP-代理对象-bean.
@Service
//交给Spring去创建对象
IOC@Transactional =èAOP处理
    public class UsersServiceImpl implements UsersService {
        //切记切记:一定有数据访问层的对象
        @Autowired
        UsersMapper usersMapper;
        //由Spring负责依赖注入
        IOCDefaultUsers users;=è初始化处理的对象
        @Override
        public int insert(Users users) {
            int num = usersMapper.insert(users)***\*;
            System.out.println("用户增加成功!num="+num);
            System.out.println(1);
            return num;
        }
    }
4.9 Spring中用到的设计模式总结
Spring框架中用到了很多的设计模式,总结如下:
- 工厂模式:Spring通过工厂模式BeanFactory,ApplicationContext创建Bean对象。
- 代理设计模式:SpringAOP的实现,底层使用了动态代理模式。
- 单例模式:Spring中的Bean默认都是单例的。
- 模板方法模式:Spring中jdbcTemplate,hibernateTemplate等以Template结尾的类都用到了模板模式。
- 装饰模式:我们的项目需要连接多个数据库,而不同的客户在访问时可能会访问不同的数据库,这种模式可以让我们根据用户的需求动态的切换数据库。
- 观察者模式:Spring的事件驱动是观察者模式的应用。
- 适配器模式:SpringAOP的增强功能使用到了适配器模式。


 1537
1537

 被折叠的 条评论
为什么被折叠?
被折叠的 条评论
为什么被折叠?
 到【灌水乐园】发言


