


     android:layout_width="wrap_content"
    android:layout_height="wrap_content"
    android:layout_alignParentLeft="true"
    android:layout_centerVertical="true"
    android:text="返回按钮" />

<TextView
    android:id="@+id/title"
    android:layout_width="wrap_content"
    android:layout_height="wrap_content"
    android:layout_centerInParent="true"
    android:text="提示文字"
    android:textSize="20sp" />

<Button
    android:id="@+id/close"
    android:layout_width="wrap_content"
    android:layout_height="wrap_content"
    android:layout_alignParentRight="true"
    android:layout_centerVertical="true"
    android:text="关闭按钮" />
activity_main.xml:
<RelativeLayout xmlns:android="http://schemas.android.com/apk/res/android"
    xmlns:tools="http://schemas.android.com/tools"
    android:layout_width="match_parent"
    android:layout_height="match_parent"
    tools:context="${relativePackage}.${activityClass}" >

    <include
        android:layout_width="match_parent"
        android:layout_height="40dp"
        layout="@layout/titlebar" />

    <Button
        android:layout_width="wrap_content"
        android:layout_height="wrap_content"
        android:layout_centerHorizontal="true"
        android:layout_centerVertical="true"
        android:onClick="click"
        android:text="点我。。。" />

</RelativeLayout>
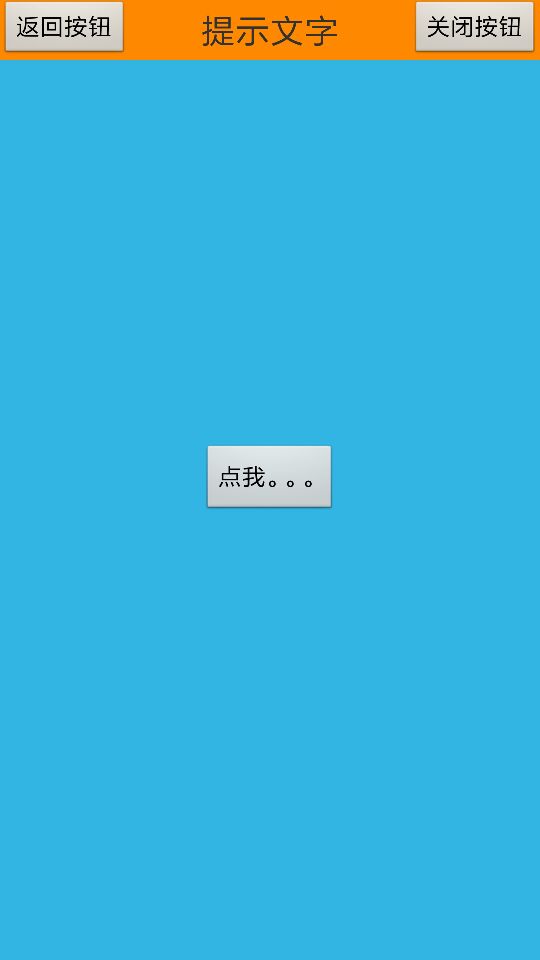
include标签使用还是很简单的,主要通过layout属性声明要引入的布局即可。运行程序界面如下:
include标签使用注意点:
1,标签当中,可以重写所有layout属性的,如上面include中指定的layout属性将会覆盖掉titlebar中指定的layout属性。
而非layout属性则无法在标签当中进行覆写。另外需要注意的是,如果我们想要在标签当中覆写layout属性,
必须要将layout_width和layout_height这两个属性也进行覆写,否则覆写效果将不会生效
2,一个xml布局文件有多个include标签需要设置ID,才能找到相应子View的控件,否则只能找到第一个include的layout布局,以及该布局的控件。
3,如果我们给include所加载的layout布局的根容器设置了id属性,也在include标签中设置了id属性,同时需要在代码中获取根容器的控件对象时,最好将这两个id设置相同的名称!否则,可能获取不到根容器对象,即为null。
二、merge的用法以及注意点
merge标签存在的意义是帮助include标签排除多余的一层ViewGroup容器,减少view hierarchy的结构,提升UI渲染的性能。include标签存在着一个不好的地方,可能会导致产生多余的布局嵌套。同样通过一个小demo来说明:
比如项目中有一个公共的登录按钮布局,如下:
login.xml:
<?xml version="1.0" encoding="utf-8"?>
<LinearLayout xmlns:android="http://schemas.android.com/apk/res/android"
    android:layout_width="match_parent"
    android:layout_height="wrap_content"
    android:orientation="vertical" >

     <Button
        android:layout_width="match_parent"
        android:layout_height="wrap_content"
        android:layout_marginLeft="20dp"
        android:layout_marginRight="20dp"
        android:text="登录按钮" />

</LinearLayout>
很简单,就是一个登录的Button。
项目中有登录功能的UI界面如下:
activity_login.xml:
<LinearLayout xmlns:android="http://schemas.android.com/apk/res/android"
    xmlns:tools="http://schemas.android.com/tools"
    android:layout_width="match_parent"
    android:layout_height="match_parent"
    android:orientation="vertical"
    android:background="@android:color/holo_blue_light">

    <EditText
        android:layout_width="match_parent"
        android:layout_height="wrap_content"
        android:layout_marginLeft="20dp"
        android:layout_marginRight="20dp"
        android:layout_marginTop="40dp"
        android:hint="请输入用户名" />

    <include layout="@layout/login" />

</LinearLayout>
同样非常简单,运行程序,如下:

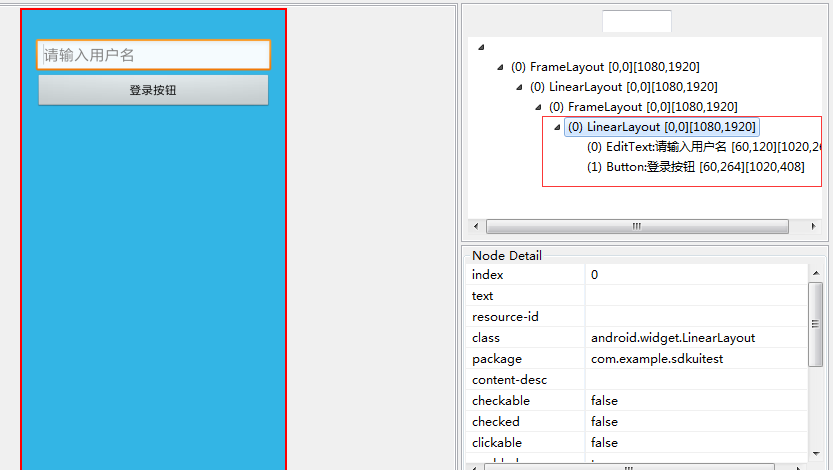
看起来没什么问题,其实不知不觉中我们多嵌套了一层布局。我们用工具查看一下此时布局结构:

除去系统布局,我们自己布局最外层是LinearLayout,然后两个并列布局EditText与LinearLayout,在LinearLayout里面是Button登录按钮。
其实这种情况下:在主界面中,<include>标签的parent ViewGroup与包含的layout根容器ViewGroup是相同的类型,这里都是LinearLayout,那么则可以将包含的layout根容器ViewGroup使用<merge>标签代替,从而减少一层ViewGroup的嵌套,提升UI渲染性能。
这里我们把activity_login.xml修改如下:
<?xml version="1.0" encoding="utf-8"?>
<merge xmlns:android="http://schemas.android.com/apk/res/android">

     <Button
        android:layout_width="match_parent"
        android:layout_height="wrap_content"
        android:layout_marginLeft="20dp"
        android:layout_marginRight="20dp"
        android:text="登录按钮" />

</merge>
重新运行程序UI和上面一样效果,通过工具再次查看布局结构;
看到了吧,我们自己布局减少了一层嵌套,从而提升了UI的渲染速度。
merge标签使用注意点:
1,根布局是FrameLayout且不需要设置background或padding等属性,可以用merge代替,因为Activity的ContentView父元素就是FrameLayout,所以可以用merge消除只剩一个.
2,因为merge标签并不是View,所以在通过LayoutInflate.inflate()方法渲染的时候,第二个参数必须指定一个父容器,且第三个参数必须为true,也就是必须为merge下的视图指定一个父亲节点.由于merge不是View所以****对merge标签设置的所有属性都是无效的.
LayoutInflate中源码体现:
public View inflate(XmlPullParser parser, @Nullable ViewGroup root, boolean attachToRoot) {
        synchronized (mConstructorArgs) {

            ...

                if (TAG_MERGE.equals(name)) {
                    if (root == null || !attachToRoot) {
                        throw new InflateException("<merge /> can be used only with a valid "
                                + "ViewGroup root and attachToRoot=true");
                    }

                    rInflate(parser, root, inflaterContext, attrs, false);
                }
            ...
        }
    }
3,merge标签必须使用在根布局,并且ViewStub标签中的layout布局不能使用merge标签.
###三、ViewStub的用法以及注意点
ViewStub也可以用来加载布局文件,但与include标签完全不同。ViewStub是一个不可见的View类,用于在运行时按需懒加载资源,只有在代码中调用了viewStub.inflate()或者viewStub.setVisible(View.visible)方法时才内容才变得可见。这里需要注意的一点是,当ViewStub被inflate到parent时,ViewStub就被remove掉了,即当前view hierarchy中不再存在ViewStub,而是使用对应的layout视图代替。
同样我们通过一个小demo说明一下,比如我们需要保存一个用户信息,用户名是必须保存的,但是其余信息是不必要的,这是其余信息就可以一开始不显示出来,用户想输入的时候在现实出来。
其余信息布局如下:
otherinfo.xml:
<?xml version="1.0" encoding="utf-8"?>
<LinearLayout xmlns:android="http://schemas.android.com/apk/res/android"
android:layout_width="match_parent"
android:orientation="vertical"
android:layout_height="wrap_content" >
## 最后
其实Android开发的知识点就那么多,面试问来问去还是那么点东西。所以面试没有其他的诀窍,只看你对这些知识点准备的充分程度。so,出去面试时先看看自己复习到了哪个阶段就好。
上面分享的**腾讯、头条、阿里、美团、字节跳动等公司2019-2021年的高频面试题**,博主还把这些技术点整理成了视频和PDF(实际上比预期多花了不少精力),包含**知识脉络 + 诸多细节**,由于篇幅有限,上面只是以图片的形式给大家展示一部分。
**[CodeChina开源项目:《Android学习笔记总结+移动架构视频+大厂面试真题+项目实战源码》](https://codechina.csdn.net/m0_60958482/android_p7)**
**【Android思维脑图(技能树)】**
知识不体系?这里还有整理出来的Android进阶学习的思维脑图,给大家参考一个方向。

**【Android高级架构视频学习资源】**
](https://codechina.csdn.net/m0_60958482/android_p7)**
**【Android思维脑图(技能树)】**
知识不体系?这里还有整理出来的Android进阶学习的思维脑图,给大家参考一个方向。
[外链图片转存中...(img-zVPs072W-1630829319831)]
**【Android高级架构视频学习资源】**


 被折叠的 条评论
为什么被折叠?
被折叠的 条评论
为什么被折叠?
 到【灌水乐园】发言


