


(1)第一步:使用Spring配置JedisPoolConfig对象
大部分的情况下,我们还是会用到连接池的,于是先用 Spring 配置一个 JedisPoolConfig 对象:
<bean id="poolConfig" class="redis.clients.jedis.JedisPoolConfig">

    <!--最大空闲数-->

    <property name="maxIdle" value="50"/>

    <!--最大连接数-->

    <property name="maxTotal" value="100"/>

    <!--最大等待时间-->

    <property name="maxWaitMillis" value="20000"/>

</bean>
(2)第二步:为连接池配置工厂模型
好了,我们现在配置好了连接池的相关属性,那么具体使用哪种工厂实现呢?在Spring Data Redis中有四种可供我们选择的工厂模型,它们分别是:
-
JredisConnectionFactory
-
JedisConnectionFactory
-
LettuceConnectionFactory
-
SrpConnectionFactory
我们这里就简单配置成JedisConnectionFactory:
<bean id="connectionFactory" class="org.springframework.data.redis.connection.jedis.JedisConnectionFactory">

    <!--Redis服务地址-->

    <property name="hostName" value="localhost"/>

    <!--端口号-->

    <property name="port" value="6379"/>

    <!--如果有密码则需要配置密码-->

    <!--<property name="password" value="password"/>-->

    <!--连接池配置-->

    <property name="poolConfig" ref="poolConfig"/>

</bean>
(3)第三步:配置RedisTemplate
普通的连接根本没有办法直接将对象直接存入 Redis 内存中,我们需要替代的方案:将对象序列化(可以简单的理解为继承Serializable接口)。我们可以把对象序列化之后存入Redis缓存中,然后在取出的时候又通过转换器,将序列化之后的对象反序列化回对象,这样就完成了我们的要求:
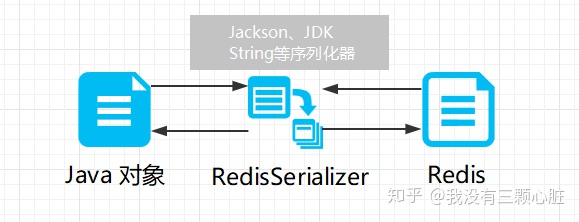
RedisTemplate可以帮助我们完成这份工作,它会找到对应的序列化器去转换Redis的键值:
<bean id="redisTemplate"

      class="org.springframework.data.redis.core.RedisTemplate"

      p:connection-factory-ref="connectionFactory"/>
笔者从《JavaEE互联网轻量级框架整合开发》中了解到,这一步需要配置单独的序列化器去支撑这一步的工作,但是自己在测试当中,发现只要我们的POJO类实现了Serializable接口,就不会出现问题…所以我直接省略掉了配置序列化器这一步…
(4)第四步:编写测试
首先编写好支持我们测试的POJO类:
/**
* @author: @我没有三颗心脏
* @create: 2018-05-30-下午 22:31
*/
public class Student implements Serializable{
private String name;
private int age;
/**
* 给该类一个服务类用于测试
*/
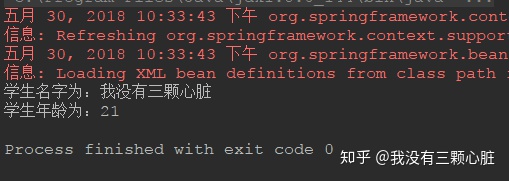
public void service() {
System.out.println("学生名字为:" + name);
System.out.println("学生年龄为:" + age);
}
public String getName() {
return name;
}
public void setName(String name) {
this.name = name;
}
public int getAge() {
return age;
}
public void setAge(int age) {
this.age = age;
}
}
然后编写测试类:
@Test

public void test() {

	ApplicationContext context =

			new ClassPathXmlApplicationContext("applicationContext.xml");

	RedisTemplate redisTemplate = context.getBean(RedisTemplate.class);

	Student student = new Student();

	student.setName("我没有三颗心脏");

	student.setAge(21);

	redisTemplate.opsForValue().set("student_1", student);

	Student student1 = (Student) redisTemplate.opsForValue().get("student_1");

	student1.service();

}
运行可以成功看到结果:
第四步:在 SpringBoot 中使用 Redis
(1)在SpringBoot中添加Redis依赖:
<!-- Radis -->

<dependency>

    <groupId>org.springframework.boot</groupId>

    <artifactId>spring-boot-starter-data-redis</artifactId>

</dependency>
(2)添加配置文件:
在SpringBoot中使用.properties或者.yml都可以,这里给出.properties的例子,因为自己的.yml文件看上去感觉乱糟糟的:
# REDIS (RedisProperties)

# Redis数据库索引(默认为0)

spring.redis.database=0

# Redis服务器地址

spring.redis.host=localhost

# Redis服务器连接端口

spring.redis.port=6379

# Redis服务器连接密码(默认为空)

spring.redis.password=

# 连接池最大连接数(使用负值表示没有限制)

spring.redis.pool.max-active=8

# 连接池最大阻塞等待时间(使用负值表示没有限制)

spring.redis.pool.max-wait=-1

# 连接池中的最大空闲连接

spring.redis.pool.max-idle=8

# 连接池中的最小空闲连接

spring.redis.pool.min-idle=0

# 连接超时时间(毫秒)

spring.redis.timeout=0
(3)测试访问:
@RunWith(SpringJUnit4ClassRunner.class)
@SpringBootTest()
public class ApplicationTests {
@Autowired
private StringRedisTemplate stringRedisTemplate;
@Test
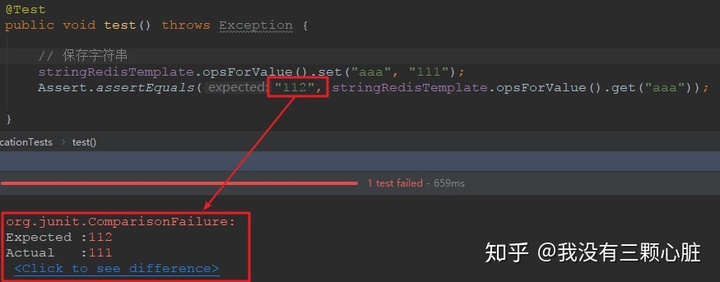
public void test() throws Exception {
// 保存字符串
stringRedisTemplate.opsForValue().set("aaa", "111");
Assert.assertEquals("111", stringRedisTemplate.opsForValue().get("aaa"));
}
}
通过上面这段极为简单的测试案例演示了如何通过自动配置的StringRedisTemplate对象进行Redis的读写操作,该对象从命名中就可注意到支持的是String类型。原本是RedisTemplate<K, V>接口,StringRedisTemplate就相当于RedisTemplate<String, String>的实现。
运行测试,如果一切成功则不会报错,如果我们没有拿到或者拿到的数不是我们想要的 “111” ,那么则会报错,这是使用Assert的好处(下面是我改成112之后运行报错的结果):
(4)存储对象:
这一步跟上面使用Spring一样,只需要将POJO类实现Serializable接口就可以了,我这里就贴一下测试代码:
@RunWith(SpringJUnit4ClassRunner.class)

@SpringBootTest()

public class ApplicationTests {


	@Autowired

	private RedisTemplate redisTemplate;


	@Test

	public void test() throws Exception {


		User user = new User();

		user.setName("我没有三颗心脏");

		user.setAge(21);


		redisTemplate.opsForValue().set("user_1", user);

		User user1 = (User) redisTemplate.opsForValue().get("user_1");


		System.out.println(user1.getName());

	}

}
仍然没有任何问题:
参考文章:
1. [https://www.cnblogs.com/ityouknow/p/5748830.html](
)
2. [http://blog.didispace.com/springbootredis/](
)
在Redis中操作集合
引用文章: [https://www.jianshu.com/p/29aaac3172b5](
)
直接黏上两段简单的示例代码:
在Redis中操作List
// list数据类型适合于消息队列的场景:比如12306并发量太高,而同一时间段内只能处理指定数量的数据!必须满足先进先出的原则,其余数据处于等待
@Test
public void listPushResitTest() {
// leftPush依次由右边添加
stringRedisTemplate.opsForList().rightPush("myList", "1");
stringRedisTemplate.opsForList().rightPush("myList", "2");
stringRedisTemplate.opsForList().rightPush("myList", "A");
stringRedisTemplate.opsForList().rightPush("myList", "B");
// leftPush依次由左边添加
stringRedisTemplate.opsForList().leftPush("myList", "0");
}
@Test
public void listGetListResitTest() {
// 查询类别所有元素
List<String> listAll = stringRedisTemplate.opsForList().range("myList", 0, -1);
logger.info("list all {}", listAll);
### 最后
俗话说,好学者临池学书,不过网络时代,对于大多数的我们来说,我倒是觉得学习意识的觉醒很重要,这是开始学习的转折点,比如看到对自己方向发展有用的信息,先收藏一波是一波,比如如果你觉得我这篇文章ok,先点赞收藏一波。这样,等真的沉下心来学习,不至于被找资料分散了心神。慢慢来,先从点赞收藏做起,加油吧!
> **[CodeChina开源项目:【一线大厂Java面试题解析+核心总结学习笔记+最新讲解视频】](
)**
另外,给大家安排了一波学习面试资料:
[外链图片转存中...(img-162PoNTK-1631179636564)]
[外链图片转存中...(img-WOOOQnaX-1631179636565)]
以上就是本文的全部内容,希望对大家的面试有所帮助,祝大家早日升职加薪迎娶白富美走上人生巅峰!


 514
514


 被折叠的 条评论
为什么被折叠?
被折叠的 条评论
为什么被折叠?
 到【灌水乐园】发言


