


目录
自定义hook函数(使用的Composition API进行封装 )
toRef和toRefs(创建ref 对象,响应式对象供外界使用,针对对象 )
1.使用toRefs时,可以return一个扩展对象的形式,这样对象里面所有属性都是响应式了
计算属性与监视
computed函数(计算属性函数写在setup中)
-
与Vue2.x中computed配置功能一致
import {computed} from 'vue'

setup(){
    ...
	//计算属性——简写
    let fullName = computed(()=>{
        return person.firstName + '-' + person.lastName
    })
    //计算属性——完整
    let fullName = computed({
        get(){
            return person.firstName + '-' + person.lastName
        },
        set(value){
            const nameArr = value.split('-')
            person.firstName = nameArr[0]
            person.lastName = nameArr[1]
        }
    })
}
1.Vue3计算属性两种写法
- Vue3计算属性简写形式(没有考虑计算属性被修改的情况)
- 计算属性完整写法(考虑读和写)
<template>
	<h1>一个人的信息</h1>
	姓:<input type="text" v-model="person.firstname">
  <hr>
  名:<input type="text" v-model="person.lastname">
  <hr>
  <span>全名:{{ person.fullName }}</span>
  <hr>
  全名: <input type="text" v-model="person.fullName">
</template>

<script>
/* 先导入computed */
	import {reactive,computed} from 'vue'
	export default {
		name: 'MyDemo',
  /*  vue2写法计算属性
   computed:{
      fullName(){
        return this.person.firstname+'-'+this.person.lastname
      }
    }, */
		setup(){
			let person = reactive({
				firstname:'迪丽',
				lastname:'热巴'
			})
      /* Vue3计算属性简写形式(没有考虑计算属性被修改的情况) */
      /* person.fullName=computed(()=>{
        return person.firstname+'-'+person.lastname
      }) */

      /* 计算属性完整写法(考虑读和写) */
      person.fullName=computed({
        get(){
          return person.firstname+'-'+person.lastname
        },
        set(value){
          /* 将值用-拆分成数组 */
          const nameArr=value.split('-')
          person.firstname=nameArr[0]
          person.lastname=nameArr[1]
        }
      })

			//返回一个对象(常用)
			return {
				person,
			}
		}
	}
</script>
watch函数(监视写在setup中)
-
与Vue2.x中watch配置功能一致
1.两个注意点
-
监视reactive定义的响应式数据时:oldValue无法正确获取、强制开启了深度监视(deep配置失效)。
-
监视reactive定义的响应式数据中某个属性时:deep配置有效。
//情况一:监视ref定义的响应式数据
watch(sum,(newValue,oldValue)=>{
	console.log('sum变化了',newValue,oldValue)
},{immediate:true})

//情况二:监视多个ref定义的响应式数据
watch([sum,msg],(newValue,oldValue)=>{
	console.log('sum或msg变化了',newValue,oldValue)
})

/* 情况三:监视reactive定义的响应式数据
			若watch监视的是reactive定义的响应式数据,则无法正确获得oldValue!!
			若watch监视的是reactive定义的响应式数据,则强制开启了深度监视
*/
watch(person,(newValue,oldValue)=>{
	console.log('person变化了',newValue,oldValue)
},{immediate:true,deep:false}) //此处的deep配置不再奏效

//情况四:监视reactive定义的响应式数据中的某个属性
watch(()=>person.job,(newValue,oldValue)=>{
	console.log('person的job变化了',newValue,oldValue)
},{immediate:true,deep:true})

//情况五:监视reactive定义的响应式数据中的某些属性
watch([()=>person.job,()=>person.name],(newValue,oldValue)=>{
	console.log('person的job变化了',newValue,oldValue)
},{immediate:true,deep:true})

//特殊情况
watch(()=>person.job,(newValue,oldValue)=>{
    console.log('person的job变化了',newValue,oldValue)
},{deep:true}) //此处由于监视的是reactive素定义的对象中的某个属性,所以deep配置有效
watchEffect函数(写在setup中)
1.watchEffect函数与watch函数的区别
-
watchEffect的套路是:不用指明监视哪个属性,监视的回调中用到哪个属性,那就监视哪个属性。
-
watch的套路是:既要指明监视的属性,也要指明监视的回调。
watchEffect有点像computed:
-
但computed注重的计算出来的值(回调函数的返回值),所以必须要写返回值。
-
而watchEffect更注重的是过程(回调函数的函数体),所以不用写返回值。
//watchEffect所指定的回调中用到的数据只要发生变化,则直接重新执行回调。
watchEffect(()=>{
    const x1 = sum.value
    const x2 = person.age
    console.log('watchEffect配置的回调执行了')
})
<template>
<h2>当前求和为:{{sum}}</h2>
<button @click="sum++">点我+1</button>
<hr>
<h2>当前的信息为:{{msg}}</h2>
<button @click="msg+='!'">修改信息</button>
<hr>
<h2>姓名:{{person.name}}</h2>
<h2>年龄:{{person.age}}</h2>
<h2>薪资:{{person.job.j1.salary}}K</h2>
<button @click="person.name+='~'">修改姓名</button>
<button @click="person.age++">增长年龄</button>
<button @click="person.job.j1.salary++">涨薪</button>
</template>
<script>
import {ref,reactive,watchEffect} from 'vue'
export default {
name: 'MyDemo',
setup(){
//数据
let sum = ref(0)
let msg = ref('你好啊')
let person = reactive({
name:'张三',
age:18,
job:{
j1:{
salary:20
}
}
})
//监视
/* watch(sum,(newValue,oldValue)=>{
console.log('sum的值变化了',newValue,oldValue)
},{immediate:true}) */
watchEffect(()=>{
const x1 = sum.value
const x2 = person.job.j1.salary
console.log('watchEffect所指定的回调执行了')
})
//返回一个对象(常用)
return {
sum,
msg,
person
}
}
}
</script>
生命周期
1.Vue3生命周期图示
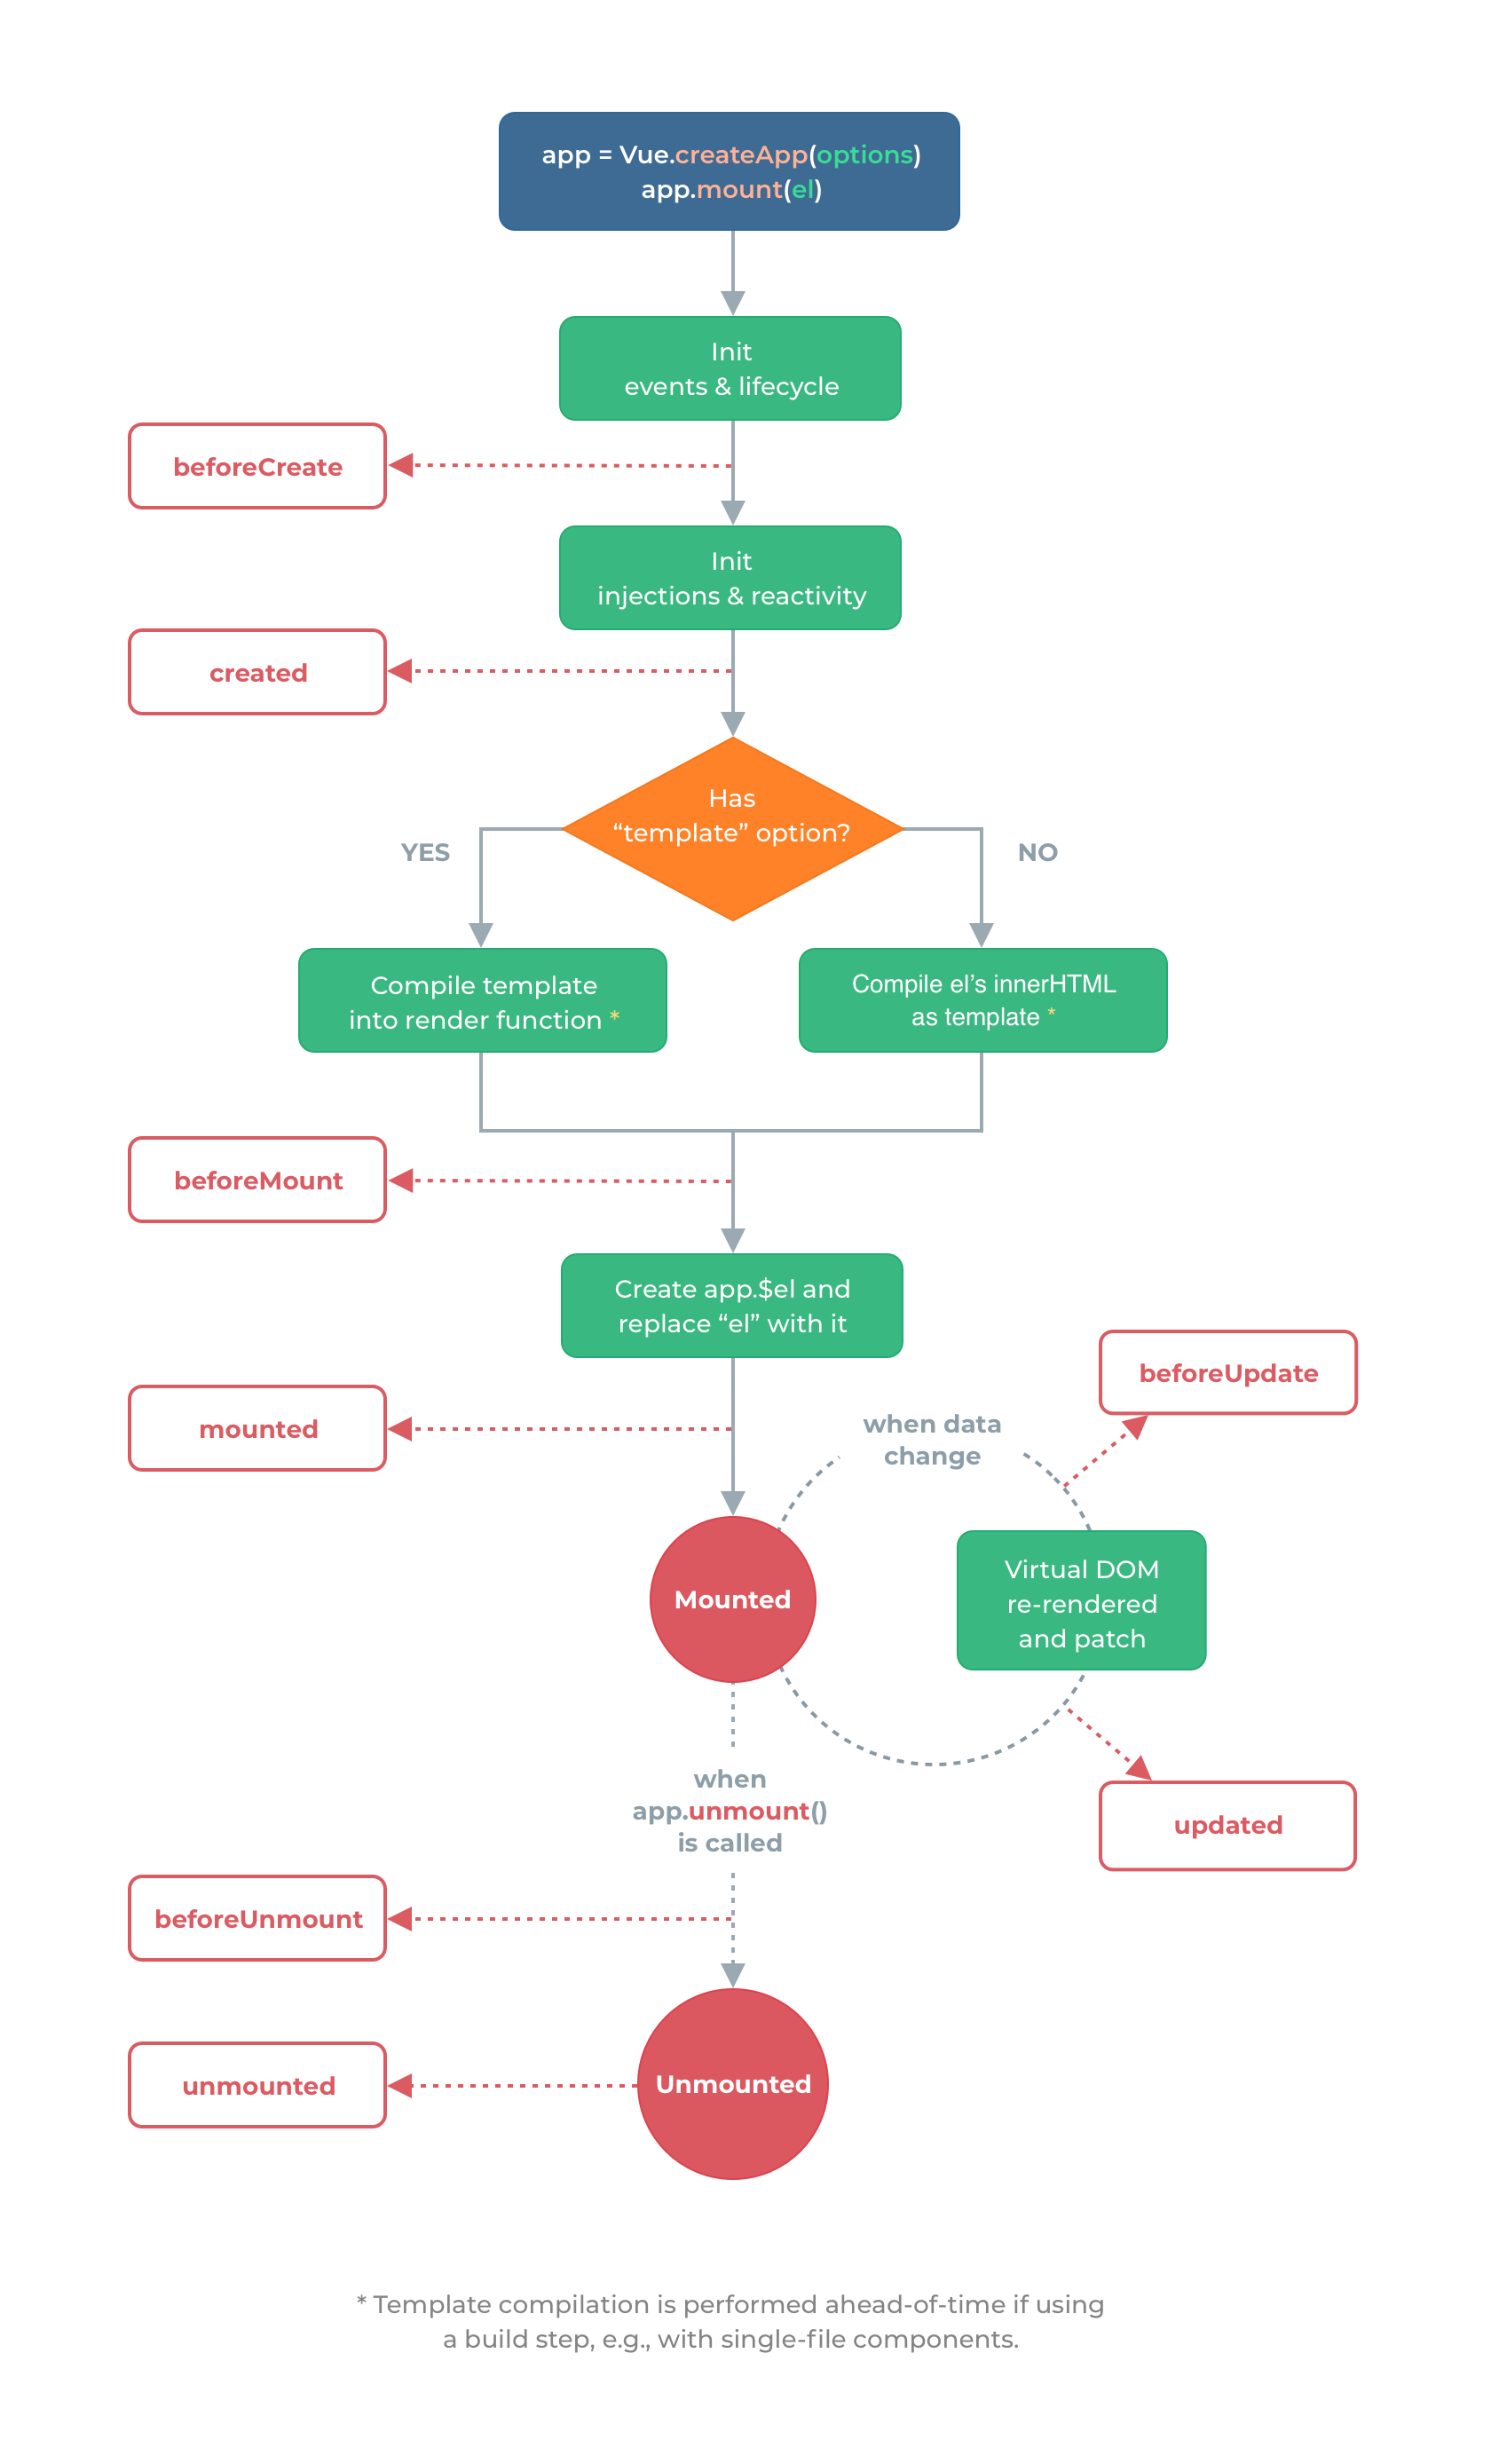
-
Vue3.0中可以继续使用Vue2.x中的生命周期钩子,但有有两个被更名:
-
beforeDestroy改名为beforeUnmount -
destroyed改名为unmounted
-
-
Vue3.0也提供了 Composition API 形式的生命周期钩子,与Vue2.x中钩子对应关系如下:
-
beforeCreate===>setup() -
created=======>setup() -
beforeMount===>onBeforeMount -
mounted=======>onMounted -
beforeUpdate===>onBeforeUpdate -
updated=======>onUpdated -
beforeUnmount==>onBeforeUnmount -
unmounted=====>onUnmounted
-
2.在setup中使用生命周期钩子函数
<template>
	<h2>当前求和为:{{sum}}</h2>
	<button @click="sum++">点我+1</button>
</template>

<script>
	import {ref,onBeforeMount,onMounted,onBeforeUpdate,onUpdated,onBeforeUnmount,onUnmounted} from 'vue'
	export default {
		name: 'MyDemo',

		setup(){
			console.log('---setup---')
			//数据
			let sum = ref(0)

			//通过组合式API的形式去使用生命周期钩子
			onBeforeMount(()=>{
				console.log('---onBeforeMount---')
			})
			onMounted(()=>{
				console.log('---onMounted---')
			})
			onBeforeUpdate(()=>{
				console.log('---onBeforeUpdate---')
			})
			onUpdated(()=>{
				console.log('---onUpdated---')
			})
			onBeforeUnmount(()=>{
				console.log('---onBeforeUnmount---')
			})
			onUnmounted(()=>{
				console.log('---onUnmounted---')
			})

			//返回一个对象(常用)
			return {sum}
		},
		//通过配置项的形式使用生命周期钩子
		//#region
		beforeCreate() {
			console.log('---beforeCreate---')
		},
		created() {
			console.log('---created---')
		},
		beforeMount() {
			console.log('---beforeMount---')
		},
		mounted() {
			console.log('---mounted---')
		},
		beforeUpdate(){
			console.log('---beforeUpdate---')
		},
		updated() {
			console.log('---updated---')
		},
		beforeUnmount() {
			console.log('---beforeUnmount---')
		},
		unmounted() {
			console.log('---unmounted---')
		},
		//#endregion
	}
</script>
自定义hook函数(使用的Composition API进行封装 )
-
什么是hook?—— 本质是一个函数,把setup函数中使用的Composition API进行了封装。
-
类似于vue2.x中的mixin。
-
自定义hook的优势: 复用代码, 让setup中的逻辑更清楚易懂。
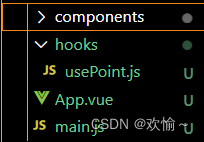
1.先封装业务逻辑usePoint.js
注意:一定要导入相关函数和return相应的值
import {reactive,onMounted,onBeforeUnmount} from 'vue'
export default function (){
	//实现鼠标“打点”相关的数据
	let point = reactive({
		x:0,
		y:0
	})

	//实现鼠标“打点”相关的方法
	function savePoint(event){
		point.x = event.pageX
		point.y = event.pageY
		console.log(event.pageX,event.pageY)
	}

	//实现鼠标“打点”相关的生命周期钩子
	onMounted(()=>{
		window.addEventListener('click',savePoint)
	})

	onBeforeUnmount(()=>{
		window.removeEventListener('click',savePoint)
	})

	return point
}
2.在需要的组件setup中进行引入使用
<template>
	<h2>我是Test组件</h2>
	<h2>当前点击时鼠标的坐标为:x:{{point.x}},y:{{point.y}}</h2>
</template>

<script>
	import usePoint from '../hooks/usePoint'
	export default {
		name:'Test',
		setup(){
			const point = usePoint()
			return {point}
		}
	}
</script>
toRef和toRefs(创建ref 对象,响应式对象供外界使用,针对对象 )
作用:创建一个 ref 对象,其value值指向另一个对象中的某个属性。
语法:
const name = toRef(person,'name')应用: 要将响应式对象中的某个属性单独提供给外部使用时。
扩展:
toRefs与toRef功能一致,但可以批量创建多个 ref 对象,语法:toRefs(person)
1.使用toRefs时,可以return一个扩展对象的形式,这样对象里面所有属性都是响应式了
在模板中使用就可以直接属性,不用再对象名.属性名了
<template>
	<h4>{{person}}</h4>
	<h2>姓名:{{name}}</h2>
	<h2>年龄:{{age}}</h2>
	<h2>薪资:{{job.j1.salary}}K</h2>
	<button @click="name+='~'">修改姓名</button>
	<button @click="age++">增长年龄</button>
	<button @click="job.j1.salary++">涨薪</button>
</template>

<script>
	import {ref,reactive,toRef,toRefs} from 'vue'
	export default {
		name: 'Demo',
		setup(){
			//数据
			let person = reactive({
				name:'张三',
				age:18,
				job:{
					j1:{
						salary:20
					}
				}
			})

			// const name1 = person.name
			// console.log('%%%',name1)

			// const name2 = toRef(person,'name')
			// console.log('####',name2)

			const x = toRefs(person)
			console.log('******',x)

			//返回一个对象(常用)
			return {
				person,
				// name:toRef(person,'name'),
				// age:toRef(person,'age'),
				// salary:toRef(person.job.j1,'salary'),
				...toRefs(person)
			}
		}
	}
</script>


 505
505


 被折叠的 条评论
为什么被折叠?
被折叠的 条评论
为什么被折叠?
 到【灌水乐园】发言


