创建一个maven项目名为SSM。
(当报了很多错的时候,我们该从下往上看)
Mybatis
Mybatis特性
- MyBatis是支持定制化SQL、存储过程以及高级映射的优秀持久层框架。
- MyBatis避免了几乎所有的JDBC代码和手动设置参数以及获取结果集。
- MyBatis可以使用简单的XML或注解用于配置和原始映射,将接口和java的POJO(Plain Old java Objects,普通的java对象)映射成数据库中的记录。
- MyBatis是一个半自动的ORM(Object Relation Mapping) 框架
Mybatis和其他持久层技术对比:
Mybatis快速开始
创建模块,名为mybatis_helloworld
t_user表创建:
SET NAMES utf8mb4;
SET FOREIGN_KEY_CHECKS = 0;
-- ----------------------------
-- Table structure for t_user
-- ----------------------------
DROP TABLE IF EXISTS `t_user`;
CREATE TABLE `t_user` (
  `id` int(11) NOT NULL AUTO_INCREMENT,
  `username` varchar(20) DEFAULT NULL,
  `password` varchar(20) DEFAULT NULL,
  `age` int(11) DEFAULT NULL,
  `gender` char(1) DEFAULT NULL,
  `email` varchar(50) DEFAULT NULL,
  PRIMARY KEY (`id`)
) ENGINE=InnoDB DEFAULT CHARSET=utf8;

SET FOREIGN_KEY_CHECKS = 1;
编写一个User类在com.luhang.mybatis.pojo下。有setter、getter,有参、无参、toString方法。
private Integer id;
private String username;
private String password;
private Integer age;
private String gender;
private String email;
创建MyBatis的核心配置文件
创建mybatis核心配置文件:
习惯上命名为mybatis-config.xml,这个文件名仅仅只是建议,并非强制要求。将来整合Spring之后,这个配置文件可以省略,所以此时可以直接复制粘贴。
核心配置文件主要用于配置连接数据库的环境以及MyBatis的全局配置信息。
核心配置文件存放的位置是src/main/resources目录下。
<?xml version="1.0" encoding="UTF-8" ?>
<!-- 文件约束 Config -->
<!DOCTYPE configuration
        PUBLIC "-//mybatis.org//DTD Config 3.0//EN"
        "http://mybatis.org/dtd/mybatis-3-config.dtd">
<configuration>
    <!--    配置连接数据库的环境 -->
    <environments default="development">
        <environment id="development">
            <!--            事务管理器 -->
            <transactionManager type="JDBC"/>
            <!--            数据源:帮助我们管理数据库的连接 -->
            <dataSource type="POOLED">
                <property name="driver" value="com.mysql.jdbc.Driver"/>
                <property name="url" value="jdbc:mysql://localhost:3306/ssm"/>
                <property name="username" value="root"/>
                <property name="password" value="root"/>
            </dataSource>
        </environment>
    </environments>

    <!--    引入mybatis的映射文件 -->
    <mappers>
        <mapper resource="mappers/UserMapper.xml"/>
    </mappers>
</configuration>
创建mapper接口
Mybatis中的mapper接口相当于以前的dao。
package com.luhang.mybatis.mapper;

public interface UserMapper {
    int insertUser();
}
创建Mybatis的映射文件
ORM(Object Relationship Mapping)对象关系映射。
| java概念 | 数据库概念 |
|---|---|
| 类 | 表 |
| 属性 | 字段/列 |
| 对象 | 记录/行 |
- 映射文件命名规则:实体类的类名+Mapper.xml。eg:UserMapper.xml
Mybatis映射文件用于编写SQL,访问以及操作表中的数据。
Mybatis映射文件存放的位置是src/main/resources/mappers目录下。 - MyBatis中可以面向接口操作数据,要保证
mapper接口的全类名和映射文件的namespace一致。
mapper接口中的方法的方法名要和映射文件中的sql的id保持一致。
UserMapper.xml
<?xml version="1.0" encoding="UTF-8" ?>
<!DOCTYPE mapper
        PUBLIC "-//mybatis.org//DTD Mapper 3.0//EN"
        "http://mybatis.org/dtd/mybatis-3-mapper.dtd">

<!-- namespace :对应的mapper接口 -->
<mapper namespace="com.luhang.mybatis.mapper.UserMapper">
	 <!-- id : 对应接口的方法名称.	-->
    <insert id="insertUser">
  		 insert into t_user values (null,"admin","123",23,'女',"111@qq.com")
	</insert>
</mapper>
测试添加用户功能
test 下 java 中 com.luhang.mybatis.test.MybatisTest 类:
public class MybatisTest {
    @Test
    public void testInsert() throws Exception {
        // 获取核心配置文件的输入流   ,选 import org.apache.ibatis.io.Resources;
        InputStream is = Resources.getResourceAsStream("mybatis-config.xml");
//    或    InputStream is=new FileInputStream("src/main/resources/mybatis-config.xml");

        // 获取 SqlSessionFactoryBuilder 对象
        SqlSessionFactoryBuilder sqlSessionFactoryBuilder=new SqlSessionFactoryBuilder();
        // 获取 SqlSessionFactory 对象
        SqlSessionFactory sqlSessionFactory = sqlSessionFactoryBuilder.build(is);

/*        // 获取sql的会话对象 sqlSession(不会自动提交事务,需手动提交事务) ,是Mybatis提供的操作数据库的对象
        SqlSession sqlSession = sqlSessionFactory.openSession();
 */
        // 会自动提交事务
        SqlSession sqlSession = sqlSessionFactory.openSession(true);

        // 此方法用的比较多
        // 获取 UserMapper 的代理实现类对象
        UserMapper mapper = sqlSession.getMapper(UserMapper.class);
        // 调用 mapper接口 中的方法,实现添加用户信息的功能
        int result = mapper.insertUser();


 /*       // 此方法用的不多:通过sql以及唯一标识找到sql并执行,唯一标识:namespace.sql的id
        int result = sqlSession.insert("com.luhang.mybatis.mapper.UserMapper.insertUser");
  */

        System.out.println("结果"+result);

        // 手动提交事务。 当通过sqlSession来执行sql语句的话,当前事务要自己去设置,默认会回滚。
//        sqlSession.commit();

        // 关闭sqlSession
        sqlSession.close();
    }
}
添加后,查看数据库,中文数据显示?:
需在db.properties 文件中,把url的尾巴加上
?useSSL=true&useUnicode=true&characterEncoding=utf8 。
加入log4j日志功能
日志级别:FATAL(致命)> ERROR(错误)>WARN(警告)INFO(信息)> DEBUG(调试)
从左到右打印的内容越来越详细。
<!-- log4j日志 -->
<dependency>
    <groupId>log4j</groupId>
    <artifactId>log4j</artifactId>
    <version>1.2.17</version>
</dependency>
resources/log4j.xml ,粘贴直接用即可。
<?xml version="1.0" encoding="UTF-8"?>
<!DOCTYPE log4j:configuration SYSTEM "log4j.dtd">

<log4j:configuration xmlns:log4j="http://jakarta.apache.org/log4j/">

    <appender name="STDOUT" class="org.apache.log4j.ConsoleAppender">
        <param name="Encoding" value="UTF-8"/>
        <layout class="org.apache.log4j.PatternLayout">
            <param name="ConversionPattern" value="%-5d %d{MM-dd HH:mm:ss,SSS} %m (%F:%L) \n"/>
        </layout>
    </appender>

    <logger name="java.sql">
        <level value="debug"/>
    </logger>
    <logger name="org.apache.ibatis" >
        <level value="info"/>
    </logger>

    <!-- 默认配置,级别为debug 且根据name为log.console和 log.file两个appender输出-->
    <root>
        <level value="debug"/>
        <appender-ref ref="STDOUT"/>
    </root>
</log4j:configuration>
SqlSessionUtil工具类
因为使用时,代码都一样,所以写成工具类,就不用重复写此代码了。
创建com.luhang.mybatis.utils.SqlSessionUtil类:
public class SqlSessionUtil {
    public static SqlSession getSqlSession(){
        SqlSession sqlSession=null;
        try {
            // 获取核心配置文件的输入流
            InputStream is = Resources.getResourceAsStream("mybatis-config.xml");
            SqlSessionFactoryBuilder sqlSessionFactoryBuilder=new SqlSessionFactoryBuilder();
            SqlSessionFactory sqlSessionFactory = sqlSessionFactoryBuilder.build(is);
            sqlSession = sqlSessionFactory.openSession(true);
        } catch (IOException e) {
            e.printStackTrace();
        }
        return sqlSession;
    }
}
实现修改、删除、查询用户
目前使用,数据先写死。后边会讲解参数的获取。
查询注意:设置结果映射
resultType:设置结果类型,即查询数据要转换为java类型
resultMap:自定义映射,处理 多对一 或 一对多 的关系映射
MybatisTest
@Test
public void testUpdate(){
    SqlSession sqlSession = SqlSessionUtil.getSqlSession();
    UserMapper mapper = sqlSession.getMapper(UserMapper.class);
    mapper.updateUser();
    sqlSession.close();
}
@Test
public void testDelete(){
    SqlSession sqlSession = SqlSessionUtil.getSqlSession();
    UserMapper mapper = sqlSession.getMapper(UserMapper.class);
    mapper.deleteUser();
    sqlSession.close();
}

@Test
 public void testGetUserById(){
     SqlSession sqlSession = SqlSessionUtil.getSqlSession();
     UserMapper mapper = sqlSession.getMapper(UserMapper.class);
     User user = mapper.getUserById();
     sqlSession.close();
     System.out.println(user);
 }
 @Test
 public void testGetAllUser(){
     SqlSession sqlSession = SqlSessionUtil.getSqlSession();
     UserMapper mapper = sqlSession.getMapper(UserMapper.class);
     List<User> list = mapper.getAllUser();
     for (User user : list) {
         System.out.println(user);
     }
     sqlSession.close();
 }
UserMapper
/**
  * 修改用户
  */
 void updateUser();

 /**
  * 删除用户
  */
 void deleteUser();

/**
  * 根据id查询用户信息
  */
 User getUserById();

 /**
  * 查询所有用户信息
  */
 List<User> getAllUser();
UserMapper.xml
<!--    void updateUser(); -->
    <update id="updateUser">
        update t_user set username='root',password='123' where id = 3
    </update>

<!--    void deleteUser(); -->
    <delete id="deleteUser">
        delete from t_user where id = 3
    </delete>

<!--    User getUserById(); -->
<!--
    resultType:设置结果类型,即查询数据要转换为java类型
    resultMap:自定义映射,处理 多对一 或 一对多 的关系映射
-->
    <select id="getUserById" resultType="com.luhang.mybatis.pojo.User">
        select * from t_user where id = 1
    </select>

<!--    List<User> getAllUser(); -->
    <select id="getAllUser" resultType="com.luhang.mybatis.pojo.User">
        select * from t_user
    </select>
MyBatis核心配置文件
environments
mybatis-config.xml
<?xml version="1.0" encoding="UTF-8" ?>
<!DOCTYPE configuration
        PUBLIC "-//mybatis.org//DTD Config 3.0//EN"
        "http://mybatis.org/dtd/mybatis-3-config.dtd">

<configuration>
    <!--    environments:配置连接数据库的环境
            属性:
            default:设置默认使用的环境的id    -->
    <environments default="development">
<!--    environment:设置一个具体的连接数据库的环境
        属性:
        id:设置环境的唯一标识,不能重复        -->
        <environment id="development">
<!--        transactionManager:设置事务管理器
            属性:
            type:设置事务管理器的方式
            type="JDBC|MANAGED"
            JDBC:表示使用JDBC中原生的事务管理方式
            MANAGED:被管理,例如:Spring       -->
            <transactionManager type="JDBC"/>
<!--        dataSource:设置数据源
            属性:
            type:设置数据源的类型
            type="POOLED|UNPOOLED|JNDI"
            POOLED:表示使用数据库连接池
            UNPOOLED:表示不使用数据库连接池
            JNDI:表示使用上下文中的数据源        -->
            <dataSource type="POOLED">
                <property name="driver" value="com.mysql.jdbc.Driver"/>
                <property name="url" value="jdbc:mysql://localhost:3306/ssm"/>
                <property name="username" value="root"/>
                <property name="password" value="root"/>
            </dataSource>
        </environment>
    </environments>

    <!--    引入mybatis的映射文件 -->
    <mappers>
        <mapper resource="mappers/UserMapper.xml"/>
    </mappers>
</configuration>
properties
mybatis-config.xml
<?xml version="1.0" encoding="UTF-8" ?>
<!DOCTYPE configuration
        PUBLIC "-//mybatis.org//DTD Config 3.0//EN"
        "http://mybatis.org/dtd/mybatis-3-config.dtd">

<configuration>

<!-- 引入properties文件,就可以在当前文件中使用 ${key} 的方式f访问value      -->
    <properties resource="jdbc.properties"/>

    <environments default="development">
        <environment id="development">
            <transactionManager type="JDBC"/>
            <dataSource type="POOLED">
                <property name="driver" value="${jdbc.driver}"/>
                <property name="url" value="${jdbc.url}"/>
                <property name="username" value="${jdbc.username}"/>
                <property name="password" value="${jdbc.password}"/>
            </dataSource>
        </environment>
    </environments>

    <!--    引入mybatis的映射文件 -->
    <mappers>
        <mapper resource="mappers/UserMapper.xml"/>
    </mappers>
</configuration>
jdbc.properties
jdbc.driver=com.mysql.jdbc.Driver
jdbc.url=jdbc:mysql://localhost:3306/ssm?useSSL=true&useUnicode=true&characterEncoding=utf8
jdbc.username=root
jdbc.username=root
jdbc.password=root
如果使用的事 MySql 8.0+ ,则需加上一个时区配置:
&serverTimezone=Asia/Shanghai
typeAliases
mybatis-config.xml
<?xml version="1.0" encoding="UTF-8" ?>
<!DOCTYPE configuration
        PUBLIC "-//mybatis.org//DTD Config 3.0//EN"
        "http://mybatis.org/dtd/mybatis-3-config.dtd">

<configuration>
<!-- Mybatis核心配置文件中的标签必须要按照指定的顺序配置:
        "(properties?,settings?,typeAliases?,typeHandlers?,
        objectFactory?,objectWrapperFactory?,reflectorFactory?,plugins?,
        environments?,databaseIdProvider?,mappers?)".       -->

    <properties resource="jdbc.properties"/>

<!--    typeAliases:设置类型别名,即为某个具体的类型设置一个别名
        在Mybatis的范围中,就可以使用一个别名表示一个具体的类型     -->
    <typeAliases>
<!--     type:设置需要起别名的类型
         alias:设置某个类型的别名        -->

        <typeAlias type="com.luhang.mybatis.pojo.User" alias="abc"/>

<!--        若不设置alias,当前的类型拥有默认别名,即类名,且不区分大小写      -->
<!--        <typeAlias type="com.luhang.mybatis.pojo.User"/>-->

<!--        通过包来设置类型别名,指定包下所有的类型将全部拥有默认的别名,即类名,且不区分大小写      -->
<!--        <package name="com.luhang.mybatis.pojo"/>-->
    </typeAliases>

    <environments default="development">
        <environment id="development">
            <transactionManager type="JDBC"/>
            <dataSource type="POOLED">
                <property name="driver" value="${jdbc.driver}"/>
                <property name="url" value="${jdbc.url}"/>
                <property name="username" value="${jdbc.username}"/>
                <property name="password" value="${jdbc.password}"/>
            </dataSource>
        </environment>
    </environments>

    <!--    引入mybatis的映射文件 -->
    <mappers>
        <mapper resource="mappers/UserMapper.xml"/>
    </mappers>
</configuration>
userMapper.xml
<select id="getUserById" resultType="abc">
     select * from t_user where id = 1
 </select>

 <select id="getAllUser" resultType="abc">
     select * from t_user
 </select>
mappers
使用包的方式引入映射文件:需在resources创建目录com/luhang/mybatis/mapper,然后将UserMapper.xml移动到此目录下。
mybatis-config.xml
<?xml version="1.0" encoding="UTF-8" ?>
<!DOCTYPE configuration
        PUBLIC "-//mybatis.org//DTD Config 3.0//EN"
        "http://mybatis.org/dtd/mybatis-3-config.dtd">

<configuration>
    <properties resource="jdbc.properties"/>
    <typeAliases>
<!--        <typeAlias type="com.luhang.mybatis.pojo.User" alias="abc"/>-->
<!--        <typeAlias type="com.luhang.mybatis.pojo.User"/>-->
        <package name="com.luhang.mybatis.pojo"/>
    </typeAliases>

    <environments default="development">
        <environment id="development">
            <transactionManager type="JDBC"/>
            <dataSource type="POOLED">
                <property name="driver" value="${jdbc.driver}"/>
                <property name="url" value="${jdbc.url}"/>
                <property name="username" value="${jdbc.username}"/>
                <property name="password" value="${jdbc.password}"/>
            </dataSource>
        </environment>
    </environments>

<!--    引入mybatis的映射文件 -->
    <mappers>
     <!--   注意:用此方式映入配置文件用 / 分隔 -->
<!--        <mapper resource="mappers/UserMapper.xml"/>-->

<!--        以包的方式引入映射文件,但必须满足两个条件:
            1、mapper接口和映射文件所在的包必须一致
            2、mapper接口的名字和映射文件的名字必须一致       -->
        <package name="com.luhang.mybatis.mapper"/>
    </mappers>
</configuration>
看UserMapper与UserMapper.xml文件 :
都加载到了类路径下:
idea创建mybatis核心配置文件和映射文件的模版
点击OK
使用模板:
mybatis核心配置文件模版:
<?xml version="1.0" encoding="UTF-8" ?>
<!DOCTYPE configuration
        PUBLIC "-//mybatis.org//DTD Config 3.0//EN"
        "http://mybatis.org/dtd/mybatis-3-config.dtd">

<configuration>
    <!-- Mybatis核心配置文件中的标签必须要按照指定的顺序配置:
        "(properties?,settings?,typeAliases?,typeHandlers?,
        objectFactory?,objectWrapperFactory?,reflectorFactory?,plugins?,
        environments?,databaseIdProvider?,mappers?)".       -->
    <properties resource="jdbc.properties"/>
    <typeAliases>
        <!--        <typeAlias type="com.luhang.mybatis.pojo.User" alias="abc"/>-->
        <!--        <typeAlias type="com.luhang.mybatis.pojo.User"/>-->
        <package name="com.luhang.mybatis.pojo"/>
    </typeAliases>

    <environments default="development">
        <environment id="development">
            <transactionManager type="JDBC"/>
            <dataSource type="POOLED">
                <property name="driver" value="${jdbc.driver}"/>
                <property name="url" value="${jdbc.url}"/>
                <property name="username" value="${jdbc.username}"/>
                <property name="password" value="${jdbc.password}"/>
            </dataSource>
        </environment>
    </environments>

    <mappers>
        <package name="com.luhang.mybatis.mapper"/>
    </mappers>
</configuration>
映射文件模版也同样操作。模版名称为mybatis-mapper。
映射文件模版:
<?xml version="1.0" encoding="UTF-8" ?>
<!DOCTYPE mapper
        PUBLIC "-//mybatis.org//DTD Mapper 3.0//EN"
        "http://mybatis.org/dtd/mybatis-3-mapper.dtd">

<mapper namespace="com.luhang.mybatis.mapper.UserMapper">

</mapper>
MyBatis获取参数值
MyBatis获取参数值的两种方式:
${}:本质是字符串拼接。
使用字符串拼接的方式拼接sql,若为字符串类型或日期类型的字段进行赋值时,需要手动添加单引号,否则会被当字段来用。#{}:本质是占位符赋值。
使用占位符的方式拼接sql,此时为字符串类型的字段进行赋值时,可以自动添加单引号。
单个字面量类型参数
参数为单个字面量类型(从字面上看见的是什么就是什么)。比如基本数据类型,字符串,包装类。
UserMapper.java
User getUserByUserName(String username);
UserMapper.xml
<!-- sql中获取参数的username,可以是任意内容,比如aaa,bbb。也能实现查询 -->
<!-- 占位符方式 -->
<select id="getUserByUserName" resultType="User">
    select * from t_user where username = #{username}
</select>
<!-- 字符串拼接方式 -->
<select id="getUserByUserName" resultType="User">
    select * from t_user where username = '${username}'
</select>
多个字面量类型参数
mapper接口方法的参数为多个字面量类型时,MyBatis会将参数放在Map集合中,以两种方式存储数据:
- 以 arg0,arg1,arg2 … 为键,以参数为值。
- 以param1,param2 … 为键,以参数为值。
因此,只需通过 #{ } 和 ${ } 访问Map集合的键,就可以获取相对应的值。
UserMapper.java
User checkLogin(String username, String password);
UserMapper.xml
<select id="checkLogin" resultType="User">
    select * from t_user where username=#{arg0} and password=#{arg1}
</select>

<select id="checkLogin" resultType="User">
    select * from t_user where username=#{param1} and password=#{param2}
</select>
Map参数
mapper接口方法的参数为map集合类型时,只需通过 #{ } 和 ${ } 访问Map集合的键,就可以获取相对应的值。
UserMapper.java
User checkLoginByMap(Map<String, Object> map);
UserMapper.xml
<select id="checkLoginByMap" resultType="User">
    select * from t_user where username=#{username} and password=#{password}
</select>
实体类类型参数(常用)
只需通过 #{ } 和 ${ } 访问实体类的属性名,就可以获取相对应的属性值。
注意:此属性名跟成员变量没有关系,只跟getter、setter方法有关系。(把方法名的get和set去掉,剩余字母首字母小写后,就是属性名)即没有成员变量,但有getter、setter方法,也是可以访问到所对应的属性的。
UserMapper.java
void insertUser(User user);
UserMapper.xml
<insert id="insertUser">
    insert into t_user values (null,#{username},#{password},#{age},#{gender},#{email})
</insert>
命名参数 @Param(常用)
mapper接口方法的参数上设置@Param注解。(除了实体类类型的参数,其他都可以设置)
- 以@Param注解的value属性值为键,以参数为值。
- 以param1,param2 … 为键,以参数为值。
只需通过 #{ } 和 ${ } 访问Map集合的键,就可以获取相对应的值。
UserMapper.java
User checkLoginByParam(@Param("username") String username, @Param("password") String password);
UserMapper.xml
<select id="checkLoginByParam" resultType="User">
    select * from t_user where username=#{username} and password=#{password}
</select>
查询功能
若sql语句查询的结果为多条时,一定不能以实体类类型作为方法的返回值。否则抛出异常:TooManyResultsException。
若sq语句查询的结果为1条时,此时可以使用实体类类型或list集合作为方法的返回值。
查询一个实体类对象
SelectMapper.java
User getUserById(@Param("id") Integer id);
SelectMapper.xml
<select id="getUserById" resultType="User">
    select * from t_user where id=#{id}
</select>
查询一个list集合
SelectMapper.java
List<User> getAllUser();
SelectMapper.xml
<select id="getAllUser" resultType="User">
    select * from t_user
</select>
查询当行单列
MyBatis中为Java中常用的类型设置了类型别名(常见的java类型内建的类型别名):
8个基本数据类型的别名为: _小写类型名
引用数据类型的别名为:小写类型名
或者用引用数据类型的全限定名。
Integer:Integer,intint:_int,_integerMap:mapString:string
还有很多其他的,有需要可以去官方文档中查询核心配置文件的别名。
SelectMapper.java
Integer getCount();
SelectMapper.xml
<select id="getCount" resultType="int">
    select count(*) from t_user
</select>
查询Map(常用)
查询的结果没有对应的实体类时,使用Map集合。
查询为 NULL 的字段是不会放到Map集合中。
一条数据查询为Map:
SelectMapper.java
Map<String,Object> getUserByIdToMap(@Param("id") Integer id);
SelectMapper.xml
<select id="getUserByIdToMap" resultType="map">
    select * from t_user where id=#{id}
</select>
多条数据查询为Map:
查询的数据有多条时,且要将每条数据转为map集合:
-
将mapper接口方法的返回值设置为泛型是Map的List集合。一条数据对应一个Map。
-
将每条数据转换的Map集合放在一个大的Map中,但是必须要通过**@MapKey注解**。
将查询的某个字段的值作为大的Map键。
SelectMapper.java
// 方式1:
List<Map<String,Object>> getAllUserToMap();

// 方式2:
@MapKey("id")
Map<String,Object> getAllUserToMap();
SelectMapper.xml
<select id="getAllUserToMap" resultType="map">
    select * from t_user
</select>
测试
 @Test
 public void testGetAllUserToMap(){
      SqlSession sqlSession = SqlSessionUtil.getSqlSession();
      SelectMapper mapper = sqlSession.getMapper(SelectMapper.class);
	  // 方式1:
//        List<Map<String, Object>> map = mapper.getAllUserToMap();
	  // 方式2:
      Map<String, Object> map = mapper.getAllUserToMap();
      System.out.println(map);
  }
特殊SQL的执行
模糊查询
SpecialSQLMapper.java
User getUserByLike(@Param("mohu") String mohu);
SpecialSQLMapper.xml:以下3种方式都可用,建议使用最后一个方式。
<select id="getUserByLike" resultType="User">
    select * from t_user where username like '%${mohu}%'
    select * from t_user where username like concat('%',#{mohu},'%')
    select * from t_user where username like "%"#{mohu}"%"
</select>
批量删除
SpecialSQLMapper.java
void deleteMoreUser(@Param("ids") String ids);
SpecialSQLMapper.xml
<!-- ids: 9,10  -->
<delete id="deleteMoreUser">
    delete from t_user where id in(${ids})
</delete>
动态设置表名
动态设置表名,来查询用户信息。
SpecialSQLMapper.java
List<User> getUserList(@Param("tableName") String tableName);
SpecialSQLMapper.xml
<select id="getUserList" resultType="User">
    select * from ${tableName}
</select>
添加功能获取自增的主键
useGeneratedKeys:表示当前添加功能使用自增的主键。
keyProperty:将添加的数据的自增主键为实体类类型的参数的属性赋值。
SpecialSQLMapper.java
void insertUser(User user);
SpecialSQLMapper.xml
<insert id="insertUser" useGeneratedKeys="true" keyProperty="id">
    insert into t_user values (null,#{username},#{password},#{age},#{gender},#{email})
</insert>
自定义映射resultMap
resultMap处理字段和属性的映射关系
字段名和属性名不一致时,如何处理映射关系?
- 为查询的字段设置别名,和属性名保持一致。
- 当字段符合MYSQL的要求使用
_,而属性符合java的要求使用驼峰。此时可以在MyBatis的核心配置文件中设置一个全局配置,可以自动将下划线映射为驼峰。eg:emp_id ⇒ empId 。 - 使用resultMap自定义映射处理。
resultMap:设置自定义映射关系。
id:唯一标识
type:处理映射关系的实体类的类型。
常用标签:id:处理主键和实体类中属性的映射关系。result:处理普通字段和实体类中属性的映射关系。association:处理多对一的映射关系(处理实体类类型的属性)。collection:处理一对多的映射关系(处理集合类型的属性)。column:设置映射关系中的字段名,必须是sql查询出的某个字段。property:设置映射关系中的属性的属性名,必须是处理的实体类类型中的属性名。
mybatis-config.xml
<settings>
    <!-- 方式2: -->
    <!--  将下划线映射为驼峰 -->
    <setting name="mapUnderscoreToCamelCase" value="true"/>
</settings>
EmpMapper.java
Emp getEmpByEmpId(@Param("empId") Integer empId);
EmpMapper.xml
<!-- 方式3: -->
<resultMap id="empResultMap" type="Emp">
   <id column="emp_id" property="empId"/>
   <result column="emp_name" property="empName"/>
   <result column="age" property="age"/>
   <result column="gender" property="gender"/>
</resultMap>
<select id="getEmpByEmpId" resultMap="empResultMap">
   select * from t_emp where emp_id=#{empId}
</select>

<select id="getEmpByEmpId" resultType="Emp">
	<!-- 方式1: -->
    select emp_id empId,emp_name empName,age,gender from t_emp where emp_id=#{empId}
    <!-- 方式2:需在mybatis-config.xml中配置映射驼峰 -->
    select * from t_emp where emp_id=#{empId}
</select>
多对一的映射处理
(注意:一对一。一个订单从属于一个用户,所以mybatis将多对一看成一对一。)
- 级联处理
- association处理
association:处理多对一的映射关系(处理实体类类型的属性)。property:设置需要处理映射关系的属性的属性名。javaType:设置要处理的属性的类型。
- 分步查询
property:设置需要处理映射关系的属性的属性名。select:设置分步查询的sql的唯一标识。column:将查询出的某个字段作为分步查询的sql条件。fetchType:在开启了延迟加载的环境中,通过该属性设置当前的分步查询是否使用延迟加载。fetchType = " eager(立即加载) | lazy(延迟加载) "。
分步查询的优点:可以实现延迟加载。
但必须要核心配置文件中设置全局配置信息:
lazyLoadingEnabled:延迟加载的全局开关。当开启时,所有关联对象都会延迟加载。aggressiveLazyLoading:当开启时,任何方法的调用都会加载该对象的所有属性。否则,每个属性都会按需加载。
此时就可以实现按需加载,获取的数据是什么,就会执行相应的sql。可通过association和collection中的fetchType属性设置当前的分步查询是否使用延迟加载。
class Emp{
	private Integer empId;
	private String empName;
	private Integer age;
	private String gender;
	private Dept dept;
	// setter、getter、构造、toString 略
}
class Dept {
    private Integer deptId;
    private String deptName;
    // setter、getter、构造、toString 略
}
EmpMapper.java
Emp getEmpAndDeptByEmpId(@Param("empId") Integer empId);

// 分步查询第一步:
Emp getEmpAndDeptByStepOne(@Param("empId") Integer empId);
EmpMapper.xml
<!-- 级联处理 -->
<resultMap id="empAndDeptResultMap" type="Emp">
    <id column="emp_id" property="empId"/>
    <result column="emp_name" property="empName"/>
    <result column="age" property="age"/>
    <result column="gender" property="gender"/>
    <result column="dept_id" property="dept.deptId"/>
    <result column="dept_name" property="dept.deptName"/>
</resultMap>
<!-- association处理 -->
<resultMap id="empAndDeptResultMap" type="Emp">
    <id column="emp_id" property="empId"/>
    <result column="emp_name" property="empName"/>
    <result column="age" property="age"/>
    <result column="gender" property="gender"/>
    <association property="dept" javaType="Dept">
        <id column="dept_id" property="deptId"/>
        <result column="dept_name" property="deptName"/>
    </association>
</resultMap>

<select id="getEmpAndDeptByEmpId" resultMap="empAndDeptResultMap">
    select
    t_emp.* , t_dept.*
    from t_emp
    left join t_dept
    on t_emp.dept_id = t_dept.dept_id
    where t_emp.emp_id = #{empId}
</select>

<!-- 分步查询 -->
<resultMap id="empAndDeptByStepResultMap" type="Emp">
    <id column="emp_id" property="empId"/>
    <result column="emp_name" property="empName"/>
    <result column="age" property="age"/>
    <result column="gender" property="gender"/>
    <association property="dept"  fetchType="eager"
                 select="com.luhang.mybatis.mapper.DeptMapper.getEmpAndDeptByStepTwo"
                 column="dept_id"></association>
</resultMap>
<select id="getEmpAndDeptByStepOne" resultMap="empAndDeptByStepResultMap">
    select * from t_emp where emp_id=#{empId}
</select>
DeptMapper.java
// 分步查询第二步:
Dept getEmpAndDeptByStepTwo(@Param("empId") Integer empId);
DeptMapper.xml
<select id="getEmpAndDeptByStepTwo" resultType="Dept">
    select * from t_dept where dept_id=#{deptId}
</select>
一对多的映射处理
- collection
ofType:设置集合类型的属性中存储的数据的类型。
- 分步查询
public class Dept {
    private Integer deptId;
    private String deptName;
    private List<Emp> emps;
    // setter、getter、构造、toString 略
}
DeptMapper.java
Dept getDeptAndEmpByDeptId(@Param("deptId") Integer deptId);

// 分步查询第一步:
Dept getDeptAndEmpByStepOne(@Param("deptId") Integer deptId);
DeptMapper.xml
<resultMap id="deptAndEmpResultMap" type="Dept">
    <id column="dept_id" property="deptId"/>
    <result column="dept_name" property="deptName"/>
    <collection property="emps" ofType="Emp">
        <id column="emp_id" property="empId"/>
        <result column="emp_name" property="empName"/>
        <result column="age" property="age"/>
        <result column="gender" property="gender"/>
    </collection>
</resultMap>
<select id="getDeptAndEmpByDeptId" resultMap="deptAndEmpResultMap">
    select *
    from  t_dept
    left join t_emp
    on t_dept.dept_id = t_emp.dept_id
    where t_dept.dept_id  = #{deptId}
</select>

<!-- 分步查询 -->
<resultMap id="deptAndEmpEesultMapByStep" type="Dept">
    <id column="dept_id" property="deptId"/>
    <result column="dept_name" property="deptName"/>
    <collection property="emps" fetchType="eager"
                select="com.luhang.mybatis.mapper.EmpMapper.getDeptAndEmpByStepTwo"
                column="dept_id"></collection>
</resultMap>
<select id="getDeptAndEmpByStepOne" resultMap="deptAndEmpEesultMapByStep">
    select * from t_dept where dept_id=#{deptId}
</select>
EmpMapper.java
// 分步查询第二步
List<Emp> getDeptAndEmpByStepTwo(@Param("deptId") Integer deptId);
EmpMapper.xml
<select id="getDeptAndEmpByStepTwo" resultType="Emp">
    select * from t_emp where dept_id=#{deptId}
</select>
动态SQL
根据特定条件动态拼装SQL语句的功能,解决了拼接SQL语句字符串的痛点。
DynamicSQLMapper.java
List<Emp> getEmpByCondition(Emp emp);
if
通过test属性中的表达式判断标签中的内容是否有效(是否会拼接到sql中)
DynamicSQLMapper.xml
<select id="getEmpByCondition" resultType="Emp">
     select * from t_emp where
     <if test="empName != null and empName!='' ">
         emp_name = #{empName}
     </if>
     <if test="age != null and age != '' ">
         and age = #{age}
     </if>
     <if test="gender != null and gender != '' " >
         and gender = #{gender}
     </if>
 </select>
此时,当empName为空时,会报sql语句错误。
解决1:用where标签。
解决2:用trim标签。
解决3:加 1=1 and 。如下:
<select id="getEmpByCondition" resultType="Emp">
     select * from t_emp where 1=1
     <if test="empName != null and empName!='' ">
         and emp_name = #{empName}
     </if>
     <if test="age != null and age != '' ">
         and age = #{age}
     </if>
     <if test="gender != null and gender != '' " >
         and gender = #{gender}
     </if>
 </select>
where
- 若where标签中有条件成立,会自动生成where关键字。
- 会自动将where标签中内容前多余的and去掉,但是其中内容后多余的and无法去掉。
- 若where标签中没有任何一个条件成立,则where没有任何功能。
DynamicSQLMapper.xml
 <select id="getEmpByCondition" resultType="Emp">
        select * from t_emp
        <where>
            <if test="empName != null and empName!='' ">
                emp_name = #{empName}
            </if>
            <if test="age != null and age != '' ">
                and age = #{age}
            </if>
            <if test="gender != null and gender != '' " >
                and gender = #{gender}
            </if>
        </where>
    </select>
trim
prefix、suffix:在标签中内容前面或后面添加指定内容。prefixOverrides、suffixOverrides:在标签中内容前面或后面去掉指定内容。
DynamicSQLMapper.xml
<select id="getEmpByCondition" resultType="Emp">
    select * from t_emp
    <trim prefix="where" suffixOverrides="and">
        <if test="empName != null and empName!='' ">
            emp_name = #{empName} and
        </if>
        <if test="age != null and age != '' ">
            age = #{age} and
        </if>
        <if test="gender != null and gender != '' " >
            gender = #{gender}
        </if>
    </trim>
</select>
choose、when、otherwise
相当于java中的 if … else if … else 。
when至少设置一个,otherwise最多设置一个。
DynamicSQLMapper.java
List<Emp> getEmpByChoose(Emp emp);
DynamicSQLMapper.xml
<select id="getEmpByChoose" resultType="Emp">
      select * from t_emp
      <where>
          <choose>
              <when test="empName != null and empName!='' ">
                  emp_name = #{empName}
              </when>
              <when test="age != null and age != ''">
                  age = #{age}
              </when>
              <when test="gender != null and gender != ''">
                  gender = #{gender}
              </when>
          </choose>
      </where>
  </select>
foreach
- 批量添加
- 批量删除
colleciton:设置循环的数组或集合。item:用一个字符串表示数组或集合中的每一个数据。separator:设置每次循环的数据之间的分隔符。open:循环的所有内容以什么开始。close:循环的所有内容以什么结束。
DynamicSQLMapper.java
// 批量添加
void insertMoreEmp(@Param("emps") List<Emp> emps);
// 批量删除
void deleteMoreEmp(@Param("empIds") Integer[] empIds);
DynamicSQLMapper.xml
<!-- 批量添加 -->
<insert id="insertMoreEmp">
    insert into t_emp values
    <foreach collection="emps" item="emp" separator=",">
        (null,#{emp.empName},#{emp.age},#{emp.gender},null)
    </foreach>
</insert>

<!-- 批量删除 -->
<delete id="deleteMoreEmp">
    <!-- 方式1:-->
    delete from  t_emp where emp_id in
    (
        <foreach collection="empIds" item="empId" separator=",">
            #{empId}
        </foreach>
    )

    <!-- 方式2:-->
    delete from  t_emp where emp_id in
    <foreach collection="empIds" item="empId" separator="," open="(" close=")">
        #{empId}
    </foreach>

    <!-- 方式3:-->
    delete from  t_emp where
    <foreach collection="empIds" item="empId" separator="or">
        emp_id = #{empId}
    </foreach>
</delete>
SQL片段
可以记录一段sql,在需要用的地方使用include标签进行引用。
<!-- 定义SQL片段 -->
<sql id="empColumns">
    emp_id,emp_name,age,gender,dept_id
</sql>

<!-- 使用SQL片段 -->
<select id="getEmpByCondition" resultType="Emp">
    select <include refid="empColumns" /> from t_emp
    <trim prefix="where" suffixOverrides="and">
        <if test="empName != null and empName!='' ">
            emp_name = #{empName} and
        </if>
        <if test="age != null and age != '' ">
            age = #{age} and
        </if>
        <if test="gender != null and gender != '' " >
            gender = #{gender}
        </if>
    </trim>
</select>
MyBatis缓存
MyBatis的一级缓存
Mybatis的一级缓存是SqlSession级别的,默认开启。
即通过同一个SqlSession查询的数据会被缓存。再次使用同一个SqlSession查询同一条数据,会从缓存中获取。
使一级缓存失效的四种情况:
- 不同的SqlSession对应不同的一级缓存。
- 同一个SqlSession但查询条件不同。
- 同一个SqlSession两次查询期间执行了任何一次增删改操作。
- 同一个SqlSession两次查询期间手动清空了缓存。
Test.java
public void testGetEmpById(){
     SqlSession sqlSession = SqlSessionUtil.getSqlSession();
     CacheMapper mapper = sqlSession.getMapper(CacheMapper.class);
     Emp emp = mapper.getEmpById(1);
     System.out.println(emp);
     // 只查询了一次,因为使用同一个SqlSession,有缓存
     Emp emp2 = mapper.getEmpById(1);
     System.out.println(emp2);
 }
CacheMapper.java
Emp getEmpById(@Param("empId") Integer empId);
CacheMapper.xml
<select id="getEmpById" resultType="Emp">
    select * from t_emp where emp_id=#{empId}
</select>
MyBatis的二级缓存
MyBatis的二级缓存是SqlSessionFactory级别的。即通过同一个SqlSeesionFactory所获取的SqlSession对象查询的数据会被缓存,再通过同一个SqlSessionFactory所获取的SqlSession查询相同的数据会从缓存中获取。
MyBatis二级缓存开启的条件:
- 在核心配置文件中,设置全局配置属性
cacheEnabled="true",默认为true,不需要设置。 - 在映射文件中设置标签
<cache/>。 - 二级缓存必须在SqlSession关闭或提交之后有效。
- 查询的数据所转换的实体类类型必须实现序列化的接口。
使二级缓存失效的情况:
两次查询之间执行了任意的增删改,会使一级和二级缓存同时失效。
test.java
public void testCache() throws IOException {
    InputStream is = Resources.getResourceAsStream("mybatis-config.xml");
    SqlSessionFactory sqlSessionFactory = new SqlSessionFactoryBuilder().build(is);

    SqlSession sqlSession1 = sqlSessionFactory.openSession(true);
    CacheMapper mapper1 = sqlSession1.getMapper(CacheMapper.class);
    Emp emp1 = mapper1.getEmpById(1);
    System.out.println(emp1);
    sqlSession1.close();

    SqlSession sqlSession2 = sqlSessionFactory.openSession(true);
    CacheMapper mapper2 = sqlSession2.getMapper(CacheMapper.class);
    Emp emp2 = mapper2.getEmpById(1);
    System.out.println(emp2);
    sqlSession2.close();
}
Emp.java
public class Emp implements Serializable {
    private Integer empId;
    private String empName;
    private Integer age;
    private String gender;
	// setter、getter、构造、toString 略
}
CacheMapper.xml
<mapper namespace="com.luhang.mybatis.mapper.CacheMapper">

    <cache/>

    <select id="getEmpById" resultType="Emp">
        select * from t_emp where emp_id=#{empId}
    </select>
</mapper>
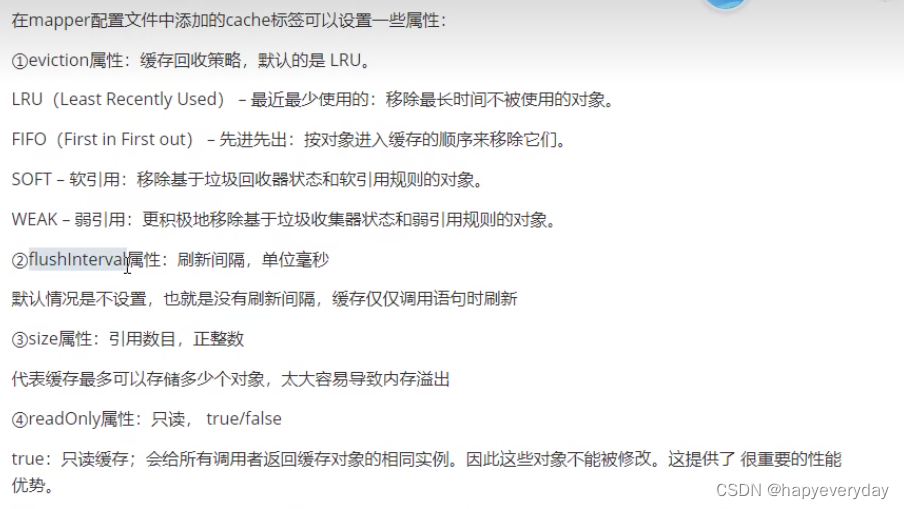
二级缓存的相关配置(了解)
了解即可
MyBais缓存查询的顺序
先查询二级缓存,因为二级缓存可能会有其他程序已经查出来的数据,可以拿来直接使用。
如果二级缓存没有命中,再查询一级缓存。
如果一级缓存也没有命中,则查询数据库。
SqlSession关闭之后,一级缓存中的数据会写入二级缓存。
MyBatis整合第三方缓存(了解)
1、添加依赖:
<!-- MyBatis EHCache整合包 -->
        <dependency>
            <groupId>org.mybatis.caches</groupId>
            <artifactId>mybatis-ehcache</artifactId>
            <version>1.2.1</version>
        </dependency>
        <!-- slf4j日志门面的一个具体实现 -->
        <dependency>
            <groupId>ch.qos.logback</groupId>
            <artifactId>logback-classic</artifactId>
            <version>1.2.3</version>
        </dependency>
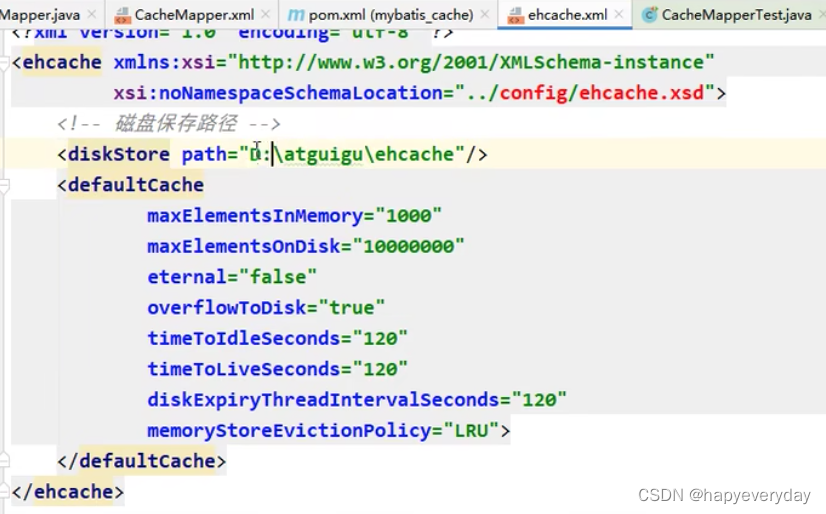
2、在resources下创建ehcache.xml:
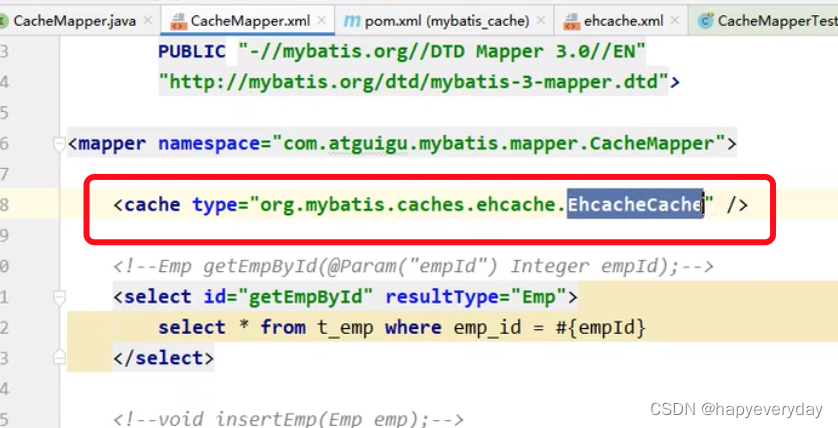
3、在映射文件中的cache中,设置二级缓存的类型。否则用默认的二级缓存。
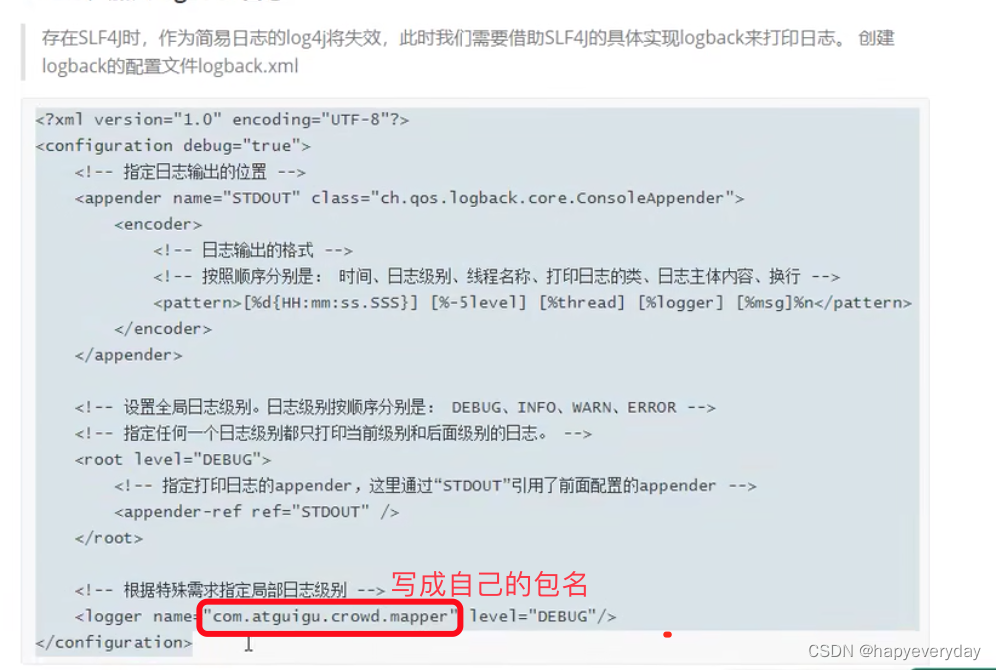
4、加入logback日志:
运行查询功能查看效果。
默认二级缓存与第三方缓存功能一样,只是实现过程效果不一样。
MyBatis的逆向工程
正向工程:先创建java实体类,由框架负责根据实体类生成数据库表。Hibernate是支持正向工程的。
逆向工程:先创建数据库表,由框架负责根据数据库表,反向生成如下资源:
- java实体类
- Mapper接口
- Mapper映射文件
有需要用再来学吧。(尚硅谷ssm 58-59集)
pom.xml
<!--  控制Maven在构建过程中相关配置  -->
<build>
    <!-- 构建过程中用到的插件  -->
    <plugins>
        <!-- 具体插件,逆向工程的操作是以构建过程中插件形式出现的  -->
        <plugin>
            <groupId>org.mybatis.generator</groupId>
            <artifactId>mybatis-generator-maven-plugin</artifactId>
            <version>1.3.0</version>
            <!-- 插件的依赖  -->
            <dependencies>
                <dependency>
                    <groupId>org.mybatis.generator</groupId>
                    <artifactId>mybatis-generator-core</artifactId>
                    <version>1.3.2</version>
                </dependency>
                <!--  MySQL驱动 -->
                <dependency>
                    <groupId>mysql</groupId>
                    <artifactId>mysql-connector-java</artifactId>
                    <version>5.1.39</version>
                </dependency>
            </dependencies>
        </plugin>
    </plugins>
</build>
分页插件
在sql中: limit index, pageSize
pageSize:每页显示的条数
pageNum:当前页的页码
index:当前页的起始索引,index = ( pageNum - 1 ) * pageSize
count:总记录数
totalPage:总页数
totalPage = count / pageSize;
if ( count% pageSize != 0 ) totalPage += 1;
pageSize=4 , pageNum =1, index=0 limit 0,4;
分页插件使用步骤:
- 添加依赖
<dependency>
    <groupId>com.github.pagehelper</groupId>
    <artifactId>pagehelper</artifactId>
    <version>5.1.2</version>
</dependency>
- 在 mybatis-config.xml 中配置分页插件。
<plugins>
    <!-- 配置分页插件-->
    <plugin interceptor="com.github.pagehelper.PageInterceptor"></plugin>
</plugins>
按两下shift,点击classes搜索PageInterceptor右击获取全限定名。

4. 测试,在DynamicSQL模块中测。
public void testPage(){
     SqlSession sqlSession = SqlSessionUtil.getSqlSession();
     DynamicSQLMapper mapper = sqlSession.getMapper(DynamicSQLMapper.class);
     // 查询功能之前开启分页功能
     Page<Object> page = PageHelper.startPage(1, 4);
     // Page继承ArrayList,也可以把Page设为查询的返回值
     List<Emp> emps = mapper.getEmpByCondition(null);
     // 查询功能之后,获取分页相关所有数据
     PageInfo<Emp> pageInfo=new PageInfo<Emp>(emps,1); //  navigatePages:导航分页的页码数
     // PageInfo 里的信息比 Page 的多, 到时候需要哪些数据,就访问哪个数据
     for (Emp emp : emps) {
         System.out.println(emp);
     }
     System.out.println(page);
     System.out.println(pageInfo);
 }
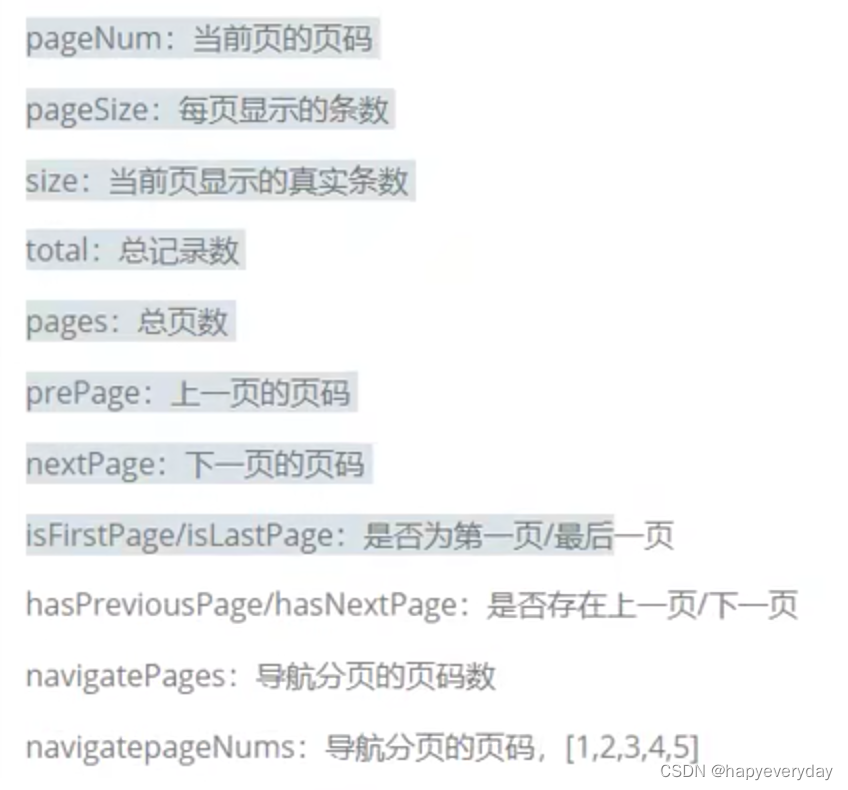
PageInfo中的数据:
Spring
Spring 基础框架,可以视为Spring基础设施,基本上任何其他Spring项目都是以Spirng Framework为基础的。
Spirng Framework特性:
- 非侵入性:使用Spring Framework开发应用程序时,Spring对应用程序本身的结构影响非常小。对领域模型可以做到零污染。对功能性组价也只需使用几个简单的注解进行标记,完全不会破坏原有结构。
- 控制反转(IOC):翻转资源获取方向。把自己创建资源、向环境索取资源 变成 环境将资源准备好,我们享受资源注入。
- 面向切面编程(AOP):在不改变源代码的基础上增强代码功能。
- 容器:Spring IOC是一个容器,因为它包含并管理组件对象的生命周期。组件享受到了容器化的管理,替程序屏蔽了组件创建过程中给的大量细节,极大的降低了使用门槛,大幅度提高了开发效率。
- 组件化:Spring实现了简单的组件配置组合成一个复杂的应用。
- 声明式:很多以前需要编写代码才能实现的功能,现在只需要声明需求即可由框架代为实现。
- 一站式:在IOC和AOP的基础上可以整合各种企业应用的开源框架和优秀的第三方类库。
Spring Framework五大功能模块
| 功能模块 | 功能介绍 |
|---|---|
| Core Container | 核心容器,在Spring环境下使用任何功能都必须基于IOC容器。 |
| AOP&Aspects | 面向切面编程 |
| Testing | 提供了对junit或TestNG测试框架的整合 |
| Data Access / Integration | 提供了对数据访问 / 集成的功能 |
| Spring MVC | 提供了面向Web应用程序的集成功能 |
IOC
IOC:反转控制。反转了资源获取方向——改由容器主动的将资源推送给需要的组件,开发人员无需知道容器是如何创建资源对象的,只需提供接收资源的方式即可。
DI:依赖注入。就是为当前Spring所管理的对象中的属性进行赋值。即组件以一些预先定义好的方式接受来自容器的资源注入。
IOC容器在Spring中的实现
Spring的IOC容器就是IOC思想的一个落地的产品实现。IOC容器中管理的组件也叫做bean。在创建bean之前,首先需要创建IOC容器。Spring提供了IOC容器的两种实现方式。
BeanFactory:是IOC容器额基本实现,是Spring内部使用的接口。面向Srping本身,不提供给开发人员使用。ApplicationContext:BeanFactory的子接口,提供了许多高级特性。面向Spring的使用者。
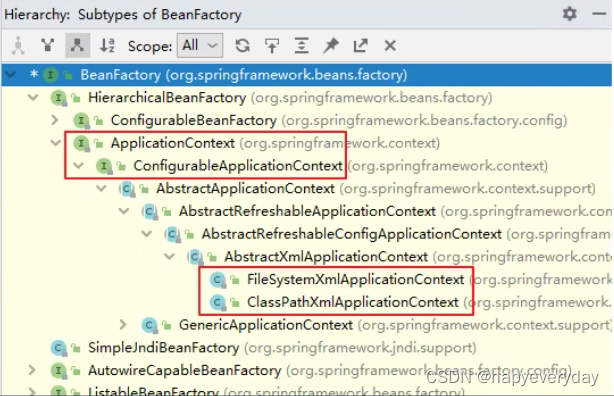
ApplicationContxt的主要实现类:
| 类型名 | 简介 |
|---|---|
| ClassPathXmlApplicationContext | 通过读取类路径下的XML格式的配置文件创建IOC容器对象 |
| FileSystemXmlApplicationContext | 通过文件系统路径读取XML格式的配置文件创建IOC容器对象 |
| ConfigurableApplicationContext | ApplicationContext的子接口,包含一些扩展方法 refresh() 和 colse() ,让ApplicationContext具有启动、关闭和刷新上下文的能力。 |
| WebApplicationContext | 专门为Web应用准备,基于Web环境创建IOC容器对象,并将对象引入存入ServletContext域中。 |
基于XML管理bean
也可以用于管理第三方jar包里的类。
引入依赖:
<dependencies>
    <dependency>
        <groupId>org.springframework</groupId>
        <artifactId>spring-context</artifactId>
        <version>5.3.1</version>
    </dependency>

    <dependency>
        <groupId>junit</groupId>
        <artifactId>junit</artifactId>
        <version>4.12</version>
        <scope>test</scope>
    </dependency>
</dependencies>
HelloWord类
public class HelloWord {
    public void sayHello(){
        System.out.println("hello,spring");
    }
}
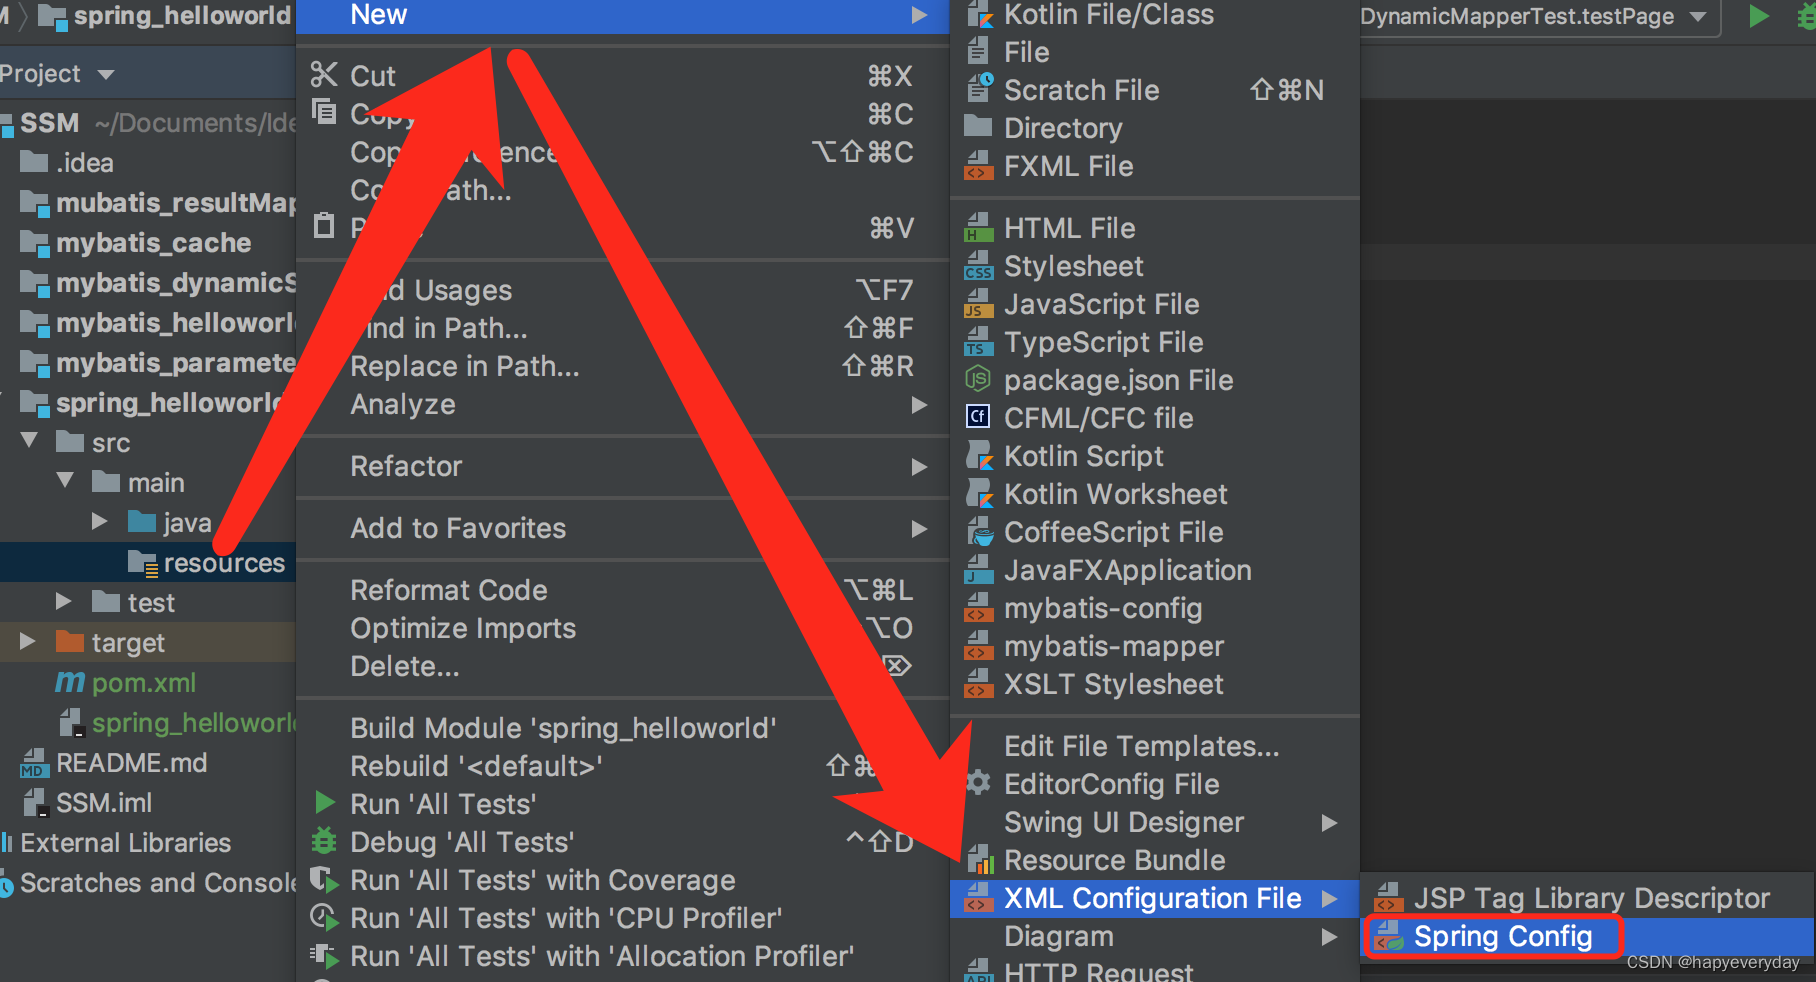
创建Spring的配置文件:
在Spring的配置文件中配置bean:
ApplicationContext.xml
<?xml version="1.0" encoding="UTF-8"?>
<beans xmlns="http://www.springframework.org/schema/beans"
       xmlns:xsi="http://www.w3.org/2001/XMLSchema-instance"
       xsi:schemaLocation="http://www.springframework.org/schema/beans http://www.springframework.org/schema/beans/spring-beans.xsd">

    <!--  bean:配置一个bean对象,将对象交给IOC容器管理
          属性:
           id:bean的唯一标识,不能重复
           class:设置bean对象所对应的内容     -->
    <bean id="helloworld" class="com.luhang.spring.pojo.HelloWord"></bean>
</beans>
测试类
public void test(){
    // 获取 IOC 容器
    ApplicationContext ioc = new ClassPathXmlApplicationContext("applicationContext.xml");
    // 获取 IOC 容器中的 bean
    HelloWord helloworld = (HelloWord)ioc.getBean("helloworld");
    helloworld.sayHello();
}
IOC容器创建对象方式
-
根据bean的id获取。 -
根据bean的类型获取。要求IOC容器中 有且只有一个类型匹配的bean。(用的最多)若没有任何一个类型匹配的bean,报错:NoSuchBeanDefinitionException。
若多个类型匹配的bean,报错:NoUniqueBeanDefinitionException。
-
根据bean的 id 和类型获取。
扩展:
如果组件类实现了接口,根据接口类型可以获取bean吗?
可以,前提是bean唯一。
若果一个接口有多个实现类。这些实现类都配置类了bean,根据接口类型可以获取bean吗?
不行,因为bean不唯一。
结论:
根据类型来获取bean时,在满足bean唯一性的前提下,其实只是看: 对象 instanceof 指定的类型 的返回结果,只要返回时true就可以认定为和类型匹配,能够获取到。
interface Person {
}

public class Student implements Person{
    private Integer sid;
    private String name;
    private Integer age;
    private String gender;
	// setter、getter、构造、toString 略
}
spring-ioc.xml
<?xml version="1.0" encoding="UTF-8"?>
<beans xmlns="http://www.springframework.org/schema/beans"
       xmlns:xsi="http://www.w3.org/2001/XMLSchema-instance"
       xsi:schemaLocation="http://www.springframework.org/schema/beans http://www.springframework.org/schema/beans/spring-beans.xsd">

    <bean id="studentOne" class="com.luhang.spring.pojo.Student"/>
<!--    <bean id="studentTwo" class="com.luhang.spring.pojo.Student"/>-->

</beans>
测试:
public void testIOC(){
    // 获取IOC容器
    ApplicationContext ioc=new ClassPathXmlApplicationContext("spring-ioc.xml");
    // 获取bean
    // 根据 id 获取
    Student student1 = (Student) ioc.getBean("studentOne");
    // 根据类型获取
    Student student2=ioc.getBean(Student.class);
    // 根据 id 和类型获取
    Student student3 = ioc.getBean("studentOne",Student.class);
    // 根据接口类型可以获取bean,前提是bean唯一。
    Person person = ioc.getBean(Person.class);
    System.out.println(person);
}
依赖注入 之setter注入
- property:通过成员变量的 set 方法进行赋值。
- name:设置需要赋值的属性名(和set方法有关)
- value:设置为属性所赋的值。
配置bean时,为属性赋值
spring-ioc.xml
<?xml version="1.0" encoding="UTF-8"?>
<beans xmlns="http://www.springframework.org/schema/beans"
       xmlns:xsi="http://www.w3.org/2001/XMLSchema-instance"
       xsi:schemaLocation="http://www.springframework.org/schema/beans http://www.springframework.org/schema/beans/spring-beans.xsd">

    <bean id="studentOne" class="com.luhang.spring.pojo.Student"/>

    <bean id="studentTwo" class="com.luhang.spring.pojo.Student">
        <property name="sid" value="1001"/>
        <property name="name" value="张三"/>
        <property name="age" value="11"/>
        <property name="gender" value="男"/>
    </bean>

</beans>
测试:
public void testIOC(){
    // 获取IOC容器
    ApplicationContext ioc=new ClassPathXmlApplicationContext("spring-ioc.xml");
    // 获取bean
    Student student = ioc.getBean("studentTwo", Student.class);
    System.out.println(student);
 }
依赖注入 之构造器注入
spring-ioc.xml
<bean id="studentThree" class="com.luhang.spring.pojo.Student">
    <constructor-arg value="1002" />
    <constructor-arg value="李四" />
    <constructor-arg value="男" />
    <constructor-arg value="34" name="age" />
    <!-- 当有两个有参构造,指定使用其中一个,用name或type标识 -->
</bean>
测试:
public void testIOC(){
    // 获取IOC容器
    ApplicationContext ioc=new ClassPathXmlApplicationContext("spring-ioc.xml");
    // 获取bean
    Student student = ioc.getBean("studentThree", Student.class);
    System.out.println(student);
}
Student.java
public class Student implements Person{
    private Integer sid;
    private String name;
    private Integer age;
    private String gender;
    private Double score;

    public Student() {
    }

    public Student(Integer sid, String name, String gender, Integer age) {
        this.sid = sid;
        this.name = name;
        this.age = age;
        this.gender = gender;
    }
    public Student(Integer sid, String name, String gender, Double score) {
        this.sid = sid;
        this.name = name;
        this.gender = gender;
        this.score = score;
    }
}
特殊值处理
- 字面量赋值
- null值
- xml实体
- CDATA节
spring-ioc.xml
<bean id="studentFour" class="com.luhang.spring.pojo.Student">
<!-- 字面量赋值 -->
<constructor-arg value="1002" />
<!-- xml实体:让值为<李四>,使用xml实体 < > 等来代替 -->
<!-- <constructor-arg value="<李四>" />-->
<!-- CDATA节:使内容原样解析 -->
<constructor-arg name="name">
<value><![CDATA[<李四>]]></value>
</constructor-arg>
<!-- null值 -->
<constructor-arg name="gender">
<null/>
</constructor-arg>
<constructor-arg value="34" name="age" />
</bean>
依赖注入 之为类类型属性赋值
- 引用外部的bean
- 级联方式
- 内部bean
spring-ioc.xml
<!-- 引用外部的bean -->
<bean id="studentFive" class="com.luhang.spring.pojo.Student">
    <property name="sid" value="1001"/>
    <property name="name" value="张三"/>
    <property name="age" value="11"/>
    <property name="gender" value="男"/>
    <property name="clazz" ref="clazzOne"/>
</bean>
<bean id="clazzOne" class="com.luhang.spring.pojo.Clazz">
    <property name="cid" value="11"/>
    <property name="cname" value="班级名称"/>
</bean>

<!-- 级联方式 -->
<bean id="studentFive" class="com.luhang.spring.pojo.Student">
    <property name="sid" value="1001"/>
    <property name="name" value="张三"/>
    <property name="age" value="11"/>
    <property name="gender" value="男"/>
    <property name="clazz" ref="clazzOne"/>
    <!-- 级联方式,要保证提前为clazz属性赋值或实例化,一般不用 -->
    <property name="clazz.cid" value="22"/>
    <property name="clazz.cname" value="名称2"/>
</bean>
<bean id="clazzOne" class="com.luhang.spring.pojo.Clazz">
    <property name="cid" value="11"/>
    <property name="cname" value="班级名称"/>
</bean>

<!-- 内部bean:只能在当前bean的内部使用,不能直接通过IOC容器获取 -->
 <bean id="studentFive" class="com.luhang.spring.pojo.Student">
    <property name="sid" value="1001"/>
    <property name="name" value="张三"/>
    <property name="age" value="11"/>
    <property name="gender" value="男"/>

    <property name="clazz">
        <bean id="clazzInner" class="com.luhang.spring.pojo.Clazz">
            <property name="cid" value="222"/>
            <property name="cname" value="名称2"/>
        </bean>
    </property>
</bean>
public class Clazz {
    private Integer cid;
    private String cname;
    // setter、getter、构造、toString 略
}
public class Student implements Person{
    private Integer sid;
    private String name;
    private Integer age;
    private String gender;
    private Double score;
    private Clazz clazz;
    // setter、getter、构造、toString 略
}
依赖注入 之为数组类型的属性赋值
spring-ioc.xml
   <bean id="studentFive" class="com.luhang.spring.pojo.Student">
        <property name="sid" value="1001"/>
        <property name="name" value="张三"/>
        <property name="age" value="11"/>
        <property name="gender" value="男"/>
        <property name="clazz">
            <bean id="clazzInner" class="com.luhang.spring.pojo.Clazz">
                <property name="cid" value="222"/>
                <property name="cname" value="名称2"/>
            </bean>
        </property>
        <!-- 为数组类型的属性赋值 -->
        <property name="hobby">
            <array>
                <value>唱</value>
                <value>跳</value>
                <value>rap</value>
                <value>篮球</value>
            </array>
        </property>
    </bean>
public class Student implements Person{
    private Integer sid;
    private String name;
    private Integer age;
    private String gender;
    private Double score;
    private Clazz clazz;
    private String[] hobby;
    // setter、getter、构造、toString 略
}
依赖注入 之为list集合类型的属性赋值
public class Clazz {
    private Integer cid;
    private String cname;
    private List<Student> students;
	// setter、getter、构造、toString 略
}
spring-ioc.xml
<bean id="clazzOne" class="com.luhang.spring.pojo.Clazz">
    <property name="cid" value="11"/>
    <property name="cname" value="班级名称"/>
    <property name="students" ref="studentList"/>
    <!--  等价于:  -->
<!--        <property name="students">-->
<!--            <list>-->
<!--                <ref bean="studentOne"/>-->
<!--                <ref bean="studentTwo"/>-->
<!--                <ref bean="studentThree"/>-->
<!--            </list>-->
<!--        </property>-->
</bean>
<!--  配置一个集合类型的bean,需要使用util的约束  -->
<util:list id="studentList">
    <ref bean="studentOne"/>
    <ref bean="studentTwo"/>
    <ref bean="studentThree"/>
</util:list>
依赖注入 之为Map集合类型属性赋值
public class Teacher {
    private Integer tid;
    private String  tname;
	// setter、getter、构造、toString 略
}

public class Student implements Person{
    private Integer sid;
    private String name;
    private Integer age;
    private String gender;
    private Double score;
    private Clazz clazz;
    private String[] hobby;
    private Map<String,Teacher> teacherMap;
	// setter、getter、构造、toString 略
}
spring-ioc.xml
<bean id="studentFive" class="com.luhang.spring.pojo.Student">
    <property name="sid" value="1001"/>
    <property name="name" value="张三"/>
    <property name="age" value="11"/>
    <property name="gender" value="男"/>
    <property name="clazz">
        <bean id="clazzInner" class="com.luhang.spring.pojo.Clazz">
            <property name="cid" value="222"/>
            <property name="cname" value="名称2"/>
        </bean>
    </property>
    <property name="hobby">
        <array>
            <value>唱</value>
            <value>跳</value>
            <value>rap</value>
            <value>篮球</value>
        </array>
    </property>
    <property name="teacherMap" ref="teacherMap"/>
    <!-- 等价于 -->
<!--        <property name="teacherMap">-->
<!--            <map>-->
<!--                <entry key="10086" value-ref="teancherOne"/>-->
<!--                <entry key="10046" value-ref="teancherTwo"/>-->
<!--            </map>-->
<!--        </property>-->
</bean>
<util:map id="teacherMap">
    <entry key="10086" value-ref="teancherOne"/>
    <entry key="10046" value-ref="teancherTwo"/>
</util:map>

<bean id="teancherOne" class="com.luhang.spring.pojo.Teacher">
    <property name="tid" value="10086"/>
    <property name="tname" value="大宝"/>
</bean>
<bean id="teancherTwo" class="com.luhang.spring.pojo.Teacher">
    <property name="tid" value="10046"/>
    <property name="tname" value="小宝"/>
</bean>
依赖注入 之p命名空间
spring-ioc.xml
  <bean id="studentSix" class="com.luhang.spring.pojo.Student"
          p:sid="12323" p:name="小明" p:teacherMap-ref="teacherMap"/>
Spring管理数据源和引入外部属性文件
pom.xml
<!-- 数据源依赖 -->
<dependency>
    <groupId>mysql</groupId>
    <artifactId>mysql-connector-java</artifactId>
    <version>5.1.39</version>
</dependency>
<dependency>
    <groupId>com.alibaba</groupId>
    <artifactId>druid</artifactId>
    <version>1.0.31</version>
</dependency>
spring-datasource.xml
<?xml version="1.0" encoding="UTF-8"?>
<beans xmlns="http://www.springframework.org/schema/beans"
       xmlns:xsi="http://www.w3.org/2001/XMLSchema-instance"
       xmlns:context="http://www.springframework.org/schema/context"
       xsi:schemaLocation="http://www.springframework.org/schema/beans http://www.springframework.org/schema/beans/spring-beans.xsd http://www.springframework.org/schema/util https://www.springframework.org/schema/util/spring-util.xsd http://www.springframework.org/schema/context https://www.springframework.org/schema/context/spring-context.xsd">

    <!--  引入 jdbc.properties ,之后可以通过 ${key} 的方式访问 -->
    <context:property-placeholder location="jdbc.properties"/>

    <bean id="DataSource" class="com.alibaba.druid.pool.DruidDataSource">
        <property name="driverClassName" value="${jdbc.driver}" />
        <property name="url" value="${jdbc.url}" />
        <property name="username" value="${jdbc.username}" />
        <property name="password" value="${jdbc.password}" />
    </bean>

</beans>
@Test
public void testDataSource() throws SQLException {
     ApplicationContext ioc=new ClassPathXmlApplicationContext("spring-datasource.xml");
     DataSource dataSource = ioc.getBean(DruidDataSource.class);
     System.out.println(dataSource.getConnection());
 }
bean的作用域
spring-scope.xml
<?xml version="1.0" encoding="UTF-8"?>
<beans xmlns="http://www.springframework.org/schema/beans"
       xmlns:xsi="http://www.w3.org/2001/XMLSchema-instance"
       xsi:schemaLocation="http://www.springframework.org/schema/beans http://www.springframework.org/schema/beans/spring-beans.xsd">

    <!--  scope:设置bean的作用域
          singleton(单例):表示获取该bean所对应的对象都是同一个。(默认)
          prototype(多例):表示获取该bean所对应的对象不是同一个。 -->
    <bean id="student" class="com.luhang.spring.pojo.Student" scope="prototype">
        <property name="sid" value="001"/>
        <property name="name" value="张三"/>
    </bean>

</beans>
public void testScope(){
    ApplicationContext ioc=new ClassPathXmlApplicationContext("spring-scope.xml");
    Student student = (Student) ioc.getBean("student");
    Student student1 = (Student) ioc.getBean("student");
    System.out.println(student.equals(student1));
}
bean的生命周期
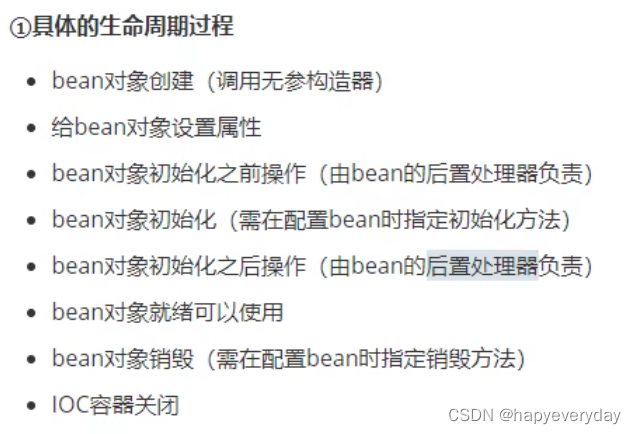

- 实例化
- 依赖注入
- 后置处理器:postProcessBeforeInitialization
- 初始化,需要通过bean的init-method属性指定初始化的方法。
- 后置处理器:postProcessAfterInitialization
- IOC容器关闭时销毁,需要通过bean的destroy-method属性指定销毁的方法。
注意:
若bean的作用域为单例时,生命周期的前三个步骤会在获取IOC容器时执行。
若bean的作用域为多例时,生命周期的前三个步骤会在获取IOC容器时执行。
spring-lifecycle.xml
<?xml version="1.0" encoding="UTF-8"?>
<beans xmlns="http://www.springframework.org/schema/beans"
       xmlns:xsi="http://www.w3.org/2001/XMLSchema-instance"
       xsi:schemaLocation="http://www.springframework.org/schema/beans http://www.springframework.org/schema/beans/spring-beans.xsd">

    <bean id="user" class="com.luhang.spring.pojo.User" init-method="initMethod" destroy-method="destroyMethod">
        <property name="id" value="011"/>
        <property name="username" value="admin"/>
        <property name="password" value="123456"/>
        <property name="age" value="18"/>
    </bean>
    <bean id="beanPostProcessor" class="com.luhang.spring.process.MyBeanPostProcessor"/>
</beans>
package com.luhang.spring.pojo;

public class User {
    private Integer id;
    private String username;
    private String password;
    private Integer age;

    public User() {
        System.out.println("生命周期1:实例化");
    }

    public User(Integer id, String username, String password, Integer age) {
        this.id = id;
        this.username = username;
        this.password = password;
        this.age = age;
    }

    public Integer getId() {
        return id;
    }

    public void setId(Integer id) {
        System.out.println("生命周期2:依赖注入");
        this.id = id;

    }

    public String getUsername() {
        return username;
    }

    public void setUsername(String username) {
        this.username = username;
    }

    public String getPassword() {
        return password;
    }

    public void setPassword(String password) {
        this.password = password;
    }

    public Integer getAge() {
        return age;
    }

    public void setAge(Integer age) {
        this.age = age;
    }

    @Override
    public String toString() {
        return "User{" +
                "id=" + id +
                ", username='" + username + '\'' +
                ", password='" + password + '\'' +
                ", age=" + age +
                '}';
    }

    public void initMethod(){
        System.out.println("生命周期3:初始化");
    }
    public void destroyMethod(){
        System.out.println("生命周期4:销毁");
    }
}


public  void testLifeCycle(){
    // ConfigurableApplicationContext是ApplicationContext的子接口,其中扩展了刷新和关闭容器的方法。
    ConfigurableApplicationContext ioc = new ClassPathXmlApplicationContext("spring-lifecycle.xml");
    User user = (User) ioc.getBean("user");
    System.out.println(user);
    ioc.close();
}

public class MyBeanPostProcessor implements BeanPostProcessor {
   public Object postProcessBeforeInitialization(Object bean, String beanName) throws BeansException {
       // 此方法bean生命周期初始化之前执行
       System.out.println("后置处理器:postProcessBeforeInitialization");
       return null;
   }

   public Object postProcessAfterInitialization(Object bean, String beanName) throws BeansException {
       // 此方法在bean生命周期初始化之后执行
       System.out.println("后置处理器:postProcessAfterInitialization");
       return null;
   }
}
FactoryBean
FactoryBean是一个接口,需要创建一个类实现该接口。
- getObject():通过一个对象交给IOC容器管理。
- getObjectType():设置所提供对象的类型。
- isSingleton():所提供的对象是否单例。
当把FactoryBean的实现类配置为bean时,会将当前类中getObject()所返回的对象交给IOC容器管理。
public class UserFactoryBean implements FactoryBean<User> {

    public User getObject() throws Exception {
        return new User();
    }

    public Class<?> getObjectType() {
        return User.class;
    }
}

public class FactoryBeanTest {
    @Test
    public void testFactoryBean(){
        ApplicationContext ioc=new ClassPathXmlApplicationContext("spring-factory.xml");
        User user = ioc.getBean(User.class);
        System.out.println(user);
    }
}
spring-factory.xml
<?xml version="1.0" encoding="UTF-8"?>
<beans xmlns="http://www.springframework.org/schema/beans"
       xmlns:xsi="http://www.w3.org/2001/XMLSchema-instance"
       xsi:schemaLocation="http://www.springframework.org/schema/beans http://www.springframework.org/schema/beans/spring-beans.xsd">

    <bean class="com.luhang.spring.factory.UserFactoryBean"/>

</beans>
基于xml的自动装配
自动装配:根据指定的策略,在IOC容器中匹配某个bean,自动为指定的bean中所依赖的类类型或接口类型属性赋值。
可以通过bean标签中的autowire属性设置自动装配的策略。
自动装配的策略:
no,default:表示不装配,即bean中的属性不会自动匹配某个bean为属性的赋值,此时属性可以使用默认值。byType:根据要赋值的属性的类型,在IOC容器中匹配某个bean,为属性赋值。
注意:
若通过类型没有找到任何一个类型匹配的bean,此时不装配,属性使用默认值。
若通过类型找到了多个类型的bean,此时会抛出异常:NoUniqueBeanDefinitionException
总结:当使用byType实现自动装配时,IOC容器中有且只有一个类型匹配的bean能够为属性赋值。
byName:将要赋值的属性名作为bean的id在IOC容器中匹配某个bean,为属性赋值。
总结:当类型匹配的bean有多个时,此时可以使用byName实现自动装配。
public class UserController {
    private UserService userService;

    public UserService getUserService() {
        return userService;
    }

    public void setUserService(UserService userService) {
        this.userService = userService;
    }

    public void saveUser(){
        userService.saveUser();
    }
}

public interface UserService {
    // 保存用户信息
    void saveUser();
}

public class UserServiceImpl implements UserService {
    private UserDao userDao;

    public UserDao getUserDao() {
        return userDao;
    }

    public void setUserDao(UserDao userDao) {
        this.userDao = userDao;
    }

    public void saveUser() {
        userDao.saveUser();
    }
}

public interface UserDao {
    void saveUser();
}

public class UserDaoImpl implements UserDao {
    public void saveUser() {
        System.out.println("保存成功");
    }
}

public class AutowireByXMLTest {
    @Test
    public void testAutowireByXML(){
        ApplicationContext ioc=new ClassPathXmlApplicationContext("spring-autowire-xml.xml");
        UserController userController = ioc.getBean(UserController.class);
        userController.saveUser();
    }
}
spring-autowire-xml.xml
<?xml version="1.0" encoding="UTF-8"?>
<beans xmlns="http://www.springframework.org/schema/beans"
       xmlns:xsi="http://www.w3.org/2001/XMLSchema-instance"
       xsi:schemaLocation="http://www.springframework.org/schema/beans http://www.springframework.org/schema/beans/spring-beans.xsd">

    <bean id="userController" class="com.luhang.spring.controller.UserController" autowire="byName">
<!--        <property name="userService" ref="userService"/>-->
    </bean>
    <bean id="userService" class="com.luhang.spring.service.impl.UserServiceImpl" autowire="byName">
<!--        <property name="userDao" ref="userDao"/>-->
    </bean>
    <bean id="userDao" class="com.luhang.spring.dao.impl.UserDaoImpl">

    </bean>
    <bean id="user" class="com.luhang.spring.dao.impl.UserDaoImpl">

    </bean>
</beans>
基于注解管理bean
标记与扫描
标识组件的常用注解:
@Component:将类标识为普通组件。@Controller:将类标识为控制层组件。@Service:将类标识为业务层组件。@Repository:将类标识为持久层组件。
以上注解的功能没有任何区别,只是给开发人员看的。
ssm整合的时候,需mvc扫描控制层,spring扫描除控制层以外的组件。
context:exclude-filter:排除扫描。
type:设置排除扫描的方式。
type=“annotation | assignable”
annotation:根据注解的类型进行排除,expression需要设置排除的注解的全类名。
assignable:根据类的类型进行排除,expression需要设置排除的类的全类名。
context:include-filter:包含扫描。
注意:需要在context:component-scan标签中设置use-default-filters=“false”。
use-default-filters=“true”(默认),所设置的包下所有的类都需要扫描,此时可以使用排除扫描。
use-default-filters=“false”,所设置的包下的类都不扫描。此时可以设置包含扫描。
spring-ioc-annotation.xml
<?xml version="1.0" encoding="UTF-8"?>
<beans xmlns="http://www.springframework.org/schema/beans"
xmlns:xsi="http://www.w3.org/2001/XMLSchema-instance"
xmlns:context="http://www.springframework.org/schema/context"
xsi:schemaLocation="http://www.springframework.org/schema/beans http://www.springframework.org/schema/beans/spring-beans.xsd http://www.springframework.org/schema/context https://www.springframework.org/schema/context/spring-context.xsd">
<!-- 扫描组件 -->
<!-- <context:component-scan base-package="com.luhang.spring.controller,com.luhang.spring.service,com.luhang.spring.dao"/>-->
<!-- 或者如下,建议尽量写精确一点-->
<context:component-scan base-package="com.luhang.spring"/>
<!-- <context:component-scan base-package="com.luhang.spring" use-default-filters="false">-->
<!--<!– <context:exclude-filter type="annotation" expression="org.springframework.stereotype.Controller"/>–>-->
<!--<!– <context:exclude-filter type="assignable" expression="com.luhang.spring.controller.UserController"/>–>-->
<!-- <context:include-filter type="annotation" expression="org.springframework.stereotype.Controller"/>-->
<!-- </context:component-scan>-->
</beans>
@Controller
public class UserController {
}

public interface UserService {
}

@Service
public class UserServiceImpl implements UserService {
}

public interface UserDao {
}

@Repository
public class UserDaoImpl implements UserDao {
}

public void test(){
     ApplicationContext ioc=new ClassPathXmlApplicationContext("spring-ioc-annotation.xml");
     UserController userController = ioc.getBean(UserController.class);
     System.out.println(userController);
     UserService userService=ioc.getBean(UserService.class);
     System.out.println(userService);
     UserDao userDao=ioc.getBean(UserDao.class);
     System.out.println(userDao);
 }
通过注解+扫描所配置的bean的id,默认值为类的小驼峰,即类名的首字母为小写的结果。
或
自定义bean的id:可以通过标识组件的注解的value属性值设置bean的自定义的id。eg:@Controller(“自定义id名”)
基于注解的自动装配 之@Autowired注解能够标识的位置
@Autowired注解能够标识的位置:
- 标识在成员变量上,此时不需要设置成员变量的set方法。
- 标识在set方法上。
- 标识在为当前成员变量赋值的有参构造上。
三种方式选择一种就好了。
package com.luhang.spring.controller;

import com.luhang.spring.service.UserService;
import org.springframework.beans.factory.annotation.Autowired;
import org.springframework.stereotype.Controller;

@Controller
public class UserController {

    @Autowired
    private UserService userService;

//    @Autowired
//    public void setUserService(UserService userService) {
//        this.userService = userService;
//    }

//    @Autowired
//    public UserController(UserService userService) {
//        this.userService = userService;
//    }

    public void saveUser(){
        userService.saveUser();
    }
}
@Autowired注解的原理:
- 默认通过byType的方式,在IOC容器中通过类型匹配某个bean为属性赋值。
- 若有多个类型匹配的bean,此时会自动转换为byName的方式实现自动装配的效果。(即:将要赋值的属性的属性名作为bean的id匹配某个bean为属性赋值)
- 若byType和byName的方式都无法实现自动装配,即IOC容器中有多个类型匹配的bean,且这些bean的id和赋值的属性的属性名都不一致,此时抛异常:NoUniqueBeanDefinitionException。
此时可以在要赋值的属性上,添加一个@Qualifier。
通过该注解的value属性值,指定某个bean的id,将这个bean为属性赋值。
注意:若IOC容器中没有任何一个类型匹配的bean,此时抛出异常:NoSuchBeanDefinitionException。
在@Autowired注解中有个属性required,默认值为true,要求必须完成自动装配。
可以将required设置为false,此时能装配则装配,无法装配则使用属性的默认值。
@Controller
public class UserController {

    @Autowired
    @Qualifier("userServiceImpl")
    private UserService userService;

    public void saveUser(){
        userService.saveUser();
    }
}

@Service
public class UserServiceImpl implements UserService {
    @Autowired
    @Qualifier("userDaoImpl")
    private UserDao userDao;

    public void saveUser() {
        userDao.saveUser();
    }
}
spring-ioc-annotation.xml
<?xml version="1.0" encoding="UTF-8"?>
<beans xmlns="http://www.springframework.org/schema/beans"
       xmlns:xsi="http://www.w3.org/2001/XMLSchema-instance"
       xmlns:context="http://www.springframework.org/schema/context"
       xsi:schemaLocation="http://www.springframework.org/schema/beans http://www.springframework.org/schema/beans/spring-beans.xsd http://www.springframework.org/schema/context https://www.springframework.org/schema/context/spring-context.xsd">
    <!--  扫描组件 -->
    <context:component-scan base-package="com.luhang.spring"/>

    <bean id="u=Service" class="com.luhang.spring.service.Impl.UserServiceImpl"/>
    <bean id="usDao" class="com.luhang.spring.dao.Impl.UserDaoImpl"/>
</beans>
AOP
代理模式
代理模式:二十三种设计模式中的一种,属于结构型模式。它的作用是通过提供一个代理类,让我们在调用目标方法时,不再直接对目标方法进行调用,而是通过代理类间接调用。让不属于目标方法核心逻辑的代码从目标方法中剥离出来 — 解耦。调用目标方法时先调用代理对象的方法,减少对目标方法的调用和打扰,同时让附加功能能够集中在一起也有利于统一维护。
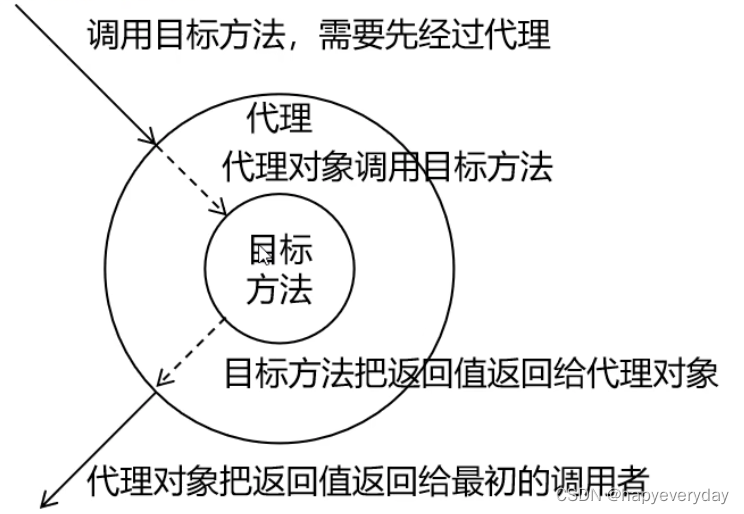
静态代理
静态代理确实实现了解耦,但代码都写死了,不具备灵活性。拿日志功能来说,将来其他地方也需要附加日志,那还得声明更多静态代理类,那就产生了大量重复的代码,日志功能还是分散的,没有统一管理。
public interface Calculator {
    int add(int i,int j);
    int sub(int i,int j);
    int mul(int i,int j);
    int div(int i,int j);
}

public class CalculatorImpl implements Calculator {
    public int add(int i, int j) {
        int result=i+j;
        System.out.println("方法内部,result:"+result);
        return result;
    }

    public int sub(int i, int j) {
        int result=i-j;
        System.out.println("方法内部,result:"+result);
        return result;
    }

    public int mul(int i, int j) {
        int result=i*j;
        System.out.println("方法内部,result:"+result);
        return result;
    }

    public int div(int i, int j) {
        int result=i/j;
        System.out.println("方法内部,result:"+result);
        return result;
    }
}

public class CalculatorStaticProxy implements Calculator {
    private CalculatorImpl target;

    public CalculatorStaticProxy(CalculatorImpl target) {
        this.target = target;
    }

    public int add(int i, int j) {
        System.out.println("日志,方法:add,参数"+i+","+j);
        int result = target.add(i, j);
        System.out.println("日志,方法:add,结果:"+result);
        return result;
    }

    public int sub(int i, int j) {
        System.out.println("日志,方法:sub,参数"+i+","+j);
        int result = target.sub(i, j);
        System.out.println("日志,方法:sub,结果:"+result);
        return result;
    }

    public int mul(int i, int j) {
        System.out.println("日志,方法:mul,参数"+i+","+j);
        int result = target.mul(i, j);
        System.out.println("日志,方法:mul,结果:"+result);
        return result;
    }

    public int div(int i, int j) {
        System.out.println("日志,方法:div,参数"+i+","+j);
        int result = target.div(i, j);
        System.out.println("日志,方法:div,结果:"+result);
        return result;
    }
}

public void testProxy(){
    CalculatorStaticProxy staticProxy=new CalculatorStaticProxy(new CalculatorImpl());
    staticProxy.add(1,2);
}
动态代理
类加载器的分类:根类加载器、扩展类加载器、应用类加载器、自定义类加载器。
动态代理有两种:
- jdk动态代理,要求必须有接口,最终生成的代理类和目标类实现相同的接口。( 在com.sun.proxy包下,类名为&proxy2 )(有接口的情况)
- cglib动态代理,最终生成的代理类会继承目标类,并且和目标类在相同的包下。(没接口的情况)
public interface Calculator {
    int add(int i,int j);
    int sub(int i,int j);
    int mul(int i,int j);
    int div(int i,int j);
}

public class CalculatorImpl implements Calculator {
    public int add(int i, int j) {
        int result=i+j;
        System.out.println("方法内部,result:"+result);
        return result;
    }

    public int sub(int i, int j) {
        int result=i-j;
        System.out.println("方法内部,result:"+result);
        return result;
    }

    public int mul(int i, int j) {
        int result=i*j;
        System.out.println("方法内部,result:"+result);
        return result;
    }

    public int div(int i, int j) {
        int result=i/j;
        System.out.println("方法内部,result:"+result);
        return result;
    }
}


public class ProxyFactory {
    private Object target;

    public ProxyFactory(Object target) {
        this.target = target;
    }

    public Object getProxy(){
        /**
         * ClassLoader loader:指定加载动态生成的代理类的类加载器
         * Class<?>[] interfaces:获取目标对象实现的所有接口的class对象的数组
         * InvocationHandler h):设置代理类中的抽象方法如何重写
         */
        ClassLoader classLoader=this.getClass().getClassLoader();
        Class<?>[] interfaces = target.getClass().getInterfaces();
        InvocationHandler i=new InvocationHandler() {
            public Object invoke(Object proxy, Method method, Object[] args) throws Throwable {
                Object result= null;
                try {
                    System.out.println("日志,方法:"+method.getName()+"参数:"+ Arrays.toString(args));

                    // proxy:代表代理对象,method:表示要执行的方法,args:表示要执行的方法的参数列表
                    result = method.invoke(target,args);
                    System.out.println("日志,方法:"+method.getName()+"结果:"+ result);
                } catch (Exception e) {
                    e.printStackTrace();
                    System.out.println("日志,方法:"+method.getName()+"异常:"+ e);
                } finally {
                    System.out.println("日志,方法:"+method.getName()+"方法结束!" );

                }
                return result;
            }
        };
        return Proxy.newProxyInstance(classLoader,interfaces,i);
    }
}

public void testProxy(){
    ProxyFactory proxyFactory=new ProxyFactory(new CalculatorImpl());
    Calculator proxy = (Calculator) proxyFactory.getProxy();
    proxy.div(1,0);
}
AOP概念及相关术语
AOP(Aspect Oriented Programming)是一种设计思想,是软件设计领域中的面向切面编程,它是 OOP(面向对象编程)的一种补充和完善。
AOP的作用:
- 简化代码:把方法中固定位置的重复的代码抽取出来,让被抽取的方法更专注于自己的核心功能,提高内聚性。
- 代码增强:把特定的功能封装到切面类中,看哪里有需要,就往上套,被套用了切面逻辑的方法就被切面给增强了。
相关术语:
- 横切关注点:从每个方法中抽出来的同一类非核心业务。(eg:日志)
- 通知:每个横切关注点上要做的事情都需要写一个方法来实现,这样的方法叫通知方法。

环绕通知 == 前面四种通知
-
切面:封装通知方法的类。
-
目标:被代理的目标对象
-
代理:向目标对象应用通知之后创建的代理对象。
-
连接点:是一个纯逻辑概念,不是语法定义的。指的是一个连接的位置。
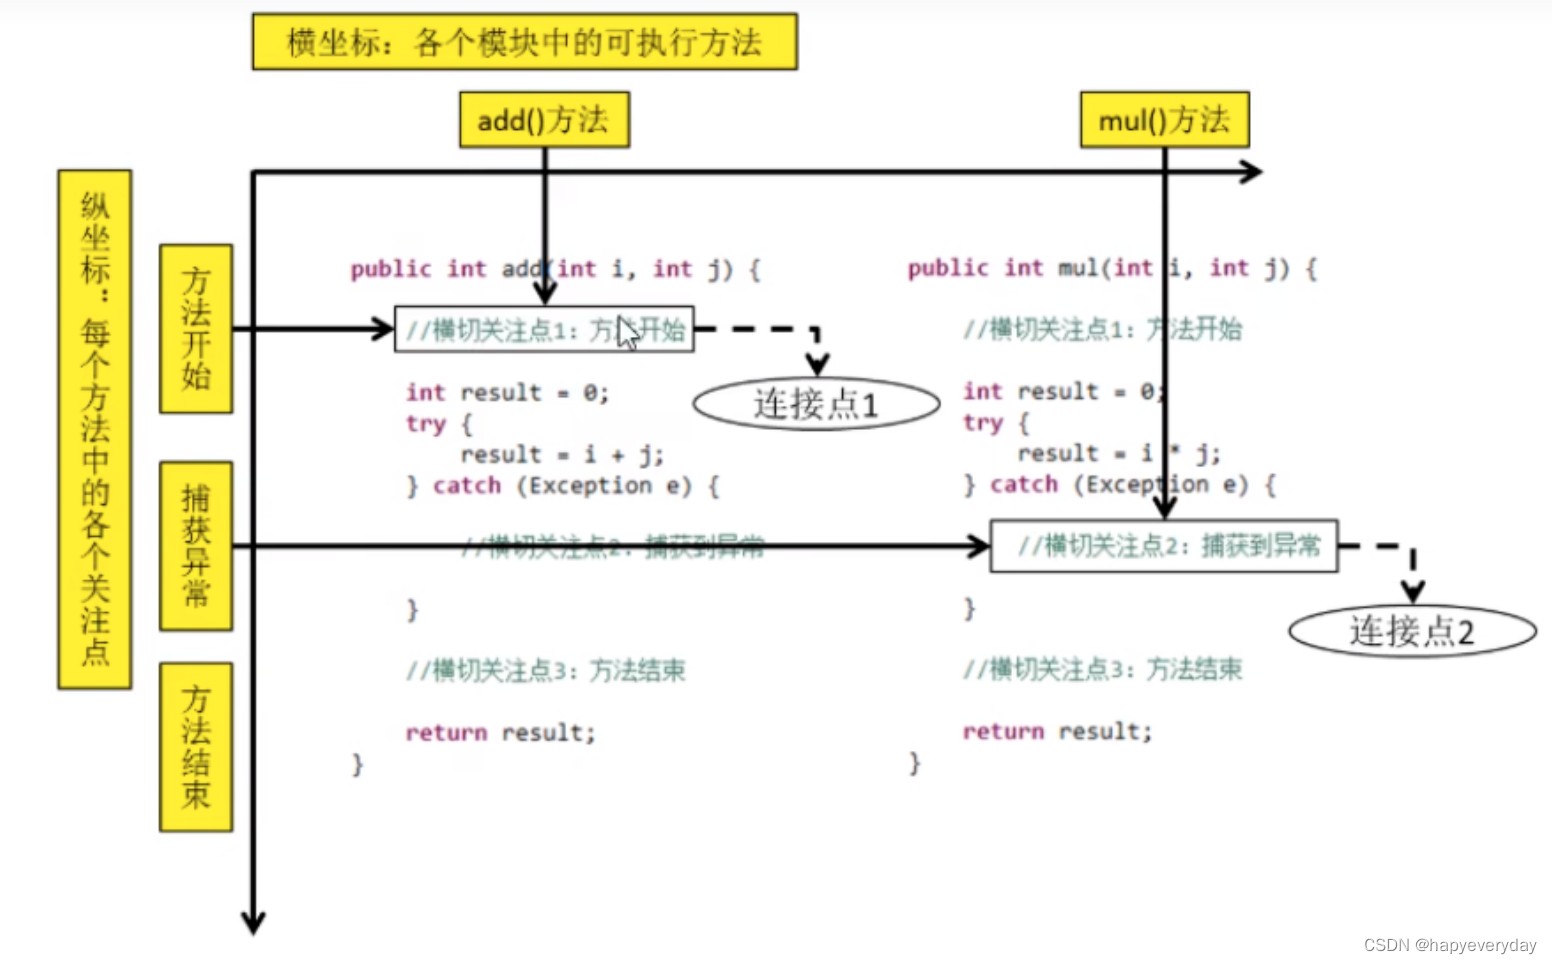
-
切入点:定位连接点的方式。
基于注解的AOP
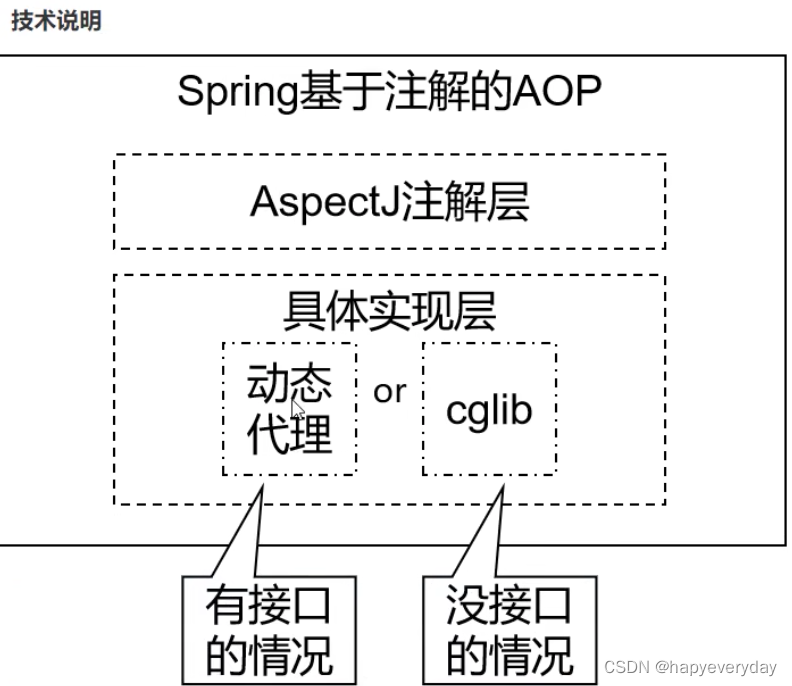
AspectJ:本质上是静态代理,将代理逻辑“织入”被代理的目标类编译得到的字节码文件,所以最终效果是动态的。weaver就是织入器。Spring只是借用了AspectJ中的注解。
- 添加依赖
在IOC所需依赖基础上再加入下面依赖即可:
<dependency>
   <groupId>org.springframework</groupId>
   <artifactId>spring-aspects</artifactId>
   <version>5.3.1</version>
</dependency>
- 准备被代理的目标资源
public interface Calculator {
    int add(int i, int j);
    int sub(int i, int j);
    int mul(int i, int j);
    int div(int i, int j);
}

public class CalculatorImpl implements Calculator {
    public int add(int i, int j) {
        int result=i+j;
        System.out.println("方法内部,result:"+result);
        return result;
    }

    public int sub(int i, int j) {
        int result=i-j;
        System.out.println("方法内部,result:"+result);
        return result;
    }

    public int mul(int i, int j) {
        int result=i*j;
        System.out.println("方法内部,result:"+result);
        return result;
    }

    public int div(int i, int j) {
        int result=i/j;
        System.out.println("方法内部,result:"+result);
        return result;
    }
}
- 创建切面类并配置
public interface Calculator {
    int add(int i, int j);
    int sub(int i, int j);
    int mul(int i, int j);
    int div(int i, int j);
}

@Component
public class CalculatorImpl implements Calculator {
    public int add(int i, int j) {
        int result=i+j;
        System.out.println("方法内部,result:"+result);
        return result;
    }

    public int sub(int i, int j) {
        int result=i-j;
        System.out.println("方法内部,result:"+result);
        return result;
    }

    public int mul(int i, int j) {
        int result=i*j;
        System.out.println("方法内部,result:"+result);
        return result;
    }

    public int div(int i, int j) {
        int result=i/j;
        System.out.println("方法内部,result:"+result);
        return result;
    }
}

/**
 *   在切面中,需要通过指定的注解将方法标识为通知方法
 *   @Before:前置通知,在目标对象方法执行之前执行
 */

@Component
@Aspect // 将当前组价标识为切面
public class LoggerAspect {
    @Before("execution(public int com.luhang.spring.aop.annotation.CalculatorImpl.add(int,int))")
    public void beforeAdviceMethod(){
        System.out.println("LoggerAspect,前置通知");
    }
}


public void testAOPAnnotationTest(){
    ApplicationContext ioc=new ClassPathXmlApplicationContext("spring-annotation.xml");
    // 此时,无法通过ioc容器获取目标对象,只能通过ioc容器获取代理对象
    Calculator calculator = ioc.getBean(Calculator.class);
    calculator.add(1,2);
}
spring-annotation.xml
<!--
    AOP的注意事项:
        切面类和目标类都需要交给IOC容器管理(可用xml,也可用注解)
        切面类必须通过@Aspect注解标识为一个切面
        在Spring的配置文件中设置 <aop:aspectj-autoproxy/> 开启基于注解的AOP
-->
<context:component-scan base-package="com.luhang.spring.aop.annotation"/>

<!--  开启基于注解的AOP  -->
<aop:aspectj-autoproxy/>
切入点表达式的语法、重用、获取连接点的信息和切面的优先级:
Calculator
public interface Calculator {
    int add(int i, int j);
    int sub(int i, int j);
    int mul(int i, int j);
    int div(int i, int j);
}
CalculatorImpl
@Component
public class CalculatorImpl implements Calculator {
    public int add(int i, int j) {
        int result=i+j;
        System.out.println("方法内部,result:"+result);
        return result;
    }

    public int sub(int i, int j) {
        int result=i-j;
        System.out.println("方法内部,result:"+result);
        return result;
    }

    public int mul(int i, int j) {
        int result=i*j;
        System.out.println("方法内部,result:"+result);
        return result;
    }

    public int div(int i, int j) {
        int result=i/j;
        System.out.println("方法内部,result:"+result);
        return result;
    }
}
LoggerAspect
/**
 *   1、在切面中,需要通过指定的注解将方法标识为通知方法
 *   @Before:前置通知,在目标对象方法执行之前执行
 *   @After:后置通知,在目标对象方法的finally子句中执行的
 *   @AfterReturning:返回通知,在目标对象方法返回值之后执行
 *   @AfterThrowing:异常通知,在目标对象方法的cath子句中执行
 *
 *   2、切入点表达式:设置在标识通知的注解的value属性中
 *   @Before("execution(public int com.luhang.spring.aop.annotation.CalculatorImpl.add(int,int))")
 *   @Before("execution(* com.luhang.spring.aop.annotation.CalculatorImpl.*(..))")
 *   第一个*表示任意的访问修饰符和返回值类型
 *   第二个*表示类中任意的方法
 *   .. 表示任意的参数列表
 *   类的地方也可以使用*,表示包下的所有的类。
 *
 *   3、重用切入点表达式
 *   // @Pointcut 声明一个公用的切入点表达式。
 *   使用方式:@Before("pointCut()")
 *
 *   4、获取连接点的信息
 *   在通知方法的参数位置,设置JointPoint类型的参数,就可以获取连接点所对应方法的信息
 *
 *   5、切面的优先级
 *   可以通过@order注解的value属性设置优先级,默认值Integer的最大值
 *   @Order注解的value属性值越小,优先级越高
 */

@Component
@Aspect // 将当前组件标识为切面
public class LoggerAspect {

    // @Pointcut 声明一个公用的切入点表达式。
    @Pointcut("execution(* com.luhang.spring.aop.annotation.CalculatorImpl.*(..))")
    public void pointCut(){}

//    @Before("execution(public int com.luhang.spring.aop.annotation.CalculatorImpl.add(int,int))")
//    @Before("execution(* com.luhang.spring.aop.annotation.CalculatorImpl.*(..))")
    @Before("pointCut()")
    public void beforeAdviceMethod(JoinPoint joinPoint){
        // 获取连接点所对应方法的签名信息
        Signature signature = joinPoint.getSignature();
        // 获取连接点所对应方法的参数
        Object[] args = joinPoint.getArgs();
        System.out.println("LoggerAspect,前置通知,方法名:"+signature.getName()+",参数:"+ Arrays.toString(args));
    }

    // 重用切入点表达式的使用方式
    @After("pointCut()")
    public void afterAdviceMethod(JoinPoint joinPoint){
        Signature signature = joinPoint.getSignature();
        System.out.println("LoggerAspect,后置通知,方法名:"+signature.getName()+",执行完毕!");
    }

    /**
     * 在返回通知中若要获取目标对象方法的返回值
     * 只需要通过@AfterReturning注解的returning属性
     * 就可以将通知方法的某个参数指定为接收目标对象方法的返回值的参数
     */
    @AfterReturning(value = "pointCut()",returning = "result")
    public void afterReturningMethod(JoinPoint joinPoint,Object result){
        Signature signature = joinPoint.getSignature();
        System.out.println("返回通知,方法:"+signature.getName()+",结果:"+result);
    }

    /**
     * 在异常通知中若要获取目标对象方法的异常
     * 只需要通过@AfterThrowing注解的throwing属性
     * 就可以将通知方法的某个参数指定为接收目标对象方法的异常的参数
     */
    @AfterThrowing(value = "pointCut()",throwing = "ex")
    public void afterThrowingAdviceMethod(JoinPoint joinPoint,Throwable ex){
        Signature signature = joinPoint.getSignature();
        System.out.println("异常通知,方法:"+signature.getName()+",异常是:"+ex);
    }

    // 环绕通知的方法的返回值一定要和目标对象方法的返回值一致
    @Around("pointCut()")
    public Object aroundAdviceMethod(ProceedingJoinPoint joinPoint){
        Object result=null;
        try {
            System.out.println("环绕通知-->前置通知");
            // 目标对象方法的执行
            result = joinPoint.proceed();
            System.out.println("环绕通知-->返回通知");
        } catch (Throwable throwable) {
            System.out.println("环绕通知-->异常通知");
            throwable.printStackTrace();
        }finally {
            System.out.println("环绕通知-->后置通知");
        }
        return  result;
    }
}
@Component
@Aspect
@Order(1) // 设置优先级
public class ValidateAspect {

//    @Before("execution(* com.luhang.spring.aop.annotation.CalculatorImpl.*(..))")
    @Before("com.luhang.spring.aop.annotation.LoggerAspect.pointCut()")
    public void beforeMethod(){
        System.out.println("ValidateAspect ---> 前置通知");
    }
}
spring-annotation.xml
<!--
    AOP的注意事项:
        切面类和目标类都需要交给IOC容器管理(可用xml,也可用注解)
        切面类必须通过@Aspect注解标识为一个切面
        在Spring的配置文件中设置 <aop:aspectj-autoproxy/> 开启基于注解的AOP
-->
<context:component-scan base-package="com.luhang.spring.aop.annotation"/>

<!--  开启基于注解的AOP  -->
<aop:aspectj-autoproxy/>
测试:
public void testAOPAnnotationTest(){
    ApplicationContext ioc=new ClassPathXmlApplicationContext("spring-annotation.xml");
    // 此时,无法通过ioc容器获取目标对象,只能通过ioc容器获取代理对象
    Calculator calculator = ioc.getBean(Calculator.class);
    calculator.div(10,2);
}
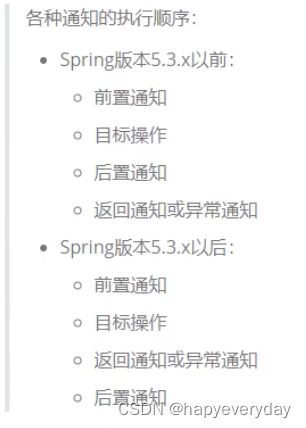
基于XML的AOP(了解)
Calculator
public interface Calculator {
    int add(int i, int j);
    int sub(int i, int j);
    int mul(int i, int j);
    int div(int i, int j);
}
CalculatorImpl
@Component
public class CalculatorImpl implements Calculator {
    public int add(int i, int j) {
        int result=i+j;
        System.out.println("方法内部,result:"+result);
        return result;
    }

    public int sub(int i, int j) {
        int result=i-j;
        System.out.println("方法内部,result:"+result);
        return result;
    }

    public int mul(int i, int j) {
        int result=i*j;
        System.out.println("方法内部,result:"+result);
        return result;
    }

    public int div(int i, int j) {
        int result=i/j;
        System.out.println("方法内部,result:"+result);
        return result;
    }
}
LoggerAspect
@Component
public class LoggerAspect {

    public void beforeAdviceMethod(JoinPoint joinPoint){
        // 获取连接点所对应方法的签名信息
        Signature signature = joinPoint.getSignature();
        // 获取连接点所对应方法的参数
        Object[] args = joinPoint.getArgs();
        System.out.println("LoggerAspect,前置通知,方法名:"+signature.getName()+",参数:"+ Arrays.toString(args));
    }

    public void afterAdviceMethod(JoinPoint joinPoint){
        Signature signature = joinPoint.getSignature();
        System.out.println("LoggerAspect,后置通知,方法名:"+signature.getName()+",执行完毕!");
    }

    public void afterReturningMethod(JoinPoint joinPoint,Object result){
        Signature signature = joinPoint.getSignature();
        System.out.println("返回通知,方法:"+signature.getName()+",结果:"+result);
    }


    public void afterThrowingAdviceMethod(JoinPoint joinPoint,Throwable ex){
        Signature signature = joinPoint.getSignature();
        System.out.println("异常通知,方法:"+signature.getName()+",异常是:"+ex);
    }

    public Object aroundAdviceMethod(ProceedingJoinPoint joinPoint){
        Object result=null;
        try {
            System.out.println("环绕通知-->前置通知");
            // 目标对象方法的执行
            result = joinPoint.proceed();
            System.out.println("环绕通知-->返回通知");
        } catch (Throwable throwable) {
            System.out.println("环绕通知-->异常通知");
            throwable.printStackTrace();
        }finally {
            System.out.println("环绕通知-->后置通知");
        }
        return  result;
    }
}
ValidateAspect
@Component
public class ValidateAspect {
    public void beforeMethod(){
        System.out.println("ValidateAspect ---> 前置通知");
    }
}
aop-xml.xml
<!--  扫描组件  -->
    <context:component-scan base-package="com.luhang.spring.aop.xml"/>

    <aop:config>
        <!-- 设置一个公共的切入点表达式 -->
        <aop:pointcut id="poingCut" expression="execution(* com.luhang.spring.aop.xml.CalculatorImpl.*(..))"/>
        <!-- 将IOC容器中的某个bean设置为切面 -->
        <aop:aspect ref="loggerAspect">
            <aop:before method="beforeAdviceMethod" pointcut-ref="poingCut" />
            <aop:after method="afterAdviceMethod" pointcut-ref="poingCut"/>
            <aop:after-returning method="afterReturningMethod" pointcut-ref="poingCut" returning="result"/>
            <aop:after-throwing method="afterThrowingAdviceMethod" pointcut-ref="poingCut" throwing="ex"/>
            <aop:around method="aroundAdviceMethod" pointcut-ref="poingCut"/>
        </aop:aspect>
        <aop:aspect ref="validateAspect" order="1">
            <aop:before method="beforeMethod" pointcut-ref="poingCut"/>
        </aop:aspect>
    </aop:config>
测试:
public void testAOPByXMLTest(){
    ApplicationContext ioc=new ClassPathXmlApplicationContext("aop-xml.xml");
    // 此时,无法通过ioc容器获取目标对象,只能通过ioc容器获取代理对象
    Calculator calculator = ioc.getBean(Calculator.class);
    calculator.div(10,2);
}
声明式事务
JdbcTemplate
Spring框架对JDBC进行封装,使用JdbcTemplate方便实现对数据库操作。
Web工程下有两个路径:
1、类路径:存放配置文件和类
2、web资源路径
Spring整合Junit4和JdbcTemplate实现更新、查询功能:
pom.xml
 <!-- spring 核心: IOC 的依赖 -->
        <dependency>
            <groupId>org.springframework</groupId>
            <artifactId>spring-context</artifactId>
            <version>5.3.1</version>
        </dependency>

        <!-- Spring持久化层jar包 orm:对象关系映射 -->
        <dependency>
            <groupId>org.springframework</groupId>
            <artifactId>spring-orm</artifactId>
            <version>5.3.1</version>
        </dependency>

        <!-- Spring 整合Junit 的包 -->
        <dependency>
            <groupId>org.springframework</groupId>
            <artifactId>spring-test</artifactId>
            <version>5.3.1</version>
        </dependency>

        <dependency>
            <groupId>junit</groupId>
            <artifactId>junit</artifactId>
            <version>4.12</version>
            <scope>test</scope>
        </dependency>

        <!-- MySql驱动 -->
        <dependency>
            <groupId>mysql</groupId>
            <artifactId>mysql-connector-java</artifactId>
            <version>8.0.16</version>
        </dependency>

        <dependency>
            <groupId>com.alibaba</groupId>
            <artifactId>druid</artifactId>
            <version>1.0.31</version>
        </dependency>
User
public class User {
    private Integer id;
    private String username;
    private String password;
    private Integer age;
    private Character gender;
    private String email;
    // setter、getter、构造、toString 略
}
jdbc.properties
jdbc.driver=com.mysql.jdbc.Driver
jdbc.url=jdbc:mysql://localhost:3306/ssm?useSSL=true&useUnicode=true&characterEncoding=utf8
jdbc.username=root
jdbc.password=root
spring-jdbc.xml
 <!-- 引入jdbc.properties -->
<context:property-placeholder location="classpath:jdbc.properties"/>

<bean id="dataSource" class="com.alibaba.druid.pool.DruidDataSource">
    <property name="driverClassName" value="${jdbc.driver}"/>
    <property name="url" value="${jdbc.url}"/>
    <property name="username" value="${jdbc.username}"/>
    <property name="password" value="${jdbc.password}"/>
</bean>

<bean class="org.springframework.jdbc.core.JdbcTemplate">
    <property name="dataSource" ref="dataSource"/>
</bean>
测试
// 指定当前测试类在Spring的测试环境中执行,此时就可以通过注入的方式直接获取IOC容器中的bean
@RunWith(SpringJUnit4ClassRunner.class)
// 设置Spring测试环境的配置文件
@ContextConfiguration("classpath:spring-jdbc.xml")
public class JdbcTemplateTest {
    @Autowired
    private JdbcTemplate jdbcTemplate;

    @Test
    public void testInsert(){
        String sql="insert into t_user values(null,?,?,?,?,?)";
        jdbcTemplate.update(sql,"root","123",23,"女","123@qq.com");
    }

    @Test
    public void testGetUserById(){
        String sql="select * from t_user where id=?";
        User user=jdbcTemplate.queryForObject(sql,new BeanPropertyRowMapper<User>(User.class),1);
        System.out.println(user);
    }

    @Test
    public void testGetAllUser(){
        String sql="select * from t_user";
        List<User> userList = jdbcTemplate.query(sql, new BeanPropertyRowMapper<User>(User.class));
        for (User user : userList) {
            System.out.println(user);
        }
    }

    @Test
    public void testGetCount(){
        String sql="select count(*) from t_user";
        Integer count = jdbcTemplate.queryForObject(sql, Integer.class);
        System.out.println(count);
    }
}
编程式事务与声明式事务
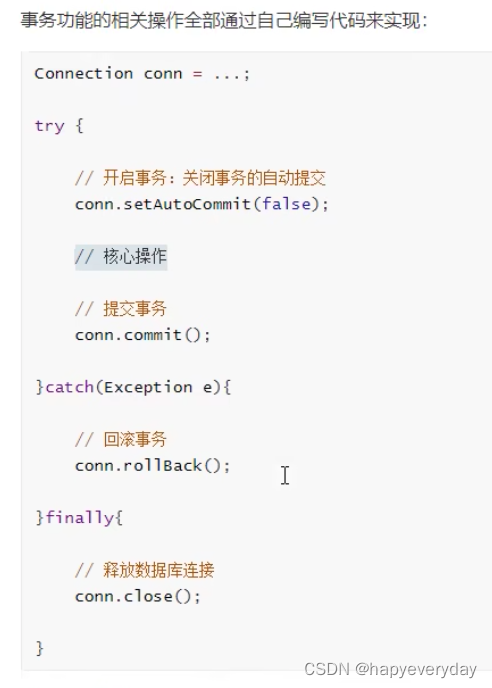
编程式的实现方式存在缺陷:
- 细节没有被屏蔽:具体操作过程中,所有细节都需要程序员自己来完成,比较繁琐。
- 代码复用性不高:如果没有有效抽取出来,每次实现功能都需要自己编写代码,代码就没有得到复用。
编程式:自己写代码实现功能。
声明式:通过配置让框架实现功能。
基于注解的声明式事务
声明式事务的配置步骤:
- 在Spring的配置文件中配置事务管理器
- 开启事务的注解驱动
在需要被事务管理的方法上,添加@Transactional注解,该方法就会被事务管理。
@Transactional注解标识的位置:
- 标识在方法上
- 标识在类上,则类中所有的方法都会被事物管理。
tx-annotation.xml
<!-- 扫描组件 -->
<context:component-scan base-package="com.luhang.spring"/>

<context:property-placeholder location="classpath:jdbc.properties"/>

<bean id="dataSource" class="com.alibaba.druid.pool.DruidDataSource">
    <property name="driverClassName" value="${jdbc.driver}"/>
    <property name="url" value="${jdbc.url}"/>
    <property name="username" value="${jdbc.username}"/>
    <property name="password" value="${jdbc.password}"/>
</bean>

<bean class="org.springframework.jdbc.core.JdbcTemplate">
    <property name="dataSource" ref="dataSource"/>
</bean>

<!-- 配置事务管理器 -->
<bean id="transactionManager" class="org.springframework.jdbc.datasource.DataSourceTransactionManager">
    <property name="dataSource" ref="dataSource"/>
</bean>
<!-- 开启事务的注解驱动
     将使用@Transactional注解所标识的方法或类中所有的方法使用事务进行管理
     transaction-manager属性:设置事务管理器的id
     若事务管理器的bean的id默认为transactionManager,则该属性可以不写      -->
<tx:annotation-driven transaction-manager="transactionManager"/>
@Controller
public class BookController {

    @Autowired
    BookService bookService;

    public void buyBook(Integer userId, Integer bookId){
        bookService.buyBook(userId,bookId);
    }
}

public interface BookService {
    void buyBook(Integer userId, Integer bookId);
}

@Service
public class BookServiceImpl implements BookService {

    @Autowired
    private BookDao bookDao;

    @Transactional(
//            readOnly = true
//            timeout = 3
   //         noRollbackFor =ArithmeticException.class
    )
    public void buyBook(Integer userId, Integer bookId) {
        try {
            TimeUnit.SECONDS.sleep(5);
        }catch (Exception e){
            e.printStackTrace();
        }
        // 查询图书的价格
        Integer price=bookDao.getPriceByBookId(bookId);
        // 更新图书的库存
        bookDao.updateStock(bookId);
        // 更新用户的余额
        bookDao.updateBalance(userId,price);
        System.out.println(1/0);
    }
}


public interface BookDao {
    Integer getPriceByBookId(Integer bookId);

    void updateBalance(Integer userId, Integer price);

    void updateStock(Integer bookId);
}


@Repository
public class BookDaoImpl implements BookDao {

    @Autowired
    JdbcTemplate jdbcTemplate;

    public Integer getPriceByBookId(Integer bookId) {
        String sql="select price from t_book where book_id=?";
        return jdbcTemplate.queryForObject(sql,Integer.class,bookId);
    }

    public void updateBalance(Integer userId, Integer price) {
        String sql="update t_user set balance=balance-? where user_id=?";
        jdbcTemplate.update(sql,price,userId);
    }

    public void updateStock(Integer bookId) {
        String sql="update t_book set stock=stock-1 where book_id=?";
        jdbcTemplate.update(sql,bookId);
    }
}


@RunWith(SpringJUnit4ClassRunner.class)
@ContextConfiguration("classpath:tx-annotation.xml")
public class TxByAnnotationTest {

    @Autowired
    private BookController bookController;

    @Test
    public void testBuyBook(){
        bookController.buyBook(1,1);
    }
}
CREATE TABLE `t_book` (
`book_id` int(11) NOT NULL AUTO_INCREMENT COMMENT '主键',
`book_name` varchar(20) DEFAULT NULL COMMENT '图书名称',
`price` int(11) DEFAULT NULL COMMENT '价格' ,
`stock` int (10) unsigned DEFAULT NULL COMMENT '库存(无符号)',
PRIMARY KEY (`book_id`)
) ENGINE=InnoDB AUTO_INCREMENT=3 DEFAULT CHARSET=utf8;
insert into `t_book` (`book_id` , `book_name` , `price` , `stock`) values (1, '斗破苍穹' ,80, 100),
(2, '斗罗大陆',50,100);

CREATE TABLE `t_user` (
`user_id` int(11) NOT NULL AUTO_INCREMENT COMMENT '主键' ,
`username` varchar(20) DEFAULT NULL COMMENT '用户名' ,
`balance` int (10) unsigned DEFAULT NULL COMMENT '余额(无符号)' ,
PRIMARY KEY ( `user_id` )
) ENGINE=InnoDB AUTO_INCREMENT=2 DEFAULT CHARSET=utf8;
insert into `t_user`( `user_id`, `username` , `balance` ) values (1, 'admin' ,50);
事务属性:只读
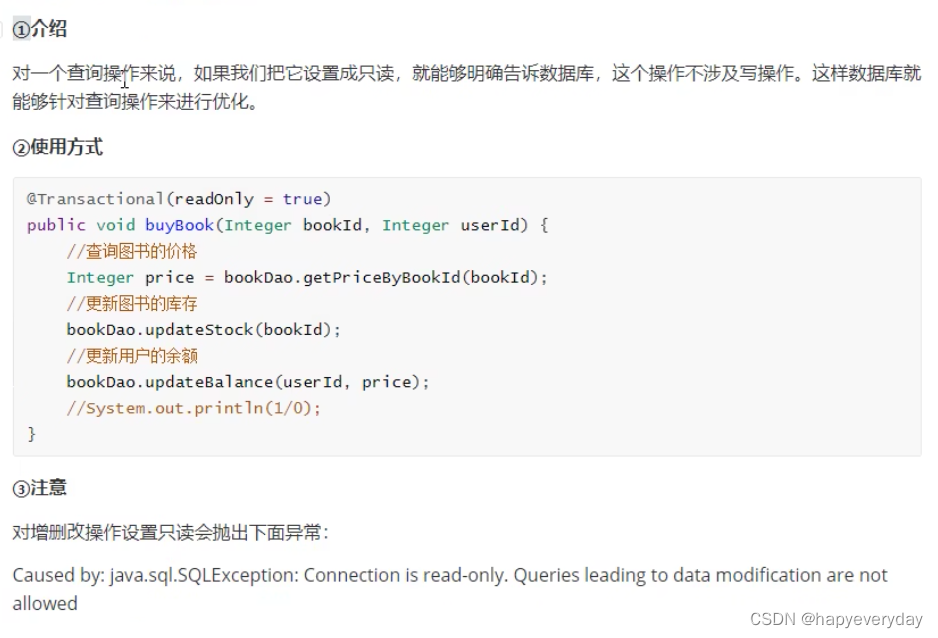
事务属性:超时
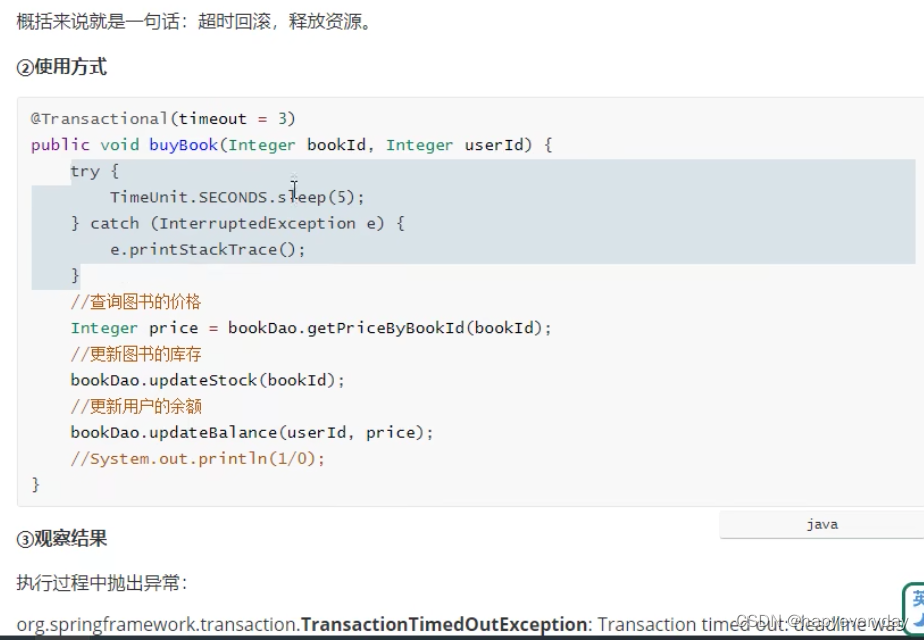
事务属性:回滚策略
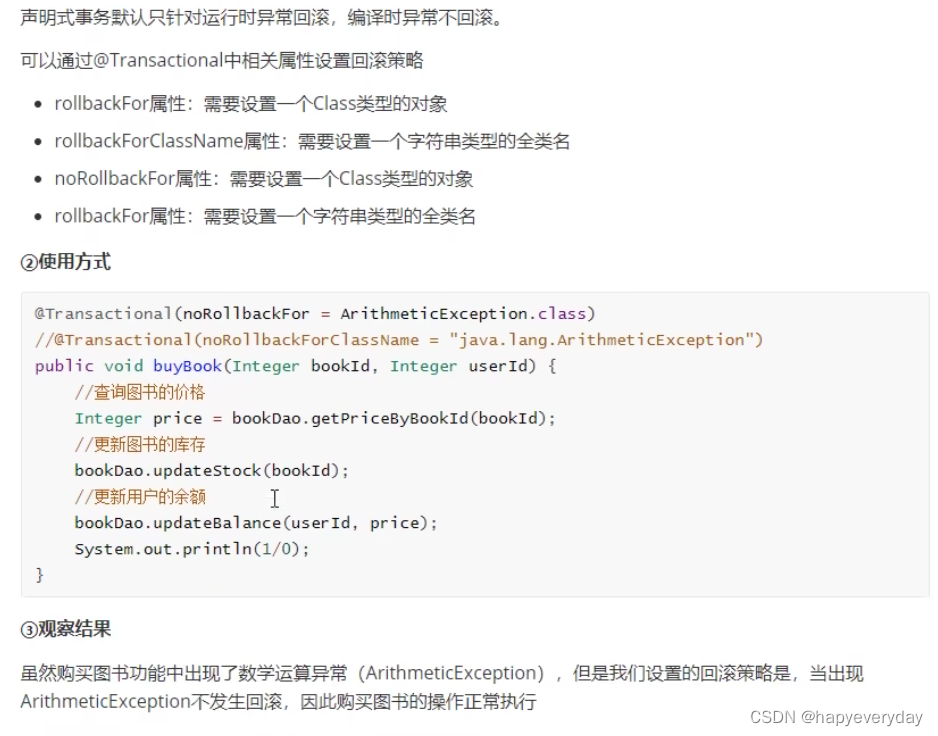
事务属性:事务隔离级别
@Transactional(isolation = Isolation.REPEATABLE_READ)
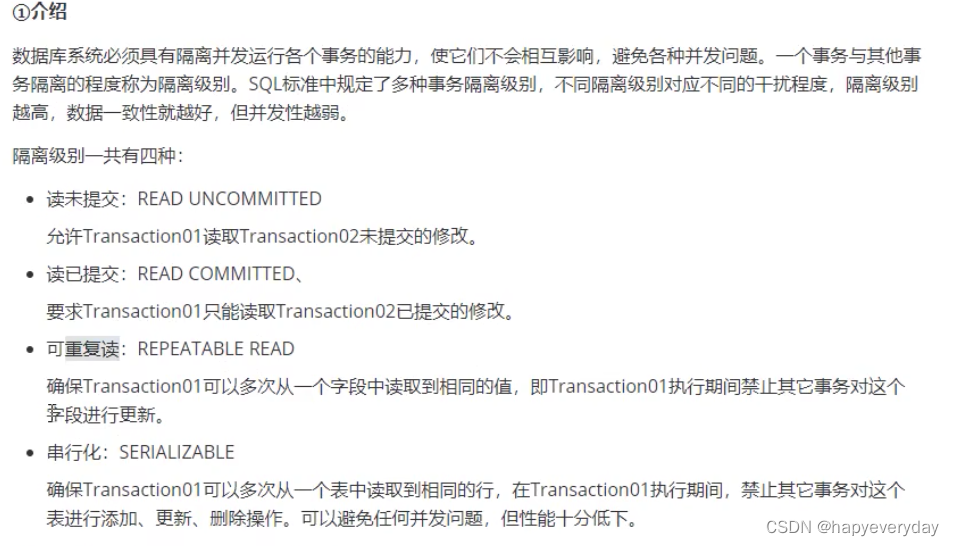


事务属性:事务的传播行为
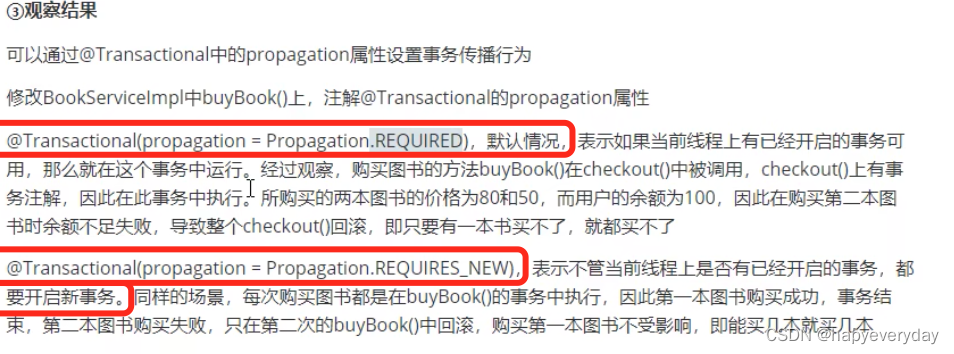
基于XML的声明式事务(了解)
tx-xml.xml
<!-- 扫描组件 -->
<context:component-scan base-package="com.luhang.spring"/>

<context:property-placeholder location="classpath:jdbc.properties"/>

<bean id="dataSource" class="com.alibaba.druid.pool.DruidDataSource">
    <property name="driverClassName" value="${jdbc.driver}"/>
    <property name="url" value="${jdbc.url}"/>
    <property name="username" value="${jdbc.username}"/>
    <property name="password" value="${jdbc.password}"/>
</bean>

<bean class="org.springframework.jdbc.core.JdbcTemplate">
    <property name="dataSource" ref="dataSource"/>
</bean>

<!-- 配置事务管理器 -->
<bean id="transactionManager" class="org.springframework.jdbc.datasource.DataSourceTransactionManager">
    <property name="dataSource" ref="dataSource"/>
</bean>

<!-- 配置事务通知 -->
<tx:advice id="tx" transaction-manager="transactionManager">
    <tx:attributes>
        <!-- tx:method标签:配置具体的事务方法 -->
        <!-- name属性:指定方法名,可以使用*代表多个字符 -->
        <tx:method name="buyBook"/>
        <tx:method name="get*"/>
    </tx:attributes>
</tx:advice>
<aop:config>
    <aop:advisor advice-ref="tx" pointcut="execution(* com.luhang.spring.service.impl.*.*(..))"/>
</aop:config>
依赖:
 <dependencies>
        <!-- spring 核心: IOC 的依赖 -->
        <dependency>
            <groupId>org.springframework</groupId>
            <artifactId>spring-context</artifactId>
            <version>5.3.1</version>
        </dependency>

        <!-- Spring持久化层jar包 orm:对象关系映射 -->
        <dependency>
            <groupId>org.springframework</groupId>
            <artifactId>spring-orm</artifactId>
            <version>5.3.1</version>
        </dependency>

        <!-- Spring 整合Junit 的包 -->
        <dependency>
            <groupId>org.springframework</groupId>
            <artifactId>spring-test</artifactId>
            <version>5.3.1</version>
        </dependency>

        <dependency>
            <groupId>junit</groupId>
            <artifactId>junit</artifactId>
            <version>4.12</version>
            <scope>test</scope>
        </dependency>

        <!-- MySql驱动 -->
        <dependency>
            <groupId>mysql</groupId>
            <artifactId>mysql-connector-java</artifactId>
            <version>8.0.16</version>
        </dependency>

        <dependency>
            <groupId>com.alibaba</groupId>
            <artifactId>druid</artifactId>
            <version>1.0.31</version>
        </dependency>

        <dependency>
            <groupId>org.springframework</groupId>
            <artifactId>spring-aspects</artifactId>
            <version>5.3.1</version>
        </dependency>
    </dependencies>
SpringMVC
MVC是一种软件架构思想,将软件按照模型、视图、控制层来划分。
JavaBean分为两类:
- 实体类Bean(eg:User、Student)
- 业务处理Bean(eg:Service、Dao)
SpringMVC的特点:

入门案例
创建web工程
打包方式:war
引入依赖:
<dependencies>
  <!-- 依赖 SpringMVC 间接引入了 Spring IOC 依赖-->
    <dependency>
        <groupId>org.springframework</groupId>
        <artifactId>spring-webmvc</artifactId>
        <version>5.3.1</version>
    </dependency>

    <!-- logback 日志: thymeleaf 依赖 slf4j,slf4j 是日志 的门面(是接口),logback实现了 slf4j, 因此需要logback-->
    <dependency>
        <groupId>ch.qos.logback</groupId>
        <artifactId>logback-classic</artifactId>
        <version>1.2.3</version>
    </dependency>

    <!-- Spring5 和 Thymeleaf 整合包 -->
    <dependency>
        <groupId>org.thymeleaf</groupId>
        <artifactId>thymeleaf-spring5</artifactId>
        <version>3.0.12.RELEASE</version>
    </dependency>

    <!-- Servlet API -->
    <dependency>
        <groupId>javax.servlet</groupId>
        <artifactId>javax.servlet-api</artifactId>
        <version>3.1.0</version>
        <scope>provided</scope>
    </dependency>
</dependencies>
配置web.xml
<?xml version="1.0" encoding="UTF-8"?>
<web-app xmlns="http://xmlns.jcp.org/xml/ns/javaee"
         xmlns:xsi="http://www.w3.org/2001/XMLSchema-instance"
         xsi:schemaLocation="http://xmlns.jcp.org/xml/ns/javaee http://xmlns.jcp.org/xml/ns/javaee/web-app_4_0.xsd"
         version="4.0">
    <!-- 配置SpringMVC的前端控制器DispatcherServlet
         SpringMVC的配置文件默认位置和名称:
            位置:WEB-INF下(以后放resources下)
            名称:<servlet-name>-servlet.xml,例如 当前配置文件名为 SpringMVC-servlet.xml
         也可以修改SpringMVC的配置文件位置和名称,下边注释部分有举例。

         url-pattern中 / 和 /* 的区别:
            / :匹配浏览器向服务器发送的所有请求(不包括.jsp)
            /* :匹配浏览器向服务器发送的所有请求(包括.jsp)
-->
    <servlet>
        <servlet-name>SpringMVC</servlet-name> <!-- 名称可以随便写 -->
        <servlet-class>org.springframework.web.servlet.DispatcherServlet</servlet-class>

        <!-- 设置SpringMVC配置文件的位置和名称,位置放在resources下边 -->
<!--        <init-param>        -->
<!--            <param-name>contextConfigLocation</param-name>      -->
<!--            <param-value>classpath:springmvc.xml</param-value>      -->
<!--        </init-param>       -->
        <!-- 将DispatcherServlet的初始化时间提前到服务器启动时 -->
        <load-on-startup>1</load-on-startup>
    </servlet>
    <servlet-mapping>
        <servlet-name>SpringMVC</servlet-name>
        <url-pattern>/</url-pattern>
    </servlet-mapping>
</web-app>
创建请求控制器
@Controller
public class HelloController {

    @RequestMapping("/")
    public String protal(){
        // 将逻辑视图返回
        return "index";
    }
}
创建SpringMVC的配置文件:SpringMVC-servlet.xml
<?xml version="1.0" encoding="UTF-8"?>
<beans xmlns="http://www.springframework.org/schema/beans"
       xmlns:xsi="http://www.w3.org/2001/XMLSchema-instance"
       xmlns:context="http://www.springframework.org/schema/context"
       xsi:schemaLocation="http://www.springframework.org/schema/beans http://www.springframework.org/schema/beans/spring-beans.xsd http://www.springframework.org/schema/context https://www.springframework.org/schema/context/spring-context.xsd">

    <context:component-scan base-package="com.luhang.controller"/>

    <!-- 配置thymeleaf视图解析器 -->
    <bean id="viewResolver" class="org.thymeleaf.spring5.view.ThymeleafViewResolver">
        <property name="order" value="1"/>
        <property name="characterEncoding" value="UTF-8"/>
        <property name="templateEngine">
            <bean class="org.thymeleaf.spring5.SpringTemplateEngine">
                <property name="templateResolver">
                    <bean class="org.thymeleaf.spring5.templateresolver.SpringResourceTemplateResolver">
                        <!-- 视图前缀 -->
                        <property name="prefix" value="/WEB-INF/templates/"/>
                        <!-- 视图后缀 -->
                        <property name="suffix" value=".html"/>
                        <property name="templateMode" value="HTML5"/>
                        <property name="characterEncoding" value="UTF-8"/>
                    </bean>
                </property>
            </bean>
        </property>
    </bean>
</beans>
<!DOCTYPE html>
<html lang="en"  xmlns:th="http://www.thymeleaf.org">
<head>
    <meta charset="UTF-8">
    <title>Title</title>
</head>
<body>
<h1>index.html</h1>
</body>
</html>
总结:

@RequestMapping注解
@RequestMapping注解作用:
将请求和处理请求的控制器方法关联起来,建立映射关系。
SpringMVC接收到指定的请求,就会来找到在映射关系中对应的控制器方法来处理这个请求。
@RequestMapping注解的位置:
标识在类上:设置映射请求的请求路径的初始信息
标识在方法上:设置映射请求的请求路径的具体信息
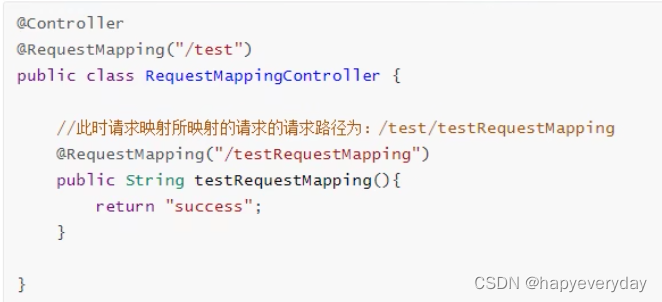
@RequestMapping注解value属性:
作用:通过请求的请求路径匹配请求。
value属性是数组类型,即当前浏览器所发送请求的请求路径匹配value属性中的任何一个值,则当前请求就会被注解所标识的方法进行处理。
@RequestMapping({"/hello","/abc"})
public String protal(){
    return "success";
}
<body>
index
<a th:href="@{/test/hello}">success</a>
<a th:href="@{/test/abc}">注解的value属性</a>
</body>
@RequestMapping注解method属性:
作用:通过请求的请求方式匹配请求。
method属性是RequestMapping类型的数组,即当前浏览器所发送请求的请求方式匹配method属性中的任何一种请求方式。
则当前请求就会被注解所标识的方法进行处理。
做浏览器所发送的请求的请求路径和@RequestMapping注解value属性匹配,但请求不匹配。
此时页面报错:405-Request method ‘GET’ not supported
在@RequestMapping基础上,结合请求方式的一些派生注解:
@GetMapping、@PostMapping、@DeleteMapping、@PutMapping
TestRequestMappingController
@Controller
@RequestMapping("/test")
public class TestRequestMappingController {
    // 此时控制器方法所匹配的请求的请求路径为:/test/hello
    @RequestMapping(
    	value = {"/hello","/abc"},
    	method = { RequestMethod.POST,RequestMethod.GET })
    public String protal(){
        return "success";
    }
}
index.html
<body>
index
<a th:href="@{/test/hello}">success</a>
<a th:href="@{/test/abc}">注解的value属性</a>
<form th:action="@{/test/hello}" >
    <input type="submit" value="测试@RequestMapping的method属性">
</form>
</body>
@RequestMapping注解params属性:
作用:通过请求的请求参数匹配请求,即浏览器发送的请求的请求参数必须满足params属性的设置。
params可以使用四种表达式:
“param”:表示当前所匹配请求的请求参数中必须携带param参数。
“!param”:表示当前所匹配请求的请求参数中一定不能携带param参数。
“param=value”:表示当前所匹配请求的请求参数中必须携带param参数且值必须为value。
“param!=value”:表示当前所匹配请求的请求参数中可以不携带param,若携带值一定不能是value。
TestRequestMappingController
@Controller
@RequestMapping("/test")
public class TestRequestMappingController {
    // 此时控制器方法所匹配的请求的请求路径为:/test/hello
    @RequestMapping(
    	value = {"/hello","/abc"},
    	method = {RequestMethod.POST,RequestMethod.GET},
    	params = {"username","!password","age=20","gender!=女"})
    public String protal(){
        return "success";
    }
}
index.html
<body>
index
<a th:href="@{/test/hello}">success</a>
<a th:href="@{/test/abc}">注解的value属性</a>
<form th:action="@{/test/hello}" method="post">
    <input type="submit" value="测试@RequestMapping的method属性">
</form>

<a th:href="@{/test/hello?username=admin}">测试@RequestMapping的params属性</a>
<a th:href="@{/test/hello(username='admin')}">测试@RequestMapping的params属性</a>
</body>
@RequestMapping注解params属性:(了解)
作用:通过请求的请求头信息匹配请求,即浏览器发送的请求的请求头信息必须满足headers属性的设置。
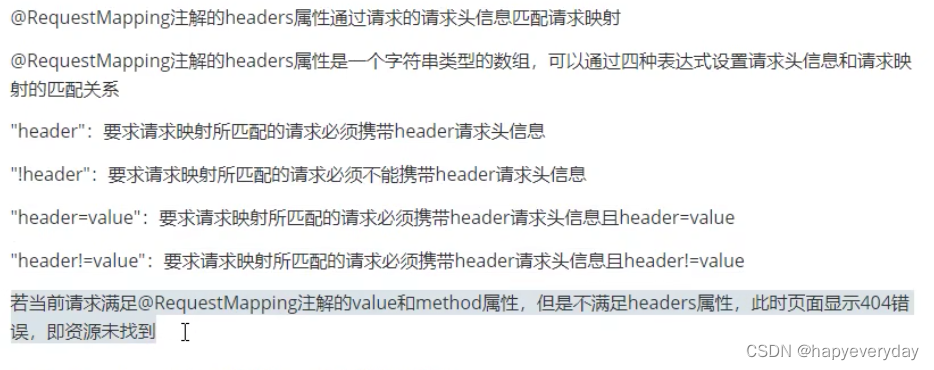
SpringMVC支持ant风格的路径:
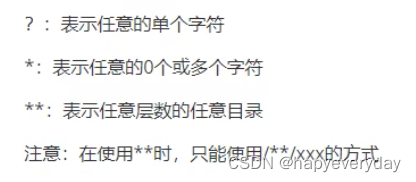
@Controller
@RequestMapping("/test")
public class TestRequestMappingController {
    @RequestMapping("/a?a/test/ant")
    public String testAnt(){
        return "success";
    }
}
<a th:href="@{/test/aaa/test/ant}">测试@RequestMapping的注解支持ant风格路径</a>
SpringMVC支持路径中的占位符(重点):
@Controller
@RequestMapping("/test")
public class TestRequestMappingController {
    @RequestMapping("/rest/{username}/{id}")
    public String testRest(@PathVariable("id") Integer id,@PathVariable("username") String username){
        System.out.println(id+","+username);
        return "success";
    }
}
<a th:href="@{/test/rest/admin/1}">测试@RequestMapping的value属性中的占位符</a>
SpringMVC获取请求参数
通过ServletAPI获取
只需在控制器方法的形参位置设置HttpServletRequest类型的形参,就可以在控制器中使用request对象获取请求参数。
@RequestMapping("/param/servletAPI")
public String getParamByServletAPI(HttpServletRequest request){
    String username = request.getParameter("username");
    String password = request.getParameter("password");
    System.out.println(username+"="+password);
    return "success";
}
<form th:action="@{/param/servletAPI}" method="post">
    用户名:<input type="text" name="username"/><br/>
    密码:<input type="password" name="password" /><br/>
    <input type="submit" value="登录"/>
</form>
通过控制器方法的形参获取
@RequestMapping("/param")
public String getParam(String username,String password){
    System.out.println(username+"="+password);
    return "success";
}
<form th:action="@{/param}" method="post">
    用户名:<input type="text" name="username"/><br/>
    密码:<input type="password" name="password" /><br/>
    <input type="submit" value="登录"/>
</form>
@RequestParam
将请求参数和控制器方法的形参绑定。
value:设置和形参绑定的请求参数的名字
required:为true时,设置必须传输value所对应的请求参数,或者用默认值。
defaultValue:设置默认值。
@RequestMapping("/param")
public String getParam(
        @RequestParam(value = "userName",required = false,defaultValue = "hello") String username,
        String password)
{
    System.out.println(username+"="+password);
    return "success";
}
<form th:action="@{/param}" method="post">
    用户名:<input type="text" name="userName"/><br/>
    密码:<input type="password" name="password" /><br/>
    <input type="submit" value="登录"/>
</form>
@RequestHeader和@CookieValue
@RequestHeader:将请求头信息和控制器方法的形参绑定。
@CookieValue:将cookie数据和控制器方法的形参绑定。
@Controller
public class TestParamController {
    @RequestMapping("/param/servletAPI")
    public String getParamByServletAPI(HttpServletRequest request){
        HttpSession session = request.getSession();
        String username = request.getParameter("username");
        String password = request.getParameter("password");
        System.out.println(username+"="+password);
        return "success";
    }

    @RequestMapping("/param")
    public String getParam(
            @RequestParam(value = "userName",required = false,defaultValue = "hello") String username,
            String password,
            @RequestHeader("referer") String referer,
            @CookieValue("JSESSIONID") String jsessionId
    ){
        System.out.println(username+"="+password+"="+referer+"="+jsessionId);
        return "success";
    }
}
通过pojo获取请求参数
通过控制器方法的实体类类型的形参获取请求参数。
需要在控制器方法的形参设置实体类类型的形参,要保证实体类中的属性的属性名和请求参数的名字一样。
@RequestMapping("/param/pojo")
public String getPojo(User user){
    System.out.println(user);
    return  "success";
}
获取请求参数的乱码问题
使用SpringMVC提供的编码过滤器CharacterEncodingFilter解决乱码问题。
注意:SpringMVC中处理编码的过滤器一定要配置到其他过滤器之前,否则无效。
tomcat7没有解决get乱码。
tomact8解决了get的乱码。
若是tomcat7,解决tomcat get乱码,如下图所示:
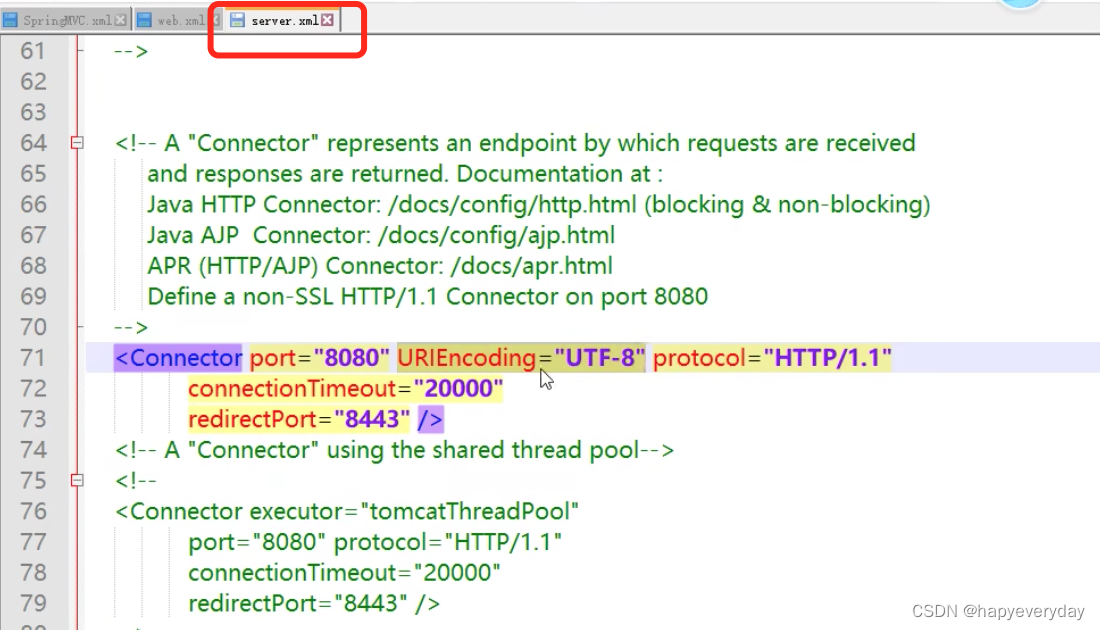
解决post乱码问题:
在web.xml中配置 Spring MVC 提供的编码过滤器CharacterEncodingFilter
<!-- 配置 Spring MVC 的编码过滤器 -->
<filter>
    <filter-name>CharacterEncodingFilter</filter-name>
    <filter-class>org.springframework.web.filter.CharacterEncodingFilter</filter-class>
    <init-param>
        <param-name>encoding</param-name>
        <param-value>UTF-8</param-value>
    </init-param>
    <init-param>
        <param-name>forceEncoding</param-name>
        <param-value>true</param-value>
    </init-param>
</filter>
<filter-mapping>
    <filter-name>CharacterEncodingFilter</filter-name>
    <url-pattern>/*</url-pattern>
</filter-mapping>
域对象共享数据
- 使用ServletAPI向request域对象共享数据

- 使用ModelAndView向request域对象共享数据
使用ModelAndView时,可以使用其Model功能向请求域共享数据。
使用View功能设置逻辑视图,但是控制器方法一定要将ModelAndView作为方法的返回值。
@Controller
public class TestScopeController {
    @RequestMapping("/test/mav")
    public ModelAndView testMav(){
        /**
         *  ModelAndView包 含 Model 和 View 功能
         *  Model:向请求域中共享数据
         *  View:设置逻辑视图实现页面跳转
         */
        ModelAndView mav=new ModelAndView();
        // 向请求域中共享数据
        mav.addObject("testRequest","hello ModelAndView");
        // 设置视图名称
        mav.setViewName("success");
        return mav;
    }
}
success页面获取数据:
<p th:text="${testRequest}"/>
- 使用Model、ModelMap、Map向request域对象共享数据
@RequestMapping("/test/model")
public String testModel(Model model){
    model.addAttribute("testRequest","hello Model");
    return "success";
}

@RequestMapping("/test/modelMap")
public String testModelMap(ModelMap modelMap){
    modelMap.addAttribute("testRequest","hello ModelMap");
    return "success";
}

@RequestMapping("/test/map")
public String tesMap(Map<String, Object> map){
    map.put("testRequest","hello Map");
    return "success";
}
<a th:href="@{/test/model}">测试Model向请求与共享数据</a>
<a th:href="@{/test/modelMap}">测试ModelMap向请求与共享数据</a>
<a th:href="@{/test/map}">测试Map向请求与共享数据</a>
Model、ModelMap、Map的关系:
在底层中,这些类的形参最终都是通过BindingAwareModelMap创建。
- 向session域、application域共享数据
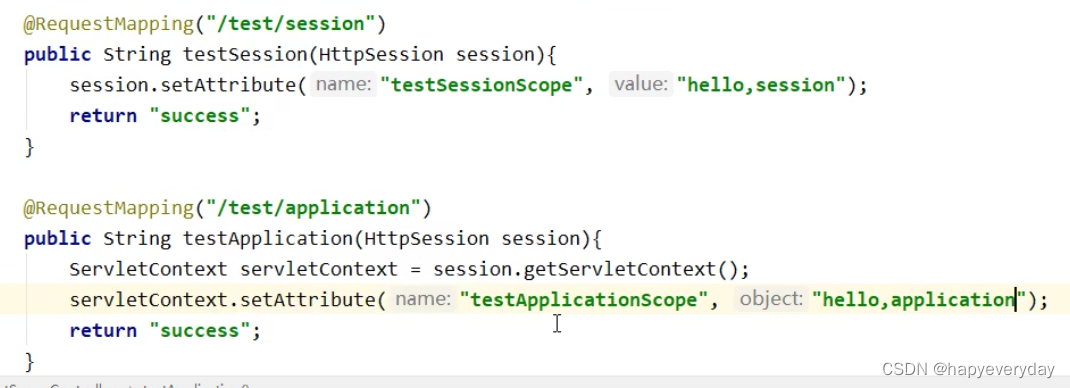

SpringMVC的视图
ThymeleafView
当控制器中方法所设置的视图名称没有任何前缀时,此时的视图名称会被SpringMVC配置文件中所配置的视图解析器解析,视图名称拼接视图前缀和视图。
@RequestMapping("/test/view/thymeleaf")
public String testThymeleafView(){
    return "success";
}
转发视图
转发:地址栏不会发生变化
@RequestMapping("/test/view/forward")
public String testInternalResourceView(){
    return "forward:/test/model";
}
重定向视图
@RequestMapping("/test/view/redirect")
public String testRedirecttView(){
    return "redirect:/test/model";
}
SpringMVC视图控制器
springmvc.xml
<!-- 开启mvc的注解驱动 -->
<mvc:annotation-driven/>

<!-- 视图控制器:为当前的请求直接设置视图名称,实现页面跳转
        若设置视图控制器,则只有视图控制器设置的请求会被处理,其他的请求将全部404。
        此时需配置一个标签 <mvc:annotation-driven/>      -->
<mvc:view-controller path="/" view-name="index"/>
RESTful
REST:表现层资源状态转移。
四个表示操作方式的动词:GET、POST、PUT、DELETE
REST风格提倡URL抵制使用同一的风格设计,用斜杠分隔。不使用问号键值对的方式携带请求参数。而是将要发送的数据作为URL地址的一部分。

注意:浏览器目前只能发送get和post请求。
要发送put和delete请求的要求:
需要在web.xml中配置一个过滤器。配置了过滤器后,发送的请求要满足两个条件,才能将请求方式转换为put或delete。
- 当前请求必须为post
- 当前请求必须传输请求参数 _method ,_method的值才是最终的请求方式。
springmvc.xml
<context:component-scan base-package="com.luhang.controller"/>

<!-- 配置thymeleaf视图解析器 -->
<bean id="viewResolver" class="org.thymeleaf.spring5.view.ThymeleafViewResolver">
    <property name="order" value="1"/>
    <property name="characterEncoding" value="UTF-8"/>
    <property name="templateEngine">
        <bean class="org.thymeleaf.spring5.SpringTemplateEngine">
            <property name="templateResolver">
                <bean class="org.thymeleaf.spring5.templateresolver.SpringResourceTemplateResolver">
                    <!-- 视图前缀 -->
                    <property name="prefix" value="/WEB-INF/templates/"/>
                    <!-- 视图后缀 -->
                    <property name="suffix" value=".html"/>
                    <property name="templateMode" value="HTML5"/>
                    <property name="characterEncoding" value="UTF-8"/>
                </bean>
            </property>
        </bean>
    </property>
</bean>
<!--  开启mvc的注解驱动  -->
<mvc:annotation-driven/>
<!-- 配置视图控制器 -->
<mvc:view-controller path="/" view-name="index"/>
web.xml
<filter>
    <filter-name>CharacterEncodingFilter</filter-name>
    <filter-class>org.springframework.web.filter.CharacterEncodingFilter</filter-class>
    <init-param>
        <param-name>encoding</param-name>
        <param-value>UTF-8</param-value>
    </init-param>
    <init-param>
        <param-name>forceEncoding</param-name>
        <param-value>true</param-value>
    </init-param>
</filter>
<filter-mapping>
    <filter-name>CharacterEncodingFilter</filter-name>
    <url-pattern>/*</url-pattern>
</filter-mapping>

<!--  设置请求处理方式的过滤器  -->
<filter>
    <filter-name>HiddenHttpMethodFilter</filter-name>
    <filter-class>org.springframework.web.filter.HiddenHttpMethodFilter</filter-class>
</filter>
<filter-mapping>
    <filter-name>HiddenHttpMethodFilter</filter-name>
    <url-pattern>/*</url-pattern>
</filter-mapping>

<!--  设置SpringMVC前端控制器  -->
<servlet>
    <servlet-name>DispatcherServlet</servlet-name>
    <servlet-class>org.springframework.web.servlet.DispatcherServlet</servlet-class>
    <init-param>
        <param-name>contextConfigLocation</param-name>
        <param-value>classpath:springmvc.xml</param-value>
    </init-param>
</servlet>
<servlet-mapping>
    <servlet-name>DispatcherServlet</servlet-name>
    <url-pattern>/</url-pattern>
</servlet-mapping>
TestRestController
@Controller
public class TestRestController {
//    @RequestMapping(value = "/user",method = RequestMethod.GET)
    @GetMapping("/user")
    public String getAllUser(){
        System.out.println("Get:查询所有用户信息...");
        return "success";
    }
//    @RequestMapping(value = "/user/{id}",method = RequestMethod.GET)
    @GetMapping("/user/{id}")
    public String getUserById(@PathVariable("id") Integer id){
        System.out.println("Get:根据id查询用户信息:user/"+id);
        return "success";
    }
//    @RequestMapping(value = "/user",method = RequestMethod.POST)
    @PostMapping("/user")
    public String insertUser(){
        System.out.println("Post:添加用户信息...");
        return "success";
    }

//    @RequestMapping(value = "/user",method = RequestMethod.PUT)
    @PutMapping("/user")
    public String updateUser(){
        System.out.println("Put:修改用户信息...");
        return "success";
    }

//    @RequestMapping(value = "/user/{id}",method = RequestMethod.DELETE)
    @DeleteMapping("/user/{id}")
    public String deleteUser(@PathVariable("id") Integer id){
        System.out.println("Delete:删除用户信息...:user/"+id);
        return "success";
    }
}
index.html、success.html
<body>
<h1>index.html</h1>
<a th:href="@{/user}">查询所有用户信息</a>
<a th:href="@{/user/1}">查询所有用户信息</a>
<form th:action="@{/user}" method="post">
    <input type="submit" value="添加用户信息">
</form>

<form th:action="@{/user}" method="post">
    <input type="hidden" name="_method" value="put">
    <input type="submit" value="修改用户信息">
</form>
<form th:action="@{/user/5}" method="post">
    <input type="hidden" name="_method" value="delete">
    <input type="submit" value="删除用户信息">
</form>
</body>


<body>
<h1>success.html</h1>
</body>
配置默认的servlet处理静态资源:
当前工程的 web.xml 配置的前端控制器 DispatcherServlet 的 url-pattern 是 / 。
tomcat 的 web.xml 配置的 DefaultServlet 的 url-pattern 也是/。
此时,浏览器发送的请求会优先被DispatcherServlet进行处理,但DispatcherServlet无法处理静态资源,若配置了<mvc:default-servlet-handler/>,此时浏览器发送的所有请求都会被DefaultServlet处理,若配置了<mvc:default-servlet-handler/> 和 <mvc:annotation-driven/>,浏览器发送的请求会先被DispatcherServlet处理,无法处理再交给DefaultServlet处理。
SpringMVC处理ajax请求
@RequestBody、@ResponseBody
- @RequestBody:将请求体中的内容和控制器方法的形参进行绑定
- 使用@RequestBody注解将json格式的请求参数转换为java对象:
- 导入jackson的依赖
- 在SpringMVC的配置文件中设置
<mvc:annotation-driven/> - 在处理请求的控制器方法的形参位置,直接设置json格式的请求参数要转换的java类型的形参,使用@RequestBody注解标识即可
- @ResponseBody:将所标识的控制器方法的返回值作为响应报文的响应体响应到浏览器。
- 使用@ResponseBody注解响应浏览器json格式的数据:
- 导入jackson的依赖
- 在SpringMVC的配置文件中设置
<mvc:annotation-driven/> - 将需要转换为json字符串的java对象直接作为控制器方法的返回值,使用@ResponseBody注解标识控制器方法就可以将java对象直接转换为json字符串,并响应到浏览器。
常用Java对象转换为json的结果:
实体类 —> json对象
map —> json对象
list —> json数组
依赖:
<!-- jackson 依赖 -->
<dependency>
    <groupId>com.fasterxml.jackson.core</groupId>
    <artifactId>jackson-databind</artifactId>
    <version>2.12.1</version>
</dependency>
index.html
<body>
<div id="app">
    <h1>index.html</h1>
    <input type="button" value="测试SpringMVC处理ajax" @click="testAjax()"/><br/>
    <input type="button" value="使用@RequestBody注解处理json格式的请求参数" @click="testRequestBody()"/><br/>
    <a th:href="@{/test/ResponseBody}">测试@ResponseBody注解响应浏览器数据</a><br/>
    <input type="button" value="使用@ResponseBody注解响应json格式的数据" @click="testResponseBody()"/><br/>

</div>

<script src="https://cdn.jsdelivr.net/npm/vue@2/dist/vue.js"></script>
<script src="https://cdn.jsdelivr.net/npm/axios/dist/axios.min.js"></script>

<script type="text/javascript">
    var vue=new Vue({
        el:'#app',
        methods:{
            testAjax(){
                axios.post(
                    "/SpringMVC/test/ajax?id=1001",
                    {username:"admin",password:"123456"}
                ).then(response=>{
                    console.log(response.data);
                });
                // axios({
                //     url:"", //请求路径
                //     method: "", // 请求方式
                //     params:{}, // 以name=value,name=value的方式发送请求参数,
                //                //不管用的请求方式是get或post,请求参数都会被拼接到请求地址后
                //                // 此种方式的请求方式,可以通过request.getParameter()获取
                //     data:{} // 以json格式发送请求参数,请求参数会被保存到请求报文的请求体传输到服务器
                //              // 此种方式的请求方式,不可以通过request.getParameter()获取
                // }).then(response=>{
                //     console.log(response.data)
                // });
            },
            testRequestBody(){
                axios.post(
                    "/SpringMVC/test/RequestBody/json",
                    {username:"admin",password:"123456",age:12,gender:"男"}
                ).then(response=>{
                    console.log(response.data);
                });
            },
            testResponseBody(){
                axios.post(
                    "/SpringMVC/test/ResponseBody/json"
                ).then(response=>{
                    console.log(response.data);
                });
            }
        }
    })
</script>
</body>
TestAjaxController
@Controller
public class TestAjaxController {

    @RequestMapping("/test/ajax")
    public void testAjax(Integer id, @RequestBody String requestBody, HttpServletResponse response) throws IOException {
        System.out.println(requestBody);
        System.out.println(id);
        response.getWriter().write("hello,axios");
    }

    // java类型接收
//    @RequestMapping("/test/RequestBody/json")
    public void testRequestBody(@RequestBody User user, HttpServletResponse response) throws IOException {
        System.out.println(user);
        response.getWriter().write("hello,RequestBody");
    }

    // Map类型接收:有java类型接收时用java类型接收,否则用map类型接收
    @RequestMapping("/test/RequestBody/json")
    public void testRequestBody(@RequestBody Map<String, Object> map, HttpServletResponse response) throws IOException {
        System.out.println(map);
        response.getWriter().write("hello,RequestBody");
    }
    @RequestMapping("/test/ResponseBody")
    @ResponseBody
    public String testResponseBody(){
        return "success";
    }
    @RequestMapping("/test/ResponseBody/json")
    @ResponseBody
    // list转json响应到浏览器
    public List<User> testResponseBodyJson(){
        User u1=new User(1001,"张三","123456",23,"男");
        User u2=new User(1002,"李四","123456",23,"男");
        User u3=new User(1003,"王五","123456",23,"男");
        List<User> list= Arrays.asList(u1,u2,u3);
        return list;
    }
    /*// // map转json响应到浏览器
    public Map<String,Object> testResponseBodyJson(){
        User u1=new User(1001,"张三","123456",23,"男");
        User u2=new User(1002,"李四","123456",23,"男");
        User u3=new User(1003,"王五","123456",23,"男");
        Map<String,Object> map=new HashMap<String, Object>();
        map.put("1001",u1);
        map.put("1002",u2);
        map.put("1003",u3);
        return map;
    }*/
   /* // 实体类转json响应到浏览器
    public User testResponseBodyJson(){
        User user=new User(1001,"张三","123456",23,"男");
        return user;
    }*/
}
User类
public class User {
    private Integer id;
    private String username;
    private String password;
    private Integer age;
    private String gender;
	// setter、getter、构造、toString 略
}
@RestController注解
@RestController = @Controller + @ResponseBody
@RestController注解是SpringMVC提供的一个复合注解,标识在控制器的类上,相当于为类添加了 @Controller注解 ,并且为其中的每个方法添加了 @ResponseBody 。
文件下载和上传
文件下载
ResponseEntity用于控制器方法的返回值类型,该控制器方法的返回值就是响应到浏览器的响应报文,使用ResponseEntity实现下载文件的功能。
ResponseEntity:可以作为控制器方法的返回值,表示响应到浏览器的完整的响应报文。
在spring_mvc_ajax项目中:
index.html
<!DOCTYPE html>
<html lang="en" xmlns:th="http://www.thymeleaf.org">
<head>
    <meta charset="UTF-8">
    <title>Title</title>
</head>
<body>
<div id="app">
    <h1>index.html</h1>
    <a th:href="@{/test/down}">下载图片</a>
</div>
</body>
</html>
FileUpAndDownController:
@Controller
public class FileUpAndDownController {

    @RequestMapping("/test/down")
    public ResponseEntity<byte[]> testResponseEntity(HttpSession session) throws IOException {
        // 1. 获得文件的真实路径 : webapp/ 开始
        String filePath = session.getServletContext().getRealPath("img");
        filePath = filePath + File.separator + "1.jpeg";

        // 2. 创建输入流
        InputStream is = new FileInputStream(filePath);

        // 3. 创建字节数组, 把文件中的字节一次性读取到字节数组中。 // is.available():获取输入流所对应文件的字节数
        byte[] bytes = new byte[is.available()];
        is.read(bytes);

        // 4. 创建 HttpHeaders 对象设置响应头信息
        MultiValueMap<String, String> headers = new HttpHeaders();

        // 5. 设置下载方式及下载文件的名字。k:头信息是固定的,不区分大小写。attachment:以附件的形式下载。
        headers.add("Content-Disposition", "attachment;filename=1.jpg");

        // 6. 设置响应状态码
        HttpStatus statusCode = HttpStatus.OK;

        // 7. 创建ResponseEndity对象 : 响应体,响应头,响应状态码
        ResponseEntity<byte[]> responseEntity = new ResponseEntity<byte[]>(bytes, headers, statusCode);

        // 8. 关闭输入流
        is.close();
        return responseEntity;
    }
}
文件上传
control+H:查看类之间的关系。eg:当前的接口被谁继承了。
文件上传的要求:
- form表单的请求方式必须为
post - form表单必须设置属性为
enctype="multipart/form-data"
index.html
<!DOCTYPE html>
<html lang="en" xmlns:th="http://www.thymeleaf.org">
<head>
    <meta charset="UTF-8">
    <title>Title</title>
</head>
<body>
<div id="app">
    <h1>index.html</h1>
    <a th:href="@{/test/down}">下载图片</a>

    <form th:action="@{/test/up}" method="post" enctype="multipart/form-data">
        头像:<input type="file" name="photo"/>
        <input type="submit" value="上传图片"/>
    </form>

</div>
</body>
</html>
springmvc.xml:
<!-- 配置文件上传解析器,id是固定的,不许变。 -->
<bean id="multipartResolver" class="org.springframework.web.multipart.commons.CommonsMultipartResolver">

</bean>
pom.xml
<!-- 文件上传 -->
<dependency>
    <groupId>commons-fileupload</groupId>
    <artifactId>commons-fileupload</artifactId>
    <version>1.3.1</version>
</dependency>
FileUpAndDownController
@Controller
public class FileUpAndDownController {
    // 上传功能
    @RequestMapping("/test/up")
    public String testUp(MultipartFile photo, HttpSession session) throws IOException {
        String filename = photo.getOriginalFilename();
        // 获取ServletContext对象
        ServletContext servletContext = session.getServletContext();
        // 获取当前工程下的photo目录的真实路径
        String photoPath = servletContext.getRealPath("photo");
        // 创建photoPath所对应的File对象
        File file=new File(photoPath);
        // 判断file所对应的目录是否存在
        if(!file.exists()){
            file.mkdir();
        }
        String finalPath = photoPath + File.separator + filename;
        // 上传图片
        photo.transferTo(new File(finalPath));
        return "success";
    }

    // 下载功能
    @RequestMapping("/test/down")
    public ResponseEntity<byte[]> testResponseEntity(HttpSession session) throws IOException {
        // 1. 获得文件的真实路径 : webapp/ 开始
        String filePath = session.getServletContext().getRealPath("img");
        filePath = filePath + File.separator + "1.jpeg";

        // 2. 创建输入流
        InputStream is = new FileInputStream(filePath);

        // 3. 创建字节数组, 把文件中的字节一次性读取到字节数组中。 // is.available():获取输入流所对应文件的字节数
        byte[] bytes = new byte[is.available()];
        is.read(bytes);

        // 4. 创建 HttpHeaders 对象设置响应头信息
        MultiValueMap<String, String> headers = new HttpHeaders();

        // 5. 设置下载方式及下载文件的名字。k:头信息是固定的,不区分大小写。attachment:以附件的形式下载。
        headers.add("Content-Disposition", "attachment;filename=1.jpg");

        // 6. 设置响应状态码
        HttpStatus statusCode = HttpStatus.OK;

        // 7. 创建ResponseEndity对象 : 响应体,响应头,响应状态码
        ResponseEntity<byte[]> responseEntity = new ResponseEntity<byte[]>(bytes, headers, statusCode);

        // 8. 关闭输入流
        is.close();
        return responseEntity;
    }
}
解决文件上传过程中文件重名的问题:
// 上传功能
@RequestMapping("/test/up")
public String testUp(MultipartFile photo, HttpSession session) throws IOException {
    String filename = photo.getOriginalFilename();


    // 获取上传的文件后缀名
    String hzName = filename.substring(filename.lastIndexOf("."));
    // 获取uuid
    String uuid = UUID.randomUUID().toString();
    // 拼接一个新的文件名
    filename=uuid+hzName;


    // 获取ServletContext对象
    ServletContext servletContext = session.getServletContext();
    // 获取当前工程下的photo目录的真实路径
    String photoPath = servletContext.getRealPath("photo");
    // 创建photoPath所对应的File对象
    File file=new File(photoPath);
    // 判断file所对应的目录是否存在
    if(!file.exists()){
        file.mkdir();
    }
    String finalPath = photoPath + File.separator + filename;
    // 上传图片
    photo.transferTo(new File(finalPath));
    return "success";
}
拦截器
创建拦截器:FirstInterceptor
/*
   拦截器的三个方法:
        preHandle():在控制器方法执行之前,其返回值表示对控制器方法的拦截(false)或放行(true)。
        postHandle():在控制器执行方法之后执行。
        afterCompletion():在控制器执行方法之后,且渲染视图完毕之后执行。
 */

@Component
public class FirstInterceptor implements HandlerInterceptor {
    public boolean preHandle(HttpServletRequest request, HttpServletResponse response, Object handler) throws Exception {
        System.out.println("FirstInterceptor ----> preHandle");
        return true;
    }

    public void postHandle(HttpServletRequest request, HttpServletResponse response, Object handler, ModelAndView modelAndView) throws Exception {
        System.out.println("pFirstInterceptor ----> ostHandle");
    }

    public void afterCompletion(HttpServletRequest request, HttpServletResponse response, Object handler, Exception ex) throws Exception {
        System.out.println("FirstInterceptor ----> afterCompletion");
    }
}
配置拦截器:springmvc.xml
<?xml version="1.0" encoding="UTF-8"?>
<beans xmlns="http://www.springframework.org/schema/beans"
       xmlns:xsi="http://www.w3.org/2001/XMLSchema-instance"
       xmlns:context="http://www.springframework.org/schema/context"
       xmlns:mvc="http://www.springframework.org/schema/mvc"
       xsi:schemaLocation="http://www.springframework.org/schema/beans http://www.springframework.org/schema/beans/spring-beans.xsd http://www.springframework.org/schema/context https://www.springframework.org/schema/context/spring-context.xsd http://www.springframework.org/schema/mvc https://www.springframework.org/schema/mvc/spring-mvc.xsd">

    <context:component-scan base-package="com.luhang"/>

    <!--  配置thymeleaf视图解析器  -->
    <bean id="viewResolver" class="org.thymeleaf.spring5.view.ThymeleafViewResolver">
        <property name="order" value="1"/>
        <property name="characterEncoding" value="UTF-8"/>
        <property name="templateEngine">
            <bean class="org.thymeleaf.spring5.SpringTemplateEngine">
                <property name="templateResolver">
                    <bean class="org.thymeleaf.spring5.templateresolver.SpringResourceTemplateResolver">
                        <!-- 视图前缀 -->
                        <property name="prefix" value="/WEB-INF/templates/"/>
                        <!-- 视图后缀 -->
                        <property name="suffix" value=".html"/>
                        <property name="templateMode" value="HTML5"/>
                        <property name="characterEncoding" value="UTF-8"/>
                    </bean>
                </property>
            </bean>
        </property>
    </bean>

    <mvc:default-servlet-handler/>
    <!--  开启mvc注解的驱动  -->
    <mvc:annotation-driven/>
    <!--  配置视图控制器  -->
    <mvc:view-controller path="/" view-name="index"/>

    <!--  配置文件上传解析器  -->
    <bean id="multipartResolver" class="org.springframework.web.multipart.commons.CommonsMultipartResolver"/>

    <!--  配置拦截器  -->
    <mvc:interceptors>
        <!--  bean 和 ref 标签所配置的拦截器默认对DispatcherServlet处理的所有的请求进行拦截  -->
            <!--  方式一: -->
<!--        <bean class="com.luhang.interceptor.FirstInterceptor"/>-->
        <!-- 方式二:用注解的方式来引用。1、在类上加注解,2、记住要配包扫描 -->
<!--        <ref bean="firstInterceptor"/>-->

        <!--  方式三:这种方式配置拦截器,更精确  -->
        <mvc:interceptor>
            <!-- 配置需要拦截的请求的请求路径。 /* 表示当前项目路径下的一层目录,/**当前目录下的所有请求 -->
            <mvc:mapping path="/**"/>
            <!-- 配置需要排除拦截的请求的请求路径  -->
            <mvc:exclude-mapping path="/abc"/>
            <!-- 配置拦截器 -->
            <ref bean="firstInterceptor"/>
        </mvc:interceptor>
    </mvc:interceptors>
</beans>
多个拦截器的执行顺序:
和在SpringMVC的配置文件中的顺序有关。preHandle() 按照配置的顺序执行,而postHandle()和afterCompletion() 按照配置的反序执行。(为啥?看源码,因为源码里的写法用正序或者反序执行。)
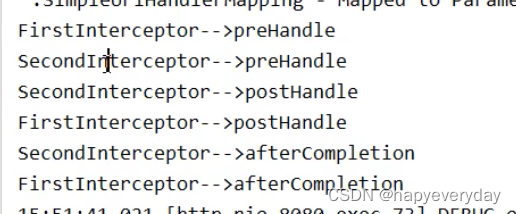
若拦截器中,有某个拦截器的preHandle()返回了false。
拦截器的preHandle()返回false和它之前的拦截器 的preHandle()都会执行。
所有的拦截器的postHandle() 都不执行。
拦截器的preHandle()返回false之前的拦截器的afterCompletion()都会执行。

异常处理器
使用xml配置异常处理
springmvc.xml
<bean class="org.springframework.web.servlet.handler.SimpleMappingExceptionResolver">
    <property name="exceptionMappings">
        <props>
            <!-- key:设置要处理的异常。value:设置出现该异常时要跳转的页面所对应的逻辑视图 -->
            <prop key="java.lang.ArithmeticException">error</prop>
        </props>
    </property>
    <!-- 设置共享在请求域中的异常信息的属性名。 -->
    <property name="exceptionAttribute" value="ex"></property>
</bean>
error.html
<!DOCTYPE html>
<html lang="en" xmlns:th="http://www.thymeleaf.org">
<head>
    <meta charset="UTF-8">
    <title>错误页面</title>
</head>
<body>
<h1>error.html</h1>
<p th:text="${ex}"></p>
</body>
</html>
在TestController中,写异常代码。
@Controller
public class TestController {
    @RequestMapping("/test/hello")
    public String testHello(){
        int a=1/0;
        return "success";
    }
}
使用注解配置异常处理
// 将当前类标识为异常处理组件
@ControllerAdvice
public class ExceptionController {
    // 设置要处理的异常信息
    @ExceptionHandler(ArithmeticException.class)
    public String handelException(Throwable ex, Model model){
        // ex表示控制器方法所出现的异常
        model.addAttribute("ex",ex);
        return "error";
    }
}
注解配置SpringMVC
使用配置类和注解代替web.xml和SpringMVC配置文件的功能。

WebInit类,代替web.xml
package com.luhang.config;

// 当前类,用来代替web.xml
public class WebInit extends AbstractAnnotationConfigDispatcherServletInitializer {
    // 设置一个配置类代替Spring的配置文件
    protected Class<?>[] getRootConfigClasses() {
        return new Class[]{SpringConfig.class};
    }
    // 设置一个配置类代替SpringMVC的配置文件
    protected Class<?>[] getServletConfigClasses() {
        return new Class[]{WebConfig.class};
    }
    // 设置SpringMVC的前端控制器DispatcherServlet的url-pattern。
    protected String[] getServletMappings() {
        return new String[]{"/"};
    }

    @Override
    // 设置当前的过滤器
    protected Filter[] getServletFilters() {
        // 创建编码过滤器
        CharacterEncodingFilter characterEncodingFilter=new CharacterEncodingFilter();
        characterEncodingFilter.setEncoding("utf-8");
        characterEncodingFilter.setForceEncoding(true);
        // 创建处理请求方式的过滤器
        HiddenHttpMethodFilter hiddenHttpMethodFilter=new HiddenHttpMethodFilter();

        return new Filter[]{characterEncodingFilter,hiddenHttpMethodFilter};
    }
}
WebConfig类,代替SpringMVC的配置文件
package com.luhang.config;

// 此类用来代替SpringMVC的配置文件
/*
   springMVC配置文件能做的:扫描组件、视图解析器、默认的servlet、mvc的注解驱动、视图控制器、文件上传解析器、拦截器、异常处理器
 */
// 将类标识为配置类
@Configuration
// 配置扫描组件
@ComponentScan("com.luhang.controller")
// 开启mvc的注解驱动
@EnableWebMvc
public class WebConfig implements WebMvcConfigurer {

    // 配置默认servlet处理静态资源
    public void configureDefaultServletHandling(DefaultServletHandlerConfigurer configurer) {
        configurer.enable();
    }

    // 配置视图控制器
    public void addViewControllers(ViewControllerRegistry registry) {
        registry.addViewController("/").setViewName("index");
    }

    // 配置文件上传解析器。@Bean注解可以将标识的方法的返回值作为bean进行管理,bean的id为方法的方法名
    @Bean
    public CommonsMultipartResolver multipartResolver(){
        return new CommonsMultipartResolver();
    }

    // 配置拦截器
    public void addInterceptors(InterceptorRegistry registry) {
        registry.addInterceptor(new FirstInterceptor()).addPathPatterns("/**");
    }

    // 异常处理器
    public void configureHandlerExceptionResolvers(List<HandlerExceptionResolver> resolvers) {
        SimpleMappingExceptionResolver simpleMappingExceptionResolver=new SimpleMappingExceptionResolver();
        Properties prpo=new Properties();
        prpo.setProperty("java.lang.ArithmeticException","error");
        simpleMappingExceptionResolver.setExceptionMappings(prpo);
        simpleMappingExceptionResolver.setExceptionAttribute("ex");

        resolvers.add(simpleMappingExceptionResolver);
    }

    // 配置视图解析器
    // 配置生成模版解析器
    @Bean
    public ITemplateResolver templateResolver() {
        WebApplicationContext webApplicationContext = ContextLoader.getCurrentWebApplicationContext();
        ServletContextTemplateResolver templateResolver = new ServletContextTemplateResolver(webApplicationContext.getServletContext());
        templateResolver.setPrefix("/WEB-INF/templates/");
        templateResolver.setSuffix(".html");
        templateResolver.setCharacterEncoding("UTF-8");
        templateResolver.setTemplateMode(TemplateMode.HTML);
        return templateResolver;
    }
    // 生成模版引擎 为模版引擎注入模版解析器
    @Bean
    public SpringTemplateEngine templateEngine(ITemplateResolver templateResolver) {
        SpringTemplateEngine templateEngine = new SpringTemplateEngine();
        templateEngine.setTemplateResolver(templateResolver);
        return templateEngine;
    }
    // 生成视图解析器 并为解析器注入模版引擎
    @Bean
    public ViewResolver viewResolver(SpringTemplateEngine templateEngine) {
        ThymeleafViewResolver viewResolver = new ThymeleafViewResolver();
        viewResolver.setCharacterEncoding("UTF-8");
        viewResolver.setTemplateEngine(templateEngine);
        return viewResolver;
    }
}
TestController
package com.luhang.controller;

@Controller
public class TestController {
}
FirstInterceptor拦截器
package com.luhang.interceptor;

public class FirstInterceptor implements HandlerInterceptor {
    public boolean preHandle(HttpServletRequest request, HttpServletResponse response, Object handler) throws Exception {
        return true;
    }

    public void postHandle(HttpServletRequest request, HttpServletResponse response, Object handler, ModelAndView modelAndView) throws Exception {

    }

    public void afterCompletion(HttpServletRequest request, HttpServletResponse response, Object handler, Exception ex) throws Exception {

    }
}
SpringMVC执行流程
SpringMVC常用组件
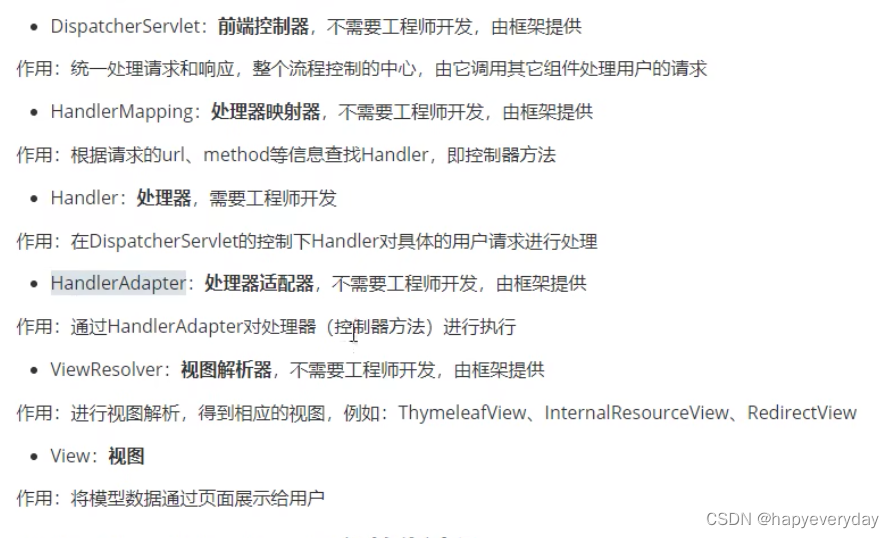
176集 听不进去


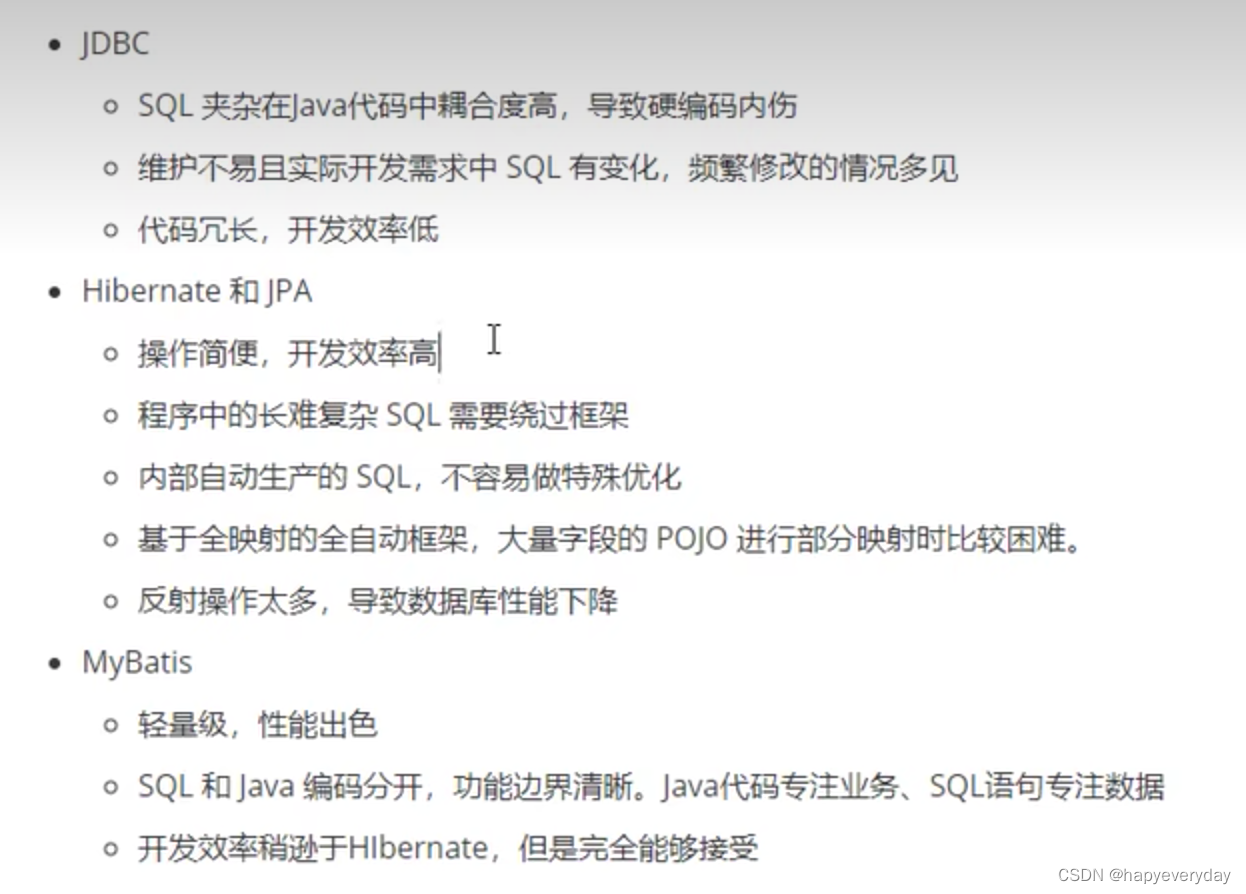
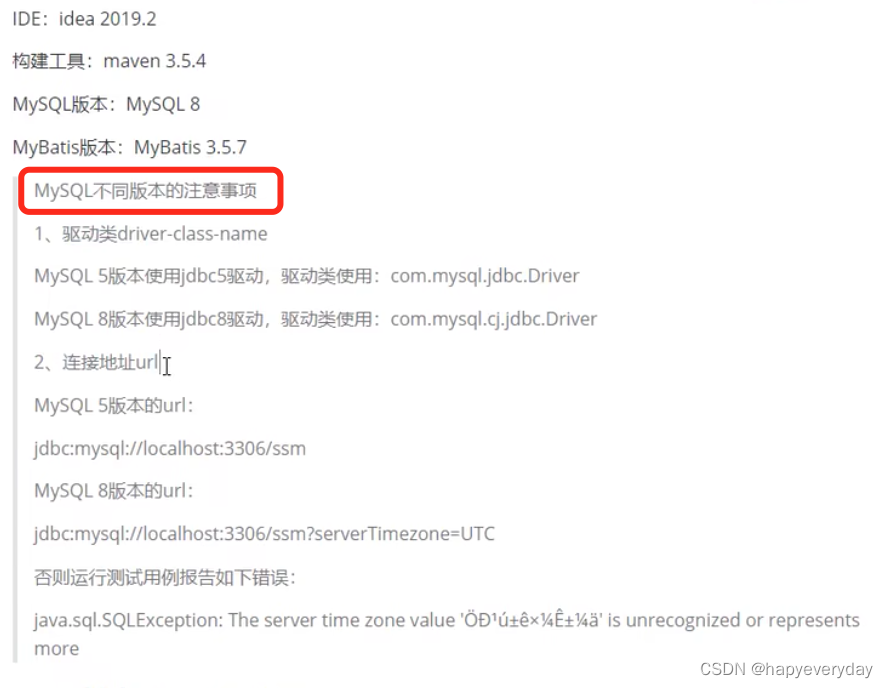
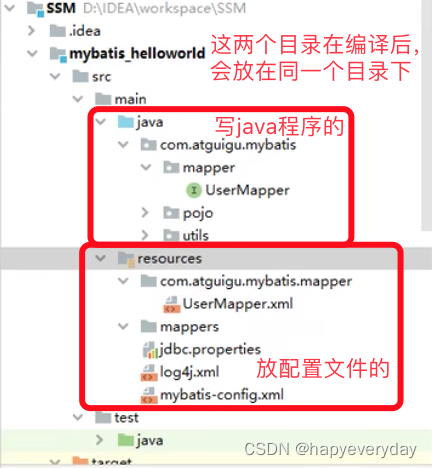
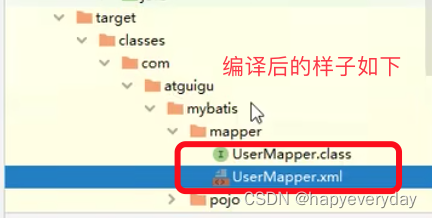
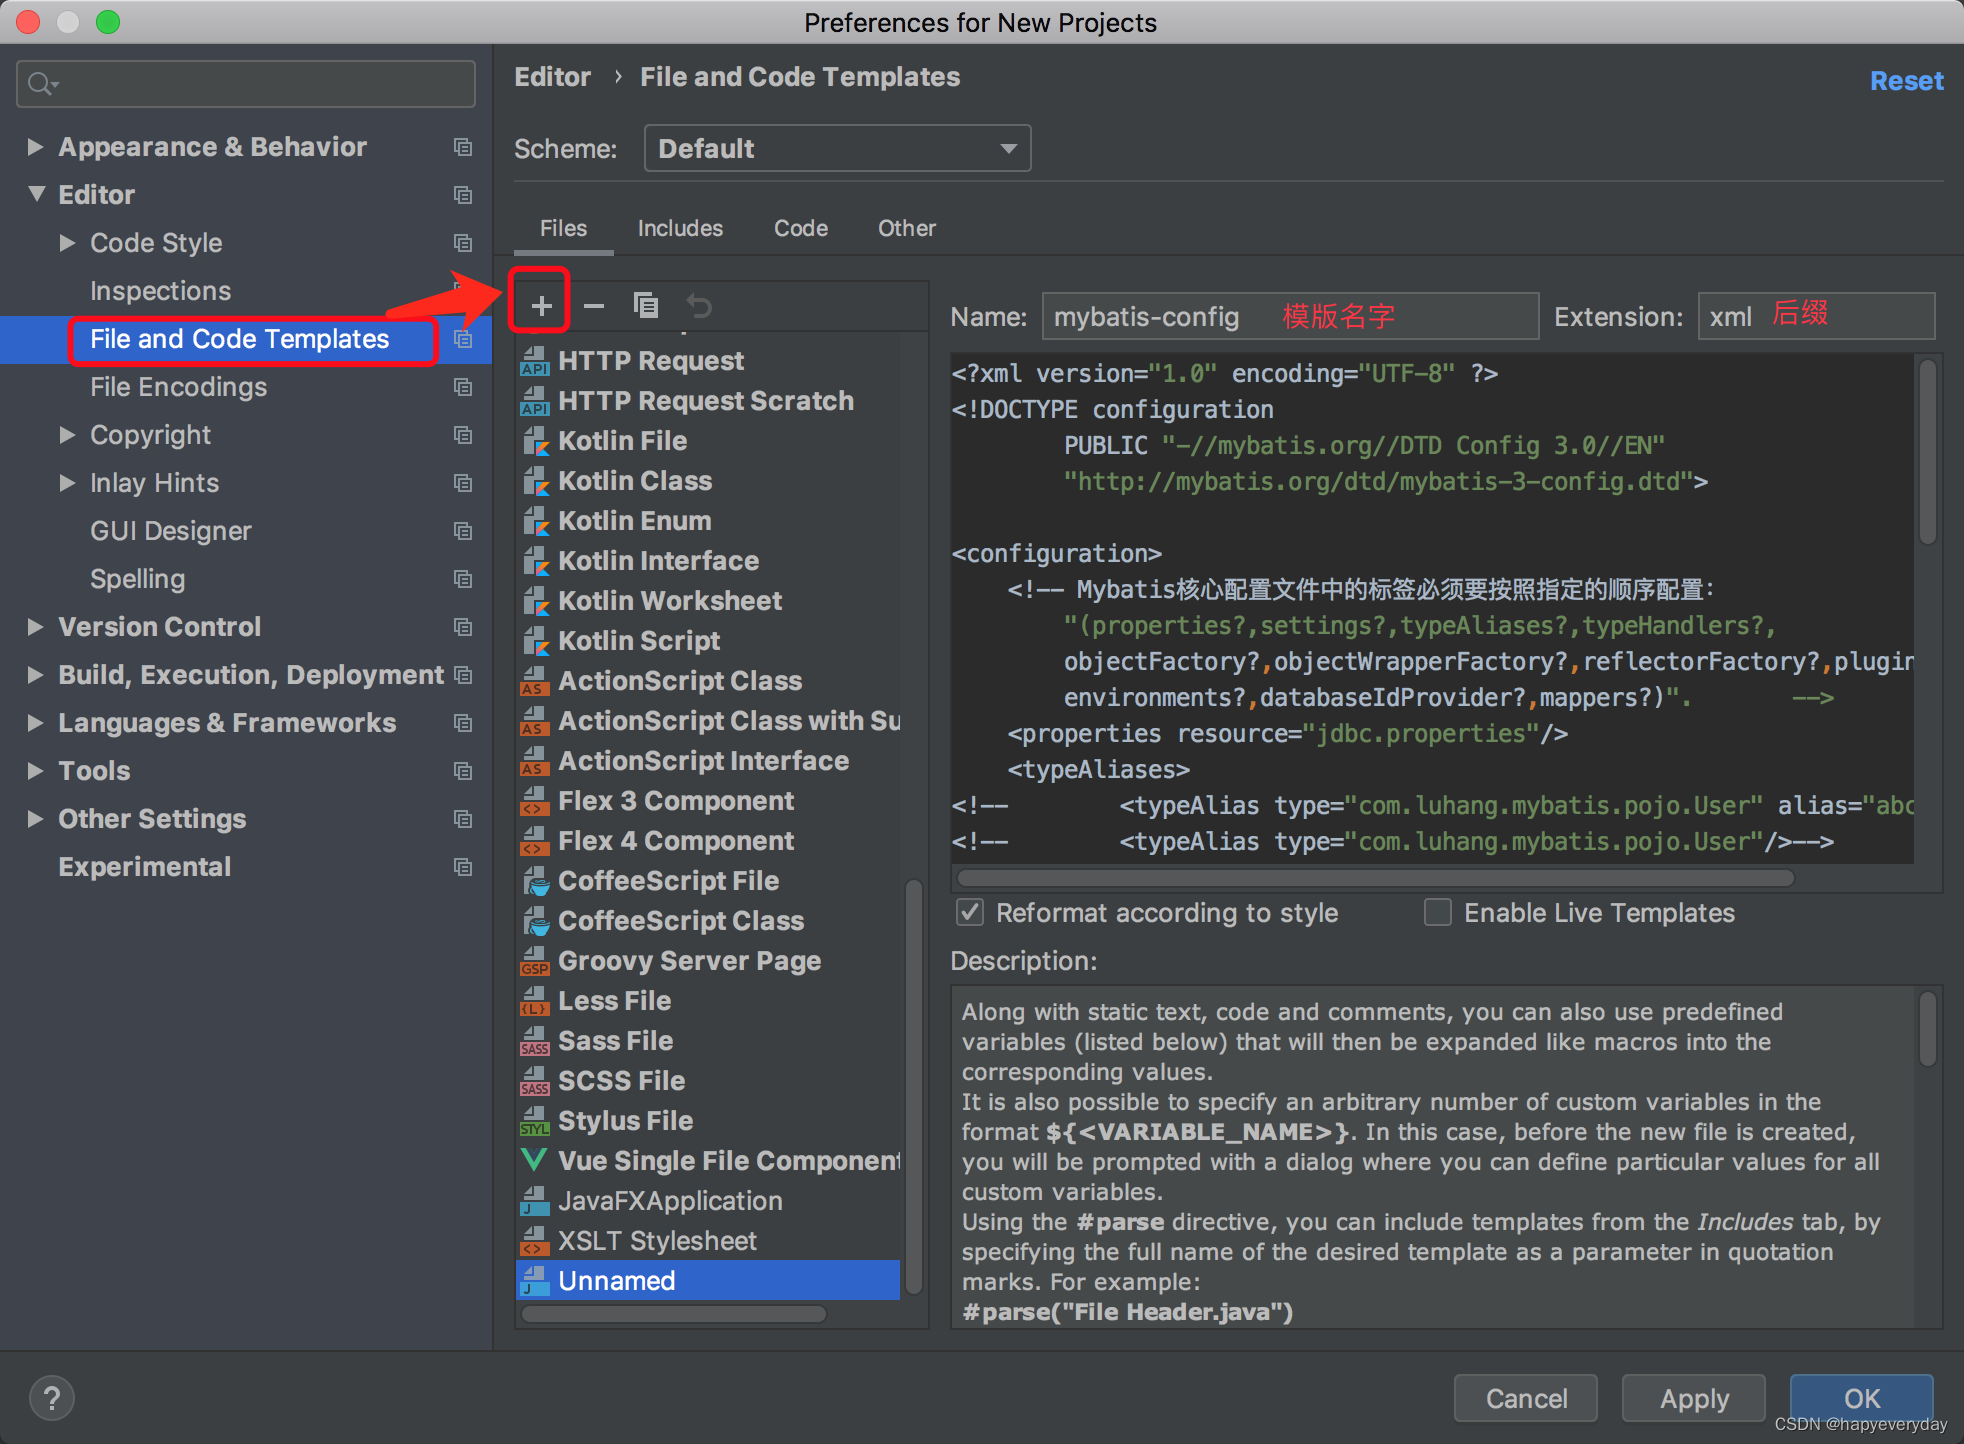
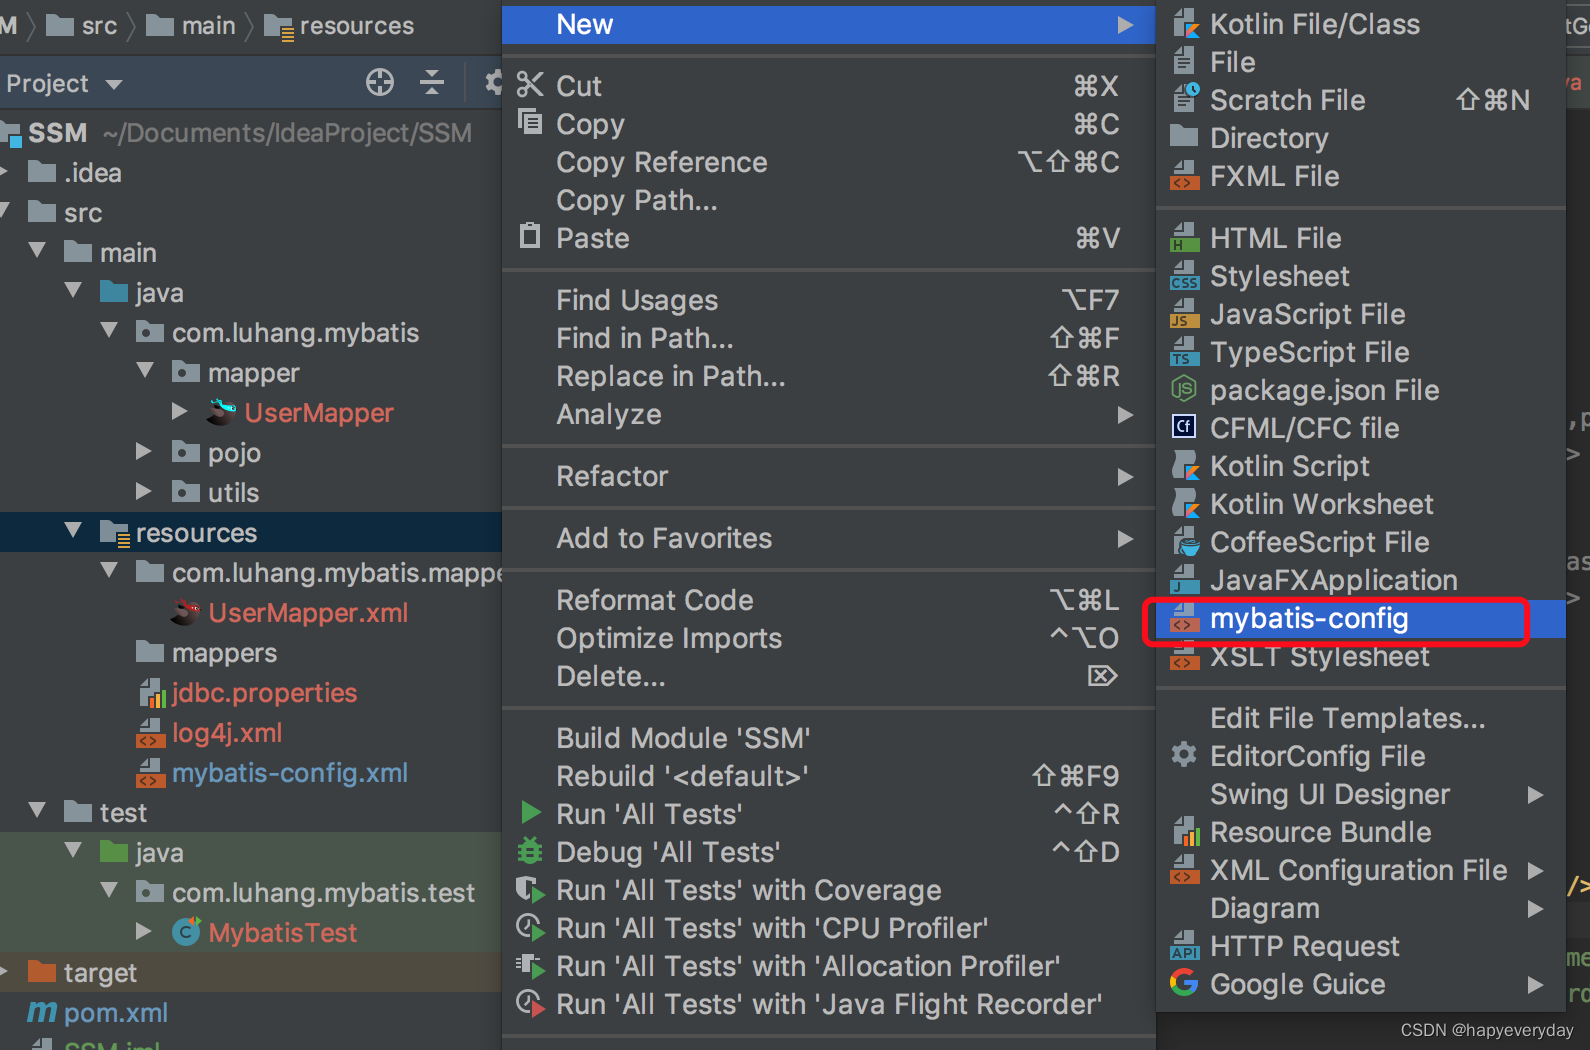
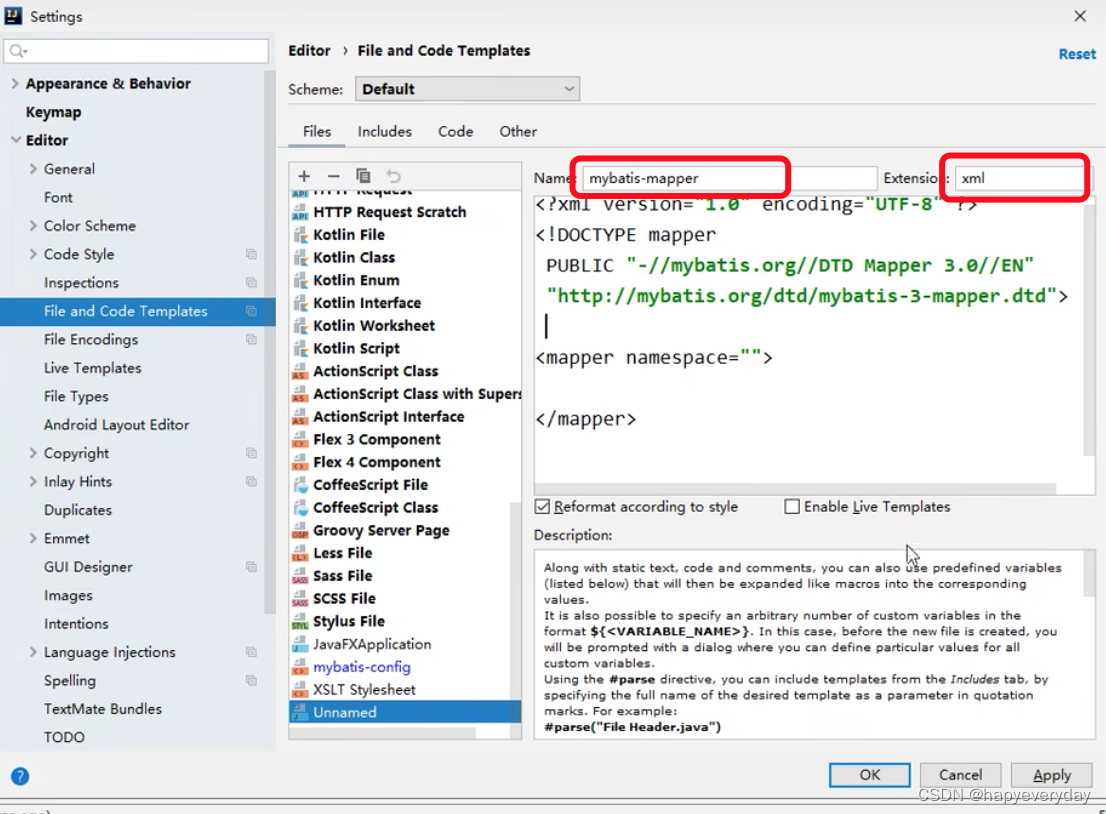


 1万+
1万+


 被折叠的 条评论
为什么被折叠?


