


学习目标
React是啥?
官方定义:将前端请求获取到的数据渲染为HTML视图的JavaScript库。
一、React入门
1、React项目创建
直接创建react,使用初始化会创建package.json
npm init -y
再安装

2、React基本使用
使用纯JS创建ReactDOM(元素)
<body>
<div id="root"></div>
<!--    1、引入js、react-dom文件-->
    <script src="./node_modules/react/umd/react.development.js"></script>
    <script src="./node_modules/react-dom/umd/react-dom.development.js"></script>
<script>
//     2、使用JS创建react元素----虚拟DOM
//     参数:元素名称、元素属性、元素子节点
    const title = React.createElement('h1',null,'Hello react 我是你大爷')
//      3、渲染react元素
//      参数:要渲染的react元素、挂载点
    ReactDOM.render(title,document.getElementById('root'))
</script>

</body>
React.createElement()方法使用不是很灵活,知道就好;
ReactDOM.render()方法渲染react元素很重要!!!使用起来友好。
3、React脚手架搭建完整项目框架
使用react脚手架初始化项目,避免了使用<script>标签嵌入到html页面中很繁琐!!!
IDEA创建React项目

1、初始化项目:项目目录下输入命令
(base) wangjia@wangbangjia reactTest % npx create-react-app my-app
2、启动项目:项目根目录下输入命令
(base) wangjia@wangbangjia reactTest % cd my-app
(base) wangjia@wangbangjia my-app % npm start
 在index.html文件中直接按照上述编写三小步骤运行就行了
总结:使用react创建react元素是基本,至于将元素渲染到什么平台(iOS,安卓,虚拟显示等)就需要再导入对应的包即可。
4、JSX语法

1、JSX基本使用
JSX就是JavaScript XML简写,表示在JavaScript代码中写XML(HTML)格式的代码。
在浏览器实际运行时,仍然是将JSX语句转化为JS语句执行。
 // 2、创建react元素
 const title2 = <h3>这是JSX语法写的</h3>
 // 3、渲染react元素
 ReactDOM.render(title2,document.getElementById('root'))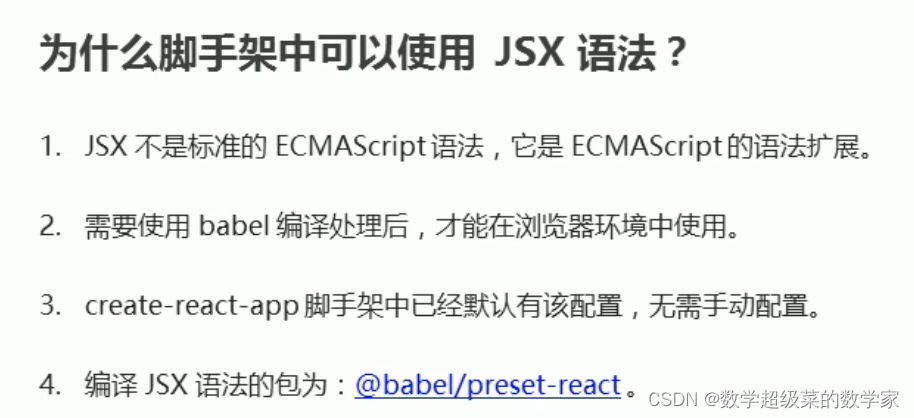

2、JSX中使用JavaScript表达式
为啥子这么干???数据存储在JS中,想要显示就要在JSX中嵌入JS表达式。
语法:{JavaScript表达式}
 const jsappend = '这是嵌入的JS的数据'
 const age = '18'
 const title2 =(
     <h3>这是JSX语法写的 {jsappend},显示的年龄为: {age}</h3>
 )
 ReactDOM.render(title2,document.getElementById('root'))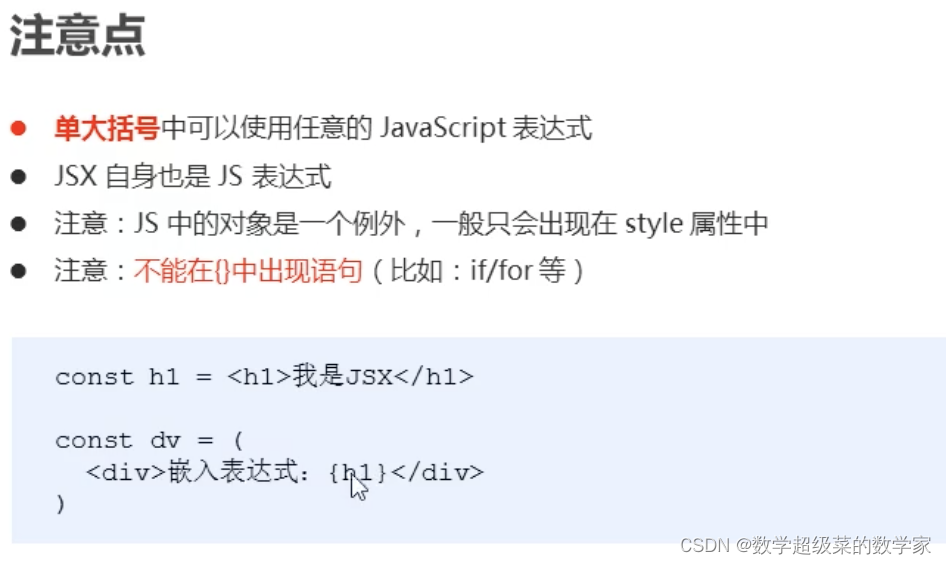
3、JSX的条件渲染
在创建react元素时引入的JS表达式是包含if-else、三元表达式、逻辑与运算符。
const isLoading = true
 // if-else
 // const loadData = () =>{
 //  if(isLoading){
 //   return <div>loading...</div>
 //  }
 //  return <div>数据加载完成,此处显示加载后的数据</div>
 // }

//三元表达式
//  const loadData = () =>{
//    return isLoading ?  <div>loading...</div> : <div>数据加载完成,此处显示加载后的数据</div>
//  }
//
//  逻辑与运算符
 const loadData=() =>{
 return isLoading && (<div>数据加载完成,此处显示加载后的数据</div>)
 }
 // 创建react元素  //函数调用作为表达式
const title=(
    <h1>
     条件渲染:
     {loadData()}
    </h1>
)
 // 渲染react元素
 ReactDOM.render(title,document.getElementById('root'))
4、JSX的列表渲染
创建react列表时应添加key属性,且唯一;map遍历谁就要给谁添加key属性
使用map方法遍历列表所有元素
const  songs = [
 {id:1,name:'我是你大爷'},
 {id:2,name:'你是我好大儿'},
 {id:3,name:'你是我孙子'},
]

 const list = (
     <ul>
      {songs.map(item => <li key={item.id}> {item.name}</li>)}
     </ul>
 )

ReactDOM.render(list,document.getElementById('root'))
5、JSX的样式处理
使用类名:className
css类index.css
.title{
  text-align:center;
  color: crimson;
  size: A4;
  background-color: #61dafb;
  }
导入css类 所在文件 import './index.css' ;确定类名 className="title"
 import './index.css'

const test = (
    <h1 className="title">
     JSX的样式处理
    </h1>
)

 ReactDOM.render(test,document.getElementById('root'))
总结:JSX确定结构,JSX确定样式
二、React面向组件编程
学习目标:

1、组件创建俩方式
1、函数式
    <div id="root"></div>
    <div id="demo"></div>

    <script type="text/babel">
        const title = <h1>react中的函数式组件</h1>
        // 1、创建普通函数式组件
        function MyComponent(){
            console.log(this);
            return <h2>我是用函数定义的组件(适用于简单组件的定义)</h2>;
        }
        // 2、创建箭头函数式组件
        const Button = () => {
            return <div>这是使用箭头函数创建的函数组件</div>
        }
        // 3、使用组件
        const content = (
            <div>
                {title};
                {<MyComponent/>}
                {<Button/>}
                </div>
        )
        // 4、渲染组件到页面
        // ReactDOM.render(<MyComponent/>,document.getElementById('root'));
            ReactDOM.render(content,document.getElementById('root'));
/*
执行ReactDOM.render(<MyComponent/>怎么做的?
1、React解析组件标签,找到MyComponent组件
2、发现组件是使用函数定义的,随后调用该函数,将返回的虚拟DOM作为真实DOM呈现在页面上

*/
        </script>
2、类方式
        <div id="root"></div>
        <div id="demo"></div>

        <script type="text/babel">
           const title = (
            <h1>React中的类组件</h1>
           )
        // 1、创建类式组件 必须继承React.Component类
           class MyComponent extends React.Component{
            render(){
                 // render方法放在了哪里? -- MyComponent类的原型对象上,供实例使用
                // render中的this就是MyComponent组件实例对象

                return <div>类组件返回,适用于复杂组件</div>
            }
           }
            const content = (
                 <div>
                    {title}
                    {<MyComponent/>}
                    </div>

            )
        ReactDOM.render(content,document.getElementById('root'));

    /*
    执行ReactDOM.render(<MyComponent/>怎么做的?
    1、React解析组件标签,找到MyComponent组件
    2、发现组件是使用类定义的,随后new出该类的实例,并通过该实例调用到原型上的render方法
    3、将render返回的虚拟DOM转为真实DOM呈现在页面上

    */

        </script>
2、组件三大属性
1、state
理解
(1)state值是对象(可包含多个key-value)
(2)组件被称为”状态机“,通过更新组件来更新对应的页面
强烈注意
1、组件中render方法中的this指向为组件实例对象
2、组件自定义方法中this为undefined,咋解决?
a、强制绑定this:通过函数bind()
b、使用箭头函数
3、状态数据,不可直接更新,要使用setState
应用场景:state也就是状态变化,多用于触发事件等
标准版本及详解->
<!DOCTYPE html>
<html lang="en">
<head>
    <meta charset="UTF-8">
    <meta name="viewport" content="width=device-width, initial-scale=1.0">
    <title>Document</title>
</head>
<body>
    <script type="text/javascript" src="../js/react.development.js"></script>
    <!-- 引入react-dom.用于支持react操作DOM -->
    <script type="text/javascript" src="../js/react-dom.development.js"></script>
    <!-- 引入babel,用于将jsx转为js -->
    <script type="text/javascript" src="../js/babel.min.js"></script>
    <!-- 创建真实dom元素节点 -->
    <div id="root"></div>
    <div id="demo"></div>

    <script type="text/babel">
        const title = <h1>组件的属性--state</h1>
        //  1、创建组件
        class Weather extends React.Component{
            // 借助构造器初始化状态  -- 构造器中的this肯定是指向实例对象的
            constructor(props){
                super(props)
                // 初始化状态
                this.state = {isHot : false}
                /*使用原型上的方法changeWeather再调用bind传参实例创建一个新的函数,
                而且此新函数的this已变成类Weather的实例对象,然后将此新函数传给
                类Weather的实例自身,并起一个新的名字。
                那么直接调用此函数,就可以获取到

                简言之:拿原型上的方法生成一个新的方法挂在实例自身上
                ~原型上的方法
                ~实例上的方法 -- 可使用指向实例的this直接调用
                */
            //    解决changeWeather中this指向问题
               this.test = this.changeWeather.bind(this);
            }
            render(){
                const {isHot} = this.state
                 // 读出实例对象的状态并使用
                return <h1 onClick = {this.test}>今天天气很{this.state.isHot ? "炎热" : "凉爽"}</h1>
            }
            changeWeather(){
               //严重注意:状态(state)不可直接修改 this.state.isHot = !isHot 就是不行的
               const isHot = this.state.isHot;
               this.setState({isHot:!isHot})
            }
            /*
            changeWeather放在那里?  --- Weather的原型对象上,供实例使用
            由于changeWeather 是作为onClick的回调,不是直接通过实例调用的,是直接调用
            类中的方法默认开启了局部的严格模式,所以changeWeather中this为undefined
            */
        }
        /*
        整个组件运行机制:
        当按点击click时就开始调用函数this.test,
        并且执行将changeWeather函数添加到实例对象中修改当前状态,
        然后由改变后的状态进行页面修改

        1、构造器调用几次? 1次,用作实例化对象时
        2、render调用几次?1+n次,1是初始化那次,n是状态更新的次数
        3、changeWeather调用几次? 点击几次就调用几次

        */

        /*
        this指向总结:
        1、构造器里的this指向实例对象 常识了
        2、render中this指向实例对象,是React悄悄 const w1=new Weather() 然后执行w1.render()
        也就是说render是由实例对象调用的 肯定里面的this指向实例对象了啦
        3、然后changeWeather就只是咱们自定义的一个函数,并不是由实例对象调用,而是作为一个事件的回调在使用,
        当触发事件时直接拉出来调用函数changeWeather,并且由于类中的方法默认开启了严格模式,导致this丢了,
        按道理讲类中的this肯定指向实例对象但是丢了就指向undefined,
        this都没有指向实例对象,咋可能调用方法changeWeather呢
        */

        const content =
        (
            <div>
                {title}
                {<Weather/>}
            </div>
        )
        // 3、渲染组件到页面
        ReactDOM.render(content,document.getElementById('root'))
    </script>
</body>

</html>
简化版本--企业开发
// 1、创建组件
         class Weather extends React.Component{
            // 初始化状态
            state = { isHot: false }
            // 触发事件
            render(){
                const {isHot} = this.state
                return <h2 onClick = {this.changeWeather}>今天天气很{this.state.isHot ? "炎热" : "凉爽"}</h2>
            }
            // 自定义方法--要用赋值语句+箭头函数
            changeWeather = () =>{
                const isHot = this.state.isHot;
                this.setState({isHot:!isHot})
            }

        }
!!!精华:此处的changeWeather就是组件Weather的一个变量,被赋值一个函数,那么在this.changeWeather拿到的就是一个函数传给onClick,而不是直接被调用返回数值给onClick
2、props
官方定义为 --> 单向数据流值
作用:接收外部数据(这是别人给的,只读!)
传递数据: 通过给组件标签添加属性
接收数据:函数组件通过 参数 props接收数据,类组件通过 this.props接收数据
1、对标签限制 --类型、必要性
    // 对标签属性进行类型、必要性的限制
        Person.propTypes = {
            name:PropTypes.string.isRequired,//限制name必传,且为字符串
            sex:PropTypes.string,
            age:PropTypes.number,
            speak:PropTypes.func//限制speak必须是函数
        }
        //指定默认标签属性值
         Person.defaultProps = {
            sex:'不男不女',
            age:18
        }
2、向组件传递数据 -- props批量传递
    // 批量传递props
    //注意: 冒号: 表示键值对 用于对象中 等于号= 用于给常量赋值
    const p = {name:"23",age:23,sex:"男"}
    ReactDOM.render(<Person {...p} />,document.getElementById('test3'))
3、简写完整版
class Person extends React.Component{
             // 对标签属性进行类型、必要性的限制
            static propTypes = {
                name:PropTypes.string.isRequired,//限制name必传,且为字符串
                sex:PropTypes.string,
                age:PropTypes.number,
                speak:PropTypes.func//限制speak必须是函数
        }
        //指定默认标签属性值
            static defaultProps = {
                sex:'不男不女',
                age:18
        }
            state = {}
            render(){
                const{name,age,sex} = this.props
                // 获取到的props数据流是只读的
                // this.props.name = 'jack' 会报错
                return(
                    <ul>
                        <li>{name}</li>
                        <li>{sex}</li>
                        <li>{age}</li>
                    </ul>
                )
            }
            // 对组件标签进行限制


        }
        ReactDOM.render(<Person name= "{23}"  speak = {speak}/>, document.getElementById('test1'))
        ReactDOM.render(<Person name="小刘" age={12} sex="女"/>, document.getElementById('test2'))
        // 批量传递props
        //注意: 冒号: 表示键值对 用于对象中 等于号= 用于给常量赋值
        const p = {name:"23",age:23,sex:"男"}
         ReactDOM.render(<Person {...p} />, document.getElementById('test3'))

         function speak(){
            console.log(这是一段话);
         }
   </script>
实现组件通信方法 -- 定义为父子组件
将父组件的state作为子组件的props,当父组件的state改变,子组件的props也跟着改变,其实它仍旧遵循了这一定律:props是不可更改的。
子组件调用父组件的方法
(1)子组件要拿到父组件的属性,需要通过 this.props 方法。
(2)同样地,如果子组件想要调用父组件的方法,只需父组件把要被调用的方法以属性的方式放在子组件上, 子组件内部便可以通过“this.props.被调用的方法”这样的方式来获取父组件传过来的方法。
父组件传参数、函数,子组件接收实例
import React, { Component, Fragment } from "react";
//React的props传参
// 父组件
class App extends Component {
  render() {
    return (
      <Fragment>
        <Child name="卡卡罗特" jineng={this.bianshen}></Child>
      </Fragment>
    );
  }

  bianshen() {
    return "变身超级赛亚人";
  }
}
// 子组件
class Child extends Component {
  render() {
    return (
      <div>
        {this.props.name}
        {this.props.jineng()}
      </div>
    );
  }
}

export default App;
父组件调用子组件的方法 在 ReactJS 中有个叫 ref 的属性。这个属性就像给组件起个引用名字一样,子组件被设置为 ref 之后(比如 ref=“xxx”)。父组件便可以通过 this.refs.xxx 来获取到子组件了。
3、ref
组件内的标签定义ref标识自己
字符串形式 -- 简单好用但逐渐过时
<script type="text/babel">
        // 创建组件
        class Demo extends React.Component{
            // 展示左侧输入框的数据
            showData = ()=>{
                const {input1} = this.refs
                alert(input1.value)
            }
            // 展示右侧输入框的数据
            showData2 = ()=>{
                const {input2} = this.refs
                alert(input2.value)
            }
            render(){
                return(
                    <div>
                        <input ref="input1" type="text" placeholder="点击按钮提示数据"/>
                        <button onClick={this.showData}>点我提示左侧的数据</button>
                        <input ref="input2" onBlur={this.showData2}type="text" placeholder="失去焦点提示数据"/>
                    </div>
                )
            }
        }
        ReactDOM.render(<Demo/>,document.getElementById("test1"))
    </script>
回调形式 -- 麻烦
<script type="text/babel">
        // 创建组件
        class Demo extends React.Component{
            // 展示左侧输入框的数据
            showData = ()=>{
                const {input1} = this
                alert(input1.value)
            }
            // 展示右侧输入框的数据
            showData2 = ()=>{
                const {input2} = this
                alert(input2.value)
            }
            render(){
             //    使用回调函数,把input1挂载到组件实例对象this上 从而直接获取input1
                return(
                    <div>
                         <input ref={cur => this.input1 = cur} type="text" placeholder="点击按钮提示数据"/>
                        <button onClick={this.showData}>点我提示左侧的数据</button>
                        <input onBlur={this.showData2} ref={cur => this.input2 = cur}  type="text" placeholder="失去焦点提示数据"/>
                    </div>
                )
            }
        }
        ReactDOM.render(<Demo/>,document.getElementById("test1"))
    </script>
createRef -- 官方最新
<script type="text/babel">
        // 创建组件
        class Demo extends React.Component{
            // React.createRef调用后返回一个容器 可存储被ref标识的节点 但只能一个
            myRef = React.createRef()
            myRef2 = React.createRef()
            // 展示左侧输入框的数据
            showData = ()=>{
                alert(this.myRef.current.value)
            }
            // 展示右侧输入框的数据
            showData2 = ()=>{
                alert(this.myRef2.current.value)
            }
            render(){
                 return(
                    <div>
                        <input  ref={this.myRef} type="text" placeholder="点击按钮提示数据"/>
                        <button onClick={this.showData}>点我提示左侧的数据</button>
                        <input  onBlur={this.showData2} ref={this.myRef2} type="text" placeholder="点击按钮提示数据"/>
                     </div>
                )
            }
        }
        ReactDOM.render(<Demo/>,document.getElementById("test1"))
    </script>
3、事件处理
将发生的事件作为参数
        class Demo extends React.Component{
            // React.createRef调用后返回一个容器 可存储被ref标识的节点 但只能一个
            myRef = React.createRef()
            myRef2 = React.createRef()
            // 展示左侧输入框的数据
            showData = ()=>{
                alert(this.myRef.current.value)
            }

            // 展示右侧输入框的数据
            showData2 = (event)=>{
                alert(event.target.value)
            }
            render(){
                 return(
                    <div>
                        <input  ref={this.myRef} type="text" placeholder="点击按钮提示数据"/>
                        <button onClick={this.showData}>点我提示左侧的数据</button>
                        {/*发生事件的元素刚好是要操作的元素,就可省略ref*/}
                        <input  onBlur={this.showData2}  type="text" placeholder="点击按钮提示数据"/>
                     </div>
                )
            }
            // 事件处理中,点击第二个输入文本就是一个未指定的事件,在showData2函数中将点击事件作为参数获取值显示
        }
        ReactDOM.render(<Demo/>,document.getElementById("test1"))
4、React生命周期
旧版本

组件的钩子中只有三个钩子常用
1、初始化阶段:由ReactDOM.render()出发 -- 初次渲染
1、constructor()
2、componentWillMount()
3、render()
4、componentDidMount() ====》常用
一般在这个钩子中做一些初始化的事,例如:开启定时器、发送网络请求、订阅消息
2、更新阶段:有组件内部this.setState()或父组件render触发
1、componentWillReceiveProps()
2、shouldComponentUpdate()
3、componentWillUpdate()
4、render() 必用
5、componentDidUpdate()
3、卸载阶段:由ReactDOM.unmountComponentAtNode()触发
1、componentWillUnmount() ===》常用
一般在这个钩子中做一些收尾的事,例如:关闭定时器、取消订阅消息
基本钩子实例
<script type="text/babel">
            class Count extends React.Component{
                //1、构造器
                constructor(props){
                    super(props)
                    console.log('1、Count --- Constructor')
                    // 初始化状态
                    this.state = {count:0}
                }
                //  各个事件的回调函数
                add = () => {
                    // 获取原状态
                    const{count} = this.state
                    // 更新状态
                    this.setState({count:count+1})
                }
                //卸载组件按钮的回调
                death = () => {
                    ReactDOM.unmountComponentAtNode(document.getElementById('test1'))
                }
                force = () => {
                    this.forceUpdate()
                }

                // 2、组件将要挂载的钩子 -- componentWillMount
                componentWillMount(){
                    console.log('2、Count --- componentWillMount')
                }
                // 4、组件挂载完毕的钩子 -- componentDidMount
                componentDidMount(){
                    console.log('4、Count --- componentDidMount')
                }
                // 4、2组件更新完毕的钩子
                componentDidUpdate(){
                    console.log('4.2、Count --- componentDidUpdate')
                }
                // 5、组件将要卸载的钩子 -- componentWillUnmount
                componentWillUnmount(){
                    console.log('5、Count --- componentWillUnmount')
                }
                // 3.1前置、判断组件是否可更新的钩子
                shouldComponentUpdate(){
                    console.log('3.1前置、Count --- shouldComponentUpdate')
                    return true
                }
                // 3.2前置、组件将要更新的钩子
                componentWillUpdate(){
                    console.log('3.2前置、Count --- ComponentWillUpdate')
                }
                // 3、render
                render(){
                    console.log('3、Count --- render')
                    const {count} = this.state
                    return(
                        <div>
                            <h2>当前求和为:{count}</h2>
                            <button onClick={this.add}>点我+1</button>
                            <button onClick={this.death}>卸载组件</button>
                            <button onClick={this.force}>不输入数据就是要强制更新一下</button>

                        </div>
                    )
                }
            }
            // 渲染组件
            ReactDOM.render(<Count/>,document.getElementById("test1"))
父组件与子组件
 class A extends React.Component{
                state = {carName:'宝马'}
                changeCar = () =>{
                    this.setState({carName:'奥迪'})
                }
                render(){
                    return(
                        <div>
                            <div>我是A组件</div>
                            <button onClick={this.changeCar}>换车</button>
                            <B receiveCarName = {this.state.carName}/>
                        </div>
                    )
                }
            }

            class B extends React.Component{
                render(){
                    return(
                        <div>
                            我是B组件,接收到父组件A的车是:{this.props.receiveCarName}
                        </div>
                    )
                }
            }

            ReactDOM.render(<A/>,document.getElementById('test1'))
新版本
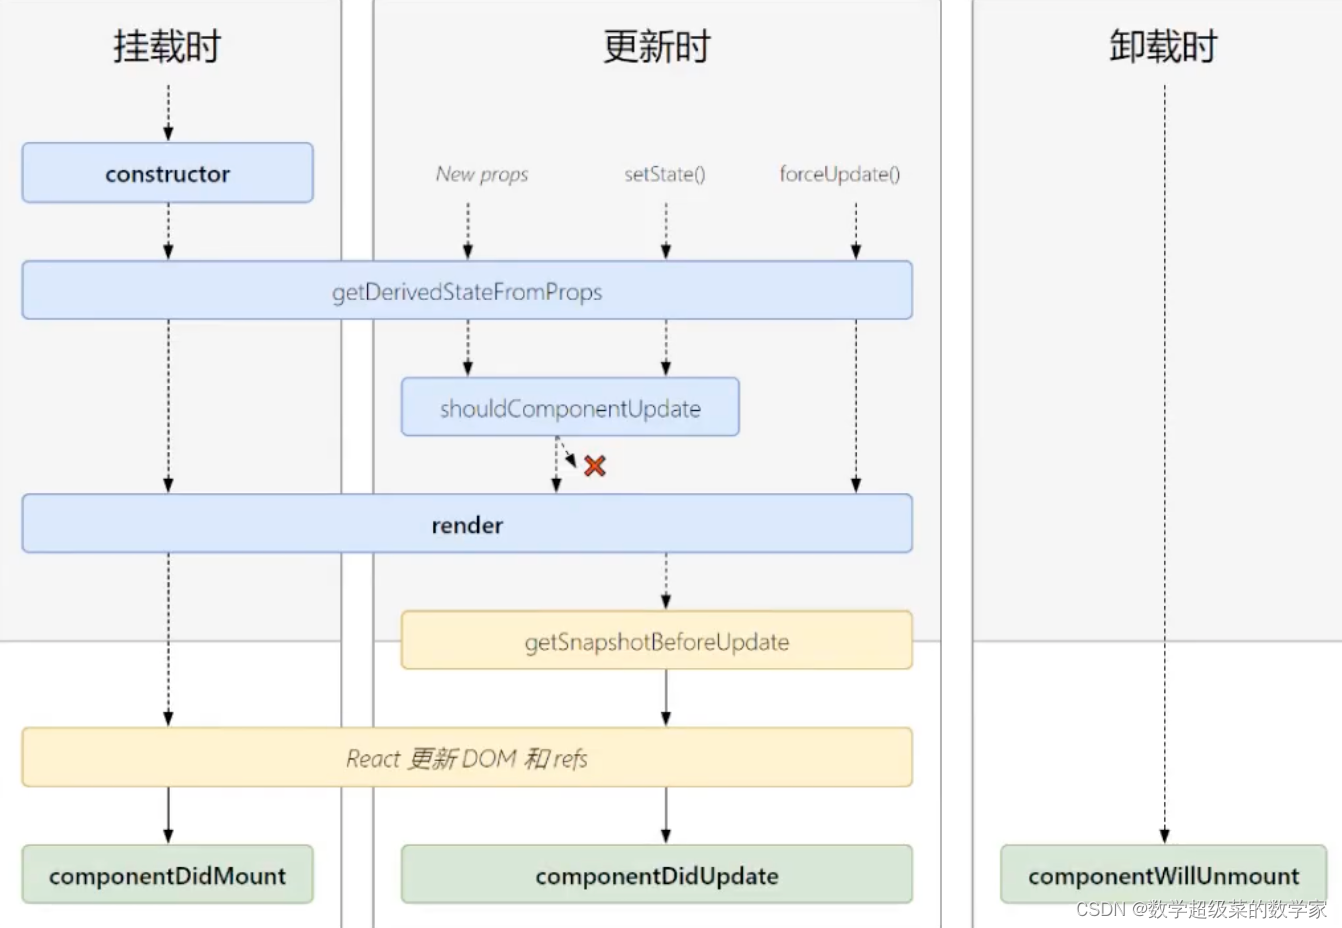
新版本与旧版本区别
1、新版本废弃了三个will钩子:
componentWillMount()、componentWillUpdate()、componentWillReceiveProps()
2、增加了俩个钩子:
getDerivedStateProps()、getSnapshotBeforeUpdate()
其他的初始化组件、更新组件、卸载组件三大生命周期过程就原样。
// getDerivedStateFromProps作用:当前组件的state的值在任何时候都取决于外部传入的props  基本不用
                static getDerivedStateFromProps(props,state){
                    console.log('执行getDerivedStateFromProps')
                    return props
                }

// 更新之前获取快照
                getSnapshotBeforeUpdate(){
                    console.log('执行getSnapshotBeforeUpdate')
                    return 'atguigu'
                }
1、初始化阶段:由ReactDOM.render()出发 -- 初次渲染
1、constructor()
2、getDerivedStateProps()
3、render()
4、componentDidMount() ====》常用
一般在这个钩子中做一些初始化的事,例如:开启定时器、发送网络请求、订阅消息
2、更新阶段:有组件内部this.setState()或父组件render触发
1、getDerivedStateProps()
2、shouldComponentUpdate()
3、render() 必用
4、getSnapshotBeforeUpdate()
5、componentDidUpdate()
3、卸载阶段:由ReactDOM.unmountComponentAtNode()触发
1、componentWillUnmount() ===》常用
一般在这个钩子中做一些收尾的事,例如:关闭定时器、取消订阅消息 -->
三、React应用(基于React脚手架)
create-react-app库提供脚手架,首先就要全局安装create-react-app库,
npm i -g create-react-app
接着就是使用库安装脚手架。
create-react-app [脚手架名字]
详细讲解见我的另一篇React脚手架-详细解析目录与运行-CSDN博客
实例todoList
见代码:/Users/wangjia/Desktop/web前端/react脚手架/03_src
四、React Ajax
由于Ajax同源策略,涉及到跨域问题无法接收请求,使用代理配置--实现url转换。
方法一
在package.json中追加如下配置
"proxy":"http://localhost:5000"说明:
1. 优点:配置简单,前端请求资源时可以不加任何前缀。
2. 缺点:不能配置多个代理。
3. 工作方式:上述方式配置代理,当请求了3000不存在的资源时,那么该请求会转发给5000 (优先匹配前端资源)
方法二1. 第一步:创建代理配置文件
在src下创建配置文件:src/setupProxy.js2. 编写setupProxy.js配置具体代理规则:
const { createProxyMiddleware } = require("http-proxy-middleware")
module.exports = function(app) {
app.use(
createProxyMiddleware('/api1', { //api1是需要转发的请求(所有带有/api1前缀的请求都会转发给5000)
target: 'http://localhost:5000', //配置转发目标地址(能返回数据的服务器地址)
changeOrigin: true, //控制服务器接收到的请求头中host字段的值
/*
changeOrigin设置为true时,服务器收到的请求头中的host为:localhost:5000
changeOrigin设置为false时,服务器收到的请求头中的host为:localhost:3000
changeOrigin默认值为false,但我们一般将changeOrigin值设为true
*/
pathRewrite: {'^/api1': ''}//去除请求前缀,保证交给后台服务器的是正常请求地址(必须配置)
})
)
}
```说明:
1. 优点:可以配置多个代理,可以灵活的控制请求是否走代理。
2. 缺点:配置繁琐,前端请求资源时必须加前缀。
props---实现组件通信
App.js
export default class App extends Component {

  state = {
    users:[],//users初始值为数组
    isFirst:true,//是否为第一次打开页面
    isLoading:false,//标示是否处于加载中
    err:''//存储请求相关的错误信息

  }
  // 通用 -- 更新App的state
  updateAppState = (stateObj) => {
    this.setState(stateObj)
  }
  render() {
    return (
        <div className="container">
             <Search updateAppState={this.updateAppState}/>
             <List {...this.state}/>
      </div>
    )
  }
}
Search.js
export default class Search extends Component {
search = () => {
// 1、获取用户的输入 -- 连续解构赋值
const{keyWordElement:{value:keyWord}} = this
// 发送请求前通知App更新状态
this.props.updateAppState({isFirst:false,isLoading:true})
// 2、发送网络请求 拿到返回的数据 给谁发?url 用啥方法?method 带啥参数? params 站在3000给5000发请求 - 配代理
// 站在3000给3000发,3000有代理转发给5000
axios.get(`http://localhost:3000/api1/search/users2?q=${keyWord}`).then(
response => {
//请求成功后通知App更新状态
this.props.updateAppState({isLoading:false,users:response.data.items})
},
error => {
//请求失败后通知App更新状态
this.props.updateAppState({isLoading:false,err:error.message})
}
)}
render() {
return (
<section className="jumbotron">
<h3 className="jumbotron-heading">Search Github Users</h3>
<div>
<input ref={cur => this.keyWordElement = cur} type="text" placeholder="enter the name you search"/>
<button onClick={this.search}>搜索</button>
</div>
</section>
)
}List.js
export default class List extends Component {
  render() {
    const {users,isFirst,isLoading,err} = this.props
    return (
        // JSX使用三元表达式,不可以判断语句  多个条件要判断使用连续三元表达式
      <div className="row">
         {
            isFirst ? <h2>欢迎使用,输入关键字,随后点击搜索</h2> :
            isLoading ? <h2>Loading.......</h2> :
            err ? <h2 style={{color:'red'}}>{err}</h2> :
            users.map((userObj)=>{
                return(
                    <div key={userObj.id} className="card">
                        <a rel="noreferrer" href={userObj.html_url} target="_blank">
                            <img alt="head_portrait" src={userObj.avatar_url} style={{width: '100px'}}/>
                        </a>
                        <p className="card-text">{userObj.login}</p>
                    </div>
                )
            })
         }
    </div>
1、axios-发送HTTP请求
Axios 是一个基于 promise 网络请求库。

fetch用于请求,内置的。
xhr用于发送http请求,jQuery与axios都是对xhr的封装。底层还都是xhr。只不过xhr的API太繁琐。所以要使用就要安装jQuery与axios。
也就是用来发送Ajax请求时使用的网络请求库。也就是发送HTTP请求的
const axios = require("axios");
// 向给定 ID 的用户发起请求
axios
.get("/user?ID=12345")
.then(function (response) {
//处理成功情况
console.log(response);
})
.catch(function (error) {
//处理错误情况
console.log(error);
})
.then(function () {
//总是会执行
});2、消息订阅机制-组件通信
消息订阅与取消 -- 在组件完成挂载时接收消息、在组件卸载时取消订阅
接收消息:PubSub.subscribe(mag,function())
// 订阅消息--接收消息
  componentDidMount(){
    this.token = PubSub.subscribe('atguigu',(_,stateObj)=>{
      this.setState(stateObj)
    })
  }
  // 取消订阅
  componentWillUnmount(){
    PubSub.unsubscribe(this.token)
  }
发送消息PubSub.publish(mag,data)
PubSub.publish('atguigu',{isFirst:false,isLoading:true})
PubSub.publish('atguigu',{isLoading:false,err:error.message})
使用fetch发送请求,我这个java程序员,就不深入学喽。
五、React-router
1、路由基本概念
路由工作原理:
之前是多页面更新,(多个.html),一次刷新就要整个页面全部刷新,重新挂载dom。
如今页面更新方式,采用单页面多组件,刷新也只是页面局部刷新。

路由:就是一对映射关系(key : value)
key为路径;value为function或component
路由分类:

2、React-router-dom(前端路由)
1、路由组件基本使用
React的插件库。
使用路由套路:1、导航区在哪?(导航区内选项即为路由链接) 2、展示区在哪?
详细过程:点击导航区内选项,引起路径变化; 路径变化被前端路由器监测到,并匹配组件,从而展示。
    1.明确好界面中的导航区、展示区
    2.导航区的a标签改为Link标签
    	<Link to="/xxxx">Demo</Link>
    3.展示区写Route标签进行路径的匹配
    	<Route path='/xxxx’ component={Demo}/>
    4. <App>的最外侧包襄了一个<BrowserRouter>或<HashRouter>
1、编写路由链接
<Link className="list-group-item" to="/about">About</Link>
<Link className="list-group-item" to="/home">Home</Link>
2、注册路由
<Route path="/about" component={About}/>
<Route path="/home" component={Home}/>
3、使用唯一的BrowserRouter 监听
为了使唯一的监听器能够监听到 路由链接切换并注册路由,以及其他事情,将BrowserRouter直接放在index.js挂载组件的标签外
<BrowserRouter>
<App />
</BrowserRouter>
* 原生HTML中,靠<a>跳转不同的页面
<a className="list-group-item" href="./about.html">About</a>
* 在React中靠路由链接实现切换组件
<BrowserRouter>
<Link className="list-group-item" to="/about">About</link>
</BrowserRouter>
路由组件与一般组件
路由组件:存储在pages文件夹下
使用路由匹配引用 <Route path="/home" component={Home}/>
路由组件接收到路由器传送的props中三个固定属性:history、location、match
一般组件:存储在components文件夹下
使用标签引用 <Header/>
一般组件标签内传啥,props就包含啥
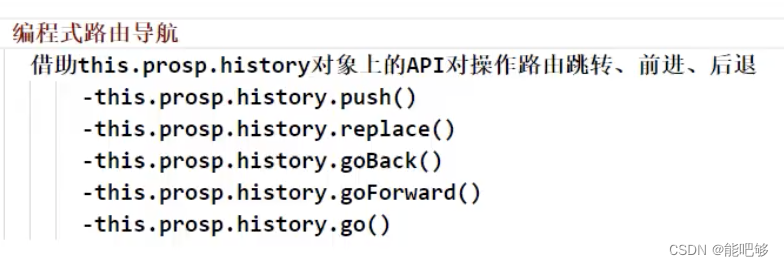
路由组件关键三个属性
history:
go: function go(n)
goBack: function goBack()
goForward: function goForward()
push: function push(path, state)
replace: function replace(path, state)
location:
pathname: "/home"
search: ""
state: undefined
match:
params: Object { }
path: "/home"
url: "/home"
组件封装 :使用 一般组件 封装 路由组件
向组件属性传值
<MyNavLink to="/about">About</MyNavLink>
<MyNavLink to="/home">Home</MyNavLink>
被封装的组件直接使用...this.props接收(固定值直接写死,变化值使用this.props传输)
<NavLink activeClassName="atguigu" className="list-group-item" {...this.props}/>
注意:标签体内容是特殊的标签属性
标签体内容this.props.children可以直接在标签属性中使用children代替。
<GGB>this.props.children</GGB> <=> <GGB children></GGB>
使用Switch组件提高(注册路由)匹配效率
一般情况,路由器监测到路径改变后,就会与所有注册路由匹配,匹配成功后依然匹配,效率低!
使用Switch组件后,匹配成功停止匹配。
注册路由内path与component是一一对应,使用Switch进行单一匹配。
<Switch>
<Route path="/about" component={About}/>
<Route path="/home" component={Home}/>
<Route path="/home" component={Test}/>
</Switch>

严格匹配与模糊匹配
路由链接与注册路由在匹配时,默认开启的是模糊匹配。只要路由链接开始就包含注册路由,依然可以匹配成功。
<MyNavLink to="/home/a/b">Home</MyNavLink>
<Route path="/home" component={Home}/>
当有exact时,即开启了严格匹配
<MyNavLink to="/home/a/b">Home</MyNavLink>
<Route exact path="/home" component={Home}/>
路由一旦开启严格匹配,那么其子路由全部作废,无法匹配
因此对于多级路由,根路由不可开启严格匹配
重定向默认匹配
刚打开时,localhost:3000/ 其中/ 与注册路由逐一匹配,失败后就啥也不显示,但是希望可以上来就有一个默认显示的。
使用Redirect重定向,执行路由链接与注册路由逐一匹配时,当全部匹配失败,就执行Redirect,后面跟上默认匹配的注册路由,进行展示。
Redirect写在所有注册路由最下方。
{/* 注册路由 */}
<Switch>
<Route path="/about" component={About}/>
<Route path="/home" component={Home}/>
<Redirect to="/home"/>
</Switch>
2、嵌套路由---多级路由
1、子路由的链接与注册均要写上父路由的path值---也就是多级路由一定要完整写出。
2、路由的匹配是按照路由的注册顺序尽心匹配。先进行父路由的匹配,再进行子路由的完整匹配
<ul className="nav nav-tabs">
<li>
<MyNavLink to="/home/news">News</MyNavLink>
</li>
<li>
<MyNavLink to="/home/message">Message</MyNavLink>
</li>
</ul>
<Switch>
<Route path="/home/news" component={News}/>
<Route path="/home/message" component={Message}/>
<Redirect to="/home/message"/>
</Switch>
3、传递路由参数
也就是在路由链接后面加上要传递到目的组件的参数。有params、search、state三大类参数
1、params参数
{/* 向路由组件传递params参数  --- 在链接路由路径后 携带参数*/}
<Link to={`/home/message/detail/${msgObj.id}/${msgObj.title}`}>{msgObj.title}</Link>

{/* 声明接收params参数 --- 在路由路径后直接声明接收参数 */}
<Route path='/home/message/detail/:id/:title' component={Detail}/>

// 接收params参数
const {id,title} = this.props.match.params
2、search参数
 {/* 向路由组件传递Search参数 */}
<Link to={`/home/message/detail/?id=${msgObj.id}&title=${msgObj.title}`}>{msgObj.title}</Link>

{/* 无需 声明接收Search参数 */}
<Route path='/home/message/detail' component={Detail}/>

//接受Search参数 --- 需要将字符串转换为key-value
const {search} = this.props.location
const {id,title} = qs.parse(search.slice(1))
3、state参数
此state不是组件的状态,就是history的location下的state属性!
{/* 向路由组件传递state参数 -- 是个对象!!!! */}
<Link to={{pathname:'/home/message/detail',state:{id:msgObj.id,title:msgObj.title}}}>{msgObj.title}</Link>

{/* 无需 声明接收state参数 */}
<Route path='/home/message/detail' component={Detail}/>

//接受state参数
const {id,title} = this.props.location.state
4、路由跳转俩模式push&replace
4、编程式路由导航
5、withRouter
withRouter可以加工一般组件,使其具备路由组件所特有的API,比如this.props.history
import React, { Component } from 'react'
import { withRouter } from 'react-router-dom/cjs/react-router-dom.min'
class Header extends Component {
back = () => {
this.props.history.goBack()
}
forward = () => {
this.props.history.goForward()
}
go = () => {
this.props.history.go(-2)
}
render() {
console.log(this.props.history)
return (
<div className="page-header">
<h2>React Router Demo</h2>
<button onClick={this.back}>回退</button>
<button onClick={this.forward}>前进</button>
<button onClick={this.go}>go</button>
</div>
)
}
}
export default withRouter(Header)
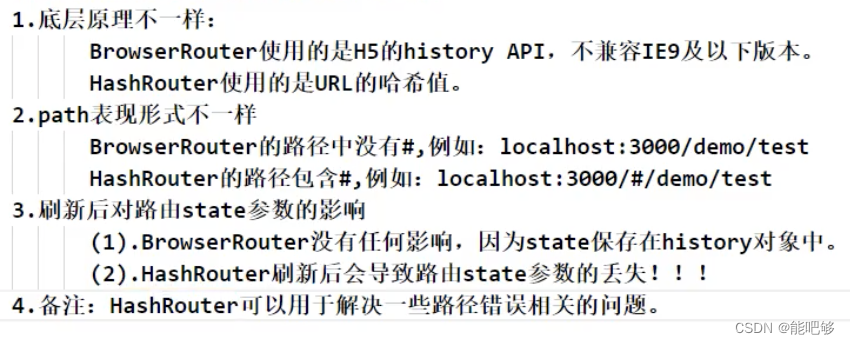
六、BrowserRouter和HashRouter区别
六、React UI组件库
ant-design 前端UI组件库
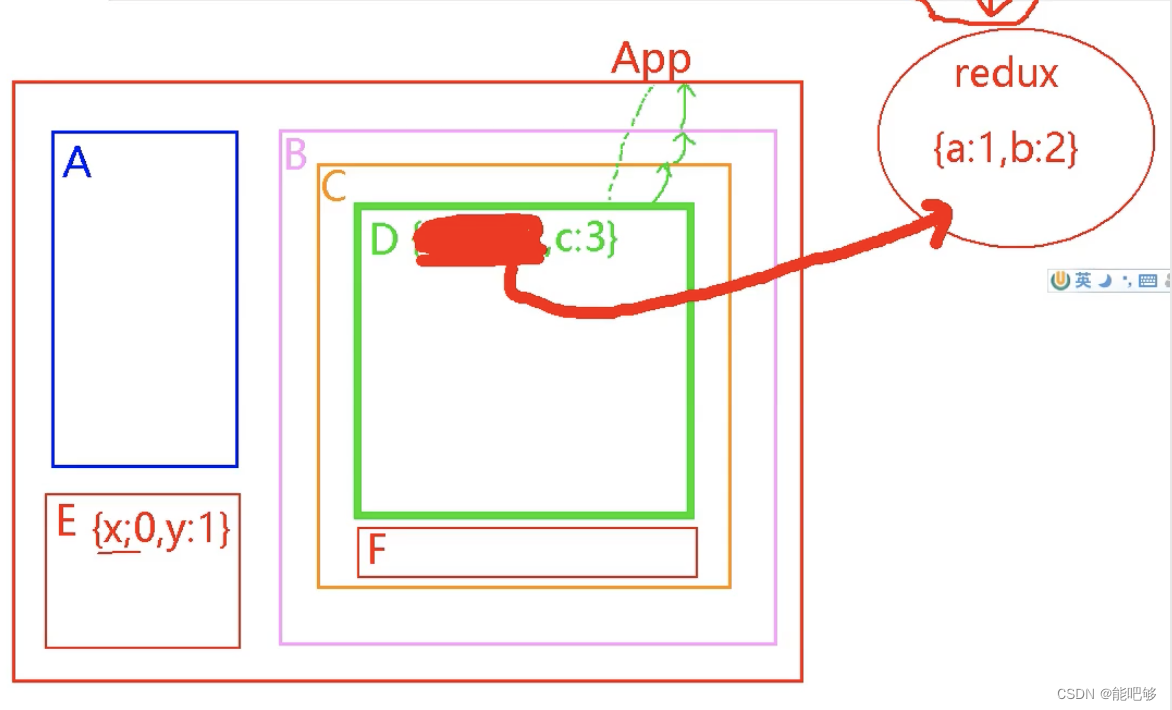
七、redux
1、redux理解
定义:专门用作状态管理的js库(不是React插件)
作用:集中式管理React应用中多个组件共享的状态。
啥时候用?
共享:某个组件的状态,可以让其他组件随时拿到。
通信:一个组件需要改变另一个组件的状态。
使用原则:能不用就不用。实在是使用消息订阅或者props吃力才使用。
2、redux原理

action
动作的对象
包含2个属性:
- type:标识属性, 值为字符串, 唯一, 必要属性
- data:数据属性, 值类型任意, 可选属性
例子:{ type: 'ADD_STUDENT',data:{name: 'tom',age:18} }
reducer
- 用于初始化状态、加工状态。
- 加工时,根据旧的state和action, 产生新的state的纯函数
store
将 state 、 action 、reducer联系在一起的对象 如何得到此对象?
- import {createStore} from 'redux'
- import reducer from './reducers'
- const store = createStore(reducer)
此对象的功能?
- getState(): 得到state
- dispatch(action): 分发action, 触发reducer调用, 产生新的state
- subscribe(listener): 注册监听, 当产生了新的state时, 自动调用
八、扩展
1、setState更新状态的2种写法
总结:
1.对象式的
setState是函数式的setState的简写方式(语法糖)
2.使用原则:
(1).如果新状态不依赖于原状态 ===> 使用对象方式
(2).如果新状态依赖于原状态 ===> 使用函数方式
(3).如果需在setState()执行后获取最新状态数据,要在第二个callback函数中读取
1.setState(stateChange, [callback])------对象式的setState
stateChange为状态改变对象(该对象可以体现出状态的更改)callback是可选的回调函数, 它在状态更新完毕、界面也更新后(render调用后)才被调用
import React, { Component } from 'react'

export default class Demo extends Component {

	state = {count:0}

	add = ()=>{
		//对象式的setState
		//1.获取原来的count值
		const {count} = this.state
		//2.更新状态
		this.setState({count:count+1},()=>{
			console.log(this.state.count);//1
		})
		console.log('12行的输出',this.state.count); //0
	}

	render() {
		return (
			<div>
				<h1>当前求和为:{this.state.count}</h1>
				<button onClick={this.add}>点我+1</button>
			</div>
		)
	}
}
2.setState(updater, [callback])------函数式的setState
updater为返回stateChange对象的函数。updater可以接收到state和props。callback是可选的回调函数, 它在状态更新、界面也更新后(render调用后)才被调用
import React, { Component } from 'react'

export default class Demo extends Component {

	state = {count:0}

	add = ()=>{
		//函数式的setState
		this.setState( (state,props) => ({count:state.count+1}),()=>{
			//回调中拿到的是render之后的新数据
			console.log(state,props);
		})
	}

	render() {
		return (
			<div>
				<h1>当前求和为:{this.state.count}</h1>
				<button onClick={this.add}>点我+1</button>
			</div>
		)
	}
}
2. lazyLoad
路由组件的lazyLoad 懒加载--将页面显示优先加载,资源懒加载,提高页面展示速度
	//1.通过React的lazy函数配合import()函数动态加载路由组件 ===> 路由组件代码会被分开打包
	const Login = lazy(()=>import('@/pages/Login'))

	//2.通过<Suspense>指定在加载得到路由打包文件前显示一个自定义loading界面
	<Suspense fallback={<h1>loading.....</h1>}>
        <Switch>
            <Route path="/xxx" component={Xxxx}/>
            <Redirect to="/login"/>
        </Switch>
    </Suspense>
3、Hooks
State Hook
(1). State Hook让函数组件也可以有state状态, 并进行状态数据的读写操作
(2). 语法: const [xxx, setXxx] = React.useState(initValue)
(3). useState()说明:
        参数: 第一次初始化指定的值在内部作缓存
        返回值: 包含2个元素的数组, 第1个为内部当前状态值, 第2个为更新状态值的函数
(4). setXxx()2种写法:
        setXxx(newValue): 参数为非函数值, 直接指定新的状态值, 内部用其覆盖原来的状态值
        setXxx(value => newValue): 参数为函数, 接收原本的状态值, 返回新的状态值, 内部用其覆盖原来的状态值
function Demo(){
const [count,setCount] = React.useState(0)
//加的回调
function add(){
//setCount(count+1) //第一种写法
setCount(count => count+1 )
}
return (
<div>
<button onClick={add}>点我+1</button>
</div>
)
}
export default DemoEffect Hook
(1). Effect Hook 可以让你在函数组件中执行副作用操作(用于模拟类组件中的生命周期钩子)
(2). React中的副作用操作:
        发ajax请求数据获取
        设置订阅 / 启动定时器
        手动更改真实DOM
(3). 语法和说明:
        useEffect(() => {
          // 在此可以执行任何带副作用操作
          return () => { // 在组件卸载前执行
            // 在此做一些收尾工作, 比如清除定时器/取消订阅等
          }
        }, [stateValue]) // 如果指定的是[], 回调函数只会在第一次render()后执行

(4). 可以把 useEffect Hook 看做如下三个函数的组合
        componentDidMount()
        componentDidUpdate()
    	componentWillUnmount()
Ref Hook
(1). Ref Hook可以在函数组件中存储/查找组件内的标签或任意其它数据
(2). 语法: const refContainer = useRef()
(3). 作用:保存标签对象,功能与React.createRef()一样
4、render props
如何向组件内部动态传入带内容的结构(标签)?
Vue中:
	使用slot技术, 也就是通过组件标签体传入结构  <A><B/></A>
React中:
	使用children props: 通过组件标签体传入结构
	使用render props: 通过组件标签属性传入结构,而且可以携带数据,一般用render函数属性
children props
<A>
  <B>xxxx</B>
</A>
{this.props.children}
问题: 如果B组件需要A组件内的数据, ==> 做不到
render props
<A render={(data) => <C data={data}></C>}></A>
A组件: {this.props.render(内部state数据)}
C组件: 读取A组件传入的数据显示 {this.props.data}
5、组件通信方式总结
组件间的关系:
- 父子组件
- 兄弟组件(非嵌套组件)
- 祖孙组件(跨级组件)
几种通信方式:
	1.props:
		(1).children props
		(2).render props
	2.消息订阅-发布:
		pubs-sub、event等等
	3.集中式管理:
		redux、dva等等
	4.conText:
		生产者-消费者模式
比较好的搭配方式:
	父子组件:props
	兄弟组件:消息订阅-发布、集中式管理
	祖孙组件(跨级组件):消息订阅-发布、集中式管理、conText(开发用的少,封装插件用的多)


 252
252


 被折叠的 条评论
为什么被折叠?
被折叠的 条评论
为什么被折叠?
 到【灌水乐园】发言


