


Python 的特殊文件操作
ini文件是Initialization File的缩写,平时用于存储软件的的配置文件。例如:MySQL数据库的配置文件。
1.ini 文件
#代表注释,[]代表节点,下面的的所有代表键值。
[mysqld] # 节点
# 键= 值
datadir=/var/lib/mysql
socket=/var/lib/mysql/mysql.sock
log-bin=py-mysql-bin
character-set-server=utf8
collation-server=utf8_general_ci
log-error=/var/log/mysqld.log
# Disabling symbolic-links is recommended to prevent assorted security risks
symbolic-links=0
[mysqld_safe] # 节点
log-error=/var/log/mariadb/mariadb.log
pid-file=/var/run/mariadb/mariadb.pid
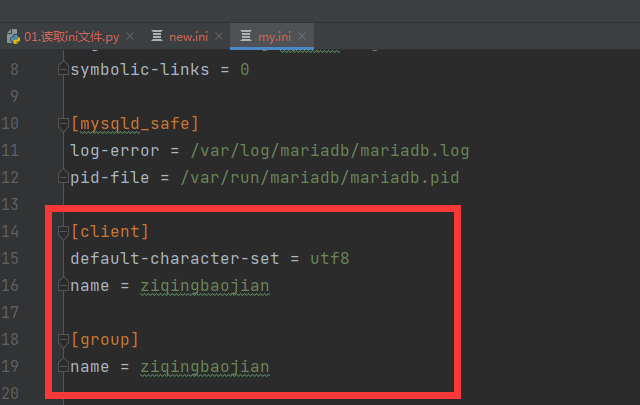
[client] # 节点
# 键=值
default-character-set=utf8
这种格式是可以直接使用open来出来,考虑到自己处理比较麻烦,所以 Python 为我们提供了更为方便的方式。
2.读取 ini 文件
实例化对象,读取文件。
# 以下用到的config对象均是此处实例化好的。
import configparser

config = configparser.ConfigParser() # 实例化对象
config.read('my.ini',encoding="utf-8")
2.1 获取所有节点
import configparser

config = configparser.ConfigParser() # 实例化对象
config.read('my.ini',encoding="utf-8")

# 1.获取所有节点
result = config.sections()
print(result)
>>> ['mysqld', 'mysqld_safe', 'client']

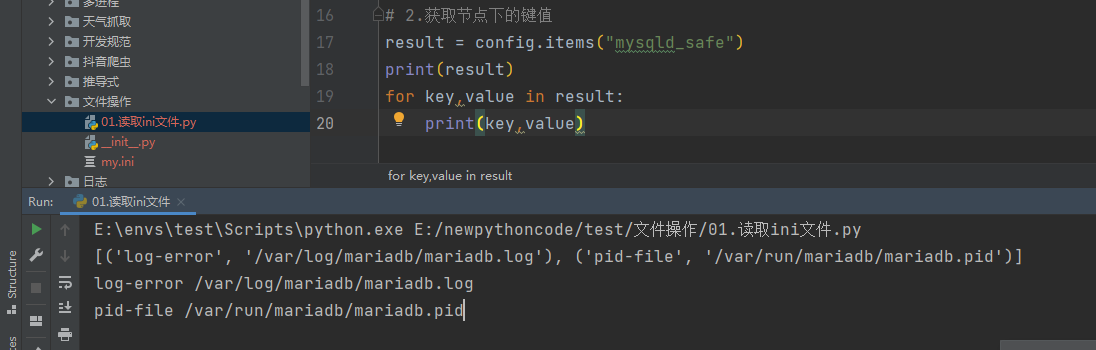
2.2 获取节点下的键值
# 2.获取节点下的键值
result = config.items("mysqld_safe")
print(result)
for key,value in result:
    print(key,value)
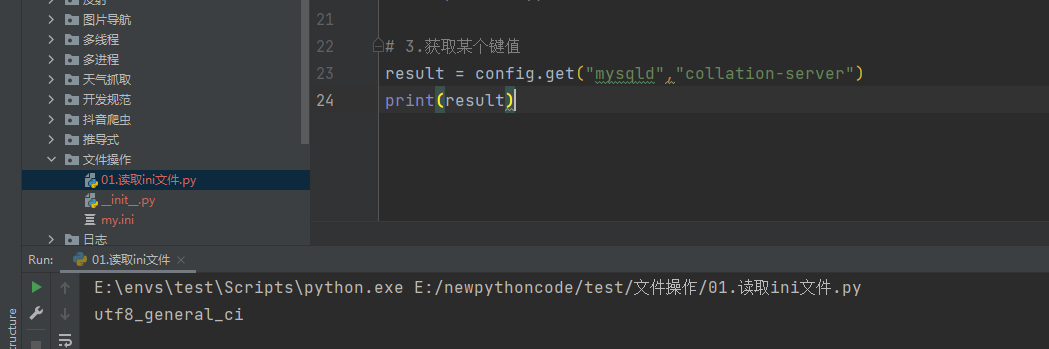
2.3 获取某个节点的键值
# 3.获取某个键值
result = config.get("mysqld","collation-server")
print(result)
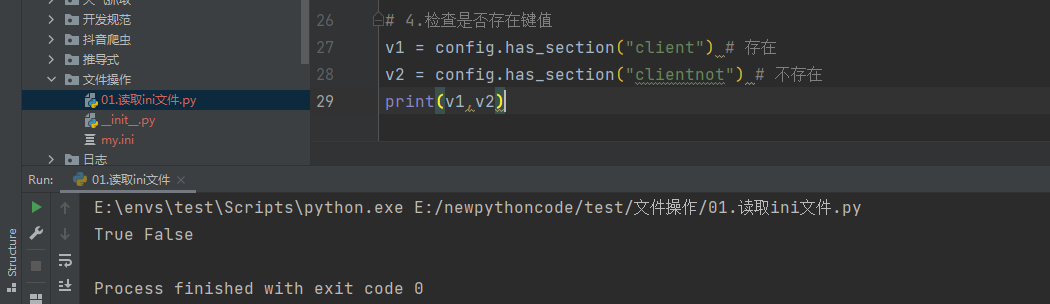
2.4 检查是否存在节点
# 4.检查是否存在键值
v1 = config.has_section("client") # 存在
v2 = config.has_section("clientnot") # 不存在
print(v1,v2)
>>> True False
2.5 创建节点添加或键值
# 5.添加一个节点
config.add_section("group")# 创建节点
config.set('group',"name","ziqingbaojian") # 给创建的节点添加值
config.set('client',"name","ziqingbaojian") # 给已有的节点添加值
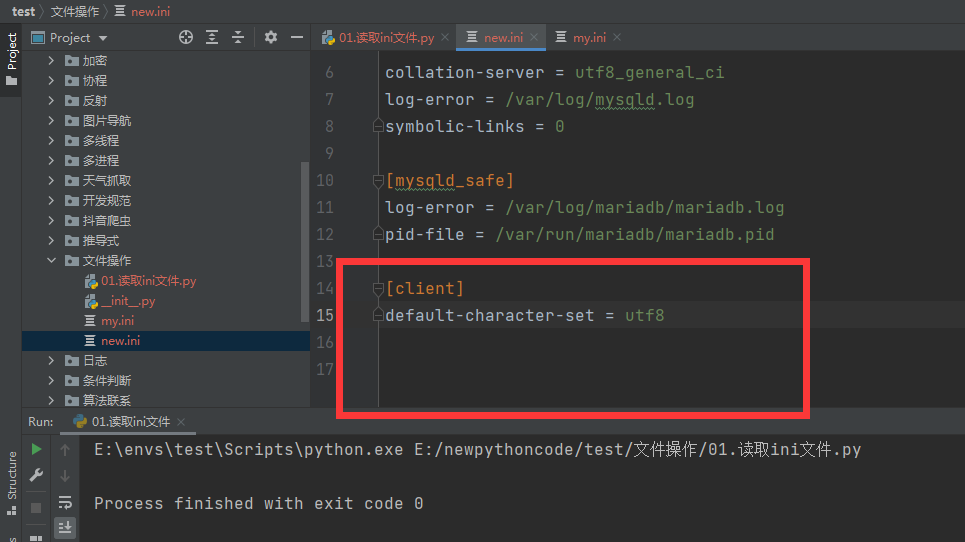
# 此时添加好的节点数据仍然只在内存中,需要将数据写入到对应的文件中
config.write(open('new.ini',mode='w',encoding='utf-8'))
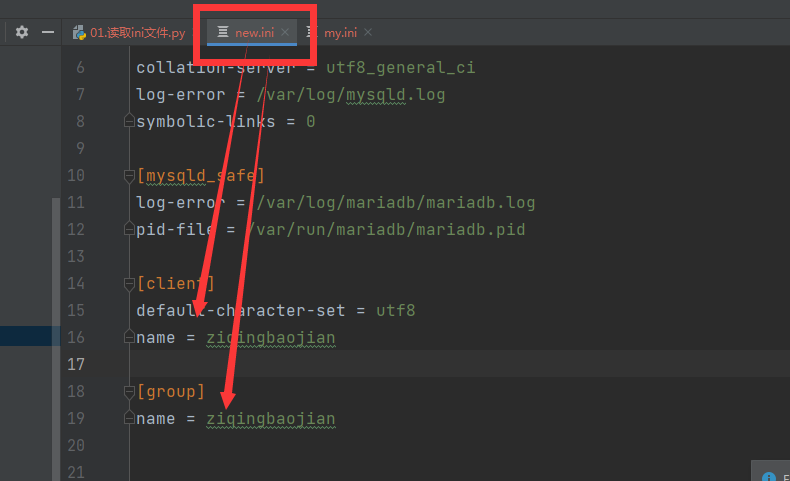
由图可得,两个节点的数据都插入成功,且保存到了新的文件中。
# 5.添加一个节点
config.add_section("group")
config.set('group',"name","ziqingbaojian")
config.set('client',"name","ziqingbaojian")
# config.write(open('new.ini',mode='w',encoding='utf-8'))
config.write(open('my.ini',mode='w',encoding='utf-8'))
保存到已有的文件中,直接进行覆盖重写。
2.6 删除节点或键值
# 6.删除节点
config.remove_section("group")
# 删除节点中的值
config.remove_option("client",'name')
# 数据写入内存
config.write(open('new.ini',mode='w',encoding='utf-8'))
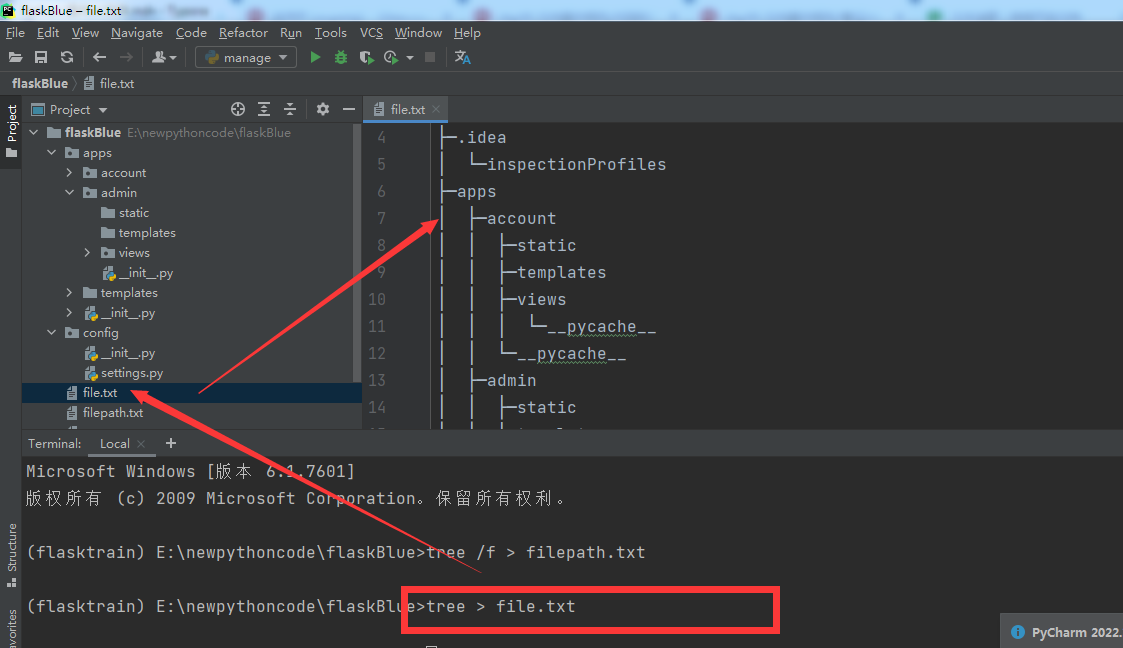
3.文件树(tree 命令)
说明:本部分不属于 Python 的内容,属于 windows 中的知识点。进行简单的介绍,使用可能较多通常用在写文档中。
tree /f > xxx.txt   生成包含所有文件的文件树
tree > xxx.txt  只包含文件夹,没有文件
例如:下图为一个flask的项目获取它的文件树只需在终端执行相关的文件即可
tree /f > filepath.txt
E:.
│  filepath.txt
│  manage.py
│
├─.idea
│  │  .gitignore
│  │  flaskBlue.iml
│  │  misc.xml
│  │  modules.xml
│  │  workspace.xml
│  │
│  └─inspectionProfiles
│          profiles_settings.xml
│          Project_Default.xml
│
├─apps
│  │  __init__.py
│  │
│  ├─account
│  │  │  __init__.py
│  │  │
│  │  ├─static
│  │  ├─templates
│  │  │      login.html
│  │  │
│  │  ├─views
│  │  │  │  forget.py
│  │  │  │  user.py
│  │  │  │  __init__.py
│  │  │  │
│  │  │  └─__pycache__
│  │  │          forget.cpython-38.pyc
│  │  │          user.cpython-38.pyc
│  │  │          __init__.cpython-38.pyc
│  │  │
│  │  └─__pycache__
│  │          __init__.cpython-38.pyc
│  │
│  ├─admin
│  │  │  __init__.py
│  │  │
│  │  ├─static
│  │  ├─templates
│  │  ├─views
│  │  │      __init__.py
│  │  │
│  │  └─__pycache__
│  │          __init__.cpython-38.pyc
│  │
│  ├─templates
│  │      login.html
│  │
│  └─__pycache__
│          __init__.cpython-38.pyc
│
└─config
    │  settings.py
    │  __init__.py
    │
    └─__pycache__
            settings.cpython-38.pyc
            __init__.cpython-38.pyc

tree > file.txt # 本命令只显示文件夹
文件夹 PATH 列表
卷序列号为 53BF-F447
E:.
├─.idea
│  └─inspectionProfiles
├─apps
│  ├─account
│  │  ├─static
│  │  ├─templates
│  │  ├─views
│  │  │  └─__pycache__
│  │  └─__pycache__
│  ├─admin
│  │  ├─static
│  │  ├─templates
│  │  ├─views
│  │  └─__pycache__
│  ├─templates
│  └─__pycache__
└─config
    └─__pycache__
4.xml格式文件
可扩展标记语言,是一种简单的数据存储语言,XML 被设计用来传输和存储数据。
- 存储,可用来存放配置文件,例如:java的配置文件。
- 传输,网络传输时以这种格式存在,例如:早期ajax传输的数据、soap协议等。
<data>
    <country name="Liechtenstein">
        <rank updated="yes">2</rank>
        <year>2023</year>
        <gdppc>141100</gdppc>
        <neighbor direction="E" name="Austria" />
        <neighbor direction="W" name="Switzerland" />
    </country>
    <country name="Singapore">
        <rank updated="yes">5</rank>
        <year>2026</year>
        <gdppc>59900</gdppc>
        <neighbor direction="N" name="Malaysia" />
    </country>
    <country name="Panama">
        <rank updated="yes">69</rank>
        <year>2026</year>
        <gdppc>13600</gdppc>
        <neighbor direction="W" name="Costa Rica" />
        <neighbor direction="E" name="Colombia" />
    </country>
</data>
注意:在Python开发中用的相对来比较少,作为了解即可(微信支付、微信公众号消息处理 时会用到基于xml传输数据)。
例如:https://developers.weixin.qq.com/doc/offiaccount/Message_Management/Receiving_standard_messages.html
4.1 读取文件和内容
from xml.etree import ElementTree as ET

# ET去打开xml文件
tree = ET.parse("files/xo.xml")

# 获取根标签
root = tree.getroot()

print(root) # <Element 'data' at 0x7f94e02763b0>
from xml.etree import ElementTree as ET

content = """
<data>
    <country name="Liechtenstein">
        <rank updated="yes">2</rank>
        <year>2023</year>
        <gdppc>141100</gdppc>
        <neighbor direction="E" name="Austria" />
        <neighbor direction="W" name="Switzerland" />
    </country>
     <country name="Panama">
        <rank updated="yes">69</rank>
        <year>2026</year>
        <gdppc>13600</gdppc>
        <neighbor direction="W" name="Costa Rica" />
        <neighbor direction="E" name="Colombia" />
    </country>
</data>
"""

root = ET.XML(content)
print(root)  # <Element 'data' at 0x7fdaa019cea0>
4.2 读取节点数据
from xml.etree import ElementTree as ET

content = """
<data>
    <country name="Liechtenstein" id="999" >
        <rank>2</rank>
        <year>2023</year>
        <gdppc>141100</gdppc>
        <neighbor direction="E" name="Austria" />
        <neighbor direction="W" name="Switzerland" />
    </country>
     <country name="Panama">
        <rank>69</rank>
        <year>2026</year>
        <gdppc>13600</gdppc>
        <neighbor direction="W" name="Costa Rica" />
        <neighbor direction="E" name="Colombia" />
    </country>
</data>
"""

# 获取根标签 data
root = ET.XML(content)

country_object = root.find("country")
print(country_object.tag, country_object.attrib)
gdppc_object = country_object.find("gdppc")
print(gdppc_object.tag,gdppc_object.attrib,gdppc_object.text)
from xml.etree import ElementTree as ET

content = """
<data>
    <country name="Liechtenstein">
        <rank>2</rank>
        <year>2023</year>
        <gdppc>141100</gdppc>
        <neighbor direction="E" name="Austria" />
        <neighbor direction="W" name="Switzerland" />
    </country>
     <country name="Panama">
        <rank>69</rank>
        <year>2026</year>
        <gdppc>13600</gdppc>
        <neighbor direction="W" name="Costa Rica" />
        <neighbor direction="E" name="Colombia" />
    </country>
</data>
"""

# 获取根标签 data
root = ET.XML(content)

# 获取data标签的孩子标签
for child in root:
    # child.tag = conntry
    # child.attrib = {"name":"Liechtenstein"}
    print(child.tag, child.attrib)
    for node in child:
        print(node.tag, node.attrib, node.text)
from xml.etree import ElementTree as ET

content = """
<data>
    <country name="Liechtenstein">
        <rank>2</rank>
        <year>2023</year>
        <gdppc>141100</gdppc>
        <neighbor direction="E" name="Austria" />
        <neighbor direction="W" name="Switzerland" />
    </country>
     <country name="Panama">
        <rank>69</rank>
        <year>2026</year>
        <gdppc>13600</gdppc>
        <neighbor direction="W" name="Costa Rica" />
        <neighbor direction="E" name="Colombia" />
    </country>
</data>
"""

root = ET.XML(content)

for child in root.iter('year'):
    print(child.tag, child.text)
from xml.etree import ElementTree as ET

content = """
<data>
    <country name="Liechtenstein">
        <rank>2</rank>
        <year>2023</year>
        <gdppc>141100</gdppc>
        <neighbor direction="E" name="Austria" />
        <neighbor direction="W" name="Switzerland" />
    </country>
     <country name="Panama">
        <rank>69</rank>
        <year>2026</year>
        <gdppc>13600</gdppc>
        <neighbor direction="W" name="Costa Rica" />
        <neighbor direction="E" name="Colombia" />
    </country>
</data>
"""

root = ET.XML(content)
v1 = root.findall('country')
print(v1)

v2 = root.find('country').find('rank')
print(v2.text)
4.3 修改和删除节点
from xml.etree import ElementTree as ET

content = """
<data>
    <country name="Liechtenstein">
        <rank>2</rank>
        <year>2023</year>
        <gdppc>141100</gdppc>
        <neighbor direction="E" name="Austria" />
        <neighbor direction="W" name="Switzerland" />
    </country>
     <country name="Panama">
        <rank>69</rank>
        <year>2026</year>
        <gdppc>13600</gdppc>
        <neighbor direction="W" name="Costa Rica" />
        <neighbor direction="E" name="Colombia" />
    </country>
</data>
"""

root = ET.XML(content)

# 修改节点内容和属性
rank = root.find('country').find('rank')
print(rank.text)
rank.text = "999"
rank.set('update', '2020-11-11')
print(rank.text, rank.attrib)
############ 保存文件 ############
tree = ET.ElementTree(root)
tree.write("new.xml", encoding='utf-8')


# 删除节点
root.remove( root.find('country') )
print(root.findall('country'))

############ 保存文件 ############
tree = ET.ElementTree(root)
tree.write("newnew.xml", encoding='utf-8')
4.4 构建文档
<home>
    <son name="儿1">
        <grandson name="儿11"></grandson>
        <grandson name="儿12"></grandson>
    </son>
    <son name="儿2"></son>
</home>
from xml.etree import ElementTree as ET

# 创建根标签
root = ET.Element("home")

# 创建节点大儿子
son1 = ET.Element('son', {'name': '儿1'})
# 创建小儿子
son2 = ET.Element('son', {"name": '儿2'})

# 在大儿子中创建两个孙子
grandson1 = ET.Element('grandson', {'name': '儿11'})
grandson2 = ET.Element('grandson', {'name': '儿12'})
son1.append(grandson1)
son1.append(grandson2)

# 把儿子添加到根节点中
root.append(son1)
root.append(son2)

tree = ET.ElementTree(root)
tree.write('oooo.xml', encoding='utf-8', short_empty_elements=False)
<famliy>
    <son name="儿1">
        <grandson name="儿11"></grandson>
        <grandson name="儿12"></grandson>
    </son>
    <son name="儿2"></son>
</famliy>
from xml.etree import ElementTree as ET

# 创建根节点
root = ET.Element("famliy")


# 创建大儿子
son1 = root.makeelement('son', {'name': '儿1'})
# 创建小儿子
son2 = root.makeelement('son', {"name": '儿2'})

# 在大儿子中创建两个孙子
grandson1 = son1.makeelement('grandson', {'name': '儿11'})
grandson2 = son1.makeelement('grandson', {'name': '儿12'})

son1.append(grandson1)
son1.append(grandson2)


# 把儿子添加到根节点中
root.append(son1)
root.append(son2)

tree = ET.ElementTree(root)
tree.write('oooo.xml',encoding='utf-8')
<famliy>
	<son name="儿1">
    	<age name="儿11">孙子</age>
    </son>
	<son name="儿2"></son>
</famliy>
from xml.etree import ElementTree as ET


# 创建根节点
root = ET.Element("famliy")


# 创建节点大儿子
son1 = ET.SubElement(root, "son", attrib={'name': '儿1'})
# 创建小儿子
son2 = ET.SubElement(root, "son", attrib={"name": "儿2"})

# 在大儿子中创建一个孙子
grandson1 = ET.SubElement(son1, "age", attrib={'name': '儿11'})
grandson1.text = '孙子'


et = ET.ElementTree(root)  #生成文档对象
et.write("test.xml", encoding="utf-8")
<user><![CDATA[你好呀]]</user>
from xml.etree import ElementTree as ET

# 创建根节点
root = ET.Element("user")
root.text = "<![CDATA[你好呀]]"

et = ET.ElementTree(root)  # 生成文档对象
et.write("test.xml", encoding="utf-8")
案例:
content = """<xml>
    <ToUserName><![CDATA[gh_7f083739789a]]></ToUserName>
    <FromUserName><![CDATA[oia2TjuEGTNoeX76QEjQNrcURxG8]]></FromUserName>
    <CreateTime>1395658920</CreateTime>
    <MsgType><![CDATA[event]]></MsgType>
    <Event><![CDATA[TEMPLATESENDJOBFINISH]]></Event>
    <MsgID>200163836</MsgID>
    <Status><![CDATA[success]]></Status>
</xml>"""

from xml.etree import ElementTree as ET

info = {}
root = ET.XML(content)
for node in root:
    # print(node.tag,node.text)
    info[node.tag] = node.text
print(info)
继续努力,终成大器。


 1万+
1万+


 被折叠的 条评论
为什么被折叠?
被折叠的 条评论
为什么被折叠?
 到【灌水乐园】发言


