


一:周选择器

vue代码如下:
        <div class="calendar-body" v-if="viewType == 'week'">
            <div class="calendar-module-item" v-for="(_item, _index) in currentWeekList" :key="_index">
              <div class="week-normal">
                <div :class="[_item.select ? 'select-day' : '']">
                  <div class="calendar-head-item">{{ _item.label }}</div>
                  <div class="day" @click="dayClickHandle(_item)">{{ _item.day }}</div>
                </div>
              </div>
            </div>
          </div>
样式部分:
    .calendar {
      background: #fff;
      // 周选择样式
      .calendar-body {
        display: flex;
        align-items: center;
        justify-content: space-around;
        .calendar-module-item {
          position: relative;
          width: 7%;
          height: 5em;
          text-align: center;
          line-height: 35px;

          &:not(:last-child) {
            margin-right: 1px;
          }

          .week-normal {
            height: 30px;
            color: #666666;
            align-items: center;
            justify-content: space-around;
          }
          .select-day {
            background-color: #1866fe;
            width: 100%;
            border-radius: 20px 20px 20px 20px;
            height: 230%;
            color: #fff;
          }
          .day {
            font-size: 14px;
            font-weight: 600;
            padding-bottom: 1%;
            cursor: pointer;
          }
        }
      }
}
ts代码:
    const state = reactive({
      viewType: 'week',  // 切换周或者月选择器
      currentMonth: '',  // 当前月份展示
      isToday: true,  // 是否今日
      currentWeekList: [],  //周数据
      typeOptions: [
        { label: '周', value: 'week' }, { label: '月', value: 'month' }
      ],
      dataListMonth: [],
      WeekNum: [
        { label: "日", value: 0, fullName: "星期日" },
        { label: "一", value: 1, fullName: "星期一" },
        { label: "二", value: 2, fullName: "星期二" },
        { label: "三", value: 3, fullName: "星期三" },
        { label: "四", value: 4, fullName: "星期四" },
        { label: "五", value: 5, fullName: "星期五" },
        { label: "六", value: 6, fullName: "星期六" },
      ],
    } as any);

 //获取这周的时间数据
    const getCurrentWeek = (time: any) => {
      const dateTime = new Date(time);
      const Date2 = dateTime.getTime(); //毫秒数
      const weekList = new Array(6); //放置周数据
      const day2week = ['日', '一', '二', '三', '四', '五', '六'];
      const week = dateTime.getDay(); //获取传入的time日期为星期几
      const dayTime = 3600 * 24 * 1000; //一天的毫秒数
      for (let i = 0; i <= 6; i++) {
        weekList[i] = {
          label: day2week[i],
          day: new Date(Date2 - (week - i) * dayTime).getDate(),
          select: (week - i) * dayTime === 0,
        };
      }
      return weekList;
    };
    const putListToWeek = () => {
      const date = getFormatterDate(new Date());
      state.currentWeekList = getCurrentWeek(date);
    };

 onMounted(() => {
    putListToWeek();
    });
二:月选择器
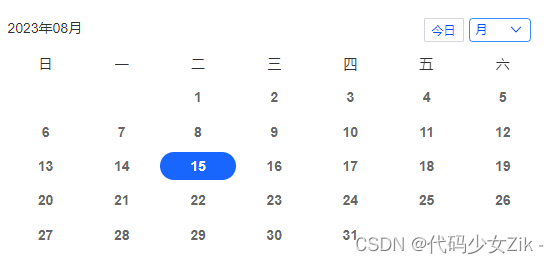
vue代码如下:
 <!-- 月数据 -->
          <div class="calendar-body-month" v-else>
            <div class="week">
              <div class="calendar-month-item" v-for="(key, _index) in WeekNum" :key="_index">{{ key.label }}</div>
            </div>
            <div class="day">
              <div class="day-item" v-for="(item, ind) in dataListMonth" :key="ind">
                <div class="day" :class="[val.select ? 'select-day-item' : '']" v-for="(val, index) in item" @click="dayClickHandle(val)" :key="index">{{ val.day }}</div>
              </div>
            </div>
          </div>
css样式:
     // 月选择样式
      .calendar-body-month {
        width: 100%;
        .week {
          width: 100%;
          display: flex;
          align-items: center;
          justify-content: space-around;
          margin-bottom: 1.5%;
          .calendar-month-item {
            position: relative;
            width: 7%;
            height: 2em;
            text-align: center;
            line-height: 35px;
          }
        }
        .day {
          // width: 100%;
          .day-item {
            display: flex;
            align-items: center;
            justify-content: space-around;
            width: 100%;
            .day {
              text-align: center;
              width: 20%;
              margin-bottom: 1.2%;
              cursor: pointer;
              height: 2em;
              line-height: 2em;
              color: #666666;
              font-size: 14px;
              font-weight: 600;
            }
            .select-day-item {
              background-color: #1866fe;
              border-radius: 20px 20px 20px 20px;
              color: #fff;
            }
          }
        }
      }
ts代码:
  // 获取本月的时间数据
    const getCurrentMonth = (year: any, month: any) => {
      var stratDate: any = new Date(year, month - 1, 1),
        endData: any = new Date(year, month, 1);
      var days = (endData - stratDate) / (1000 * 60 * 60 * 24);
      var list = []
      for (var i = 1; i <= days; i++) {
        const d = i
        const day = d
        const week =
          new Date(month + '/' + i + '/' + year).getDay() == 0 ? '日' : new Date(month + '/' + i + '/' + year).getDay() == 1 ? '一' : new Date(month + '/' + i + '/' + year).getDay() == 2 ? '二' : new Date(month + '/' + i + '/' + year).getDay() == 3 ? '三' : new Date(month + '/' + i + '/' + year).getDay() == 4 ? '四' : new Date(month + '/' + i + '/' + year).getDay() == 5 ? '五' : new Date(month + '/' + i + '/' + year).getDay() == 6 ? '六' : ''
        list.push({
          day,
          week,
          d,
          select: false,
        })
        state.dataListMonth = list
      }


      // 获取某月第一天对应的星期几
      let currentIndex = state.WeekNum.findIndex((item: any) => item.label == state.dataListMonth[0].week);
      // 往总天数中添加currentIndex个对象用于错位
      let addList = Array.from({ length: currentIndex }).map((_, index) => {
        return {
          d: "",
          day: "",
          week: "",
          select: false,
        }
      });
      // 合并
      let mergeArr = [...addList, ...state.dataListMonth];
      let resultList = [];
      let index = 0;
      // 将数组分为长度为7的数组方便页面循环
      while (index < days) {
        resultList.push(mergeArr.slice(index, index += 7));
      }
      state.dataListMonth = resultList;
      if (state.dataListMonth[state.dataListMonth.length - 1].length < 7) {
        do {
          state.dataListMonth[state.dataListMonth.length - 1].push({
            d: "",
            day: "",
            week: "",
            select: false,
          })
        } while (state.dataListMonth[state.dataListMonth.length - 1].length < 7);
      }
    };

   onMounted(() => {
      // 获取本月时间
      var date = new Date();
      var year = date.getFullYear(); //获取完整的年份(4位)
      var month1 = date.getMonth() + 1; //获取当前月份(0-11,0代表1月)
      getCurrentMonth(year, month1)//传入参数年和月
}


 491
491


 被折叠的 条评论
为什么被折叠?
被折叠的 条评论
为什么被折叠?
 到【灌水乐园】发言


