


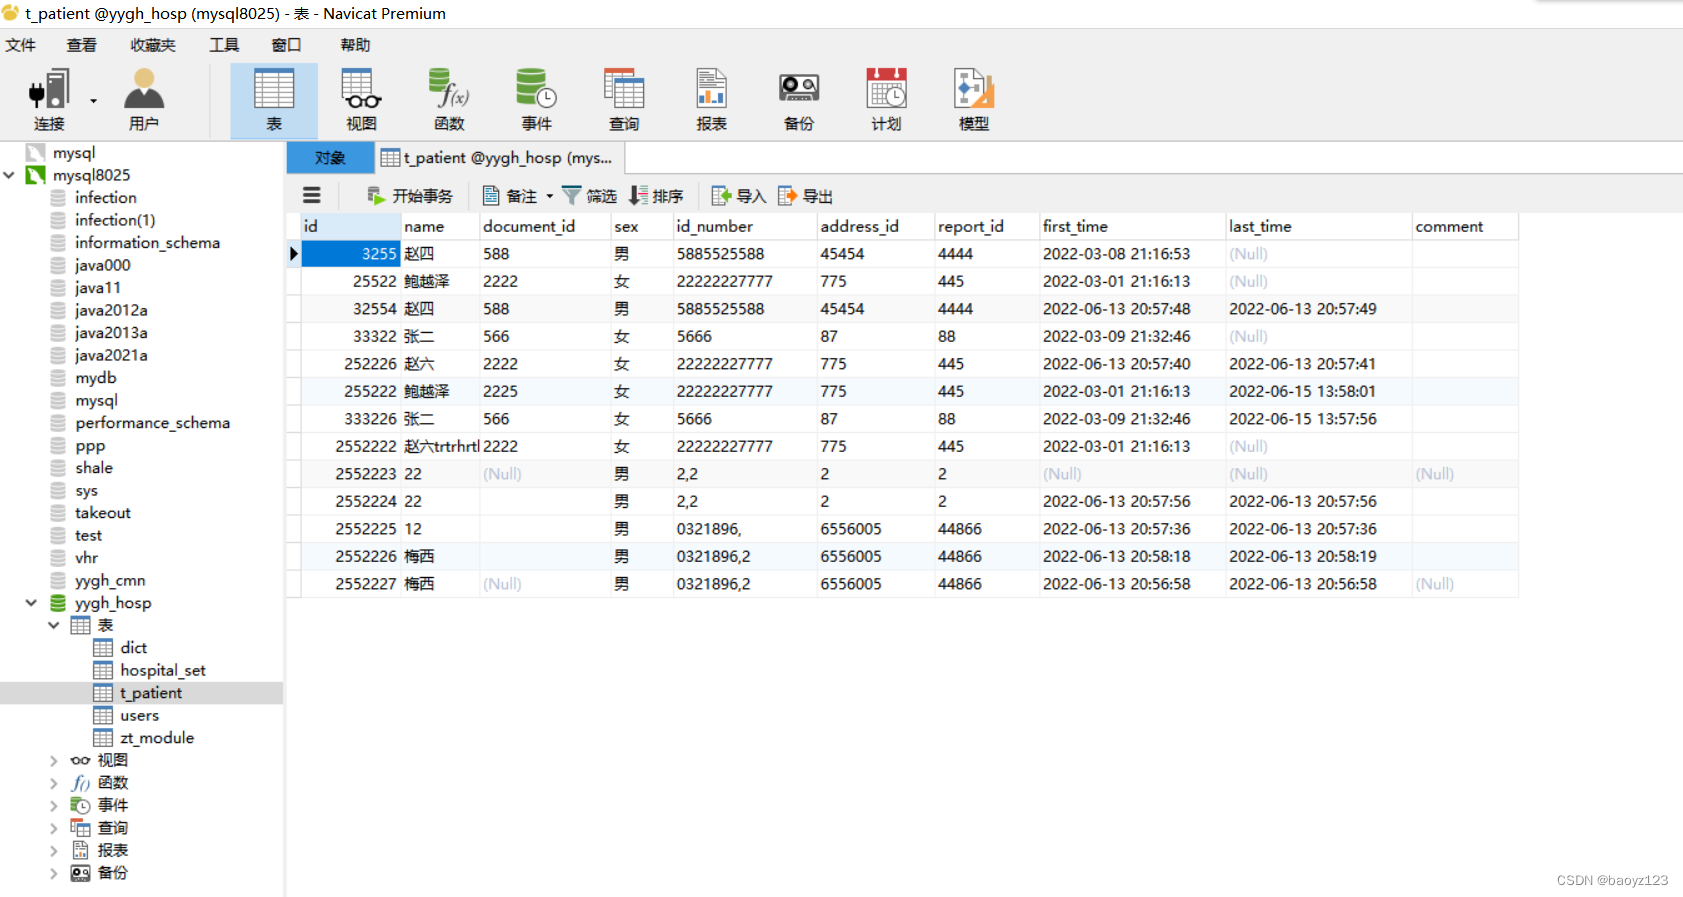
一. 效果展示
数据库,表的显示
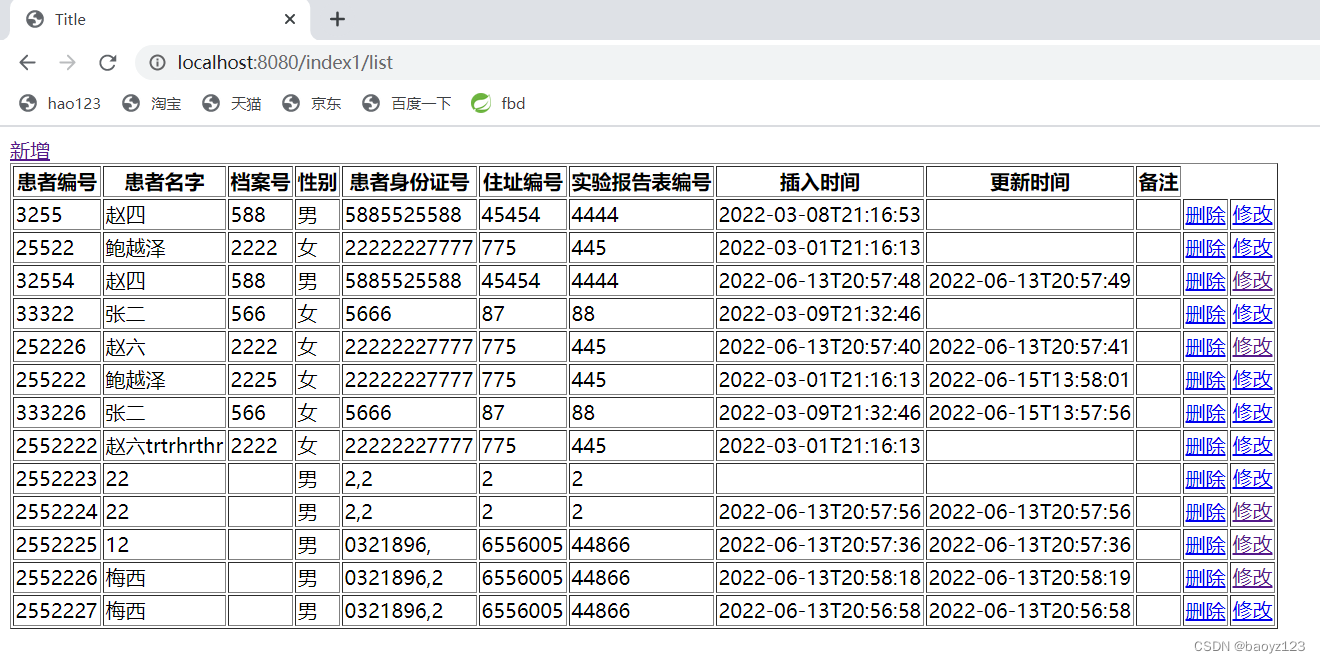
网页显示效果
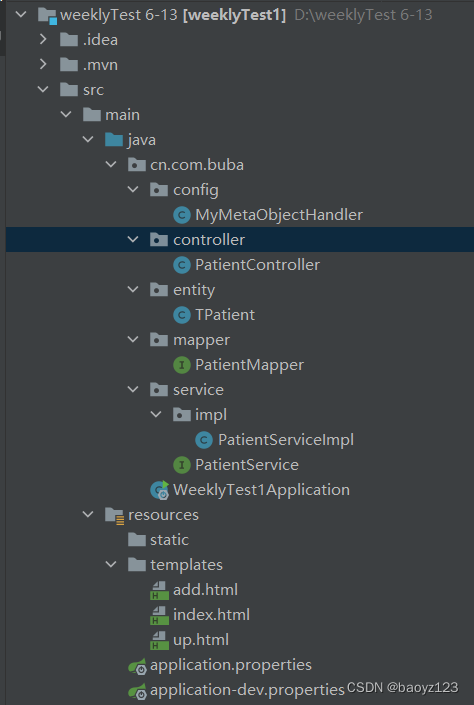
目录显示
现在开始写代码了
二. 搭好springboot框架
可以先用mybatis-plus自动生成一下框架,可以看我之前的博客:逆向生成文件(mybatis-plus)
1. config配置类:
package cn.com.buba.config;


import com.baomidou.mybatisplus.core.handlers.MetaObjectHandler;
import lombok.extern.slf4j.Slf4j;
import org.apache.ibatis.reflection.MetaObject;
import org.springframework.stereotype.Component;

import java.time.LocalDateTime;
import java.util.Date;

/**
 * @program: demoClass
 * @ClassName MyMetaObjectHandler
 * @description:
 * @author: XXD
 * @create: 2022-06-13 16:53
 * @Version 1.0
 **/
@Component
@Slf4j
public class MyMetaObjectHandler implements MetaObjectHandler {
    //添加时候自动填充 setFieldValByName三个参数为:映射类字段,填充值,原对象
    @Override
    public void insertFill(MetaObject metaObject) {
        log.info("[自动填充公共字段......insert......]");
        metaObject.setValue("firstTime", LocalDateTime.now());
        metaObject.setValue("lastTime", LocalDateTime.now());
    }

    //修改时候自动填充
    @Override
    public void updateFill(MetaObject metaObject) {
        log.info("[自动填充公共字段......update......]");
        metaObject.setValue("lastTime", LocalDateTime.now());
    }
}//设置时间的
2. controller代码:
package cn.com.buba.controller;

import cn.com.buba.entity.TPatient;
import cn.com.buba.service.PatientService;
import lombok.extern.slf4j.Slf4j;
import org.springframework.beans.factory.annotation.Autowired;
import org.springframework.stereotype.Controller;
import org.springframework.web.bind.annotation.*;

import javax.servlet.http.HttpServletRequest;
import java.util.List;
import java.util.Map;

/**
 * @program: weeklyTest1
 * @ClassName UsersController
 * @description:
 * @author: MSY
 * @create: 2022-06-10 15:12
 * @Version 1.0
 **/
@Slf4j
@Controller
@RequestMapping("/index1")
public class PatientController {

    @Autowired
    private PatientService patientService;

    //查询患者
    @RequestMapping("/list")
    public String list(Map<String , Object> map){

        List<TPatient> list = patientService.list();
        map.put("list",list);
        return "index";//返回网页
    }

    //通过id删除用户信息
    @RequestMapping(value = "/delete/{id}")
                    //PathVariable:/del/1
                    // 不添加        /del?id=1
    public String delete(@PathVariable  Integer id){//找到id
        patientService.removeById(id);//根据id删除的方法
      return "forward:/index1/list";//返回查询的页面

    }

    //新增数据
    @GetMapping("/add")//获取新增的前端页面
    public String add(){
        return "add";
    }
    @GetMapping("/adds")//实现修改成功的前端页面
    public String save(TPatient tPatient) {
        patientService.save(tPatient);//新增,保存的方法
        //表示重置list界面(显示页面的)
        return "forward:/index1/list";
    }


    //修改数据
    @GetMapping("/up/{id}")
    //               request请求 在前端也得写一个请求; 获取,找到id
    public String up(HttpServletRequest request, @PathVariable Integer id){
        TPatient byId = patientService.getById(id);//usersService里面获取这个id的方法
        request.setAttribute("by",byId);//获取带值的参数前端得写一个<div th:each="i:${by}">  里面值i.
        return "up";//返回这个页面
    }

    @GetMapping("/ups")
    public String ups(TPatient tPatient) {
        patientService.updateById(tPatient);//用到的usersService里的修改id的方法
        return "forward:/index1/list";//跳转到查询这个页面
    }


}
3. entity实体类配置
package cn.com.buba.entity;

/**
 * @program: weeklyTest1
 * @ClassName Users
 * @description:实体类
 * @author: MSY
 * @create: 2022-06-10 14:10
 * @Version 1.0
 **/

import com.baomidou.mybatisplus.annotation.FieldFill;
import com.baomidou.mybatisplus.annotation.IdType;
import com.baomidou.mybatisplus.annotation.TableField;
import com.baomidou.mybatisplus.annotation.TableId;
import lombok.Data;

import java.io.Serializable;
import java.time.LocalDateTime;

/** * user 实体类 */
@Data//get,set方法
public class TPatient implements Serializable {

    @TableId(value = "id",type = IdType.AUTO)

    private Integer id;

    private String name;

    private String documentId;

    private String sex;

    private String idNumber;

    private Integer addressId;

    private Integer reportId;

    //插入时间
    @TableField(fill = FieldFill.INSERT)//加上这个注解得写配置类config;然后在从设计表中把数据类型改成timestamp;前端就不用写时间;他就直接获取
    private LocalDateTime firstTime;

    //更新时间
    @TableField(fill = FieldFill.INSERT_UPDATE)
    private LocalDateTime lastTime;

    private String comment;

}
4. mapper接口代码:
package cn.com.buba.mapper;

import cn.com.buba.entity.TPatient;
import com.baomidou.mybatisplus.core.mapper.BaseMapper;
import org.apache.ibatis.annotations.Mapper;

/**
 * @program: weeklyTest1
 * @interfaceName UsersMapper
 * @description:UsersMapper接口
 * @author: MSY
 * @create: 2022-06-10 14:12
 * @Version 1.0
 **/
@Mapper
public interface PatientMapper extends BaseMapper<TPatient> {

}
5. service服务代码:
package cn.com.buba.service;

import cn.com.buba.entity.TPatient;
import com.baomidou.mybatisplus.extension.service.IService;

/**
 * @program: weeklyTest1
 * @ClassName UsersMapper
 * @description:
 * @author: MSY
 * @create: 2022-06-10 14:13
 * @Version 1.0
 **/

public interface PatientService extends IService<TPatient> {

}
6. impl实现类代码:templates
package cn.com.buba.service.impl;

import cn.com.buba.entity.TPatient;
import cn.com.buba.mapper.PatientMapper;
import cn.com.buba.service.PatientService;
import com.baomidou.mybatisplus.extension.service.impl.ServiceImpl;
import org.springframework.stereotype.Service;

/**
 * @program: weeklyTest1
 * @ClassName UsersServiceImpl
 * @description:
 * @author: MSY
 * @create: 2022-06-10 14:14
 * @Version 1.0
 **/
@Service
public class PatientServiceImpl extends ServiceImpl<PatientMapper, TPatient> implements PatientService {

}
7. templates包index显示页面代码:
<!DOCTYPE html>
<html lang="en" xmlns:th="http://www.thymeleaf.org"><!--Thymeleaf是⾯向Web和独⽴环境的现代服务器端Java模板引擎,能够处理HTML,XML,JavaScript,CSS甚⾄纯⽂本。-->
<head>
  <meta charset="UTF-8">
  <title>Title</title>
</head>
<body>
<a href="/index1/add">新增</a><!--和后端约定的路径的路径-->
<table border="1">
  <tr>
    <th>患者编号</th>
    <th>患者名字</th>
    <th>档案号</th>
    <th>性别</th>
    <th>患者身份证号</th>
    <th>住址编号</th>
    <th>实验报告表编号</th>
    <th>插入时间</th>
    <th>更新时间</th>
    <th>备注</th>
  </tr>
  <tr th:each="li:${list}">
    <td th:text="${li.id}"></td>
    <td th:text="${li.name}"></td>
    <td th:text="${li.documentId}"></td>
    <td th:text="${li.sex}"></td>
    <td th:text="${li.idNumber}"></td>
    <td th:text="${li.addressId}"></td>
    <td th:text="${li.reportId}"></td>
    <td th:text="${li.firstTime}"></td>
    <td th:text="${li.lastTime}"></td>
    <td th:text="${li.comment}"></td>
    <td>
      <a th:href="@{/index1/delete/} + ${li.id}">删除</a><!--和后端约定的路径的路径-->
    </td>
    <td>
      <a th:href="@{'/index1'+'/up/'+${li.id}}">修改</a><!--和后端约定的路径的路径-->
    </td>
  </tr>
</table>
</body>
</html>
8.add.html新增页面代码:
<!DOCTYPE html>
<html lang="en" xmlns:th="http://www.thymeleaf.org">
<head>
    <meta charset="UTF-8">
    <title>Title</title>
</head>
<body>
<form action="adds" method="get">
  <h1>患者信息表</h1>
  <div>
    <label>患者编号</label>
    <input type="text"  name="id">
  </div>
  <br>
  <div>
    <label>患者名字</label>
    <input type="text"  name="name">
  </div>
  <br>
  <div>
    <label>档案号</label>
    <input type="text"  name="age">
  </div>
  <br>
  <div>
    <label>患者性别</label>
    <input type="text"  name="sex">
  </div>
  <br>
  <div>
    <label>患者身份证号</label>
    <input type="text"  name="idNumber">
  </div>
  <br>
  <div>
    <label>住址编号</label>
    <input type="text"  name="addressId">
  </div>
  <br>
  <div>
    <label>实验报告表编号</label>
    <input type="text"  name="reportId">
  </div>
  <br>
  <!--在这不用写时间的前端它将自动生成-->
  <div>
    <label>备注</label>
    <input type="text"  name="idNumber">
  </div>
  <button type="submit">保存</button>
</form>
</body>
</html>
9. up.html修改页面代码:
<!DOCTYPE html>
<html lang="en" >
<head>
    <meta charset="UTF-8">
    <title>Title</title>
</head>
<body>
<form action="/index1/ups" method="get"><!--约定路径;请求get-->
  <h1>患者信息表</h1>
  <div th:each="i:${by}">
    <div>
      <label>患者编号</label>
      <input type="text" th:value="${i.id}" name="id"  readonly><!--readonly意思是不能删除id,只能看不能动-->
    </div>
    <br>
    <div>
      <label>患者名字</label>
      <input type="text" th:value="${i.name}" name="name">
    </div>
    <br>
    <div>
      <label>档案号</label>
      <input type="text" th:value="${i.documentId}" name="documentId">
    </div>
    <br>
    <div>
      <label>患者性别</label>
      <input type="text" th:value="${i.sex}" name="sex">
    </div>
    <br>
    <div>
      <label>患者身份证号</label>
      <input type="text" th:value="${i.idNumber}" name="idNumber">
    </div>
    <br>
    <div>
      <label>住址编号</label>
      <input type="text" th:value="${i.addressId}" name="addressId">
    </div>
    <br>
    <div>
      <label>实验报告表编号</label>
      <input type="text" th:value="${i.reportId}" name="reportId">
    </div>
    <br>
    <!--在这不用写时间的前端它将自动生成-->
    <div>
      <label>备注</label>
      <input type="text" th:value="${i.comment}" name="comment">
    </div>
  <button type="submit">保存</button>
  </div>
</form>
</body>
</html>
10. application.properties配置文件代码:
spring.profiles.active=dev
11. application-dev.properties配置文件代码:
server.port=8080

spring.application.name=mp-test

spring.datasource.driver-class-name=com.mysql.cj.jdbc.Driver
spring.datasource.druid.url=jdbc:mysql://localhost:3307/yygh_hosp?serverTimezone=Asia/Shanghai&useUnicode=true&characterEncoding=utf-8&zeroDateTimeBehavior=convertToNull&useSSL=false&allowPublicKeyRetrieval=true
spring.datasource.username=root
spring.datasource.druid.password=123456

#在映射实体或者属性时,将数据库中表名和字段名中的下划线去掉,按照驼峰命名法映射
mybatis-plus.configuration.map-underscore-to-camel-case=true

#日志
mybatis-plus.configuration.log-impl=org.apache.ibatis.logging.stdout.StdOutImpl

#主键生成策略:雪花算法
#mybatis-plus.configuration.global-config.db-config.id-type=ASSIGN_ID


spring.mvc.hiddenmethod.filter.enabled=true


 2万+
2万+


 被折叠的 条评论
为什么被折叠?
被折叠的 条评论
为什么被折叠?
 到【灌水乐园】发言


