


系列文章目录
第一章 Linux学习之MySQL传统主从同步
第二章 Linux学习之MySQL GTID主从同步
第三章 Linux学习之MySQL MHA高可用集群架构
第四章 Linux学习之MySQL MGR集群
第五章 Linux学习之MySQL mycat
第六章 Linux学习之MySQL Redis
第七章 Linux学习之MongoDB 主从同步
前言
linux学习之mysql的传统主从,连接主库与一台从库。
一、准备工作
环境:
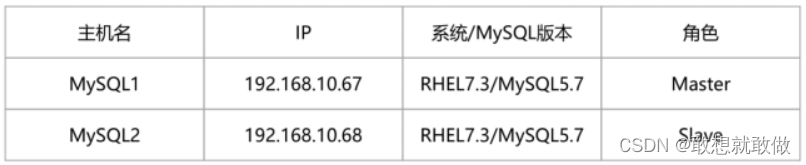
原理:
1)、在master机器上的操作:
当master上的数据发生变化时,该事件变化会按照顺序写入binlog中。当slave链接到master的时候,master机器会为slave开启binlog dump线程。当master的binlog发生变化的时候,bin-log dump线程会通知slave,并将相应的binlog内容发送给slave。
2)、在slave机器上操作:
当主从同步开启的时候,slave上会创建两个线程:I/O线程:该线程连接到master机器,master机器上的binlog dump 线程会将binlog的内容发送给该I/O线程。该I/O线程接收到binlog内容后,再将内容写入到本地的relay log;SQL线程:该线程读取到I/O线程写入的relay log,并且根据relay log 的内容对slave数据库做相应的操作。
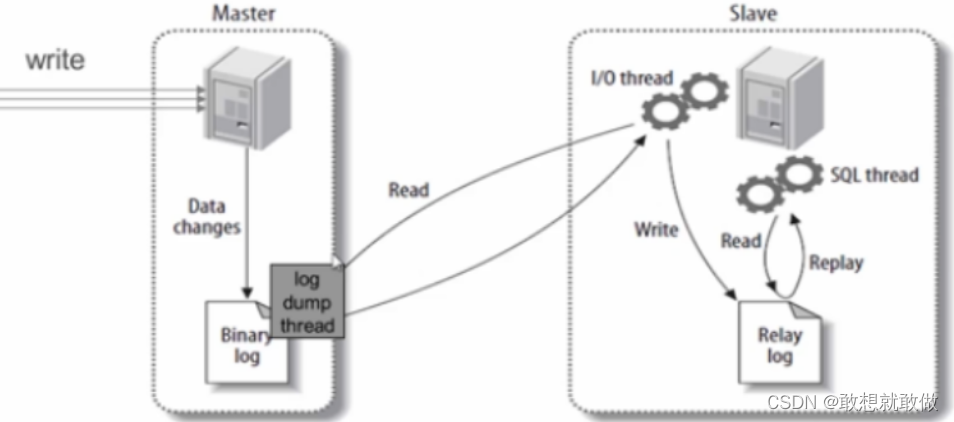
3)、MySQL主从同步原理图如下:
从库生成两个线程,一个I/O线程,一个SQL线程;
I/O线程去请求主库的binlog,并将得到的binlog日志写到relay log(中继日志) 文件中;
主库会生成一个 log dump 线程,用来给从库I/O线程传binlog;
SQL 线程,会读取relay log文件中的日志,并解析成具体操作,来实现主从的操作一致,而最终数据一致;
注意:搭建MySQL主从同步前,需要分别在主数据和从数据上安装并配置好MySQL数据库!
二、配置步骤
1.配置Master
(1)配置 /etc/my.cnf
log‐bin=mysql‐bin‐master ------》启用二进制日志
server‐id=1 ------》本机数据库ID 标示
binlog‐do‐db=testdb ------》可以被从服务器复制的库, 二进制需要同步的数据库名
binlog‐ignore‐db=mysql ------》不可以被从服务器复制的库
lower_case_table_names=1
注意:Linux下部署安装MySQL,默认不忽略表名大小写,需要手动到/etc/my.cnf 下配置 lower_case_table_names=1 使Linux环境下MySQL忽略表名大小写,否则使用MyCAT的时候会提示找不到表的错误!
[root@MySQL1 ~]# cat /etc/my.cnf
[mysqld]
datadir=/var/lib/mysql
socket=/var/lib/mysql/mysql.sock
symbolic-links=0

log-error=/var/log/mysqld.log
pid-file=/var/run/mysqld/mysqld.pid
skip-name-resolve

log-bin=mysql-bin-master
server-id=1
binlog-do-db=testdb
binlog-ignore-db=mysql
lower_case_table_names=1
(2)重启MYSQL服务:
[root@MySQL1 ~]# systemctl restart mysqld
(3)创建要同步的数据库并创建表:
[root@MySQL1 ~]# mysql -uroot -p1234
mysql>

CREATE DATABASE testdb;
show databases;
use testdb;
CREATE TABLE TABLE666 (bTypeId int,bName char(16),price int,publishing char(16));
(4)授权:
[root@MySQL1 ~]# mysql -uroot -p1234
#如果提示 mysql 命令不存在,请尝试用 /usr/local/mysql57/bin/mysql ‐uroot ‐p"1234" 来登录MySQL数据库
mysql: [Warning] Using a password on the command line interface can be in
secure.
Welcome to the MySQL monitor. Commands end with ; or \g.
Your MySQL connection id is 3
Server version: 5.7.19‐log Source distribution

Copyright (c) 2000, 2017, Oracle and/or its affiliates. All rights reserv
ed.

Oracle is a registered trademark of Oracle Corporation and/or its
affiliates. Other names may be trademarks of their respective
owners.

Type 'help;' or '\h' for help. Type '\c' to clear the current input stat
ement.

mysql> grant replication slave on *.* to 'slave'@"192.168.10.%" identified by "1234";
Query OK, 0 rows affected, 1 warning (0.01 sec)

mysql> show master status;
+-------------------------+----------+--------------+------------------+-------------------+
| File                    | Position | Binlog_Do_DB | Binlog_Ignore_DB | Executed_Gtid_Set |
+-------------------------+----------+--------------+------------------+-------------------+
| mysql-bin-master.000002 |      154 | testdb       | mysql            |                   |
+-------------------------+----------+--------------+------------------+-------------------+
1 row in set (0.00 sec)

mysql> show binlog events\G
*************************** 1. row ***************************
   Log_name: mysql-bin-master.000001
        Pos: 4
 Event_type: Format_desc
  Server_id: 1
End_log_pos: 123
       Info: Server ver: 5.7.24-log, Binlog ver: 4
*************************** 2. row ***************************
   Log_name: mysql-bin-master.000001
        Pos: 123
 Event_type: Previous_gtids
  Server_id: 1
End_log_pos: 154
       Info:
*************************** 3. row ***************************
   Log_name: mysql-bin-master.000001
        Pos: 154
 Event_type: Stop
  Server_id: 1
End_log_pos: 177
       Info:
3 rows in set (0.00 sec)

mysql> flush privileges;
Query OK, 0 rows affected (0.00 sec)

mysql> exit
Bye
[root@MySQL1 ~]# ls /var/lib/mysql
auto.cnf         ib_logfile1              performance_schema
ca-key.pem       ibtmp1                   private_key.pem
ca.pem           mysql                    public_key.pem
client-cert.pem  mysql-bin-master.000001  server-cert.pem
client-key.pem   mysql-bin-master.000002  server-key.pem
ib_buffer_pool   mysql-bin-master.index   sys
ibdata1          mysql.sock               testdb
ib_logfile0      mysql.sock.lock
(5)导出数据库并传给从服务器:
[root@MySQL1 ~]# mysqldump -uroot -p1234 -B testdb > testdb.sql
mysqldump: [Warning] Using a password on the command line interface can b
e insecure.

[root@MySQL1 ~]# ls
BUILD CPackConfig.cmake install_manifest.txt mysys storage
client CPackSourceConfig.cmake libbinlogevents mysys_ssl strings
cmake CTestTestfile.cmake libbinlogstandalone packaging support‐files
CMakeCache.txt dbug libevent plugin testclients
CMakeFiles Docs libmysql rapid unittest
cmake_install.cmake Doxyfile‐perfschema libmysqld README VERSION
CMakeLists.txt extra libservices regex VERSION.dep
cmd‐line‐utils testdb.sql make_dist.cmake scripts vio
config.h.cmake include Makefile source_downloads win
configure.cmake info_macros.cmake man sql zlib
COPYING INSTALL mysql‐test sql‐common

[root@MySQL1 ~]# scp testdb.sql 192.168.10.68:/root
The authenticity of host '192.168.10.68 (192.168.10.68)' can't be establ
ished.
ECDSA key fingerprint is
57:3d:7f:91:5a:bc:6f:a1:88:4f:d2:fc:17:0e:51:8b.
Are you sure you want to continue connecting (yes/no)? yes
Warning: Permanently added '192.168.10.68' (ECDSA) to the list of known
hosts.
root@192.168.10.68's password:
testdb.sql 100% 1765 1.7KB/s 00:00
2.配置Slave
(1)配置 /etc/my.cnf:
server‐id=2
#从服务器ID号,不要和主ID相同 ,如果设置多个从服务器,每个从服务器必须有一个唯一的server‐id值,必须与主服务器的以及其它从服务器的不相同。可以认为server‐id值类似于IP地址:这些ID值能唯一识别复制服务器群集中的每个服务器实例。
lower_case_table_names=1
#注意:Linux下部署安装MySQL,默认不忽略表名大小写,需要手动到/etc/my.cnf 下配置 lower_case_table_names=1 使Linux环境下MySQL忽略表名大小写,否则使用MyCAT的时候会提示找不到表的错误!
[root@MySQL2 ~]# cat /etc/my.cnf
[mysqld]
datadir=/var/lib/mysql
socket=/var/lib/mysql/mysql.sock
symbolic-links=0

log-error=/var/log/mysqld.log
pid-file=/var/run/mysqld/mysqld.pid
skip-name-resolve

server-id=2
lower_case_table_names=1
(2)重启mysql服务:
[root@MySQL2 ~]# systemctl restart mysqld
两台数据库服务器mysql版本要一致:
mysql> show variables like '%version%';
 +‐‐‐‐‐‐‐‐‐‐‐‐‐‐‐‐‐‐‐‐‐‐‐‐‐+‐‐‐‐‐‐‐‐‐‐‐‐‐‐‐‐‐‐‐‐‐+
 | Variable_name | Value |
 +‐‐‐‐‐‐‐‐‐‐‐‐‐‐‐‐‐‐‐‐‐‐‐‐‐+‐‐‐‐‐‐‐‐‐‐‐‐‐‐‐‐‐‐‐‐‐+
 | innodb_version | 5.7.19 |
 | protocol_version | 10 |
 | slave_type_conversions | |
 | tls_version | TLSv1,TLSv1.1 |
 | version | 5.7.19‐log |
 | version_comment | Source distribution |
 | version_compile_machine | x86_64 |
 | version_compile_os | Linux |
 +‐‐‐‐‐‐‐‐‐‐‐‐‐‐‐‐‐‐‐‐‐‐‐‐‐+‐‐‐‐‐‐‐‐‐‐‐‐‐‐‐‐‐‐‐‐‐+
 8 rows in set (0.01 sec)
3.测试
(1)测试连接到主数据库是否成功:
[root@MySQL2 ~]# mysql -uslave -p1234 -h 192.168.10.67
mysql> show databases;
+‐‐‐‐‐‐‐‐‐‐‐‐‐‐‐‐‐‐‐‐+
| Database |
+‐‐‐‐‐‐‐‐‐‐‐‐‐‐‐‐‐‐‐‐+
| information_schema |
+‐‐‐‐‐‐‐‐‐‐‐‐‐‐‐‐‐‐‐‐+
1 row in set (0.00 sec)
#此时看不到 testdb 数据库属正常现象
(2)在从库导入测试数据库:
[root@MySQL2 ~]# mysql -uroot -p1234 < testdb.sql
 mysql: [Warning] Using a password on the command line interface can be i
nsecure.
[root@MySQL2 ~]# mysql -uroot -p1234
mysql> show databases;
+‐‐‐‐‐‐‐‐‐‐‐‐‐‐‐‐‐‐‐‐+
| Database |
+‐‐‐‐‐‐‐‐‐‐‐‐‐‐‐‐‐‐‐‐+
| information_schema |
| testdb |
| mysql |
| performance_schema |
| sys |
+‐‐‐‐‐‐‐‐‐‐‐‐‐‐‐‐‐‐‐‐+
5 rows in set (0.00 sec)

mysql> use testdb;
Reading table information for completion of table and column names
You can turn off this feature to get a quicker startup with ‐A

Database changed
mysql> show tables;
+‐‐‐‐‐‐‐‐‐‐‐‐‐‐+
| Tables_in_testdb |
+‐‐‐‐‐‐‐‐‐‐‐‐‐‐+
| table666 |
+‐‐‐‐‐‐‐‐‐‐‐‐‐‐+
1 row in set (0.00 sec)

mysql> exit
Bye
(3)指定主数据库,重启slave:
Slave_IO_Running :一个负责与主机的IO通信
Slave_SQL_Running:负责自己的slave mysql进程
两个为 Yes 就成功了!
[root@MySQL2 ~]# mysql -uroot -p1234
mysql> stop slave;
Query OK, 0 rows affected, 1 warning (0.00 sec)

mysql> change master to master_host='192.168.10.67',master_user='slave',master_password='1234';
Query OK, 0 rows affected, 2 warnings (0.00 sec)

mysql> start slave;
Query OK, 0 rows affected (0.00 sec)

mysql> show slave status\G
*************************** 1. row ***************************
 Slave_IO_State: Waiting for master to send event
 Master_Host: 192.168.10.67
 Master_User: slave
 Master_Port: 3306
 Connect_Retry: 60
 Master_Log_File: mysql‐bin‐master.000002
 Read_Master_Log_Pos: 601
 Relay_Log_File: MySQL2‐relay‐bin.000003
 Relay_Log_Pos: 828
 Relay_Master_Log_File: mysql‐bin‐master.000002
 Slave_IO_Running: Yes
 Slave_SQL_Running: Yes
(4)再到主数据库上查看状态:
[root@MySQL1 ~]# mysql ‐uroot ‐p1234
mysql> show processlist\G
*************************** 1. row ***************************
 Id: 6
 User: slave
 Host: 192.168.10.68:54656
 db: NULL
 Command: Binlog Dump
 Time: 165
 State: Master testdbs sent all binlog to slave; waiting for more updates
 Info: NULL
*************************** 2. row ***************************
 Id: 7
 User: root
 Host: localhost
 db: NULL
Command: Query
 Time: 0
 State: starting
 Info: show processlist
2 rows in set (0.00 sec)
(5)测试主从同步:
主库:
[root@MySQL1 ~]# mysql -uroot -p1234
mysql> show databases;
+--------------------+
| Database           |
+--------------------+
| information_schema |
| mysql              |
| performance_schema |
| sys                |
| testdb             |
+--------------------+
5 rows in set (0.00 sec)

mysql> use testdb;
Reading table information for completion of table and column names
You can turn off this feature to get a quicker startup with -A

Database changed
mysql> show tables;
+------------------+
| Tables_in_testdb |
+------------------+
| table666         |
+------------------+
1 row in set (0.00 sec)

mysql> select * from table666;
Empty set (0.00 sec)

mysql>

INSERT INTO table666(bTypeId,bName,price,publishing) VALUES('1','Linux','66','DZ');
INSERT INTO table666(bTypeId,bName,price,publishing) VALUES('2','CLD','68','RM');
INSERT INTO table666(bTypeId,bName,price,publishing) VALUES('3','SYS','90','JX');
INSERT INTO table666(bTypeId,bName,price,publishing) VALUES('4','MySQL1','71','QH');
INSERT INTO table666(bTypeId,bName,price,publishing) VALUES('5','MySQL2','72','QH');
INSERT INTO table666(bTypeId,bName,price,publishing) VALUES('6','MySQL3','73','QH');

mysql> select * from table666;
+---------+--------+-------+------------+
| bTypeId | bName  | price | publishing |
+---------+--------+-------+------------+
|       1 | Linux  |    66 | DZ         |
|       2 | CLD    |    68 | RM         |
|       3 | SYS    |    90 | JX         |
|       4 | MySQL1 |    71 | QH         |
|       5 | MySQL2 |    72 | QH         |
|       6 | MySQL3 |    73 | QH         |
+---------+--------+-------+------------+
6 rows in set (0.00 sec)
从库:
[root@MySQL2 ~]# mysql -uroot -p1234
mysql> select * from testdb.table666;
+---------+--------+-------+------------+
| bTypeId | bName  | price | publishing |
+---------+--------+-------+------------+
|       1 | Linux  |    66 | DZ         |
|       2 | CLD    |    68 | RM         |
|       3 | SYS    |    90 | JX         |
|       4 | MySQL1 |    71 | QH         |
|       5 | MySQL2 |    72 | QH         |
|       6 | MySQL3 |    73 | QH         |
+---------+--------+-------+------------+
6 rows in set (0.00 sec)
总结
本文介绍了传统主从同步的实现步骤,用于记录学习笔记。


 645
645


 被折叠的 条评论
为什么被折叠?
被折叠的 条评论
为什么被折叠?
 到【灌水乐园】发言


