


项目源代码
web相关
在web展示页面,不涉及到路由权限控制,所以不进行配置
创建项目文件结构和admin文件一致,这里就省略了。这里对于前端的显示页面只有3个部分需要使用到vue-rouoter控制。

在路由配置文件中配置相关代码
const routes = [
  {
    path: '/',
    name: 'home',
    component: Home
  },
  {
    path: '/news',
    name: 'news',
    component: News
  },
  {
    path: '/product',
    name: 'product',
    component: Product
  },
]
这个时候可以在前端页面给用户增加体验,每次切换路由的时候会显示一个进度条效果
使用命令安装:npm install --save nprogress
// 导入进度条样式
import NProgress from 'nprogress'
//导入进度条样式
import 'nprogress/nprogress.css'
在路由进入和退出之前调用对应的进度条显示方法
router.beforeEach((to, from, next) => {
  NProgress.start();
  next()
})
router.afterEach((to, from) => {
  NProgress.done();
})
Navbar导航栏
使用UI组件库的menu菜单制作顶部导航栏,通过设置router属性来决定是否开启路由模式,其对应的值取自index。default-active决定当前哪一个菜单项高亮显示。。但是需要注意的是,在当前项目中web和admin各自占用不同的端口号,所以对于目前的登录按钮只能采用原始的location跳转
<template>
  <div class="navbar-content">
    <el-menu
      :default-active="route.fullPath"
      class="navbar"
      mode="horizontal"
      :router="true"
    >
      <el-menu-item index="/">首页</el-menu-item>
      <el-menu-item index="/news">新闻</el-menu-item>
      <el-menu-item index="/product">产品</el-menu-item>
      <el-menu-item index="" @click="handleLogin">登录</el-menu-item>
    </el-menu>
    <div class="name">新闻门户网站</div>
  </div>
</template>
  setup() {
    const route = useRoute();
    const handleLogin = () => {
      window.location = "http://localhost:8080";
    };
    return {
      route,
      handleLogin,
    };
  },
首页
首页的设计比较简单,这里设置的轮播图数据都是固定的,非请求获取的数据,可以自行获取
其中图片地址是存放在src/assets目录下,存放在src目录下的数据都需要引入才能使用,需要区别public文件
<template>
  <div class="home-container">
    <el-carousel height="calc(100vh - 59px)">
      <el-carousel-item :key="1">
        <div
          :style="{
            backgroundImage: `url(${require('@/assets/1.jpg')})`,
          }"
        ></div>
      </el-carousel-item>
      <el-carousel-item :key="2">
        <div
          :style="{
            backgroundImage: `url(${require('@/assets/2.jpg')})`,
          }"
        ></div>
      </el-carousel-item>
      <el-carousel-item :key="3">
        <div
          :style="{
            backgroundImage: `url(${require('@/assets/3.jpg')})`,
          }"
        ></div>
      </el-carousel-item>
    </el-carousel>
  </div>
</template>

<script>
export default {
  name: "Home",
};
</script>

<style lang="less" scoped>
.el-carousel {
  div {
    width: 100%;
    height: 100%;
    background-size: cover;
    background-position: center;
  }
}
</style>
新闻中心
新闻头部布局
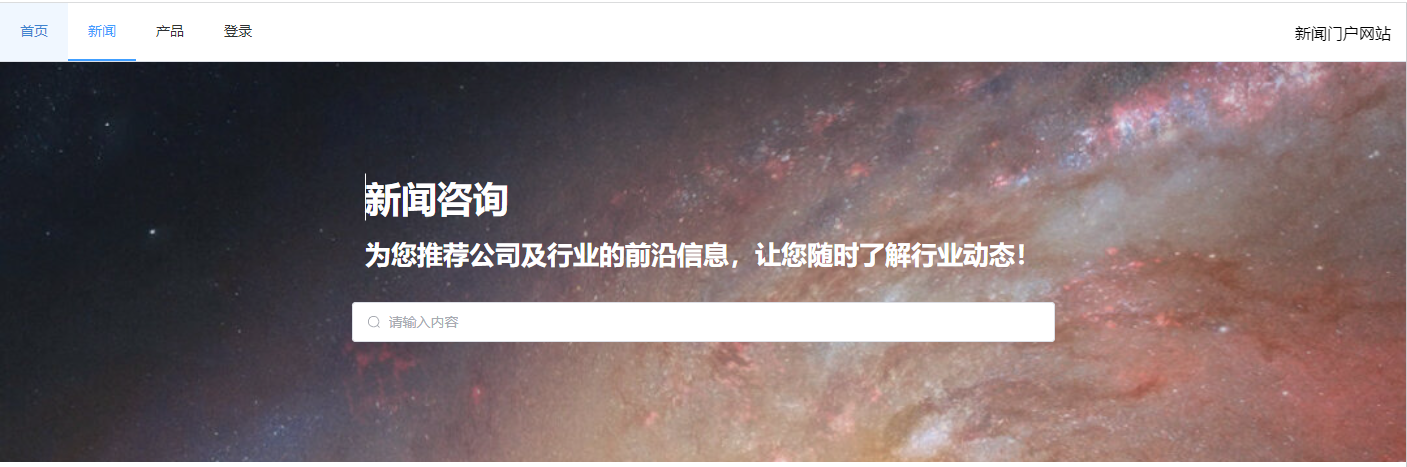
先布局基本的页面结构,放一张header背景图在顶部显示,将搜索框放在背景图中显示即可。
然后采用el-popover组件创建气泡弹窗页面,并且在里面放入一个输入框并调整样式,其中visible用来控制气泡窗的显示和隐藏的,希望该状态是根据input框的输入和失去焦点来决定
<div class="news-container">
<div
class="header"
:style="{
backgroundImage: `url(${require('@/assets/2.jpg')})`,
}"
>
<div class="title">
<h1>新闻咨询</h1>
<h3>为您推荐公司及行业的前沿信息,让您随时了解行业动态!</h3>
</div>
</div>
<div class="search">
<el-popover
placement="bottom"
title="搜索结果"
width="50%"
:visible="visible"
>
<template #reference>
<el-input
v-model="inputText"
class="w-50 m-2"
placeholder="请输入内容"
:prefix-icon="Search"
type="search"
size="large"
@input="visible = true"
@blur="visible = false"
/>
</template>
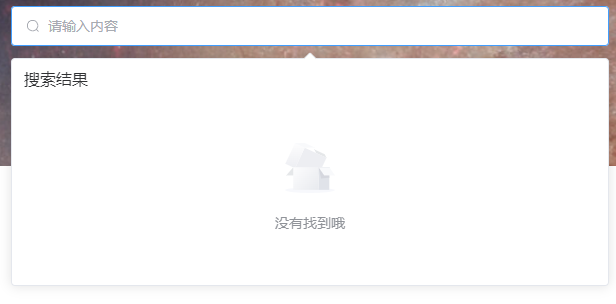
<div v-if="searchList.length">
<div v-for="item in searchList" :key="item._id">{{ item.title }}</div>
</div>
<div v-else><el-empty description="没有找到哦" image-size="50" /></div>
</el-popover>
</div>
</div>
<script setup>
import { Search } from "@element-plus/icons-vue";
import { ref } from "vue";
const inputText = ref();
const visible = ref(false);
</script>
基本样式布局后,页面效果如下
获取数据
该页面的全部新闻信息都是要求已经发布的,即isPublish值为1,且需要按照最新发布的时间排序,在这里在组件创建的时候在onMounted函数中就获取符合条件的全部数据。方便以后使用。
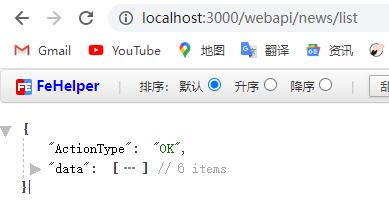
onMounted(async () => {
  const res = await axios.get("/webapi/news/list");
  newsList.value = res.data.data;
});
配置代理
  devServer: {
    proxy: {
      '/webapi': {
        target: 'http://localhost:3000',
        changeOrigin: true
      }
    }
  }
筛选用户输入的数据
newsList 的值是保存后端返回的新闻列表数据,searchList 用于展示符合用户输入经过筛选后的数据显示
const newsList = ref([]);
const searchList = computed(() => {
  //存放筛选的数据
  if (inputText.value === "") {
    return [];
  } else {
    return newsList.value.filter(
      (item) => item.title.includes(inputText.value) //将用户输入的值进行匹配
    );
  }
});
基本效果如下
新闻列表展示
在header页面下面,将最新的四条数据显示。在服务器查询数据库的时候已经对数据进行排序了,所以只需要对前四条数据进行截取即可。
采用layout布局完成,一行中方四个卡片每个卡片中就显示图片和文字与时间。下面是主要的代码,关于样式自定义选择
    <div class="topshow">
      <el-row :gutter="20">
        <el-col :span="6" v-for="item in topList" :key="item._id">
          <el-card shadow="hover">
            <div
              class="images"
              :style="{
                backgroundImage: `url(http://localhost:3000${item.cover})`,
              }"
            ></div>
            <div>
              <span class="news-title">{{ item.title }}</span>
              <div class="bottom">
                <time class="time">{{ formatTime(item.editTime) }}</time>
              </div>
            </div>
          </el-card>
        </el-col>
      </el-row>
    </div>
// 顶部显示四个数据展示
const topList = computed(() => newsList.value.slice(0, 4));
// 格式时间
const formatTime = (time) => {
  return dayjs(time).format("YYYY年M月D日 H:m");
};
基本效果如下

新闻种类分裂显示
按照如图所示,需要将不同种类的新闻筛选到一个种类下显示。

利用Tabs 标签页搭建基本的雏形。其中 v-model双向绑定name的值,根据name的值决定高亮哪一个选择项
    <!-- 俺新闻种类显示数据 -->
    <el-tabs style="margin: 15px" v-model="activeName" class="demo-tabs">
      <!-- 遍历数据项生成 -->
      <el-tab-pane
        v-for="item in tabList"
        :key="item.name"
        :label="item.label"
        :name="item.name"
        >{{ item.label }}</el-tab-pane
      >
    </el-tabs>

const activeName = ref(1);
// 新闻种类分类显示
const tabList = [
  //tab标签页的显示内容,
  {
    label: "最新动态",
    name: 1,
  },
  {
    label: "典型案例",
    name: 2,
  },
  {
    label: "通知公告",
    name: 3,
  },
];
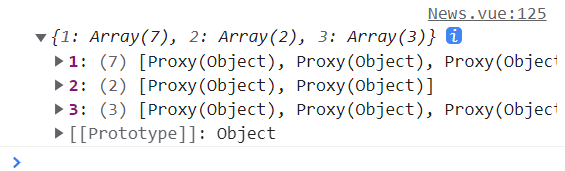
当完成上面的代码后,就需要设计如何存放不同种类的新闻到一个数组中,这里使用lodash库实现
安装并引入lodash库,并测试,调用groupBy方法,对某一个数据集合按照某一个字段进行分组。
打印的分裂结果如下,其返回值是一个对象形式,其中的每一个键名为数字1,2,3正好可以对应刚才设计的name的值,实现嵌套循环打印的效果。
import _ from "lodash";
console.log(_.groupBy(newsList.value, "category"));
利用计算属性获取分类后的值,并在循环中嵌套显示
// 计算分类后的新闻种类
const tabNews = computed(() => _.groupBy(newsList.value, "category"));
在刚才的el-tab-pane标签循环中,再次嵌循环。其中v-for="data in tabNews[item.name]"决定选择什么新闻种类进行循环,tabNews[item.name]选出各个分类的新闻
 <div
          style="margin: 15px"
          v-for="data in tabNews[item.name]"
          :key="data._id"
        >
          <el-card shadow="hover">
            <div
              class="tab-images"
              :style="{
                backgroundImage: `url(http://localhost:3000${data.cover})`,
              }"
            ></div>
            <div>
              <span class="tab-title">{{ data.title }}</span>
              <div class="bottom">
                <time class="tab-time">{{ formatTime(data.editTime) }}</time>
              </div>
            </div>
          </el-card>
        </div>
之后添加一个时间线,在旁边显示,Timeline 时间线组件完成。并且和新闻种类左右显示。下面是完整代码
    <!-- 俺新闻种类显示数据 -->
    <el-tabs style="margin: 15px" v-model="activeName" class="demo-tabs">
      <!-- 遍历数据项生成 -->
      <el-tab-pane
        v-for="item in tabList"
        :key="item.name"
        :label="item.label"
        :name="item.name"
      >
        <el-row :gutter="20">
          <!-- 左侧图标文字区域 -->
          <el-col :span="18">
            <div
              style="margin: 15px"
              v-for="data in tabNews[item.name]"
              :key="data._id"
            >
              <el-card shadow="hover">
                <div
                  class="tab-images"
                  :style="{
                    backgroundImage: `url(http://localhost:3000${data.cover})`,
                  }"
                ></div>
                <div>
                  <span class="tab-title">{{ data.title }}</span>
                  <div class="bottom">
                    <time class="tab-time">{{
                      formatTime(data.editTime)
                    }}</time>
                  </div>
                </div>
              </el-card>
            </div>
          </el-col>
          <!-- 右侧时间线区域 -->
          <el-col :span="6">
            <el-timeline>
              <el-timeline-item
                v-for="(activity, index) in tabNews[item.name]"
                :key="index"
                :timestamp="formatTime(activity.timestamp)"
              >
                {{ activity.title }}
              </el-timeline-item>
            </el-timeline>
          </el-col>
        </el-row>
      </el-tab-pane>
    </el-tabs>
效果图如下

给代码添加一个简单的功能,滑动到某一个时刻出现一个跳转顶部按钮。利用Backtop 回到顶部组件快速创建
<el-backtop :right="100" :bottom="100" />
之后就需要创建一个新闻详情页NewsDetail,当点击每一个新闻项的时候,携带当前新闻id号跳转过去显示内容。
首先创建一个显示新闻详情的组件,之后配置该组件的路由信息。
  {
    path: '/detail/:id',
    name: 'NewsDetail',
    component: NewsDetail
  },
给每一个需要点击查看详情页的新闻绑定该事件。当点击的时候就将自身id号传递过来。
// 处理新闻跳转
const handleDetail = (id) => {
  router.push(`/detail/${id}`);
};
新闻详情
布局如下,采用左右布局,各站18和6份。offset栅格左侧的间隔格数,pull栅格向左移动格数
  <el-row>
    <el-col :span="17" :offset="1">111</el-col>
    <el-col :span="4" :offset="1" :pull="1">111</el-col>
  </el-row>
页面一跳转,就立即获取当前新闻项的信息。
onMounted(async () => {
  const res = await axios.get(`/webapi/news/list/${route.params.id}`);
  console.log(res.data.data[0]);
  detailData.value = res.data.data[0];
});
左侧布局显示新闻的具体内容信息
    <el-col :span="17" :offset="1">
      <div>
        <h2>{{ detailData.title }}</h2>
        <div class="time">{{ formatTime(detailData.editTime) }}</div>
        <el-divider>
          <el-icon><star-filled /></el-icon>
        </el-divider>
        <div class="content" v-html="detailData.content"></div>
      </div>
    </el-col>

const detailData = ref({});
下面是基本效果图

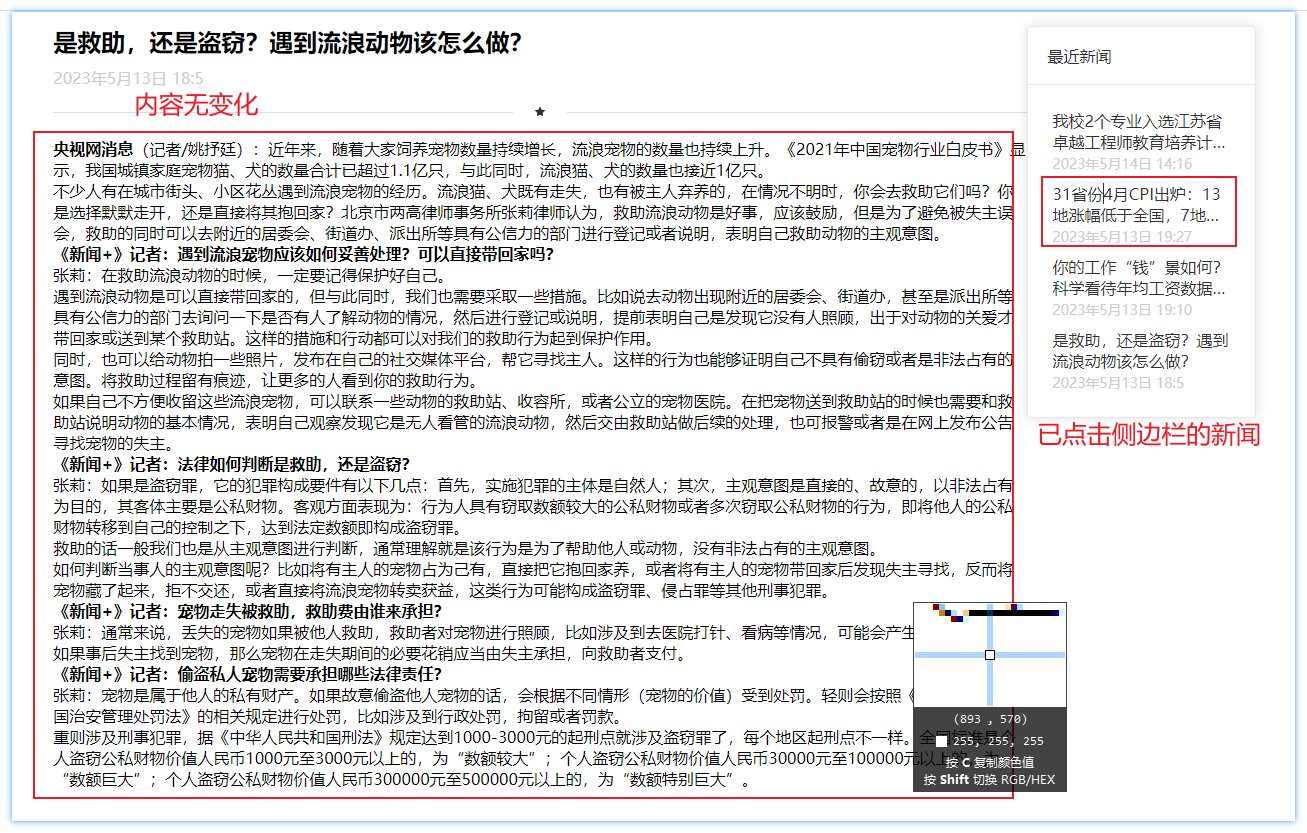
右侧布局,显示最近四条信息内容。
const topNews = ref([]);
onMounted(async () => {
	。。。。。。。省略重复代码
    const res2 = await axios.get("/webapi/news/toplist?limit=4");
	topNews.value = res2.data.data;
});
将获取的四条数据显示在侧边栏中
      <el-card class="box-card">
        <template #header>
          <div class="card-header">
            <span>最近新闻</span>
          </div>
        </template>
        <div
          v-for="item in topNews"
          :key="item._id"
          class="text item"
          style="padding: 5px"
          @click="handleDetail(item._id)"
        >
          <span class="detail-title">{{ item.title }}</span>
          <div class="bottom">
            <time class="detail-time">{{ formatTime(item.editTime) }}</time>
          </div>
        </div>
      </el-card>

给每一个新闻点击,实现跳转详情。注意:在这里跳转不像之前页面的跳转,像之前的都是在不同的组件之间跳转,每次跳转的时候都会销毁上一个组件并创建新的组件,所以都会去执行onMounted方法获取最新的详情数据。但是在当前详情页的时候,点击某个新闻去跳转的,只是进行路由组件的更新,并不会去执行卸载和创建的过程,所以onMounted方法只会执行一次,因此点击某个新闻标题的时候只会显示主新闻详情的信息。
const handleDetail = (id) => {
  // 往当前页面跳转
  router.push(`/detail/${id}`);
};
解决这个问题的办法,就是需要监听路由变化的信息,就重新获取当前详情页的数据信息显示,即使用watchEffect钩子实现。该钩子会监听内部route.params.id值的改变,一旦改变就会重新执行一次,所以这个时候详情页跳转详情页就实现了
watchEffect(async () => {
  const res = await axios.get(`/webapi/news/list/${route.params.id}`);
  const res2 = await axios.get("/webapi/news/toplist?limit=4");
  // console.log(res.data.data[0]);
  // console.log(res2.data.data);
  detailData.value = res.data.data[0];
  topNews.value = res2.data.data;
});
但是这个时候会存在一个bug,从详情页点击别的顶部导航的时候,程序会出现问题。是因为watchEffect在两个组件之间切换销毁的时候,没有进行解绑监听,导致切换路由的时候,从详情页切换到别的组件的时候,没有带过去路由的当前id,导致watchEffect方法,会接收一个undefined字符串去查询后端的数据库信息,最终导致报错产生。
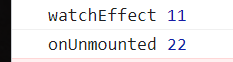
因为当前watchEffect设计到异步回调,所以需要手动关闭监听,调用 watchEffect 返回的函数在onUnmounted卸载钩子中使用即可。(同步情况下会自动销毁)
const stopWatch = watchEffect(async () => {
  console.log("watchEffect", 11);
});
onUnmounted(() => {
  console.log("onUnmounted", 22);
  stopWatch();
});
但是这样子写完依旧会出现之前的bug,这是因为watchEffect钩子的触发时机早于onUnmounted钩子。如下图所示,当在详情页面,点击首页的时候,打印如下,先去执行了watchEffect钩子中的方法体,然后进入了查询,后执行了组件之间切换的销毁创建过程。
解决办法
- 第一种:使用
watchPostEffect钩子代替watchEffect钩子,使用后程序可以正常执行相互跳转 - 第二种:
watchEffect钩子的起始位置处,判断当前的route.params.id是否存在,存在的情况下才会执行数据库的查询操作
const stopWatch = watchEffect(async () => {
  if (!route.params.id) {
    return;
  }
});
产品服务
产品页以轮播图的形式展示,在进入该组件的时候,就向后端发送请求获取列表数据渲染轮播图
const loopList = ref([]);
onMounted(async () => {
  const res = await axios.get("/webapi/product/list");
  loopList.value = res.data.data;
});
结构代码如下
<template>
  <div>
    <el-carousel
      height="calc(100vh - 59px)"
      direction="vertical"
      :autoplay="false"
      v-if="loopList.length"
    >
      <el-carousel-item v-for="item in loopList" :key="item._id">
        <div
          class="images"
          :style="{
            backgroundImage: `url(http://localhost:3000${item.cover})`,
          }"
        >
          <el-card class="box-card">
            <template #header>
              <div class="card-header">
                <h1>{{ item.title }}</h1>
              </div>
            </template>
            <div class="card-body">
              <div>
                <h2>{{ item.introduction }}</h2>
                <h4>{{ item.detail }}</h4>
              </div>
            </div>
          </el-card>
        </div>
      </el-carousel-item>
    </el-carousel>
    <el-empty v-else description="暂无产品" />
  </div>
</template>
Service相关代码
在web相关的后台服务器代码信息都放在web文件中,区分与admin文件
//WebNewsRouter文件的路由信息
const express = require('express')
const NewsController = require('../../controller/web/NewsController')
const router = express.Router()

router.get('/webapi/news/list', NewsController.getList)

module.exports = router

//WebNewsController文件中的代码
const NewsServices = require("../../services/web/NewsServices")
const NewsController = {
  getList: async (req, res) => {
    const result = await NewsServices.getList(req.params) //如果查指定的数据复用该方法
    res.send({
      ActionType: 'OK',
      data: result
    })
  }
}
module.exports = NewsController

//WebNewsServices中的代码,查询数据库,重点查询发布状态为1的数据
const NewsModel = require('../../models/NewsModel')
const NewsServices = {
  getList: async ({ id }) => {
    return id ? NewsModel.find({ _id: id, isPublish: 1 }) : NewsModel.find({ isPublish: 1 }).sort({ editTime: -1 })
  }
}
module.exports = NewsServices
后端测试后,能够正常查询数据,就代码后端模块功能正常,现在只需要处理前端的反向代理即可。
新闻详情获取四条数据
router.get('/webapi/news/toplist', NewsController.getTopList)

  getTopList: async (req, res) => {
    const result = await NewsServices.getTopList(req.query)
    res.send({
      ActionType: 'OK',
      data: result
    })
  }

  getTopList: async ({ limit }) => {
    return NewsModel.find({ isPublish: 1 }).sort({ editTime: -1 }).limit(limit)
  }
产品列表数据
router.get('/webapi/product/list', ProductController.getList)
const ProductController = {
  getList: async (req, res) => {
    const result = await ProductServices.getList()
    res.send({
      ActionType: 'OK',
      data: result
    })
  }
}
const ProductServices = {
  getList: async () => {
    return ProductModel.find({})
  }
}


 被折叠的 条评论
为什么被折叠?
被折叠的 条评论
为什么被折叠?
 到【灌水乐园】发言


