


文章摘要
一、非JSON格式的数据
1.普通请求 ( 参数列表直接声明接收 )
前端请求: http://localhost:8080/user/001?username=jack&password=12345688
@RestController
@RequestMapping("/user")
public class UserController {
	//这里用RequestMapping() 是因为可以接收前端任意方式的请求,例:GET、POST...
    @RequestMapping("/001")
    public String save(String username, String password){
        System.out.println("username:  "+username);
        System.out.println("password:  "+password);
        return "success";
    }
}	 //如果前端声明了很多请求参数这种会蛮烦,演变成了下面的用实体类接收
前端: 请求参数名 <<==>> 后端: 接收参数名 两者要保持一致
2.普通请求 ( 用实体类接收 )
前端请求: http://localhost:8080/user/002?username=jack&password=12345688
@RestController
@RequestMapping("/user")
public class UserController {

	@RequestMapping("/002")
	public String save2(User user){
        System.out.println(user);
        return "success";
    }

}
后端: 接收类里的属性名 <<==>> 前端: 请求参数名字 两者要保持一致 (否则接收不到为null)
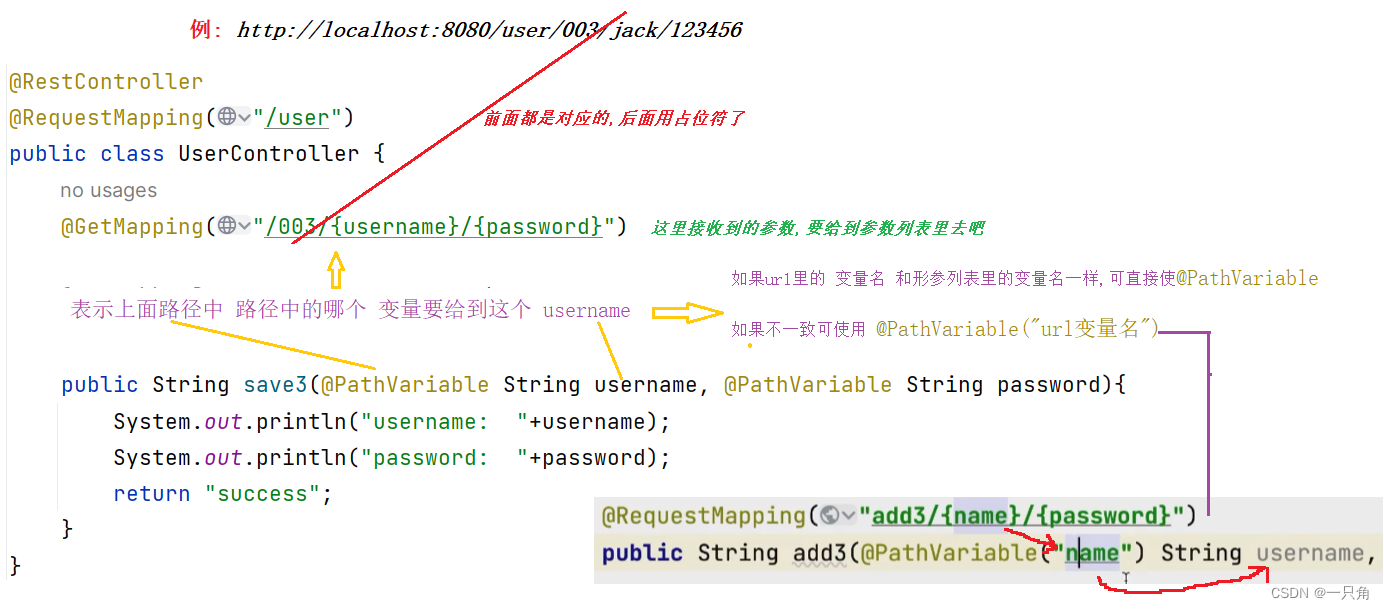
3.RestFul风格请求 @PathVariable
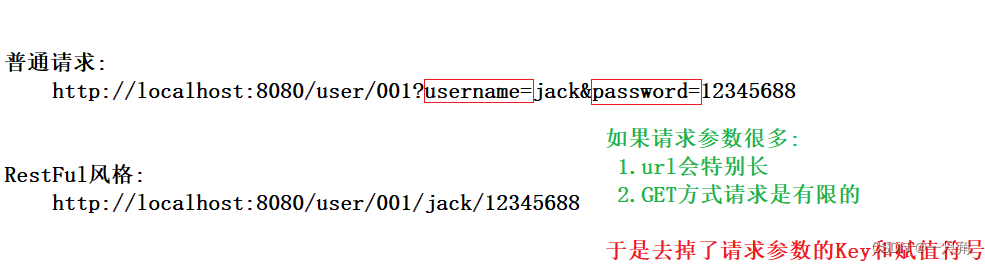
例如: ( 如果接收有异常,会报500错误 )
4.普通请求 ( 用HttpServletRequest对象 直接接受 )
前端请求:http://localhost:8080/user/004?username=jack&password=123456
@RestController
@RequestMapping("/user")
public class UserController {

	@RequestMapping("/004")
    public String save4(HttpServletRequest request){
        //request对象中的数据是以 key-value键值对存储的
        //key就是前端的参数名称username=jack (key就是username)
        String username = request.getParameter("username");
        String password = request.getParameter("password");
        System.out.println("username:  "+username);
        System.out.println("password:  "+password);
        return "success";
    }

}
二、JSON格式的数据
1.直接使用实体类对象来接收 @RequestBody
前提: 前端提交数据时,数据类型要选择JSON格式的
前端请求:http://localhost:8080/user/005

请求的数据如下:
{
"username":"xiaoming",
"password":"888"
}
@RestController
@RequestMapping("/user")
public class UserController {

	@RequestMapping("/005")
    public String save5(@RequestBody User user){
        System.out.println(user);
        return "success";
    }

}
如果前端JSON中的key和后端实体类里的字段名 不一致,后端接收为null
2.使用Map集合来接收 @RequestBody
前端请求:http://localhost:8080/user/006

请求的数据如下:
{
"username":"xiaoming",
"password":"888"
}
@RestController
@RequestMapping("/user")
public class UserController {

	@RequestMapping("/006")
    public String save6(@RequestBody Map map){
        String username = (String) map.get("username");
        String password = (String) map.get("password");
        System.out.println("username:  "+username);
        System.out.println("password:  "+password);
        return "success";
    }

}
如果Map前不使用@RequestBody注解,后端map就拿不到值
三、小总结
只要前端传递的是JSON数据, 后端接收时必须使用 @RequestBody 注解


 977
977


 被折叠的 条评论
为什么被折叠?
被折叠的 条评论
为什么被折叠?
 到【灌水乐园】发言


