


建立浏览窗口 导入ttk模块使用里面的Treeview控件【from tkinter import ttk】用来搭建,ttk是新出的GUI会覆盖掉tkinter库,它比tkinter的界面更简洁美观,在包含tkinter库的基础上增加了一些新的控件,并删除了一些fg,bg这些属性,ttk库中的这些属性用style类来定义,可以定义一次多次使用,增加了代码的简洁度。
| columns | 列标识的列表,定义了列的数量和名称。 |
| height | 指定可见的行数。注意:所需宽度由各列宽度之和决定。 |
| padding | 指定控件内部的留白。为不超过四个元素的长度列表。 |
| show | 由0个或下列值组成的列表,指定要显示树的哪些元素。
默认为“tree headings”,显示所有元素。 ** 注意** :第 #0 列一定是指 tree 列,即便未设置 show="tree" 也一样。 |
from tkinter import *
from tkinter import ttk
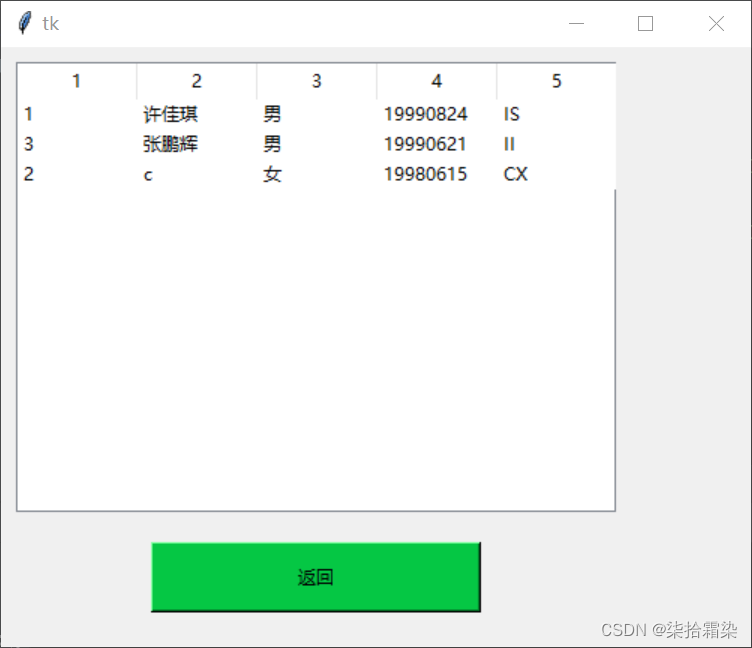
array1=['1','许佳琪','男','19990824',"IS"]
array2=['2','c','女','19980615','CX']
array3=['3','张鹏辉','男','19990621','II']
ayy=[array1,array2,array3]
def A5(): # 浏览
r5 = Tk()
r5.geometry('500x400')
t = ttk.Treeview(r5, show='headings', height=10)#show='headings'设置
t['columns'] = ['工号', '姓名', '性别', '出生日期', '职位'] # 表格头
t.place(x=10, y=10, width=400, height=300)
t.column('工号', width=80) # 单元格的宽度
t.column('姓名', width=80)
t.column('性别', width=80)
t.column('出生日期', width=80)
t.column('职位', width=80)
t.heading('工号', text='1')
t.heading('姓名', text='2')
t.heading('性别', text='3')
t.heading('出生日期', text='4')
t.heading('职位', text='5')
for i in ayy:
value=(i[0],i[1],i[2],i[3],i[4])
t.insert(parent='',index=1,values=value)
b=Button(r5,text='返回',width=30,height=2,bg='#05c744',command=r5.destroy)
b.place(x=100,y=330)
r5.mainloop()
A5()t['columns'] = ['工号', '姓名', '性别', '出生日期', '职位'] 【是Treeview的一个属性可以加进去】
t = ttk.Treeview(r5, show='headings', height=10,columns=('工号', '姓名', '性别', '出生日期', '职位'))【show='headings'隐藏首列【就是#0列】,height显示10行,columns对应的列】
t.column('工号', width=80)【根据第一个设置对应列的宽度】
t.heading('工号', text='1')【根据第一个设置对应列的列标题,这里的text就是在窗口上显示的】
或者换一下方便理解
t['columns']=('1', '2', '3', '4', '5')【list,tuple均可】【设置5列对应str类型的1,2,3,4,5,】
t.column('1',width=80)【设置第一列的宽度】
t.column('1',text='工号')【设置第一列的列标题】
t.insert()
value:类似column
parent:父组件【类似两个不同文件夹下建立相同的文件,这里没有向上文件夹所以为空】
index:插入的位置【index 是整数或“end”。如果 index 小于等于0,则在开头插入新节点;如果 index 大于或等于当前子节点数,则将其插入末尾】
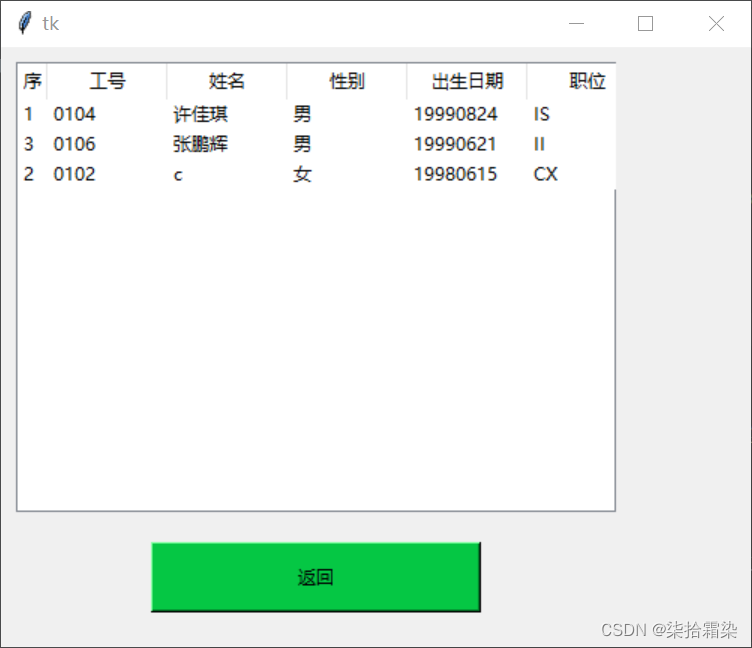
这里我用的是整数看图第三行被插在了第一行后【注意我的表里面的第一列是工号,工号在一开始就设置的列表中,当工号乱序时,该表则看不出,可以在加一行形成行号,便于观察】
加上之后的【这里更改了工号】序号的宽度设置小了,
from tkinter import *
from tkinter import ttk

array1=['0104','许佳琪','男','19990824',"IS"]
array2=['0102','c','女','19980615','CX']
array3=['0106','张鹏辉','男','19990621','II']
ayy=[array1,array2,array3]
def A5():  # 浏览
    r5 = Tk()
    r5.geometry('500x400')
    t = ttk.Treeview(r5, show='headings', height=10,columns=('0','1', '2', '3', '4', '5'))#show='headings'设置
    #t['columns'] = ['工号', '姓名', '性别', '出生日期', '职位']  # 表格头
    t.place(x=10, y=10, width=400, height=300)

    t.column('0',width=20)
    t.column('1', width=80)  # 单元格的宽度
    t.column('2', width=80)
    t.column('3', width=80)
    t.column('4', width=80)
    t.column('5', width=80)

    t.heading('0',text='序号')
    t.heading('1', text='工号')
    t.heading('2', text='姓名')
    t.heading('3', text='性别')
    t.heading('4', text='出生日期')
    t.heading('5', text='职位')
    j=0
    for i in ayy:
        j+=1
        value=[j,i[0],i[1],i[2],i[3],i[4]]
        t.insert(parent='',index=1,values=value)
    b=Button(r5,text='返回',width=30,height=2,bg='#05c744',command=r5.destroy)
    b.place(x=100,y=330)
    r5.mainloop()
A5()
更改index观察出来的表格,数据有限可以增加数据观察更改各个属性熟悉各个属性的作用
链接数据库,序号没有写
from tkinter import *
from tkinter import ttk
import pyodbc

def A5():  # 浏览
    r5 = Tk()
    r5.geometry('500x400')
    t = ttk.Treeview(r5, show='headings', height=20)
    co = pyodbc.connect('DRIVER={sql server};SERVER=127.0.0.1;DATABASE=rsgldb')
    yb = co.cursor()
    s = "select * from rs"
    yb.execute(s)
    arr = yb.fetchone()
    t['columns'] = ['工号', '姓名', '性别', '出生日期', '职位']  # 表格头
    t.place(x=10, y=10, width=400, height=300)

    t.column('工号', width=80)  # 单元格的宽度
    t.column('姓名', width=80)
    t.column('性别', width=80)
    t.column('出生日期', width=80)
    t.column('职位', width=80)

    t.heading('工号', text='1')
    t.heading('姓名', text='2')
    t.heading('性别', text='3')
    t.heading('出生日期', text='4')
    t.heading('职位', text='5')

    while arr:
        value = (arr[0], arr[1], arr[2], arr[3], arr[4])
        t.insert('', 1, values=(value))
        arr = yb.fetchone()
    yb.close()
    co.close()
    b=Button(r5,text='返回',width=30,height=2,bg='#05c744',command=r5.destroy)
    b.place(x=100,y=330)
    r5.mainloop()
A5()
组合五个模块就是一个简单的人事管理了,这部分先到此结束。后续增加导入导出excel的区域。


 1003
1003


 被折叠的 条评论
为什么被折叠?
被折叠的 条评论
为什么被折叠?
 到【灌水乐园】发言


