


前言:
权限不是越大越好,不仅意味着不安全,还可能导致某些功能无法正常运行
1. 背景一
故事要从几天前的网易有数迁移说起,因为考虑更换云供应商,将其迁移到了另一家的计算资源上,但是启动时报权限错误,日志显示permission denied,大意是权限错误,应为700。查看权限为777,当时很奇怪明明777 > 700,为什么还会报错,搁置了疑问,按照提示更改文件权限后,成功启动。
2. 背景二
最近新入一批机器,批量配置免密时,发生了一些错误,表现为免密命令没有任何报错,但是再次连接提示仍然需要密码,考虑两点
(1)ssh策略是否正确
输入:
vim /etc/ssh/sshd_config确定以下三段配置正确,含义如下:
PermitRootLogin yes # 允许root用户登录
PubkeyAuthentication yes # 允许公钥认证
AuthorizedKeysFile .ssh/authorized_keys # 认证文件保存位置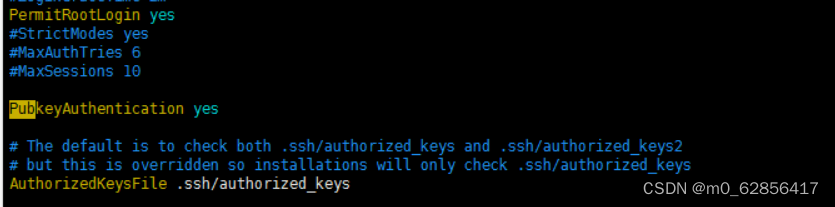 发现配置文件被更改,无法免密登录,再次做免密,仍然需要密码,继续排查
(2)考虑是否有权限异常
输入:
cat /var/log/secure # 查看是否认证有被阻断发现有错误日志,Authentication refused: bad ownership or modes for file /root/.ssh/authorized_keys
或者 Authentication refused: bad ownership or modes for directory /root/.ssh
由于免密相关的各类公私钥认证文件对权限要求很严格,所以会发生此类错误
![]()
(3)解决方法:
对报错的目录或文件做权限更改 类似:
chmod 700 /root权限可参考:
-->/root目录权限为:700
-->.ssh目录权限为:700
-->id_rsa:私钥,相当于"锁"。文件权限:600,不能更改。
-->id_rsa.pub:公钥,相当于"钥匙"。文件权限:644,不能更改。
-->authorized_keys:认证文件,记录"别人"(即:对端)给你的公钥“钥匙”。文件权限:600,不能更改。
-->known_hosts:“指纹”文件,记录首次SSH互信认证"别人"(即:对端)留给你的“指纹”信息。文件权限:600,不能更改。
参考:Linux服务器配置SSH免密码登录后,登录仍提示输入密码(一次真实的问题排查解决记录)_ssh免密设置后仍然需要密码_小黑要上天的博客-CSDN博客
3. 最后分享一段一直自用的免密脚本:
设置变量后,按提示使用
#!/bin/bash

# ur input should like that sh /path/to/passfree.sh "192.168.40.1,192.168.40.2……"

get_cmd_real_output() {
    # 接收要执行的命令作为函数参数
    local command="$1"

    # 将命令输出保存到临时文件
    local cmd_output
    cmd_output=$(eval "$command")
    echo "$cmd_output" > temp_file_get_cmd_real_output.txt
    # $cmd_output 2>&1 | tee temp_file_get_cmd_real_output.txt

    # 读取文件内容到变量中,保留换行符
    local val
    val=$(<temp_file_get_cmd_real_output.txt)
    # read -r val < temp_file_get_cmd_real_output.txt

    # 删除临时文件
    rm temp_file_get_cmd_real_output.txt

    # 将结果返回
    echo -e "$val"
}

print_colored_text() {
    local color="$1"
    local text="$2"
    local reset="\033[0m"

    if [[ "$color" =~ ^([0-7]|3[0-7]|4[0-7])$ ]]; then
        echo -e "\033[${color}m$text$reset"
    else
        echo "无效的颜色代码: $color"
    fi
# 函数:print_colored_text
# 参数:$1为颜色代码,$2为文本内容
# 颜色代码:
#   0: 默认颜色(重置)
#   1: 加粗
#   4: 下划线
#   5: 闪烁
#   7: 反显
#   30-37: 前景色
#   30:黑色
#   31:红色 *
#   32:绿色 *
#   33:黄色 *
#   34:蓝色
#   35:紫色
#   36:青色 *
#   37:白色
#   40-47: 背景色
    # 判断是否是有效的颜色代码
}

set_ssh_keyless_login() {

    # local authorized_keys_file="$ssh_dir/authorize0d_keys"
    # 多个目标主机的 IP 地址列表

    mkdir -p $ssh_dir
    # chown $ssh_dir "$username":"$username"
    # chmod 700 $ssh_dir

    # 生成密钥对,如果已经存在则跳过
    if [ ! -f "$ssh_dir/id_rsa" ]; then
        print_colored_text 36 "info: 检测到密钥未生成,正在生成中"
        # temp_ans=$(echo "$ssh_dir"/id_rsa | ssh-keygen -t rsa)
        temp_ans=$(get_cmd_real_output "stdbuf -o 0 echo \"$ssh_dir\"/id_rsa | ssh-keygen -t rsa")

        if [[ "$temp_ans" == *"randomart"* ]] && [[ "$temp_ans" == *"fingerprint"* ]]; then
            print_colored_text 32 "SUCCESS: 密钥生成成功"
        else
            print_colored_text 31 "ERROR: 密钥生成失败,请查看回返内容。"
        fi
    else
        print_colored_text 36 "info:检测到密钥已经存在"
    fi

    # cat "$ssh_dir/id_rsa.pub" >> $authorized_keys_file
    # chmod 600 $authorized_keys_file

    # 使用 ssh-copy-id 自动复制公钥到多个远程主机
    for host in "${target_hosts[@]}"; do
        print_colored_text 36 "info:正在向 $host 发送密钥……"

        temp_ans2=$(get_cmd_real_output "stdbuf -o 0 sshpass -p '$password' ssh-copy-id -i $ssh_dir/id_rsa.pub -p \"$port\" -o StrictHostKeyChecking=no \"$username\"@\"$host\"")
        # debug line below
        # print_colored_text '36' "stdbuf -o 0 sshpass -p '$password' ssh-copy-id -i $ssh_dir/id_rsa.pub -p \"$port\" -o StrictHostKeyChecking=no \"$username\"@\"$host\""

        if [[ "$temp_ans2" == *"Number of key(s) added: 1"* ]]; then
            # clear
            print_colored_text 32 "SUCCESS: $host 密钥分发成功"
        elif [[ "$temp_ans2" == *"already"* ]]; then
            print_colored_text 31 "ERROR: 密钥分发失败,请查看回返内容。"
        fi
    done

}

password=''            # 密码
username="root"        # 需要免密的远端用户
ssh_dir="/root/.ssh"   # 认证等文件存放位置
port="22"              # ssh端口
# 使用方法 sh passfree.sh "1.1.1.1,2.2.2.2"
#                    ║       ╚══ IP 列表
#                    ╚══════════ 脚本路径
sudo yum install -y sshpass
temp="$1"
IFS=','
read -ra target_hosts <<< "$temp"
IFS=' '
set_ssh_keyless_login

rm $0 # 建议保留这一行,防止密码泄露


 5410
5410


 被折叠的 条评论
为什么被折叠?
被折叠的 条评论
为什么被折叠?
 到【灌水乐园】发言


