


目录
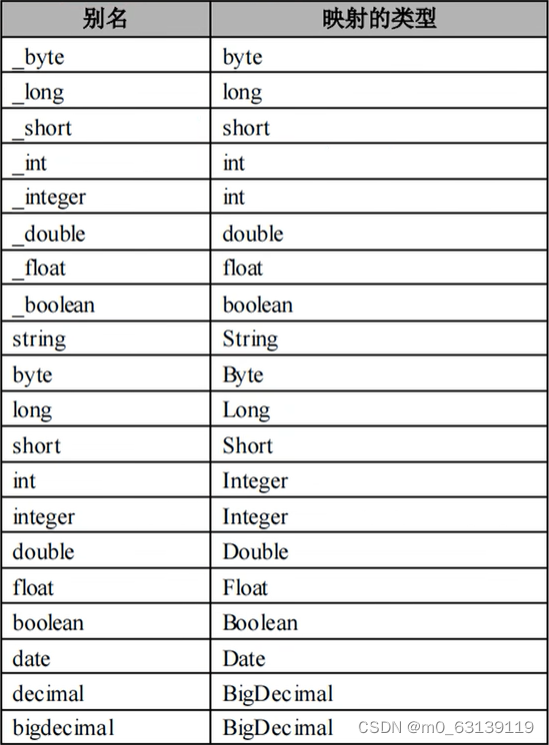
接口XXXMapper.class 和 XXXMapper.xml映射类型名
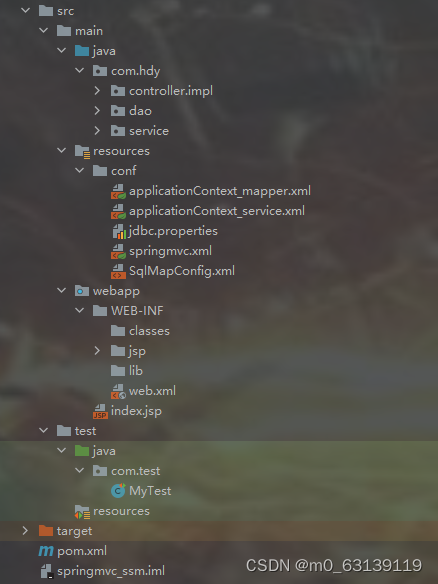
2、applicationContext_mapper.xml
3、applicationContext_service.xml
一、Mybatis

1、pom.xml
<dependencies>标签中添加依赖
<!--mybatis依赖-->
    <dependency>
      <groupId>org.mybatis</groupId>
      <artifactId>mybatis</artifactId>
      <version>3.5.8</version>
    </dependency>

    <!--mysql依赖-->
    <dependency>
      <groupId>mysql</groupId>
      <artifactId>mysql-connector-java</artifactId>
      <version>5.1.45</version>
    </dependency>
<build>标签中指定资源文件位置
    <resources>
      <resource>
        <directory>src/main/java</directory>
        <includes>
          <include>**/*.xml</include>
          <include>**/*.properties</include>
        </includes>
      </resource>

      <resource>
        <directory>src/test/java</directory>
        <includes>
          <include>**/*.xml</include>
          <include>**/*.properties</include>
        </includes>
      </resource>
    </resources>
2、jdbc.properties
jdbc.driverClassName=com.mysql.jdbc.Driver
jdbc.url=jdbc:mysql://localhost:3306/s_t?useUnicode=true&characterEncoding=utf8
jdbc.username=root
jdbc.password=000
3、SqlMapperConfig.xml
内容详情:
- <properties>读取jdbc.properties属性
- <settings>标签设置日志
- 设置别名
- <typeAlias>设置单个实体类别名
- <typeAliases><package /></typeAliases>设置包下的全部实体类别名
- <environments>配置环境变量
- 配置事务管理器
type:指定事务管理的方式
JDBC:事务的控制交给程序员处理
MANAGED:有容器(spring)来管理事务 - 配置数据源
type:指定不同的配置方式
JNDI:Java命名目录接口,在服务器端进行数据库连接池的管理,表示使用上下文中的数据源
POOLED:使用数据库连接池
UNPOLLED:不使用数据库连接池 - -配置数据库连接的基本参数
private String driver;
private String url;
private String username;
private String password;
- 配置事务管理器
- <mappers>注册mapper.xml文件
- 单个注册 <mapper class="com.bjpowernode.mapper.CourseMapper"></mapper>
- 批量注册 <package name="com.bjpowernode.mapper"/>
- 属性名解析
- resource:从resources目录下找指定名称的文件注册
- url:使用绝对路径注册
- class:动态代理方式下的注册
<?xml version="1.0" encoding="utf-8" ?>
<!DOCTYPE configuration PUBLIC "-//mybatis.org//DTD Config 3.0//EN"
        "http://mybatis.org/dtd/mybatis-3-config.dtd">

    <!--读取属性文件(jdbc.properties)
        属性:resources:从resources目录下找指定名称的文件加载
             url:使用绝对路径加载属性文件
    -->
<configuration>
    <!--读取jdbc.properties属性-->
    <properties resource="jdbc.properties"></properties>


    <!--
        设置日志输出底层执行的代码
        name和value中的值都是固定的
    -->
    <settings>
        <setting name="logImpl" value="STDOUT_LOGGING"/>
    </settings>


    <!--注册实体类的别名-->
        <!--
            单个实体类别名的注册:
            可以在将替代为parameterType="student"
                         resultType="student"
            <typeAlias type="com.bjpowernode.pojo.Student" alias="student"></typeAlias>
        -->

    <typeAliases>
        <!--
            批量注册别名
            别名是类名的驼峰命名法(规范)
        -->
        <package name="com.bjpowernode.pojo"/>
    </typeAliases>


    <!--配置环境变量-->
    <!--
        配置数据库的环境变量
        当需要使用时,default选取id中的值,即可选择指定的数据库配置
    -->
    <environments default="development">
        <environment id="development">
            <!--配置事务管理器
                type:指定事务管理的方式
                JDBC:事务的控制交给程序员处理
                MANAGED:有容器(spring)来管理事务
            -->
            <transactionManager type="JDBC"></transactionManager>
            <!--配置数据源
                type:指定不同的配置方式
                JNDI:Java命名目录接口,在服务器端进行数据库连接池的管理,表示使用上下文中的数据源
                POOLED:使用数据库连接池
                UNPOLLED:不使用数据库连接池
            -->
            <dataSource type="POOLED">
                <!--配置数据库连接的基本参数
                    private String driver;
                    private String url;
                    private String username;
                    private String password;
                -->
                <property name="driver" value="${jdbc.driverClassName}"/>
                <property name="url" value="${jdbc.url}"/>
                <property name="username" value="${jdbc.username}"/>
                <property name="password" value="${jdbc.password}"/>
            </dataSource>
        </environment>
    </environments>


    <!--注册mapper.xml文件
        resource:从resources目录下找指定名称的文件注册
        url:使用绝对路径注册
        class:动态代理方式下的注册
    -->
    <mappers>
        <mapper class="com.bjpowernode.mapper.CourseMapper"></mapper>
        <!--批量注册
            <package name="com.bjpowernode.mapper"/>
        -->
    </mappers>
</configuration>
4、XXXMapper.xml
<?xml version="1.0" encoding="utf-8" ?>
<!DOCTYPE mapper PUBLIC "-//mybatis.org//DTD Mapper 3.0//EN"
        "http://mybatis.org/dtd/mybatis-3-mapper.dtd">
<!--
    mapper:是整个文件的大标签,用来开始和结束xml文件
    属性:namespace:指定命名空间(相当于包名),用来区分不同mapper.xml文件中相同的id属性
-->
<mapper namespace="zar">
    <!--
        完成查询全部学生的功能
        List<Student> getAll();
            resultType:指定查询返回的结果集的类型,如果是集合,则必须是泛型的类型
            parameterType:如果有参数,则通过他来指定的参数类型
            (如果传递的参数有两个或以上就不需要写 parameterType)
    -->
    <select id="getAll" resultType="com.bjpowernode.pojo.Student">
        select sno,sname,ssex,sage,sdept from student
    </select>

    <!--
        按主键sno查询学生信息
        Student getById(String sno);
    -->
    <select id="getBySno" parameterType="string" resultType="com.bjpowernode.pojo.Student">
        select sno,sname,ssex,sage,sdept
        from student
        where sno like '%${sno}%'
    </select>

    <!--
        增加学生
        int insert(Student stu);
        #{?}:中括号中内容为实体类中定义的属性名
            private String sno;
            private String sname;
            private String ssex;
            private Integer sage;
            private String sdept;
    -->
    <insert id="insert" parameterType="com.bjpowernode.pojo.Student">
        insert into student (sno,sname,ssex,sage,sdept) values (#{sno}, #{sname}, #{ssex}, #{sage}, #{sdept})
    </insert>

    <!--
        删除学生
        int delete(String sno);
    -->
    <delete id="delete" parameterType="int">
        delete from student where sno like '%${sno}%'
    </delete>

    <!--
        更新学生
        int update(Student stu);
    -->
    <update id="update" parameterType="com.bjpowernode.pojo.Student">
        update student set sno=#{sno}, sname=#{sname}, ssex=#{ssex}, sage=#{sage}, sdept=#{sdept}
        where sage=#{sage}
    </update>

<!--
        List<Course> getAllMap();
        使用resultMap手工完成映射
    -->
    <resultMap id="courseMap" type="course">
        <!--主键绑定
            property 中的值要和实体类中的主键属性名一直
            column 中的值要和数据库中的主键列名一直
        -->
        <id property="cno" column="cno"></id>
        <!--非主键绑定
            property
            column      中的值和主键绑定用法一样
        -->
        <result property="cname" column="cname"></result>
        <result property="cpno" column="cpno"></result>
        <result property="ccredit" column="ccredit"></result>

        <!--当一方有另一方的集合或一对多,则使用此完成映射   <collection property="" column=""></collection>
            当一方持有另一方的对象或多对一时,则使用此映射   <association property="" javaType=""></association>

            <collection property="" column="">
            主键绑定
                property 中的值要和实体类中的主键属性名一直
                column 中的值要和数据库中的主键列名一直

            <id property="cno" column="cno"></id>
             非主键绑定
                property
                column      中的值和主键绑定用法一样

            <result property="" column=""></result>

            </collection>
        -->
    </resultMap>
    <select id="getAllMap" resultMap="courseMap">
        select cname, cpno, ccredit
        from course
    </select>


    <!--
        多表映射查询
        <resultMap id="courseMap" type="course">
            <id property="cno" column="cno"></id>

            <result property="cname" column="cname"></result>


         ///这边放置的就是 表table2 绑定的
            <collection property="" column="">
                <id property="" column=" "></id>

                <result property="" column=""></result>
            </collection>
        </resultMap>

        <select id="getAllMap" resultMap="courseMap">
            select cname, cpno, ccredit
            from table1 t1 inner join table2 t2 on t1.a=t2.b
        </select>
        即分别给 table1表 取别名 t1 ,给 table2表 取别名 t2
        关联两表中等价的属性值查找,即 t1 中的 a列值 与 t2 中的 b列值 相等
        此外,inner 指两表等价
             left 指重点在于左表
             right 指重点在于右表
    -->
</mapper>
指定参数位置
18.指定参数位置
如果入参是多个,可以通过指定参数位置进行传参,是实体包含不住的条件.实体类只能封装住成员变量的条件.如果某个成员变量要有区
间范围内的判断,或者有两个值进行处理,则实体类包不住.
例如:查询指定日期范围内的用户信息.

<!--
//查询指定日期范围内的用户
List<Users> getByBirthday (Date begin, Date end) ;
-->
<select id="getByBirthday" resultType="users/>
select <include refid="allCo1umns"> </ inqlude>
from users
where birthday between #{arg0} and #{arg1}
</ select>
字符串替换
需求:模糊地址或用户名查询
select * from users where username like 18小8' ;
select * from users where address like 18市8 '

<!--
//模糊用户名和地址查询
//如果参数超过一个,则parameterType不写
//接口语句
-->
List<Users> getByNameOrAddress (
        @Param ("columnName") ===>为 了在sq1语句中使用的名称
        String columnName ,
        @Param ("columnValue") ===> 为 了在sq1语句中使用的名称
        String columnValue) ;
//xml语句
<select id="getByNameOrAddress" resultType="users">
    select id,username , bi rthday , sex , address
    from users
    where $ {columnName} like concat('8' ,#{columnValue},'8') == =>此处使用的是0Param注解里的名称
</ select>
#{}占位符和${}占位符
#{}占位符
传参大部分使用#{}传参,它的底层使用的是Preparedstatement对象,是安全的数据库访问,防止sql注入.
#{}里如何写,看parameterType参数的类型

1)如果parameterType的类型是简单类型(8种基本(封装)+String),则#{}里随便写.
<select id="getById" parameterType="int" resultType="users"> == == =>入参类型是简单类型
    select id, username , bi rthday , sex, address
    from users
    where id=#{zar} ===>随便写
</select>

2) parameterType的类型是实体类的类型,则#{}里只能是类中成员变量的名称,而且区分大小写.
<insert id=" insert" parameterType= ="users" > === => 入参是实体类
    insert into users (username, birthday, sex, address) values (# {userName} ,
    #{birthday},#{sex} ,#{address}) == =>成员变量名称
</insert>


${}字符串拼接或字符串替换
1)字符串拼接,一般用于模糊查询中.建议少用,因为有sql注入的风险.
也分两种情况,同样的看parameterType的类型

A.如果parameterType 的类型是简单类型,则${}里随便写,但是分版本,如果是3.5.1及以下的版本,只以写value.
<select id="getByName" parameterType=" string" resultType="users"> === =>入参是简单类型
    select id, username , birthday , sex , address
    from users
    where username like ' 8${zar}8'== =>随便写
</select>

B.如果parameterType的类型是实体类的类型,则${}里只能是类中成员变量的名称.(现在已经少用)
C.优化后的模糊查询(以后都要使用这种方式)
<select id="getByNameGood" parameterType=" string" resultType="users">
    select id, username , birthday , sex , address
    from users
    where username like concat('8' ,#{name}, 181)
</ select>
返回主键值
在插入语句结束后,返回自增的主键值到入参的users对象的id属性中.
<insert id=" insert" parameterType="users" > >
    <selectKey keyProperty="id" resultType="int" order="AFTER">
        select last_ insert_ id()
    </ selectKey>
    insert into users (username, birthday, sex, address) values (# {userName} , #{birthday}
    ,#{sex} , #{address})
</ insert>

<selectKey>标签的参数详解:
    keyProperty:users对象的哪个属性来接返回的主键值
    resultType:返回的主键的类型
    order:在插入语句执行前,还是执行后返回主键的值


UUID这是一个全球唯---字符串,由36个字母数字中划线组.
UUID uuid = UUID. randomUUID() ;
System. out . println (uuid. toString() . replace("-", "") . substring(20)) ;
入参是map
入参是map(重点掌握)
如果入参超过一一个以.上,使用map封装查询条件,更有语义,查询条件更明确.
    <!--
        //入参是map
        List<Users> getByMap (Map map) ;
        # {birthdayBegin} :就是map中的key
    --->
<select id="getByMap" resultType="users" >
    select <include refid="allColumns"> </ include>
    from users
    where birthday between # {birthdayBegin} and # [birthdayEnd|
</ select>

测试类中
@Test
public void testGetByMap() throws ParseException {
Date begin = sf.parse("1999-01-01") ;
Date end = sf.parse("1999-12-31") ;
Map map = new HashMap<>() ;
map. put ("birthdayBegin" ,begin) ;
map. put ("pirthdayEnd, end) ;
List<Users> list = uMapper . getByMap (map) ;
list. forEach (users -> System. out . println (users)) ;
}
接口XXXMapper.class 和 XXXMapper.xml映射类型名
动态代理的实现规范:
- UsersMapper. xml文件与UsersMapper. java的接口必须同-一个目录下。
- UsersMapper. xml文件与UsersMapper. java的接口的文件名必须一致,后缀不管.
- Use rMapper . xml文件中标签的id值与与UserMapper. java的接口中方法的名称完全一- 致.
- UserMapper . xml文件中标签的parameterType属性值与与UserMapper . java的接口中方法的参数类型完全一致.
- UserMapper . xml文件中标签的resultType值与与UserMapper . java的接口中方法的返回值类型完全一致.
- UserMapper . xml文件中namespace属性必须是接口的完全限定名称com. bj powernode . mapper . UsersMapper
- 在SqlMapConfig . xml文件中注册mapper文件时,使用class=接口的完全限定名称com. bjpowernode . mapper .UsersMapper.
动态代理访问的步骤
- 建表Users
- 新建maven工程,刷新可视化
- 修改目录
- 修改pom.xml文件,添加依赖
- 添加jdbc . propertis文件到resources目录下
- 添加sqlMapConfig . xml文件
- 添加实体类
- 添加mapper文件夹,新建UsersMapper接口
- 在mapper文件夹“下,新建UsersMapper. xml文件,完成增删改查功能
- 添加测试类,测试功能
<sql>标签封装SQL语句或字段,<include>标签引入来调用
<sql id="allColumns">
    cno,cname,cpno,ccredit
</sql>

<select id="getByCpnos" resultType="course">
        select
            <include refid="allColumns"></include>
        from course
        where cpno in
        (
            <foreach collection="array" item="cpno" separator=",">
                #{cpno}
            </foreach>
        )
</select>
<foreach>循环遍历
参数详解:
- collection:用来指定入参的类型,如果是List集合,则为1ist,如果是Map集合,则为map,如果是数组,则为array.
- item:每次循环遍历出来的值或对象
- separator:多个值或对象或语句之间的分隔符
- open:整个循环外面的前括号
- close:整个循环外面的后括号
用来进行循环遍历,完成循环条件查询,批量删除,批量增加,批量更新.

查询实现
<select id="getByIds" resultType="users">
    select <include refid="allColumns"></include>
    from users
    where id in
    <foreach collection="array" item="id" separator="," open="(" close=")">
        #{id}
    </foreach>
</select>
批量删除实现
<delete id="deleteBatch" >
    delete from users
    where id in
        <foreach collection="array" item="id" separator="," open="(" close=") ">
            #{id}
        </foreach>
</delete>
批量增加实现
<insert id=" insertBatch">
    insert into users (username,birthday, sex, address) values
        <foreach collection="list" item="u" separator="," >
            (#{u. userName} , #{u .birthday} , #{u. sex} , #{u. address})
        </foreach>
</insert>
<set>条件的更新
但是注意至少更新-列,这种方式如果实体类中的成员变量没有给值,则数据库中相应的字段不更改
<update id= "updateContidion" parameterType= "users">
    update users
    <set>
        <if test="userName != null">
            username= #{userName},
        </if>
    </set>
    where id= #{id}
</update>
分页功能
- 添加依赖
<!--分页依赖-->
<dependency>
    <groupId>com.github.pagehelper</groupId>
    <artifactId>pagehelper</artifactId>
    <version>4.1.4</version>
</dependency>- SqlMapperConfig.xml中添加插件
<!--配置分页插件-->
<plugins>
    <plugin interceptor="com.github.pagehelper.pageInterceptor"></plugin>
</plugins>- 使用
@Test
public void pageTest() throws IOException {
   InputStream resource = Resources.getResourceAsStream("mybatisConfig.xml");
   SqlSessionFactory factory = new SqlSessionFactoryBuilder().build(resource);
   SqlSession sqlSession = factory.openSession();
   studentMapper = sqlSession.getMapper(StudentMapper.class);

   //数据操作前设置分页
   PageHelper.startPage(1, 3);
   List<Student> list = studentMapper.getAll();
   list.forEach(student -> System.out.println(student));
   sqlSession.close();
}
5、 test测试
//***在所有的增删改查后必须手工提交事务!!!
这是直接使用xml文件中的方式
    @Test
    public void testA() throws IOException {
        //使用文件流读取核心配置文件SqlMapperConfig.xml
        InputStream in1 = Resources.getResourceAsStream("SqlMapConfig.xml");
        //创建SqlSessionFactory工厂
        SqlSessionFactory factory = new SqlSessionFactoryBuilder().build(in1);
        //取出sqlSession的对象
        SqlSession sqlSession = factory.openSession();
        //完成查询操作
        List<Student> list = sqlSession.selectList("zar.getAll");
        list.forEach(student -> System.out.println(student));
        //关闭sqlSession
        sqlSession.close();
    }


这是通过XXXMapper.class接口方式
    @Test
    public void testGetAll() throws IOException {
        //读取核心配置文件
        InputStream in1 = Resources.getResourceAsStream("SqlMapperConfig.xml");
        //创建工厂对象
        SqlSessionFactory factory = new SqlSessionFactoryBuilder().build(in1);
        //取出sqlSession
        SqlSession sqlSession = factory.openSession();
        /*
        *   执行动作
        * 取出动态代理的对象,完成接口方法中的调用,实则是调用xml文件中相的标签的功能
        */
        CourseMapper courseMapper = sqlSession.getMapper(CourseMapper.class);
        //查看接口类型
        System.out.println(courseMapper.getClass());
        //调用接口方法,mybatis已经为功能代理出来了
        List<Course> list = courseMapper.getAll();
        list.forEach(course -> System.out.println(course));
        //关闭
        sqlSession.close();
    }
二、Spring

1、pom.xml
<!--spring核心IOC-->
<dependency>
      <groupId>org.springframework</groupId>
      <artifactId>spring-context</artifactId>
      <version>5.3.19</version>
</dependency>

<!--aspects依赖-->
<dependency>
      <groupId>org.springframework</groupId>
      <artifactId>spring-aspects</artifactId>
      <version>5.3.19</version>
</dependency>

<!--做spring事务时用到-->
<dependency>
      <groupId>org.springframework</groupId>
      <artifactId>spring-tx</artifactId>
      <version>5.3.19</version>
</dependency>
2、 applicationContext.xml
内容详情:
- 添加包扫描
- 绑定aspectj
- 事务处理
- 添加事务处理器
- 配置数据源
- 添加事务注解的驱动
- 添加事务处理器
<!--添加包扫描,这是将该包下的都创建对象-->
<context:component-scan base-package="com.hdy.s01"></context:component-scan>


<!--创建单个对象-->
<bean id="school" class="com.hdy.pojo2.School"></bean>


<!--绑定aspectj-->
<aop:aspectj-autoproxy></aop:aspectj-autoproxy>


<!--事务处理-->
<!--1、添加事务管理器-->
<bean id="transactionManager" class="org.springframework.jdbc.datasource.DataSourceTransactionManager">
    <!--因为事务必须关联数据库处理,所以要配置数据源-->
    <property name="dataSource" ref="dataSource"></property>
</bean>

<!--2、添加事务的注解驱动-->
<tx:annotation-driven transaction-manager="transactionManager"></tx:annotation-driven>
创建对象赋值
赋值方式
- setter注入
- 简单类型注入值使用value属性
- 引用类型注入值使用ref属性
- 必须要注意:使用setter注入必须提供无参的构造方法,必须提供setXXX()方法.
- 构造方法注入
- 构造方法的参数名称注入
- 构造方法的参数下标注入
- 构造方法的参数默认顺序注入
基于xml的IOC
1)创建对象
<!--创建学生对象
        等同于 Student stu = new Student();
        id:创建对象的名称
        class:创建对象的类型,底层通过反射构建对象
-->
<bean id="stu" class="com. bj powernode . pojo. Student"></bean>


2)给创建的对象赋值
A.使用setter注入
注入分为简单类型注入和引用类型注入
简单类型注入值使用value属性
引用类型注入值使用ref属性
必须要注意:使用setter注入必须提供无参的构造方法,必须提供setXXX()方法.
<!--创建学生对象-->
<bean id="stu" class=" com. bj powe rnode . pojo2. Student">
<property name="name" value=" 李四"></property> = ==>简 单类型注入
<property name="age" value="22"></ property>
<property name=" school" ref=" school"></property> == == => 引用类型注入
</bean>
<!--创建学校对象-->
<bean id=" school" class=" com. bj powernode . pojo2. School">
<property name="name" value= ="清华大学"></property>
<property name="address" value= ="海淀区"></property>
</bean>


B.使用构造方法注入值
<!--创建学校的对象,使用构造方法参数名称注入值-->
<bean id="school" c1 ass="com. bipowe rnode . pojo3. School">
    <constructor-arg name="namel" value="清华 大学"></constructor- arg>
    <constructor-arg name="address1" value="海淀区">< / const ructor-arg>
</bean>

<!--创建学生对象,使用构造方法的参数的下标注入值-->
<bean id="stu" class="comxpowernode. pojo3. Student">
    <constructor-arg index="0" value="钱七"></constructor-arg>
    <constructor-arg index="1" value="22"></const ructor-arg>
    <constructor-arg index="2" ref="school"></constructor-arg>
</bean>

<!--创建学生对象,使用默认的构造方法的参数顺序-->
<bean id=" stuSequence" class="com. bjpowe rnode .pojo3 .Student">
    <constructor-arg value="陈+"></constructor-arg>
    <constructor-arg value="22"></constructor-arg>
    <constructor-arg ref="school"></constructor-arg>
</bean>
基于注解的IOC
注解annotation
- 创建对象的注解
- @Component:可以创建任意对象.
- @Controller:专门用来创建控制器的对象(Servlet),这种对象可以接收用户的请求,可以返回处理结果给客户端.
- @Service:专门用来创建业务逻辑层的对象,负责向下访问数据访问层,处理完毕后的结果返回给界面层.
- @Repository:专门用来创建数据访问层的对象,负责数据库中的增删改查所有操作。
-
依赖注入的注解
- 值类型的注入
- @Value:用来给简单类型注入值
- 引用类型的注入
- @Autowired:使用类型注入值,从整个Bean工厂中搜索同源类型的对象进行注入.
- @Autowired @Qualifier:使用名称注入值,从整个Bean工厂中搜索相同名称的对象进行注入.
- 值类型的注入
AspectJ(掌握)
- AspectJ中常用的通知有四种类型:
- 前置通知@Before
- 后置通知@AfterReturning
- 环绕通知@Around
- 最终通知@After
- 定义切入点@Pointcut
- 切入点规范的公式:
-
execution (访问权限 方法返回值 方法声明(参数) 异常类型)
-
简化后的公式:execution(方法返回值 方法声明(参数) )
-
-
用到的符号:
-
*代码任意个任意的字符(通配符)
-
..如果出现在方法的参数中,则代表任意参数
如果出现在路径中,则代表本路径及其所有的子路径
-
示例:
execution(public * *(..)) :任意的公共方法
execution(* set*(..)) :任何一个以"set"开始的方法
execution(* com.xyz.service.impl.*.*(..)):任意的返回值类型,在com.xyz.service.impl包下的任意类的任意方法的任意参数
execution(* com.xyz.service..*. *(..)):任意的返回值类型, 在com. xyz . service及其子包下的任意类的任意方法的任意参数
com.xyz.service.a.b.*.*(..)
com.xyZ.service.*.*(. .)
execution(* *. .service.*.*(. .)) :service之前可以有任意的子包.
execution(* *.service.*.*(. .)) :service之前只有一 个包
test测试
    @Test
    public void testStudentSpring(){
        /*
        *由spring容器进行对象的创建
        * 要从spring容器中取出对象:首先是要创建容器对象,并且启动才可以取对象
        */
        ApplicationContext ac = new ClassPathXmlApplicationContext("s01/applicationContext.xml");

        Student student = (Student) ac.getBean("stu");
        System.out.println(student);
    }
三、SpringMvc

1、 pom.xml
<dependencies>添加依赖
<!--SpringMVC依赖-->
<dependency>
       <groupId>org.springframework</groupId>
       <artifactId>spring-webmvc</artifactId>
       <version>5.2.21.RELEASE</version>
</dependency>
<!--servlet依赖-->
<dependency>
      <groupId>javax.servlet</groupId>
      <artifactId>javax.servlet-api</artifactId>
      <version>4.0.1</version>
</dependency>
2、springmvc.xml
<?xml version="1.0" encoding="UTF-8"?>
<beans xmlns="http://www.springframework.org/schema/beans"
       xmlns:xsi="http://www.w3.org/2001/XMLSchema-instance"
       xmlns:context="http://www.springframework.org/schema/context"
       xmlns:mvc="http://www.springframework.org/schema/mvc"
       xsi:schemaLocation="http://www.springframework.org/schema/beans
       http://www.springframework.org/schema/beans/spring-beans.xsd
       http://www.springframework.org/schema/context
       https://www.springframework.org/schema/context/spring-context.xsd
       http://www.springframework.org/schema/mvc
       https://www.springframework.org/schema/mvc/spring-mvc.xsd">


    <!--添加包扫描-->
    <context:component-scan base-package="com.hdy.controller"></context:component-scan>
    <!--
        不用添加视图解析器,因为处理的是Ajax请求
        但是必须要添加注解驱动,专门来处理Ajax请求
    -->
    <mvc:annotation-driven></mvc:annotation-driven>
</beans>
3、web.xml
- 中文编码过滤器
- 注册SpringMvc框架
<?xml version="1.0" encoding="UTF-8"?>
<web-app xmlns="http://xmlns.jcp.org/xml/ns/javaee"
         xmlns:xsi="http://www.w3.org/2001/XMLSchema-instance"
         xsi:schemaLocation="http://xmlns.jcp.org/xml/ns/javaee http://xmlns.jcp.org/xml/ns/javaee/web-app_4_0.xsd"
         version="4.0">


    <!--中文编码过滤器配置-->
    <filter>
        <filter-name>encode</filter-name>
        <filter-class>org.springframework.web.filter.CharacterEncodingFilter</filter-class>
    <!--
        配置参数:
        private String encoding;
        private boolean forceRequestEncoding;
        private boolean forceResponseEncoding;
    -->
        <init-param>
            <param-name>encoding</param-name>
            <param-value>utf-8</param-value>
        </init-param>
        <init-param>
            <param-name>forceRestEncoding</param-name>
            <param-value>true</param-value>
        </init-param>
        <init-param>
            <param-name>forceResponseEncoding</param-name>
            <param-value>true</param-value>
        </init-param>
    </filter>
    <filter-mapping>
        <filter-name>encode</filter-name>
        <url-pattern>/*</url-pattern>
    </filter-mapping>


    <!--注册springMVC框架-->
    <servlet>
        <servlet-name>springmvc</servlet-name>
        <servlet-class>org.springframework.web.servlet.DispatcherServlet</servlet-class>
        <init-param>
            <!--
  	            加载配置文件
  	            默认加载规范:
  	            * 文件命名:servlet-name-servlet.xml====springmvc-servlet.xml
  	            * 路径规范:必须在WEB-INF目录下面
  	            修改加载路径:
            -->
            <param-name>contextConfigLocation</param-name>
            <param-value>classpath:springmvc.xml</param-value>
        </init-param>
    </servlet>
    <servlet-mapping>
        <servlet-name>springmvc</servlet-name>
        <!--
            指定拦截什么样的请求:
            http:localhost:8080/index
            http:localhost:8080/index.jsp
            http:localhost:8080/index.action
            <a hrref="${pageContext.request.contextPath}/demo.action">访问服务器</a>
        -->
        <url-pattern>*.action</url-pattern>
    </servlet-mapping>
</web-app>
4、数据提交
post请求会产生中文乱码,而get请求就不会产生这个问题并且name="?", 值需要要变量名一样才能找到
- 单个数据提交
- 参数名称和属性名称一致
- 对象封装提交
- 实体类参数名称和属性名称一致
- 动态占位符提交
- 仅限于超链接或地址栏提交数据,是一斜杠一个值,一缸一大括号
- 使用注解 @PathVariable 来解析
- 如果 {name} 中与 String myname 中变量名不同,可以用 @PathVariable(“name”) String myname来使用
- 映射名称不一样时提交
- 如果 {name} 中与 String myname 中变量名不同,可以用 @RequestParam("name") String myname来使用
- @RequestParam("name")和@PathVariable(“name”)区别:
- @RequestParam("name")是从请求参数中
- @PathVariable("name")是从请求路径中
- 手工数据提交
- 通过(HttpServletRequest httpServletRequest)方式在java文件中赋值 String name = httpServletRequest.getParameter("name");
int age = Integer.parseInt(httpServletRequest.getParameter("age")); - 如果类型不同需要转换成相应的类型
- 通过(HttpServletRequest httpServletRequest)方式在java文件中赋值 String name = httpServletRequest.getParameter("name");
index.jsp
<%@ page contentType="text/html;charset=UTF-8" language="java" %>
<html>
<head>
    <title>Title</title>
</head>
<body>
  <h2>测试不同请求提交方式</h2>
<form action="${pageContext.request.contextPath}/req.action" method="post">
    <input type="submit" value="提交">
</form>
  <br>
<h2>单个数据提交</h2>
  <form action="${pageContext.request.contextPath}/one.action" method="get">
      姓名:<input name="myname"><br>
      年龄:<input name="age"><br>
      <input type="submit" value="提交">
  </form>
  <br>
<h2>对象封装数据提交</h2>
  <form action="${pageContext.request.contextPath}/two.action" method="post">
      姓名:<input name="name"><br>
      年龄:<input name="age"><br>
      <input type="submit" value="提交">
  </form>
<h3>
    post请求会产生中文乱码,而get请求就不会产生这个问题
    并且name="?", 值需要要变量名一样才能找到
</h3><br>
<h2>动态占位符提交</h2>
  <a href="${pageContext.request.contextPath}/three/展示/22.action">动态提交</a>
  <br>
<h2>映射名称不一样</h2>
  <form action="${pageContext.request.contextPath}/four.action" method="post">
      姓名:<input name="name"><br>
      年龄:<input name="age"><br>
      <input type="submit" value="提交">
  </form>
  <br>
<h2>手工提取数据</h2>
  <form action="${pageContext.request.contextPath}/five.action" method="post">
      姓名:<input name="name"><br>
      年龄:<input name="age"><br>
      <input type="submit" value="提交">
  </form>
</body>
</html>
DataSubmitAction
import com.hdy.Users;
import org.springframework.stereotype.Controller;
import org.springframework.web.bind.annotation.PathVariable;
import org.springframework.web.bind.annotation.RequestMapping;
import org.springframework.web.bind.annotation.RequestParam;

import javax.servlet.http.HttpServletRequest;

@Controller
public class DataSubmitAction {
    /*
         姓名:<input name="myname"><br>
         年龄:<input name="age"><br>
    */
    @RequestMapping("/one")
    public String one(String myname, int age){
        System.out.println("myname" + myname + ", age" + age);
        return "one";
    }

    @RequestMapping("/two")
    public String two(Users users){
        System.out.println(users);
        return "two";
    }


    /*
    * <a href="${pageContext.request.contextPath}"/three/展示/22.action>动态提交</a>
    * 仅限于超链接或地址栏提交数据,是一斜杠一个值,一缸一大括号
    * 使用注解 @PathVariable 来解析
    *
    * 如果 {name} 中与 String myname 中变量名不同,可以用 @PathVariable(“name”) String myname来使用
    * */
    @RequestMapping("/three/{name}/{age}")
    public String three(
            @PathVariable String name,
            @PathVariable int age){
        System.out.println("myname" + name + ", age" + age);
        return "three";
    }

    @RequestMapping("/four")
    public String four(
            @RequestParam("name") String myname,
            @RequestParam("age") int uage
            ){
        System.out.println("myname" + myname + ", age" + uage);
        return "four";
    }


    //@RequestParam("name")和@PathVariable(“name”)区别:
    //          @RequestParam("name")是从请求参数中
    //          @PathVariable("name")是从请求路径在


    @RequestMapping("/five")
    public String five(HttpServletRequest httpServletRequest){
        String name = httpServletRequest.getParameter("name");
        int age = Integer.parseInt(httpServletRequest.getParameter("age"));
        System.out.println("myname" + name + ", age" + age);
        return "five";
    }
}
当要解析ajax请求,必须要在springmvc.xml文件中添加注解驱动,还需要添加@ResponseBody
public class StudentListAction {
    @RequestMapping("/list")
    @ResponseBody   //解析ajax请求,必须要在springmvc.xml文件中添加注解驱动
    public List<Student> list(){
        List<Student> list = new ArrayList<>();
        Student stu1 = new Student("Tom", 12);
        Student stu2 = new Student("Jack", 12);
        Student stu3 = new Student("Hony", 12);
        list.add(stu1);
        list.add(stu2);
        list.add(stu3);

        return list;    //springmvc框架负责将集合转为json数组
    }
}
5、转发与重定向
- 请求转发
- 默认是请求转发,使用视图解析器拼接前缀后缀进行页面跳转
- forward: 这组字符串可以屏蔽前缀和后缀的拼接
- 如果不使用 forward 将会是 /admin/ /other.action.jsp 路径就会有问题
return "forward:/other.action";
- 如果不使用 forward 将会是 /admin/ /other.action.jsp 路径就会有问题
- 重定向
- redirect: 这组字符串可以屏蔽前缀后缀的拼接,实现重定向
- redirect: 这组字符串可以屏蔽前缀后缀的拼接,实现重定向
@Controller
public class JumpAction {
    @RequestMapping("/one")
    public String one(){
        System.out.println("这是请求转发页面跳转。。。。。");
        return "main";   //默认是请求转发,使用视图解析器拼接前缀后缀进行页面跳转
    }

    @RequestMapping("/two")
    public String two(){
        System.out.println("这是请求转发action跳转。。。。。");

        //forward: 这组字符串可以屏蔽前缀和后缀的拼接
        //如果不使用 forward 将会是 /admin/   /other.action.jsp 路径就会有问题
        return "forward:/other.action";
    }

    @RequestMapping("/three")
    public String three(){
        System.out.println("这是重定向跳转。。。。。");
        //redirect: 这组字符串可以屏蔽前缀后缀的拼接,实现重定向
        return "redirect:/admin/main.jsp";   //默认是请求转发,使用视图解析器拼接前缀后缀进行页面跳转
    }

    @RequestMapping("/four")
    public String four(){
        System.out.println("这是重定向action跳转。。。。。");
        //redirect: 这组字符串可以屏蔽前缀后缀的拼接,实现重定向
        return "redirect:/admin/other.action";   //默认是请求转发,使用视图解析器拼接前缀后缀进行页面跳转
    }

    SimpleDateFormat sf = new SimpleDateFormat("yyyy-MM-dd");   //可以当做刷子,规定输出样式
    /*
    注册单个日期处理注解
        @RequestMapping("/mydate")
        public String mydate(@DateTimeFormat(pattern = "yyyy-MM-dd")Data mydate){
            System.out.println(mydate);
            System.out.println(sf.format(mydate));
            return "main";
        }
    */

    //注册一个全局的日期处理注解
    @InitBinder
    public void initBinder(WebDataBinder dataBinder){
        dataBinder.registerCustomEditor(Data.class, new CustomDateEditor(sf, true));
    }
    @RequestMapping("/mydate")
    public String mydate(Data mydate){
        System.out.println(mydate);
        System.out.println(sf.format(mydate));
        return "main";
    }
}
@Controller
public class OtherAction {
    @RequestMapping("/other")
    public String other(){
        System.out.println("other的action访问");
        return "main";
    }
}
<%@ page contentType="text/html;charset=UTF-8" language="java" %>
<html>
<head>
<title>Title</title>
</head>
<body>
<a href="${pageContext.request.contextPath}/one.action">1.请求页面跳转(默认)</a><br><br>
<a href="${pageContext.request.contextPath}/two.action">2.请求转发action跳转</a><br><br>
<a href="${pageContext.request.contextPath}/three.action">3.重定向页面</a><br><br>
<a href="${pageContext.request.contextPath}/four.action">4.重定向action</a><br>
<br><br>
<form action="${pageContext.request.contextPath}/mydate.action">
日期:<input type="date" name="mydaye">
<input type="submit" value="提交">
</form>
</body>
</html>
四、ssm整合
1、pom.xml
<dependencies>
        <!--junit-->
        <dependency>
            <groupId>junit</groupId>
            <artifactId>junit</artifactId>
            <version>4.12</version>
            <scope>test</scope>
        </dependency>
        <!--servlet-->
        <dependency>
            <groupId>javax.servlet</groupId>
            <artifactId>javax.servlet-api</artifactId>
            <version>4.0.1</version>
        </dependency>
        <!--jsp-->
        <dependency>
            <groupId>javax.servlet.jsp</groupId>
            <artifactId>jsp-api</artifactId>
            <version>2.2.1-b03</version>
        </dependency>
        <!--springmvc-->
        <dependency>
            <groupId>org.springframework</groupId>
            <artifactId>spring-webmvc</artifactId>
            <version>5.2.21.RELEASE</version>
        </dependency>
        <!--spring事务-->
        <dependency>
            <groupId>org.springframework</groupId>
            <artifactId>spring-tx</artifactId>
            <version>5.3.20</version>
        </dependency>
        <!--spring jdbc-->
        <dependency>
            <groupId>org.springframework</groupId>
            <artifactId>spring-jdbc</artifactId>
            <version>5.3.19</version>
        </dependency>
        <!--spring测试-->
        <dependency>
            <groupId>org.springframework</groupId>
            <artifactId>spring-test</artifactId>
            <version>5.2.22.RELEASE</version>
        </dependency>
        <!--Jackon-->
        <dependency>
            <groupId>com.fasterxml.jackson.core</groupId>
            <artifactId>jackson-databind</artifactId>
            <version>2.13.3</version>
        </dependency>
        <dependency>
            <groupId>com.fasterxml.jackson.core</groupId>
            <artifactId>jackson-core</artifactId>
            <version>2.13.3</version>
        </dependency>
        <dependency>
            <groupId>com.fasterxml.jackson.core</groupId>
            <artifactId>jackson-annotations</artifactId>
            <version>2.13.3</version>
        </dependency>
        <!--mybatis-->
        <dependency>
            <groupId>org.mybatis</groupId>
            <artifactId>mybatis-spring</artifactId>
            <version>2.0.7</version>
        </dependency>
        <dependency>
            <groupId>org.mybatis</groupId>
            <artifactId>mybatis</artifactId>
            <version>3.5.8</version>
        </dependency>
        <dependency>
            <groupId>mysql</groupId>
            <artifactId>mysql-connector-java</artifactId>
            <version>5.1.45</version>
        </dependency>
        <dependency>
            <groupId>com.alibaba</groupId>
            <artifactId>druid</artifactId>
            <version>1.2.9</version>
        </dependency>
    </dependencies>
2、applicationContext_mapper.xml
- 读取属性文件
- 声明数据源,连接数据库
- SqlSessionFactoryBean创建SqlSessionFactory
- 注册mapper.xml
- 声明mybatis的扫描器
<?xml version="1.0" encoding="UTF-8"?>
<beans xmlns="http://www.springframework.org/schema/beans"
       xmlns:xsi="http://www.w3.org/2001/XMLSchema-instance"
       xmlns:context="http://www.springframework.org/schema/context"
       xsi:schemaLocation="http://www.springframework.org/schema/beans http://www.springframework.org/schema/beans/spring-beans.xsd http://www.springframework.org/schema/context https://www.springframework.org/schema/context/spring-context.xsd">

    <!--读取属性文件-->
    <context:property-placeholder location="classpath:conf/jdbc.properties"></context:property-placeholder>
    <!--声明数据源,连接数据库-->
    <bean id="dataSource" class="com.alibaba.druid.pool.DruidDataSource">
        <property name="driverClassName" value="${jdbc.driverClassName}"></property>
        <property name="url" value="${jdbc.url}"></property>
        <property name="username" value="${jdbc.username}"></property>
        <property name="password" value="${jdbc.password}"></property>
    </bean>

    <!--SqlSessionFactoryBean创建SqlSessionFactory-->
    <bean id="sqlSessionFactory" class="org.mybatis.spring.SqlSessionFactoryBean">
        <property name="dataSource" ref="dataSource"></property>
        <property name="configLocation" value="classpath:conf/SqlMapConfig.xml"></property>
        <property name="typeAliasesPackage" value="com.hdy.dao.pojo"></property>
    </bean>

    <!--注册mapper.xml文件-->
    <bean class="org.mybatis.spring.mapper.MapperScannerConfigurer">
        <property name="basePackage" value="com.hdy.dao.mapper"></property>
    </bean>

    <!--声明mybatis的扫描器,创建dao对象-->
    <bean class="org.mybatis.spring.mapper.MapperScannerConfigurer">
        <property name="sqlSessionFactoryBeanName" value="sqlSessionFactory"></property>
        <property name="basePackage" value="com.hdy.dao.mapper"></property>
    </bean>
</beans>
3、applicationContext_service.xml
- 导入applicationContext_mapper.xml整合sm
- 添加service层包扫描,这是将该包下的都创建对象
- 事务处理
- 添加事务管理器
- 因为事务必须关联数据库处理,所以要配置数据源
- 添加事务的注解驱动
- 添加事务管理器
<?xml version="1.0" encoding="UTF-8"?>
<beans xmlns="http://www.springframework.org/schema/beans"
       xmlns:xsi="http://www.w3.org/2001/XMLSchema-instance"
       xmlns:context="http://www.springframework.org/schema/context" xmlns:tx="http://www.springframework.org/schema/tx"
       xmlns:aop="http://www.springframework.org/schema/aop"
       xsi:schemaLocation="http://www.springframework.org/schema/beans http://www.springframework.org/schema/beans/spring-beans.xsd http://www.springframework.org/schema/context https://www.springframework.org/schema/context/spring-context.xsd http://www.springframework.org/schema/tx http://www.springframework.org/schema/tx/spring-tx.xsd http://www.springframework.org/schema/aop https://www.springframework.org/schema/aop/spring-aop.xsd">


    <import resource="applicationContext_mapper.xml"></import>
    <!--声明service的注解所在的包名位置-->
    <context:component-scan base-package="com.hdy.service.impl"></context:component-scan>


    <!--事务配置-->
    <bean id="transactionManager" class="org.springframework.jdbc.datasource.DataSourceTransactionManager">
        <property name="dataSource" ref="dataSource"></property>
    </bean>
    <tx:annotation-driven transaction-manager="transactionManager"></tx:annotation-driven>
</beans>
4、springmvc.xml
内容详情:
- springmvc配置文件,声明controller和其他相关web对象
- 添加注解驱动,专门来处理Ajax请求(不用添加视图解析器,因为处理的是Ajax请求)<mvc:annotation-driven></mvc:annotation-driven>必须是(xmlns:mvc="http://www.springframework.org/schema/mvc")
<?xml version="1.0" encoding="UTF-8"?>
<beans xmlns="http://www.springframework.org/schema/beans"
       xmlns:xsi="http://www.w3.org/2001/XMLSchema-instance"
       xmlns:context="http://www.springframework.org/schema/context"
       xmlns:mvc="http://www.springframework.org/schema/mvc"
       xsi:schemaLocation="http://www.springframework.org/schema/beans http://www.springframework.org/schema/beans/spring-beans.xsd http://www.springframework.org/schema/context https://www.springframework.org/schema/context/spring-context.xsd http://www.springframework.org/schema/mvc https://www.springframework.org/schema/mvc/spring-mvc.xsd">

    <!--springmvc配置文件,声明controller和其他相关web对象-->
    <context:component-scan base-package="com.hdy.controller"></context:component-scan>

    <bean class="org.springframework.web.servlet.view.InternalResourceViewResolver">
        <property name="suffix" value="/WEB-INF/jsp/"></property>
        <property name="prefix" value=".jsp"></property>
    </bean>

    <!--
    1、响应Ajax请求,返回json
    2、解决静态资源访问问题
    -->
    <mvc:annotation-driven></mvc:annotation-driven>
</beans>
5、web.xml
- 中文编码过滤器配置
- 注册SpringMvc框架
- 注册Spring框架,即监听Spring
<?xml version="1.0" encoding="UTF-8"?>
<web-app xmlns="http://xmlns.jcp.org/xml/ns/javaee"
         xmlns:xsi="http://www.w3.org/2001/XMLSchema-instance"
         xsi:schemaLocation="http://xmlns.jcp.org/xml/ns/javaee http://xmlns.jcp.org/xml/ns/javaee/web-app_4_0.xsd"
         version="4.0">

    <!--注册中央调度器-->
    <servlet>
        <servlet-name>myweb</servlet-name>
        <servlet-class>org.springframework.web.servlet.DispatcherServlet</servlet-class>
        <init-param>
            <param-name>contextConfigLocation</param-name>
            <param-value>classpath:conf/springmvc.xml</param-value>
        </init-param>
        <load-on-startup>1</load-on-startup>
    </servlet>
    <servlet-mapping>
        <servlet-name>myweb</servlet-name>
        <url-pattern>/</url-pattern>
    </servlet-mapping>

    <!--注册监听器-->
    <context-param>
        <param-name>contextConfigLocation</param-name>
        <param-value>classpath:conf/applicationContext_service.xml</param-value>
    </context-param>
    <listener>
        <listener-class>org.springframework.web.context.ContextLoaderListener</listener-class>
    </listener>

    <!--注册字符集过滤器-->
    <filter>
        <filter-name>characterEncodingFilter</filter-name>
        <filter-class>org.springframework.web.filter.CharacterEncodingFilter</filter-class>
        <init-param>
            <param-name>encoding</param-name>
            <param-value>UTF-8</param-value>
        </init-param>
        <init-param>
            <param-name>forceRequestEncoding</param-name>
            <param-value>true</param-value>
        </init-param>
        <init-param>
            <param-name>forceResponseEncoding</param-name>
            <param-value>true</param-value>
        </init-param>
    </filter>
    <filter-mapping>
        <filter-name>characterEncodingFilter</filter-name>
        <url-pattern>/*</url-pattern>
    </filter-mapping>
</web-app>
6、sm的单元集成测试
这边@RunWith(SpringJUnit4ClassRunner.class) 在pom.xml中添加的测试依赖需要版本4.12以上
这里 @ContextConfiguration(locations = {"classpath*:/conf/applicationContext_mapper.xml", "classpath*:/conf/applicationContext_service.xml"}) 只使用classpath*, 如果使用classpath则会报读取报文件错误
@RunWith(SpringJUnit4ClassRunner.class)
@ContextConfiguration(locations = {"classpath*:/conf/applicationContext_mapper.xml", "classpath*:/conf/applicationContext_service.xml"})
public class MyTest {
    @Autowired
    private UsersService usersService;

    @Test
    public void testSelect(){
        List<MyUser> list = usersService.selectAllUser();
        list.forEach(myUser -> System.out.println(myUser));
    }
    @Test
    public void testInsert(){
        int num = usersService.addUser(new MyUser(6, "kitty", "man"));
        List<MyUser> list = usersService.selectAllUser();
        list.forEach(myUser -> System.out.println(myUser));
    }
}


 469
469


 被折叠的 条评论
为什么被折叠?
被折叠的 条评论
为什么被折叠?
 到【灌水乐园】发言


