


手机验证码登录
1、需求分析
为了方便用户登录,移动端通常都会提供通过手机验证码登录的功能。
手机验证码登录的优点:
- 方便快捷,无需注册,直接登录
- 使用短信验证码作为登录凭证,无需记忆密码
- 安全
登录流程:输入手机号>获取验证码>输入验证码>点击登录>登录成功
注意:通过手机验证码登录,手机号是区分不同用户的标识。
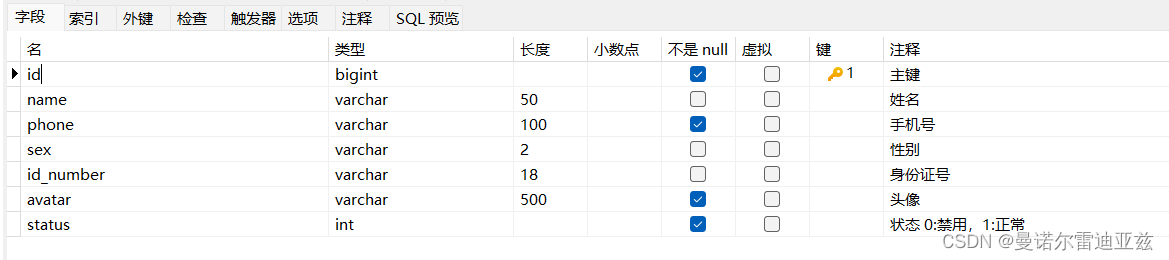
2、数据模型
通过手机验证码登录时,涉及的表为user表,即用户表。结构如下:
3、代码开发-交互过程
在开发代码之前,需要梳理一下登录时前端页面和服务端的交互过程:
- 在登录页面(front/page/login.html)输入手机号,点击【获取验证码】按钮,页面发送ajax请求,在服务端调用短信服务API给指定手机号发送验证码短信
- 在登录页面输入验证码,点击【登录】按钮,发送ajax请求,在服务端处理登录请求
开发手机验证码登录功能,其实就是在服务端编写代码去处理前端页面发送的这2次请求即可。
4、代码开发-准备工作
在开发业务功能前,先将需要用到的类和接口基本结构创建好:
- 实体类User
- Mapper接口UserMapper
- 业务层接口UserService
- 业务层实现类UserServicelmpl控制层Usercontroller
- 工具类SMSutils、ValidateCodeutils
工具类SMSutils(阿里云短信服务):
package com.mannor.reggie_take_out.Utils;

import com.aliyuncs.DefaultAcsClient;
import com.aliyuncs.IAcsClient;
import com.aliyuncs.dysmsapi.model.v20170525.SendSmsRequest;
import com.aliyuncs.dysmsapi.model.v20170525.SendSmsResponse;
import com.aliyuncs.exceptions.ClientException;
import com.aliyuncs.profile.DefaultProfile;

/**
 * 短信发送工具类
 */
public class SMSUtils {

	/**
	 * 发送短信
	 * @param signName 签名
	 * @param templateCode 模板
	 * @param phoneNumbers 手机号
	 * @param param 参数
	 */
	public static void sendMessage(String signName, String templateCode,String phoneNumbers,String param){
		DefaultProfile profile = DefaultProfile.getProfile("cn-hangzhou", "", "");
		IAcsClient client = new DefaultAcsClient(profile);

		SendSmsRequest request = new SendSmsRequest();
		request.setSysRegionId("cn-hangzhou");
		request.setPhoneNumbers(phoneNumbers);
		request.setSignName(signName);
		request.setTemplateCode(templateCode);
		request.setTemplateParam("{\"code\":\""+param+"\"}");
		try {
			SendSmsResponse response = client.getAcsResponse(request);
			System.out.println("短信发送成功");
		}catch (ClientException e) {
			e.printStackTrace();
		}
	}

}
工具类:ValidateCodeutils(生成验证码):
package com.mannor.reggie_take_out.Utils;

import java.util.Random;

/**
 * 随机生成验证码工具类
 */
public class ValidateCodeUtils {
    /**
     * 随机生成验证码
     * @param length 长度为4位或者6位
     * @return
     */
    public static Integer generateValidateCode(int length){
        Integer code =null;
        if(length == 4){
            code = new Random().nextInt(9999);//生成随机数,最大为9999
            if(code < 1000){
                code = code + 1000;//保证随机数为4位数字
            }
        }else if(length == 6){
            code = new Random().nextInt(999999);//生成随机数,最大为999999
            if(code < 100000){
                code = code + 100000;//保证随机数为6位数字
            }
        }else{
            throw new RuntimeException("只能生成4位或6位数字验证码");
        }
        return code;
    }

    /**
     * 随机生成指定长度字符串验证码
     * @param length 长度
     * @return
     */
    public static String generateValidateCode4String(int length){
        Random rdm = new Random();
        String hash1 = Integer.toHexString(rdm.nextInt());
        String capstr = hash1.substring(0, length);
        return capstr;
    }
}
5、代码开发-修改LoginCheckFilter
-
LoginCheckFilter过滤器的开发,此过滤器用于检查用户的登录状态。我们在进行手机验证码登录时,发送的请求需要在此过滤器处理时直接放行。(注释1)
-
在LoginCheckFilter过滤器中扩展逻辑,判断移动端用户登录状态(注释4-1):
package com.mannor.reggie_take_out.filter;

import com.alibaba.fastjson.JSON;
import com.mannor.reggie_take_out.common.BaseContext;
import com.mannor.reggie_take_out.common.R;
import lombok.extern.slf4j.Slf4j;
import org.springframework.util.AntPathMatcher;

import javax.servlet.*;
import javax.servlet.annotation.WebFilter;
import javax.servlet.http.HttpServletRequest;
import javax.servlet.http.HttpServletResponse;
import java.io.IOException;


@WebFilter(filterName = "LoginCheckFilter", urlPatterns = "/*")
@Slf4j
public class LoginCheckFilter implements Filter {
    //路径匹配器,支持通配符
    public static final AntPathMatcher PATH_MATCHER = new AntPathMatcher();

    @Override
    public void doFilter(ServletRequest servletRequest, ServletResponse servletResponse, FilterChain filterChain) throws IOException, ServletException {
        HttpServletRequest request = (HttpServletRequest) servletRequest;
        HttpServletResponse response = (HttpServletResponse) servletResponse;

        // 1、获取本次请求的URI
        String requestURI = request.getRequestURI();
        log.info("拦截到请求:{}", requestURI);
        //定义不需要处理的路径
        String[] urls = new String[]{
                "/employee/login",
                "/employee/logout",
                "/backend/**",
                "/front/**",
                "/common/**",
                "/user/login", //移动端登录
                "/user/sendMsg" //移动端发送短信
        };
        // 2、判断本次请求是否需要处理
        boolean check = check(urls, requestURI);
        // 3、如果不需要处理,则直接放行
        if (check) {
            filterChain.doFilter(request, response);
            log.info("本次请求{}不需要处理", requestURI);
            return;
        }
        // 4-1、判断员工登录状态,如果已登录,则直接放行
        if (request.getSession().getAttribute("EmployeeId") != null) {
            log.info("用户已经登录,用户id为:{}", request.getSession().getAttribute("EmployeeId"));

            //将id存入线程变量a
            Long employeeId = (Long) request.getSession().getAttribute("EmployeeId");
            BaseContext.setCurrentId(employeeId);

            filterChain.doFilter(request, response);
            return;
        }
        // 4-1、判断用户登录状态,如果已登录,则直接放行
        if (request.getSession().getAttribute("user") != null) {
            log.info("用户已经登录,用户id为:{}", request.getSession().getAttribute("user"));

            //将id存入线程变量a
            Long userId = (Long) request.getSession().getAttribute("EmployeeId");
            BaseContext.setCurrentId(userId);

            filterChain.doFilter(request, response);
            return;
        }
        // 5、如果未登录则返回未登录结果,通过输出流方式向客户端相应数据
        log.info("用户未登录");
        response.getWriter().write(JSON.toJSONString(R.error("ONT_LOGIN")));

        return;
    }

    public boolean check(String[] urls, String requestURI) {
        for (String url : urls) {
            boolean match = PATH_MATCHER.match(url, requestURI);
            if (match) {
                return true;
            }
        }
        return false;
    }
}
6、代码开发-接口开发
package com.mannor.reggie_take_out.controller;

import com.baomidou.mybatisplus.core.conditions.query.LambdaQueryWrapper;
import com.mannor.reggie_take_out.Utils.SMSUtils;
import com.mannor.reggie_take_out.Utils.ValidateCodeUtils;
import com.mannor.reggie_take_out.common.R;
import com.mannor.reggie_take_out.entity.User;
import com.mannor.reggie_take_out.service.UserService;
import lombok.extern.slf4j.Slf4j;
import org.apache.commons.lang.StringUtils;
import org.springframework.beans.factory.annotation.Autowired;
import org.springframework.web.bind.annotation.PostMapping;
import org.springframework.web.bind.annotation.RequestBody;
import org.springframework.web.bind.annotation.RequestMapping;
import org.springframework.web.bind.annotation.RestController;

import javax.servlet.http.HttpSession;
import java.util.Map;

@RestController
@Slf4j
@RequestMapping("/user")
public class UserController {

    @Autowired
    private UserService userService;

    /**
     * 发送短信验证码
     *
     * @param user
     * @param session
     * @return
     */
    @PostMapping("/sendMsg")
    public R<String> sendMsg(@RequestBody User user, HttpSession session) {
        //获取手机号
        String phone = user.getPhone();
        if (StringUtils.isNotEmpty(phone)) {
            //生成随机的6位验证码
            String code = ValidateCodeUtils.generateValidateCode(6).toString();
            log.info("code={}", code);
            //调用阿里云提供的短信服务API完成发送短信
            //SMSUtils.sendMessage("杨自强的博客","SMS_462036405",phone,code);
            //需要将生成的验证码保存到Session
            session.setAttribute(phone, code);
            return R.success("短信验证码发送成功!");
        }
        return R.error("短信验证码发送失败!");
    }

    @PostMapping("/login")
    public R<User> login(@RequestBody Map map, HttpSession session) {
        log.info("map={}", map);
        //获取手机号
        String phone = map.get("phone").toString();
        //获取验证码
        String code = map.get("code").toString();
        //从Session中获取保存的验证码
        Object codeInSession = session.getAttribute(phone);
        //进行验证码的比对(页面提交的验证码和Session中保存的验证码比对)
        if (codeInSession != null && codeInSession.equals(code)) {
            // 如果能够比对成功,说明登录成功
            LambdaQueryWrapper<User> lambdaQueryWrapper = new LambdaQueryWrapper<>();
            lambdaQueryWrapper.eq(User::getPhone, phone);
            User user = userService.getOne(lambdaQueryWrapper);
            if (user == null) {
                //判断当前手机号对应的用户是否为新用户,如果是新用户就自动完成注册
                user = new User();
                user.setPhone(phone);
                user.setStatus(1);
                userService.save(user);
            }
            session.setAttribute("user",user.getId());
            return R.success(user);
        }
        return R.error("登录失败");
    }
}
7、前端代码介绍
- 登录页面
<!DOCTYPE html>
<html lang="en">
<head>
    <meta charset="utf-8">
    <meta http-equiv="X-UA-Compatible" content="IE=edge">
    <!-- 上述3个meta标签*必须*放在最前面,任何其他内容都*必须*跟随其后! -->
    <meta name="viewport"
          content="width=device-width, initial-scale=1.0, maximum-scale=1.0,user-scalable=no,minimal-ui">
    <title>菩提阁</title>
    <link rel="icon" href="../images/favico.ico">
    <!--不同屏幕尺寸根字体设置-->
    <script src="../js/base.js"></script>
    <!--element-ui的样式-->
    <link rel="stylesheet" href="../../backend/plugins/element-ui/index.css"/>
    <!--引入vant样式-->
    <link rel="stylesheet" href="../styles/vant.min.css"/>
    <!-- 引入样式  -->
    <link rel="stylesheet" href="../styles/index.css"/>
    <!--本页面内容的样式-->
    <link rel="stylesheet" href="../styles/login.css"/>
</head>
<body>
<div id="login" v-loading="loading">
    <div class="divHead">登录</div>
    <div class="divContainer">
        <el-input placeholder=" 请输入手机号码" v-model="form.phone" maxlength='20'/>
        </el-input>
        <div class="divSplit"></div>
        <el-input placeholder=" 请输入验证码" v-model="form.code" maxlength='20'/>
        </el-input>
        <span @click='getCode'>获取验证码</span>
    </div>
    <div class="divMsg" v-if="msgFlag">手机号输入不正确,请重新输入</div>
    <el-button type="primary" :class="{btnSubmit:1===1,btnNoPhone:!form.phone,btnPhone:form.phone}" @click="btnLogin">
        登录
    </el-button>
</div>
<!-- 开发环境版本,包含了有帮助的命令行警告 -->
<script src="../../backend/plugins/vue/vue.js"></script>
<!-- 引入组件库 -->
<script src="../../backend/plugins/element-ui/index.js"></script>
<!-- 引入vant样式 -->
<script src="../js/vant.min.js"></script>
<!-- 引入axios -->
<script src="../../backend/plugins/axios/axios.min.js"></script>
<script src="../js/request.js"></script>
<script src="../api/login.js"></script>
</body>
<script>
    new Vue({
        el: "#login",
        data() {
            return {
                form: {
                    phone: '',
                    code: ''
                },
                msgFlag: false,
                loading: false
            }
        },
        computed: {},
        created() {
        },
        mounted() {
        },
        methods: {
            getCode() {
                this.form.code = ''
                const regex = /^(13[0-9]{9})|(15[0-9]{9})|(17[0-9]{9})|(18[0-9]{9})|(19[0-9]{9})$/;
                if (regex.test(this.form.phone)) {
                    this.msgFlag = false
                    //this.form.code = (Math.random()*1000000).toFixed(0)  //随机生成数
                    sendMsgApi({phone: this.form.phone})
                } else {
                    this.msgFlag = true
                }
            },
            async btnLogin() {
                if (this.form.phone && this.form.code) {
                    this.loading = true
                    const res = await loginApi(this.form)
                    this.loading = false
                    if (res.code === 1) {
                        sessionStorage.setItem("userPhone", this.form.phone)
                        window.requestAnimationFrame(() => {
                            window.location.href = '/front/index.html'
                        })
                    } else {
                        this.$notify({type: 'warning', message: res.msg});
                    }
                } else {
                    this.$notify({type: 'warning', message: '请输入手机号码'});
                }
            }
        }
    })
</script>
</html>
- 登录的js文件:
function loginApi(data) {
    return $axios({
        'url': '/user/login',
        'method': 'post',
        data
    })
}

function loginoutApi() {
    return $axios({
        'url': '/user/loginout',
        'method': 'post',
    })
}

function sendMsgApi(data) {
    return $axios({
        "url": "/user/sendMsg",
        "method": "post",
        data
    })
}
8、启动测试
前端发起页面请求,进行测试。


 925
925


 被折叠的 条评论
为什么被折叠?
被折叠的 条评论
为什么被折叠?
 到【灌水乐园】发言


