


目录
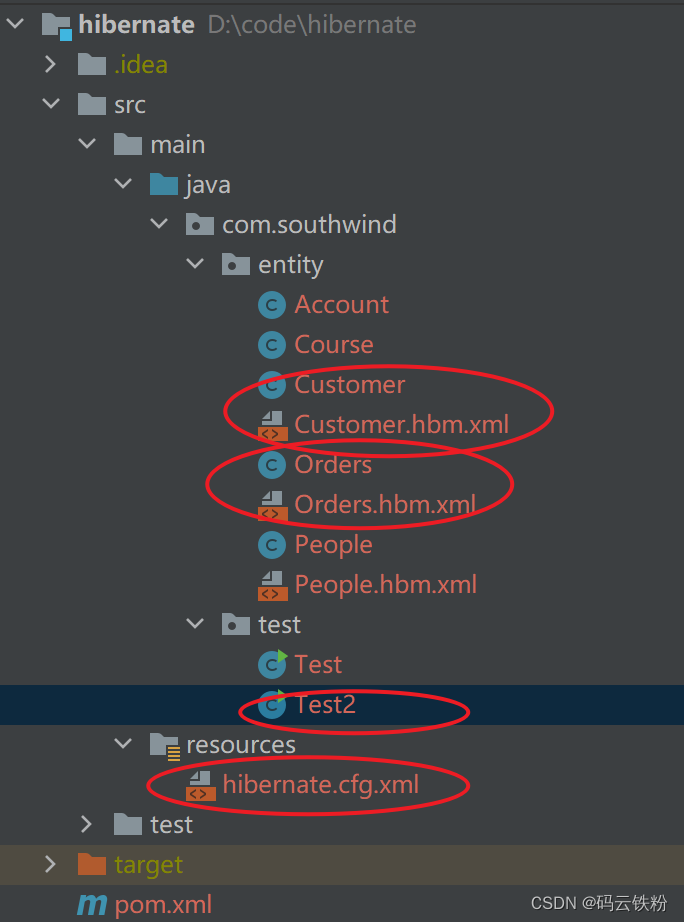
1、Customer实体类和Customer.hbm.xml文件:
3、hibernate.cfg.xml文件:(实体关系映射⽂件注册到 Hibernate 的配置⽂件中。)
1、Account实体类和Account.hbm.xml文件:
3、hibernate.cfg.xml文件:(实体关系映射⽂件注册到 Hibernate 的配置⽂件中。)
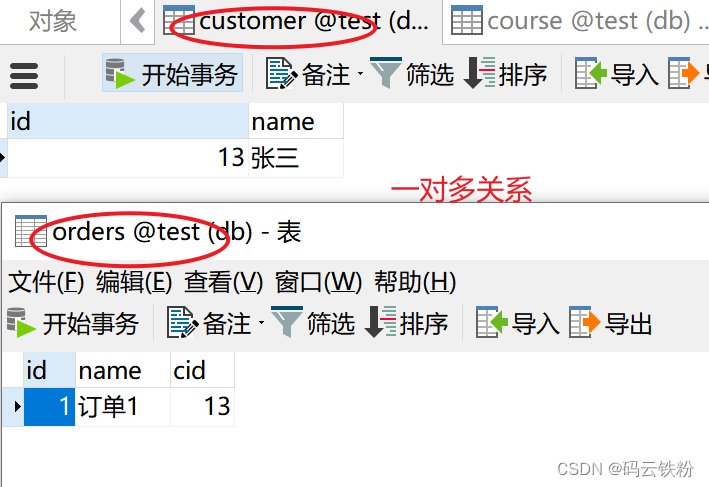
1、⼀对多关系
客户和订单:
每个客户可以购买多个产品,⽣成多个订单,但是⼀个订单只能属于⼀个客户,所以客户是⼀,订单是多。
数据库中⼀的⼀⽅是主表,多的⼀⽅时候从表,通过主外键关系来维护。
代码实现:
1、Customer实体类和Customer.hbm.xml文件:
//Customer实体类
@Getter
@Setter
public class Customer {
    private Integer id;
    private String  name;
    private Set<Orders> orders;  //一个customer对应多个order

    @Override
    public String toString() {
        return "Customer{" +
                "id=" + id +
                ", name='" + name + '\'' +
                '}';
    }
}


#Customer.hbm.xml文件:
<?xml version="1.0"?>
<!DOCTYPE hibernate-mapping PUBLIC "-//Hibernate/Hibernate Mapping DTD 3.0//EN"
        "http://hibernate.sourceforge.net/hibernate-mapping-3.0.dtd">
<hibernate-mapping> <!--文件名的hbm就是hibernate-mapping 的缩写,在这里面完成类和表的映射-->

    <!-- class 就是指类,name就是指类名 table 就是指对应的表名,表customer里面有id和name两个字段-->
    <class name="com.southwind.entity.Customer" table="customer">
       <!-- 主键映射 name指的是实体类里面的属性:id   type指的是id属性的类型-->
        <id name="id" type="java.lang.Integer">
            <!--column是字段,指的是对应类里面id的表里面的名称-->
            <column name="id"></column>
            <!--这个是配置主键自增的方式,identity的意思就是自增-->
            <generator class="identity"></generator>
        </id>
        <!-- 下面继续配置类里面的其他信息,name   type指的是name属性的类型-->
        <property name="name" type="java.lang.String">
            <!--column是字段,指的是对应类里面name的表里面的名称-->
            <column name="name"></column>
        </property>

        <!-- 下面继续配置类里面的其他信息,因为是set集合,就直接用set配,table是orders.   private Set<Orders> orders;-->
        <set name="orders" table="orders" lazy="extra">
            <!-- key是外键,column是字段,指的是表里面的外键名称-->
            <key column="cid"></key>
            <!-- 怎么去映射这个东西,这里面one-to-many 指的是一对多的关系     private Set<Orders> orders;
                  class表示是这里面的类从哪里来的,创建orders对象把它装到set集合里面-->
            <one-to-many class="com.southwind.entity.Orders"></one-to-many>
        </set>
<!--        set 标签来配置实体类中的集合属性 orsers-->
<!--        name 实体类属性名-->
<!--        table 表名-->
<!--        key 外键-->
<!--        one-to-many 与集合泛型的实体类对应-->

    </class>

</hibernate-mapping>


<!--hibernate-mapping 属性
package:给 class 节点对应的实体类统⼀设置包名,此处设置包名,class 的 name 属性就可以
省略包名
<?xml version="1.0"?>
<!DOCTYPE hibernate-mapping PUBLIC "-//Hibernate/Hibernate Mapping DTD
3.0//EN"
 "http://hibernate.sourceforge.net/hibernate-mapping-3.0.dtd">
<hibernate-mapping package="com.southwind.entity">
 <class name="Course" table="t_course">
 <id name="id" type="java.lang.Integer">
 <column name="id"></column>
 ....


-->
2、Orders实体类和Orders.hbm.xml文件:
//Orders实体类
@Data
public class Orders {
    private Integer id;
    private String name;
    private Customer customer; //一个订单对应一个客户
}

#Orders.hbm.xml文件:
<?xml version="1.0"?>
<!DOCTYPE hibernate-mapping PUBLIC "-//Hibernate/Hibernate Mapping DTD 3.0//EN"
        "http://hibernate.sourceforge.net/hibernate-mapping-3.0.dtd">
<hibernate-mapping> <!--文件名的hbm就是hibernate-mapping 的缩写,在这里面完成类和表的映射-->

    <!-- class 就是指类,name就是指类名 table 就是指对应的表名,表customer里面有id和name两个字段-->
    <class name="com.southwind.entity.Orders" table="orders">
       <!-- 主键映射 name指的是实体类里面的属性:id   type指的是id属性的类型-->
        <id name="id" type="java.lang.Integer">
            <!--column是字段,指的是对应类里面id的表里面的名称-->
            <column name="id"></column>
            <!--这个是配置主键自增的方式,identity的意思就是自增-->
            <generator class="identity"></generator>
        </id>
        <!-- 下面继续配置类里面的其他信息,name   type指的是name属性的类型-->
        <property name="name" type="java.lang.String">
            <!--column是字段,指的是对应类里面name的表里面的名称-->
            <column name="name"></column>
        </property>

<!--        many-to-one 配置实体类对应的对象属性-->
<!--        name 属性名-->
<!--        class 属性对应的类-->
<!--        column 外键-->
        <many-to-one name="customer" class="com.southwind.entity.Customer" column="cid"></many-to-one>

    </class>

</hibernate-mapping>
3、hibernate.cfg.xml文件:(实体关系映射⽂件注册到 Hibernate 的配置⽂件中。)
<?xml version="1.0" encoding="UTF-8"?>
<!DOCTYPE hibernate-configuration PUBLIC
"-//Hibernate/Hibernate Configuration DTD 3.0//EN"
"http://hibernate.sourceforge.net/hibernate-configuration-3.0.dtd">
<hibernate-configuration>
<!-- 核⼼配置:session-factory-->
<!-- SessionFactory:针对单个数据库映射经过编译的内存镜像⽂件,将数据库转换为⼀个 Java 可以识别的镜像⽂件。-->
<!-- 构建 SessionFactory ⾮常耗费资源,所以通常⼀个⼯程只需要创建⼀个 SessionFactory。-->
<session-factory>
<!-- datasource 数据源配置 -->
<property name="connection.username">root</property>
<property name="connection.password">123456</property>
<property name="connection.driver_class">com.mysql.cj.jdbc.Driver</property>
<property name="connection.url">jdbc:mysql://localhost:3306/test?useUnicode=true&characterEncoding=utf8&serverTimezone=GMT</property>
<!--?useUnicode=true&characterEncoding=utf8&serverTimezone=GMT" />-->
<!-- C3P0 连接池 -->
<property name="hibernate.c3p0.acquire_increment">10</property> <!-- 每次不够的话就会增加的数量-->
<property name="hibernate.c3p0.idle_test_period">10000</property> <!--释放资源时间的设置,s为单位-->
<property name="hibernate.c3p0.timeout">5000</property> <!-- 超时时间-->
<property name="hibernate.c3p0.max_size">30</property> <!-- 最大连接数-->
<property name="hibernate.c3p0.min_size">5</property> <!-- 最小连接数-->
<property name="hibernate.c3p0.max_statements">10</property> <!-- 最大线程数数-->
<!-- 数据库⽅⾔ oracle或mysql-->
<property name="dialect">org.hibernate.dialect.MySQLDialect</property>
<!-- 打印SQL语句,固定写法 -->
<property name="show_sql">true</property>
<!-- 格式化SQL语句,固定写法 -->
<property name="format_sql">true</property>
<!-- 是否⾃动⽣成数据表-->
<property name="hibernate.hbm2ddl.auto">update</property>
<!-- create:每次加载hibernate时都会删除上一次的生成的表,然后根据你的model类再重新来生成新表,
哪怕两次没有任何改变也要这样执行,这就是导致数据库表数据丢失的一个重要原因。
create-drop :每次加载hibernate时根据model类生成表,但是sessionFactory一关闭,表就自动删除。
update:最常用的属性,第一次加载hibernate时根据model类会自动建立起表的结构(前提是先建立好数据库),
以后加载hibernate时根据 model类自动更新表结构,即使表结构改变了但表中的行仍然存在不会删除以前的行。
要注意的是当部署到服务器后,表结构是不会被马上建立起来的,是要等 应用第一次运行起来后才会。
validate :每次加载hibernate时,验证创建数据库表结构,只会和数据库中的表进行比较,不会创建新表,但是会插入新值。
-->
<!-- 注册实体关系映射文件 -->
<mapping resource="com/southwind/entity/People.hbm.xml"></mapping>
<mapping resource="com/southwind/entity/Customer.hbm.xml"></mapping>
<mapping resource="com/southwind/entity/Orders.hbm.xml"></mapping>
<!-- <mapping resource="com/southwind/entity/Account.hbm.xml"></mapping>-->
<!-- <mapping resource="com/southwind/entity/Course.hbm.xml"></mapping>-->
</session-factory>
</hibernate-configuration>4、使⽤ Hibernate API 完成数据操作
package com.southwind.test;

import com.southwind.entity.Customer;
import com.southwind.entity.Orders;
import com.southwind.entity.People;
import org.hibernate.Session;
import org.hibernate.SessionFactory;
import org.hibernate.cfg.Configuration;

public class Test2 {
    public static void main(String[] args) {

        //创建Configuration,即配置类对象 默认的是去读hibernate.cfg.xml,
        // 不然你就在下面一行最后面这样写:.configure("hibernate.xml");,这个可以自己在resources下面定义文件名是什么
//        Configuration configuration = new Configuration().configure();
//        System.out.println("configuration = " + configuration);


        //创建Configuration,即配置类对象 默认的是去读hibernate.cfg.xml,
        // 不然你就在下面一行最后面这样写:.configure("hibernate.xml");,这个可以自己在resources下面定义文件名是什么
        Configuration configuration = new Configuration().configure();
        //获取SessionFactory
        SessionFactory sessionFactory = configuration.buildSessionFactory();
        //获取Session
        Session session = sessionFactory.openSession();

        //创建 Customer
        Customer customer = new Customer();
        customer.setName("张三");

        //创建 Orders
        Orders orders = new Orders();
        orders.setName("订单1");

        //建立关联关系
        orders.setCustomer(customer);

        //保存
        session.save(customer);
        session.save(orders);

        //提交事务
        session.beginTransaction().commit();

        //关闭session
        session.close();
    }
}2、多对多关系
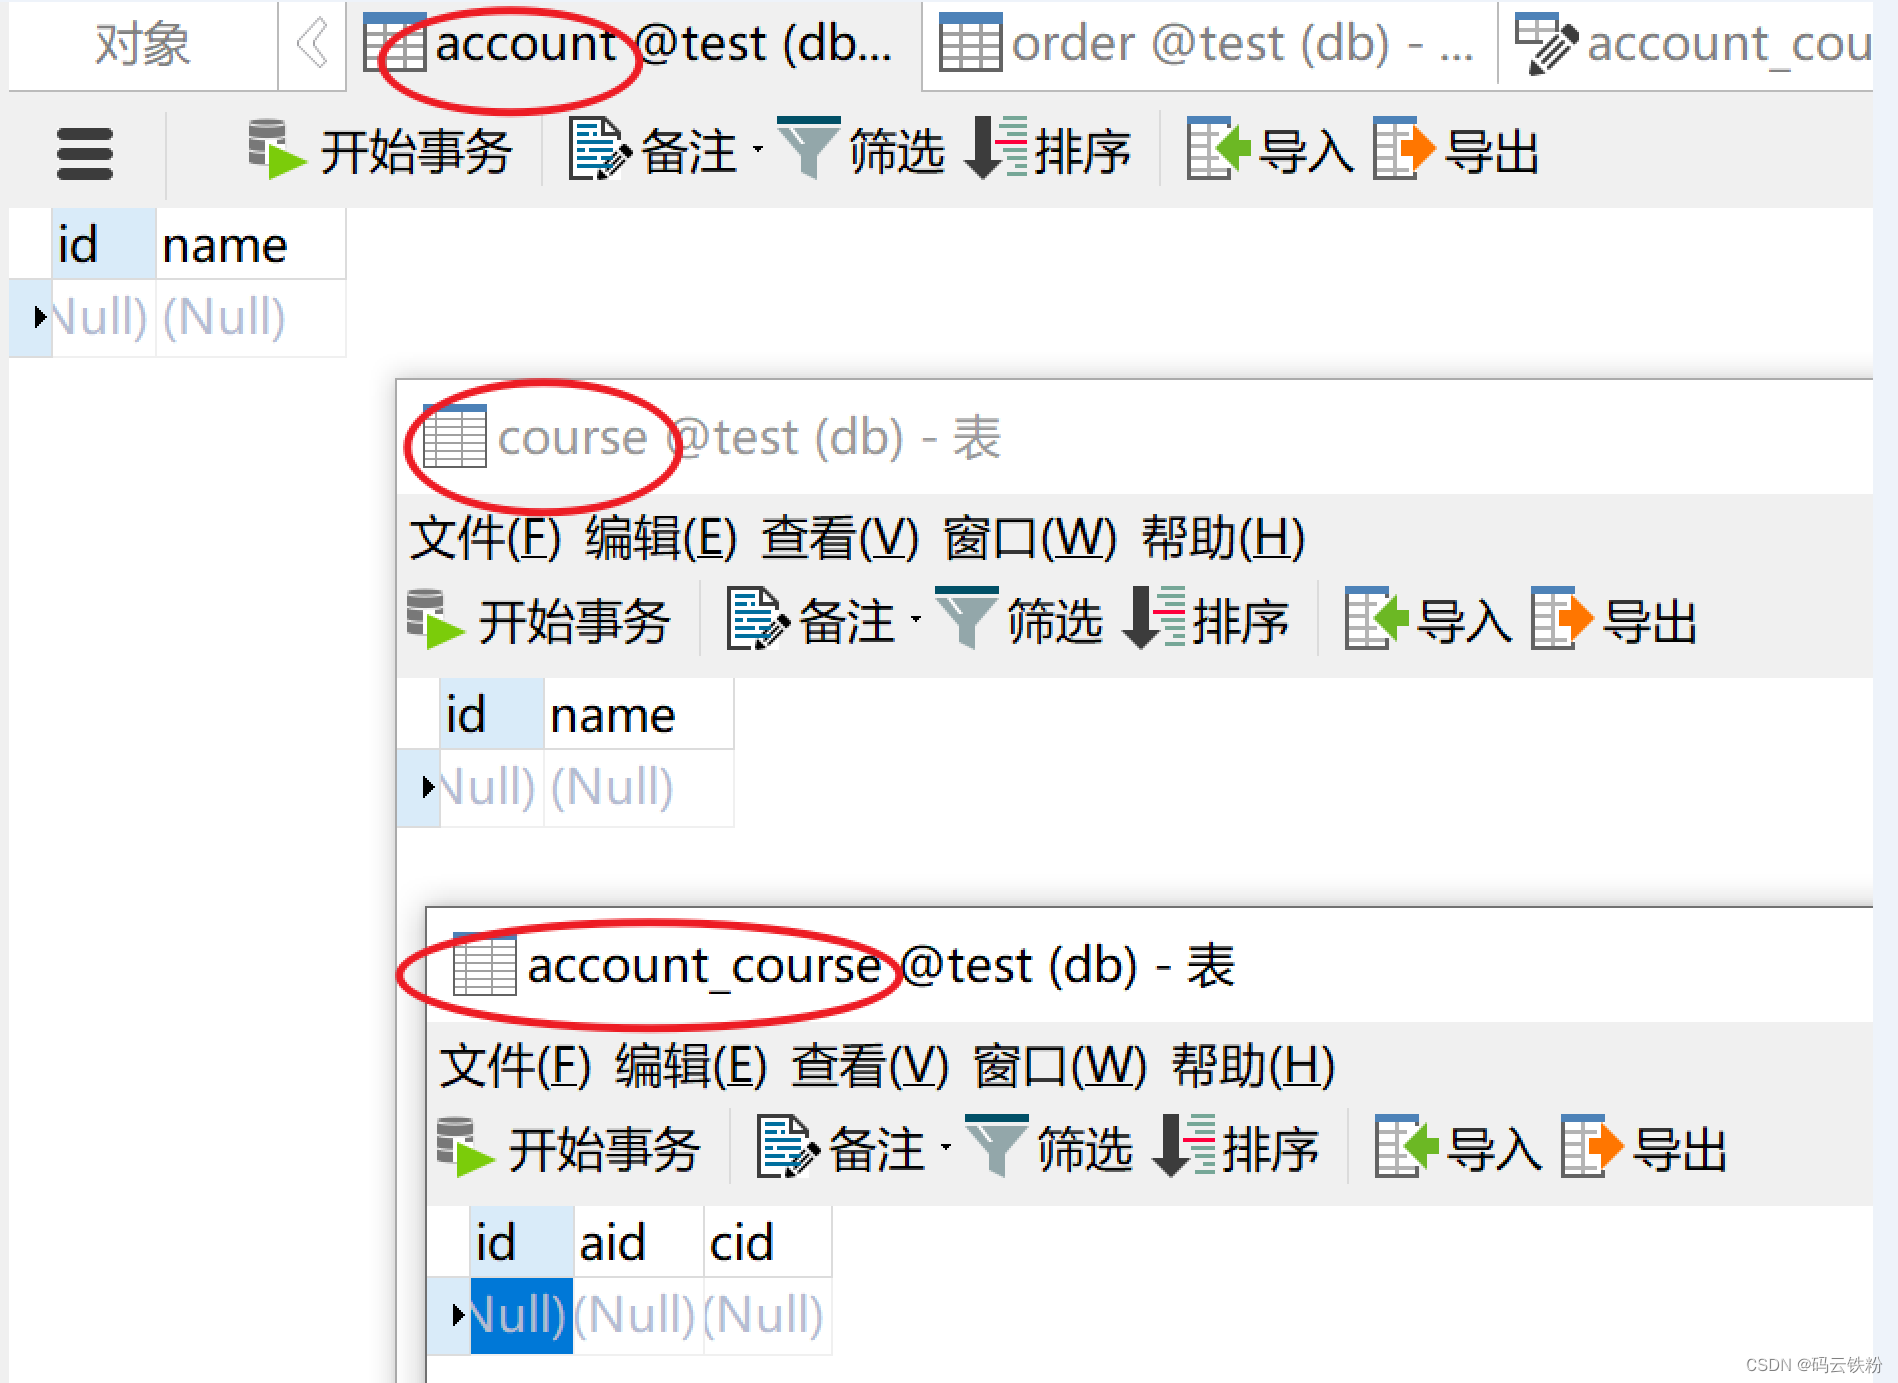
学⽣选课:
⼀⻔课程可以被多个学⽣选择,⼀个学⽣可以选择多⻔课程,学⽣是多,课程也是多。
数据库中是通过两个⼀对多关系来维护的,学⽣和课程都是主表,额外增加⼀张中间表作为从表,两张
主表和中间表都是⼀对多关系。
代码实现:
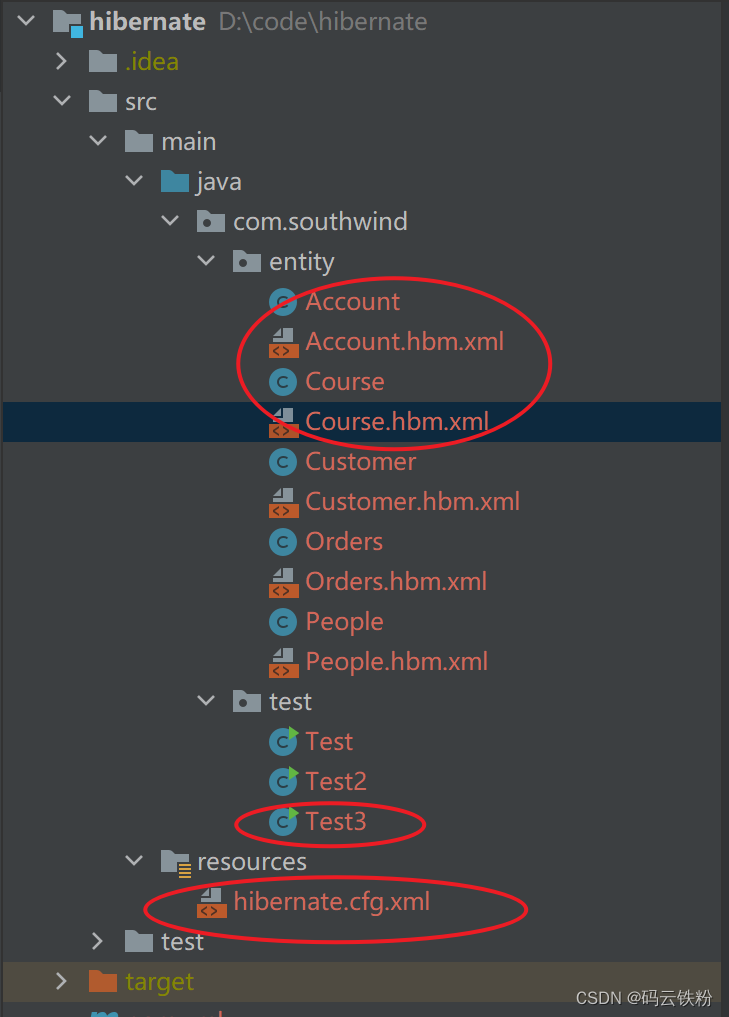
1、Account实体类和Account.hbm.xml文件:
//Account实体类:
@Getter
@Setter
public class Account {
    private Integer id;
    private String name;
    private Set<Course> courses; //一个学生对应多个课程

    @Override
    public String toString() {
        return "Account{" +
                "id=" + id +
                ", name='" + name + '\'' +
                '}';
    }
}

#Account.hbm.xml文件:
<?xml version="1.0"?>
<!DOCTYPE hibernate-mapping PUBLIC "-//Hibernate/Hibernate Mapping DTD 3.0//EN"
        "http://hibernate.sourceforge.net/hibernate-mapping-3.0.dtd">
<hibernate-mapping> <!--文件名的hbm就是hibernate-mapping 的缩写,在这里面完成类和表的映射-->

    <!-- class 就是指类,name就是指类名 table 就是指对应的表名,表customer里面有id和name两个字段-->
    <class name="com.southwind.entity.Account" table="account">
       <!-- 主键映射 name指的是实体类里面的属性:id   type指的是id属性的类型-->
        <id name="id" type="java.lang.Integer">
            <!--column是字段,指的是对应类里面id的表里面的名称-->
            <column name="id"></column>
            <!--这个是配置主键自增的方式,identity的意思就是自增-->
            <generator class="identity"></generator>
        </id>
        <!-- 下面继续配置类里面的其他信息,name   type指的是name属性的类型-->
        <property name="name" type="java.lang.String">
            <!--column是字段,指的是对应类里面name的表里面的名称-->
            <column name="name"></column>
        </property>

        <!-- 下面继续配置类里面的其他信息,因为是set集合,就直接用set配,private Set<Course> courses; //一个学生对应多个课程-->
        <!--这里要特别注意,多对多关系的话,这里的table是中间表,account_course-->
        <set name="courses" table="account_course" >
            <!-- key是外键,column是字段,指的是表里面的外键名称-->
            <key column="aid"></key>
            <!-- 怎么去映射这个东西,这里面many-to-many 指的是多对多的关系     private Set<Orders> orders;
                  class表示是这里面的类从哪里来的,创建Course对象把它装到set集合里面-->
            <!-- 注意这里是要加上column="cid",即course在中间标的外键名称-->
            <many-to-many class="com.southwind.entity.Course" column="cid"></many-to-many>
        </set>

    </class>

</hibernate-mapping>
2、Course实体类和Course.hbm.xml文件:
//Course实体类:
@Getter
@Setter
public class Course {
    private Integer id;
    private String name;
    private Set<Account> accounts; //一个课程对应多个学生

    @Override
    public String toString() {
        return "Course{" +
                "id=" + id +
                ", name='" + name + '\'' +
                '}';
    }
}

#Course.hbm.xml文件:
<?xml version="1.0"?>
<!DOCTYPE hibernate-mapping PUBLIC "-//Hibernate/Hibernate Mapping DTD 3.0//EN"
        "http://hibernate.sourceforge.net/hibernate-mapping-3.0.dtd">
<hibernate-mapping> <!--文件名的hbm就是hibernate-mapping 的缩写,在这里面完成类和表的映射-->

    <!-- class 就是指类,name就是指类名 table 就是指对应的表名,表customer里面有id和name两个字段-->
    <class name="com.southwind.entity.Course" table="course">
       <!-- 主键映射 name指的是实体类里面的属性:id   type指的是id属性的类型-->
        <id name="id" type="java.lang.Integer">
            <!--column是字段,指的是对应类里面id的表里面的名称-->
            <column name="id"></column>
            <!--这个是配置主键自增的方式,identity的意思就是自增-->
            <generator class="identity"></generator>
        </id>
        <!-- 下面继续配置类里面的其他信息,name   type指的是name属性的类型-->
        <property name="name" type="java.lang.String">
            <!--column是字段,指的是对应类里面name的表里面的名称-->
            <column name="name"></column>
        </property>

        <!-- 下面继续配置类里面的其他信息,因为是set集合,就直接用set配,private Set<Account> accounts; //一个课程对应多个学生-->
        <!--这里要特别注意,多对多关系的话,这里的table是中间表,account_course-->
        <set name="accounts" table="account_course" >
            <!-- key是外键,column是字段,指的是表里面的外键名称-->
            <key column="cid"></key>
            <!-- 怎么去映射这个东西,这里面many-to-many 指的是多对多的关系     private Set<Orders> orders;
                  class表示是这里面的类从哪里来的,创建Course对象把它装到set集合里面-->
            <!-- 注意这里是要加上column="cid",即course在中间标的外键名称-->
            <many-to-many class="com.southwind.entity.Account" column="aid"></many-to-many>
        </set>
<!--        name 实体类对应的集合属性名-->
<!--        table 中间表名-->
<!--        key 外键-->
<!--        many-to-many 与集合泛型的实体类对应-->
<!--        column 属性与中间表的外键字段名对应-->

    </class>

</hibernate-mapping>
3、hibernate.cfg.xml文件:(实体关系映射⽂件注册到 Hibernate 的配置⽂件中。)
<?xml version="1.0" encoding="UTF-8"?>
<!DOCTYPE hibernate-configuration PUBLIC
"-//Hibernate/Hibernate Configuration DTD 3.0//EN"
"http://hibernate.sourceforge.net/hibernate-configuration-3.0.dtd">
<hibernate-configuration>
<!-- 核⼼配置:session-factory-->
<!-- SessionFactory:针对单个数据库映射经过编译的内存镜像⽂件,将数据库转换为⼀个 Java 可以识别的镜像⽂件。-->
<!-- 构建 SessionFactory ⾮常耗费资源,所以通常⼀个⼯程只需要创建⼀个 SessionFactory。-->
<session-factory>
<!-- datasource 数据源配置 -->
<property name="connection.username">root</property>
<property name="connection.password">123456</property>
<property name="connection.driver_class">com.mysql.cj.jdbc.Driver</property>
<property name="connection.url">jdbc:mysql://localhost:3306/test?useUnicode=true&characterEncoding=utf8&serverTimezone=GMT</property>
<!--?useUnicode=true&characterEncoding=utf8&serverTimezone=GMT" />-->
<!-- C3P0 连接池 -->
<property name="hibernate.c3p0.acquire_increment">10</property> <!-- 每次不够的话就会增加的数量-->
<property name="hibernate.c3p0.idle_test_period">10000</property> <!--释放资源时间的设置,s为单位-->
<property name="hibernate.c3p0.timeout">5000</property> <!-- 超时时间-->
<property name="hibernate.c3p0.max_size">30</property> <!-- 最大连接数-->
<property name="hibernate.c3p0.min_size">5</property> <!-- 最小连接数-->
<property name="hibernate.c3p0.max_statements">10</property> <!-- 最大线程数数-->
<!-- 数据库⽅⾔ oracle或mysql-->
<property name="dialect">org.hibernate.dialect.MySQLDialect</property>
<!-- 打印SQL语句,固定写法 -->
<property name="show_sql">true</property>
<!-- 格式化SQL语句,固定写法 -->
<property name="format_sql">true</property>
<!-- 是否⾃动⽣成数据表-->
<property name="hibernate.hbm2ddl.auto">update</property>
<!-- create:每次加载hibernate时都会删除上一次的生成的表,然后根据你的model类再重新来生成新表,
哪怕两次没有任何改变也要这样执行,这就是导致数据库表数据丢失的一个重要原因。
create-drop :每次加载hibernate时根据model类生成表,但是sessionFactory一关闭,表就自动删除。
update:最常用的属性,第一次加载hibernate时根据model类会自动建立起表的结构(前提是先建立好数据库),
以后加载hibernate时根据 model类自动更新表结构,即使表结构改变了但表中的行仍然存在不会删除以前的行。
要注意的是当部署到服务器后,表结构是不会被马上建立起来的,是要等 应用第一次运行起来后才会。
validate :每次加载hibernate时,验证创建数据库表结构,只会和数据库中的表进行比较,不会创建新表,但是会插入新值。
-->
<!-- 注册实体关系映射文件 -->
<mapping resource="com/southwind/entity/People.hbm.xml"></mapping>
<mapping resource="com/southwind/entity/Customer.hbm.xml"></mapping>
<mapping resource="com/southwind/entity/Orders.hbm.xml"></mapping>
<mapping resource="com/southwind/entity/Account.hbm.xml"></mapping>
<mapping resource="com/southwind/entity/Course.hbm.xml"></mapping>
</session-factory>
</hibernate-configuration>4、使⽤ Hibernate API 完成数据操作
package com.southwind.test;

import com.southwind.entity.Account;
import com.southwind.entity.Course;
import org.hibernate.Session;
import org.hibernate.SessionFactory;
import org.hibernate.cfg.Configuration;

import java.util.HashSet;
import java.util.Set;

public class Test3 {
    public static void main(String[] args) {
        //创建 Configuration
        Configuration configuration = new Configuration().configure();
        //获取 SessionFactory
        SessionFactory sessionFactory = configuration.buildSessionFactory();
        //获取 Session
        Session session = sessionFactory.openSession();
        //创建 Course
        Course course = new Course();
        course.setName("Java");
       //创建 Account
        Account account = new Account();
        account.setName("张三");

        //建立关联关系
        Set<Course> courses = new HashSet<>();
        courses.add(course);
        //建立关联关系
        account.setCourses(courses);

        //保存
        session.save(course);
        session.save(account);
       //提交事务
        session.beginTransaction().commit();
        //关闭session
        session.close();
    }
}


 171
171


 被折叠的 条评论
为什么被折叠?
被折叠的 条评论
为什么被折叠?
 到【灌水乐园】发言


