


一、run
SpringBoot项目启动特别简单,只需要点击一下,一切就自动运行,其背后的原理呢?
本文会将源码拆分,最后部分会附上run方法的源码。
@SpringBootApplication
@EnableDiscoveryClient
@EnableFeignClients
public class ServiceOrderApp {
    public static void main(String[] args) {
        SpringApplication.run(ServiceOrderApp.class,args);
    }
}
1.1
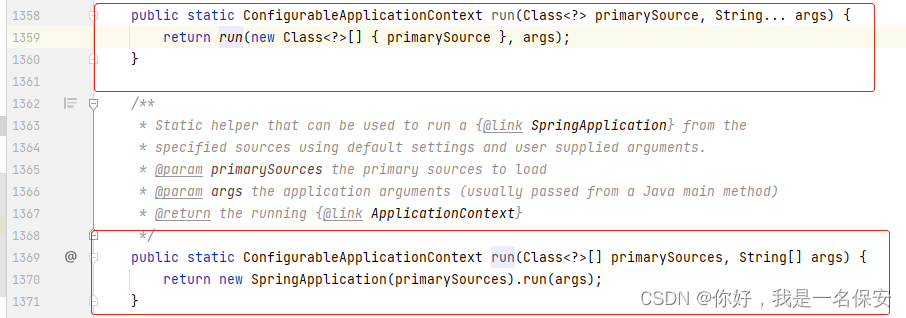
点击run方法后,我们会发现有两个重写的静态run方法和一个返回值是ConfigurableApplicationContext的run方法。这两个方法的使用规则是run方法进SpringApplication实例化操作,再根据实例化对象调用另一个run方法来完成整个项目的启动和初始化。
public static ConfigurableApplicationContext run(Class<?> primarySource, String... args) {
		return run(new Class<?>[] { primarySource }, args);
	}
public static ConfigurableApplicationContext run(Class<?>[] primarySources, String[] args) {
return new SpringApplication(primarySources).run(args);
}1.2
我们先跟踪一下SpringAppliaction的构造方法源码:
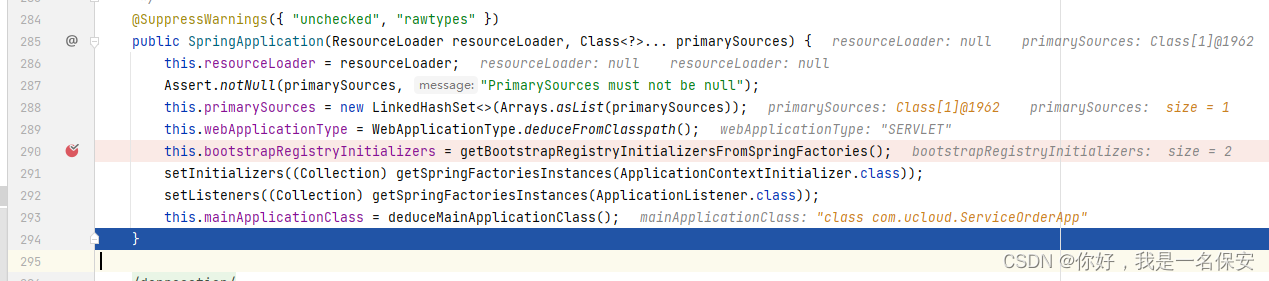
	@SuppressWarnings({ "unchecked", "rawtypes" })
	public SpringApplication(ResourceLoader resourceLoader, Class<?>... primarySources) {
		this.resourceLoader = resourceLoader;
		Assert.notNull(primarySources, "PrimarySources must not be null");
		this.primarySources = new LinkedHashSet<>(Arrays.asList(primarySources));
		this.webApplicationType = WebApplicationType.deduceFromClasspath();
		this.bootstrapRegistryInitializers = getBootstrapRegistryInitializersFromSpringFactories();
		setInitializers((Collection) getSpringFactoriesInstances(ApplicationContextInitializer.class));
		setListeners((Collection) getSpringFactoriesInstances(ApplicationListener.class));
		this.mainApplicationClass = deduceMainApplicationClass();
	}
1.2.1拆分SpringApplication构造方法
流程图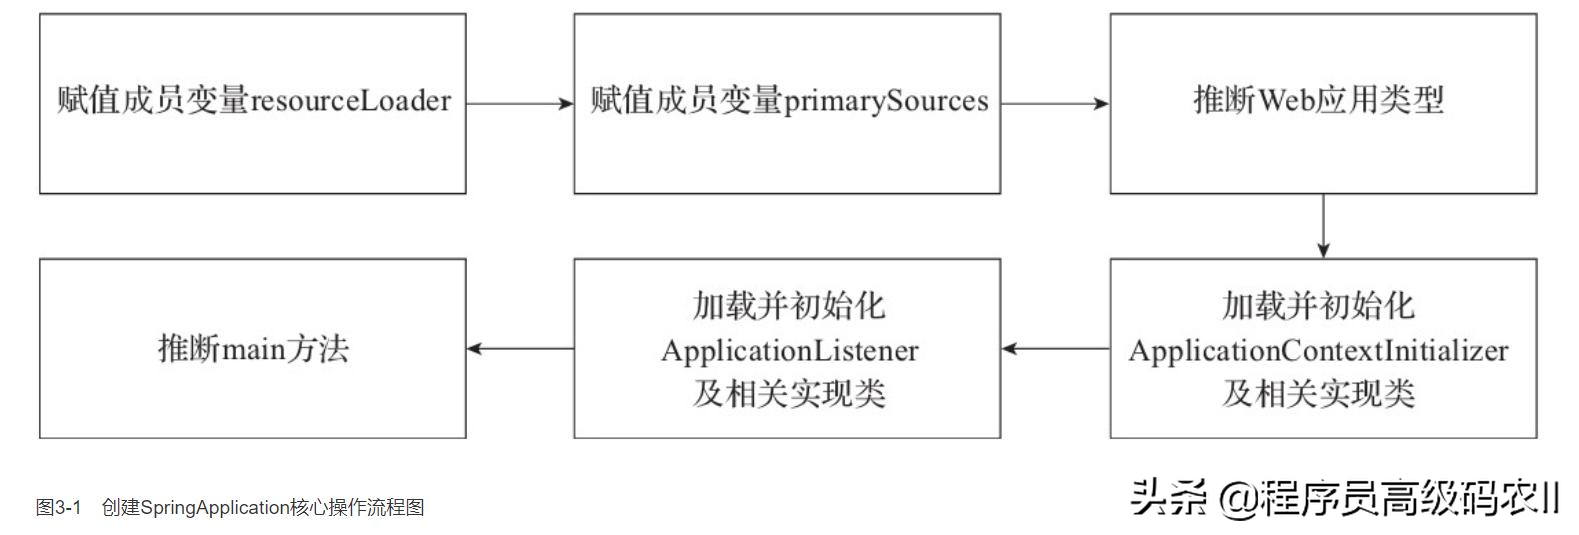
//resourceLoader:资源加载的接口,用来在启动时打印banner艺术字
//primarySources:可变参数,默认传入SpringBoot入口类。
也就是启动类的类。但是作为项目的入口类,此类还必须满足一个条件,
就是被@EnableConfiguration注解标注;
因为@SpringBootApplication注解也包含了此注解,
所以被@SpringBootApplication注解修饰的类也可以作为参数传入。
虽然也可以传入普通类,但是只有被@EnableConfiguration修饰的类才能开启自动配置!
public SpringApplication(ResourceLoader resourceLoader, Class<?>... primarySources)
//将入口类设置为属性存储起来
this.primarySources = new LinkedHashSet<>(Arrays.asList(primarySources));//获取到应用类型
this.webApplicationType = WebApplicationType.deduceFromClasspath();获取应用类型的方法deduceFromClasspath()比较简单,三种返回结果,四种常量;在初始化容器的时候,会对这四个常量进行判断,如果存在就返回对应的结果
- NONE: 非web应用,即不会启动服务器
- SERVLET: 基于servlet的web应用
- REACTIVE: 响应式web应用(暂未接触过)
SERVLET_INDICATOR_CLASSES = { "javax.servlet.Servlet",
      "org.springframework.web.context.ConfigurableWebApplicationContext" }
//去meta-inf/spring.factories目录下查找ApplicationContextInitializer并且保存起来
this.bootstrapRegistryInitializers = getBootstrapRegistryInitializersFromSpringFactories();
//获取所有初始化器
setInitializers((Collection)getSpringFactoriesInstances(ApplicationContextInitializer.class));getSpringFactoriesInstances()方法有两个重写方法,主要是下面的那个;先走第一个方法
private <T> Collection<T> getSpringFactoriesInstances(Class<T> type) {
		return getSpringFactoriesInstances(type, new Class<?>[] {});
	}
而这个方法调用的👇
//参数type:就是从上个方法传递过来的
//interface org.springframework.context.ApplicationContextInitializer

private <T> Collection<T> getSpringFactoriesInstances(Class<T> type, Class<?>[] parameterTypes, Object... args) {

		ClassLoader classLoader = getClassLoader();
		// Use names and ensure unique to protect against duplicates
		Set<String> names = new LinkedHashSet<>(SpringFactoriesLoader.loadFactoryNames(type, classLoader));
		List<T> instances = createSpringFactoriesInstances(type, parameterTypes, classLoader, args, names);
		AnnotationAwareOrderComparator.sort(instances);
		return instances;
	}
// 参数: // Class<?> factoryType:需要被加载的工厂类的class // ClassLoader classLoader:类加载器 public static List<String> loadFactoryNames(Class<?> factoryType, @Nullable ClassLoader classLoader) { ClassLoader classLoaderToUse = classLoader; if (classLoaderToUse == null) { // 若没传入类加载器,使用该本类的类加载器 classLoaderToUse = SpringFactoriesLoader.class.getClassLoader(); } // class.getName():获取该类的全类限定名字 String factoryTypeName = factoryType.getName(); // loadSpringFactories(classLoaderToUse) 返回是Map // Map.getOrDefault(A,B): A为Key,从Map中获取Value,若Value为Null,则返回B 当作返回值 return loadSpringFactories(classLoaderToUse).getOrDefault(factoryTypeName, Collections.emptyList()); }// 该方法是最核心部分: // 1. 从项目中找到所有META-INF/spring.factories // 2. 并解析所有spring.factories文件,生成 Map<一个接口类--->对应所有具体实现类集合>,即Map<key,List<String>> private static Map<String, List<String>> loadSpringFactories(ClassLoader classLoader) { // Map<ClassLoader, Map<String, List<String>>> cache: // 该缓存存储的是:一个类加载器对应 加载spring.factories的结果集 // 这里类加载器的知识往后我再补吧,望有好心人提醒我 Map<String, List<String>> result = cache.get(classLoader); // 有则说明已经加载过了,直接返回 // Map<String, List<String>> result: // key: 接口类的名字--->value: 具体实现类的名字 if (result != null) { return result; } result = new HashMap<>(); try { // public static final String FACTORIES_RESOURCE_LOCATION = "META-INF/spring.factories"; // springboot项目部署之后如何读取到 Resource(ClassPath)下的资源,请看下面博客: // https://blog.csdn.net/xueyijin/article/details/121441738 // Enumeration:可以认为是旧版的迭代器,目前被Iterator取代 // 加载spring.factories资源并封装为URL对象 Enumeration<URL> urls = classLoader.getResources(FACTORIES_RESOURCE_LOCATION); while (urls.hasMoreElements()) { URL url = urls.nextElement(); // UrlResource 类是spring 对URL资源一种封装而已 UrlResource resource = new UrlResource(url); // 解析properties文件,因为spring.factories 本身就是以key-->value来书写的 Properties properties = PropertiesLoaderUtils.loadProperties(resource); for (Map.Entry<?, ?> entry : properties.entrySet()) { // key:接口全限定名字 String factoryTypeName = ((String) entry.getKey()).trim(); // 因为value:是可以写多个,并且要求之间 用,\ 来隔开 // commaDelimitedListToStringArray方法就是把value的值,解析并封装为数组 String[] factoryImplementationNames = StringUtils.commaDelimitedListToStringArray((String) entry.getValue()); for (String factoryImplementationName : factoryImplementationNames) { // result 格式:Map<String, List<String>> // computeIfAbsent(key,function): // 若key 找不到则执行function方法得到value,并put(key,value) // 若key 找的到则直接返回get(key)的值,这里则是List<String>因此后面可以直接跟list.add(String)方法 // Map中compute()、computeIfPresent()、computeIfAbsent()、merge()的使用以及原理,请看这篇博客: // https://blog.csdn.net/xueyijin/article/details/122851868 result.computeIfAbsent(factoryTypeName, key -> new ArrayList<>()) .add(factoryImplementationName.trim()); } } } // Replace all lists with unmodifiable lists containing unique elements // replaceAll(BiFunction):将对map中的value值做一系列变化操作,比如原来key:5,value:5 可以改成key:5 value:5-5 // 由BiFunction 实现最终value值的逻辑 // Collections::unmodifiableList:是不可修改的List类,如果执行set、add等修改操作,直接报错,具体下文会说 // 把spring.factories的key对应的value结果集去重,并且转化为不可变List类 result.replaceAll((factoryType, implementations) -> implementations.stream().distinct() .collect(Collectors.collectingAndThen(Collectors.toList(), Collections::unmodifiableList))); // 放入缓存,防止多次执行上述操作,提高性能 cache.put(classLoader, result); } catch (IOException ex) { throw new IllegalArgumentException("Unable to load factories from location [" + FACTORIES_RESOURCE_LOCATION + "]", ex); } return result; }
//获取所有监听器
setListeners((Collection) getSpringFactoriesInstances(ApplicationListener.class));
//定位main方法
this.mainApplicationClass = deduceMainApplicationClass(); private Class<?> deduceMainApplicationClass() {
try {
//通过创建运行时异常的方式获取栈
StackTraceElement[] stackTrace = new RuntimeException().getStackTrace();
//遍历获取main方法所在的类并且返回
for (StackTraceElement stackTraceElement : stackTrace) {
if ("main".equals(stackTraceElement.getMethodName())) {
return Class.forName(stackTraceElement.getClassName());
}
}
}
catch (ClassNotFoundException ex) {
// Swallow and continue
}
return null;
}
整个流程就是这样,参数为rsourceLoader用来打印艺术字,primarySources用来接收入口类;
288行:获取到的入口类实例;
289行:获取应用类型
290行:去meta-inf/spring.factories目录下查找ApplicationContextInitializer并且保存起来
291行:获取所有的初始化器
292行:获取所有的监听器
293行:定位main方法;
1.3run()
了解完构造方法所有的功能之后,现在要做的事情就是走到run()方法了,拆分了解,代码沾到最后。
首先是构造SpringApplication实例代码,
return new SpringApplication(primarySources).run(args);会将当前入口类(SpringApplication.class:你自己入口类的名字)传入构造方法,构造方法中会将此参数放在
this.primarySources进行存储。(看构造方法)
run方法:
//用来记录当前SpringBoot启动耗时
StopWatch stopWatch = new StopWatch();
//记录启动开始时间
		stopWatch.start();

//创建引导启动器,类似一个ApplicationContext,可以往里面添加一些对象。
DefaultBootstrapContext bootstrapContext = createBootstrapContext();

/*
*去spring.factroies中读取了 org.springframework.boot.SpringApplicationRunListener为key的对
*象,默认是EventPublishingRunListener对象,
*然后封装进SpringApplicationRunListeners 对象中,
*此对象还是比较有用的,用来发布springboot启动进行中的各个状态的事件,
*上面方法中读取到的监听器就可以监听到这些事件,
*所以可以运用这些特性进行自己的扩展。
*/
 SpringApplicationRunListeners listeners = getRunListeners(args);

//发布ApplicationStartingEvent事件,在运行开始时发送 ,发送springboot启动开始事件;
listeners.starting(bootstrapContext, this.mainApplicationClass);
try{}里面的方法:
//根据启动项目命令所带的参数创建applicationArguments 对象
ApplicationArguments applicationArguments = new DefaultApplicationArguments(args);
//根据SpringApplicationRunListeners对象和参数来准备环境
ConfigurableEnvironment environment = prepareEnvironment(listeners, bootstrapContext, applicationArguments);
configureIgnoreBeanInfo(environment);//打字:启动SpringBoot的时候打印在控制台上的ASCII艺术字
Banner printedBanner = printBanner(environment);//根据容器类型,创建对应的Spring上下文,也就是ApplicainContext上下文对象。
context = createApplicationContext();
//给spring上下文赋值DefaultApplicationStartup对象
context.setApplicationStartup(this.applicationStartup);//预初始化上下文,添加environment,上面获取到的initializers集合中的ApplicationContextInitializer
//对象执行其入参为上下文initialize方法,对上下文做编辑,所以此处我们可以做扩展;发送
//ApplicationContextInitializedEvent容器初始化事件;发送BootstrapContextClosedEvent事件;最重
//要的一个方法就是把启动配置类注册成了beanDefinition;发送ApplicationPreparedEvent事件,并把
//listeners集合属性中的事件添加到上下文中;
prepareContext(bootstrapContext, context, environment, listeners, applicationArguments, printedBanner);
//刷新容器,和spring中的refresh()方法的作用是一样的,主要的作用就是读取所有的bean转成、
//beanDefinition然后再创建bean对象;不过这个容器重写了其中的onRefresh()方法,在此方法中,创建了
//springboot内置的tomcat对象并进行启动;接下来特别说明一下这个内置tomcat
refreshContext(context);
//Spring容器后置处理
afterRefresh(context, applicationArguments);//打印启动时间
if (this.logStartupInfo) {
new StartupInfoLogger(this.mainApplicationClass).logStarted(getApplicationLog(), stopWatch);
}
//发布容器启动事件ApplicationStartedEvent;
//发布AvailabilityChangeEvent容器;
listeners.started(context);

started源码👇
@Override
	public void started(ConfigurableApplicationContext context) {
		context.publishEvent(new ApplicationStartedEvent(this.application, this.args, context));
		AvailabilityChangeEvent.publish(context, LivenessState.CORRECT);
	}
//执行容器中ApplicationRunner、ApplicationRunner类型对象的run方法
callRunners(context, applicationArguments);//发布ApplicationReadyEvent容器已经正常事件
listeners.running(context);prepareEnvironment()
getOrCreateEnvironment()👇
private ConfigurableEnvironment getOrCreateEnvironment() {
		if (this.environment != null) {
			return this.environment;
		}
		switch (this.webApplicationType) {
		case SERVLET:
			return new ApplicationServletEnvironment();
		case REACTIVE:
			return new ApplicationReactiveWebEnvironment();
		default:
			return new ApplicationEnvironment();
		}
	}
private ConfigurableEnvironment prepareEnvironment(SpringApplicationRunListeners listeners,
ApplicationArguments applicationArguments) {
// 根据webApplicationType 创建Environment 创建就会读取: java环境变量和系统环境变量
ConfigurableEnvironment environment = getOrCreateEnvironment();
// 将命令行参数读取环境变量中
configureEnvironment(environment, applicationArguments.getSourceArgs());
// 将@PropertieSource的配置信息 放在第一位, 因为读取配置文件@PropertieSource优先级是最低的
ConfigurationPropertySources.attach(environment);
// 发布了ApplicationEnvironmentPreparedEvent 的监听器 读取了全局配置文件
listeners.environmentPrepared(environment);
// 将所有spring.main 开头的配置信息绑定SpringApplication
bindToSpringApplication(environment);
if (!this.isCustomEnvironment) {
environment = new EnvironmentConverter(getClassLoader()).convertEnvironmentIfNecessary(environment,
deduceEnvironmentClass());
}
//更新PropertySources
ConfigurationPropertySources.attach(environment);
return environment;
} public ConfigurableApplicationContext run(String... args) {
StopWatch stopWatch = new StopWatch();
stopWatch.start();
DefaultBootstrapContext bootstrapContext = createBootstrapContext();
ConfigurableApplicationContext context = null;
configureHeadlessProperty();
SpringApplicationRunListeners listeners = getRunListeners(args);
listeners.starting(bootstrapContext, this.mainApplicationClass);
try {
ApplicationArguments applicationArguments = new DefaultApplicationArguments(args);
ConfigurableEnvironment environment = prepareEnvironment(listeners, bootstrapContext, applicationArguments);
configureIgnoreBeanInfo(environment);
Banner printedBanner = printBanner(environment);
context = createApplicationContext();
context.setApplicationStartup(this.applicationStartup);
prepareContext(bootstrapContext, context, environment, listeners, applicationArguments, printedBanner);
refreshContext(context);
afterRefresh(context, applicationArguments);
stopWatch.stop();
if (this.logStartupInfo) {
new StartupInfoLogger(this.mainApplicationClass).logStarted(getApplicationLog(), stopWatch);
}
listeners.started(context);
callRunners(context, applicationArguments);
}
catch (Throwable ex) {
handleRunFailure(context, ex, listeners);
throw new IllegalStateException(ex);
}
try {
listeners.running(context);
}
catch (Throwable ex) {
handleRunFailure(context, ex, null);
throw new IllegalStateException(ex);
}
return context;
}1.4分析细节处理
监听器
// 1:获取并启动监听器
    SpringApplicationRunListeners listeners = getRunListeners(args);
    listeners.starting();
这部分代码,用的也是此方法
SpringFactoriesLoader.loadFactoryNames(type, classLoader),目的是去spring.properties中获取SpringApplicationRunListener实现类的全限定名,然后通过反射构造实例,再将实例给引用的类型:
SpringApplicationRunListeners容器来管理
创建容器
跟踪源码
context = createApplicationContext();
我们再次点击create();有两个实现类,点击进去
@Override
		public ConfigurableApplicationContext create(WebApplicationType webApplicationType) {
			return (webApplicationType != WebApplicationType.SERVLET) ? null
					: new AnnotationConfigServletWebServerApplicationContext();
		}
@Override public ConfigurableApplicationContext create(WebApplicationType webApplicationType) { return (webApplicationType != WebApplicationType.REACTIVE) ? null : new AnnotationConfigReactiveWebServerApplicationContext(); }我们发现会进行WebApplicationType的判断,如果为SERVLET,则返回的容器是AnnotationConfigServletWebServerApplicationContext,
兄弟们需要注意,这两个类型全都是继承了或者变量继承了GenericApplicationContext


容器前置处理
prepareContext(bootstrapContext, context, environment, listeners, applicationArguments, printedBanner);在容器的前置准备中,我追踪了很深的源码,注意看
其中,重要的是prepareContext完成了对启动类的加载,注入到容器
追踪getAllSources()方法👇
public Set<Object> getAllSources() { Set<Object> allSources = new LinkedHashSet<>(); if (!CollectionUtils.isEmpty(this.primarySources)) { allSources.addAll(this.primarySources); } if (!CollectionUtils.isEmpty(this.sources)) { allSources.addAll(this.sources); } return Collections.unmodifiableSet(allSources); }其中参数this.primarySources,debug我们发现是我们的启动类!!!也就是说,Set<Object> sources = getAllSources();返回的sources是我们的启动类!
然后注意看下一行代码👇
load(context, sources.toArray(new Object[0]));sources.toArray(new Object[0]))不用说了,就是启动类对象,context也是我们上面获取的应用上下文对象,一切都很清晰,接着向下走👇
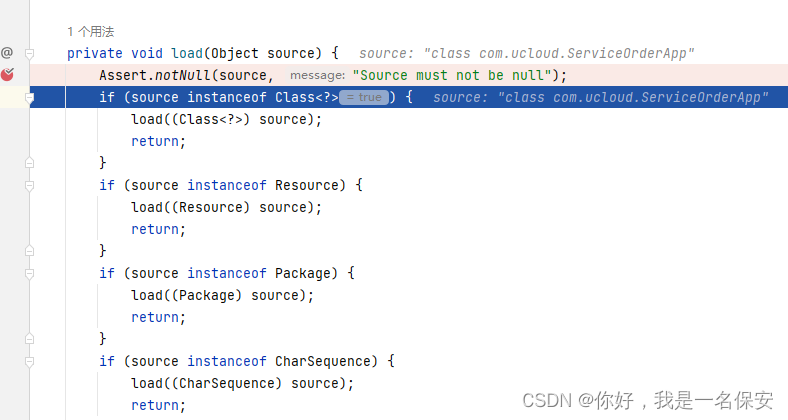
protected void load(ApplicationContext context, Object[] sources) {
		if (logger.isDebugEnabled()) {
			logger.debug("Loading source " + StringUtils.arrayToCommaDelimitedString(sources));
		}
		BeanDefinitionLoader loader = createBeanDefinitionLoader(getBeanDefinitionRegistry(context), sources);
		if (this.beanNameGenerator != null) {
			loader.setBeanNameGenerator(this.beanNameGenerator);
		}
		if (this.resourceLoader != null) {
			loader.setResourceLoader(this.resourceLoader);
		}
		if (this.environment != null) {
			loader.setEnvironment(this.environment);
		}
		loader.load();
	}
在这里,BeanDefinitionLoader loader = createBeanDefinitionLoader(getBeanDefinitionRegistry(context), sources);这行代码创建了BeanDefinitionLoader对象,并且也是使用的其load()方法去实现的,这个createBeanDefinitionLoader()方法也是new了一个新的BeanDefinitionLoader实例
protected BeanDefinitionLoader createBeanDefinitionLoader(BeanDefinitionRegistry registry, Object[] sources) { return new BeanDefinitionLoader(registry, sources); }然后进入load()👇private void load(Object source) { Assert.notNull(source, "Source must not be null"); if (source instanceof Class<?>) { load((Class<?>) source); return; } if (source instanceof Resource) { load((Resource) source); return; } if (source instanceof Package) { load((Package) source); return; } if (source instanceof CharSequence) { load((CharSequence) source); return; } throw new IllegalArgumentException("Invalid source type " + source.getClass()); }
将启动类对象传递进来比较为true,走load((Class<?>) source方法,
private void load(Class<?> source) {
		if (isGroovyPresent() && GroovyBeanDefinitionSource.class.isAssignableFrom(source)) {
			// Any GroovyLoaders added in beans{} DSL can contribute beans here
			GroovyBeanDefinitionSource loader = BeanUtils.instantiateClass(source, GroovyBeanDefinitionSource.class);
			((GroovyBeanDefinitionReader) this.groovyReader).beans(loader.getBeans());
		}
		if (isEligible(source)) {
			this.annotatedReader.register(source);
		}
	}
第一个判断为 判断使用groovy脚本,false跳过;第二个判断 (判断类是否符合条件){ //使用注解读取器注册资源};后续该启动类将 作为开启自动化配置的入口


刷新容器
前面都是SpringBoot的工作,Bean放在IOC容器中,从现在开始就是Spring的部分了。
太多了,不写了
后置处理
afterRefresh(context, applicationArguments);
扩展接口,设计模式中的模板方法,默认为空实现。如果有自定义需求,可以重写该方法。比如打印一些启动结束log,或者一些其它后置处理。
截止时间记录
stopWatch.stop();
发出结束执行的事件
listeners.started(context)@Override public void started(ConfigurableApplicationContext context) { context.publishEvent(new ApplicationStartedEvent(this.application, this.args, context)); AvailabilityChangeEvent.publish(context, LivenessState.CORRECT); }一个是发布容器启动事件ApplicationStartedEvent,
另一个是发布AvailabilityChangeEvent容器可用于实践
callRunners
callRunners(context, applicationArguments)private void callRunners(ApplicationContext context, ApplicationArguments args) { List<Object> runners = new ArrayList<>(); runners.addAll(context.getBeansOfType(ApplicationRunner.class).values()); runners.addAll(context.getBeansOfType(CommandLineRunner.class).values()); AnnotationAwareOrderComparator.sort(runners); for (Object runner : new LinkedHashSet<>(runners)) { if (runner instanceof ApplicationRunner) { callRunner((ApplicationRunner) runner, args); } if (runner instanceof CommandLineRunner) { callRunner((CommandLineRunner) runner, args); } } }SpringBoot源码解析(二十)ApplicationRunner_一元咖啡的博客-CSDN博客_spring applicationrunner原理可以自定义 ApplicationRunner 或 CommandLineRunner,实现 run 方法,注入到容器中, 在SpringBoot 启动后,就会执行所有的 runner 的 run 方法。
return context
END


 1991
1991


 被折叠的 条评论
为什么被折叠?
被折叠的 条评论
为什么被折叠?
 到【灌水乐园】发言


