


RabbitMq+WebSocket+Quartz
1、Java当中实现定时的六种方法
几乎在所有的项目中,定时任务的使用都是不可或缺的,如果使用不当甚至会造成资损。还记得多年前在做金融系统时,出款业务是通过定时任务对外打款,当时由于银行接口处理能力有限,外加定时任务使用不当,导致发出大量重复出款请求。还好在后面环节将交易卡在了系统内部,未发生资损。
线程等待实现
先从最原始最简单的方式来讲解。可以先创建一个thread,然后让它在while循环里一直运行着,通过sleep方法来达到定时任务的效果。
public class Task {

    public static void main(String[] args) {
        // run in a second
        final long timeInterval = 1000;
        Runnable runnable = new Runnable() {
            @Override
            public void run() {
                while (true) {
                    System.out.println("Hello !!");
                    try {
                        Thread.sleep(timeInterval);
                    } catch (InterruptedException e) {
                        e.printStackTrace();
                    }
                }
            }
        };
        Thread thread = new Thread(runnable);
        thread.start();
    }
}
这种方式简单直接,但是能够实现的功能有限,而且需要自己来实现。
JDK自带Timer实现
目前来看,JDK自带的Timer API算是最古老的定时任务实现方式了。Timer是一种定时器工具,用来在一个后台线程计划执行指定任务。它可以安排任务“执行一次”或者定期“执行多次”。
在实际的开发当中,经常需要一些周期性的操作,比如每5分钟执行某一操作等。对于这样的操作最方便、高效的实现方式就是使用java.util.Timer工具类。核心方法
Timer类的核心方法如下:
// 在指定延迟时间后执行指定的任务
schedule(TimerTask task,long delay);

// 在指定时间执行指定的任务。(只执行一次)
schedule(TimerTask task, Date time);

// 延迟指定时间(delay)之后,开始以指定的间隔(period)重复执行指定的任务
schedule(TimerTask task,long delay,long period);

// 在指定的时间开始按照指定的间隔(period)重复执行指定的任务
schedule(TimerTask task, Date firstTime , long period);

// 在指定的时间开始进行重复的固定速率执行任务
scheduleAtFixedRate(TimerTask task,Date firstTime,long period);

// 在指定的延迟后开始进行重复的固定速率执行任务
scheduleAtFixedRate(TimerTask task,long delay,long period);

// 终止此计时器,丢弃所有当前已安排的任务。
cancal();

// 从此计时器的任务队列中移除所有已取消的任务。
purge();
下面用几个示例演示一下核心方法的使用。首先定义一个通用的TimerTask类,用于定义用执行的任务。
public class DoSomethingTimerTask extends TimerTask {

    private String taskName;

    public DoSomethingTimerTask(String taskName) {
        this.taskName = taskName;
    }

    @Override
    public void run() {
        System.out.println(new Date() + " : 任务「" + taskName + "」被执行。");
    }
}
执行上述代码,延迟一秒之后执行定时任务,并打印结果。其中第二个参数单位为毫秒。
固定间隔执行
在指定的延迟时间开始执行定时任务,定时任务按照固定的间隔进行执行。比如:延迟2秒执行,固定执行间隔为1秒
public class PeriodDemo {

    public static void main(String[] args) {
        Timer timer = new Timer();
        timer.schedule(new DoSomethingTimerTask("PeriodDemo"),2000L,1000L);
    }
}
固定速率执行
在指定的延迟时间开始执行定时任务,定时任务按照固定的速率进行执行。比如:延迟2秒执行,固定速率为1秒。
public class FixedRateDemo {

    public static void main(String[] args) {
        Timer timer = new Timer();
        timer.scheduleAtFixedRate(new DoSomethingTimerTask("FixedRateDemo"),2000L,1000L);
    }
}
执行程序,会发现2秒之后开始每隔1秒执行一次。
Timer的缺陷
Timer计时器可以定时(指定时间执行任务)、延迟(延迟5秒执行任务)、周期性地执行任务(每隔个1秒执行任务)。但是,Timer存在一些缺陷。首先Timer对调度的支持是基于绝对时间的,而不是相对时间,所以它对系统时间的改变非常敏感。
其次Timer线程是不会捕获异常的,如果TimerTask抛出的了未检查异常则会导致Timer线程终止,同时Timer也不会重新恢复线程的执行,它会错误的认为整个Timer线程都会取消。同时,已经被安排单尚未执行的TimerTask也不会再执行了,新的任务也不能被调度。故如果TimerTask抛出未检查的异常,Timer将会产生无法预料的行为。
JDK自带ScheduledExecutorService
ScheduledExecutorService是JAVA 1.5后新增的定时任务接口,它是基于线程池设计的定时任务类,每个调度任务都会分配到线程池中的一个线程去执行。也就是说,任务是并发执行,互不影响。
需要注意:只有当执行调度任务时,ScheduledExecutorService才会真正启动一个线程,其余时间ScheduledExecutorService都是出于轮询任务的状态。
ScheduledExecutorService主要有以下4个方法:
ScheduledFuture<?> schedule(Runnable command,long delay, TimeUnit unit);
<V> ScheduledFuture<V> schedule(Callable<V> callable,long delay, TimeUnit unit);
ScheduledFuture<?> scheduleAtFixedRate(Runnable command,long initialDelay,long period,TimeUnitunit);
ScheduledFuture<?> scheduleWithFixedDelay(Runnable command,long initialDelay,long delay,TimeUnitunit);
其中scheduleAtFixedRate和scheduleWithFixedDelay在实现定时程序时比较方便,运用的也比较多。
ScheduledExecutorService中定义的这四个接口方法和Timer中对应的方法几乎一样,只不过Timer的scheduled方法需要在外部传入一个TimerTask的抽象任务。
而ScheduledExecutorService封装的更加细致了,传Runnable或Callable内部都会做一层封装,封装一个类似TimerTask的抽象任务类(ScheduledFutureTask)。然后传入线程池,启动线程去执行该任务。scheduleAtFixedRate方法
scheduleAtFixedRate
方法,按指定频率周期执行某个任务。定义及参数说明:
public ScheduledFuture<?> scheduleAtFixedRate(Runnable command,
				long initialDelay,
				long period,
				TimeUnit unit);
参数对应含义:command为被执行的线程;initialDelay为初始化后延时执行时间;period为两次开始执行最小间隔时间;unit为计时单位。
使用实例:
public class ScheduleAtFixedRateDemo implements Runnable{

    public static void main(String[] args) {
        ScheduledExecutorService executor = Executors.newScheduledThreadPool(1);
        executor.scheduleAtFixedRate(
                new ScheduleAtFixedRateDemo(),
                0,
                1000,
                TimeUnit.MILLISECONDS);
    }

    @Override
    public void run() {
        System.out.println(new Date() + " : 任务「ScheduleAtFixedRateDemo」被执行。");
        try {
            Thread.sleep(2000L);
        } catch (InterruptedException e) {
            e.printStackTrace();
        }
    }
}
上面是scheduleAtFixedRate方法的基本使用方式,但当执行程序时会发现它并不是间隔1秒执行的,而是间隔2秒执行。
这是因为,scheduleAtFixedRate是以period为间隔来执行任务的,如果任务执行时间小于period,则上次任务执行完成后会间隔period后再去执行下一次任务;但如果任务执行时间大于period,则上次任务执行完毕后会不间隔的立即开始下次任务。
scheduleWithFixedDelay方法
scheduleWithFixedDelay方法,按指定频率间隔执行某个任务。定义及参数说明:
public ScheduledFuture<?> scheduleWithFixedDelay(Runnable command,
				long initialDelay,
				long delay,
				TimeUnit unit);
参数对应含义:command为被执行的线程;initialDelay为初始化后延时执行时间;period为前一次执行结束到下一次执行开始的间隔时间(间隔执行延迟时间);unit为计时单位。
使用实例:
public class ScheduleAtFixedRateDemo implements Runnable{

    public static void main(String[] args) {
        ScheduledExecutorService executor = Executors.newScheduledThreadPool(1);
        executor.scheduleWithFixedDelay(
                new ScheduleAtFixedRateDemo(),
                0,
                1000,
                TimeUnit.MILLISECONDS);
    }

    @Override
    public void run() {
        System.out.println(new Date() + " : 任务「ScheduleAtFixedRateDemo」被执行。");
        try {
            Thread.sleep(2000L);
        } catch (InterruptedException e) {
            e.printStackTrace();
        }
    }
}
上面是scheduleWithFixedDelay方法的基本使用方式,但当执行程序时会发现它并不是间隔1秒执行的,而是间隔3秒。
这是因为scheduleWithFixedDelay是不管任务执行多久,都会等上一次任务执行完毕后再延迟delay后去执行下次任务。
Quartz框架实现
除了JDK自带的API之外,我们还可以使用开源的框架来实现,比如Quartz。
Quartz是Job scheduling(作业调度)领域的一个开源项目,Quartz既可以单独使用也可以跟spring框架整合使用,在实际开发中一般会使用后者。使用Quartz可以开发一个或者多个定时任务,每个定时任务可以单独指定执行的时间,例如每隔1小时执行一次、每个月第一天上午10点执行一次、每个月最后一天下午5点执行一次等。
Quartz通常有三部分组成:调度器(Scheduler)、任务(JobDetail)、触发器(Trigger,包括SimpleTrigger和CronTrigger)。下面以具体的实例进行说明。
Quartz集成
要使用Quartz,首先需要在项目的pom文件中引入相应的依赖:
<dependency>
    <groupId>org.quartz-scheduler</groupId>
    <artifactId>quartz</artifactId>
    <version>2.3.2</version>
</dependency>
<dependency>
    <groupId>org.quartz-scheduler</groupId>
    <artifactId>quartz-jobs</artifactId>
    <version>2.3.2</version>
</dependency>
定义执行任务的Job,这里要实现Quartz提供的Job接口:
public class PrintJob implements Job {
    @Override
    public void execute(JobExecutionContext jobExecutionContext) throws JobExecutionException {
        System.out.println(new Date() + " : 任务「PrintJob」被执行。");
    }
}
创建Scheduler和Trigger,并执行定时任务:
public class MyScheduler {

    public static void main(String[] args) throws SchedulerException {
        // 1、创建调度器Scheduler
        SchedulerFactory schedulerFactory = new StdSchedulerFactory();
        Scheduler scheduler = schedulerFactory.getScheduler();
        // 2、创建JobDetail实例,并与PrintJob类绑定(Job执行内容)
        JobDetail jobDetail = JobBuilder.newJob(PrintJob.class)
                .withIdentity("job", "group").build();
        // 3、构建Trigger实例,每隔1s执行一次
        Trigger trigger = TriggerBuilder.newTrigger().withIdentity("trigger", "triggerGroup")
                .startNow()//立即生效
                .withSchedule(SimpleScheduleBuilder.simpleSchedule()
                        .withIntervalInSeconds(1)//每隔1s执行一次
                        .repeatForever()).build();//一直执行

        //4、Scheduler绑定Job和Trigger,并执行
        scheduler.scheduleJob(jobDetail, trigger);
        System.out.println("--------scheduler start ! ------------");
        scheduler.start();
    }
}
执行程序,可以看到每1秒执行一次定时任务。
在上述代码中,其中Job为Quartz的接口,业务逻辑的实现通过实现该接口来实现。
JobDetail绑定指定的Job,每次Scheduler调度执行一个Job的时候,首先会拿到对应的Job,然后创建该Job实例,再去执行Job中的execute()的内容,任务执行结束后,关联的Job对象实例会被释放,且会被JVM GC清除。
Trigger是Quartz的触发器,用于通知Scheduler何时去执行对应Job。SimpleTrigger可以实现在一个指定时间段内执行一次作业任务或一个时间段内多次执行作业任务。
CronTrigger功能非常强大,是基于日历的作业调度,而SimpleTrigger是精准指定间隔,所以相比SimpleTrigger,CroTrigger更加常用。CroTrigger是基于Cron表达式的。
常见的Cron表达式示例如下:

可以看出,基于Quartz的CronTrigger可以实现非常丰富的定时任务场景。
Spring Task
从Spring 3开始,Spring自带了一套定时任务工具Spring-Task,可以把它看成是一个轻量级的Quartz,使用起来十分简单,除Spring相关的包外不需要额外的包,支持注解和配置文件两种形式。通常情况下在Spring体系内,针对简单的定时任务,可直接使用Spring提供的功能。
基于XML配置文件的形式就不再介绍了,直接看基于注解形式的实现。使用起来非常简单,直接上代码:
@Component("taskJob")
public class TaskJob {

    @Scheduled(cron = "0 0 3 * * ?")
    public void job1() {
        System.out.println("通过cron定义的定时任务");
    }

    @Scheduled(fixedDelay = 1000L)
    public void job2() {
        System.out.println("通过fixedDelay定义的定时任务");
    }

    @Scheduled(fixedRate = 1000L)
    public void job3() {
        System.out.println("通过fixedRate定义的定时任务");
    }
}
如果是在Spring Boot项目中,需要在启动类上添加@EnableScheduling来开启定时任务。
上述代码中,@Component用于实例化类,这个与定时任务无关。@Scheduled指定该方法是基于定时任务进行执行,具体执行的频次是由cron指定的表达式所决定。关于cron表达式上面CronTrigger所使用的表达式一致。与cron对照的,Spring还提供了fixedDelay和fixedRate两种形式的定时任务执行。
fixedDelay和fixedRate的区别
fixedDelay和fixedRate的区别于Timer中的区别很相似。
fixedRate有一个时刻表的概念,在任务启动时,T1、T2、T3就已经排好了执行的时刻,比如1分、2分、3分,当T1的执行时间大于1分钟时,就会造成T2晚点,当T1执行完时T2立即执行。
fixedDelay比较简单,表示上个任务结束,到下个任务开始的时间间隔。无论任务执行花费多少时间,两个任务间的间隔始终是一致的。
Spring Task的缺点
Spring Task 本身不支持持久化,也没有推出官方的分布式集群模式,只能靠开发者在业务应用中自己手动扩展实现,无法满足可视化,易配置的需求。
分布式任务调度
以上定时任务方案都是针对单机的,只能在单个JVM进程中使用。而现在基本上都是分布式场景,需要一套在分布式环境下高性能、高可用、可扩展的分布式任务调度框架。
Quartz分布式
首先,Quartz是可以用于分布式场景的,但需要基于数据库锁的形式。简单来说,quartz的分布式调度策略是以数据库为边界的一种异步策略。各个调度器都遵守一个基于数据库锁的操作规则从而保证了操作的唯一性,同时多个节点的异步运行保证了服务的可靠。
因此,Quartz的分布式方案只解决了任务高可用(减少单点故障)的问题,处理能力瓶颈在数据库,而且没有执行层面的任务分片,无法最大化效率,只能依靠shedulex调度层面做分片,但是调度层做并行分片难以结合实际的运行资源情况做最优的分片。
轻量级神器XXL-Job
XXL-JOB是一个轻量级分布式任务调度平台。特点是平台化,易部署,开发迅速、学习简单、轻量级、易扩展。由调度中心和执行器功能完成定时任务的执行。调度中心负责统一调度,执行器负责接收调度并执行。
针对于中小型项目,此框架运用的比较多。
demo项目模拟发送消息
- 新建一个springboot项目
- yml配置如下
- rabbitMq 默认端口是5672,用户名密码都是admin
server:
  port: 8080

spring:
  thymeleaf:
    mode: HTML
  rabbitmq:
    host: 127.0.0.1
    port: 5672
    username: guest
    password: guest
    publisher-confirms: true    #  消息发送到交换机确认机制,是否确认回调
    publisher-returns: true
    listener:
      simple:
        acknowledge-mode: manual
在处理后端业务逻辑的时候,需要我们同时向前端页面返回一个通知,我们通过rabbitMq来发送消息,可这消息不是在后端进行处理,而是需要返回前端去展示,所以我们就需要通过webSocket来讲我们的消息异步返回给前端处理
pom文件结构 引入 rabbitmq 与 webSocket 同时还有 quartz 后续我们会用到
同时还引入了 thymeleaf 模板引擎,这样可以再html页面直接获取后端model中的值
RabbitMq配置
- 接下类就是rabbitMq配置,
- 首先我们配置一个 RabbitMqConfig类,来声明队列,和绑定交换机与路由
- 现有一个RabbitConstant 类,声明名称
package com.workfeng.message.config.constant;

public class RabbitConstant {
    //交换机名称
    public final static String EXCHANGE = "exchange_test";
    //队列
    public final static String QUEUE_TRANSACTION = "queue_transaction";
    public final static String QUEUE_CONTRACT = "queue_contract";
    public final static String QUEUE_QUALIFICATION = "queue_qualification";
    //路由key
    public final static String RK_TRANSACTION = "transaction";
    public final static String RK_CONTRACT = "contract";
    public final static String RK_QUALIFICATION = "qualification";
}
- 接下来是 RabbitMqConfig 配置类,
package com.workfeng.message.config.rabbitmq;

import com.workfeng.message.config.constant.RabbitConstant;
import org.springframework.amqp.core.Binding;
import org.springframework.amqp.core.BindingBuilder;
import org.springframework.amqp.core.DirectExchange;
import org.springframework.amqp.core.Queue;
import org.springframework.context.annotation.Bean;
import org.springframework.context.annotation.Configuration;

@Configuration
public class RabbitMqConfig {

    /**
     * 声明队列
     *
     * @return
     */
    @Bean
    public Queue queueTransaction() {
        // true表示持久化该队列
        return new Queue(RabbitConstant.QUEUE_TRANSACTION, true);
    }

    @Bean
    public Queue queueContract() {
        // true表示持久化该队列
        return new Queue(RabbitConstant.QUEUE_CONTRACT, true);
    }

    @Bean
    public Queue queueQualification() {
        // true表示持久化该队列
        return new Queue(RabbitConstant.QUEUE_QUALIFICATION, true);
    }

    /**
     * 声明交互器
     *
     * @return
     */
    @Bean
    DirectExchange directExchange() {
        return new DirectExchange(RabbitConstant.EXCHANGE);
    }

    /**
     * 绑定
     *
     * @return
     */
    @Bean
    public Binding bindingTransaction() {
        return BindingBuilder.bind(queueTransaction()).to(directExchange()).with(RabbitConstant.RK_TRANSACTION);
    }

    /**
     * 绑定
     *
     * @return
     */
    @Bean
    public Binding bindingContract() {
        return BindingBuilder.bind(queueContract()).to(directExchange()).with(RabbitConstant.RK_CONTRACT);
    }

    /**
     * 绑定
     *
     * @return
     */
    @Bean
    public Binding bindingQualification() {
        return BindingBuilder.bind(queueQualification()).to(directExchange()).with(RabbitConstant.RK_QUALIFICATION);
    }

}
WebSocket配置
-
接下来就是去监听 RabbitMq 队列,如果有消息发送了,就通过webSocket发送到前端页面,给出弹出框提示,所以我们先来配置webSocket,再去处理监听事件。
-
这是我的前端资源文件摆放位置,消息弹框组件组要依赖jQuery,引了一个jquery.js
-
这边我只用了一个index页面,我们先用controller访问index页面
-
模拟一个用户登陆,在model中放入一个用户id,到index页面获取
package com.workfeng.message.controller;

import com.workfeng.message.config.rabbitmq.MessageVo;
import com.workfeng.message.config.rabbitmq.Sender;
import com.workfeng.message.utils.SuccessTip;
import org.springframework.beans.factory.annotation.Autowired;
import org.springframework.stereotype.Controller;
import org.springframework.ui.Model;
import org.springframework.web.bind.annotation.RequestMapping;
import org.springframework.web.bind.annotation.ResponseBody;

import java.util.Arrays;

@Controller
public class IndexController {

    @Autowired
    private Sender sender;

    @RequestMapping("/index")
    public String index(Model model){

        // 假设用户1登陆
        model.addAttribute("userId","1");

        return "index";
    }
}
- 然后是index页面下 webSocket 的配置信息
<script>
    layui.use(['layer',"jquery"], function(){
        var layer = layui.layer;
        $ = layui.jquery;

        var websocket = null;
        var userId = $("#userId").val();

        //判断当前浏览器是否支持WebSocket
        if ('WebSocket' in window) {
            // 连接服务端  并将userId带入
            websocket = new WebSocket("ws://localhost:8080/ws/message/"+userId);
        }
        else {
            alert('当前浏览器 不支持WebSocket')
        }

        //连接发生错误的回调方法
        websocket.onerror = function () {
            //setMessageInnerHTML("连接发生错误");
            console.log("webSocket 连接发生错误")
        };

        //连接成功建立的回调方法
        websocket.onopen = function () {
            console.log("webSocket 连接成功")
        };

        //接收到消息的回调方法,此处添加处理接收消息方法,当前是将接收到的信息显示在网页上
        websocket.onmessage = function (event) {
            setMessageInnerHTML(event.data);
        };

        //连接关闭的回调方法
        websocket.onclose = function () {
            console.log("webSocket 连接关闭,如需登录请刷新页面。")
        };

        //监听窗口关闭事件,当窗口关闭时,主动去关闭websocket连接,防止连接还没断开就关闭窗口,server端会抛异常。
        window.onbeforeunload = function () {
            websocket.close();
        };

        //将消息显示在网页上,如果不需要显示在网页上,则不调用该方法
        function setMessageInnerHTML(result) {
            var message = JSON.parse(result.replace(/'/g,'\"'));
            // 消息不为空
            if(message !== undefined && message !== null){
                // 播放通知
                //$("#chatAudio").get(0).play();
                // 消息状态 log(默认), success(成功), warn(警告), error(危险)
                var status = message.status;
                naranja()[status]({
                    title: '新消息',
                    text:  "<div class='goto' m-type='"+message.type+"' m-key='"+message.bussinessKey+"'><a href='javascript:void(0)'>"+message.message+"</a></div>",
                    timeout: 'keep',
                    buttons: [{
                        text: '我知道了',
                        click: function (e) {
                            e.closeNotification();
                        }
                    }]
                })
            }
        }
		/**
         * 链接点击事件
         */
        $(document).on("click",".goto",function () {
            // 消息类型
            var type = $(this).attr("m-type");
            // 消息key
            var key = $(this).attr("m-key");
            // 点击之后关闭当前消息框
            naranja().closeThisNotification(this);
            // 根据类型去相应页面
            if(type === "todo"){
                // 根据 type请求不同的页面,key可作为参数携带
            }
        });
    });
</script>
- 接下来就是服务端的webSocket配置,要和js中的对应起来,首先是config类
package com.workfeng.message.config.webSocket;

import org.springframework.context.annotation.Bean;
import org.springframework.context.annotation.Configuration;
import org.springframework.web.socket.server.standard.ServerEndpointExporter;

@Configuration
public class WebSocketConfig {

    @Bean
    public ServerEndpointExporter serverEndpointExporter() {
        return new ServerEndpointExporter();
    }

}
- 然后是连接网页端的配置类
package com.workfeng.message.config.webSocket;

import com.alibaba.fastjson.JSONObject;
import com.workfeng.message.config.rabbitmq.MessageVo;
import org.slf4j.Logger;
import org.slf4j.LoggerFactory;
import org.springframework.stereotype.Component;

import javax.websocket.*;
import javax.websocket.server.PathParam;
import javax.websocket.server.ServerEndpoint;
import java.io.IOException;
import java.util.Iterator;
import java.util.Map;
import java.util.concurrent.ConcurrentHashMap;

/**
 * ServerEndpoint
 * <p>
 * 使用springboot的唯一区别是要@Component声明下,而使用独立容器是由容器自己管理websocket的,但在springboot中连容器都是spring管理的。
 * <p>
 * 虽然@Component默认是单例模式的,但springboot还是会为每个websocket连接初始化一个bean,所以可以用一个静态set保存起来。
 */
@ServerEndpoint("/ws/message/{userId}") //WebSocket客户端建立连接的地址
@Component
public class WebSocketServerEndpoint {

    private final static Logger log = LoggerFactory.getLogger(WebSocketServerEndpoint.class);
    /**
     * 存活的session集合(使用线程安全的map保存)
     */
    private static Map<String, Session> livingSessions = new ConcurrentHashMap<>();
    /**
     * 未发送出的消息
     */
    public static Map<String,Map<String,String>> unSensMessages = new ConcurrentHashMap<>();
    /**
     * 建立连接的回调方法
     *
     * @param session 与客户端的WebSocket连接会话
     * @param userId  用户名,WebSocket支持路径参数
     */
    @OnOpen
    public void onOpen(Session session, @PathParam("userId") String userId) {
        // 建立连接时 保存当前登陆人到已登录集合中
        livingSessions.put(userId, session);
        // 判断当前登陆人是否有未读的消息  有则发送
        Iterator<Map.Entry<String, Map<String, String>>> iterator = unSensMessages.entrySet().iterator();
        while (iterator.hasNext()){
            Map.Entry<String, Map<String, String>> next = iterator.next();
            Map<String, String> nextValue = next.getValue();
            Iterator<Map.Entry<String, String>> iterator1 = nextValue.entrySet().iterator();
            while (iterator1.hasNext()){
                Map.Entry<String, String> next1 = iterator1.next();
                if(next1.getKey().equals(userId)){
                    sendMessage(session,next1.getValue());
                    //移除已发送的消息
                    iterator1.remove();
                }
            }
            if(next.getValue().size() == 0){
                // 当前事件已全部发送 移除该事件
                iterator.remove();
            }
        }
        log.info(userId + "进入连接");
    }

    @OnMessage
    public void onMessage(String message, Session session, @PathParam("userId") String userId) {
        log.info(userId + " : " + message);
        //sendMessageToAll(userId + " : " + message);
    }


    @OnError
    public void onError(Session session, Throwable error) {
        log.info("发生错误");
        log.error(error.getStackTrace() + "");
    }


    @OnClose
    public void onClose(Session session, @PathParam("userId") String userId) {
        livingSessions.remove(userId);
        log.info(userId + " 关闭连接");
    }

    /**
     * 单独发送消息
     *
     * @param session
     * @param message
     */
    public void sendMessage(Session session, String message) {
        try {
            session.getBasicRemote().sendText(message.replace('\"', '\''));
        } catch (IOException e) {
            e.printStackTrace();
        }
    }

    /**
     * 群发消息
     * userIds 是需要接收消息的用户id集合 可单发,可群发
     *
     * @param message
     */
    public void sendMessageToAll(String message) {
        // 将json字符串转为message类
        MessageVo messageVo = JSONObject.parseObject(message, MessageVo.class);

        // 需要发送的人可能未上线 将未发送的消息保存到未发送集合中
        Map<String,String> unSendsUsers = new ConcurrentHashMap<>();
        // 遍历需要发送到的人
        for (Integer userId : messageVo.getUserIds()) {
            // 当前已登录的人
            if(livingSessions.get(String.valueOf(userId)) != null){
                //当前user已登录,发送消息
                sendMessage(livingSessions.get(String.valueOf(userId)), message);
            }else{
                // 当前user未登录,保存到集合中
                unSendsUsers.put(String.valueOf(userId),message);
            }
        };
        // 这些消息属于同一个事件,放入集合中
        unSensMessages.put(messageVo.getBussinessKey(),unSendsUsers);
    }

}
监听消息队列
- 最后就是监听消息队列,通过webSocke发送到前端页面
- 先封装一个 message 类,保存我们需要发送的消息
package com.workfeng.message.config.rabbitmq;

import org.springframework.stereotype.Component;

import java.io.Serializable;
import java.util.List;

/**
 * 公共消息类
 */
@Component
public class MessageVo implements Serializable {

    //消息的唯一标识
    private String bussinessKey;
    //消息内容
    private String message;
    //可以收到的用户id
    private List<Integer> userIds;

    public String getBussinessKey() {
        return bussinessKey;
    }

    public void setBussinessKey(String bussinessKey) {
        this.bussinessKey = bussinessKey;
    }

    public String getMessage() {
        return message;
    }

    public void setMessage(String message) {
        this.message = message;
    }

    public List<Integer> getUserIds() {
        return userIds;
    }

    public void setUserIds(List<Integer> userIds) {
        this.userIds = userIds;
    }
}
- 然后是监听类
package com.workfeng.message.config.rabbitmq;

import com.rabbitmq.client.Channel;
import com.workfeng.message.config.webSocket.WebSocketServerEndpoint;
import org.slf4j.Logger;
import org.slf4j.LoggerFactory;
import org.springframework.amqp.core.AcknowledgeMode;
import org.springframework.amqp.core.Message;
import org.springframework.amqp.core.Queue;
import org.springframework.amqp.rabbit.annotation.EnableRabbit;
import org.springframework.amqp.rabbit.annotation.RabbitListenerConfigurer;
import org.springframework.amqp.rabbit.connection.ConnectionFactory;
import org.springframework.amqp.rabbit.listener.RabbitListenerEndpointRegistrar;
import org.springframework.amqp.rabbit.listener.SimpleMessageListenerContainer;
import org.springframework.amqp.rabbit.listener.api.ChannelAwareMessageListener;
import org.springframework.beans.factory.annotation.Autowired;
import org.springframework.beans.factory.annotation.Qualifier;
import org.springframework.context.annotation.Bean;
import org.springframework.context.annotation.Configuration;
import org.springframework.messaging.converter.MappingJackson2MessageConverter;
import org.springframework.messaging.handler.annotation.support.DefaultMessageHandlerMethodFactory;

import java.io.IOException;


@Configuration
@EnableRabbit
public class ConsumerConfig implements RabbitListenerConfigurer {

    private final static Logger log = LoggerFactory.getLogger(ConsumerConfig.class);

    @Autowired
    private ConnectionFactory connectionFactory;
    @Autowired
    private WebSocketServerEndpoint webSocketServerEndpoint;

    @Bean
    public DefaultMessageHandlerMethodFactory handlerMethodFactory() {
        DefaultMessageHandlerMethodFactory factory = new DefaultMessageHandlerMethodFactory();
        factory.setMessageConverter(new MappingJackson2MessageConverter());
        return factory;
    }

    /**
     * 监听消息发送
     * @param transaction
     * @param contract
     * @param qualification
     * @return
     */
    @Bean
    public SimpleMessageListenerContainer messageContainer(@Qualifier("queueTransaction") Queue transaction, @Qualifier("queueContract") Queue contract, @Qualifier("queueQualification") Queue qualification) {
        SimpleMessageListenerContainer container = new SimpleMessageListenerContainer(connectionFactory);
        container.setQueues(transaction, contract, qualification);
        container.setMaxConcurrentConsumers(1);
        container.setConcurrentConsumers(1);
        container.setAcknowledgeMode(AcknowledgeMode.MANUAL); //设置确认模式手工确认
        container.setMessageListener(new ChannelAwareMessageListener() {
            @Override
            public void onMessage(Message message, Channel channel) throws Exception {
                // 获取消息体
                byte[] body = message.getBody();
                log.info("receive msg : " + new String(body));
                try {
                    // 通过websocket向前端发送消息
                    webSocketServerEndpoint.sendMessageToAll(new String(body));
                    channel.basicAck(message.getMessageProperties().getDeliveryTag(), false);//确认消息成功消费
                } catch (IOException e) {
                    log.error("消息推送前台出错:" + e.getMessage() + "/r/n重新发送");
                    channel.basicNack(message.getMessageProperties().getDeliveryTag(), false, true); //重新发送
                }
            }
        });
        return container;
    }

    @Override
    public void configureRabbitListeners(RabbitListenerEndpointRegistrar rabbitListenerEndpointRegistrar) {
        rabbitListenerEndpointRegistrar.setMessageHandlerMethodFactory(handlerMethodFactory());
    }
}
模拟发送消息
- 接下来我们模拟向用户1 发送消息
@RequestMapping("/hello")
@ResponseBody
public Object hello(){

    // 发送给用户1的消息
    Integer[] ids = {1};
    String[] status = {"log","success","warn","error"};

    for(int i = 0; i< status.length;i++){
        MessageVo vo = new MessageVo();
        vo.setBussinessKey("00000"+i); // 消息唯一标识,将事件id作为消息唯一标识
        vo.setMessage("这是发送给用户 "+ids[0]+" 的 "+status[i]+" 状态的消息"); // 消息内容
        vo.setUserIds(Arrays.asList(ids)); //收消息的人
        vo.setStatus(status[i]); //警告
        vo.setType("toDo"); // 待办事项
        sender.send(vo);
    }

    return new SuccessTip();
}
消息发送逻辑详解
- 我们来看看这中间都做了什么
- 1,用户登陆

- 2,前端html页面获取到userId, js向后端发起socket连接

3,连接到 *WebSocketServerEndpoint 类,触发 onOpen() 方法

-
4,onOpen() 方法将当前登陆人的id保存到已登录人的集合中,并判断当前登陆人是否有未读事件的消息,有则发送。注释已经写了。想看的可以看看
-
5,没有消息,就啥都没有反应啦。。。
-
所以我们就主动发一条

- 6 看一下send方法

- 7,这里就通过rabbitMq发送了一条消息
- 所以下一步就到了消息监听那里

- 8 再接下来就是webSocket那边给前端发送消息了
- 这边就是先遍历我需要发送的人,再查看我发送的人是否已登录,已登录就发送,未登陆就保存到集合中,下次登陆时就可以读到(第四步)


- 9,接下类我们测试一下先发消息,在登陆看看是否可以读到消息
- 我们先发消息,直接访问 /hello

- 10,发送成功 ,此时用户1是有一条未读消息的
- 11 我们 “登陆” 用户1,访问 /index

定时循环发送消息
- 这边的定时任务我用的是 quartz ,可以动态生成定时任务,和动态删除,正好可以用到。
- pom 文件我们之前引过了
- 接下来就是配置
- 首先是jobBean工厂
package com.workfeng.message.config.quartz;

import org.quartz.spi.TriggerFiredBundle;
import org.springframework.beans.factory.config.AutowireCapableBeanFactory;
import org.springframework.context.ApplicationContext;
import org.springframework.context.ApplicationContextAware;
import org.springframework.scheduling.quartz.SpringBeanJobFactory;

/**
 * 自动注入的jobBean工厂
 */
public class AutowiringSpringBeanJobFactory extends SpringBeanJobFactory
        implements ApplicationContextAware {

    private transient AutowireCapableBeanFactory beanFactory;

    @Override
    public void setApplicationContext(final ApplicationContext context) {

        beanFactory = context.getAutowireCapableBeanFactory();
    }

    @Override
    protected Object createJobInstance(final TriggerFiredBundle bundle) throws Exception {
        final Object job = super.createJobInstance(bundle);

        beanFactory.autowireBean(job);

        return job;
    }
}
- 配置一个监听类,可以在控制台看到任务的动态log信息
package com.workfeng.message.config.quartz;

import org.quartz.JobExecutionContext;
import org.quartz.JobExecutionException;
import org.quartz.JobListener;

public class SchedulerListener implements JobListener {
    public static final String LISTENER_NAME = "QuartSchedulerListener";

    @Override
    public String getName() {
        return LISTENER_NAME; //must return a name
    }

    //任务被调度前
    @Override
    public void jobToBeExecuted(JobExecutionContext context) {

        String jobName = context.getJobDetail().getKey().toString();
        System.out.println("jobToBeExecuted");
        System.out.println("Job : " + jobName + " is going to start...");

    }

    //任务调度被拒了
    @Override
    public void jobExecutionVetoed(JobExecutionContext context) {
        System.out.println("jobExecutionVetoed");
        //可以做一些日志记录原因

    }

    //任务被调度后
    @Override
    public void jobWasExecuted(JobExecutionContext context,
                               JobExecutionException jobException) {
        System.out.println("jobWasExecuted");

        String jobName = context.getJobDetail().getKey().toString();
        System.out.println("Job : " + jobName + " is finished...");

        if (jobException!=null&&!jobException.getMessage().equals("")) {
            System.out.println("Exception thrown by: " + jobName
                    + " Exception: " + jobException.getMessage());
        }

    }
}
- 创建动态任务的管理类
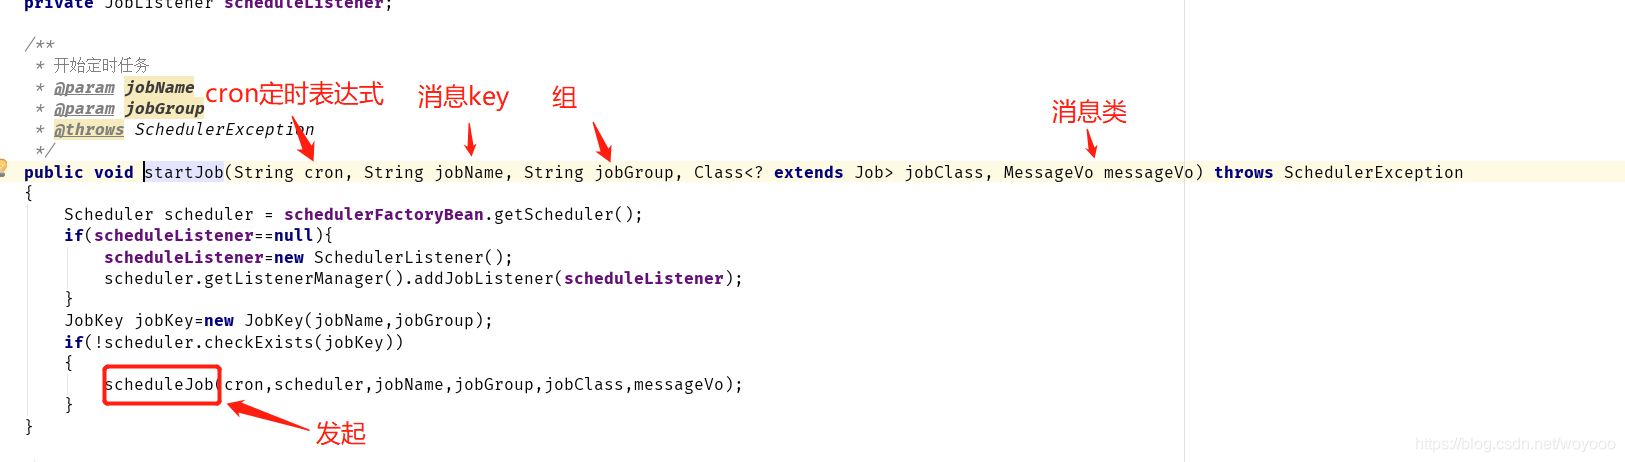
- startJob() 方法创建定时任务,供外部调用
- scheduleJob() 启动任务
package com.workfeng.message.config.quartz;

import com.alibaba.fastjson.JSONObject;
import com.workfeng.message.config.rabbitmq.MessageVo;
import org.quartz.*;
import org.springframework.beans.factory.annotation.Autowired;
import org.springframework.scheduling.quartz.SchedulerFactoryBean;
import org.springframework.stereotype.Component;

@Component
public class SchedulerManager {

    @SuppressWarnings("SpringJavaInjectionPointsAutowiringInspection")
    @Autowired
    private SchedulerFactoryBean schedulerFactoryBean;
    private JobListener scheduleListener;

    /**
     * 开始定时任务
     * @param jobName
     * @param jobGroup
     * @throws SchedulerException
     */
    public void startJob(String cron, String jobName, String jobGroup, Class<? extends Job> jobClass, MessageVo messageVo) throws SchedulerException
    {
        Scheduler scheduler = schedulerFactoryBean.getScheduler();
        if(scheduleListener==null){
            scheduleListener=new SchedulerListener();
            scheduler.getListenerManager().addJobListener(scheduleListener);
        }
        JobKey jobKey=new JobKey(jobName,jobGroup);
        if(!scheduler.checkExists(jobKey))
        {
            scheduleJob(cron,scheduler,jobName,jobGroup,jobClass,messageVo);
        }
    }

    /**
     * 移除定时任务
     * @param jobName
     * @param jobGroup
     * @throws SchedulerException
     */
    public void deleteJob(String jobName,String jobGroup) throws SchedulerException
    {
        Scheduler scheduler = schedulerFactoryBean.getScheduler();
        JobKey jobKey=new JobKey(jobName,jobGroup);
        scheduler.deleteJob(jobKey);
    }
    /**
     * 暂停定时任务
     * @param jobName
     * @param jobGroup
     * @throws SchedulerException
     */
    public void pauseJob(String jobName,String jobGroup) throws SchedulerException
    {
        Scheduler scheduler = schedulerFactoryBean.getScheduler();
        JobKey jobKey=new JobKey(jobName,jobGroup);
        scheduler.pauseJob(jobKey);
    }
    /**
     * 恢复定时任务
     * @param jobName
     * @param jobGroup
     * @throws SchedulerException
     */
    public void resumeJob(String jobName,String jobGroup) throws SchedulerException
    {
        Scheduler scheduler = schedulerFactoryBean.getScheduler();
        JobKey triggerKey=new JobKey(jobName,jobGroup);
        scheduler.resumeJob(triggerKey);
    }
    /**
     * 清空所有当前scheduler对象下的定时任务【目前只有全局一个scheduler对象】
     * @throws SchedulerException
     */
    public void clearAll() throws SchedulerException {
        Scheduler scheduler = schedulerFactoryBean.getScheduler();
        scheduler.clear();
    }


    /**
     * 动态创建Job
     * @param scheduler
     * @throws SchedulerException
     */
    private void scheduleJob(String cron,Scheduler scheduler,String jobName,String jobGroup,Class<? extends Job> jobClass,MessageVo messageVo) throws SchedulerException{
		// 将消息key,和消息体作为参数发送
        JobDetail jobDetail = JobBuilder
                .newJob(jobClass).withIdentity(jobName, jobGroup)
                .usingJobData(messageVo.getBussinessKey(), JSONObject.toJSON(messageVo).toString())
                .usingJobData("businessKey",messageVo.getBussinessKey())
                .build();
        // 每5s执行一次
        CronScheduleBuilder scheduleBuilder = CronScheduleBuilder.cronSchedule(cron);
        CronTrigger cronTrigger = TriggerBuilder.newTrigger().withIdentity(jobName, jobGroup).withSchedule(scheduleBuilder).build();

        scheduler.scheduleJob(jobDetail,cronTrigger);
    }

}
- 这边定时任务还没有处理我们的业务逻辑(定时向前端推送消息)
- 下边我们就处理
package com.workfeng.message.config.quartz;
import com.workfeng.message.config.util.DateUtil;
import com.workfeng.message.config.webSocket.WebSocketServerEndpoint;
import org.jboss.logging.Logger;
import org.quartz.*;
import org.springframework.beans.factory.annotation.Autowired;
import java.util.Date;
/**
* 自定义定时任务
*/
public class ScheduledJob implements Job {
private static final Logger logger= Logger.getLogger(ScheduledJob.class);
@Autowired
private WebSocketServerEndpoint webSocketServerEndpoint;
@Override
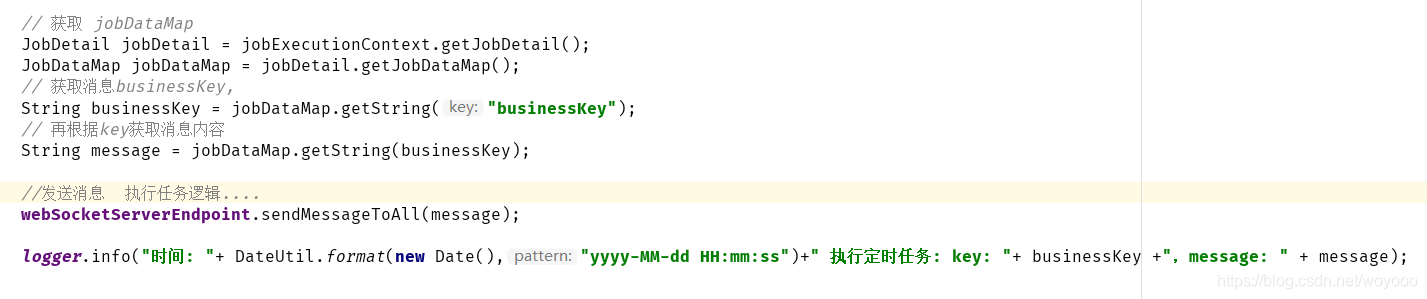
public void execute(JobExecutionContext jobExecutionContext) throws JobExecutionException {
// 获取 jobDataMap
JobDetail jobDetail = jobExecutionContext.getJobDetail();
JobDataMap jobDataMap = jobDetail.getJobDataMap();
// 获取消息businessKey,
String businessKey = jobDataMap.getString("businessKey");
// 再根据key获取消息内容
String message = jobDataMap.getString(businessKey);
//发送消息 执行任务逻辑....
webSocketServerEndpoint.sendMessageToAll(message);
logger.info("时间: "+ DateUtil.format(new Date(),"yyyy-MM-dd HH:mm:ss")+" 执行定时任务: key: "+ businessKey +",message: " + message);
}
}
测试定时发送消息
- 这样定时任务就配置的差不多了
- 我们测试一下
- 发消息是启动定时任务,每分钟发送一次
- 修改 /hello
	// 注入
	@Autowired
    public SchedulerManager myScheduler;

	@RequestMapping("/hello")
    @ResponseBody
    public Object hello(){

        // 发送给用户1的消息
        Integer[] ids = {1};
        String[] status = {"log","success","warn","error"};

        for(int i = 0; i< status.length;i++){
            MessageVo vo = new MessageVo();
            vo.setBussinessKey("00000"+i); // 消息唯一标识,将事件id作为消息唯一标识
            vo.setMessage("这是发送给用户 "+ids[0]+" 的 "+status[i]+" 状态的消息"); // 消息内容
            vo.setUserIds(Arrays.asList(ids)); //收消息的人
            vo.setStatus(status[i]); //警告
            vo.setType("toDo"); // 待办事项
            sender.send(vo);

            //定时任务
            try {
                myScheduler.startJob("0 0/1 * * * ?", vo.getBussinessKey(),"messages", ScheduledJob.class,vo);//每五分钟执行一次
            } catch (SchedulerException e) {
                e.printStackTrace();
            }
        }
        return new SuccessTip();
    }
quartz 定时任务实现逻辑步骤
- 1,启动定时任务
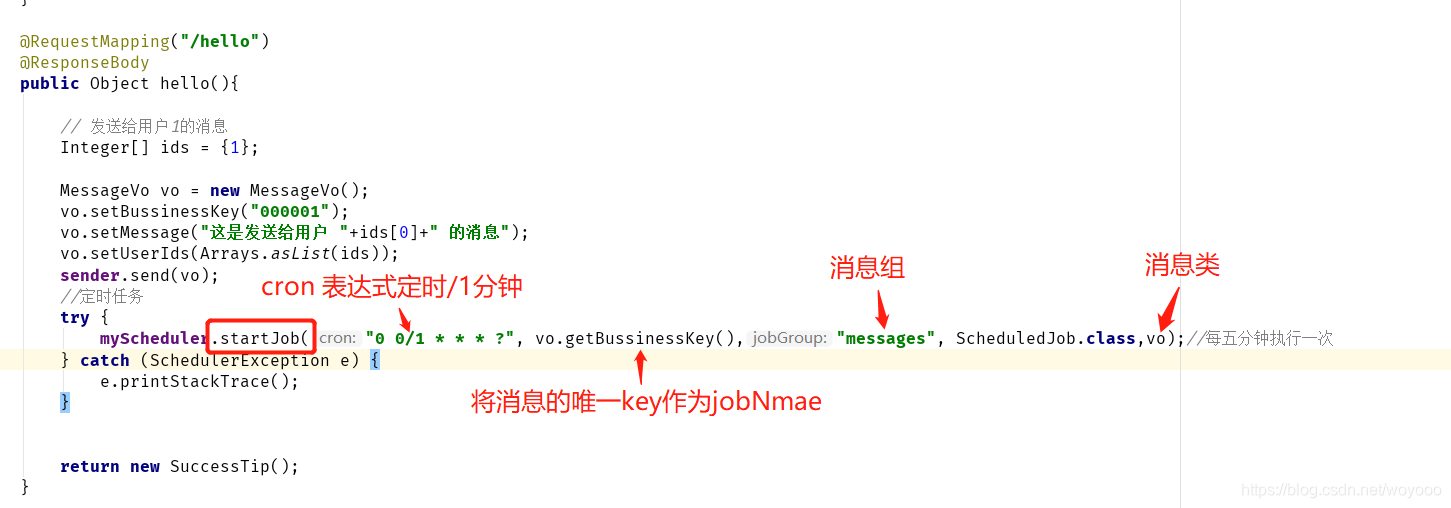
- 2,启动任务
3,发起时设置参数,携带message
[外链图片转存失败,源站可能有防盗链机制,建议将图片保存下来直接上传(img-N4AARyyp-1668570296832)(assets/watermark,type_ZmFuZ3poZW5naGVpdGk,shadow_10,text_aHR0cHM6Ly9ibG9nLmNzZG4ubmV0L3dveW9vbw==,size_16,color_FFFFFF,t_70.png)]
4, 监听任务执行
= {1};
String[] status = {“log”,“success”,“warn”,“error”};
    for(int i = 0; i< status.length;i++){
        MessageVo vo = new MessageVo();
        vo.setBussinessKey("00000"+i); // 消息唯一标识,将事件id作为消息唯一标识
        vo.setMessage("这是发送给用户 "+ids[0]+" 的 "+status[i]+" 状态的消息"); // 消息内容
        vo.setUserIds(Arrays.asList(ids)); //收消息的人
        vo.setStatus(status[i]); //警告
        vo.setType("toDo"); // 待办事项
        sender.send(vo);

        //定时任务
        try {
            myScheduler.startJob("0 0/1 * * * ?", vo.getBussinessKey(),"messages", ScheduledJob.class,vo);//每五分钟执行一次
        } catch (SchedulerException e) {
            e.printStackTrace();
        }
    }
    return new SuccessTip();
}
## quartz 定时任务实现逻辑步骤
- 1,启动定时任务

- 2,**启动任务**

3,**发起时设置参数,携带message**
[外链图片转存中...(img-N4AARyyp-1668570296832)]
4, **监听任务执行**


 1297
1297

 被折叠的 条评论
为什么被折叠?
被折叠的 条评论
为什么被折叠?
 到【灌水乐园】发言


