


概念小结
冲突
冲突一词出现在哈希表当中,即不同关键字通过相同的哈希函数计算出相同的哈希地址,该现象称为哈希冲突(也叫哈希碰撞)。对于关键字的理解你可以认为它就是你想放进哈希表中的元素。
哈希函数
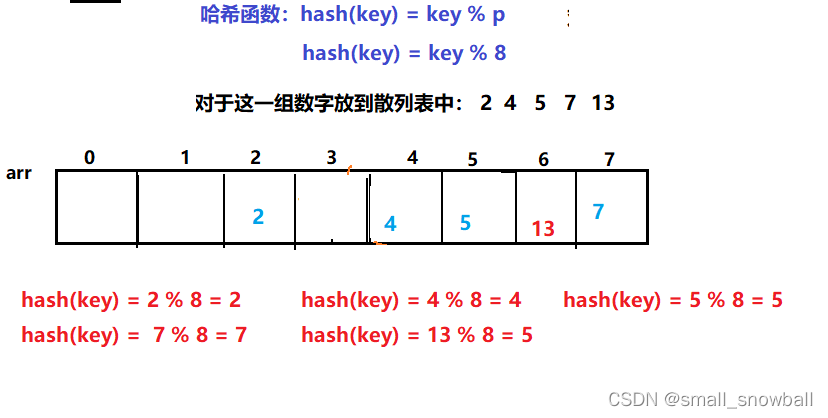
哈希方法中使用的转换函数称为哈希(散列)函数,构造出来的结构称为哈希表(HashTable)(或者称散列表) 。 相当于每个哈希表都会有哈希函数来解决冲突。哈希函数也有很多种,但常用的是除留余数法(设散列表中允许的地址数为m,取一个不大于m,但最接近或者等于m的质数p作为除数,按照哈希函数:Hash(key) = key% p(p<=m),将关键码转换成哈希地址),在此我们一般会把散列表的大小作为p,以此来设计散列函数。
对于散列表其实就是数组
冲突避免
第一个就是设置哈希函数,第二个就是对负载因子的调节
负载因子的定义:表中的元素个数 / 散列表的长度
负载因子越大冲突率越高(在开放定址法中限制在0.7-0.8以下)
解决:散列表中元素是一定的,则对散列表扩容才可以避免
强调:冲突是必然发生的,我们只能降低冲突率
冲突解决
1.闭散列
也叫开放定址法:当发生哈希冲突时,如果哈希表没被装满,则可以把key存放到冲突位置的“下一个”空位置中去
寻找“下一个”空位置:
线性探测法
当key为13模8为5,此时5位置已经有了,发生冲突,则只需将13往后面移动即可,直到找出空位置,这就是线性探测法。
二次探测法
在使用线性探测法处理冲突时,最后会发现数据都集中在一起,二次探测法就是为了避免这样的情况。hash(key) = (key + i^2),其中i为1,2,3… 或者是将加号换成相减也可以。
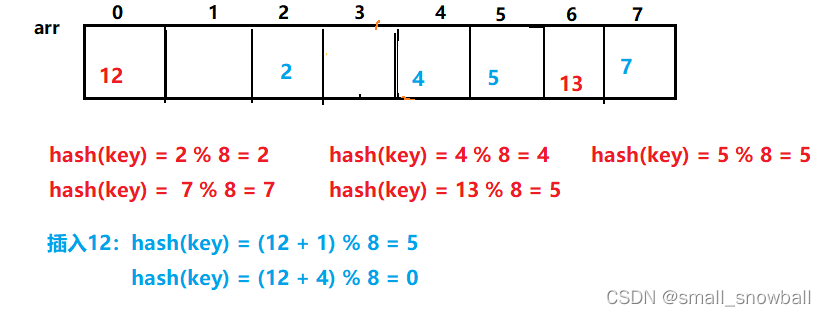
当第一次使用二次探测法取余为5时,此时5位置有元素,则进行第二次取余,取余为0则将12放到0位置
缺陷:* 闭散列法空间利用率较低*
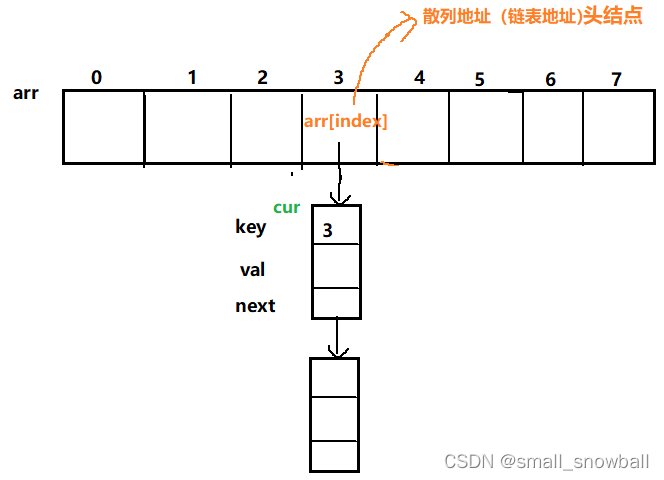
2.开散列(哈希桶)
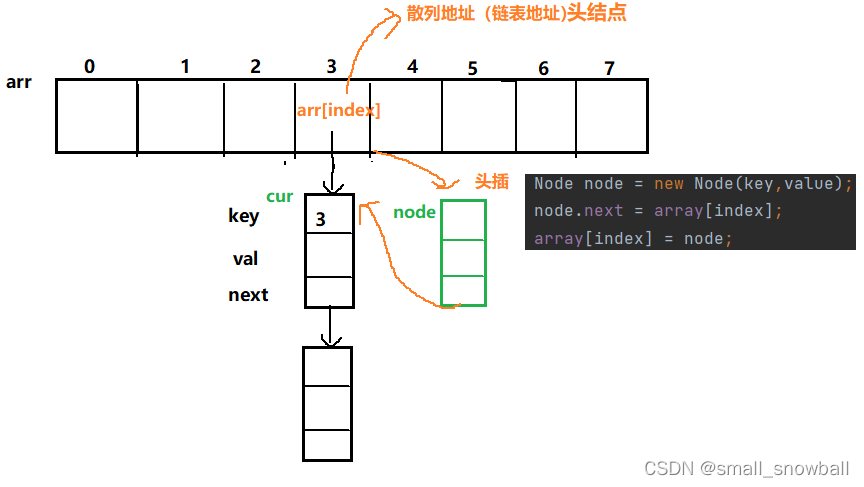
开散列法又叫链地址法(开链法),首先对关键码集合用哈希函数计算散列地址,具有相同地址的关键码归于同一子集合,每一个子集合称为一个桶,各个桶中的元素通过一个单链表链接起来,各链表的头结点存储在哈希表中(即数组中)。
哈希桶实现(key - val模型)
1.哈希桶由数组+链表+红黑树构成。
2.简单理解为数组中每个下标中存放链表的头结点,然后由头结点组成链表(看图)
具体实现(代码+文字+图片)
1.创建数组和链表
    static class Node {   //内部类
        public int key;
        public int val;
        public Node next;   //存放下一个结点的地址

        public Node(int key, int val) {
            this.key = key;
            this.val = val;
        }
    }
    public Node[] array;   //创建数组,类型为Node类型(因为存放的是链表)
    public int usedSize;    //当前数组里面数据个数

    public static final double LOAD_FACTOR = 0.75;   //定义负载因子
    public HashBucket(){
        array = new Node[10];   //定义数组大小
    }
2.插入实现
思路: 1. 使用哈希函数计算关键字key在数组中的位置
2.定义一个Node类型的cur对链表进行遍历,找出key,若有就将val替换,若无就进行插入(此处采用头插法,尾插也可,用尾插就先找出链表尾部)。
3.插入成功后则usedSize++
4.判断负载因子的大小,若超过就要进行扩容操作
    public void put(int key, int value) {
        int index = key % array.length; //用哈希函数计算key在数组中的下标
        Node cur = array[index];   //对index下标的链表进行遍历
        while (cur != null){   //该下标下面有链表
            if (cur.key == key){          //若链表中有key,将val进行覆盖
                cur.val = value;
                return;
            }
            cur = cur.next;       //走向下一个结点
        }
        //链表中无key,则进行头插
        Node node = new Node(key,value);
        node.next = array[index];
        array[index] = node;
        usedSize++;
        if (calculateLodeFactor() >= LOAD_FACTOR){   //负载因子大于等于0.75进行扩容
            resize();    //调用扩容方法
        }
    }
     private double calculateLodeFactor(){   //计算负载因子
        return usedSize*1.0 / array.length;
    }
3.扩容实现
注意: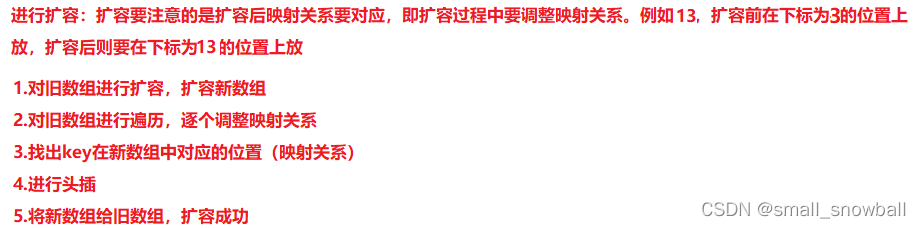
    private void resize() {   //哈希表的扩容
        Node[] newArray = new Node[2*array.length];     //进行二倍扩容
        //逐个遍历,调整映射关系
        for (int i = 0; i < array.length; i++) {
            Node cur = array[i];
            while (cur != null){
                Node curNext = cur.next;    //定义一个新node,用来保存cur在旧数组中的位置,以便于cur继续向后面走
                int index = cur.key % newArray.length;    //找到key在新的数组对应的位置(映射关系)
                //进行头插。将cur指向的结点插到新数组对应的位置
                cur.next = newArray[index];
                newArray[index] = cur;
                //cur继续向后面走,调整链表中其余结点对应的位置(映射关系)
                cur = curNext;
            }
        }
        //将新的数组给旧数组,扩容成功
        array = newArray;
    }
4.查找实现
思路:
    public int get(int key) {
        int index = key % array.length;  //找到key的位置
        Node cur = array[index];
        //对链表进行遍历
        while (cur != null){
            if (cur.key == key){
                return cur.val;
            }
            cur = cur.next;
        }
        return -1;   //无关键字key
    }
5. 测试类(对上述方法测试)
    public static void main(String[] args) {
        HashBucket hashBucket = new HashBucket();
        hashBucket.put(2,12);
        hashBucket.put(3,13);
        hashBucket.put(4,14);
        hashBucket.put(5,15);
        hashBucket.put(6,16);
        hashBucket.put(7,17);
        hashBucket.put(8,18);
        System.out.println("---------------");
        int ret = hashBucket.get(7);
        System.out.println(ret);
    }
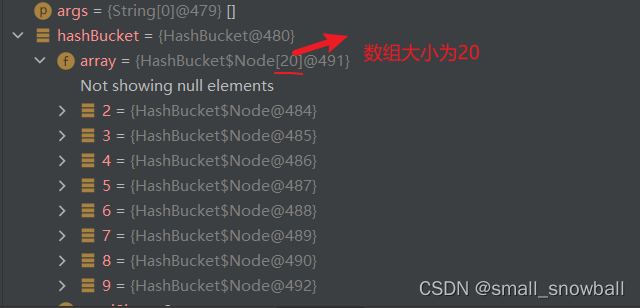
插入,扩容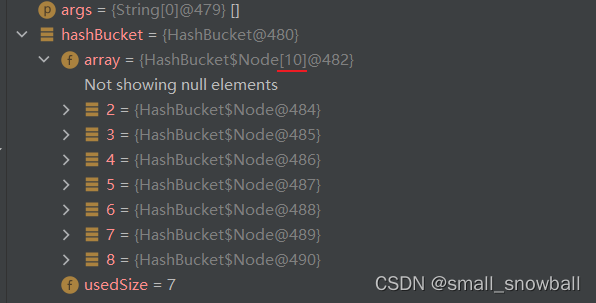
此时在数组中有7个数据(结点),小于负载因子则不需要扩容,接下来来测测扩容,当我们在数组里面放8个数据(结点),负载因子:8 / 10 = 8 大于0.75,则就会以2倍数组大小扩容
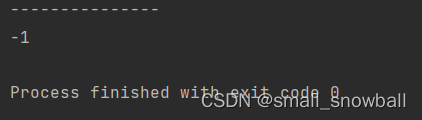
get方法


整体代码
public class HashBucket {   // key-value 模型
    static class Node {
        public int key;
        public int val;
        public Node next;

        public Node(int key, int val) {
            this.key = key;
            this.val = val;
        }
    }
    public Node[] array;
    public int usedSize;    //当前数据个数

    public static final double LOAD_FACTOR = 0.75;
    public HashBucket(){
        array = new Node[10];   //默认数组的大小
    }


    public void put(int key, int value) {
        int index = key % array.length; //用散列函数计算key在数组中的下标
        Node cur = array[index];   //对index下标的链表进行遍历
        while (cur != null){   //该下标下面有链表
            if (cur.key == key){          //若链表中有key,将val进行覆盖
                cur.val = value;
                return;
            }
            cur = cur.next;
        }
        //链表中无key,则进行头插
        Node node = new Node(key,value);
        node.next = array[index];
        array[index] = node;
        usedSize++;
        if (calculateLodeFactor() >= LOAD_FACTOR){   //负载因子大于等于0.75进行扩容
            resize();
        }
    }

    private double calculateLodeFactor(){   //计算负载因子
        return usedSize*1.0 / array.length;
    }

    private void resize() {   //哈希表的扩容
        Node[] newArray = new Node[2*array.length];     //进行二倍扩容
        //逐个遍历,调整映射关系
        for (int i = 0; i < array.length; i++) {
            Node cur = array[i];
            while (cur != null){
                Node curNext = cur.next;    //定义一个新node,用来保存cur在旧数组中的位置,以便于cur继续向后面走
                int index = cur.key % newArray.length;    //找到key在新的数组对应的位置(映射关系)
                //进行头插。将cur指向的结点插到新数组对应的位置
                cur.next = newArray[index];
                newArray[index] = cur;
                //cur继续向后面走,调整链表中其余结点对应的位置(映射关系)
                cur = curNext;
            }
        }
        //将新的数组给旧数组,扩容成功
        array = newArray;
    }


    public int get(int key) {
        int index = key % array.length;  //找到key的位置
        Node cur = array[index];
        //对链表进行遍历
        while (cur != null){
            if (cur.key == key){
                return cur.val;
            }
            cur = cur.next;
        }
        return -1;
    }
}
public class Test_HashBucket {

    public static void main(String[] args) {
        HashBucket hashBucket = new HashBucket();
        hashBucket.put(2,12);
        hashBucket.put(3,13);
        hashBucket.put(4,14);
        hashBucket.put(5,15);
        hashBucket.put(6,16);
        hashBucket.put(7,17);
        hashBucket.put(8,18);
        hashBucket.put(9,19);
        System.out.println("---------------");
        int ret = hashBucket.get(19);
        System.out.println(ret);
    }
}


 443
443


 被折叠的 条评论
为什么被折叠?
被折叠的 条评论
为什么被折叠?
 到【灌水乐园】发言


