


第九章、Bean的循环依赖问题
9.1 什么是Bean的循环依赖
A对象中有B属性。B对象中有A属性。这就是循环依赖。我依赖你,你也依赖我。
比如:丈夫类Husband,妻子类Wife。Husband中有Wife的引用。Wife中有Husband的引用。
public class Husband {
    private String name;
    private Wife wife;
}

public class Wife {
    private String name;
    private Husband husband;
}
9.2 singleton下的set注入产生的循环依赖
<?xml version="1.0" encoding="UTF-8"?>
<beans xmlns="http://www.springframework.org/schema/beans"
       xmlns:xsi="http://www.w3.org/2001/XMLSchema-instance"
       xsi:schemaLocation="http://www.springframework.org/schema/beans http://www.springframework.org/schema/beans/spring-beans.xsd">

    <bean id="husbandBean" class="com.powernode.spring6.bean.Husband" scope="singleton">
        <property name="name" value="张三"/>
        <property name="wife" ref="wifeBean"/>
    </bean>
    <bean id="wifeBean" class="com.powernode.spring6.bean.Wife" scope="singleton">
        <property name="name" value="小花"/>
        <property name="husband" ref="husbandBean"/>
    </bean>
</beans>
通过测试得知:在singleton + set注入的情况下,循环依赖是没有问题的。Spring可以解决这个问题。
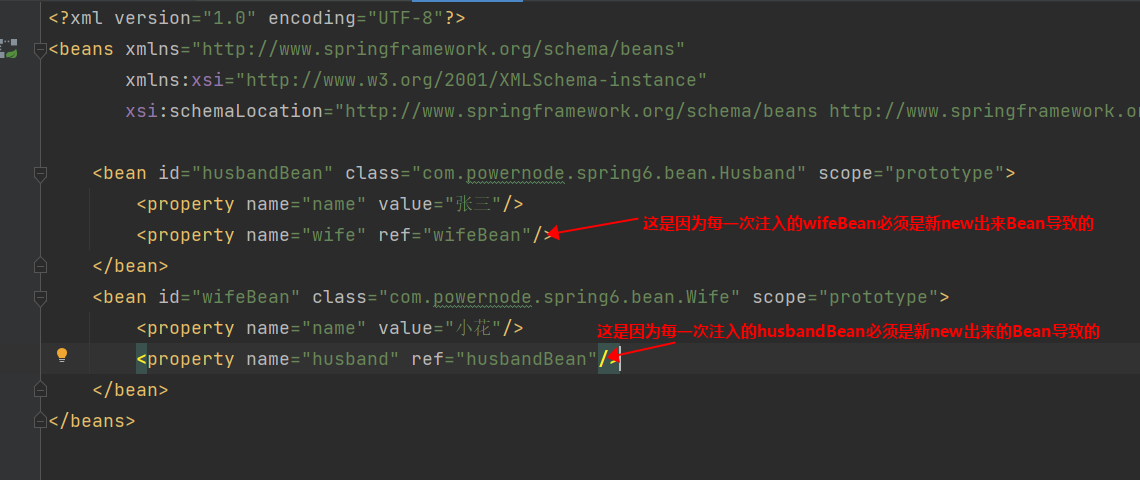
9.3 prototype下的set注入产生的循环依赖
<?xml version="1.0" encoding="UTF-8"?>
<beans xmlns="http://www.springframework.org/schema/beans"
       xmlns:xsi="http://www.w3.org/2001/XMLSchema-instance"
       xsi:schemaLocation="http://www.springframework.org/schema/beans http://www.springframework.org/schema/beans/spring-beans.xsd">

    <bean id="husbandBean" class="com.powernode.spring6.bean.Husband" scope="prototype">
        <property name="name" value="张三"/>
        <property name="wife" ref="wifeBean"/>
    </bean>
    <bean id="wifeBean" class="com.powernode.spring6.bean.Wife" scope="prototype">
        <property name="name" value="小花"/>
        <property name="husband" ref="husbandBean"/>
    </bean>
</beans>
执行测试程序:发生了异常,异常信息如下:
Caused by: org.springframework.beans.factory.BeanCurrentlyInCreationException:
翻译为:创建名为“husbandBean”的bean时出错:请求的bean当前正在创建中:是否存在无法解析的循环引用?
通过测试得知,当循环依赖的所有Bean的scope="prototype"的时候,产生的循环依赖,Spring是无法解决的,会出现BeanCurrentlyInCreationException异常。
大家可以测试一下,以上两个Bean,如果其中一个是singleton,另一个是prototype,是没有问题的。
9.4 singleton下的构造注入产生的循环依赖
我们再来测试一下singleton + 构造注入的方式下,spring是否能够解决这种循环依赖。
<?xml version="1.0" encoding="UTF-8"?>
<beans xmlns="http://www.springframework.org/schema/beans"
       xmlns:xsi="http://www.w3.org/2001/XMLSchema-instance"
       xsi:schemaLocation="http://www.springframework.org/schema/beans http://www.springframework.org/schema/beans/spring-beans.xsd">

    <bean id="hBean" class="com.powernode.spring6.bean2.Husband" scope="singleton">
        <constructor-arg name="name" value="张三"/>
        <constructor-arg name="wife" ref="wBean"/>
    </bean>

    <bean id="wBean" class="com.powernode.spring6.bean2.Wife" scope="singleton">
        <constructor-arg name="name" value="小花"/>
        <constructor-arg name="husband" ref="hBean"/>
    </bean>
</beans>
和上一个测试结果相同,都是提示产生了循环依赖,并且Spring是无法解决这种循环依赖的。
为什么呢?
主要原因是因为通过构造方法注入导致的:因为构造方法注入会导致实例化对象的过程和对象属性赋值的过程没有分离开,必须在一起完成导致的。
9.5 Spring解决循环依赖的机理
Spring为什么可以解决set + singleton模式下循环依赖?
根本的原因在于:这种方式可以做到将“实例化Bean”和“给Bean属性赋值”这两个动作分开去完成。
实例化Bean的时候:调用无参数构造方法来完成。此时可以先不给属性赋值,可以提前将该Bean对象“曝光”给外界。
给Bean属性赋值的时候:调用setter方法来完成。
两个步骤是完全可以分离开去完成的,并且这两步不要求在同一个时间点上完成。
也就是说,Bean都是单例的,我们可以先把所有的单例Bean实例化出来,放到一个集合当中(我们可以称之为缓存),所有的单例Bean全部实例化完成之后,以后我们再慢慢的调用setter方法给属性赋值。这样就解决了循环依赖的问题。
那么在Spring框架底层源码级别上是如何实现的呢?请看:

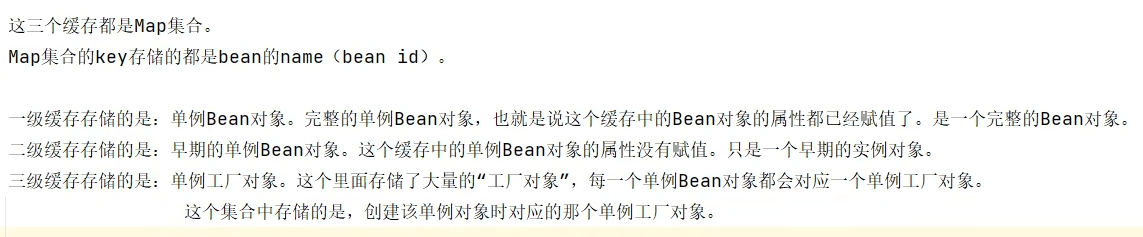
在以上类中包含三个重要的属性:
Cache of singleton objects: bean name to bean instance. 单例对象的缓存:key存储bean名称,value存储Bean对象【一级缓存】
Cache of early singleton objects: bean name to bean instance. 早期单例对象的缓存:key存储bean名称,value存储早期的Bean对象【二级缓存】
Cache of singleton factories: bean name to ObjectFactory. 单例工厂缓存:key存储bean名称,value存储该Bean对应的ObjectFactory对象【三级缓存】
这三个缓存其实本质上是三个Map集合。
我们再来看,在该类中有这样一个方法addSingletonFactory(),这个方法的作用是:将创建Bean对象的ObjectFactory对象提前曝光。
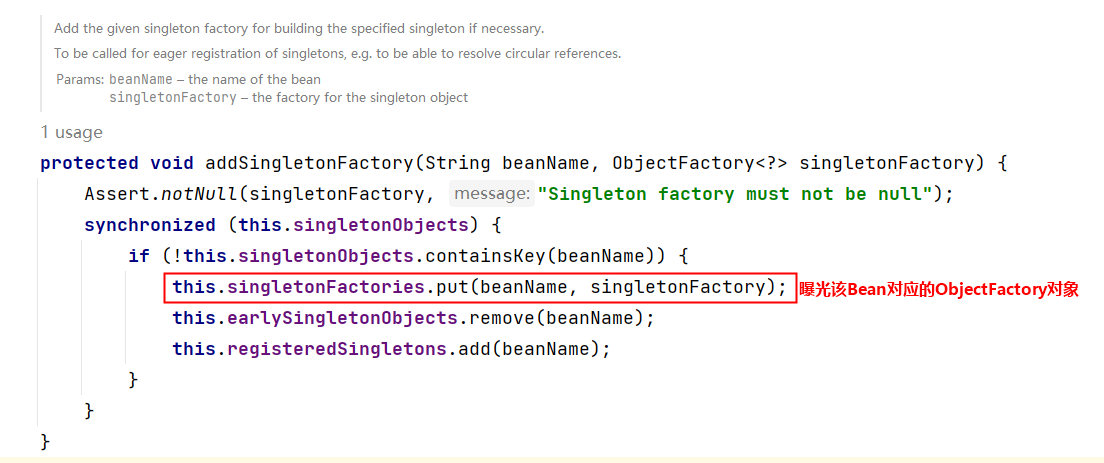
再分析下面的源码:

从源码中可以看到,spring会先从一级缓存中获取Bean,如果获取不到,则从二级缓存中获取Bean,如果二级缓存还是获取不到,则从三级缓存中获取之前曝光的ObjectFactory对象,通过ObjectFactory对象获取Bean实例,这样就解决了循环依赖的问题。
总结:
Spring只能解决setter方法注入的单例bean之间的循环依赖。ClassA依赖ClassB,ClassB又依赖ClassA,形成依赖闭环。Spring在创建ClassA对象后,不需要等给属性赋值,直接将其曝光到bean缓存当中。在解析ClassA的属性时,又发现依赖于ClassB,再次去获取ClassB,当解析ClassB的属性时,又发现需要ClassA的属性,但此时的ClassA已经被提前曝光加入了正在创建的bean的缓存中,则无需创建新的的ClassA的实例,直接从缓存中获取即可。从而解决循环依赖问题。
十、回顾反射机制
10.1 分析方法四要素
- 调用哪个对象的(systemService)
- 哪个方法(login)
- 传什么参数("admin", "admin123")
- 返回什么值(success)
第一步:创建对象(四要素之首:调用哪个对象的)
Class clazz = Class.forName("com.powernode.reflect.SystemService");
Object obj = clazz.newInstance();
第二步:获取方法login(String,String)(四要素之一:哪个方法)
Method loginMethod = clazz.getDeclaredMethod("login", String.class, String.class);
第三步:调用方法
Object retValue = loginMethod.invoke(obj, "admin", "admin123");
你知道以下这几条信息:
- 类名是:com.powernode.reflect.User
- 该类中有String类型的name属性和int类型的age属性。
- 另外你也知道该类的设计符合javabean规范。(也就是说属性私有化,对外提供setter和getter方法)
你如何通过反射机制给User对象的name属性赋值zhangsan,给age属性赋值20岁。
public class UserTest {
    public static void main(String[] args) throws Exception{
        // 已知类名
        String className = "com.powernode.reflect.User";
        // 已知属性名
        String propertyName = "age";

        // 通过反射机制给User对象的age属性赋值20岁
        Class<?> clazz = Class.forName(className);
        Object obj = clazz.newInstance(); // 创建对象

        // 根据属性名获取setter方法名
        String setMethodName = "set" + propertyName.toUpperCase().charAt(0) + propertyName.substring(1);

        // 获取Method
        Method setMethod = clazz.getDeclaredMethod(setMethodName, int.class);

        // 调用Method
        setMethod.invoke(obj, 20);

        System.out.println(obj);
    }
}
十一、手写Spring框架
Spring IoC容器的实现原理:工厂模式 + 解析XML + 反射机制。
我们给自己的框架起名为:myspring
 <dependencies>
        <dependency>
            <groupId>org.dom4j</groupId>
            <artifactId>dom4j</artifactId>
            <version>2.1.3</version>
        </dependency>
        <dependency>
            <groupId>jaxen</groupId>
            <artifactId>jaxen</artifactId>
            <version>1.2.0</version>
        </dependency>
        <dependency>
            <groupId>junit</groupId>
            <artifactId>junit</artifactId>
            <version>4.13.2</version>
            <scope>test</scope>
        </dependency>
    </dependencies>
准备两个实体类以及对应的xml文件
<?xml version="1.0" encoding="UTF-8"?>
<beans>

    <bean id="userBean" class="com.powernode.myspring.bean.User">
        <property name="name" value="张三"/>
        <property name="age" value="20"/>
        <property name="addr" ref="addrBean"/>
    </bean>

    <bean id="addrBean" class="com.powernode.myspring.bean.Address">
        <property name="city" value="北京"/>
        <property name="street" value="大兴区"/>
        <property name="zipcode" value="1000001"/>
    </bean>

</beans>
编写ApplicationContext接口
ApplicationContext接口中提供一个getBean()方法,通过该方法可以获取Bean对象。
public interface ApplicationContext {
    /**
     * 根据bean的id获取bean实例。
     * @param beanId bean的id
     * @return bean实例
     */
    Object getBean(String beanId);
}
编写ClassPathXmlApplicationContext
ClassPathXmlApplicationContext是ApplicationContext接口的实现类。该类从类路径当中加载myspring.xml配置文件。
public class ClassPathXmlApplicationContext implements ApplicationContext{
    @Override
    public Object getBean(String beanId) {
        return null;
    }
}
确定采用Map集合存储Bean
确定采用Map集合存储Bean实例。Map集合的key存储beanId,value存储Bean实例。Map<String,Object>
在ClassPathXmlApplicationContext类中添加Map<String,Object>属性。
并且在ClassPathXmlApplicationContext类中添加构造方法,该构造方法的参数接收myspring.xml文件。
同时实现getBean方法。
public class ClassPathXmlApplicationContext implements ApplicationContext{
    /**
     * 存储bean的Map集合
     */
    private Map<String,Object> beanMap = new HashMap<>();

    /**
     * 在该构造方法中,解析myspring.xml文件,创建所有的Bean实例,并将Bean实例存放到Map集合中。
     * @param resource 配置文件路径(要求在类路径当中)
     */
    public ClassPathXmlApplicationContext(String resource) {

    }

    @Override
    public Object getBean(String beanId) {
        return beanMap.get(beanId);
    }
}
解析配置文件:
public ClassPathXmlApplicationContext(String resource) {
    try {
        SAXReader reader = new SAXReader();
        Document document = reader.read(ClassLoader.getSystemClassLoader().getResourceAsStream(resource));
        // 获取所有的bean标签
        List<Node> beanNodes = document.selectNodes("//bean");
        // 遍历集合
        beanNodes.forEach(beanNode -> {
            Element beanElt = (Element) beanNode;
            // 获取id
            String id = beanElt.attributeValue("id");
            // 获取className
            String className = beanElt.attributeValue("class");
            try {
                // 通过反射机制创建对象
                Class<?> clazz = Class.forName(className);
                Constructor<?> defaultConstructor = clazz.getDeclaredConstructor();
                Object bean = defaultConstructor.newInstance();
                // 存储到Map集合
                beanMap.put(id, bean);
            } catch (Exception e) {
                e.printStackTrace();
            }
        });
    } catch (Exception e) {
        e.printStackTrace();
    }
}
给bean的属性赋值
public class ClassPathXmlApplicationContext implements ApplicationContext{
    /**
     * 存储bean的Map集合
     */
    private Map<String,Object> beanMap = new HashMap<>();

    /**
     * 在该构造方法中,解析myspring.xml文件,创建所有的Bean实例,并将Bean实例存放到Map集合中。
     * @param resource 配置文件路径(要求在类路径当中)
     */
    public ClassPathXmlApplicationContext(String resource) {
        try {
            SAXReader reader = new SAXReader();
            Document document = reader.read(ClassLoader.getSystemClassLoader().getResourceAsStream(resource));
            // 获取所有的bean标签
            List<Node> beanNodes = document.selectNodes("//bean");
            // 遍历集合(这里的遍历只实例化Bean,不给属性赋值。为什么要这样做?)
            beanNodes.forEach(beanNode -> {
                Element beanElt = (Element) beanNode;
                // 获取id
                String id = beanElt.attributeValue("id");
                // 获取className
                String className = beanElt.attributeValue("class");
                try {
                    // 通过反射机制创建对象
                    Class<?> clazz = Class.forName(className);
                    Constructor<?> defaultConstructor = clazz.getDeclaredConstructor();
                    Object bean = defaultConstructor.newInstance();
                    // 存储到Map集合
                    beanMap.put(id, bean);
                } catch (Exception e) {
                    e.printStackTrace();
                }
            });
            // 再重新遍历集合,这次遍历是为了给Bean的所有属性赋值。
            // 思考:为什么不在上面的循环中给Bean的属性赋值,而在这里再重新遍历一次呢?
            // 通过这里你是否能够想到Spring是如何解决循环依赖的:实例化和属性赋值分开。
            beanNodes.forEach(beanNode -> {
                Element beanElt = (Element) beanNode;
                // 获取bean的id
                String beanId = beanElt.attributeValue("id");
                // 获取所有property标签
                List<Element> propertyElts = beanElt.elements("property");
                // 遍历所有属性
                propertyElts.forEach(propertyElt -> {
                    try {
                        // 获取属性名
                        String propertyName = propertyElt.attributeValue("name");
                        // 获取属性类型
                        Class<?> propertyType = beanMap.get(beanId).getClass().getDeclaredField(propertyName).getType();
                        // 获取set方法名
                        String setMethodName = "set" + propertyName.toUpperCase().charAt(0) + propertyName.substring(1);
                        // 获取set方法
                        Method setMethod = beanMap.get(beanId).getClass().getDeclaredMethod(setMethodName, propertyType);
                        // 获取属性的值,值可能是value,也可能是ref。
                        // 获取value
                        String propertyValue = propertyElt.attributeValue("value");
                        // 获取ref
                        String propertyRef = propertyElt.attributeValue("ref");
                        Object propertyVal = null;
                        if (propertyValue != null) {
                            // 该属性是简单属性
                            String propertyTypeSimpleName = propertyType.getSimpleName();
                            switch (propertyTypeSimpleName) {
                                case "byte": case "Byte":
                                    propertyVal = Byte.valueOf(propertyValue);
                                    break;
                                case "short": case "Short":
                                    propertyVal = Short.valueOf(propertyValue);
                                    break;
                                case "int": case "Integer":
                                    propertyVal = Integer.valueOf(propertyValue);
                                    break;
                                case "long": case "Long":
                                    propertyVal = Long.valueOf(propertyValue);
                                    break;
                                case "float": case "Float":
                                    propertyVal = Float.valueOf(propertyValue);
                                    break;
                                case "double": case "Double":
                                    propertyVal = Double.valueOf(propertyValue);
                                    break;
                                case "boolean": case "Boolean":
                                    propertyVal = Boolean.valueOf(propertyValue);
                                    break;
                                case "char": case "Character":
                                    propertyVal = propertyValue.charAt(0);
                                    break;
                                case "String":
                                    propertyVal = propertyValue;
                                    break;
                            }
                            setMethod.invoke(beanMap.get(beanId), propertyVal);
                        }
                        if (propertyRef != null) {
                            // 该属性不是简单属性
                            setMethod.invoke(beanMap.get(beanId), beanMap.get(propertyRef));
                        }
                    } catch (Exception e) {
                        e.printStackTrace();
                    }
                });
            });

        } catch (Exception e) {
            e.printStackTrace();
        }
    }

    @Override
    public Object getBean(String beanId) {
        return beanMap.get(beanId);
    }
}
这样就基本完成了对xml文件的解析,然后可以完成bean的注册进map里面。可以完成对bean的值注入。
写完这些之后就可以删除xml,实体类等文件。然后就可以打包成jar当成一个简化版的spring来使用了。
十二、Spring IoC注解式开发
注解的存在主要是为了简化XML的配置。Spring6倡导全注解开发。
12.1 声明Bean的注解
负责声明Bean的注解,常见的包括四个:
- @Component
- @Controller
- @Service
- @Repository
@Target({ElementType.TYPE})
@Retention(RetentionPolicy.RUNTIME)
@Documented
@Component
public @interface Controller {
    @AliasFor(
        annotation = Component.class
    )
    String value() default "";
}


@Target({ElementType.TYPE})
@Retention(RetentionPolicy.RUNTIME)
@Documented
@Component
public @interface Service {
    @AliasFor(
        annotation = Component.class
    )
    String value() default "";
}


@Target({ElementType.TYPE})
@Retention(RetentionPolicy.RUNTIME)
@Documented
@Component
public @interface Repository {
    @AliasFor(
        annotation = Component.class
    )
    String value() default "";
}
通过源码可以看到,@Controller、@Service、@Repository这三个注解都是@Component注解的别名。
也就是说:这四个注解的功能都一样。用哪个都可以。
只是为了增强程序的可读性,建议:
- 控制器类上使用:Controller
- service类上使用:Service
- dao类上使用:Repository
他们都是只有一个value属性。value属性用来指定bean的id,也就是bean的名字。
12.2 Spring注解的使用
如何使用以上的注解呢?
- 第一步:加入aop的依赖
- 第二步:在配置文件中添加context命名空间
- 第三步:在配置文件中指定扫描的包
- 第四步:在Bean类上使用注解
直接在类上面使用注解就行了,然后再xml文件中开启扫描,spring会自动将这些添加了注解的类放到bean工厂中。
12.4 选择性实例化Bean
假设在某个包下有很多Bean,有的Bean上标注了Component,有的标注了Controller,有的标注了Service,有的标注了Repository,现在由于某种特殊业务的需要,只允许其中所有的Controller参与Bean管理,其他的都不实例化。这应该怎么办呢?
@Component
public class A {
    public A() {
        System.out.println("A的无参数构造方法执行");
    }
}

@Controller
class B {
    public B() {
        System.out.println("B的无参数构造方法执行");
    }
}

@Service
class C {
    public C() {
        System.out.println("C的无参数构造方法执行");
    }
}

@Repository
class D {
    public D() {
        System.out.println("D的无参数构造方法执行");
    }
}

@Controller
class E {
    public E() {
        System.out.println("E的无参数构造方法执行");
    }
}

@Controller
class F {
    public F() {
        System.out.println("F的无参数构造方法执行");
    }
}
我只想实例化bean3包下的Controller。配置文件这样写:
use-default-filters="true" 表示:使用spring默认的规则,只要有Component、Controller、Service、Repository中的任意一个注解标注,则进行实例化。
use-default-filters="false" 表示:不再spring默认实例化规则,即使有Component、Controller、Service、Repository这些注解标注,也不再实例化。
<context:include-filter type="annotation" expression="org.springframework.stereotype.Controller"/> 表示只有Controller进行实例化。
<?xml version="1.0" encoding="UTF-8"?>
<beans xmlns="http://www.springframework.org/schema/beans"
       xmlns:xsi="http://www.w3.org/2001/XMLSchema-instance"
       xmlns:context="http://www.springframework.org/schema/context"
       xsi:schemaLocation="http://www.springframework.org/schema/beans http://www.springframework.org/schema/beans/spring-beans.xsd
                           http://www.springframework.org/schema/context http://www.springframework.org/schema/context/spring-context.xsd">

    <context:component-scan base-package="com.powernode.spring6.bean3" use-default-filters="false">
        <context:include-filter type="annotation" expression="org.springframework.stereotype.Controller"/>
    </context:component-scan>

</beans>
也可以将use-default-filters设置为true(不写就是true),并且采用exclude-filter方式排出哪些注解标注的Bean不参与实例化:
<context:component-scan base-package="com.powernode.spring6.bean3">
  <context:exclude-filter type="annotation" expression="org.springframework.stereotype.Repository"/>
  <context:exclude-filter type="annotation" expression="org.springframework.stereotype.Service"/>
  <context:exclude-filter type="annotation" expression="org.springframework.stereotype.Controller"/>
</context:component-scan>
12.4 负责注入的注解
@Component @Controller @Service @Repository 这四个注解是用来声明Bean的,声明后这些Bean将被实例化。接下来我们看一下,如何给Bean的属性赋值。给Bean属性赋值需要用到这些注解:
- @Value
- @Autowired
- @Qualifier
- @Resource
12.4.1 @Value
当属性的类型是简单类型时,可以使用@Value注解进行注入。
@Component
public class User {
    @Value(value = "zhangsan")
    private String name;
    @Value("20")
    private int age;

    @Override
    public String toString() {
        return "User{" +
                "name='" + name + '\'' +
                ", age=" + age +
                '}';
    }
}


开启包扫描
<context:component-scan base-package="com.powernode.spring6.bean4"/>
除了直接在属性上注入,也可以放在set方法和构造方法上
 public User(@Value("隔壁老王") String name, @Value("33") int age) {
        this.name = name;
        this.age = age;
    }


@Value("李四")
    public void setName(String name) {
        this.name = name;
    }
12.4.2 @Autowired与@Qualifier
@Autowired注解可以用来注入非简单类型。被翻译为:自动连线的,或者自动装配。
单独使用@Autowired注解,默认根据类型装配。【默认是byType】
- 第一处:该注解可以标注在哪里?
-
- 构造方法上
- 方法上
- 形参上
- 属性上
- 注解上
- 第二处:该注解有一个required属性,默认值是true,表示在注入的时候要求被注入的Bean必须是存在的,如果不存在则报错。如果required属性设置为false,表示注入的Bean存在或者不存在都没关系,存在的话就注入,不存在的话,也不报错。
@Service // 纳入bean管理
public class UserService {

    @Autowired // 在属性上注入
    private UserDao userDao;

    // 没有提供构造方法和setter方法。

    public void save(){
        userDao.insert();
    }
}


 @Autowired
    public void setUserDao(UserDao userDao) {
        this.userDao = userDao;
    }


 @Autowired
    public UserService(UserDao userDao) {
        this.userDao = userDao;
    }


public UserService(@Autowired UserDao userDao) {
        this.userDao = userDao;
    }
这个注解可以放在属性,set方法,构造方法,构造方法的参数。
当有参数的构造方法只有一个时,@Autowired注解可以省略。
package com.powernode.spring6.service;

import com.powernode.spring6.dao.UserDao;
import org.springframework.stereotype.Service;

@Service
public class UserService {

    private UserDao userDao;

    public UserService(UserDao userDao) {
        this.userDao = userDao;
    }

    public void save(){
        userDao.insert();
    }
}
@Autowired注解默认是byType进行注入的,也就是说根据类型注入的,如果以上程序中,UserDao接口还有另外一个实现类,会出现问题吗?
@Repository //纳入bean管理
public class UserDaoForOracle implements UserDao{
    @Override
    public void insert() {
        System.out.println("正在向Oracle数据库插入User数据");
    }
}
当你写完这个新的实现类之后,此时IDEA工具已经提示错误信息了:
错误信息中说:不能装配,UserDao这个Bean的数量大于1.
怎么解决这个问题呢?当然要byName,根据名称进行装配了。
@Autowired注解和@Qualifier注解联合起来才可以根据名称进行装配,在@Qualifier注解中指定Bean名称。
总结:
- @Autowired注解可以出现在:属性上、构造方法上、构造方法的参数上、setter方法上。
- 当带参数的构造方法只有一个,@Autowired注解可以省略。
- @Autowired注解默认根据类型注入。如果要根据名称注入的话,需要配合@Qualifier注解一起使用。
12.4.3 @Resource
@Resource注解也可以完成非简单类型注入。那它和@Autowired注解有什么区别?
- @Resource注解是JDK扩展包中的,也就是说属于JDK的一部分。所以该注解是标准注解,更加具有通用性。(JSR-250标准中制定的注解类型。JSR是Java规范提案。)
- @Autowired注解是Spring框架自己的。
- @Resource注解默认根据名称装配byName,未指定name时,使用属性名作为name。通过name找不到的话会自动启动通过类型byType装配。
- @Autowired注解默认根据类型装配byType,如果想根据名称装配,需要配合@Qualifier注解一起用。
- @Resource注解用在属性上、setter方法上。
- @Autowired注解用在属性上、setter方法上、构造方法上、构造方法参数上。
@Resource注解属于JDK扩展包,所以不在JDK当中,需要额外引入以下依赖:【如果是JDK8的话不需要额外引入依赖。高于JDK11或低于JDK8需要引入以下依赖。】
<dependency>
  <groupId>jakarta.annotation</groupId>
  <artifactId>jakarta.annotation-api</artifactId>
  <version>2.1.1</version>
</dependency>

一定要注意:如果你用Spring6,要知道Spring6不再支持JavaEE,它支持的是JakartaEE9。(Oracle把JavaEE贡献给Apache了,Apache把JavaEE的名字改成JakartaEE了,大家之前所接触的所有的  javax.*  包名统一修改为  jakarta.*包名了。)
如果你是spring5-版本请使用这个依赖

<dependency>
  <groupId>javax.annotation</groupId>
  <artifactId>javax.annotation-api</artifactId>
  <version>1.3.2</version>
</dependency>
一句话总结@Resource注解:默认byName注入,没有指定name时把属性名当做name,根据name找不到时,才会byType注入。byType注入时,某种类型的Bean只能有一个。
12.5 全注解式开发
所谓的全注解开发就是不再使用spring配置文件了。写一个配置类来代替配置文件。
@Configuration
@ComponentScan({"com.powernode.spring6.dao", "com.powernode.spring6.service"})
public class Spring6Configuration {
}

编写测试程序:不再new ClassPathXmlApplicationContext()对象了。
@Test
public void testNoXml(){
    ApplicationContext applicationContext = new AnnotationConfigApplicationContext(Spring6Configuration.class);
    UserService userService = applicationContext.getBean("userService", UserService.class);
    userService.save();
}
十三、JdbcTemplate
JdbcTemplate是Spring提供的一个JDBC模板类,是对JDBC的封装,简化JDBC代码。
当然,你也可以不用,可以让Spring集成其它的ORM框架,例如:MyBatis、Hibernate等。
接下来我们简单来学习一下,使用JdbcTemplate完成增删改查。
JdbcTemplate是Spring提供好的类,这类的完整类名是:org.springframework.jdbc.core.JdbcTemplate
我们怎么使用这个类呢?new对象就可以了。怎么new对象,Spring最在行了。直接将这个类配置到Spring配置文件中,纳入Bean管理即可。这个对象需要数据源。
<?xml version="1.0" encoding="UTF-8"?>
<beans xmlns="http://www.springframework.org/schema/beans"
       xmlns:xsi="http://www.w3.org/2001/XMLSchema-instance"
       xsi:schemaLocation="http://www.springframework.org/schema/beans http://www.springframework.org/schema/beans/spring-beans.xsd">

    <bean id="myDataSource" class="com.powernode.spring6.jdbc.MyDataSource">
        <property name="driver" value="com.mysql.cj.jdbc.Driver"/>
        <property name="url" value="jdbc:mysql://localhost:3306/spring6"/>
        <property name="username" value="root"/>
        <property name="password" value="123456"/>
    </bean>
    <bean id="jdbcTemplate" class="org.springframework.jdbc.core.JdbcTemplate">
        <property name="dataSource" ref="myDataSource"/>
    </bean>
</beans>
JdbcTemplate的使用
新增
@Test
    public void testInsert(){
        // 获取JdbcTemplate对象
        ApplicationContext applicationContext = new ClassPathXmlApplicationContext("spring.xml");
        JdbcTemplate jdbcTemplate = applicationContext.getBean("jdbcTemplate", JdbcTemplate.class);
        // 执行插入操作
        // 注意:insert delete update的sql语句,都是执行update方法。
        String sql = "insert into t_user(id,real_name,age) values(?,?,?)";
        int count = jdbcTemplate.update(sql, null, "张三", 30);
        System.out.println("插入的记录条数:" + count);
    }
修改

@Test
public void testUpdate(){
    // 获取JdbcTemplate对象
    ApplicationContext applicationContext = new ClassPathXmlApplicationContext("spring.xml");
    JdbcTemplate jdbcTemplate = applicationContext.getBean("jdbcTemplate", JdbcTemplate.class);
    // 执行更新操作
    String sql = "update t_user set real_name = ?, age = ? where id = ?";
    int count = jdbcTemplate.update(sql, "张三丰", 55, 1);
    System.out.println("更新的记录条数:" + count);
}

删除
@Test
public void testDelete(){
    // 获取JdbcTemplate对象
    ApplicationContext applicationContext = new ClassPathXmlApplicationContext("spring.xml");
    JdbcTemplate jdbcTemplate = applicationContext.getBean("jdbcTemplate", JdbcTemplate.class);
    // 执行delete
    String sql = "delete from t_user where id = ?";
    int count = jdbcTemplate.update(sql, 1);
    System.out.println("删除了几条记录:" + count);
}
查询
查询单个对象
@Test
public void testSelectOne(){
    // 获取JdbcTemplate对象
    ApplicationContext applicationContext = new ClassPathXmlApplicationContext("spring.xml");
    JdbcTemplate jdbcTemplate = applicationContext.getBean("jdbcTemplate", JdbcTemplate.class);
    // 执行select
    String sql = "select id, real_name, age from t_user where id = ?";
    User user = jdbcTemplate.queryForObject(sql, new BeanPropertyRowMapper<>(User.class), 2);
    System.out.println(user);
}

查询多个对象
@Test
public void testSelectAll(){
    // 获取JdbcTemplate对象
    ApplicationContext applicationContext = new ClassPathXmlApplicationContext("spring.xml");
    JdbcTemplate jdbcTemplate = applicationContext.getBean("jdbcTemplate", JdbcTemplate.class);
    // 执行select
    String sql = "select id, real_name, age from t_user";
    List<User> users = jdbcTemplate.query(sql, new BeanPropertyRowMapper<>(User.class));
    System.out.println(users);
}

查询一个值
@Test
public void testSelectOneValue(){
    // 获取JdbcTemplate对象
    ApplicationContext applicationContext = new ClassPathXmlApplicationContext("spring.xml");
    JdbcTemplate jdbcTemplate = applicationContext.getBean("jdbcTemplate", JdbcTemplate.class);
    // 执行select
    String sql = "select count(1) from t_user";
    Integer count = jdbcTemplate.queryForObject(sql, int.class); // 这里用Integer.class也可以
    System.out.println("总记录条数:" + count);
}
批量添加
@Test
public void testAddBatch(){
    // 获取JdbcTemplate对象
    ApplicationContext applicationContext = new ClassPathXmlApplicationContext("spring.xml");
    JdbcTemplate jdbcTemplate = applicationContext.getBean("jdbcTemplate", JdbcTemplate.class);
    // 批量添加
    String sql = "insert into t_user(id,real_name,age) values(?,?,?)";

    Object[] objs1 = {null, "小花", 20};
    Object[] objs2 = {null, "小明", 21};
    Object[] objs3 = {null, "小刚", 22};
    List<Object[]> list = new ArrayList<>();
    list.add(objs1);
    list.add(objs2);
    list.add(objs3);

    int[] count = jdbcTemplate.batchUpdate(sql, list);
    System.out.println(Arrays.toString(count));
}

批量修改
@Test
public void testUpdateBatch(){
    // 获取JdbcTemplate对象
    ApplicationContext applicationContext = new ClassPathXmlApplicationContext("spring.xml");
    JdbcTemplate jdbcTemplate = applicationContext.getBean("jdbcTemplate", JdbcTemplate.class);
    // 批量修改
    String sql = "update t_user set real_name = ?, age = ? where id = ?";
    Object[] objs1 = {"小花11", 10, 2};
    Object[] objs2 = {"小明22", 12, 3};
    Object[] objs3 = {"小刚33", 9, 4};
    List<Object[]> list = new ArrayList<>();
    list.add(objs1);
    list.add(objs2);
    list.add(objs3);

    int[] count = jdbcTemplate.batchUpdate(sql, list);
    System.out.println(Arrays.toString(count));
}

批量删除
@Test
public void testDeleteBatch(){
    // 获取JdbcTemplate对象
    ApplicationContext applicationContext = new ClassPathXmlApplicationContext("spring.xml");
    JdbcTemplate jdbcTemplate = applicationContext.getBean("jdbcTemplate", JdbcTemplate.class);
    // 批量删除
    String sql = "delete from t_user where id = ?";
    Object[] objs1 = {2};
    Object[] objs2 = {3};
    Object[] objs3 = {4};
    List<Object[]> list = new ArrayList<>();
    list.add(objs1);
    list.add(objs2);
    list.add(objs3);
    int[] count = jdbcTemplate.batchUpdate(sql, list);
    System.out.println(Arrays.toString(count));
}
使用回调函数
@Test
public void testCallback(){
    // 获取JdbcTemplate对象
    ApplicationContext applicationContext = new ClassPathXmlApplicationContext("spring.xml");
    JdbcTemplate jdbcTemplate = applicationContext.getBean("jdbcTemplate", JdbcTemplate.class);
    String sql = "select id, real_name, age from t_user where id = ?";

    User user = jdbcTemplate.execute(sql, new PreparedStatementCallback<User>() {
        @Override
        public User doInPreparedStatement(PreparedStatement ps) throws SQLException, DataAccessException {
            User user = null;
            ps.setInt(1, 5);
            ResultSet rs = ps.executeQuery();
            if (rs.next()) {
                user = new User();
                user.setId(rs.getInt("id"));
                user.setRealName(rs.getString("real_name"));
                user.setAge(rs.getInt("age"));
            }
            return user;
        }
    });
    System.out.println(user);
}
使用德鲁伊连接池
<dependency>
  <groupId>com.alibaba</groupId>
  <artifactId>druid</artifactId>
  <version>1.1.8</version>
</dependency>

<?xml version="1.0" encoding="UTF-8"?>
<beans xmlns="http://www.springframework.org/schema/beans"
       xmlns:xsi="http://www.w3.org/2001/XMLSchema-instance"
       xsi:schemaLocation="http://www.springframework.org/schema/beans http://www.springframework.org/schema/beans/spring-beans.xsd">

    <bean id="druidDataSource" class="com.alibaba.druid.pool.DruidDataSource">
        <property name="driverClassName" value="com.mysql.cj.jdbc.Driver"/>
        <property name="url" value="jdbc:mysql://localhost:3306/spring6"/>
        <property name="username" value="root"/>
        <property name="password" value="root"/>
    </bean>

    <bean id="jdbcTemplate" class="org.springframework.jdbc.core.JdbcTemplate">
        <property name="dataSource" ref="druidDataSource"/>
    </bean>
</beans>


 350
350


 被折叠的 条评论
为什么被折叠?
被折叠的 条评论
为什么被折叠?
 到【灌水乐园】发言


