


1、配置ssh免密登陆:客户端主机通过redhat用户基于秘钥验证方式进行远程连接服务器的root用户。
2、综合练习:请给openlab搭建web网站
网站需求: 1.基于域名www.openlab.com可以访问网站内容为 welcome to openlab!!! 2.给该公司创建三个子界面分别显示学生信息,教学资料和缴费网站,基于www.openlab.com/student 网站访问学生信息,www.openlab.com/data网站访问教学资料,www.openlab.com/money网站访问缴费网站。
3、配置dns服务的正向解析
1、配置ssh免密登陆:客户端主机通过redhat用户基于秘钥验证方式进行远程连接服务器的root用户。
1.创建密钥对
[root@localhost ~]# ssh-keygen -t rsa
Generating public/private rsa key pair.
Enter file in which to save the key (/root/.ssh/id_rsa):
/root/.ssh/id_rsa already exists.
Overwrite (y/n)? y
Enter passphrase (empty for no passphrase):
Enter same passphrase again:
Your identification has been saved in /root/.ssh/id_rsa
Your public key has been saved in /root/.ssh/id_rsa.pub
2.复制该公钥文件到服务端的该目录下
[root@localhost ~]# ssh-copy-id root@192.168.169.131
/usr/bin/ssh-copy-id: INFO: attempting to log in with the new key(s), to filter out any that are already installed
/usr/bin/ssh-copy-id: INFO: 1 key(s) remain to be installed -- if you are prompted now it is to install the new keys
root@192.168.169.131's password:
Number of key(s) added: 1
3.尝试在本地服务器上登陆对端服务器
[root@localhost ~]# ssh root@192.168.169.131
Activate the web console with: systemctl enable --now cockpit.socket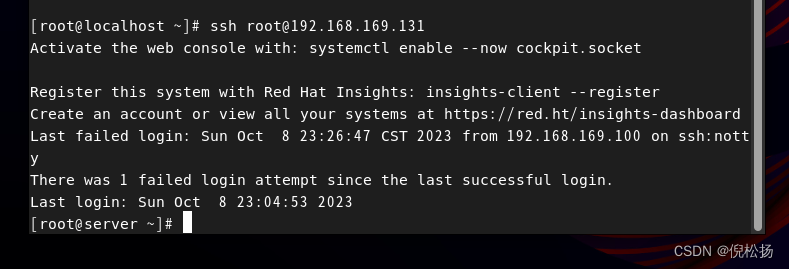
2、综合练习:请给openlab搭建web网站
网站需求: 1.基于域名www.openlab.com可以访问网站内容为 welcome to openlab!!! 2.给该公司创建三个子界面分别显示学生信息,教学资料和缴费网站,基于www.openlab.com/student 网站访问学生信息,www.openlab.com/data网站访问教学资料,www.openlab.com/money网站访问缴费网站。
1.创建内容目录
[root@server ~]# mkdir -p /www/openlab
2.创建html文件
echo 'welcome to openlab!!!' > /www/openlab/index.html
3.更新配置文件
vim /etc/httpd/conf.d/vshots.conf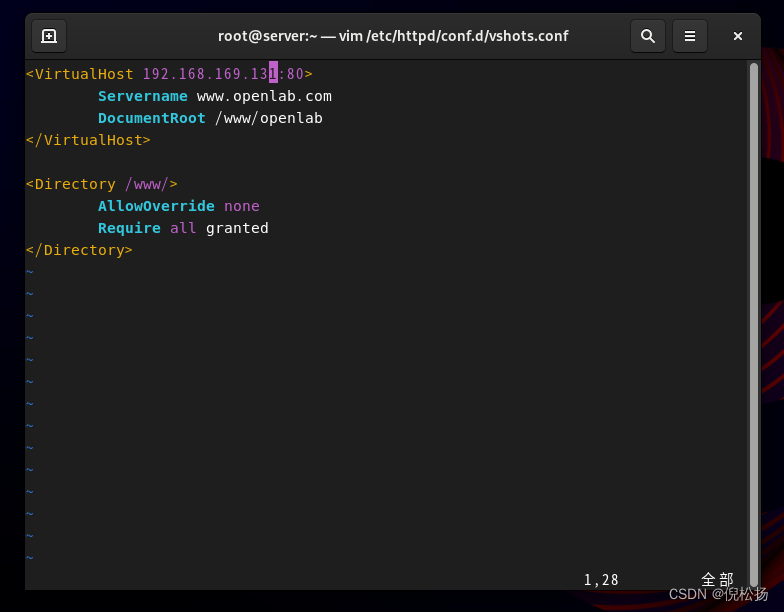
4.更新域名解析文件
[root@server ~]# vim /etc/hosts

5.重启httpd服务
[root@server ~]# systemctl restart httpd
6.关闭防火墙及selinux
[root@server ~]# systemctl stop firewalld
[root@server ~]# setenforce 0
7.尝试访问域名

8.创建证书

9.创建子目录

10.写入内容

11.更新配置文件
[root@server ~]# vim /etc/httpd/conf.d/vshots.conf
12.重启httpd服务
[root@server ~]# systemctl restart httpd
13.尝试访问网页
[root@server ~]# curl --insecure https://www.openlab.com/student/
this is openlab student
14.安装bind软件
[root@server ~]# yum install bind -y
14.配置dns服务的正向解析
[root@server ~]# vim /etc/named.conf
options {
listen-on port 53 {any; };
directory "/var/named";
allow-query { localhost; };
};
zone "." IN {
type hint;
file "named.ca";
};
配置主文件
[root@server ~]# vim /etc/named.conf
options {
listen-on port 53 {any; };
directory "/var/named";
};
zone "openlab.com" IN {
type master;
file "named.openlab.com";
};


 195
195


 被折叠的 条评论
为什么被折叠?
被折叠的 条评论
为什么被折叠?
 到【灌水乐园】发言


