


1 尚品甄选H5介绍
本章讲解尚品甄选H5端介绍。
1.1 业务功能介绍
首页、商品分类查询、关键字查询、商品详情、注册、登录、购物车模块、用户收货地址管理、订单模块、支付…
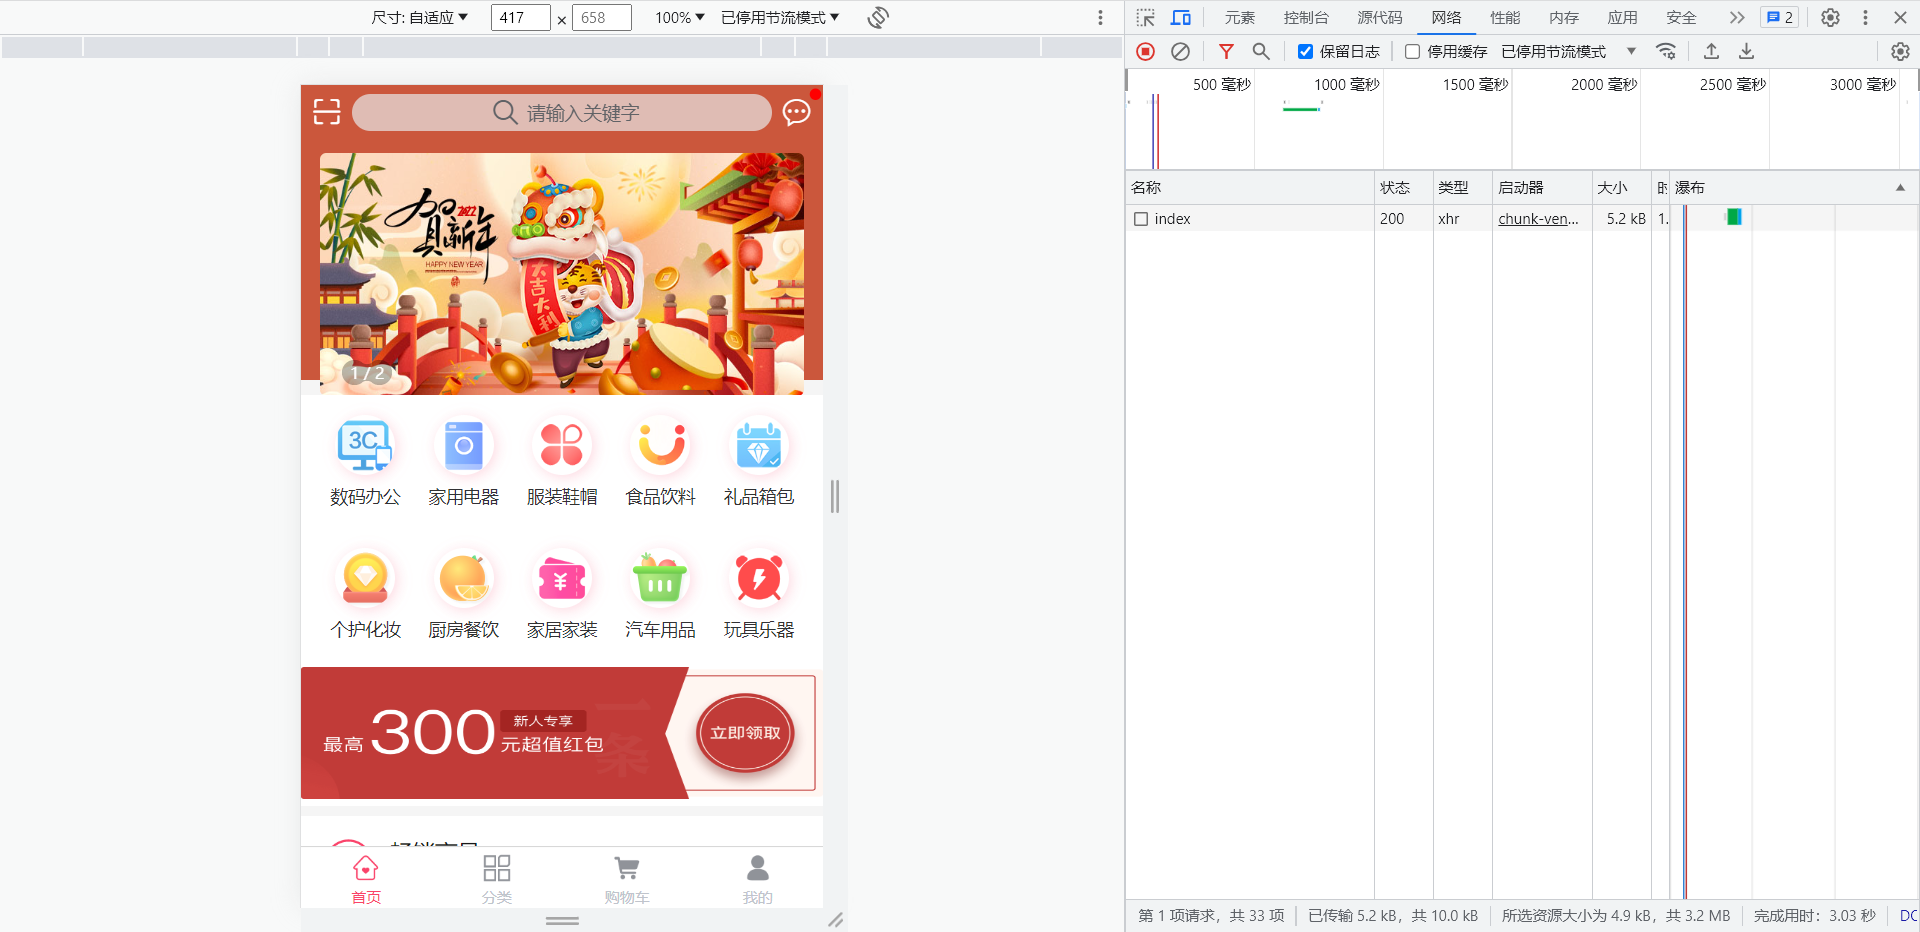
项目演示地址:http://spzx.atguigu.cn/
1.2 系统架构
服务器端架构:SpringBoot3 + Spring Cloud + Spring Cloud Alibaba(Nacos/Sentinel) + MyBatis + Redis + Mysql
前端架构:Uni-App
1.3 前端H5开发说明
前端H5部分我们不需要开发,我们只需要根据接口文档开发微服务接口,然后对接到写好的前端H5即可
导入课程资料:spzx-h5
部署spzx-h5:
1、docker部署nginx
#拉取镜像
docker pull nginx:latest

#运行nginx镜像
docker run -d -p 80:80 \
--name nginx-spzx \
-v nginx_html:/usr/share/nginx/html \
-v nginx_conf:/etc/nginx/ \
-v nginx_logs:/var/log/nginx  nginx

# nginx-spzx容器的管理命令
docker start nginx-spzx			# 启动容器
docker stop nginx-spzx			# 关闭容器
docker rm nginx-spzx			# 删除容器

#使用浏览器访问测试:http://ip
2、部署spzx-h5
删除/var/lib/docker/volumes/nginx_html/_data目录下的文件,将spzx-h5目录下的文件上传到该目录下。
view /var/lib/docker/volumes/nginx-conf/_data/nginx.conf
[root@localhost ~]# view /var/lib/docker/volumes/nginx-conf/_data/nginx.conf


events {
    worker_connections  1024;
}


http {
    include       /etc/nginx/mime.types;
    default_type  application/octet-stream;

    log_format  main  '$remote_addr - $remote_user [$time_local] "$request" '
                      '$status $body_bytes_sent "$http_referer" '
                      '"$http_user_agent" "$http_x_forwarded_for"';

    access_log  /var/log/nginx/access.log  main;

    sendfile        on;
    #tcp_nopush     on;

    keepalive_timeout  65;

    #gzip  on;

    include /etc/nginx/conf.d/*.conf;
    server{
       listen 80;
       server_name www.spzx.com;
       location / {
           root /usr/share/nginx/html;
           index index.html index.html;

       }

    }

}
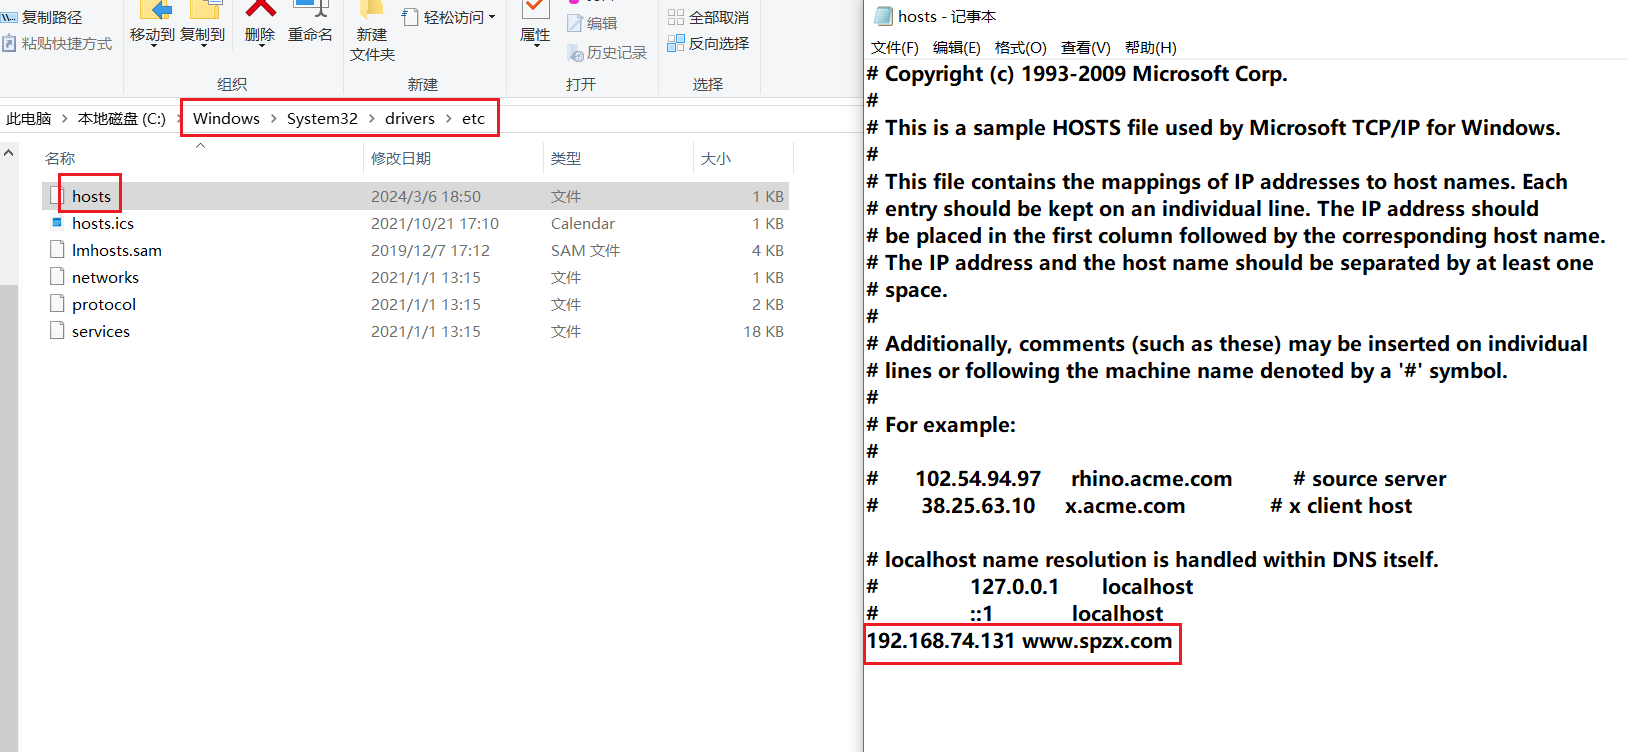
C:\Windows\System32\drivers\etc
C:\Windows\System32\drivers\etc
浏览器访问:http://ip,打开手机模式
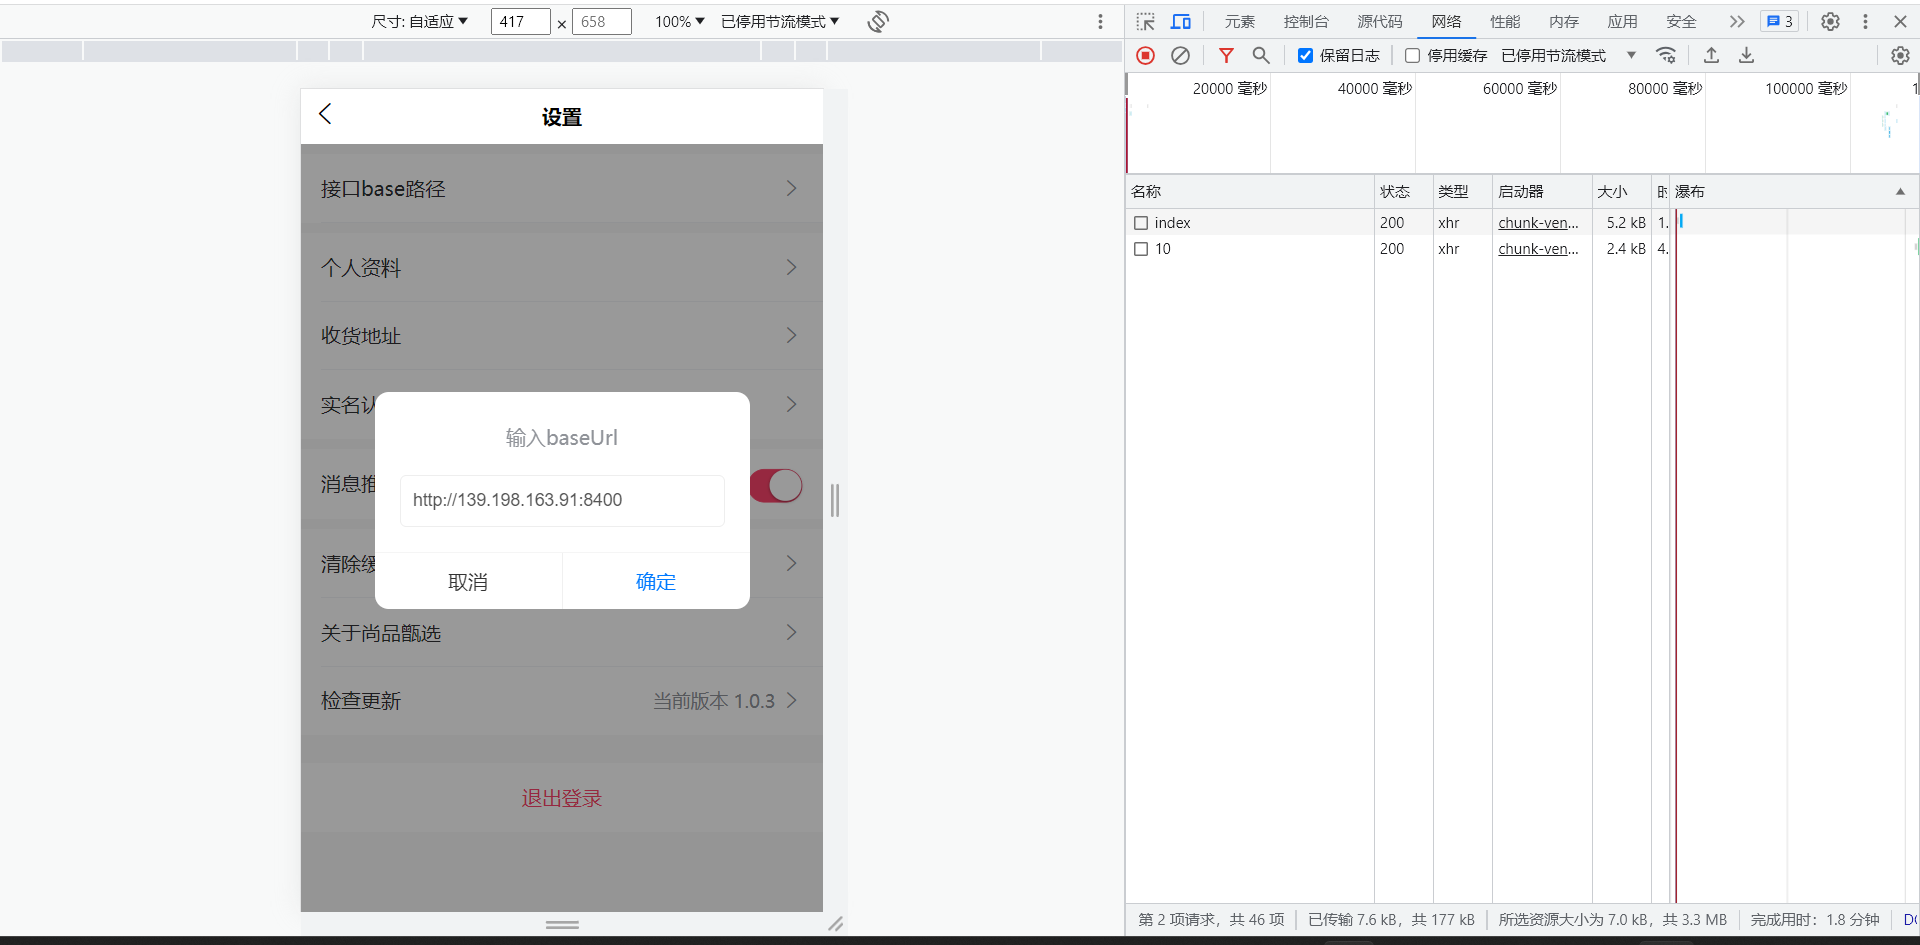
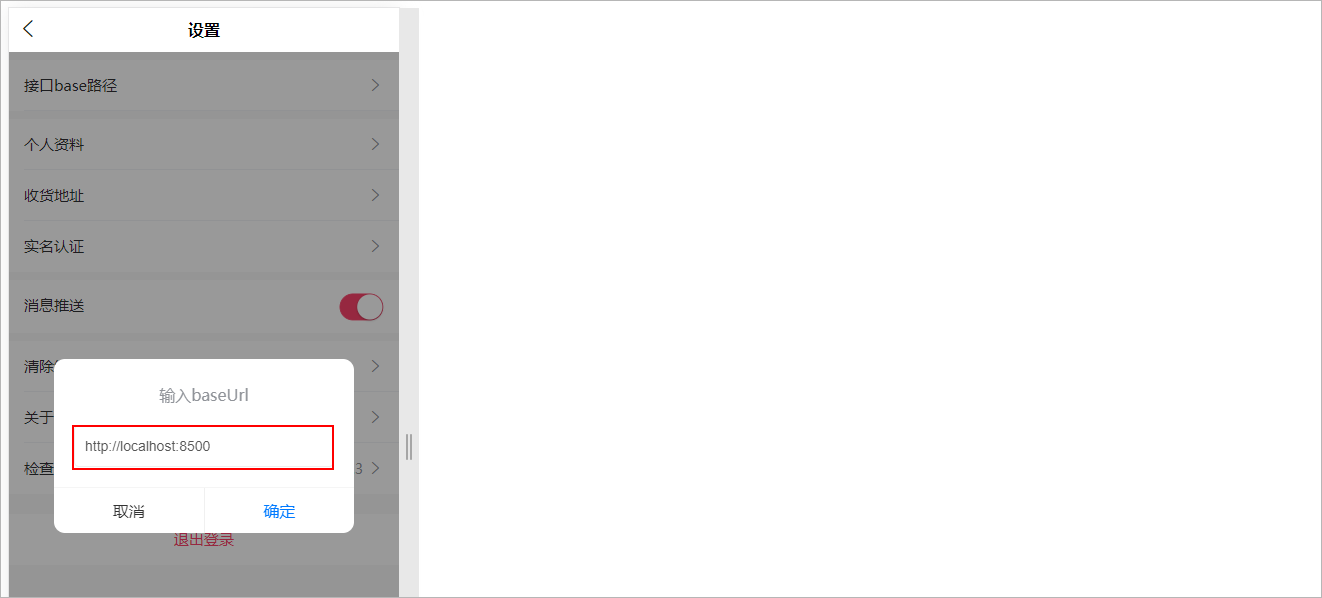
3、H5调用本地接口设置
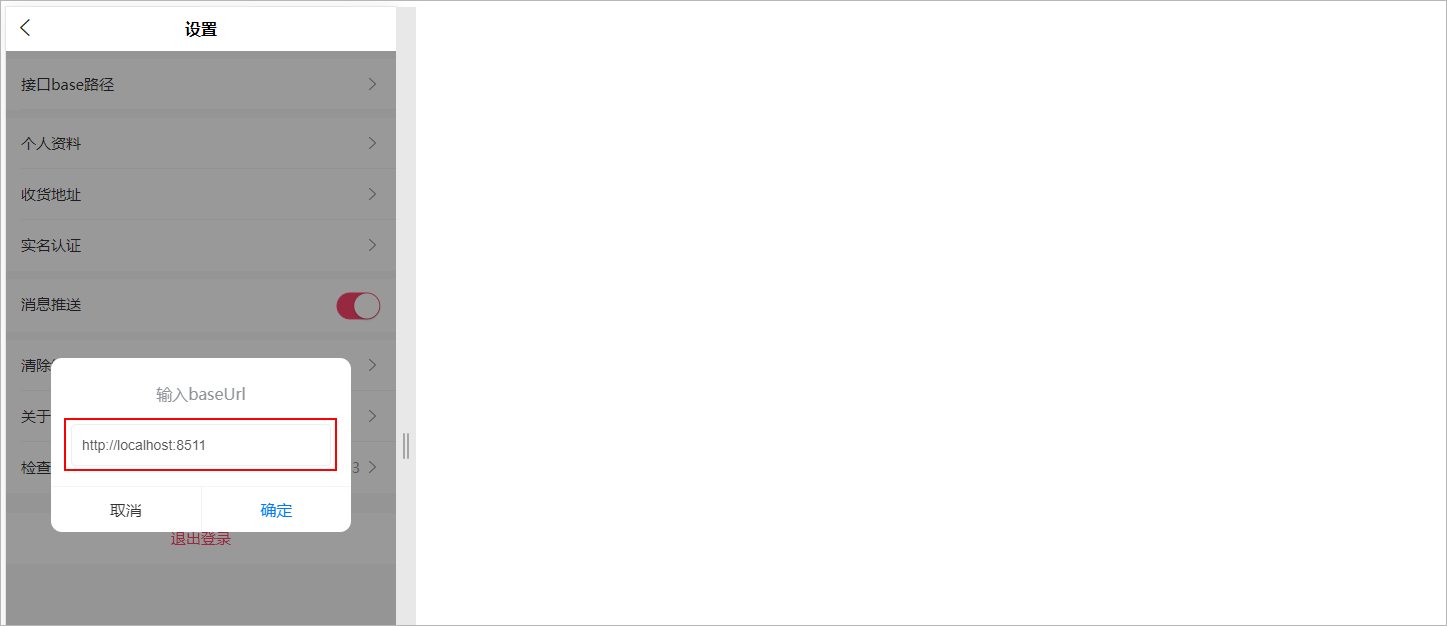
我的 => 设置 =》 接口base路径,改为本地网关地址:http://IP:端口
注意:http://139.198.163.91:8400为云服务接口地址
2 搭建项目环境
本章讲解在spzx-parent基础上搭建尚品甄选H5端微服务开发环境。
2.1 项目结构说明
尚品甄选H5端微服务项目结构如下所示:
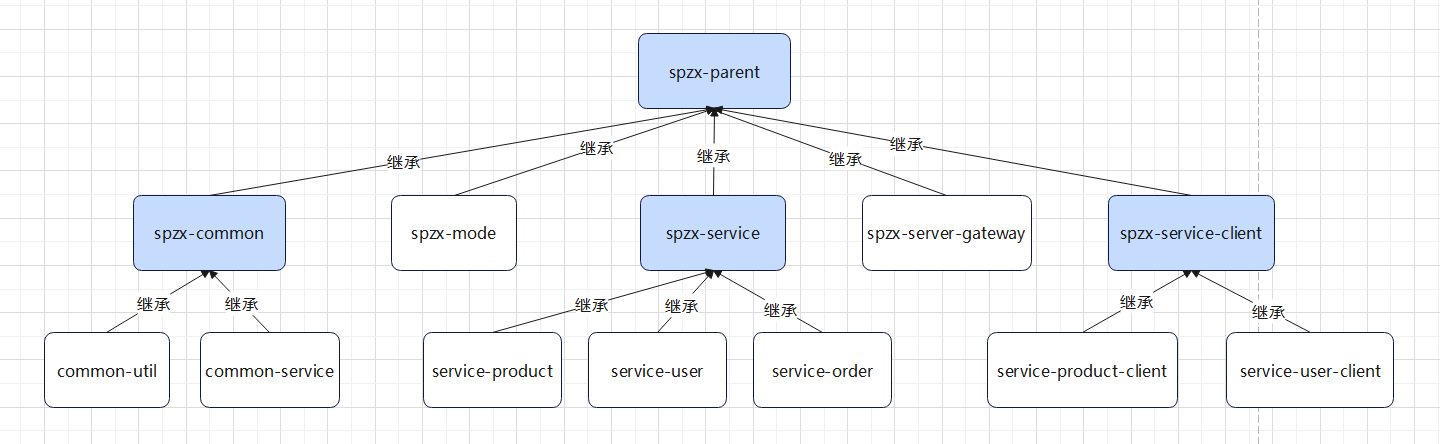
模块说明:
spzx-parent: 尚品甄选项目的父工程,进行项目依赖的统一管理,打包方式为pom
spzx-common: 尚品甄选项目公共模块的管理模块
common-util: 工具类模块
common-service:公共服务模块
spzx-model: 尚品甄选项目实体类模块
spzx-manager: 尚品甄选项目后台管理系统的后端服务(忽略、前面已讲)
spzx-server-gateway: 尚品甄选项目的网关
spzx-service: 尚品甄选微服务模块的父工程
service-product:商品微服务模块
service-user:用户微服务模块
service-order:订单微服务模块
spzx-service-client: 尚品甄选微服务模块远程调用接口的父工程
service-product-client:商品微服务远程调用接口模块
service-user-client:用户微服务远程调用接口模块
2.2 模块依赖说明
模块之间的依赖关系如下图所示:
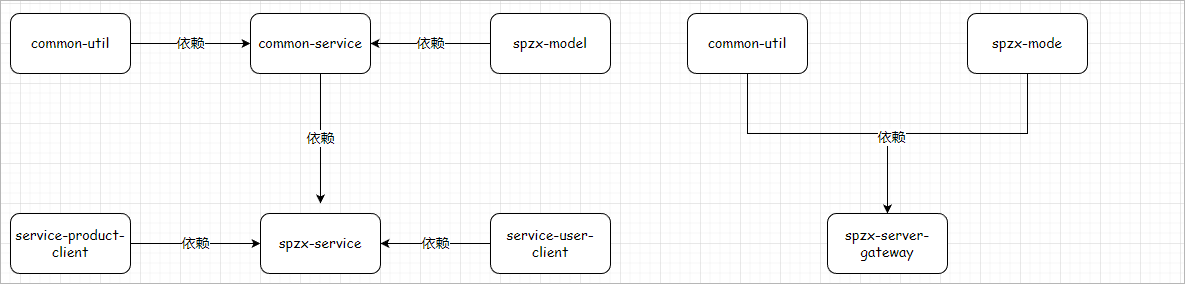
对应说明:
1、common-service依赖common-util、spzx-mode
2、spzx-service依赖common-service、service-product-client、service-user-client
3、spzx-server-gateway依赖common-util、spzx-mode
2.3 环境说明
本次项目开发的时候所使用的软件环境版本如下所示:
| 软件名称 | 版本说明 |
|---|---|
| jdk | jdk17 |
| spring boot | 3.0.5 |
| spring cloud | 2022.0.2 |
| spring cloud alibaba | 2022.0.0.0-RC2 |
| redis | 7.0.10 |
| mybaits-spring-boot-starter | 3.0.1 |
| mysql | 8.0.29 |
| idea | 2022.2.2 |
| nacos server | 2.2.1 |
| sentinel dashboard | 2.0.0-alpha-preview |
2.4 项目模块创建
2.4.1 spzx-parent
添加微服务依赖:
<properties>
    ...

    <cloud.version>2022.0.2</cloud.version>
    <alibaba.version>2022.0.0.0-RC2</alibaba.version>
    <alipay.version>4.8.73.ALL</alipay.version>
</properties>

<!-- 管理依赖,版本锁定 -->
<dependencyManagement>

    <dependencies>
        <dependency>
            <groupId>org.springframework.cloud</groupId>
            <artifactId>spring-cloud-dependencies</artifactId>
            <version>${cloud.version}</version>
            <type>pom</type>
            <scope>import</scope>
        </dependency>
        <dependency>
            <groupId>com.alibaba.cloud</groupId>
            <artifactId>spring-cloud-alibaba-dependencies</artifactId>
            <version>${alibaba.version}</version>
            <type>pom</type>
            <scope>import</scope>
        </dependency>
        <!--导入支付宝支付sdk-->
        <dependency>
            <groupId>com.alipay.sdk</groupId>
            <artifactId>alipay-sdk-java</artifactId>
            <version>${alipay.version}</version>
        </dependency>

        ...
    </dependencies>
</dependencyManagement>
2.4.2 spzx-service
在spzx-parent下面创建该子模块,并导入如下依赖:
<dependencies>

    <dependency>
        <groupId>com.atguigu.spzx</groupId>
        <artifactId>common-service</artifactId>
        <version>1.0-SNAPSHOT</version>
    </dependency>

    <!-- mybatis的起步依赖 -->
    <dependency>
        <groupId>org.mybatis.spring.boot</groupId>
        <artifactId>mybatis-spring-boot-starter</artifactId>
    </dependency>

    <!-- mysql驱动 -->
    <dependency>
        <groupId>mysql</groupId>
        <artifactId>mysql-connector-java</artifactId>
    </dependency>

    <dependency>
        <groupId>org.springframework.boot</groupId>
        <artifactId>spring-boot-configuration-processor</artifactId>
        <optional>true</optional>
    </dependency>

    <dependency>
        <groupId>com.github.pagehelper</groupId>
        <artifactId>pagehelper-spring-boot-starter</artifactId>
        <version>1.3.0</version>
    </dependency>

    <!-- 服务注册 -->
    <dependency>
        <groupId>com.alibaba.cloud</groupId>
        <artifactId>spring-cloud-starter-alibaba-nacos-discovery</artifactId>
    </dependency>

    <!-- 流量控制 -->
    <dependency>
        <groupId>com.alibaba.cloud</groupId>
        <artifactId>spring-cloud-starter-alibaba-sentinel</artifactId>
    </dependency>

</dependencies>
注意:删除src目录、修改项目packaging类型为pom
2.4.43 service-product
在spzx-service下面创建子模块service-product.在service-product服务的src/resources目录下创建application.yml、application-dev.yml文件,文件的内容如下所示:
application.yml
spring:
  profiles:
    active: dev
application-dev.yml
server:
  port: 8511

spring:
  application:
    name: service-product
  cloud:
    nacos:
      discovery:
        server-addr: 192.168.136.142:8848
    sentinel:
      transport:
        dashboard: localhost:8080
  datasource:
    type: com.zaxxer.hikari.HikariDataSource
    driver-class-name: com.mysql.cj.jdbc.Driver
    url: jdbc:mysql://192.168.136.142:3306/db_spzx?serverTimezone=UTC&characterEncoding=utf8&useUnicode=true&useSSL=true
    username: root
    password: 1234

mybatis:
  config-location: classpath:mybatis-config.xml
  mapper-locations: classpath:mapper/*/*.xml
导入课程资料中提供的:logback-spring.xml配置文件,修改输出路径:
<property name="log.path" value="F://logs//service-product//logs" />
启动类创建
package com.atguigu.spzx.product;

@SpringBootApplication
public class ProductApplication {

    public static void main(String[] args) {
        SpringApplication.run(ProductApplication.class, args);
    }

}
2.5 导入接口文档
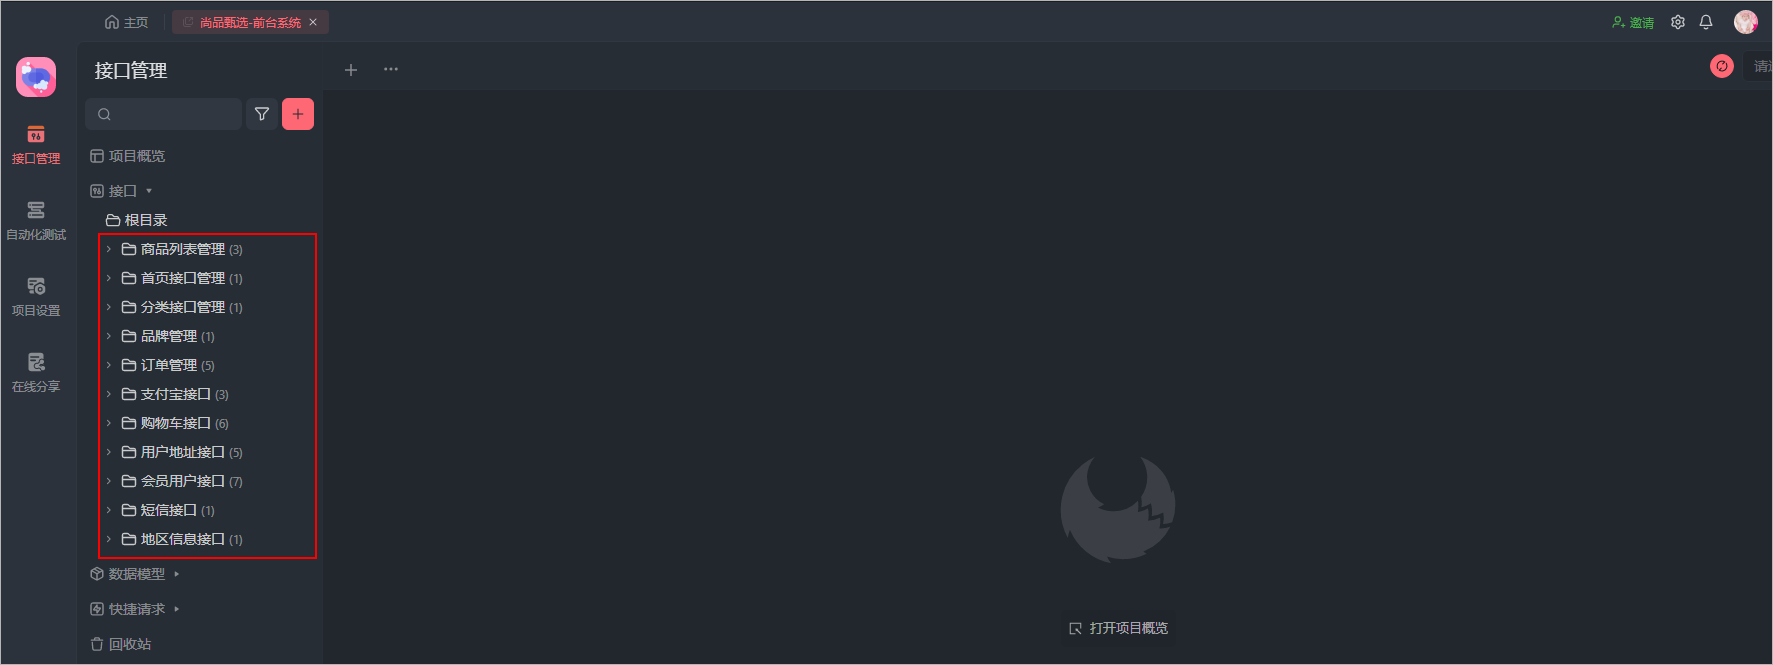
将课程资料中所提供的接口文档(OpenAPI文件夹下的json文件)导入到Apifox中,具体步骤如下所示:
1、在Apifox中创建项目
2、进入项目 ----> 项目设置 ----> 导入数据 -----> 点击或者拖拽文件到本区域导入
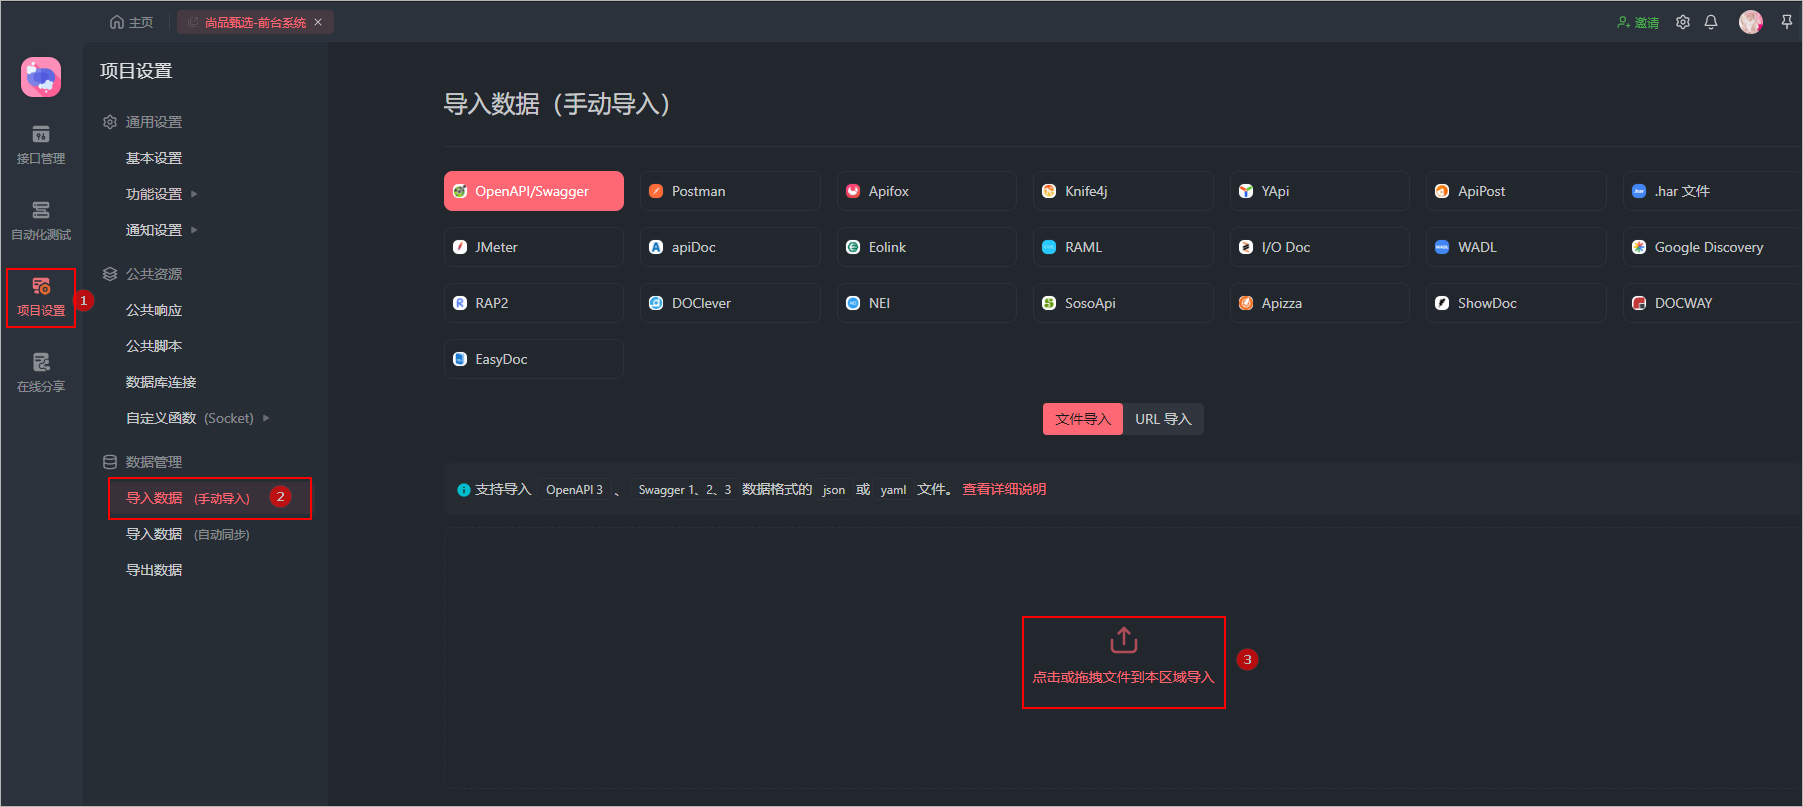
3、导出完毕以后可以在接口中管理中看到对应的接口信息
3 首页接口开发
3.1 需求分析
需求说明:在前台系统首页展示商品一级分类数据以及畅销商品列表数据,如下所示:
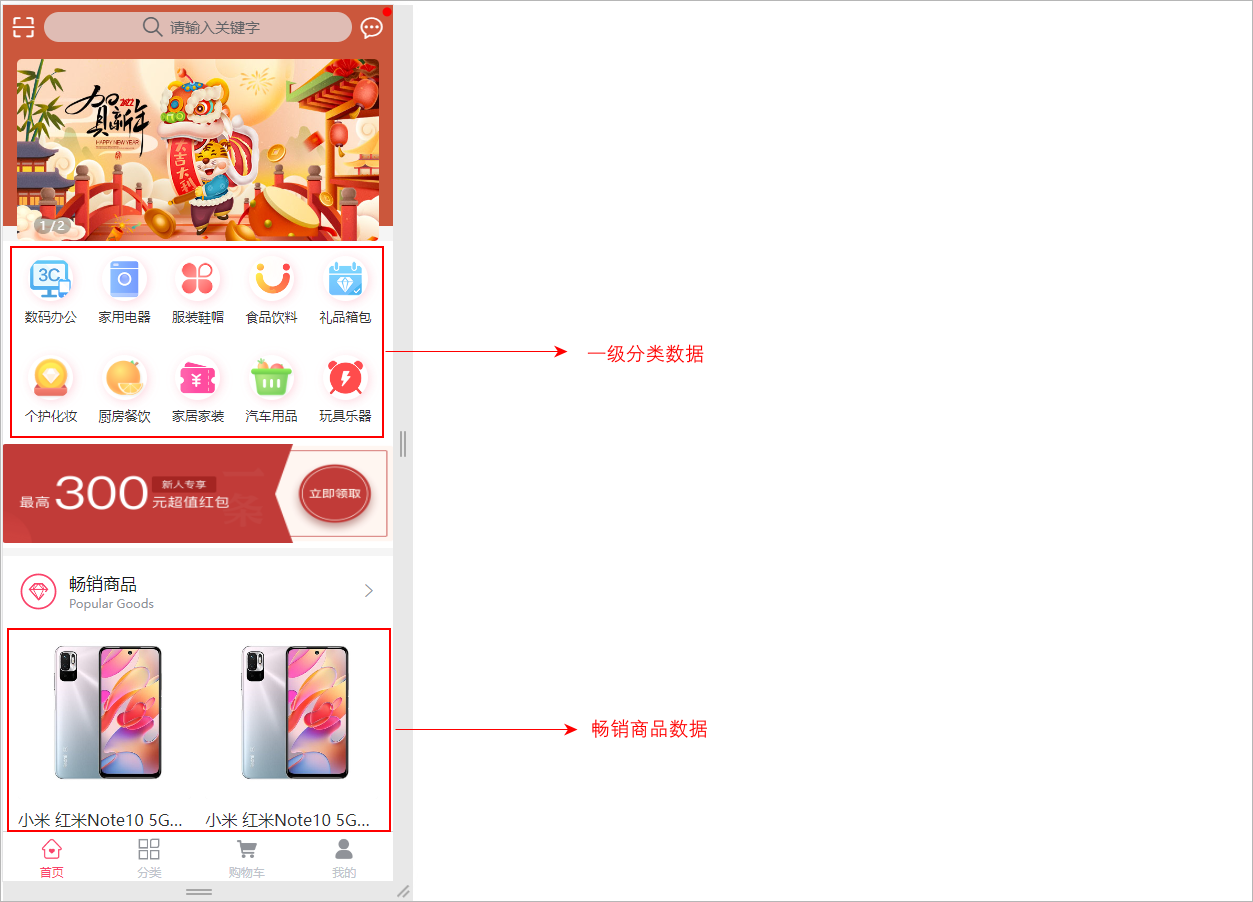
需求分析:
商品一级分类:查询category表,获取parent_id="0"的数据列表
畅销商品列表:查询product_sku表,根据sale_num字段排序,取前20条数据列表
整体的访问流程如下所示:

3.3 接口开发
对比着接口文档进行相关接口的开发。
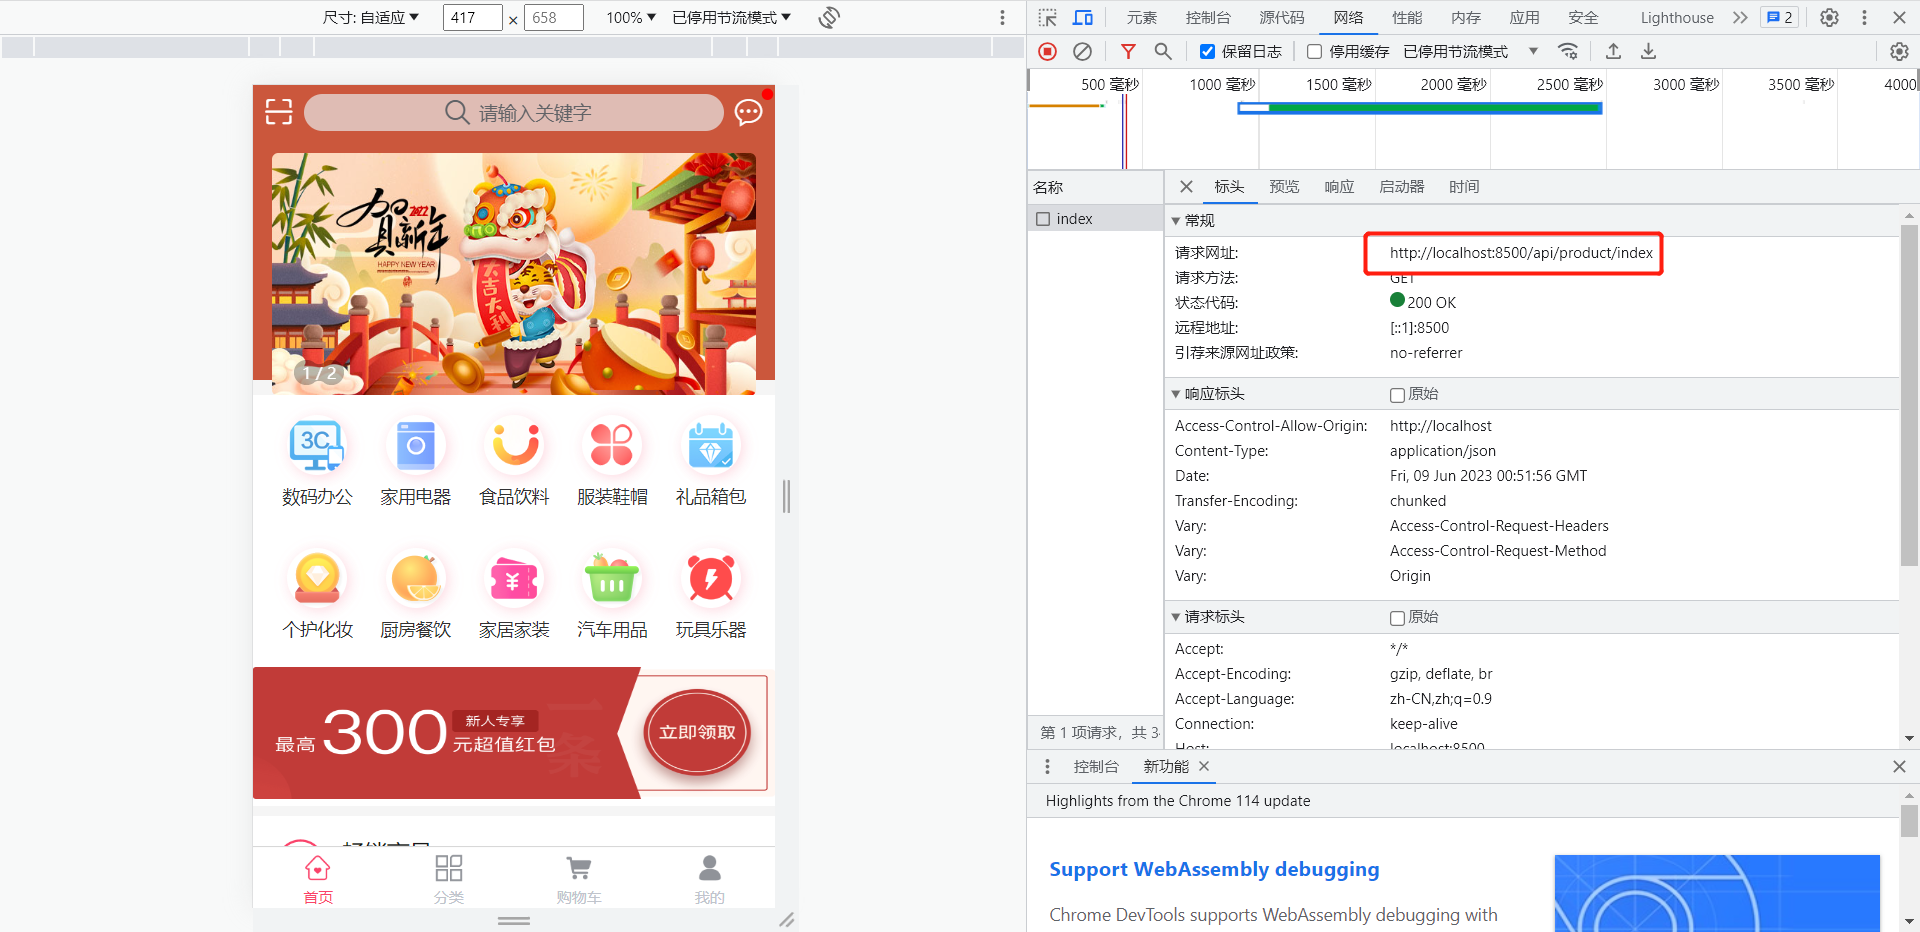
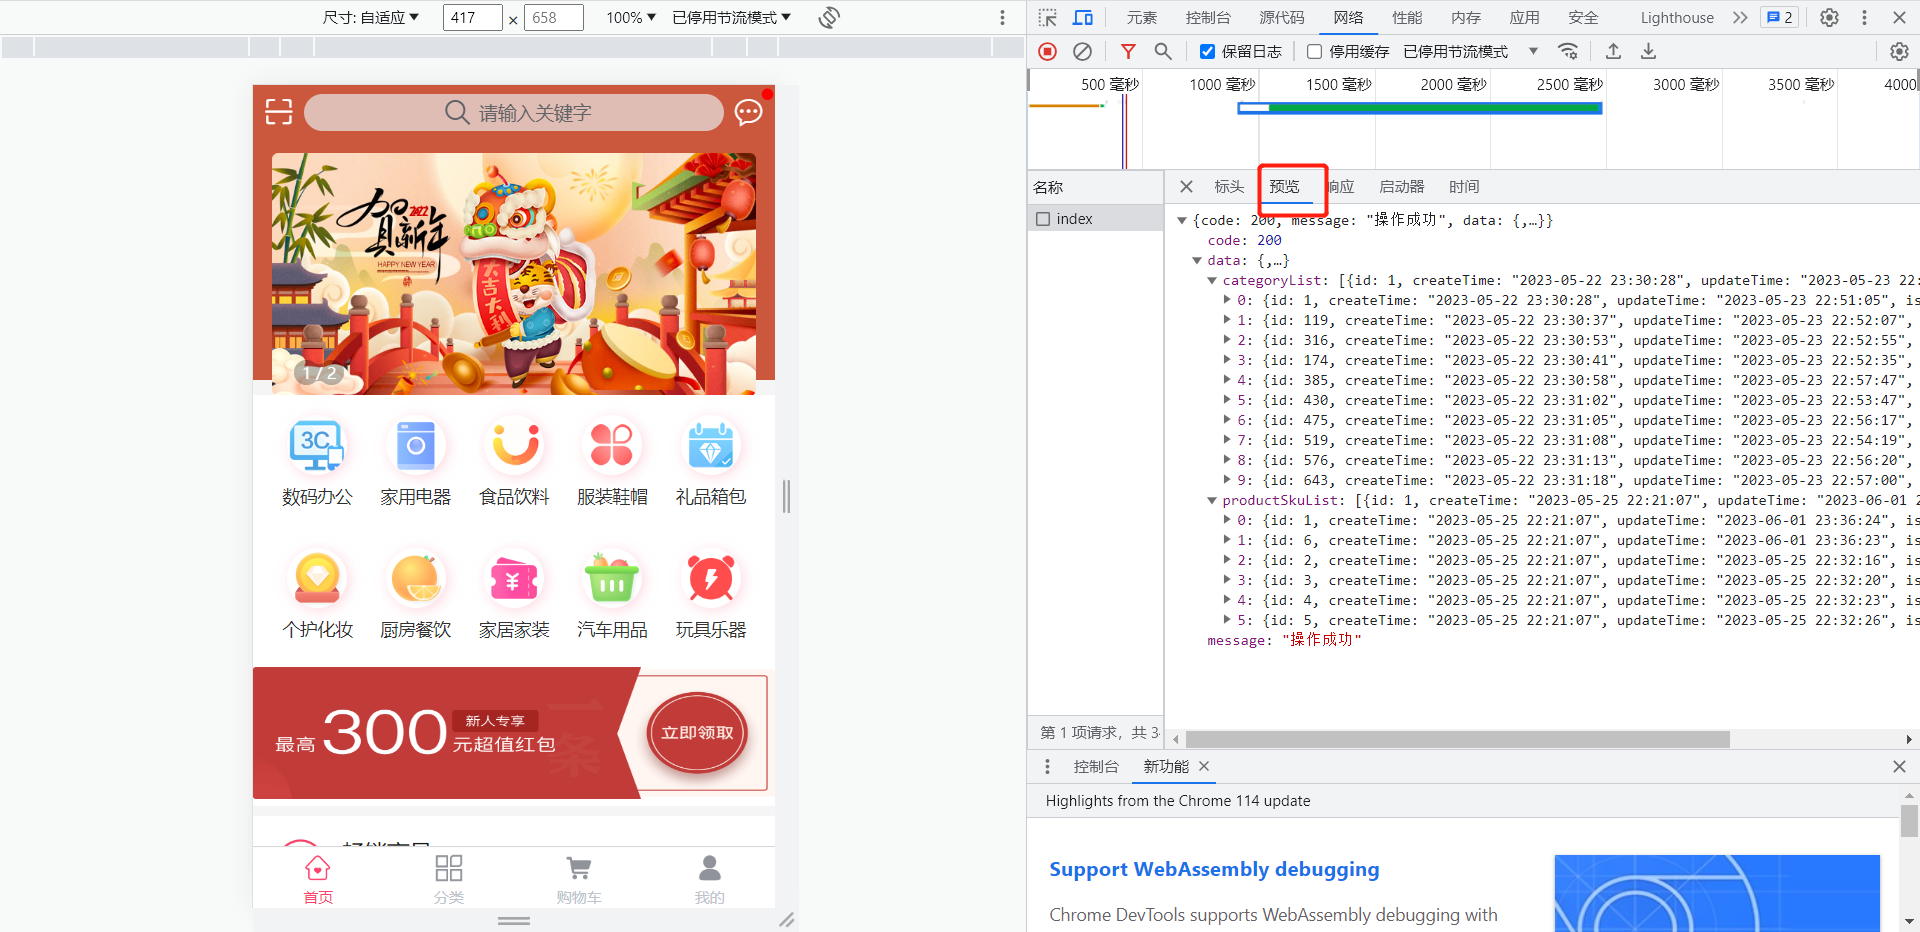
查看接口文档:
首页接口地址及示例数据
get  /api/product/index
返回结果:
{
    "code": 200,
    "message": "成功",
    "data": {
        "productSkuList": [
            {
                "id": 1,
                "createTime": "2023-05-25 22:21:07",
                "skuCode": "1_0",
                "skuName": "小米 红米Note10 5G手机 颜色:白色 内存:8G",
                "productId": 1,
                "thumbImg": "http://139.198.127.41:9000/spzx/20230525/665832167-5_u_1 (1).jpg",
                "salePrice": 1999.00,
                "marketPrice": 2019.00,
                "costPrice": 1599.00,
                "stockNum": 99,
                "saleNum": 1,
                "skuSpec": "颜色:白色,内存:8G",
                "weight": "1.00",
                "volume": "1.00",
                "status": null,
                "skuSpecList": null
            },
            ...
        ],
        "categoryList": [
            {
                "id": 1,
                "createTime": "2023-05-22 23:30:28",
                "name": "数码办公",
                "imageUrl": "https://lilishop-oss.oss-cn-beijing.aliyuncs.com/230f48f024a343c6be9be72597c2dcd0.png",
                "parentId": 0,
                "status": 1,
                "orderNum": 1,
                "hasChildren": null,
                "children": null
            },
            ...
        ]
    }
}
3.3.1 IndexVo
定义一个实体类来封装要给前端详细的数据,如下所示:
// com.atguigu.spzx.model.vo.h5;
@Data
public class IndexVo {

    private List<Category> categoryList ;       // 一级分类的类别数据
    private List<ProductSku> productSkuList ;   // 畅销商品列表数据

}
3.3.2 IndexController
操作模块:service-product
表现层代码:
// com.atguigu.spzx.product.controller;

@Tag(name = "首页接口管理")
@RestController
@RequestMapping(value="/api/product/index")
@SuppressWarnings({"unchecked", "rawtypes"})
public class IndexController {

   @Autowired
   private CategoryService categoryService;

   @Autowired
   private ProductService productService;

   @Operation(summary = "获取首页数据")
   @GetMapping
   public Result<IndexVo> findData(){
      List<Category> categoryList = categoryService.findOneCategory();
      List<ProductSku> productSkuList = productService.findProductSkuBySale();
      IndexVo indexVo = new IndexVo() ;
      indexVo.setCategoryList(categoryList);
      indexVo.setProductSkuList(productSkuList);
      return Result.build(indexVo , ResultCodeEnum.SUCCESS);
   }

}
3.3.3 商品一级分类接口
CategoryService
业务层代码实现
// 业务接口
public interface CategoryService {

    List<Category> findOneCategory();

}

// 接口实现类
@Service
public class CategoryServiceImpl implements CategoryService {

	@Autowired
	private CategoryMapper categoryMapper;

    @Override
    public List<Category> findOneCategory() {
        return categoryMapper.findOneCategory();
    }
}
CategoryMapper
持久层代码实现
@Mapper
public interface CategoryMapper {

    List<Category> findOneCategory();
}
CategoryMapper.xml
在映射文件中定义对应的sql语句
<?xml version="1.0" encoding="UTF-8" ?>
<!DOCTYPE mapper PUBLIC "-//mybatis.org//DTD Mapper 3.0//EN" "http://mybatis.org/dtd/mybatis-3-mapper.dtd">


<mapper namespace="com.atguigu.spzx.product.mapper.CategoryMapper">

   <resultMap id="categoryMap" type="com.atguigu.spzx.model.entity.product.Category" autoMapping="true">
   </resultMap>

   <!-- 用于select查询公用抽取的列 -->
   <sql id="columns">
      id,name,image_url,parent_id,status,order_num,create_time,update_time,is_deleted
   </sql>

   <select id="findOneCategory" resultMap="categoryMap">
      select <include refid="columns" />
      from category
      where
          parent_id = 0
         and status = 1
         and is_deleted = 0
      order by order_num
   </select>

</mapper>
3.3.4 畅销商品列表接口
ProductService
业务层代码实现
// 业务接口
public interface ProductService {

    List<ProductSku> findProductSkuBySale();

}

// 接口实现类
@Service
public class ProductServiceImpl implements ProductService {

    @Autowired
    private ProductSkuMapper productSkuMapper;

    @Override
    public List<ProductSku> findProductSkuBySale() {
        return productSkuMapper.findProductSkuBySale();
    }
}
ProductSkuMapper
持久层代码实现
@Mapper
public interface ProductSkuMapper {

    List<ProductSku> findProductSkuBySale();
}
ProductSkuMapper.xml
在映射文件中定义对应的sql语句
<?xml version="1.0" encoding="UTF-8" ?>
<!DOCTYPE mapper PUBLIC "-//mybatis.org//DTD Mapper 3.0//EN" "http://mybatis.org/dtd/mybatis-3-mapper.dtd">

<mapper namespace="com.atguigu.spzx.product.mapper.ProductSkuMapper">

   <resultMap id="productSkuMap" type="com.atguigu.spzx.model.entity.product.ProductSku" autoMapping="true">
   </resultMap>

   <!-- 用于select查询公用抽取的列 -->
   <sql id="columns">
      id,sku_code,sku_name,product_id,thumb_img,sale_price,market_price,cost_price,stock_num,sale_num,sku_spec,weight,volume,status,create_time,update_time,is_deleted
   </sql>

   <select id="findProductSkuBySale" resultMap="productSkuMap">
      select
          sku.id,sku.sku_code,sku.sku_name,sku.product_id,sku.thumb_img,sku.sale_price,sku.market_price,sku.cost_price,sku.stock_num,sku.sale_num,sku.sku_spec,sku.weight,sku.volume,sku.status,sku.create_time,sku.update_time,sku.is_deleted
      from product_sku sku
         left join product p on p.id = sku.product_id
      where
         p.status = 1
         and p.audit_status = 1
         and sku.is_deleted = 0
         and p.is_deleted = 0
         order by sku.sale_num desc
      limit 20
   </select>

</mapper>
3.3.5 Knife4j调试接口
配置前端H5接口
在common-service模块Knife4jConfig类添加配置信息:
@Bean
public GroupedOpenApi webApi() {      // 创建了一个api接口的分组
    return GroupedOpenApi.builder()
            .group("web-api")         // 分组名称
            .pathsToMatch("/api/**")  // 接口请求路径规则
            .build();
}
Knife4j调试首页接口

H5对接本地接口
启动nginx,访问:http://ip
我的 => 设置 =》 接口base路径,改为本地网关地址:http://IP:端口
请求
数据
3.3.6 接口测试
测试方向:
1、后端接口单独测试
2、配合前端项目测试
后端地址配置:
解决跨域问题:在IndexController类上添加**@CrossOrigin**注解接口跨域问题
4 分类接口开发
4.1 需求分析
需求说明:当用户点击分类导航按钮的时候,那么此时就需要将系统中所对应的所有的分类数据查询出来,如下所示:

展示全部商品三级联动的分类数据,查询category数据表
查看接口文档:
分类数据接口地址及示例数据
get  /api/product/category/findCategoryTree
返回结果:
{
    "code": 200,
    "message": "成功",
    "data": [
        {
            "id": 1,
            "createTime": "2023-05-22 23:30:28",
            "name": "数码办公",
            "imageUrl": "https://lilishop-oss.oss-cn-beijing.aliyuncs.com/230f48f024a343c6be9be72597c2dcd0.png",
            "parentId": 0,
            "status": 1,
            "orderNum": 1,
            "hasChildren": null,
            "children": [
                {
                    "id": 2,
                    "createTime": "2023-05-22 23:30:28",
                    "name": "手机通讯",
                    "imageUrl": "",
                    "parentId": 1,
                    "status": 1,
                    "orderNum": 0,
                    "hasChildren": null,
                    "children": [
                        {
                            "id": 3,
                            "createTime": "2023-05-22 23:30:28",
                            "name": "手机",
                            "imageUrl": "https://lilishop-oss.oss-cn-beijing.aliyuncs.com/1348576427264204943.png",
                            "parentId": 2,
                            "status": 1,
                            "orderNum": 0,
                            "hasChildren": null,
                            "children": null
                        },
                        {
                            "id": 4,
                            "createTime": "2023-05-22 23:30:28",
                            "name": "对讲机",
                            "imageUrl": "https://lilishop-oss.oss-cn-beijing.aliyuncs.com/1348576427264204944.png",
                            "parentId": 2,
                            "status": 1,
                            "orderNum": 0,
                            "hasChildren": null,
                            "children": null
                        },
                        ...
                    ]
                },
                ...
            ]
        },
        ...
    ]
}
4.2 接口开发
操作模块:service-product
4.2.1 CategoryController
表现层代码:
@Tag(name = "分类接口管理")
@RestController
@RequestMapping(value="/api/product/category")
@SuppressWarnings({"unchecked", "rawtypes"})
public class CategoryController {

   @Autowired
   private CategoryService categoryService;

   @Operation(summary = "获取分类树形数据")
   @GetMapping("findCategoryTree")
   public Result<List<Category>> findCategoryTree(){
      List<Category> list = categoryService.findCategoryTree();
      return Result.build(list,  ResultCodeEnum.SUCCESS);
   }

}
4.2.2 CategoryService
业务层代码实现
// 业务接口
List<Category> findCategoryTree();

// 接口实现类
@Override
public List<Category> findCategoryTree() {
    List<Category> categoryList = categoryMapper.findAll();
    //全部一级分类
    List<Category> oneCategoryList = categoryList.stream().filter(item -> item.getParentId().longValue() == 0).collect(Collectors.toList());
    if(!CollectionUtils.isEmpty(oneCategoryList)) {
        oneCategoryList.forEach(oneCategory -> {
            List<Category> twoCategoryList = categoryList.stream().filter(item -> item.getParentId().longValue() == oneCategory.getId().longValue()).collect(Collectors.toList());
            oneCategory.setChildren(twoCategoryList);
            if(!CollectionUtils.isEmpty(twoCategoryList)) {
                twoCategoryList.forEach(twoCategory -> {
                    List<Category> threeCategoryList = categoryList.stream().filter(item -> item.getParentId().longValue() == twoCategory.getId().longValue()).collect(Collectors.toList());
                    twoCategory.setChildren(threeCategoryList);
                });
            }
        });
    }
    return oneCategoryList;
}
4.2.3 CategoryMapper
持久层代码实现
List<Category> findAll();
4.2.4 CategoryMapper.xml
在映射文件中定义对应的sql语句
<select id="findAll" resultMap="categoryMap">
   select <include refid="columns" />
   from category
   where
   status = 1
   and is_deleted = 0
   order by order_num
</select>
4.2.5 接口测试
测试方向:
1、后端接口单独测试
2、配合前端项目测试
5 网关服务搭建
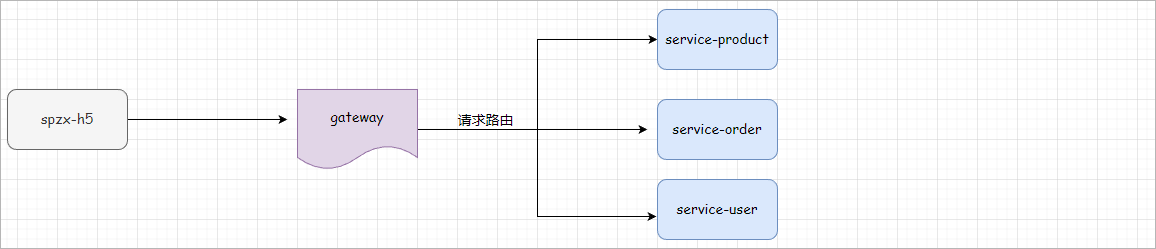
5.1 网关服务说明
后期针对前台系统会创建很多个后端微服务,前端在访问后端微服务的时候需要通过服务网关进行访问,如下图所示:
5.2 服务网关搭建
步骤:
1、在spzx-parent项目下创建一个spzx-server-gateway模块,并加入依赖
<dependencies>

    <dependency>
        <groupId>com.atguigu.spzx</groupId>
        <artifactId>common-util</artifactId>
        <version>1.0-SNAPSHOT</version>
    </dependency>

    <dependency>
        <groupId>com.atguigu.spzx</groupId>
        <artifactId>spzx-model</artifactId>
        <version>1.0-SNAPSHOT</version>
    </dependency>

    <dependency>
        <groupId>org.springframework.cloud</groupId>
        <artifactId>spring-cloud-starter-gateway</artifactId>
    </dependency>

    <!-- loadbalancer依赖 -->
    <dependency>
        <groupId>org.springframework.cloud</groupId>
        <artifactId>spring-cloud-loadbalancer</artifactId>
    </dependency>

    <!-- 服务注册 -->
    <dependency>
        <groupId>com.alibaba.cloud</groupId>
        <artifactId>spring-cloud-starter-alibaba-nacos-discovery</artifactId>
    </dependency>

    <!-- 服务保护组件 -->
    <dependency>
        <groupId>com.alibaba.cloud</groupId>
        <artifactId>spring-cloud-starter-alibaba-sentinel</artifactId>
    </dependency>

</dependencies>
2、在classpath路径下编写两个配置文件:application.yml、application-dev.yml,文件内容分别如下所示:
application.yml文件内容:
spring:
  profiles:
    active: dev
application-dev.yml文件内容:
server:
  port: 8500
spring:
  application:
    name: spzx-server-gateway
  cloud:
    nacos:
      discovery:
        server-addr: 192.168.136.142:8848
    sentinel:
      transport:
        dashboard: localhost:8080
    gateway:
      discovery: #是否与服务发现组件进行结合,通过 serviceId(必须设置成大写) 转发到具体的服务实例。默认为false,设为true便开启通过服务中心的自动根据 serviceId 创建路由的功能。
        locator: #路由访问方式:http://Gateway_HOST:Gateway_PORT/大写的serviceId/**,其中微服务应用名默认大写访问。
          enabled: true
      globalcors:
        cors-configurations:
          '[/**]':
            allowedOriginPatterns: "*"
            # 允许请求中携带的头信息
            allowedHeaders: "*"
            # 运行跨域的请求方式
            allowedMethods: "*"
            # 跨域检测的有效期,单位s
            maxAge: 36000
      routes:
        - id: service-product
          uri: lb://service-product
          predicates:
            - Path=/*/product/**
3、编写启动类
// com.atguigu.spzx.gateway;
@SpringBootApplication
public class GatewayApplication {

    public static void main(String[] args) {
        SpringApplication.run(GatewayApplication.class , args) ;
    }

}
4、导入课程资料中提供的:logback-spring.xml配置文件,修改输出路径:
<property name="log.path" value="D://logs//spzx-server-gateway//logs" />
5.3 服务网关测试
具体步骤:
1、注释掉service-product微服务两个controller上的@CrossOrigin注解
2、后端地址配置
6 Redis缓存
分类数据一般情况下不会做过多的修改,因此可以将分类数据进行缓存,以提高页面的加载速度。
6.1 使用缓存
先将首页接口获取一级分类数据缓存
步骤:
1、在service-product微服务中集成Spring Data Redis,如下所示:
在service-product的pom.xml文件中添加如下依赖:
<!-- redis的起步依赖 -->
<dependency>
    <groupId>org.springframework.boot</groupId>
    <artifactId>spring-boot-starter-data-redis</artifactId>
</dependency>
在application-dev.yml文件中添加如下Redis的相关配置:
spring:
  # Redis的相关配置
  data:
    redis:
      host: 192.168.136.142
      port: 6379
      password: 1234
2、对CategoryServiceImpl的findOneCategory方法进行改造,如下所示:
@Autowired
private RedisTemplate<String , String> redisTemplate ;

@Override
public List<Category> findOneCategory() {

    // 从Redis缓存中查询所有的一级分类数据
    String categoryListJSON = redisTemplate.opsForValue().get("category:one");
    if(!StringUtils.isEmpty(categoryListJSON)) {
        List<Category> categoryList = JSON.parseArray(categoryListJSON, Category.class);
        log.info("从Redis缓存中查询到了所有的一级分类数据");
        return categoryList ;
    }

    List<Category> categoryList = categoryMapper.findOneCategory();
    log.info("从数据库中查询到了所有的一级分类数据");
    redisTemplate.opsForValue().set("category:one" , JSON.toJSONString(categoryList) , 7 , TimeUnit.DAYS);
    return categoryList ;
}
3、启动程序进行测试:第一次查询从MySQL数据库获取,第二次查询从Redis获取
说明:针对查询所有分类的接口,也可以使用上述思想对分类数据进行缓存。
6.2 Spring Cache
6.2.1 介绍
Spring Cache是一个框架,实现了基于注解的缓存功能,只需要简单地加一个注解,就能实现缓存功能,大大简化我们在业务中操作缓存的代码。
Spring Cache只是提供了一层抽象,底层可以切换不同的cache实现。具体就是通过CacheManager接口来统一不同的缓存技术。CacheManager是Spring提供的各种缓存技术抽象接口。
针对不同的缓存技术需要实现不同的CacheManager:
| CacheManager | 描述 |
|---|---|
| EhCacheCacheManager | 使用EhCache作为缓存技术 |
| GuavaCacheManager | 使用Google的GuavaCache作为缓存技术 |
| RedisCacheManager | 使用Redis作为缓存技术 |
6.2.2 注解
在SpringCache中提供了很多缓存操作的注解,常见的是以下的几个:
| 注解 | 说明 |
|---|---|
| @EnableCaching | 开启缓存注解功能 |
| @Cacheable | 在方法执行前spring先查看缓存中是否有数据,如果有数据,则直接返回缓存数据;若没有数据,调用方法并将方法返回值放到缓存中 |
| @CachePut | 将方法的返回值放到缓存中 |
| @CacheEvict | 将一条或多条数据从缓存中删除 |
在spring boot项目中,使用缓存技术只需在项目中导入相关缓存技术的依赖包,并在启动类上使用**@EnableCaching**开启缓存支持即可。
例如,使用Redis作为缓存技术,只需要导入Spring data Redis的maven坐标即可。
6.2.3 入门程序
接下来,我们将通过一个入门案例来演示一下SpringCache的常见用法。 上面我们提到,SpringCache可以集成不同的缓存技术,如Redis、Ehcache
本次我们直接使用Redis作为缓存技术。
需求:给spring-cache-demo项目中的查询用户方法添加查询缓存逻辑
具体步骤:
1、打开课程资料中所提供的spring-cache-demo项目
2、在spring-cache-demo项目的pom.xml文件中添加如下依赖
<dependency>
    <groupId>org.springframework.boot</groupId>
    <artifactId>spring-boot-starter-cache</artifactId>
</dependency>

<dependency>
    <groupId>org.springframework.boot</groupId>
    <artifactId>spring-boot-starter-data-redis</artifactId>
</dependency>
3、在application.yml文件中配置Redis的连接信息
spring:
  data:
    redis:
      host: 192.168.136.142
      port: 6379
      password: 1234
4、配置Redis的key的序列化器
// com.atguigu.spzx.cache.config;
@Configuration
public class RedisConfig {

    @Bean
    public CacheManager cacheManager(LettuceConnectionFactory connectionFactory) {

        //定义序列化器
        GenericJackson2JsonRedisSerializer genericJackson2JsonRedisSerializer = new GenericJackson2JsonRedisSerializer();
        StringRedisSerializer stringRedisSerializer = new StringRedisSerializer();


        RedisCacheConfiguration config = RedisCacheConfiguration.defaultCacheConfig()
                //过期时间600秒
                .entryTtl(Duration.ofSeconds(600))
                // 配置序列化
                .serializeKeysWith(RedisSerializationContext.SerializationPair.fromSerializer(stringRedisSerializer))
                .serializeValuesWith(RedisSerializationContext.SerializationPair.fromSerializer(genericJackson2JsonRedisSerializer));

        RedisCacheManager cacheManager = RedisCacheManager.builder(connectionFactory)
                .cacheDefaults(config)
                .build();

        return cacheManager;
    }

}
5、在启动类上添加**@EnableCaching**注解
6、在UserServiceImpl类中的findById方法上添加**@Cacheable**注解
@Override
@Cacheable(value = "userCache" , key = "#userId")
public User findById(Long userId) {
    log.info("用户数据查询成功...");
    User user = new User() ;
    user.setAge(23);
    user.setUserName("尚硅谷");
    return user;
}
7、启动程序进行测试:第一次查询时候会打印日志,第二次查询的时候由于Redis中已经存在了数据,因此直接从Redis中进行命中
@Cacheable 说明:
1、作用: 在方法执行前,spring先查看缓存中是否有数据,如果有数据,则直接返回缓存数据;若没有数据,调用方法并将方法返回值放到缓存中
2、value: 缓存的名称,每个缓存名称下面可以有多个key
3、key: 缓存的key ----------> 支持Spring的表达式语言SPEL语法
6.2.4 其他注解
@CachePut
作用: 将方法返回值,放入缓存
value: 缓存的名称, 每个缓存名称下面可以有很多key
key: 缓存的key ----------> 支持Spring的表达式语言SPEL语法
当前UserController的save方法是用来保存用户信息的,我们希望在该用户信息保存到数据库的同时,也往缓存中缓存一份数据,我们可以在save方
法上加上注解 @CachePut,用法如下:
@CachePut(value = "userCache", key = "#user.userName")
public User saveUser(User user) {
    log.info("用户数据保存成功...");
    return user ;
}
key的写法如下:
#user.id : #user指的是方法形参的名称, id指的是user的id属性 , 也就是使用user的id属性作为key ;
#user.userName: #user指的是方法形参的名称, name指的是user的name属性 ,也就是使用user的name属性作为key ;
#result.id : #result代表方法返回值,该表达式 代表以返回对象的id属性作为key ;
#result.userName: #result代表方法返回值,该表达式 代表以返回对象的name属性作为key ;
@CacheEvict
作用: 清理指定缓存
value: 缓存的名称,每个缓存名称下面可以有多个key
key: 缓存的key ----------> 支持Spring的表达式语言SPEL语法
当我们在删除数据库user表的数据的时候,我们需要删除缓存中对应的数据,此时就可以使用**@CacheEvict**注解, 具体的使用方式如下:
@CacheEvict(value = "userCache" , key = "#userId")
public void deleteById(Long userId) {
    log.info("用户数据删除成功...");
}
6.3 缓存所有分类数据
需求:给查询所有的分类数据添加查询缓存,使用Spring Cache框架
步骤:
1、在service-product服务中的pom.xml文件中添加依赖
<dependency>
    <groupId>org.springframework.boot</groupId>
    <artifactId>spring-boot-starter-cache</artifactId>
</dependency>
2、配置Redis的key的序列化器
// com.atguigu.spzx.cache.config;
@Configuration
public class RedisConfig {

    @Bean
    public CacheManager cacheManager(LettuceConnectionFactory connectionFactory) {

        //定义序列化器
        GenericJackson2JsonRedisSerializer genericJackson2JsonRedisSerializer = new GenericJackson2JsonRedisSerializer();
        StringRedisSerializer stringRedisSerializer = new StringRedisSerializer();


        RedisCacheConfiguration config = RedisCacheConfiguration.defaultCacheConfig()
                //过期时间600秒
                .entryTtl(Duration.ofSeconds(600))
                // 配置序列化
                .serializeKeysWith(RedisSerializationContext.SerializationPair.fromSerializer(stringRedisSerializer))
                .serializeValuesWith(RedisSerializationContext.SerializationPair.fromSerializer(genericJackson2JsonRedisSerializer));

        RedisCacheManager cacheManager = RedisCacheManager.builder(connectionFactory)
                .cacheDefaults(config)
                .build();

        return cacheManager;
    }

}
3、在启动类上添加**@EnableCaching**注解
4、在CategoryServiceImpl类中的findCategoryTree方法上添加**@Cacheable**注解
@Cacheable(value = "category" , key = "'all'")
public List<Category> findAllCategory() {
..
    return oneCategoryList;
}
5、启动程序进行测试


 1045
1045


 被折叠的 条评论
为什么被折叠?
被折叠的 条评论
为什么被折叠?
 到【灌水乐园】发言


