


使用业务场景
只要是做电商类相关的产品,比如购物 APP、购物网站等等,都会遇到这么一个场景,每个商品对应着多个规格,用户可以根据不同的规格组合,选择出自己想要的产品。我们自己在生活中也会经常用到这个功能。
需要完成功能点
1.添加规格名称
2.添加规格值
3.删除规格
4.删除规格值
HTML
const columns: any[] = [
    ...specContent.map(t => {
      return {
        title: t.label,
        render: (item: any) => {
          return item[t.label]
        }
      }
    }),
    {
      title: '价格',
      render: (item: SkuData, _: SkuData, index: number) => {
        return <InputNumber
          min={0}
          defaultValue={submitList[index].piece}
          onChange={(e) => {
            submitList[index].piece = e || 0
            setSubmitList(submitList);
          }}
        />
      }
    },
    {
      title: '库存',
      render: (item: SkuData, _: SkuData, index: number) => {
        return <InputNumber
          min={0}
          defaultValue={submitList[index].stock}
          onChange={(e) => {
            submitList[index].stock = e || 0
            setSubmitList(submitList);
          }}
        />
      }
    }
  ]
  const ElInputContent = () => (
    <Input
      ref={inputRef}
      value={specLabelStr}
      style={{ width: 350 }}
      placeholder="请输入规格名称 按下Enter键确认"
      onPressEnter={onAddSpecLabel}
      onChange={(value) => setSpecLabelStr(value.target.value)}
      addonAfter={<span style={{ cursor: 'pointer' }} onClick={onAddSpecLabel}>确认添加</span>}
    />
  );
  return <div >
    <div style={{ width: '65%', margin: '130px auto' }} >
      <Card title={
        <Popover placement="bottomLeft" trigger="click" content={ElInputContent}>
          <Button type="dashed" icon={<PlusOutlined />} onClick={() => setVisible(!visible)} >添加规格</Button>
        </Popover>
      } extra={
        <h3>商品规格</h3>
      }>
        <div>
          {specContent.map((item, index) => {
            return <div key={index}>
              <h3>
                <span style={{ marginRight: 12 }}>{item.label}</span>
                <DeleteOutlined onClick={() => onDeleteSpec(index)} style={{ color: 'red' }} />
              </h3>
              <div style={{ display: 'flex', alignItems: 'center' }} ref={tagInputRef}>
                <div> {item.tags.map((str, strKey) => (
                  <Tag
                    style={{ fontSize: 16 }}
                    color="processing" key={strKey}>
                    <span>{str}</span>
                    <CloseOutlined onClick={() => onDeleteSpecTag(index, strKey)} />
                  </Tag>
                ))}</div>
                {
                  inputVisible && index === tagIndex ?
                    <Input
                      placeholder="请输入规格值"
                      value={inputTagValue}
                      size="small"
                      style={{ width: 120 }}
                      onChange={(e) => setInputTagValue(e.target.value)}
                      onBlur={() => onAddSpecTag(index)}
                      onPressEnter={() => onAddSpecTag(index)}
                    /> :
                    <Tag
                      icon={<PlusOutlined />}
                      style={{ cursor: 'pointer' }}
                      onClick={() => {
                        setTagIndex(index);
                        setInputVisible(!inputVisible)
                      }}
                    >添加规格值</Tag>
                }
              </div>
            </div>
          })}
        </div>
        <Table rowKey={'sku'} dataSource={submitList} columns={columns} pagination={false} />
      </Card>
    </div>
  </div>
}
添加规格名称
 const [submitList, setSubmitList] = useState<SkuData[]>([]); // 提交数据
  const [specContent, setSpecContent] = useState<ISpecTagValue[]>([]); //规格内容
  const [specLabelStr, setSpecLabelStr] = useState<string>('');// 规格名称输入值
  const [visible, setVisible] = useState<boolean>(false); // 点击添加规格按钮控制获取input 元素,控制输入默认选择focus
  const inputRef = useRef<InputRef>(null);// 规格输入框
  const [inputVisible, setInputVisible] = useState<boolean>(false);
  const [inputTagValue, setInputTagValue] = useState<string>('');
  const [tagIndex, setTagIndex] = useState<number | null>(null)
  const tagInputRef = useRef(null);


  // 添加规格名称
  function onAddSpecLabel() {
    if (specLabelStr) {
      setSpecContent(specContent.concat({ label: specLabelStr, tags: [] }));
      setSpecLabelStr('');
      message.success('添加规格明成功');
      tableSku();
    } else {
      message.error('请填写规格名称');
    }
  }
添加规格值
 // 添加规格值
  function onAddSpecTag(index: number) {
    if (inputTagValue) {
      const specList = [...specContent];
      specList[index].tags.push(inputTagValue);
      setSpecContent(specList);
      setInputTagValue('');// 清空输入内容
      tableSku();
      message.success('添加规格值成功');
    };
    setInputVisible(false);
  }
删除规格
  // 删除规格
  function onDeleteSpec(index: number) {
    const specList = [...specContent];
    specList.splice(index, 1);
    setSpecContent(specList);
    message.success('删除规格成功');
    tableSku();
  }
删除规格值
  //删除规格值
  function onDeleteSpecTag(labelIndex: number, tagIndex: number) {
    const specList = [...specContent];
    specList[labelIndex].tags.splice(tagIndex, 1);
    setSpecContent(specList);
    tableSku();
  }
最后附上我全部代码
如果还是没有解决你的问题可以拉取我的github源码yangjike123/React_goodsSpec (github.com)
import { Button, Card, Input, InputNumber, InputRef, message, Popover, Table, Tag } from "antd";
import { useState, useRef, useEffect } from "react";
import { PlusOutlined, DeleteOutlined, CloseOutlined } from '@ant-design/icons';
import "./App.css";
import { SkuData } from "./interface.js";
interface ISpecTagValue {
label: string,
tags: string[]
}
export default () => {
const [submitList, setSubmitList] = useState<SkuData[]>([]); // 提交数据
const [specContent, setSpecContent] = useState<ISpecTagValue[]>([]); //规格内容
const [specLabelStr, setSpecLabelStr] = useState<string>('');// 规格名称输入值
const [visible, setVisible] = useState<boolean>(false); // 点击添加规格按钮控制获取input 元素,控制输入默认选择focus
const inputRef = useRef<InputRef>(null);// 规格输入框
const [inputVisible, setInputVisible] = useState<boolean>(false);
const [inputTagValue, setInputTagValue] = useState<string>('');
const [tagIndex, setTagIndex] = useState<number | null>(null)
const tagInputRef = useRef(null);
// 添加规格名称
function onAddSpecLabel() {
if (specLabelStr) {
setSpecContent(specContent.concat({ label: specLabelStr, tags: [] }));
setSpecLabelStr('');
message.success('添加规格明成功');
tableSku();
} else {
message.error('请填写规格名称');
}
}
// 删除规格
function onDeleteSpec(index: number) {
const specList = [...specContent];
specList.splice(index, 1);
setSpecContent(specList);
message.success('删除规格成功');
tableSku();
}
// 添加规格值
function onAddSpecTag(index: number) {
if (inputTagValue) {
const specList = [...specContent];
specList[index].tags.push(inputTagValue);
setSpecContent(specList);
setInputTagValue('');// 清空输入内容
tableSku();
message.success('添加规格值成功');
};
setInputVisible(false);
}
function onDeleteSpecTag(labelIndex: number, tagIndex: number) {
const specList = [...specContent];
specList[labelIndex].tags.splice(tagIndex, 1);
setSpecContent(specList);
tableSku();
}
function tableSku() {// 绘制商品规格sku
let temp: any[] = [];
specContent.forEach((item, index) => {
if (!temp.length) {
// specContent当只有一个数据时候只需要
temp.push(...item.tags.map(str => {
const oldItem = submitList.find(t => t.sku === str);
if (oldItem) {
return { ...oldItem };
} else {
return {
[`skuName${index + 1}`]: item.label,
[`skuValue${index + 1}`]: str,
[item.label]: str,
stock: 0,
piece: 0,
sku: str
}
}
}))
} else {
const array: SkuData[] = [];
temp.forEach(obj => {
if (item.tags.length === 0) array.push(obj);
array.push(
...item.tags.map(t => {
obj.sku && (obj.sku = obj.sku + t);
const oldItem = submitList.find(t => t.sku === obj.sku);
if (oldItem) {
return { ...oldItem };
} else {
return {
...obj,
[`skuName${index + 1}`]: item.label,
[`skuValue${index + 1}`]: t,
[item.label]: t,
stock: 0,
piece: 0
};
}
})
)
});
temp = array;
}
});
setSubmitList(temp);
}
useEffect(() => {
console.log(submitList, 'SubmitList')
}, [specContent])
useEffect(() => {
inputRef.current?.focus();
}, [visible])
useEffect(() => {
(tagInputRef.current as any)?.childNodes[1].focus();
(tagInputRef.current as any)?.childNodes[0].focus();
}, [inputVisible, tagIndex])
const columns: any[] = [
...specContent.map(t => {
return {
title: t.label,
render: (item: any) => {
return item[t.label]
}
}
}),
{
title: '价格',
render: (item: SkuData, _: SkuData, index: number) => {
return <InputNumber
min={0}
defaultValue={submitList[index].piece}
onChange={(e) => {
submitList[index].piece = e || 0
setSubmitList(submitList);
}}
/>
}
},
{
title: '库存',
render: (item: SkuData, _: SkuData, index: number) => {
return <InputNumber
min={0}
defaultValue={submitList[index].stock}
onChange={(e) => {
submitList[index].stock = e || 0
setSubmitList(submitList);
}}
/>
}
}
]
const ElInputContent = () => (
<Input
ref={inputRef}
value={specLabelStr}
style={{ width: 350 }}
placeholder="请输入规格名称 按下Enter键确认"
onPressEnter={onAddSpecLabel}
onChange={(value) => setSpecLabelStr(value.target.value)}
addonAfter={<span style={{ cursor: 'pointer' }} onClick={onAddSpecLabel}>确认添加</span>}
/>
);
return <div >
<div style={{ width: '65%', margin: '130px auto' }} >
<Card title={
<Popover placement="bottomLeft" trigger="click" content={ElInputContent}>
<Button type="dashed" icon={<PlusOutlined />} onClick={() => setVisible(!visible)} >添加规格</Button>
</Popover>
} extra={
<h3>商品规格</h3>
}>
<div>
{specContent.map((item, index) => {
return <div key={index}>
<h3>
<span style={{ marginRight: 12 }}>{item.label}</span>
<DeleteOutlined onClick={() => onDeleteSpec(index)} style={{ color: 'red' }} />
</h3>
<div style={{ display: 'flex', alignItems: 'center' }} ref={tagInputRef}>
<div> {item.tags.map((str, strKey) => (
<Tag
style={{ fontSize: 16 }}
color="processing" key={strKey}>
<span>{str}</span>
<CloseOutlined onClick={() => onDeleteSpecTag(index, strKey)} />
</Tag>
))}</div>
{
inputVisible && index === tagIndex ?
<Input
placeholder="请输入规格值"
value={inputTagValue}
size="small"
style={{ width: 120 }}
onChange={(e) => setInputTagValue(e.target.value)}
onBlur={() => onAddSpecTag(index)}
onPressEnter={() => onAddSpecTag(index)}
/> :
<Tag
icon={<PlusOutlined />}
style={{ cursor: 'pointer' }}
onClick={() => {
setTagIndex(index);
setInputVisible(!inputVisible)
}}
>添加规格值</Tag>
}
</div>
</div>
})}
</div>
<Table rowKey={'sku'} dataSource={submitList} columns={columns} pagination={false} />
</Card>
</div>
</div>
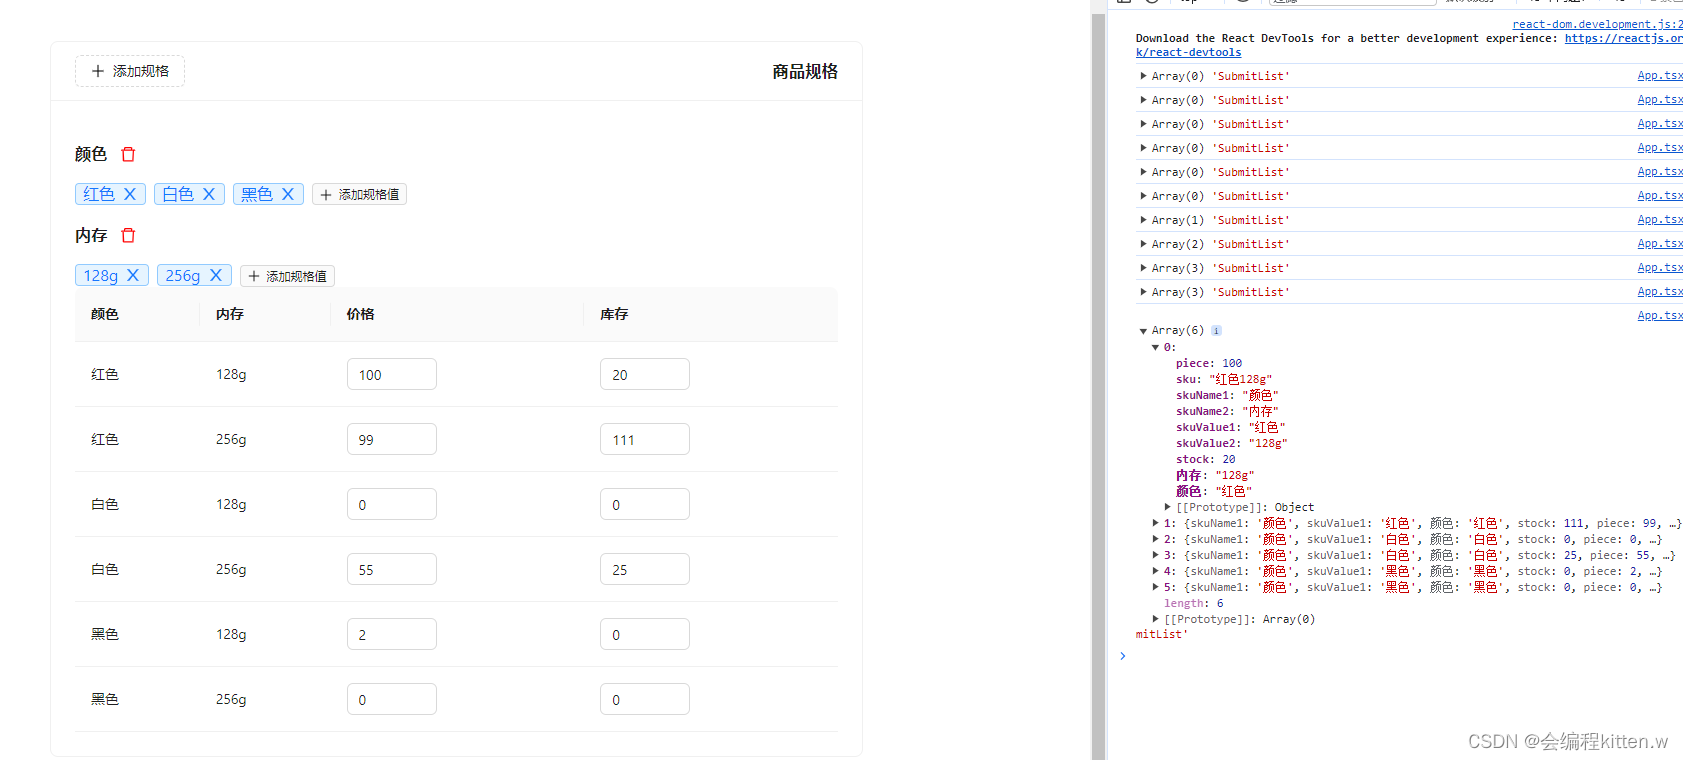
}最终实现效果


 2540
2540


 被折叠的 条评论
为什么被折叠?
被折叠的 条评论
为什么被折叠?
 到【灌水乐园】发言


